Choose your operating system:
Windows
macOS
Linux
In the following steps, we are going to create two lifts that move from one point to another automatically.
Creating the Project
In this section, we will set up the project.
-
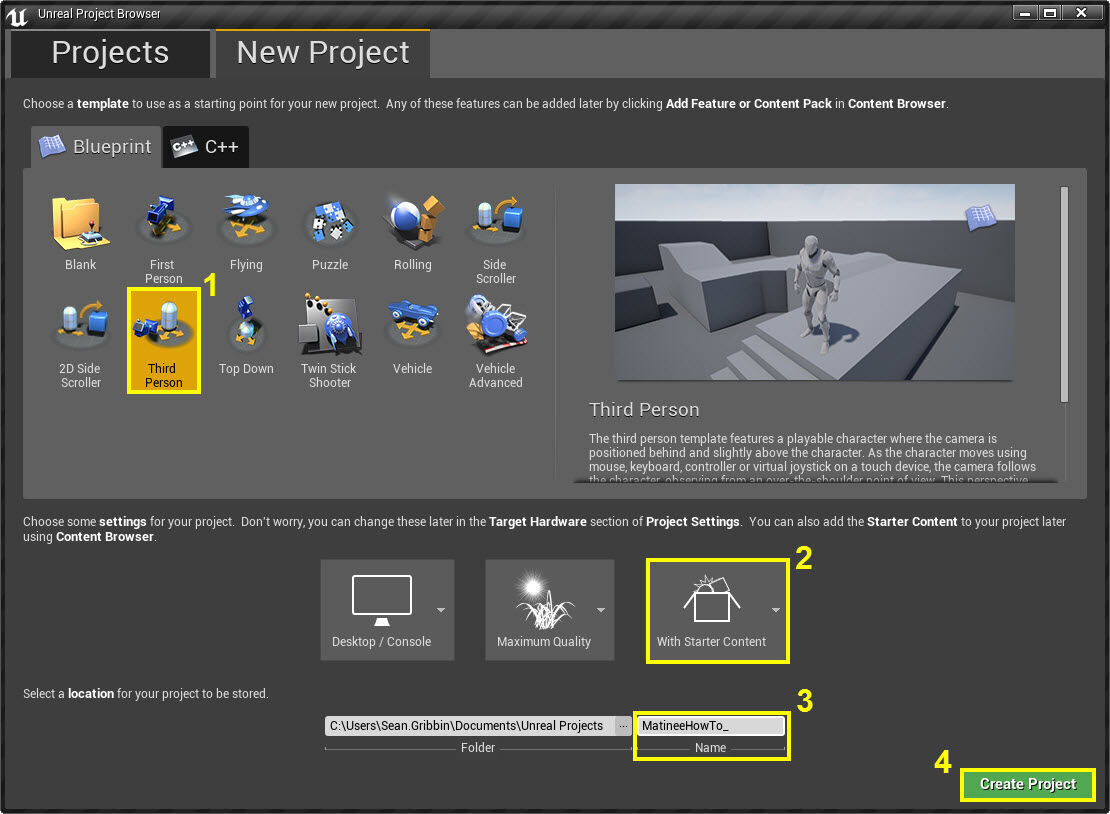
From the Unreal Project Browser window, create a New Project and use the Blueprint Third Person template.
![MatineeHowTo.jpg]()
-
Make sure that Include starter content is enabled.
-
Give the project a name.
-
With each of the above defined, click Create Project to create a new project.
Creating the Lifts
In this step, we will create both lifts and platforms using basic shapes.
-
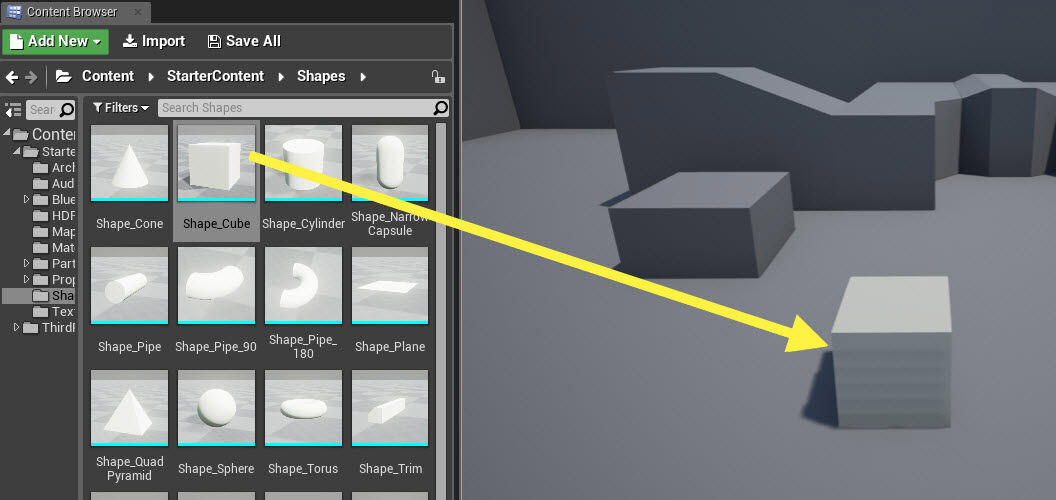
Inside the Content Browser and the Shapes folder, drag a Shape_Cube into the level in front of the PlayerStart .
![MHT2_Drag_inCube.jpg]()
-
In the Details panel for the Shape_Cube , under Transform , set the Scale for X, Y, and Z to 3.0, 3.0 and 0.25 .
![MHT2_ScaleCube1.png]()
-
With the Shape_Cube still selected, press Control+W to duplicate the cube and position it next to the first cube.
![MHT2_DuplicateCube1.png]()
-
With the second cube still selected, move it up somewhere above the level (This will serve as our platform to reach).
![MHT2_MoveCube2Up.png]()
-
With the second cube still selected, press Control+W to duplicate it and move the new cube next to the second cube.
![MHT2_ThirdCubeAdded.png]()
-
With the third cube selected, press Control+W to duplicate it and move the new cube across from and leaving a space between the third cube.
![MHT2_FourthCubeAdded.png]()
-
With the fourth cube selected, press Control+W to duplicate it and move the new cube just to the right of the fourth cube.
![MHT2_FifthCubeAdded.png]()
-
With the fifth cube selected, in the Details panel under Transform set the Scale for the Z value to 5.0 .
![MHT2_FifthCubeScaled.png]()
-
Last, select one of the other smaller platforms and press Control+W to duplicate it, then move it up near the top of the larger cube as seen below.
![MHT2_LastCubeAdded.png]()
Adding the Matinee and Moving the First Lift
In this step, we will add the Matinee and create a Movement Track for the first lift.
-
From the Toolbar menu, select Matinee and click the Add Matinee button.
![MHT1_AddMatinee.png]()
-
The Matinee undo warning message will appear, click the Continue button.
![MHT1_MatineeWarning.png]()
-
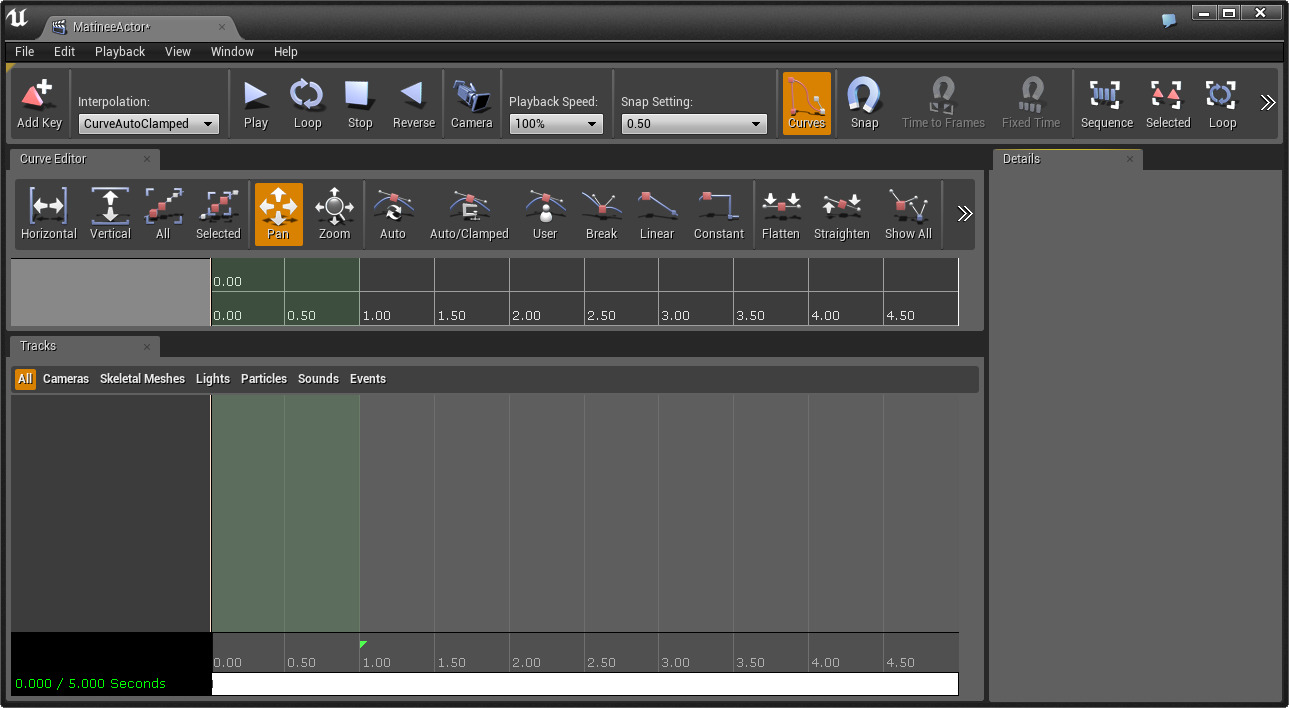
The Matinee Editor window will open.
Click for Full View.
-
Right-Click in the Tracks window (in the empty section below All ) and from the context menu, select Add New Empty Group .
![MHT1_TrackContextMenu.png]()
-
In the New Group Name box, enter a name for the group (In this example, we named the group Lift1 ).
![MHT2_Lift1GroupName.png]()
-
Minimize the Matinee window, then in the Level Viewport select the first cube created (the cube that is on the floor) so that it is highlighted.
![MHT2_ReselectFirstCube.png]()
-
Return to the Matinee window and Right-Click on the Group (Lift1) to bring up the context menu, then select Actors then Add Selected Actors .
![MHT2_AddLift1.png]()
Note: This will add the cube to the Lift1 group.
-
Right-Click on the Group (Lift1) again to bring up the context menu, then select Add New Movement Track .
![MHT2_Lift1MovementTrack.png]()
-
When the Movement Track is added, a new Keyframe will be automatically added at the time 0.00 (see 1 below) along with the track.
![MHT2_MovementTrackExplained.png]()
Note: Section 2 includes the Start/End Markers (Red Triangles), Loop Section (Green Triangles) and Time Bar (Black Bar).
-
Left-Click on the Time Bar and drag it to the time 2.00 , then press the Enter key to add a new Keyframe .
![MHT2_Lift1SecondKey.png]()
-
Minimize the Matinee Editor and return to the Level Viewport. With the first cube still selected, move it up next to the second cube.
![MHT2_Lift1MovedUp.png]()
Note: You should also see the yellow dotted line which indicates the movement the lift will take.
-
In the Matinee Editor, Left-Click on the Keyframe at 2.00 and press Control+C to copy it, then move the Time Bar to 3.00 and press Control+V to paste it.
![MHT2_Lift1ThirdKeyAdded.png]()
Note: This will allow the lift to stay in the "lifted" position for a second before we return it to the ground.
-
Left-Click on the first Keyframe at the 0.00 mark and press Control+C to copy it, then paste it at both the 4.00 and 5.00 marks.
![MHT2_Lift1Complete.png]()
Note: This will allow the lift to stay in the "lowered" position for a second before we loop the sequence and raise the lift again.
-
Return to the Main Editor window and in the World Outliner select the Matinee Actor .
![MHT2_Matinee1Selected.png]()
-
In the Details panel for the Matinee Actor, find the Play section and check both Play on Level Load and Looping .
![MHT2_Lift1Details.png]()
-
If you click the Play button to play in the editor, you should see the lift now moving up/down repeatedly, pausing at the top and bottom positions for a second.
Moving the Second Lift Using the Curve Editor
In this step, we will move the second lift by adjusting Keyframes inside the Curve Editor .
-
From the World Outliner , select the Matinee Actor and in the Details panel, select the Open Matinee option.
![MHT2_ReopenMatinee.png]()
-
Minimize the Matinee window, then in the Level Viewport select the third cube created so that it is highlighted.
![MHT2_SelectThirdPlatform.png]()
-
Return to the Matinee Editor and Right-Click under the Lift1 group, and in the context menu, select Add New Empty Group .
![MHT2_AddSecondGroup.png]()
-
In the New Group Name box, enter a name for this group (In this example, we named the group Lift2 ).
-
Right-Click on the Group (Lift2) in the Tracks Window again to bring up the context menu, then select Add New Movement Track .
![MHT2_Lift2MovementGroup.png]()
-
Left-Click on the Time Bar and drag it to the 2.00 mark, then press Enter to add a new Keyframe .
![MHT2_Lift2SecondKey.png]()
-
Minimize the Matinee window, then in the Level Viewport move the lift to the other side of the wall, next to the last platform as seen below.
![MHT2_Lift2Moved.png]()
Note: You should see that the movement track goes through the wall which we will fix using the Curve Editor .
-
With the Keyframe at the 2.00 mark selected, press the Curve Editor box next to the little green box highlighted below.
![MHT2_EnableCurveEditor.png]()
-
The Curve Editor should now be displayed in the top window and the Curve Editor icon in the Movement Track should be highlighted.
![MHT2_CurveTrackAdded.png]()
-
Press each of the Toolbar options highlighted in the box below to adjust the view of the Curve Editor so that it is more visible.
![MHT2_ToolBarOptions.png]()
Note: You can also Mouse Wheel Up or Down to zoom the graph In or Out to get a better view.
-
Right-Click on the Keyframe at the 2.00 mark of Lift2's Movement Track , and in the context menu, select Interp Mode and Curve (Break) .
![MHT2_CurveKey1Break.png]()
-
In the Curve Editor window, Left-Click on the top Keyframe at the 2.00 mark.
![MHT2_CE_ClickTopKey.png]()
-
Left-Click on the little white box and drag the handle-bar widget downward to create an arc.
![MHT2_CEDragCurveDown1.jpg]()
-
You should also see in the Level Viewport that the Movement Path has bent with the adjustment made in the last step.
![MHT2_MovementBending.png]()
-
Left-Click on the Keyframe at the 0.00 mark, then click the Break option from the Toolbar (see 2 below) and move the little white box (see 1 below) downward to create an arch.
![MHT2_CEAdjustFirstKey.jpg]()
Note: You can switch between the Keyframes at 0.00 and 2.00, and continue moving the widget to create a smoother arch.
![MHT2_EvenCurve.png]()
-
In the Movement Track scrub the Time Bar to the 3.00 and 4.00 marks and press Enter at each to create Keyframes .
![MHT2_Lift2FourthKeyAdded.png]()
-
With the fourth Keyframe selected, in the Level Viewport move the lift back to its original position.
![MHT2_Lift2FourthKeyView.png]()
Note: The movement track goes back through the wall, so we will need to adjust the curve for the remaining Keyframes as we did above.
-
In the Movement Track scrub the Time Bar to the 5.00 mark and press Enter to create the final Keyframe .
![MHT2_FinalKeyFrameAdded.png]()
-
Right-Click on the Keyframes at 3.00 and 4.00 and in the context menu, set both to use the Interp Mode / Curve(Break) option.
![MHT2_FinalCurveBreak.png]()
-
In the Curve Editor , adjust the Keyframes at 3.00 and 4.00 as previously performed above to create a curved path as seen below.
![MHT2_LoopComplete.png]()
-
The reverse movement path, should now be complete.
![MHT2_ReverseCurveComplete.png]()
-
When you click the Play button from the Main Editor's Toolbar, you should have two lifts that move differently and one that uses a curved path.


