Choose your operating system:
Windows
macOS
Linux
The features on this page are currently in the experimental stage and as such, some aspects may not yet be fully supported.
Tile Sets and Tile Maps within Paper 2D , provide a quick and easy way to layout the framework or "general layout" of your 2D levels. By creating and using a Tile Set (a collection of tiles pulled from a texture) with a Tile map (a 2D grid with a defined width and height in tiles), you can select various tiles to "paint" onto the Tile Map which can be used for your level layout. You can also paint tiles on multiple layers, each of which can specify which tile should appear in each cell of the map for that particular layer.
Creating Tile Sets
You can create Tile Sets inside the Content Browser , similar to other assets. They can be created from scratch as blank assets or generated from other existing assets.
Blank Tile Set
To create a new blank Tile Set asset:
-
Click the
![addNewButton.png]()
![TileSetButton.png]()
-
Enter in a name for the new Tile Set asset.
![PaperTitleSet.png]()
-
Double-click on the asset to open it up in the Tile Set Editor window.
![PaperTitleSetEditor.png]()
-
Specify a Tile Sheet texture asset to use inside the Details panel.
![TileSetData.png]()


Tile Set from Texture
To create a Tile Set from an existing Texture:
-
In the Content Browser , Right-click on a Texture asset, then under Sprite Actions choose Create Tile Set .
![RightClickMethod.png]()
-
The Tile Set will automatically be created/named based on the Texture you supplied.
![AutoCreate.png]()
You can rename the asset by selecting it and pressing F2 or Right-clicking on it and choosing Rename .
-
Double-click on the asset to open it up in the Tile Set Editor window.
![CreatedTitleSet.png]()


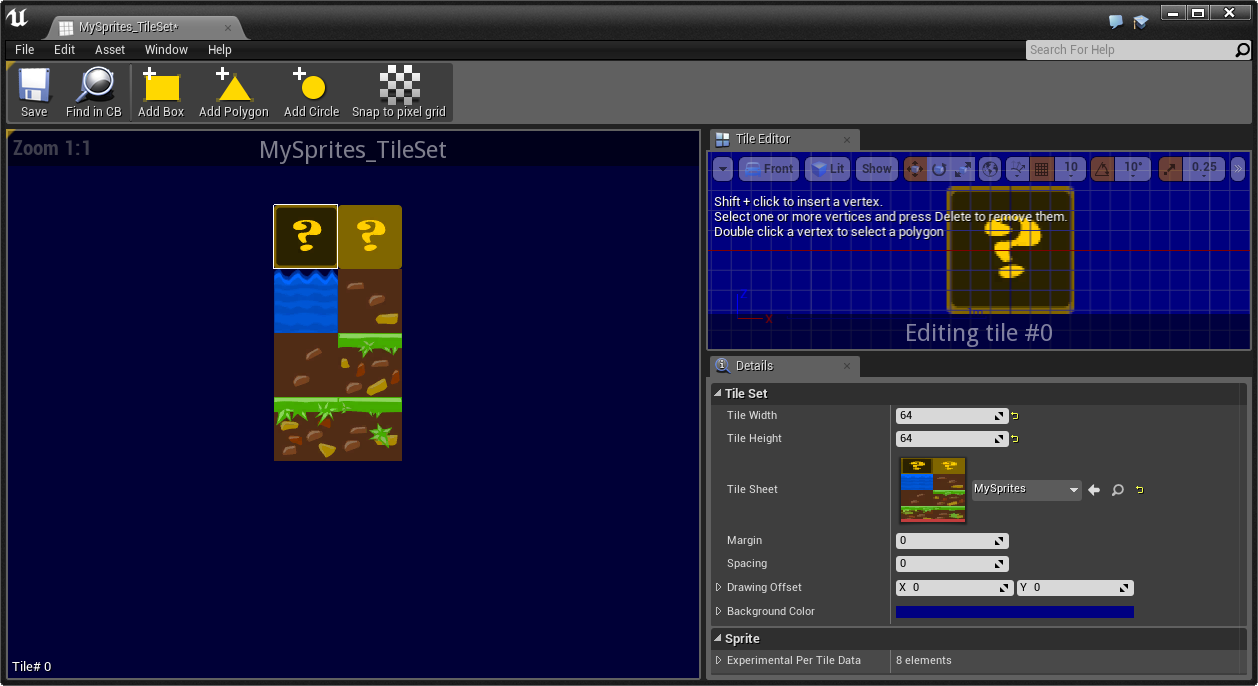
Tile Set Editor
Once you have created a new Tile Set asset, Double-clicking on the asset will open it in the Tile Set Editor .

Above in the Viewport window (1), you will see the Tile Sheet you've specified to use with your Tile Set. In the Tile Editor window (2), the currently selected tile will be displayed. In the Details panel (3), you can set various settings that will affect the Tile Set or the individual Sprites that make up the set (see Configuring Your Tile Set below).
Configuring Your Tile Set
You will more than likely need to configure your Tile Set to ensure that you are accurately selecting each tile within your sheet.
Inside the Viewport , Left-clicking on your Tile Sheet will display a white tile selection box indicating the currently selected tile.

Right Mouse Button drag inside the Viewport to pan and use the Mouse Wheel to zoom in/out on your Tile Sheet.
Above, the default Tile Width and Tile Height (in pixels) of 32 is being used represented by the white selection box. Unfortunately our tiles are larger than the default values and we want our Tile Width and Height to encompass our entire tile (represented by the yellow box outline).
Inside the Tile Editor preview window the currently selected Tile and its associated Tile Number (see below) are displayed. Just below it, inside the Details panel, you can adjust the Tile Width and Tile Height so that it properly encompasses your entire tile.

In our example, we've increased the Tile Width and Tile Height to 64 to match our tile size.
Click for full view.
In the Viewport, the white tile selection box now fully highlights an individual tile on the Tile Sheet (you may need to experiment with different values depending on how your Tile Sheet is set up). The Tile Editor window also updates to show a single tile from our Tile Sheet that is selected.
In addition to setting Tile Width and Tile Height , you can use the following settings to further adjust your Tile Set from the Details panel.
|
Setting |
Description |
|---|---|
|
Tile Width |
The width of a single tile (in pixels). |
|
Tile Height |
The height of a single tile (in pixels). |
|
Margin |
The amount of padding around the perimeter of the tile sheet (in pixels). |
|
Spacing |
The amount of padding between tiles in the tile sheet (in pixels). |
|
Drawing Offset |
The drawing offset for tiles from this set (in pixels). |
|
Background Color |
The background color displayed in the tile set viewer. |
Per Tile Settings / Applying Tile Collision
Also inside the Details panel, you can specify per tile settings (such as applying collision to a particular tile).
To apply collision to a tile :
-
Select the tile in the viewport (1) then click the type of shape you want to use for collision (2).
![Collision_1.png]()
-
The shape will be applied and can be further edited inside the Tile Editor window.
![Collision_2.png]()
Note the tile number you are editing (green box above), you will need this to apply settings to this particular tile.
-
In the Details panel under the Sprite section, find the selected tile and change to the desired Geometry Type .
![Collision_3.png]()
For information on sprite collision types, see the Sprite Collision documentation.


This will set this tile up for collision based on the specified geometry type and shape used. For the collision to actually take effect in-game, when creating your Tile Map you will need to set the Sprite Collision Domain (see below for information on creating/using Tile Maps).
Creating Tile Maps
Tile Maps are created inside the Content Browser and edited inside the Tile Map Editor .
New Tile Map
To create a new Tile Map asset:
-
Click the
![addNewButton.png]()
![NewTileMap.png]()
-
Enter in a name for the new Tile Map asset.
![NewPaperTileMap.png]()
-
Double-click on the asset to open it up in the Tile Map Editor window.
![TileMapEditorWindow.png]()


Tile Map Editor
After opening a new Tile Map asset, before you can work within the Tile Map editor you will need to assign an Active Tile Set to work with.
-
You can specify the Active Tile Set to use inside the Toolbox window by clicking the Selection box.
![SelectTileSetWindow.png]()
Then selecting the Tile Set you wish to currently work with.
![SelectTileSet.png]()
Any Tile Sets that you have created will be displayed in the window above, allowing you to switch between the "Active Tile Set".
-
Once you have selected a Tile Set, the viewer will become updated with your selection.
![TileMapReadyToEdit.png]()


The three windows that comprise the Tile Map Editor are outlined below.

Above in the Toolbox window (1), you can switch between different Tile Sets to use for the creation of your Tile Map. The Tools used to Paint , Erase or Fill tiles on the map are also presented (in addition to options for flipping or rotating the currently selected tile). The bottom section of this window contains the Viewer, which uses the same controls for navigation as the Tile Set viewer ( Right Mouse Button drag to pan and Mouse Wheel to zoom in/out).
The center window, the Viewport (2), is used for filling out the Tile Map layout. Using the tools from the Toolbox, you can fill in tiles on the map to create the desired effect by painting, erasing or filling the tiles that comprise your Tile Map. This is where you can "paint" how you want your map to appear in-game.
In the Details panel (3), you can configure how many layers your Tile Map consists of as well as adjust various settings such as the width/height of the Tile Map itself, the width/height of the Tiles that comprise the map, the scaling factor between pixels and Unreal Units, the type of collision to use, etc.
Enabling Collision for your Tile Map
As noted in the Tile Set section, once you've specified which tiles use collision and which do not, you will also need to set your Tile Map to use a collision type. You can do so from the Details panel under the Collision section.

You can set the collision thickness (which is the extrusion thickness of collision geometry when using a 3D collision domain) as well as the Collision Domain itself (which determines if the Tile Map should have collision geometry and participate in the physical world).
The Use 2D Physics option is currently experimental and may not work properly, it is suggested that the Use 3D Physics option be used instead.
When you play in your level, you can check which tiles have collision and which do not with the Show Collision console command.

Above, the upper most ground tiles that the player walks on have collision applied to them while the lower ground and water tiles do not.
Example Tile Map Workflow
Below is an example of a typical workflow for creating a Tile Map.
-
Open your Tile Map asset.
-
In the Details panel, set the Map Width and Map Height for your Tile Map.
![SetMapSize.png]()
This is essentially the size you want your map or level to be.
-
Also set the Tile Width and Tile Height of the individual tiles in your map.
![TileSizesInMap.png]()
These are usually going to be the same size you defined in your Tile Set.
-
Assign an Active Tile Set to work with for the construction of your Tile Map.
-
Also add some additional layers to work with (one for background, one for foreground and one for the playable level geometry).
![ReadyToPaint.png]()
This is optional, but usually good to have a layer that has your background elements and another for any foreground elements and having your level geometry (the ground, boxes, platforms, etc.) that the player will walk around on placed on a separate layer.
-
Select a tile in the viewer, then in the map Left-click to paint it onto the map.
![BeginPainting.png]()
You can also select multiple tiles at once and paint multiple tiles in the map by Left-click and dragging over tiles in the viewer.
![MultipleTiles.png]()
In the map, you can then paint with the selected tiles.
![InMapMultipleTiles.png]()
-
Continue Painting, Filling or Erasing Tiles on our map to reach your desired layout.
![ExampleMap.png]()
-
Be sure to enable collision from the Collision section of the Details panel.
![Collision_4.png]()
You must have specified in your Tile Set which tiles have collision and which do not for collision to take effect.
-
Drag the Tile Map asset into your level and scale or move based on your needs.
![ExampleGameImage.png]()


