Choose your operating system:
Windows
macOS
Linux
Sequencer provides a special track for working with and animating Material Parameter Collections called the Material Parameter Collection track. This is extremely useful if you have several Materials that you need to update as you no longer have to animate individual parameter values on each material instance in order to share animation updates.
In this how-to guide, you'll use a Material Parameter Collection and Sequencer to dissolve and change the color of the environment around the player.

Steps
For this how-to guide, we are using the Blueprint Third Person Template with Starter Content enabled.
-
Right-click this Example Texture and Save target as... , then drag-and-drop it into your project's Content Browser to import it.
-
In the Content Browser , click the Add New button then under Materials & Textures , create a Material Parameter Collection called Sample_MPC .
![MPCTrack01.png]()
-
Inside Sample_MPC , add a Scalar Parameter called DissolveValue set to 1.0 and Vector Parameter called ColorValue with RGB all set to 0.18 .
![MPCTrack02.png]()
-
Inside the Main Editor viewport, select one of the walls in the level then double-click on the CubeMaterial in the Details panel to open the Material Editor .
![MPCTrack03.png]()
-
With the CubeMaterial node selected in the graph, in the Details panel, change the Blend Mode to Masked .
![MPCTrack04.png]()
-
Right-click in the graph and add a CollectionParameter node, then in the Details panel for the node, assign Sample_MPC and ColorValue .
![MPCTrack05.png]()
-
Add another CollectionParameter node set to Sample_MPC and DissolveValue , then connect the ColorValue to the Base Color on the CubeMaterial node.
![MPCTrack06.png]()
-
Hold T and left-click in the graph to create a Texture Sample , then hold 1 and create two Material Expression Constant nodes.
-
Set the Texture Sample node to use the example texture from Step 1 and set one of the Constant nodes default value to 1 .
![MPCTrack07.png]()
This texture is what we will use as part of our dissolve.
-
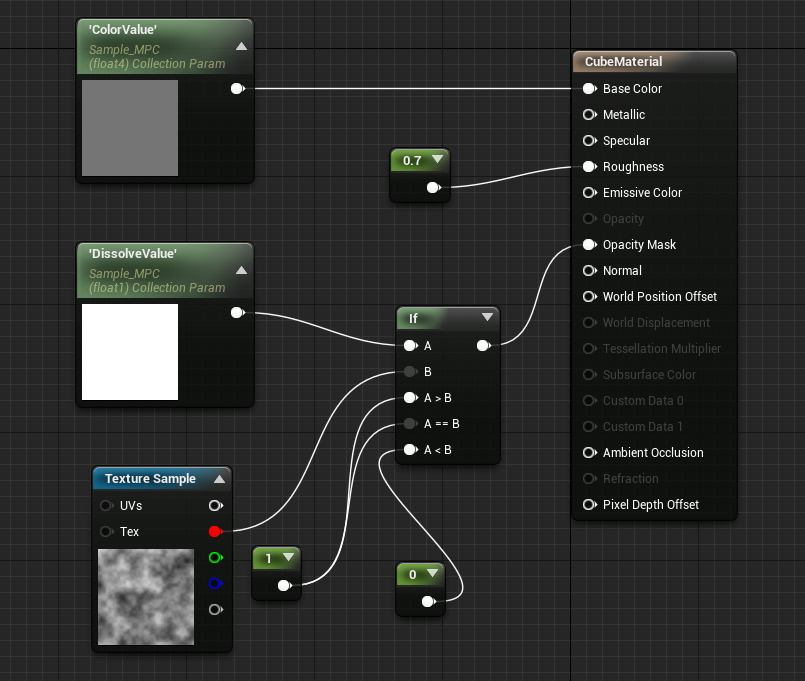
Add a If Math Expression, then connect the nodes as shown below to the Opacity Mask value on the CubeMaterial node and click Apply from the toolbar.
![MPCTrack08.png]()
This will allow us to shift between no dissolve (a DissolveValue of 1) or completely dissolved (a DissolveValue of 0).
-
From the Main Editor Toolbar, click the Cinematics button and Add Level Sequence and assign a name and save location.
![MPCTrack09.png]()
-
In the Details panel for the new sequence, check the Auto Play option and Loop Indefinitely option.
![MPCTrack10.png]()
-
Inside the Sequencer Editor , click the Add button and select Material Parameter Collection Track then Sample_MPC .
![MPCTrack11.png]()
-
Click the Parameter button and add both the DissolveValue and ColorValue parameters.
![MPCTrack12.png]()
-
Scrub the Timeline Marker ahead to 50 and add a key for DissolveValue set to 0 and Blue on the ColorValue to 1.0 .
![MPCTrack13.png]()
-
Copy and Paste the keys from the previous step at 100 on the timeline, then at 150 set DissolveValue back to 1.0 and Blue back to 0.18 .
![MPCTrack14.png]()
This will return the DissolveValue and ColorValues back to their default values.
-
Select the stairs in the level, then open the RampMaterial in the Details panel to open the Material Editor .
![MPCTrack15.png]()
The rest of the objects in the level use the Material above, to include them in the dissolve we will add the CollectionParameter setup to its Material Graph.
-
With the RampMaterial node selected, in the Details panel, change the Blend Mode to Masked .
![MPCTrack16.png]()
-
Copy and paste the graph setup used in the CubeMaterial into the RampMaterial as shown below then click Apply from the toolbar.
![MPCTrack17.png]()
-
From the Main Editor Toolbar, click the Play button to play in the editor.
End Result
When you play in the level, the environment around the player will shift from gray to purple and dissolve before returning back to normal and repeating the same process.


