Choose your operating system:
Windows
macOS
Linux
The Sequencer Editor gives users the ability to create in-game cinematics with a specialized multi-track editor (similar to Matinee ). By creating Level Sequences and adding Tracks , users can define the makeup of each Track, which will determine the content for the scene. Tracks can consist of things like Animations (for animating a character), Transformations (moving things around in the scene), Audio (for including music or sound effects), and several other Track types.
As of the release of engine version 4.20, Sequencer has undergone some refactoring in terms of how time is represented to better support filmic pipelines and contexts where frame-accuracy is of huge importance. Please see Sequencer Time Refactor Technical Notes for more information.
Creating Level Sequences
The Level Sequence is the "container" for your cinematic scenes, and must be created in order to begin working inside of the Sequencer Editor. You can create a Level Sequence directly in your Level from the Toolbar under Cinematics (as seen below).
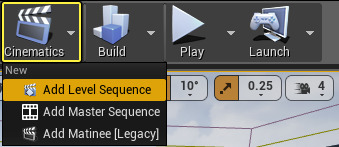
You can also access Cinemtatics and Sequencer through the Window menu.

If a Sequence is on a specific Map, you can open the Sequence by right-clicking a Map in the Sequencer Content Browser and selecting the Sequence from the Map.

Using any of these methods will add a Sequencer to the Level, at which point it can be selected, and its properties can be manipulated in the Details panel (similar to a Matinee Actor ). In the Details panel (below), you can define whether the Level Sequence will automatically play upon Level start, whether the Sequence should loop, the Play Rate for the Sequence, and other settings.
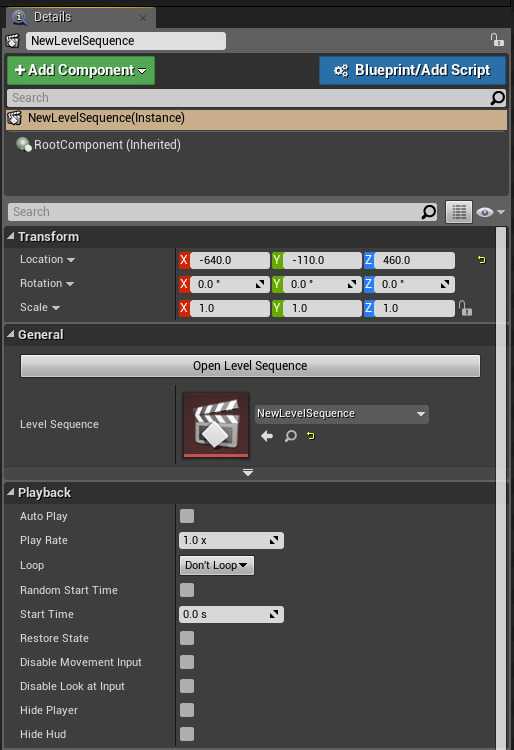
Unlike Matinee, Level Sequences are self-contained assets, and you can embed a Level Sequence within another Level Sequence. For example, you can create a Level Sequence that has animated characters and cameras as one scene that is part of a larger cinematic sequence.
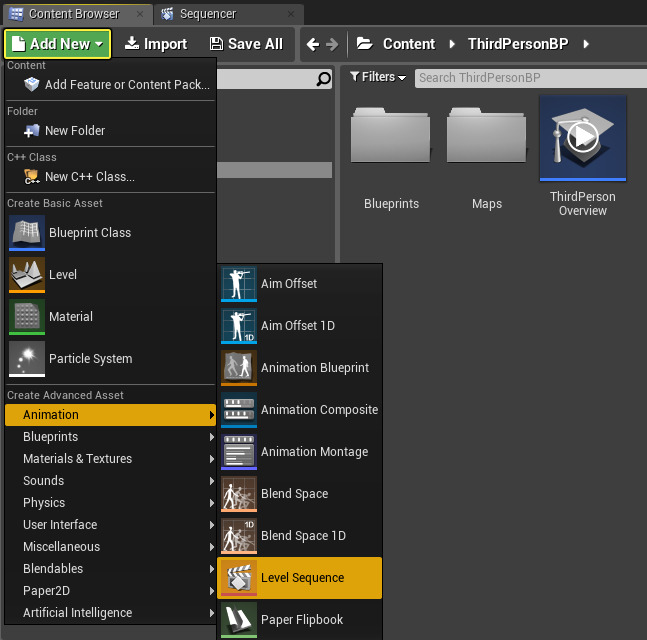
An alternate method of creating Level Sequences can be performed in the Content Browser by clicking the Add New button, and selecting Level Sequence from the Animation menu. When doing this, you are creating the Level Sequence asset before placing it in a Level.
Adding Tracks to Sequencer
After creating a Level Sequence, double-click on it to open the Sequencer Editor so that you can begin creating your cinematic.

Above, we have a newly created, empty Level Sequence.
The first thing you will need to do is add a Track type, which you can do from the Track button's drop-down menu.
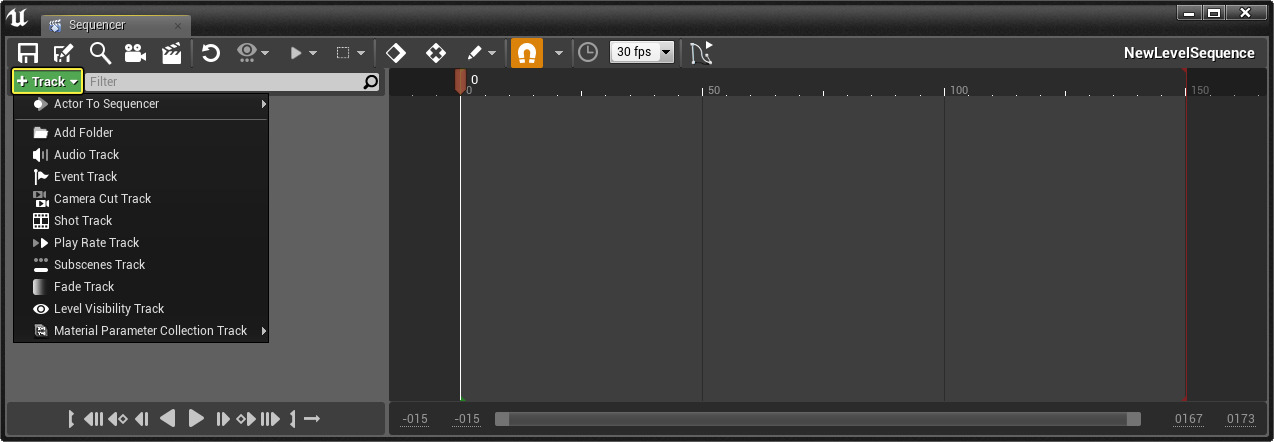
From the drop-down menu, you will see several Track types you can select from, as well as the ability to add an Actor To Sequencer . The Actor To Sequencer option will enable you to add any Actors that you have selected in your Level (at the time) to Sequencer so that you can manipulate them during your scene.
Typically, if you are creating a cinematic that has characters, animals, creatures, or anything along those lines that will animate and move, you will have a Skeletal Mesh for it, which you will need to add to Sequencer. For example, we have a Skeletal Mesh of a bear that we have placed in our Level (below). With the bear selected, we can then click the Track button in Sequencer and choose Actor To Sequencer so that we can add it and control it in the Sequencer Editor.

Once we have added our Skeletal Mesh, we can then add Sub-tracks to affect that Skeletal Mesh.

Based on the type of Track you create, Sub-Tracks may be added and the ability to add Sub-Tracks may be available.
Below, we select the Animation Sub-Track and assign an Animation for our Skeletal Mesh Bear to play.
To keep Tracks in your Level Sequences organized, you can use Folders to categorize and arrange them as desired. When a Folder is selected and you add a new Track, that track will automatically be placed inside your selected folder.

Above we have an Audio folder selected, when adding a new Track, that track will be automatically placed in the Audio folder.
You can also arrange and re-arrange tracks by dragging and dropping them inside the Tracks list.

Above we move the Audio folder to the end of our Tracks list, resulting in the image below.

Another way to help keep your tracks organized is to pin a track at the top of the Sequencer UI tree. The pinned track does not scroll with the rest of the tracks, which is helpful for keeping a specific track in context with the rest of the tracks. To pin a track, right-click on the track and check Pinned .

You can also group sections in a track together, so that when any section is moved, all sections in the group move together. To Group tracks, select the tracks you want, and then right-click and select Group .

Copy/Paste/Duplicate Tracks
You can also Copy, Paste or Duplicate Tracks within Sequencer and all of their child Tracks from the right-click context menu. This shortcut can save you time if you are working with similar Actors in your Sequence as you can copy/paste or duplicate the Actor and change the properties on the new Actor as you need to.
Below, we Duplicate the bear in our scene and rotate it around to face off against the other bear.
When copying objects through the context menu, you can copy them to the same Level Sequence or entirely new Level Sequences. Spawnable objects will be created in the new Level Sequence, while Possessables will have the data copied over only. You can also duplicate/copy animation tracks in UMG.
Adding and Editing Multiple Tracks
You can group-add multiple tracks at once by selecting the tracks with Shift or Control and then choosing the track you want to add.

You can then group-edit the tracks by selecting the tracks and Right-Clicking one of the highlighted tracks to bring up the options menu.

Sequencer World Outliner Integration
When adding Actors to a Level Sequence, the World Outliner will update to show which Level Sequences the Actor is bound to.

The World Outliner will also indicate which Actors have been spawned by Sequencer indicated by the orange lightning bolt icon.

Keyframing Scenes
If you are familiar with most animation tools, the concept of using Keyframes to drive content may be familiar to you. Sequencer allows you to manipulate your content by adding Keys (referred to as "Keyframing") with defined properties at desired points along a timeline. Upon reaching those Keys in the Timeline, the properties you have defined at each Keyframe are updated to reflect the values that you entered.
A sample scene (below) illustrates the process of adding movement by Keyframing different transformations of a Skeletal Mesh Actor.
For the Location track (above), we added a Keyframe for the starting position and another Keyframe for the ending position.
You can add a Keyframe by selecting a track and pressing Enter , or by clicking the Add Keyframe button on each track.

Some properties in the Details panel of an Actor can be Keyframed directly by clicking the Add Keyframe button next to each property.

Above, Keyframe buttons are shown for the Current Focal Length and Aperture settings of a Cine Camera Actor.
Sequencer also supports the auto-keying of properties when the Auto-Key option is enabled. Please see Using Auto-Key in Sequencer for more information.
Property Editors also have filters to Show Only Keyable Properties (only properties that can be keyed to a Level Sequence) or Show Only Animated Properties (which are tracks that have already been animated with keys).

Repositioning or Rescaling Multiple Keys
With a Key (or with multiple Keys or sections) selected, you can use the Transform Keys/Sections tools to reposition and rescale your selection.

You can also open the Transform Keys/Selection tools by pressing the Ctrl+M Key combination.
This will enable you to offset the Keys/selection by a specified amount, or the amount to scale the Keys/section by a specified time.
Stretching and Shrinking Frames between Keys
You can add or reduce the amount of frames between Transform keys for an asset as long as there are no overlapping tracks. Under Select/Edit Options , choose Stretch/Shrink .

You can enter the frame increment that you want to add (stretch) > or reduce (shrink) < and use the arrows to change the frames at the incremental amount you indicated.

You can close the toolbar by hovering over the right edge and clicking the
X
icon.

The Transform Selection and Stretch/Shrink toolbars overlap on top of each other. If you are trying to go back and forth between the two, you need to close out each toolbar to access the other.
Sequencer Editing Options
There are three editing options you can use when a Level Sequence is open that defines how property values are handled by the Sequencer editor:

-
Allow Any Edits - allows any edits to occur, some of which may produce tracks/keys or modify default properties.
-
Allow Sequencer Edits Only - any edits to properties will automatically create a track if it doesn't exist and/or a keyframe.
-
These changes will be isolated to the particular shot you are working on and won't leak into others.
-
-
Allow Level Edits Only - when using this option, you will be editing the default properties objects directly.
-
Properties that already have tracks in Sequencer will be disabled in the Details panel when you want to make global changes that affect all shots.
-
Below is an example of each setting in action:
Playback Range
Sequencer will play back your scenes based on the defined Start and Stop playback ranges (green/red markers below).

Above, our content contains two shots that end at frame 600, but our Sequence extends to frame 1000, resulting in "dead space".
You can drag the Start and Stop Playback markers to fit your content, or there is an option which can be set that will keep your content within these ranges. You can find this option under the Sequencer Options drop-down menu, called Keep Playback Range In Section Bounds .

When working with
Shot Tracks
and viewing Sequences from the Master Level (as well as the Shot Level), we evaluate the entire Sequence at its relative time. In the image below, we have two red markers for the ending of playback ranges, the first denotes the end of the Shot (from the Shot Level), while the second denotes the end of the Master Sequence. In this example, our
Shot0020_001
is set to use 50 frames, but we've set it to use 100 frames on the Master Level.
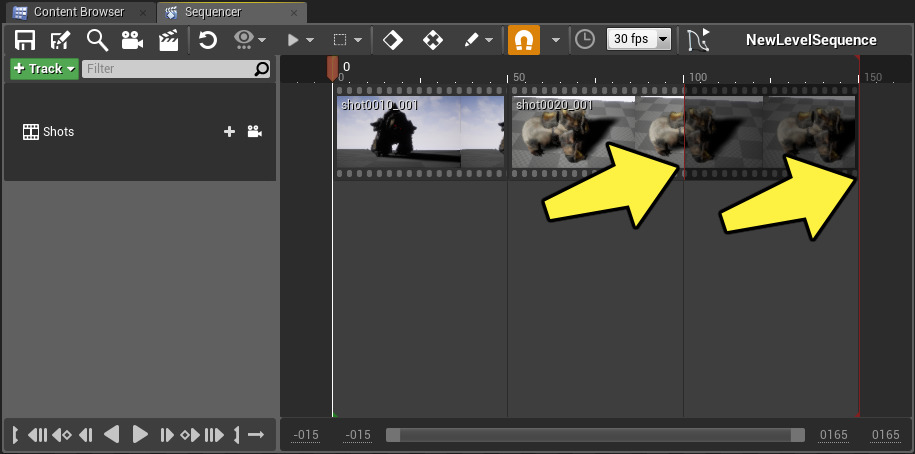
If we dive into our Shot, the first red marker denotes the end of the Shot at frame 50, while the second red marker denotes the end of the Shot at the Master Level.

Frames 50 through 100 are grayed out to indicate that they are not being considered for evaluation. To address the difference in length, we could increase the amount of frames being evaluated at the Shot Level to 100, or at the Master Sequence Level, we could reduce the length of the Shot to 50 frames.
Hierarchical Bias
By default, tracks at a lower level in the Level Sequence hierarchy take precedence. This allows filmmakers to build a pipeline they are accustomed to, where adjustments at the shot level override the Sequence they are contained in. For example, in the video below, we have a sample scene with three camera cuts and a light pointed at, and highlighting, our Actor. Our light is set to white at the Master level. However, when we dive in and add the light to our second shot, we can make changes to it, overriding the Master level setting.
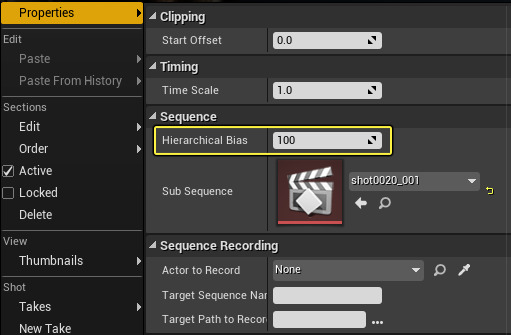
You can also set the amount of influence by right-clicking on a shot, then increasing the Hierarchical Bias value (higher values will take precedence) under Properties .
Specialized Viewports
Sequencer uses specialized viewports to make the editing process easier.

These Cinematic Viewports give a better idea of what the scene will look like, and they can be enabled from the Viewport options.
Cinematic Actors
From the Place Actors panel, within the Cinematic menu, there are three Cinematic Actors that can be used for crafting cinematics.

You can drag any of these Cinematic Actors into your Level, adding them to Sequencer, or you can drag a Cinematic Actor into Sequencer, which will make it a Spawnable.
Camera Rig Crane
The Camera Rig Crane Actor can be used to simulate crane-like camera movements that are used in traditional filmmaking.

You can attach a Camera to the Camera Rig Crane Actor, which enables you to manipulate the crane's movement through the Details panel and Crane Controls values. Those values can affect the Crane Pitch, Crane Yaw, and Crane Arm Length. All of these values can be Keyframed within Sequencer, which will enable you to adjust them as desired during your cinematics.
Please see Shooting from a Camera Rig Crane for more information.
Camera Rig Rail
The Camera Rig Rail Actor is a spline-based tool that a Camera can be attached to, which provides a "path" for movement.

You can select each spline point and alter the tangents to produce the path that you want your camera to follow. The camera that is attached to the rail can be rotated independently, and the camera's position on the rail can be adjusted (or keyframed) with the Current Position on Rail property inside of the Details panel.
You can also determine whether the orientation of the mount should be in the direction of the rail by enabling the Lock Orientation to Rail property. By enabling this option you can lock the orientation of the camera to follow the curvature of your defined spline path.
Please see Shooting from a Camera Rig Rail for more information.
Cine Camera Actor
The Cine Camera Actor is similar to the default Camera Actor. However, additional Camera Settings are available.

Cine Camera Actor (black camera) and default Camera Actor (blue camera) pictured above.
The Cine Camera Actor includes settings for Look at Tracking (following an Actor), Filmback Settings (16:9 DSLR, Super 8mm, 35mm VistaVision, etc.), Lens and Focus Settings, as well as Current Aperture and Focus Distances. While using a normal Camera Actor is perfectly fine, to achieve a more cinematic feel and expose more camera settings, it is recommended that you shoot your scenes with a Cine Camera Actor.
Once you have determined what type of camera you want to use to shoot your cinematic and have added it to your Level Sequence, you will also need to use a Camera Cuts Track to indicate which camera you want to shoot your Sequence from. Even if you are only shooting from one camera and are not planning to switch cameras during your scene, you will still need to use a Camera Cuts Track and point it to the single camera you plan to shoot from.
Please see Using Cine Camera Actors and Working with Camera Cuts for more information.
Sequence Recording
One way to reduce content creation time is to use the Sequence Recorder to record gameplay (or Level Sequences) in order to generate new Level Sequence Assets.
To add a new recording, pick an Actor to record, and click Record to start capturing. When stopping the recording, new Level Sequence Assets will be created. You can then incorporate them into your existing cinematic, or you can use pieces from the recorded Level Sequence to create new Sequences. You can also record audio to go along with your recorded Sequence from an external microphone, which will allow you to narrate your Sequence (or provide instructions while recording Level Editor actions).
Please see Recording Gameplay for more information.
Rendering Out Movies
Within Sequencer, you can render out your cinematic to a Video, or Image Sequence, from the Render Movie Settings option.
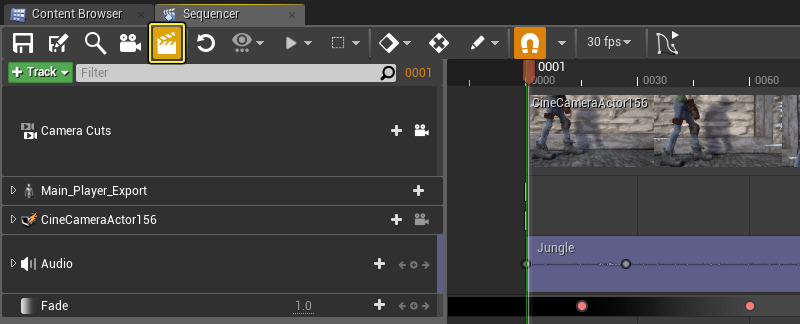
Selecting the Render Movie button will display the
Render Movie Settings
window, which you can use to define how your scene will be rendered.

Click the Capture Movie button to start the capture process of recording your scene.
Please see Render Movie Settings for more information or Rendering Out Cinematic Movies for a step-by-step guide.
Custom Burn-ins
When creating and rendering out cinematic movies, you may want to include overlays with information about the scene you are viewing such as the name of the shot, the date, time or frame information. These overlays are referred to as Burn Ins as they are burned into the movie when it is rendered out. Often times you will see this process as part of real world movie making to provide directors, editors or anyone viewing the scene with contextual information about the scene (some will even be watermarked with copyright information).
Please see Applying Burn Ins for a step-by-step guide on using burn-ins.
Import/Export EDLs
Sequencer in Unreal Engine 4 (UE4) not only allows you to render and export your entire cinematic, but you can also export your cinematic split up into each of your shots along with an Edit Decision List ( EDL ), which is a file that can be used with most video editing applications like Premiere, Avid or Final Cut.
As part of exporting an EDL, you can also add Frame Handles automatically to each of your shots, and specify the number of frames you would like to add.

Please see Importing & Exporting Edit Decision Lists (EDLs) for a step-by-step guide on using EDLs.
Custom Render Passes
If you are looking to export your cinematic in different render passes, you can do so from the
Render Movie Settings
window. These settings specify the render pass(es) to use when exporting your Sequence. You can also export HDR (High Dynamic Range) data as
.exr
files, and define compression and color gamut settings.
Please see Exporting Custom Render Passes for more information.
Embedded Sequences in Blueprint
This is an experimental feature that is currently undergoing development. Some aspects may not work as expected or may change in future revisions.
As of engine version 4.15, you can enable the Actor Sequence Plugin , which enables you to add Actor Sequence Components to Blueprints . Doing so provides the ability to embed Sequences directly into an Actor Blueprint which enables reuse of Sequences by binding the animations to the Blueprint instance and triggering them automatically or through the Event Graph of the Blueprint.
Below is an example of a Blueprint created with a Spot Light and Actor Sequence Component that animates and changes the color of the light.
Please see Using Embedded Sequencer Animations in Blueprints for a step-by-step guide.
Possessables vs. Spawnables
Sequencer is very similar to Matinee, in that it uses the concept of "possessables", meaning that an Actor exists in the Level, and Sequencer will take possession of it in order to apply your changes to it. For example, you can place a Skeletal Mesh in the Level and add it to Sequencer. Inside Sequencer, you can then add an Animation Track associated with the Skeletal Mesh and assign different animations for it to play during your scene. In this example, we are possessing the Skeletal Mesh that exists in the Level in order to tell it what to do.
Sequencer also includes another form of manipulation, which is referred to as "spawnables", meaning that the object we are possessing does not yet exist and will be spawned by Sequencer. In this case, Sequencer will have authority over the spawned Actor and can determine its lifecycle. Since the object is spawned, it is not bound to a particular Level. Anything marked as spawnable can be used in any Level, so you could create a scene and have it take place in any environment, and reuse that scene in new Levels without having to recreate it.
Please see Creating Spawnables for more information.
Workflow Considerations
Once you have a basic understanding of how the Sequencer Editor works, you may want to consider how you will use the tool (there are many ways to author content). Whether you create all of your content within a single Level Sequence, embed Sequences within one another and use a Master Sequence to control them all, or use a Master Sequence asset to get started, Sequencer offers multiple ways in which you can generate your cinematics.
Please see Workflow Considerations for more information.