Choose your operating system:
Windows
macOS
Linux
This page describes how you can render out custom passes from the Render Movie Settings window inside Sequencer . Using a Custom Render Pass will output your sequence into a series of image files based on the Render Pass you specify. The image files will be exported in the .png file format by default, however you can capture frames in HDR to export them in the .exr file format as well.
Custom Render Passes
To render out custom passes for your cinematic refer to the following steps.
-
Inside Sequencer click the Render Movie Settings button.
![RenderMovie1.png]()
-
In the Render Movie Settings window, change the Output Format to Custom Render Passes .
![RenderMovie2.png]()
-
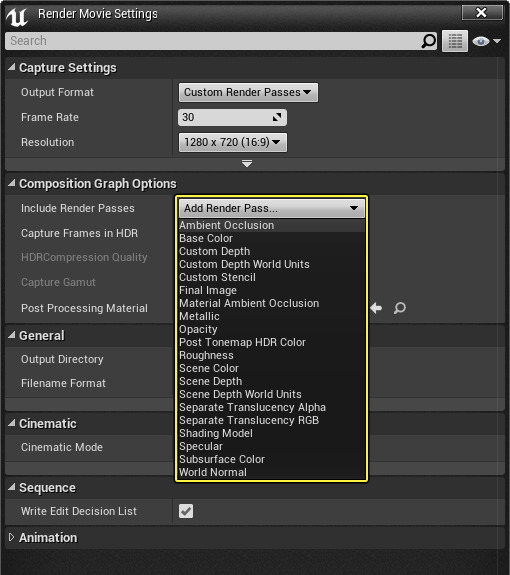
Select the desired Render Pass(es) from the Include Render Passes drop-down. You can include more than one pass as part of the export process.
![RenderMovie3.png]()
If you do not specify which render pass(es) to include, all available passes will be included as part of the export. Depending upon the number of frames in your sequence, this may result in hundreds of files being generated for each available render pass.
-
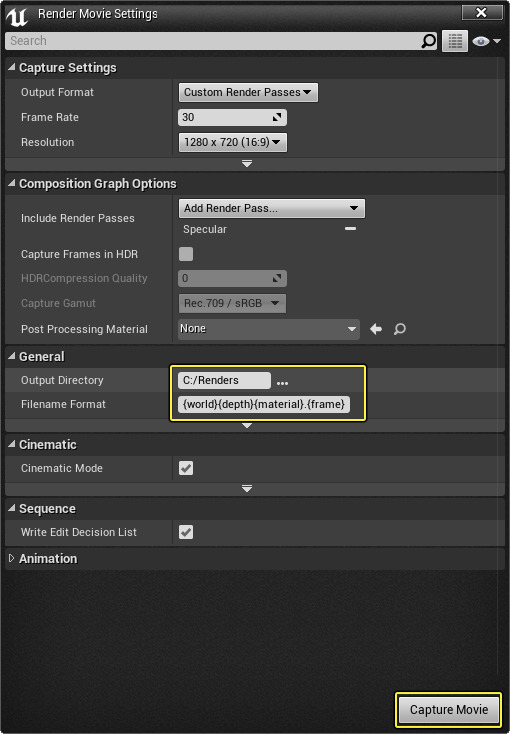
(Optional) Click the Minus button next to a render pass to remove it from the export.
![RenderMovie4.png]()
-
Specify the Output Directory and Filename Format , then click Capture Movie .
![RenderMovie5.png]()
If you use the default Filename Format , your files will automatically be named based on the render pass it reflects.
Once the render movie process completes, in your output directory there will be an image file for each frame of your sequence that corresponds to the selected render pass(es). If you selected more than one render pass, you will have a separate set of image files for each pass. Below is an example of an render pass for Scene Depth next to the original shot from the full scene.
|
|
|
|---|---|
|
Full Scene |
Exported Scene Depth |
HDR Exporting
Sequencer also provides the ability to export HDR data in OpenEXR files when performing a custom render pass. In addition, you can also specify the HDR Compression Quality (0 for no compression, 1 for the default compression) and the color Capture Gamut used when storing the captured HDR data. The choice of Capture Gamut will largely depend on the project that will make use of the exported EXRs (see the table below and click each Gamut Type for external reference).
|
Gamut Type |
Description |
|---|---|
|
This is the most widely used color gamut for images that will be displayed on monitors, TVs, and Projectors. |
|
|
This is used widely for cinematic projection. |
|
|
These gamuts are being used more with the advent of UHD TVs, HDR TVs and other advances in display technologies. ACEScg in particular now plays a prominent role in rendering and compositing for visual effects and is probably the most future-proof of gamuts. |
To export HDR frame data, perform a custom render pass and choose the Capture Frames in HDR option.

Then define the HDR Compression Quality and Capture Gamut settings as desired.


