Choose your operating system:
Windows
macOS
Linux
You can add render passes to your Movie Render Queue output by including them in the settings for your rendering jobs.
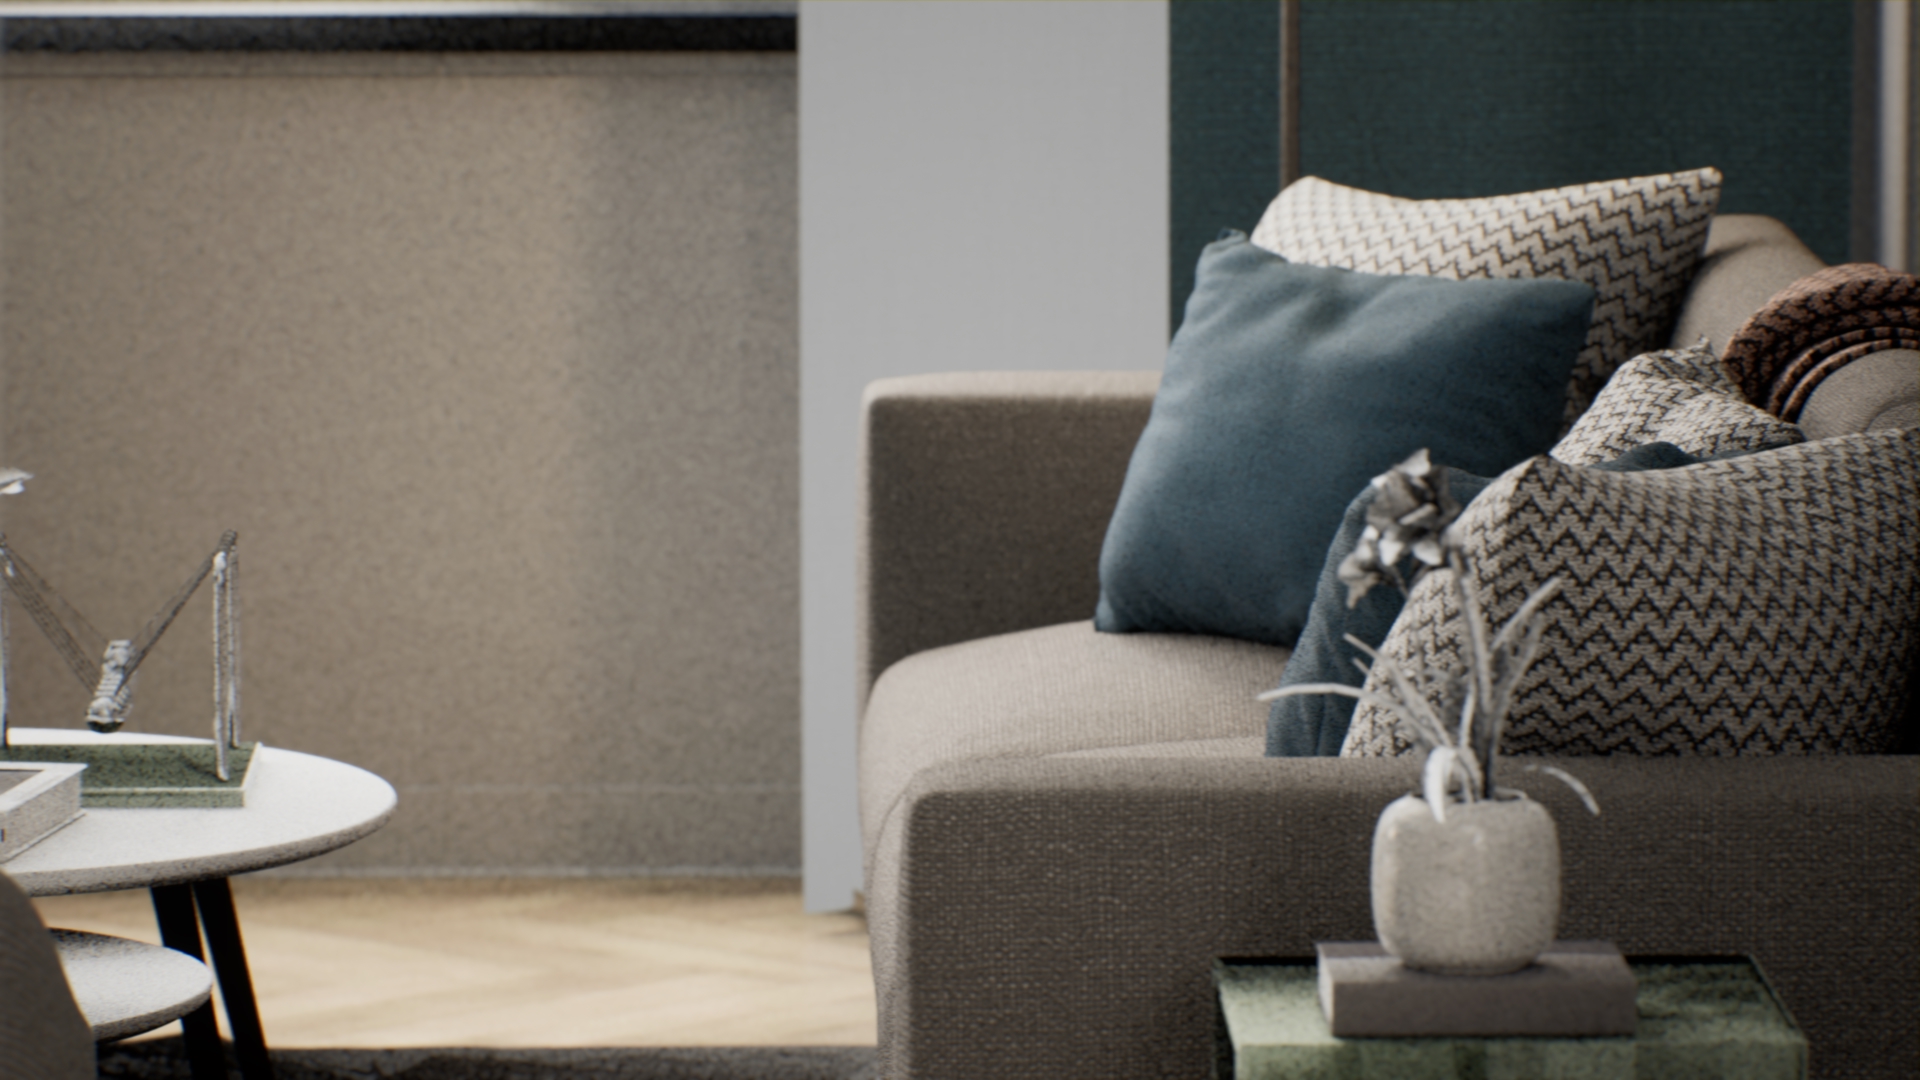
Click and drag the slider to cycle through examples of some of the render passes supported by Movie Render Queue.


Each render pass setting will output your movie in a separate rendering mode. All of your selected render passes will be output alongside each other in the final output folder. You can then use them in an external post-production or compositing program of choice.
Adding render passes does not apply them additively to the final render. Each pass is output as a separate sequence in your selected output formats.
You can add render passes to your render jobs in the Settings window by clicking the + Setting dropdown menu in the UI and selecting the rendering modes you want to output. All render passes are listed under the Render group.

Click image to enlarge.
Click any of these options to add them to the Settings list, under Rendering .

Click image to enlarge.
You can enable and disable render passes as you would with any other setting, and you can select them to edit their properties, if any are available.
Supported Render Passes
The main output from Unreal is handled by the default Deferred Rendering setting, which produces the final image that you see in the viewport. Some variations are provided, including Detail Lighting, Lighting Only, Path Tracer, Reflections, and Unlit. These variations are not used in creating the final image, and are provided here for parity with the Level Editor viewport. The full list of render passes is detailed in this section.
Deferred Rendering
The Deferred Rendering options include the following:
|
Render Pass |
Example Image (Click to Enlarge) |
Description |
|---|---|---|
|
Deferred Rendering |
|
Displays the final image for the scene, matching what you see in the viewport. |
|
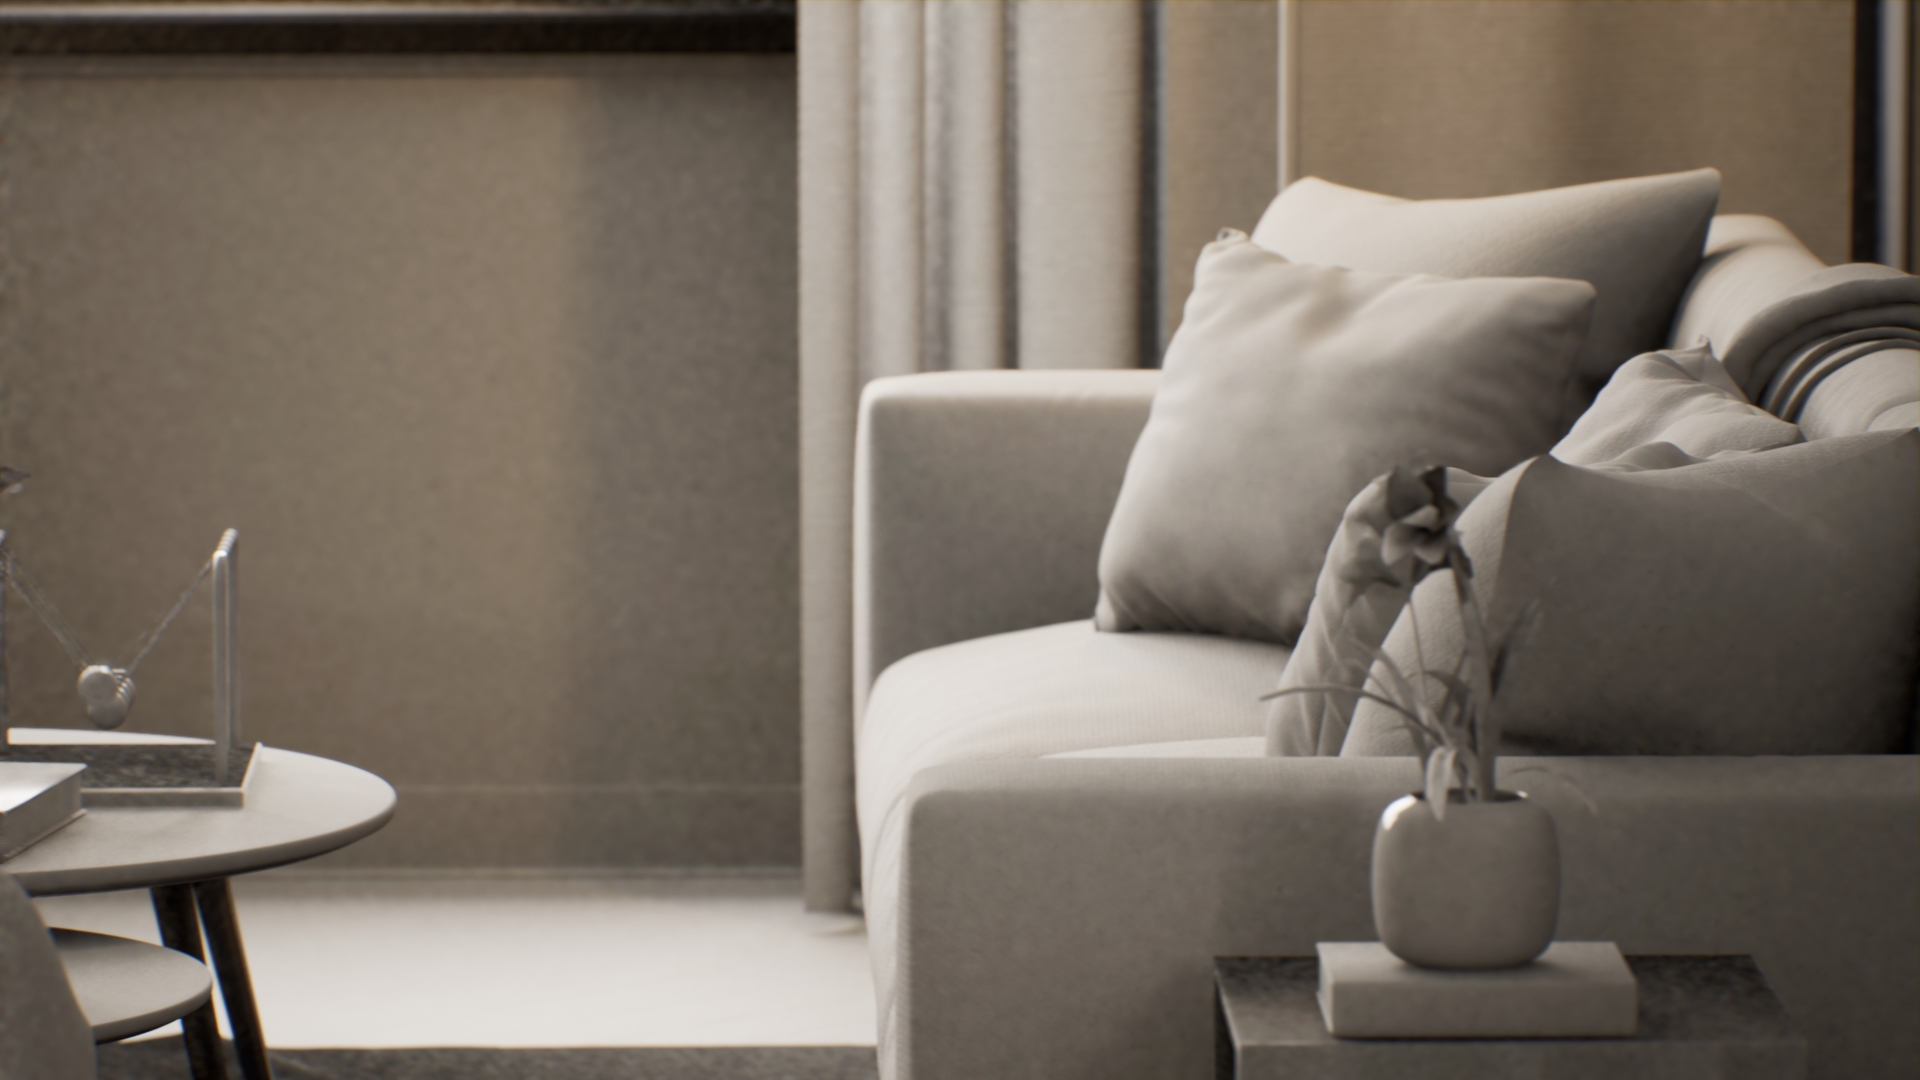
Detail Lighting |
|
A special shader variation which only displays lighting combined with normal maps. Can be useful to show off the geometry of a scene. |
|
Lighting Only |
|
Similar to Detail Lighting but without the normal maps affecting the lighting. |
|
Path Tracer |
|
Displays path tracing data as it accumulates each frame. See Reducing Noise in Path Tracer Renders for details on how to maintain high image quality for this mode. Not all rendering features are supported by the Path Tracer at this time. |
|
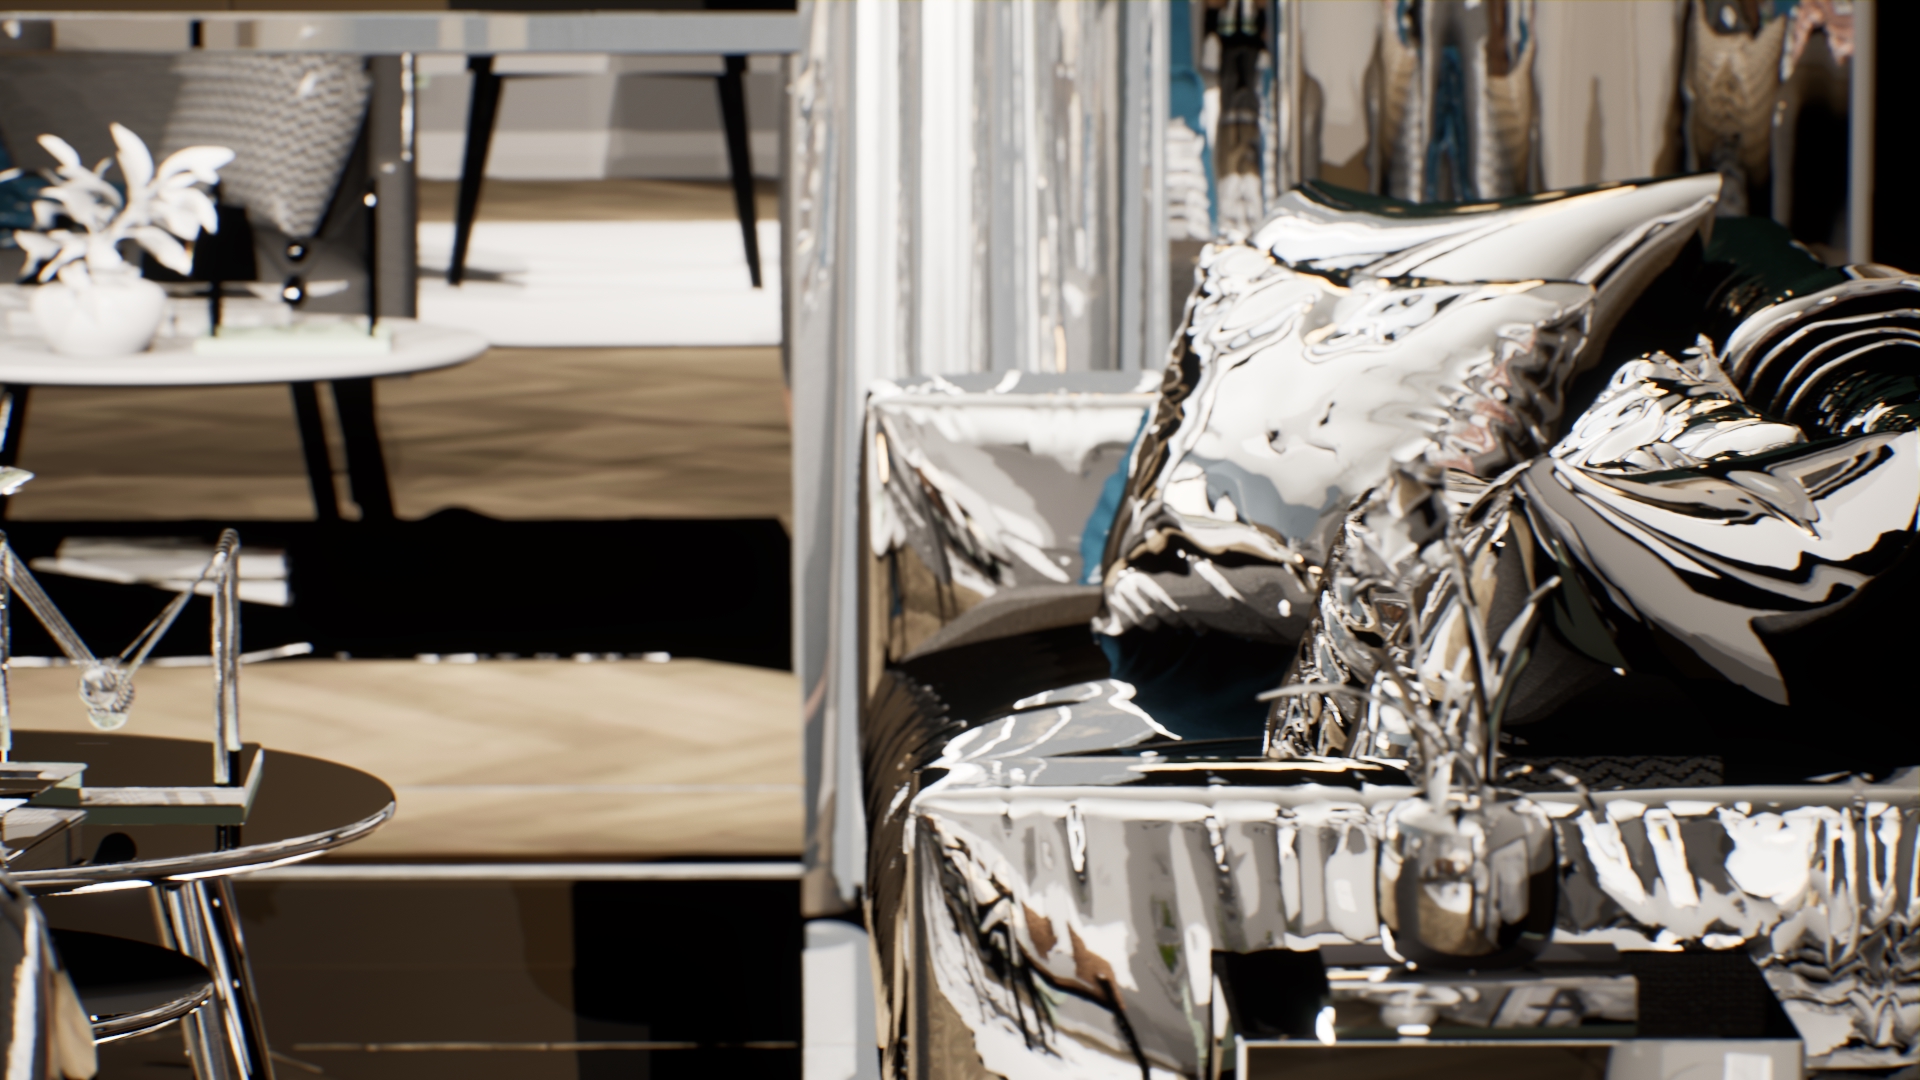
Reflections Only |
|
A special shader variation which makes everything in the world 100% reflective. |
|
Unlit |
|
A special shader variation which displays only albedo, with no lighting information. |


All Deferred Rendering passes feature the same properties, but each render pass can be configured individually.

|
ID |
Property |
Description |
|---|---|---|
|
1 |
Accumulator Includes Alpha |
If enabled, multiple temporal/spatial samples will accumulate for the alpha channel. This requires r.PostProcessing.PropagateAlpha to be set to 1 or 2, which you can enable by going to Project Settings > Rendering and using the Enable Alpha Channel Support in Post Processing setting. You must remove both sky and fog from your scene to make sure that they do not make all pixels opaque. If you enable this setting, it adds roughly 30% to the cost of accumulation, so you should avoid using it unless necessary. This applies to renders that do not use multiple temporal or spatial samples. |
|
2 |
Disable Multisample Effects |
Disables post-processing effects that blend multiple pixels together, like depth of field, temporal anti-aliasing, motion blur, and chromatic aberration, which are undesirable when using the Object Ids render pass. This setting enables you to exclude these post-processes for a rendering job without having to manually disable them within your scene. |
|
3 |
Additional Post Process Materials |
An array of additional post-process materials to apply after rendering is done. This may add noticeable additional time. Includes MovieRenderQueue_WorldDepth and MovieRenderQueue_MotionVectors by default. |
|
4 |
Add Default Layer |
Creates an extra stencil layer that contains all objects not already contained in the Stencil Layers array (see below). This default layer will render separately, enabling you to create renders that exclude small groups of objects for later re-compositing. |
|
5 |
Stencil Layers |
A list of stencil layers, which contain groups of objects in the scene. The scene will be re-rendered with all objects and then pixels that don't contain objects on the specified layer will be clipped and turned black. Post Processing is then applied which preserves the ability to use DoF, Motion Blur and TAA. New layers can be created via Window > Layers. Stencil layers do not support per-layer post processing materials, as they will match the additional post-process materials of the base layer, and are only compatible with materials that support Custom Depth/Stencil. |
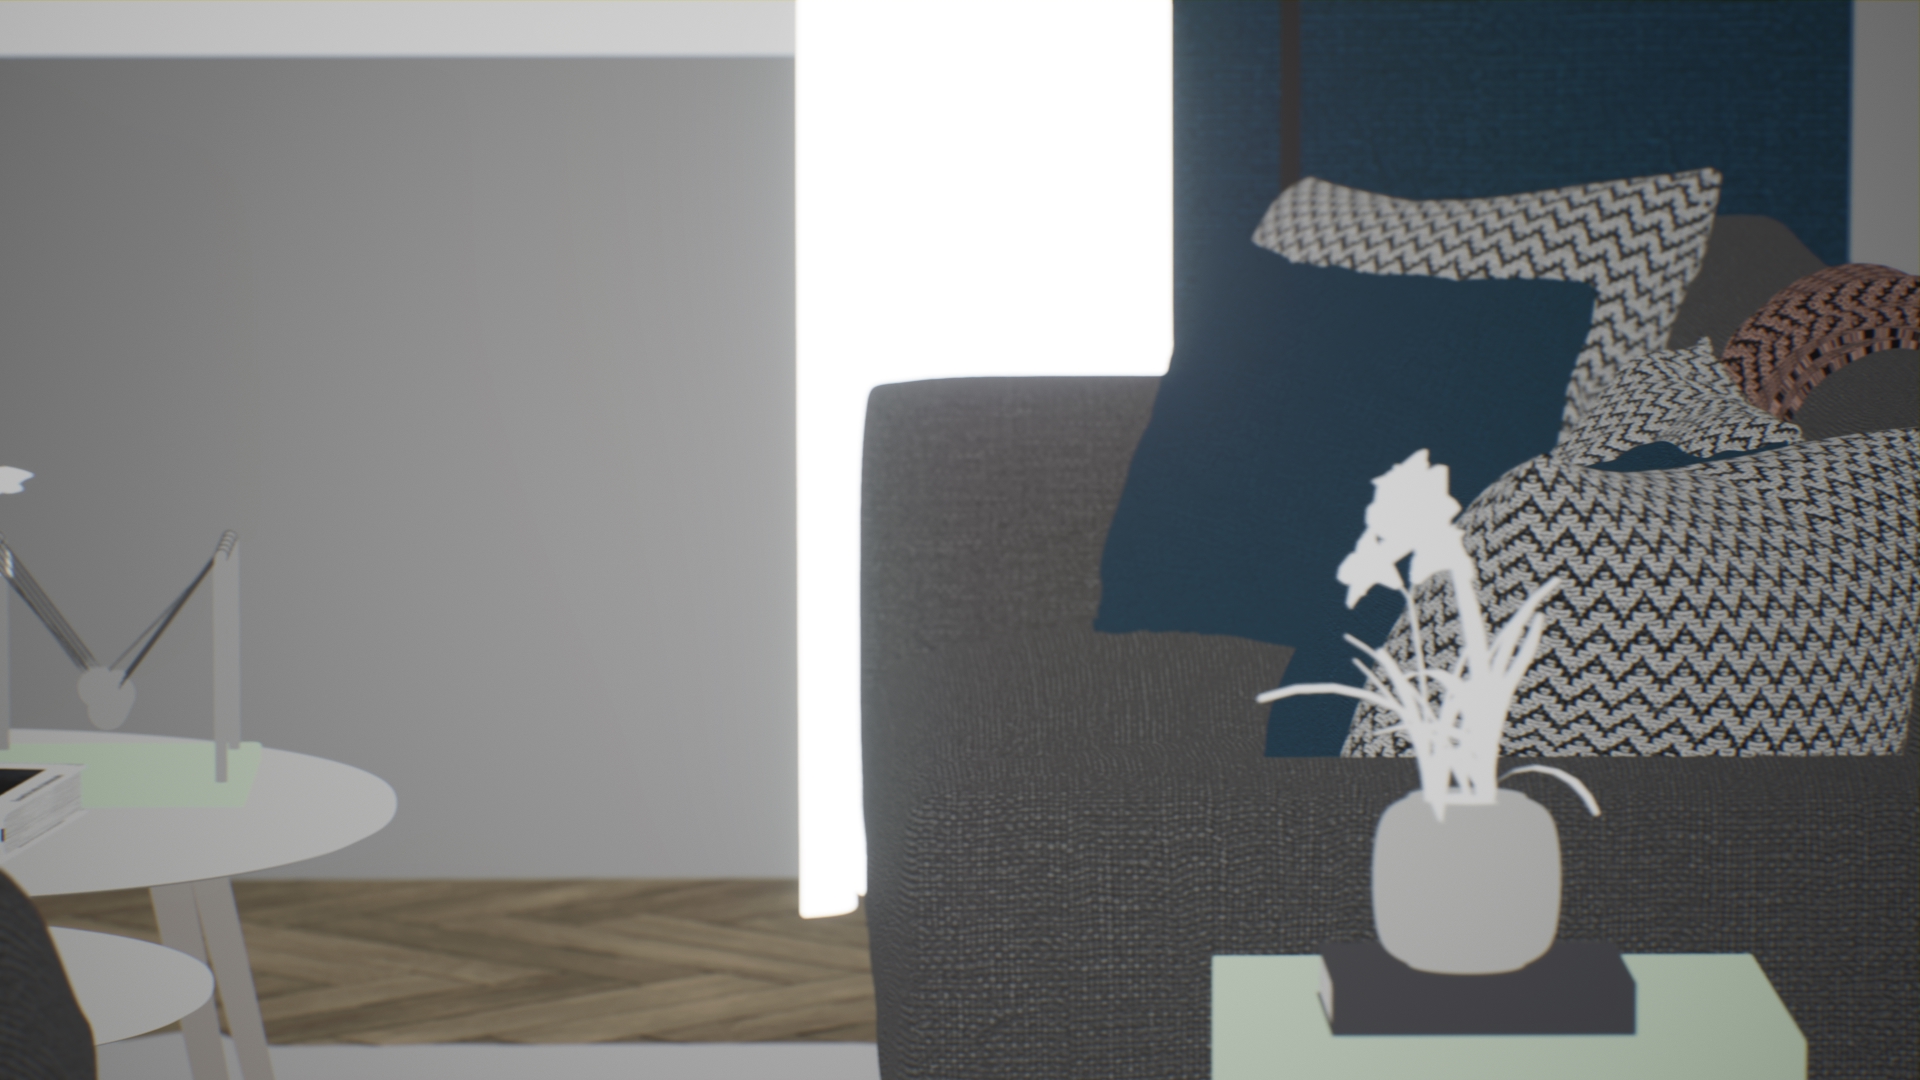
Stencil Layers
Many effects in real time rendering that require drawing content to the screen can be used later for screen space post-processes, such as Screen Space Reflections or Screen Space Ambient Occlusion . In a more traditional layering system you would be able to render a character alone while still picking up reflections from the surrounding environment. This is not normally possible in real time rendering, so instead Stencil Layers are implemented.
With Stencil Layers, the entire scene is re-rendered for each layer, but actors that belong to a layer render into the stencil buffer as well. The stencil buffer is then used to clip pixels that fall outside of the actors you intend to be on this layer. The advantage is that a shadow casting object will still be able to cast a shadow onto your actors, and your actors will be able to cast shadows onto other layers.
Once rendered to the stencil buffer, a post-processing effect is applied that takes each pixel and writes black with translucency into the pixel. This happens after translucency but before Post Processing, and then post processing is applied to this layer. The alpha channel can be preserved, which will allow you to know in post production which pixels were actually affected, and by how much.
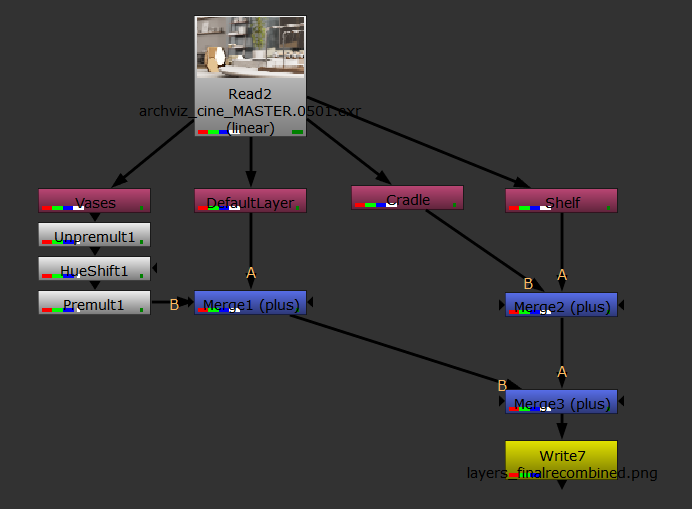
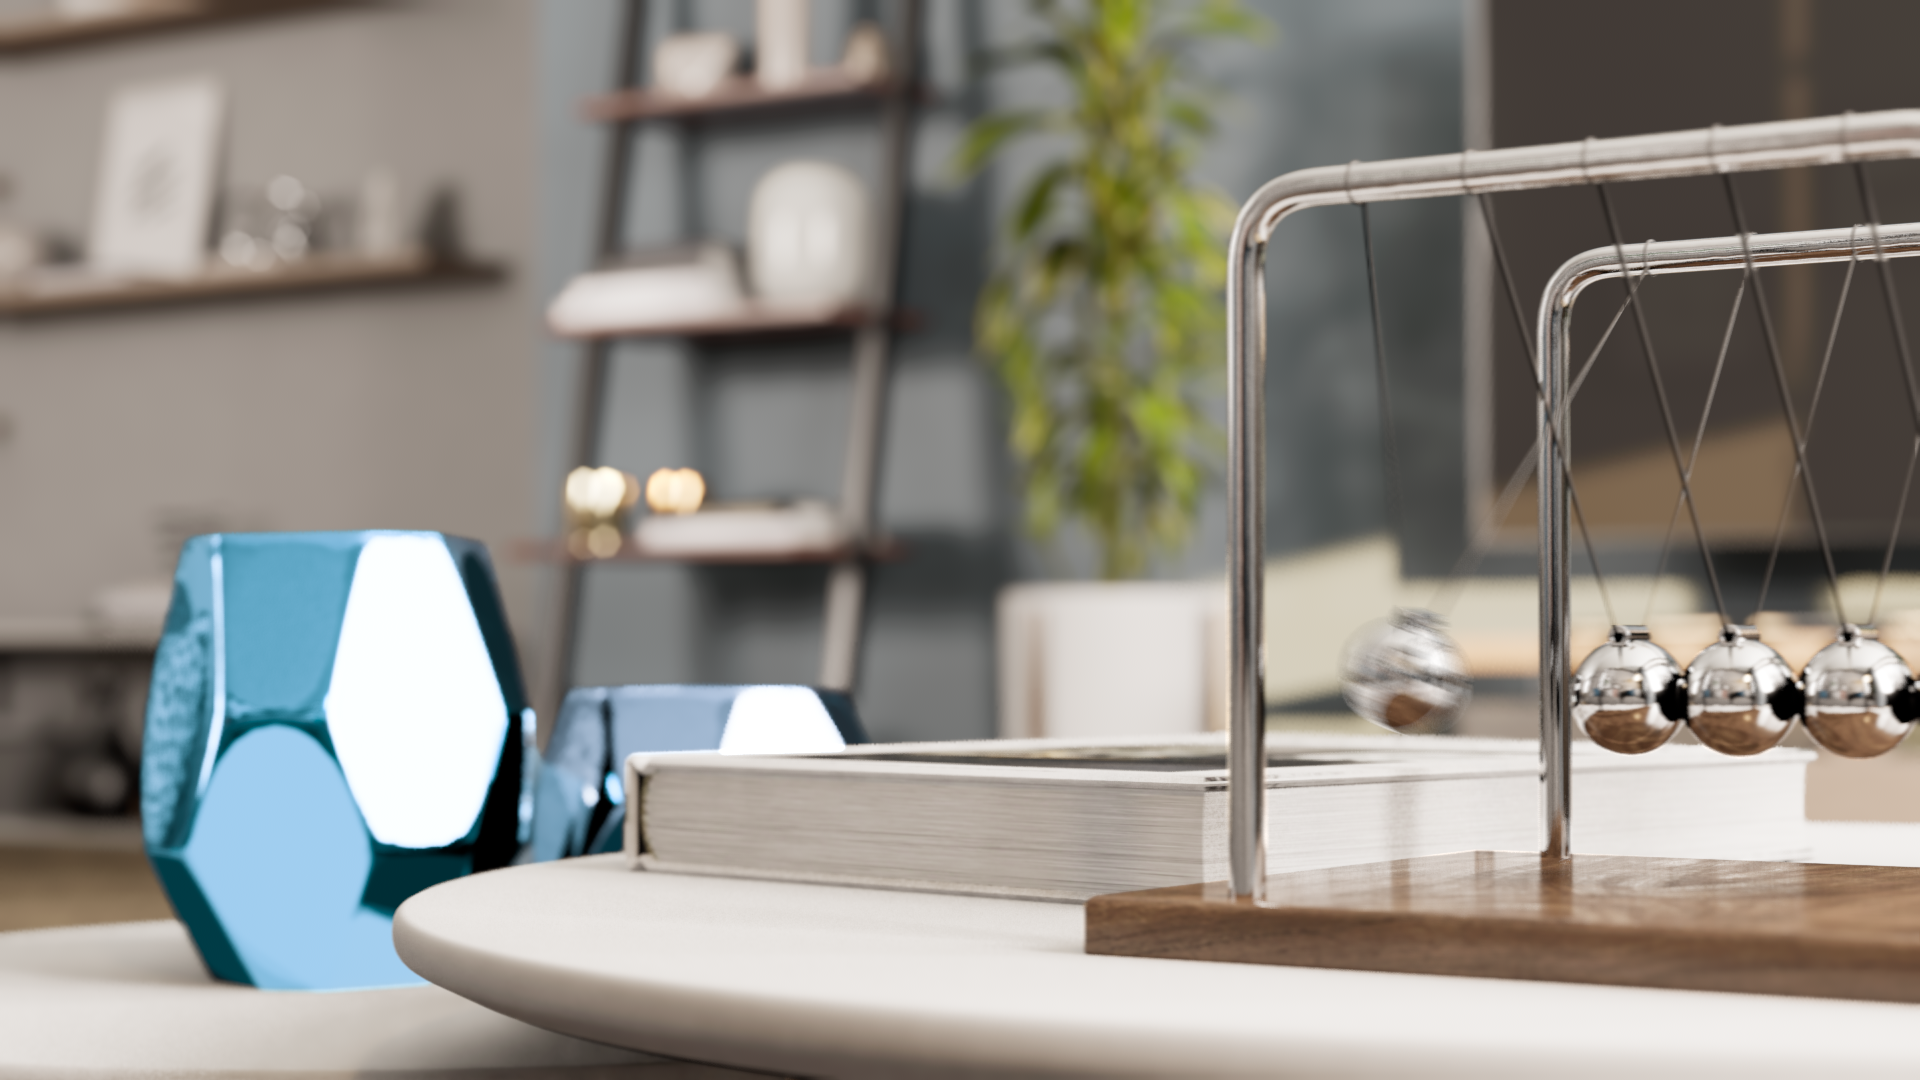
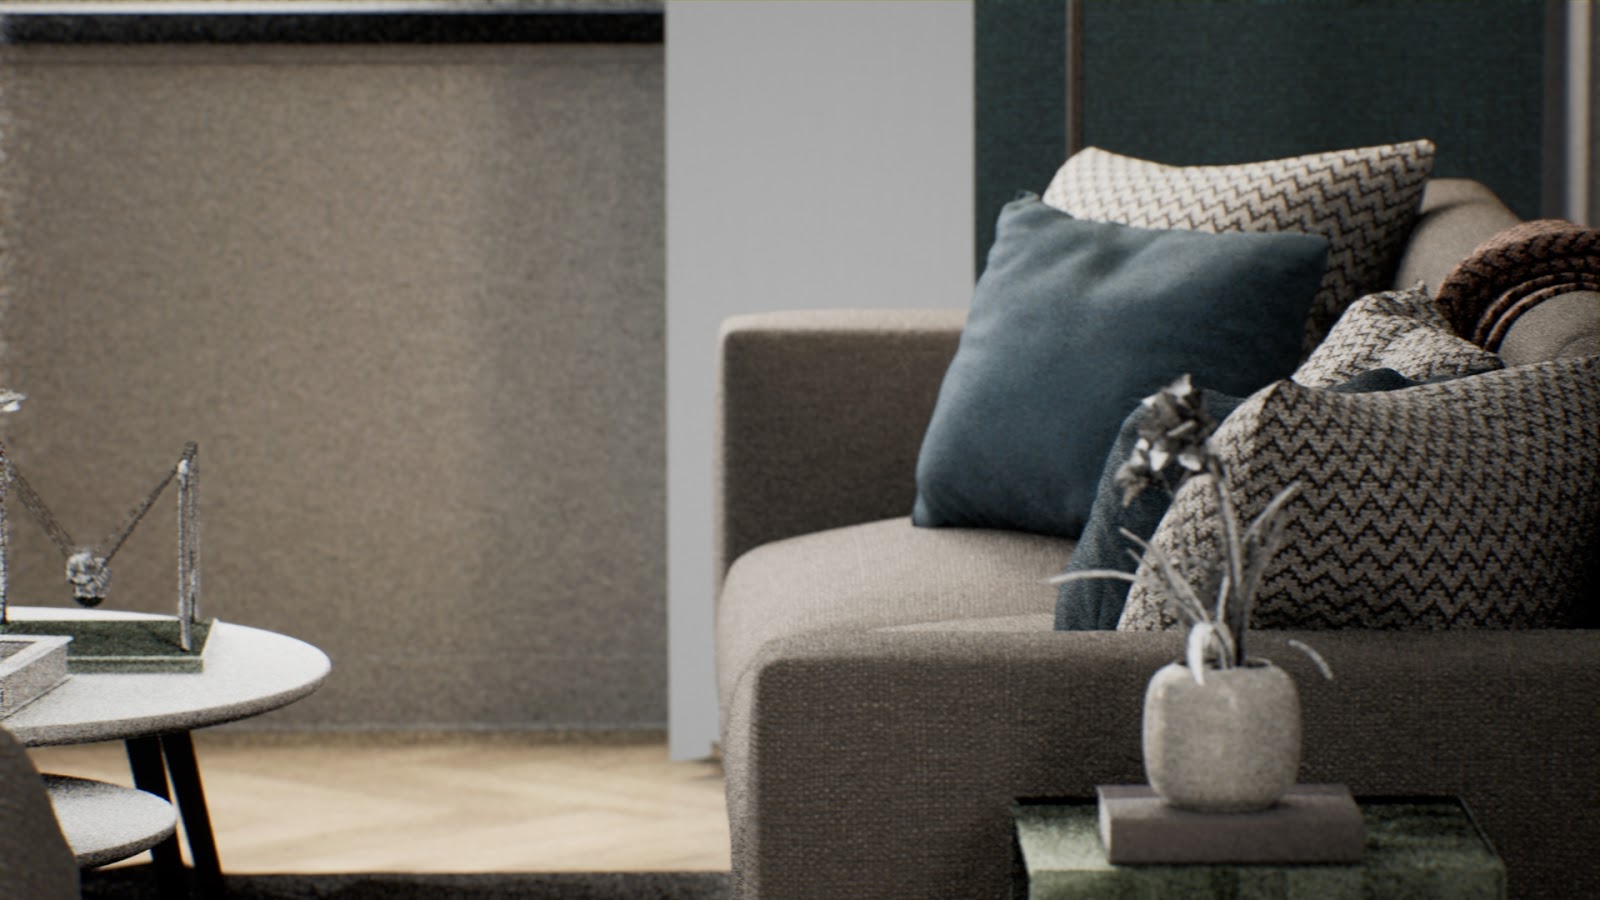
Below is an example of three Stencil Layers alongside the default layer. You can see that post processing effects, such as depth of field, have been correctly applied, and that objects in the foreground have been clipped out of background images as well. These images can be added back together to create a similar result to the final render, though it may require unpremultiplying the data.
A render divided into different stencil layers.


Below is an example from Nuke which applies a simple hue shift to one of the layers specified in the original image. The original image was rendered with alpha channel accumulation enabled and the Tone Curve disabled in the Color Output setting.
Click image to enlarge.
Click image to enlarge.
Stencil Layers are not a true layer system, as translucent objects will show opaque objects from other layers behind them, and background layers will show black holes where foreground objects occlude them.
Reducing Noise in Path Tracer Renders
The Path Tracer rendering mode accumulates path data each frame that renders. This results in a noisy image as the pixels of the image are filled in, especially if the contents of the camera frame changes significantly.
Click image to enlarge.
To reduce this noise, you should increase the number of spatial samples in your Anti-Aliasing settings.

This will render the image multiple times, and the additional samples will enable the path tracer to more effectively fill in the gaps. A large number of Spatial Samples is required to effectively de-noise a Path Tracer render, and this will greatly increase the amount of time required to output the images.
Example of a path tracer render with 1, 8, 16, 32, 64, and 128 samples.


At present time, there is no way to ensure a completely noiseless render.
The Path Tracer render mode is experimental in Unreal Engine 4.26. More refinements will be added in the future.
Object IDs


The Object Ids render pass is experimental in Unreal Engine 4.26. Additionally, it is only available in Unreal Editor, and can not be used in shipping builds.
The Object Ids render pass outputs an image where each component in the scene is assigned a unique ID. You can use this image in a post production suite to select individual objects in a scene and create a mask for them, enabling you to selectively apply adjustments to specific objects. For instance, you could change the hue of just one object or set of objects instead of affecting the hue of the entire image.
The Object Ids pass has several specific requirements to provide useable information. Follow these steps to enable it and set up your Render Queue to support it:
-
Open Plugins > Built-In > Rendering and enable the Movie Render Queue Additional Render Passes plugin. You will need to restart the editor after enabling the plugin. This will add Object Ids as an option in the Movie Render Queue settings menu.
![Additional render passes]()
-
Add the Object Ids (Limited) render pass to your job's settings.
![The Object IDs setting]()
-
Set Disable Multisample Effects to true for other render passes that you intend to composite together with an Object Id pass. This will exclude motion blur, depth of field, anti-aliasing, and other post-processes that would blend multiple layers of pixels, ensuring that all objects maintain crisp edges. This is required for the object ID pass to line up with the final image correctly.
-
Under the Deferred Renderer data for the Deferred Rendering setting, unfold the Additional Post Process Materials and enable both the MovieRenderQueue_WorldDepth and MovieRenderQueue_MotionVectors materials.
![Disabling multisample effects]()
Click image to enlarge.
-
Ensure that your Screen Percentage is set to 100 on all cameras that you are rendering. This is required for the object ID pass to line up with the final image correctly.
![Screen Percentage 100 percent]()
-
Add the Anti-aliasing setting to your job and set the Spatial Sample Count to at least 8 . This helps overcome the limitation where TAA is not supported. Using Temporal Sample Count is unlikely to produce the desired results due to the lack of motion blur covering the gap between each sample; you will simply end up with multiple copies of the object faintly superimposed over each other.
![Set spatial sample count to 8]()
-
Add the .exr Sequence output mode to your settings and deactivate or remove any other outputs. Ensure that the Multilayer property is enabled.
![Set multilayer EXR]()


When you start the Movie Render Queue with these settings in place, it will output a multi-layered EXR that includes the Final Image, Object Ids, World Depth, and Motion Vectors.
The Object Ids are stored in the EXR file using the Cryptomatte [ https://github.com/Psyop/Cryptomatte] specification and plugins to read this data are available for third party software.
World Depth
The World Depth is the depth written in world units stored in the red channel. This can be used to re-create Depth of Field in post production. The camera focal length and shutter size can be read from the EXR metadata to automatically match the in-game depth of field.
An example of the Nuke ZDefocus2 node can be found below. This will read the metadata from the EXR file and produce a similar blur to what is found in realtime.
set cut_paste_input [stack 0]
version 12.0 v3
push $cut_paste_input
add_layer {FinalImageMovieRenderQueue_WorldDepth FinalImageMovieRenderQueue_WorldDepth.red FinalImageMovieRenderQueue_WorldDepth.green FinalImageMovieRenderQueue_WorldDepth.blue FinalImageMovieRenderQueue_WorldDepth.alpha}
ZDefocus2 {
 z_channel FinalImageMovieRenderQueue_WorldDepth.red
 math depth
 fill_foreground false
 center {{"[metadata exr/unreal/camera/FinalImage/focalDistance]"}}
 focal_point {960 540}
 size {{"((input.height*(focalLength*focalLength / (fstop * (focalDistance - focalLength)))*.5 / sensorWidth)/10)" x1 26}}
 max_size 100
 filter_type bladed
 legacy_resize_mode false
 show_legacy_resize_mode false
 blades {{"[metadata exr/unreal/camera/FinalImage/dofDiaphragmBladeCount]"}}
 name ZDefocus1
 selected true
 xpos 959
 ypos 229
 addUserKnob {20 User}
 addUserKnob {7 focalLength l "Focal Length"}
 focalLength {{"[metadata exr/unreal/camera/FinalImage/focalLength]"}}
 addUserKnob {7 focalDistance l "Focal Distance"}
 focalDistance {{"[metadata exr/unreal/camera/FinalImage/focalDistance]"}}
 addUserKnob {7 sensorWidth l "Sensor Width"}
 sensorWidth {{"[metadata exr/unreal/camera/FinalImage/sensorWidth]"}}
 addUserKnob {7 fstop l Fstop}
 fstop {{"[metadata exr/unreal/camera/FinalImage/fstop]"}}
}
Motion Vectors (Velocity)
Motion Vectors are stored in the [0,1] coordinate space for X and Y, where [0.5, 0.5] is no motion.
The following Nuke VectorBlur node can be used to apply motion vectors to your image. Unreal stores motion vectors normalized to the entire screen which may be unlike other rendering packages. As a result, in the Nuke VectorBlur node the uv_offset is set to -0.5 (to rescale to [-.5, .5] instead of [0, 1]) and then the motion blur scale is driven by the width of your image.
set cut_paste_input [stack 0]
version 12.0 v3
push $cut_paste_input
add_layer {FinalImageMovieRenderQueue_MotionVectors FinalImageMovieRenderQueue_MotionVectors.red FinalImageMovieRenderQueue_MotionVectors.green FinalImageMovieRenderQueue_MotionVectors.blue FinalImageMovieRenderQueue_MotionVectors.alpha}
VectorBlur2 {
 uv FinalImageMovieRenderQueue_MotionVectors
 uv_offset -0.5
 blur_type uniform
 scale {{input.width}}
 soft_lines true
 name Unreal_VectorBlur
 selected true
 xpos 1338
 ypos -93
}
Depending on your software of choice, you may need to rescale the X and Y channels of the motion vectors independently. See the next section for more details.
Combining Object ID, Depth, and Velocity in Post
By combining multiple spatial samples, depth, and velocity you can produce a similar result to Unreal's post processing pipeline; Depth of Field via the depth map and then Motion Blur via the velocity texture. This allows using the Object Id matte to pick objects and color correct them before applying post. Anti-aliasing can be recreated via 8 or more spatial samples when initially rendering.
To preserve the correct bright highlights through DoF and MotionBlur, the scene should be rendered with the Tonecurve disabled (Settings -> Color Options -> Disable Tone Curve). This will output HDR Linear values in the sRGB colorspace. After applying DoF and MotionBlur you can now convert it to your desired colorspace (from Linear sRGB). If you do not disable the Tone Curve then your highlights will look very dull after DoF and MotionBlur are applied, because the HDR values would be reduced greatly before the blurs are applied.

Below is an example Nuke graph which uses the ZDefocus and VectorBlur nodes mentioned above. For the velocity texture to be used in Nuke, the Red and Green channels of it need to be swapped (RG_TO_GR in the graph below, using a ShuffleCopy node).
Additional, because Unreal stores motion vectors normalized [0-1] in both X and Y you will need to rescale the Red channel to ImageHeight/ImageWidth (1080/1920 in this example), or 0.5625. To do this rescaling we subtract -0.5 from the velocity channel, multiply it by 0.5625, and then add 0.5 back to the velocity channel before plugging it into the VectorBlur node. Failing to rescale the red channel will result in an incorrect angle for the motion blur.
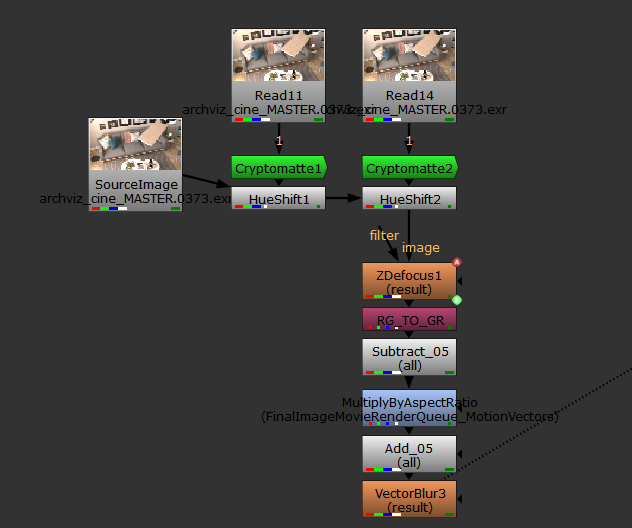
This Nuke graph takes an exr rendered with 8 spatial samples, object id pass, motion vectors and world depth. Depth of Field information is automatically pulled from the exr metadata. The cryptomatte nodes are used to create masks of the fan blade and carpet, and then are used as masks for a simple hue shift. After the hue shifting is applied the previously mentioned ZDefocus node is applied, and then the VectorBlur.
To use this Output Velocities During Base Pass must be enabled in the project settings. The editor must be restarted after changing this project setting.
Additionally, the
r.BasePassForceOutputsVelocity
CVar must be set to 1. You can do this engine wide by editing /Engine/Config/ConsoleVariables.ini, or you can apply it as a Console Variable at the start of each movie render.

[Startup] r.BasePassForceOutputsVelocity=1
UI Renderer (Non-Composited)
The UI Renderer will render Slate or UMG Widgets added to the Viewport as a separate output with alpha. You can combine this with your final images in a compositing program to add any UI elements you want to render.