Choose your operating system:
Windows
macOS
Linux
Animation blending, as a concept, simply means making a smooth transition between two or more animations on a single character or Skeletal Mesh. In Unreal Engine 4, there are various ways in which such blending can be applied either through Blend Spaces , through additive methods by literally combining two animations based on a weighted bias or alpha value, or even applying direct overrides of the existing pose.
You can also send animation directly to specific bones within the Skeleton and all of its children. For instance, you can start with an animation in which the character is running, but then selectively apply a shooting animation to the upper body of the character. The final result would be a character that can run around and shoot at the same time, similar to the video below.
1 - Setting up the Animation to Blend
In this step, we change our default player character and create an AnimMontage for the animation we want to layer in on top of our movement animations.
For this guide we are using the Blueprint Third Person Template project and have added the Animation Starter Pack to the project:

You can download the Animation Starter Pack for free through the Marketplace from the Epic Launcher.
-
With your project open, inside the Content Browser under the Content/ThirdPersonBP/Blueprints folder, open the ThirdPersonGameMode Blueprint.
-
Under Default Pawn Class , click the drop-down menu and select the Ue4ASP_Character .
![Animations1.png]()
-
Compile and Save then close the Blueprint.
-
In the Content Browser , open the Content/AnimStarterPack folder.
-
Right-click on the Fire_Shotgun_Ironsights animation, select Create then Create AnimMontage .
![Animations2.png]()
You can filter the window by typing "Fire" inside the search window as shown above.
-
Open the new AnimMontage and click the magnifying glass icon.
![Animations3.png]()
This will open the Anim Slot Manager which we will use to create a Slot that we can use to blend to when calling the Slot by name.
-
Click the Add Slot button, then name the slot UpperBody then click Save .
![Animations4.png]()
Although we chose the name "UpperBody" here, we are not targeting the upperbody just yet but have assigned the name so we know where we are targeting.
-
Click the drop-down menu inside the Montage Group section and change it to DefaultGroup.UpperBody , then close the window.
![Animations5.png]()
We have now associated this Montage with the DefaultGroup.UpperBody , allowing it to play when the Slot is called.
In the next section, we will change our default player character and make some adjustments to determine when we are firing a weapon.
2 - Updating the Character Blueprint
In this step, we create some script inside our Character Blueprint to allow us to signal our Animation Blueprint that we are firing a weapon.
-
Inside the Content Browser under Content/AnimStarterPack , open the Ue4ASP_Character Blueprint.
-
Locate the Crouching section, and delete the InputAction Crouch Event (with the Warning!) sign.
![Animations6.png]()
There is a warning on this node because our project is not set up to use the InputAction event "Crouch".
-
Right-click in the graph and add a C Key Event and connect as shown below.
![Animations7.png]()
We have just associated crouch now with the C key press, you can change this input to whatever you would like.
-
In the MyBlueprint window, click the Add Variable button to create a Boolean variable and call it Fire Button Down .
![Animations8.png]()
-
Right-click in the graph and add the Left Mouse Button Key Event.
-
Holding Alt , drag the Fire Button Down variable in the graph to create a Set node.
-
Repeat the previous step (or copy the Set node) and connect as shown below.
![Animations9.png]()
Make sure that Fire Button Down is True when Left Mouse Button is Pressed and False when Released .
-
Select CapsuleComponent in the Components window, then in the Details panel check the Hidden in Game option.
![HideCapsule.png]()
This will turn off the debug display of capsule's collision.
-
Compile and Save then close the Blueprint.
Our character is now set up to send signals to our Animation Blueprint when we are crouching or firing a weapon. In the next step, we will set up our Animation Graph inside our Animation Blueprint to handle the blending of our Anim Montage with our normal movement animations so that we can blend between the two.
3 - Setting up the Anim Graph
In this step, we set up our AnimGraph to handle the blending of our AnimMontage and the movement pose from our State Machine.
-
In the Content/AnimStarterPack , open the UE4ASP_HeroTPP_AnimBlueprint Animation Blueprint.
-
Inside the MyBlueprint window, open the AnimGraph .
![Animations9b.png]()
-
Drag off the Locomotion State Machine and search for and add New Save cached pose .
![Animations10.png]()
Here we are getting the resulting pose from our Locomotion State Machine and storing it in a cached pose that we can use elsewhere.
-
Give the cached pose a name by pressing F2 on the node such as LocomotionCache .
![Animations11.png]()
-
Right-click in the graph and add the Use cached pose 'LocomotionCache' (or whatever you named the cached pose).
![Animations12.png]()
-
Drag off the Use cached pose node and search for and add the Layered blend per bone node.
![Animations13.png]()
The Layered Blend Per Bone node will allow us to blend animations together from a specified bone on the Skeleton.
-
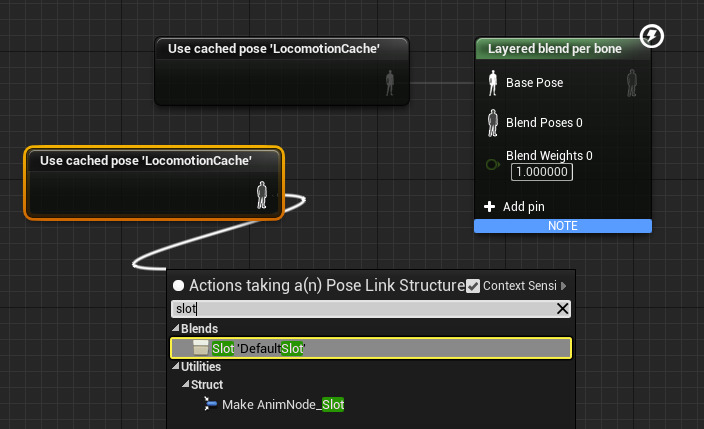
Copy/Paste the Use cached pose 'LocomotionCache' node, then drag off it and add the Slot 'DefaultSlot' node.
![Animations14.png]()
-
In the Settings for the Slot node, click the dropdown menu and select DefaultGroup.UpperBody .
![Animations15.png]()
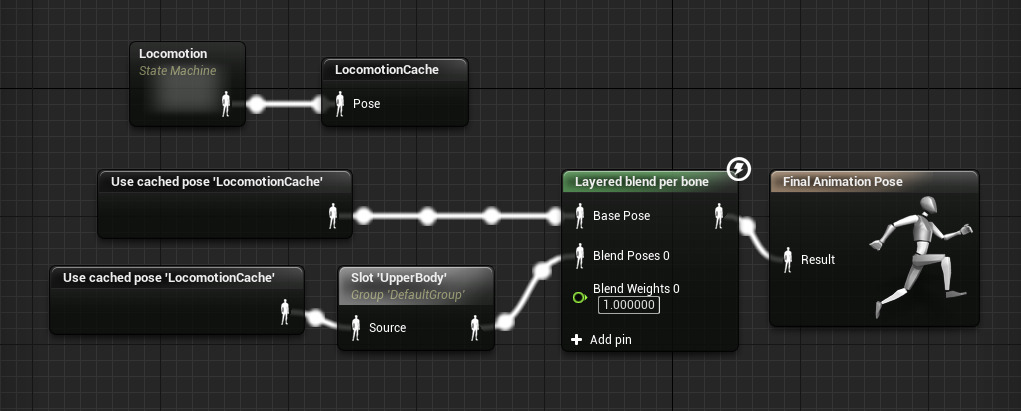
When an Animation Montage that uses this slot is called to play, it will now be called inside our AnimGraph.
-
Connect the Slot to the Blend Poses 0 pin on the Layered blend per bone node, then connect the out to the Result and Compile .
![Animations16.png]()
Our AnimGraph is complete, but we still need to modify some settings on the Layered blend per bone node to finish up which we will do next.
4 - Finalizing the Blend Settings
In this final step, we define the method in which to layer our blended animation and which bone to start the blend from.
-
Inside the AnimGraph of UE4ASP_HeroTPP_AnimBlueprint , click on the Layered blend per bone node, then expand the Layer Setup section and click the + sign.
![Animations17.png]()
-
Under Bone Name enter spine_01 , then set Blend Depth to 1 and check Mesh Space Rotation Blend .
![Animations18.png]()
With these settings, we can blend the shooting AnimMontage onto our Skeleton starting from the spine_01 bone.
-
Inside the MyBlueprint window, open the EventGraph .
![Animations18b.png]()
-
Drag off the As Ue4ASP Character pin of the Cast To Ue4ASP_Character node and add the Get Fire Button Down node.
![Animations19.png]()
This will tell us if the player is pressing the fire button or not.
-
Hold B and Left-click in the graph to create a Branch node and connect it following Set Crouching .
![Animations20.png]()
For the Condition , plug in the FireButtonDown pin.
-
Right-click in the graph and add the Montage Is Playing node and assign Fire_Shotgun_Ironsights_Montage .
![Animations22.png]()
-
Off the Return Value of the Montage Is Playing node, add a Branch .
-
Connect the Branch from Step 5 to the new Branch as shown below and add a Montage Play node with Montage to Play set to your Montage.
![Animations23.png]()
This will check now if the Montage is currently playing and if it is, do not play it (and if it is not, play the Montage).
-
Compile and Save , close the Blueprint and delete the existing ThirdPersonCharacter in the level.
![Animations24.png]()
This will allow us to use our selected character defined in our Game Mode and not the one placed in the level.
-
Play in the editor.
End Result
You will see that when you hold the Left Mouse Button down, the character will play the shooting AnimMontage. You can walk around while shooting, you can even crouch (by holding C ) and shoot as well. You could use this same guide to play a melee attack, reload animation or any other animation that you want to be able to do while moving around.
The UpperBody slot that we created and assigned in our Animation Montage can be assigned in other Animation Montages as well. Since our AnimGraph has the Slot node assigned, whenever we call to play an Animation Montage that has that slot assigned, it will get played with our defined settings.


