Choose your operating system:
Windows
macOS
Linux
One way you can improve the realism in your character's movement is to provide dynamic animations for items that they may be carrying or wearing. With AnimDynamics those pieces that you would expect to move around as you move in real life (hair, necklaces, bracelets, swords, pouches, etc.) will bounce around and move while your character moves.
In this How-to we will apply AnimDynamics to a character to achieve the effect seen below:
Above, the character has AnimDynamics applied to the harness and furnace that is being carried around the character's neck. As the character moves, the harness shifts slightly while the furnace has a bit more movement forwards/backwards. The amount of movement can be adjusted via the Details panel of the AnimDynamics node to achieve the effect you are looking for. Additional constraints can be added as well to manipulate just how the bones move.
If you already have a character with an AnimBlueprint and bones ready to drive with AnimDynamics, you can proceed to step 2.
1 - Required Setup
Before we get started with applying dynamic animations to our character we need to set up the character we wish to use. The template characters do not have any dynamic bones we can use so we will retarget animations from the template character over to an Infinity Blade character who has bones that we can influence with AnimDynamics.
For this guide, we created a New Project using the Blueprint Third Person template.
We then added the Infinity Blade: Adversaries pack which is available for free on the Marketplace to the project.

With your Blueprint Third Person based template project open and the Infinity Blade assets added:
-
In the Content Browser under Content/Mannequin/Character/Mesh , open the UE4_Mannequin_Skeleton asset.
![1_OpenMesh-2.png]()
-
Click the Retarget Manager button, then under Select Rig assign the Humanoid rig.
![2_SetRig-2.png]()
We are going to retarget this character's AnimBlueprint and Animations to an Infinity Blade character.
-
In the Content Browser navigate to and open the SK_Master_Grunt_Skeleton in the Infinity Blade Adversaries folder.
![3_OpenGrunt-1.png]()
-
Click the Retarget Manager button, then select Humanoid under the Select Rig option.
-
For each node on the Rig, assign a Bone from the Skeleton.
![4_AssignBones-1.png]()
The full assignment is shown in the table below.
Node (Rig)
Bone (Skeleton)
Root
b_MF_Root
Pelvis
b_MF_Pelvis
spine_01
b_MF_Spine_01
spine_02
b_MF_Spine_02
spine_03
b_MF_Spine_03
clavicle_l
b_MF_Clavicle_L
upperarm_l
b_MF_UpperArm_L
lowerarm_l
b_MF_Forearm_L
hand_l
b_MF_Hand_L
clavicle_r
b_MF_Clavicle_R
upperarm_r
b_MF_UpperArm_R
lowerarm_r
b_MF_Forearm_R
hand_r
b_MF_Hand_R
neck_01
b_MF_Neck
head
b_MF_Head
thigh_l
b_MF_Thigh_L
calf_l
b_MF_Calf_L
foot_l
b_MF_Foot_L
thigh_r
b_MF_Thigh_R
calf_r
b_MF_Calf_R
foot_r
b_MF_Foot_R
Before we proceed with retargeting, we will adjust the Translation Retargeting to ensure that our animations play correctly.
-
In the Skeleton Tree , click the Show Advanced Options button.
-
Right-click on the b_MF_Root bone and select Recursively Set Translation Retargeting Skeleton .
![5_TranslationRetargetingA-1.png]()
-
Under Translation Retargeting , set b_MF_Root to Animation and b_MF_Pelvis to Animation Scaled .
![5_TranslationRetargetingB-1.png]()
Our Skeleton is set up and we can now retarget the AnimBluperint and Aniamtions from the template character.
-
Navigate to the ThirdPersonAnimBP and Right-click on it and select Duplicate Anim Blueprints and Retarget .
![6_RetargetAnimBP-1.png]()
-
In the Select Skeleton window, select the SK_Master_Grunt_Skeleton asset then choose Retarget .
![7_SetTarget-1.png]()
You can click the Change... button to assign where the retargeted assets are copied to if you like.
-
Navigate to the duplicated assets and rename the new AnimBlueprint to GruntAnimBP .
![8_RenameAnimBP-1.png]()
-
Navigate to and open the ThirdPersonCharacter Blueprint.
![9_OpenThirdBP-1.png]()
-
Click the Mesh in the Components window, then assign the SK_Master_Grunt and GruntAnimBP_C in the Details panel.
![10_AssignNewCharacter-1.png]()
-
Compile and Save , then close the Blueprint.


At this point if you play in the Editor, you should be controlling the Grunt Character who can run and jump with WASD and Spacebar .
Notice the limited movement of the harness and furnace around the characters neck. It appears relatively static and our character would look more natural if these objects moved along with the character's movement.
In the next step we will use the AnimDynamics node to animate the harness and furnace so it reacts to character movement.
2 - Applying AnimDynamics
Now that our character is set up with an Animation Blueprint and has bones that we want to dynamically animate, we can do so from the AnimGraph of our Animation Blueprint with the AnimDynamics node.
In our example, the character is carrying a large furnace around their neck that we want to be animated based on character movement. If you are using your own character, you can follow the steps below and assign the bone(s) you want to drive with AnimDynamics and adjust the settings as desired.
Steps
-
In the Content Browser , open the character's Animation Blueprint ( GruntAnimBP ).
![1_OpenAnimBP.png]()
-
Click MyBlueprint , then AnimGraph to open the Animation Graph.
![2_AnimGraph.png]()
-
Right-click in the graph and search for and add the AnimDynamics node.
![3_AddNode.png]()
The AnimDynamics node takes in an External Force value which is additional force to apply to all bodies in the simulation (this is optional, but may be something to consider). It also takes in the Component Pose which is the reference pose data as well as an Alpha value (the strength with which to apply the skeletal control, where 0 is no strength and 1 is full strength).
-
Copy and Paste the node, then connect the nodes as shown below.
![4_ConnectNodes.png]()
The Local to Component and Component to Local will be automatically created when connecting pose pins.
In our example we are using two AnimDynamics nodes (one to affect the Harness and another to affect the Furnace).
-
Select the first AnimDynamics node in the sequence, then in the Details panel assign the settings shown below.
![5_Furnance1.png]()
The Preview section is all about visualization, which helps to indicate the current limits applied to the movement in the viewport. You can also see Collision Spheres if you are using Planar Limits and CoM (Center of Mass) is not enabled. This is outside the scope of this example but you can experiement with this setting.
The last thing we set is the Bound Bone or bone we are affecting which we set to the furnace bone on our character (this bone affects the Harness).
-
With the node still selected, set the Setup and Constraint sections as shown below.
![6_Furnance1.png]()
The Setup and Constraint sections are where you define the movement and range of movement for the bone driven by AnimDynamics. The Box Extent provides the inertia, the Local Joint Offset defines the pivot point, and Angular Limits provide the rotational range of movement (which is indicated by the preview visualization options when enabled).
Please see AnimDynamics section of Skeletal Controls for more information on Setup and Constraint settings.
-
Click Compile and notice how the harness object tilts to the side.
![6_Furnance1b.png]()
The Angular Limits for the Y axis is quite large right now indicated by the green cone in the picture above. Let's reduce this range.
-
With the node still selected, in the Constraints section, adjust the Angular Limits for Min/Max as shown below.
![6_Furnance1c.png]()
When you Compile this time, the harness should not shift as much to either side (even if you adjust the Speed or IsInAir? settings).
![6_Furnanced.png]()
-
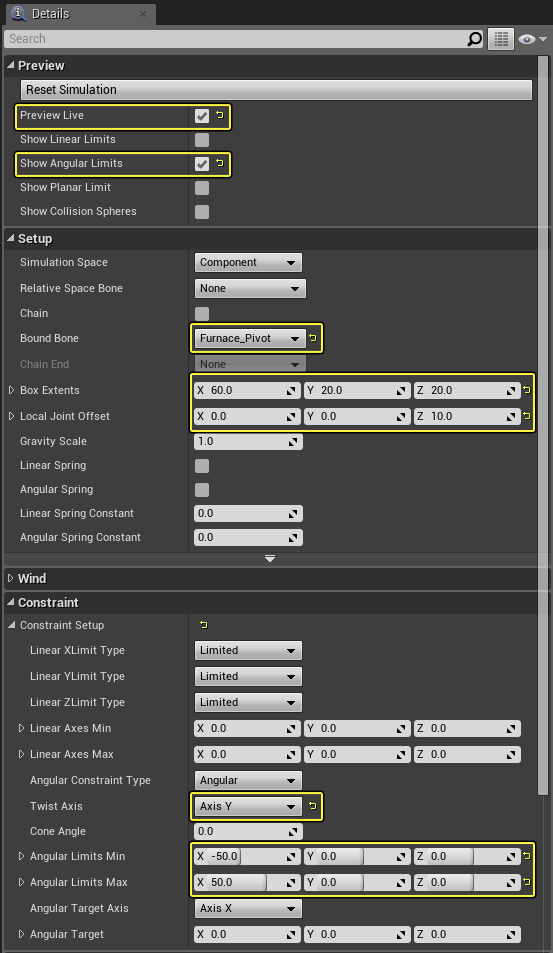
Select the second AnimDynamics node in the sequence and use the following settings.
![7_PotSettings.png]()
Click for full view.
With the settings above, we changed the Bound Bone to now target the Furnace_Pivot bone in our character which affects the furnace object. We also adjusted the Twist Axis so that it twists on the Y axis providing back-and-forth movement instead of side-to-side. The Angular Limits are set to -50 and 50 as the range in which to move.
-
Compile and Save then play in the editor.


End Result
You should now see that the furnace for our example character bounces around as the character moves based on our constraint settings.
Feel free to experiment with the Box Extent and Local Joint Offset values in the Setup section as well as the Linear and Angular Limits in the Constraints section to see how it alters the movement of our bones affected by AnimDynamics.