Choose your operating system:
Windows
macOS
Linux
The Animation Blueprint Linking system is an extension of Sub Anim Instances . It enables dynamic switching of sub-sections on an Animation Graph, making possible both multi-user-collaboration and memory savings, as the Animation Blueprint will no longer load animation assets that are not in use.
In this how-to, we create an Animation Blueprint that retrieves an animation pose contained in a Linked Animation Blueprint by way of an Animation Layer Interface .
The Content Examples project on the Learn Tab of the Epic Games Launcher also contains an example of Animation Blueprint Linking inside the Animation map.
Steps
For this guide, we are using the Blueprint Third Person template with Starter Content enabled. We also added the Animation Starter Pack , which is available for free in the Marketplace on the Epic Games Launcher for the project.
-
Inside your project, under Content > AnimStarterPack , add the Ue4ASP_Character to the Level. In the Details panel, set Auto Possess Player to Player 0 .
![AnimationLayer_01.png]()
This will let you control this character when you play in the Editor.
-
Right-click in the Content Browser . Under Animation , create an Animation Layer Interface asset called MyLayerInterface .
![AnimationLayer_02.png]()
These assets are analogous to Blueprint Interfaces , and you can use them to define the number of Layers, their names, and which groups they belong to, as well as any inputs.
-
Inside the MyLayerInterface asset, name the Layer ExampleLayer . In Details panel, click the + (plus) sign to add an Input , then click Compile .
![AnimationLayer_03.png]()
Animation Layers can expose multiple input poses from sub-graphs along with input parameters that can be used for blending or other logic-based implementation purposes.
-
Create an Animation Blueprint using the UE4_Mannequin_Skeleton (from the Animation Starter Pack folder), and name it HitReact_AnimBP .
![AnimationLayer_04.png]()
This is the Animation Blueprint that we will be linking to the existing Animation Blueprint used for the character we placed in the Level earlier in this guide.
-
Inside the HitReact_AnimBP on the toolbar, click the Class Settings button, then in the Details panel, under Interfaces , add the MyLayerInterface .
![AnimationLayer_05.png]()
-
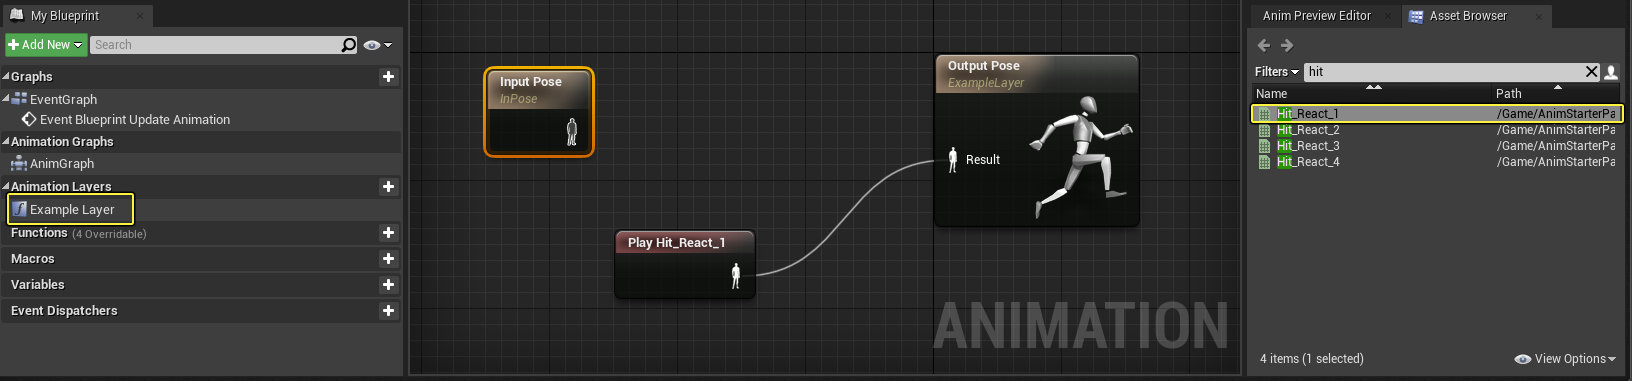
In the Example Layer , add the Hit_React_1 animation from the Asset Browser to the graph and connect to the Output Pose .
![AnimationLayer_06]()
The Input Pose from the Layer Interface can bring in pose data, and can be used to blend with any logic or other pose data defined within this layer.
-
In the Content > AnimStarterPack folder, open the UE4ASP_HeroTPP_AnimBlueprint and add the MyLayerInterface from the Class Settings .
![AnimationLayer_07.png]()
-
In the Example Layer , connect the Input Pose to the Output Pose as shown below.
![AnimationLayer_08.png]()
The Input Pose, in this case, comes from the Linked Anim BP (where we placed our Hit React animation). For this example, we are going to take the pose from the Linked Animation Blueprint directly and switch to it.
-
On the Anim Graph , add a Linked Anim Layer node (set to Example Layer ) and connect as shown.
![AnimationLayer_09.png]()
The Default state machine will pass a pose through the Linked Animation Layer and out to the Output Pose . When Link Anim Class Layers is called, the underlying Animation Blueprint will be executed.
The Linked Anim Layer node has an Instance Class property that you can use to specify a default Layer override. This is especially useful when you want to break up your logic into multiple Animation Blueprints. For example, if you have some IK logic that gets changed frequently, you can move it out to a separate Animation Blueprint and set it to run by default in your main Animation Blueprint.
-
In the Content > AnimStarterPack folder, open the Ue4ASP_Character Character Blueprint.
-
Add an H keyboard event (or any other keyboard event), then drag in the Mesh component and add both the Link Anim Class Layers and Unlink Anim Class Layers nodes set to HitReact_AnimBP .
![AnimationLayer_10.png]()
When H is pressed and held, the Linked Anim BP specified as the In Class will be set up as a linked instance and executed. When releasing H, any Layer nodes running the specified class will be unlinked and reset back to its default value.
Optionally, we also added a C keyboard event for the crouch to resolve the warning message.
-
Compile and Play in the editor.


End Result
Below, our Animation Blueprint executes normally until we press the H key to activate the Layer Node and the underlying Animation Blueprint setup (which plays a Hit React animation).
Animation Layers and Linked Animation Blueprints may provide a way to maintain scalability and organization within complex characters. With Layers and Linked Animation Blueprints, logic can be sectioned off within an Animation Blueprint through a layer, or split off entirely in another Animation Blueprint and linked from within a Master Animation Blueprint.
Additional Use Case
Below, a simplified use case for Linked Anim Layers utilized on Fortnite is shown.

In the image above, we have two interfaces—one for weapons, and andother for vehicles. It is possible to have both active at the same time.
It is also possible for a single Animation Blueprint that implements one of these interfaces to override multiple points of the graph (for example, a weapon overriding
WeaponUpperBody
and
WeaponAdditive
).
Here are some possibilities with the above setup:
-
When driving a car, the vehicle takes over the entire pose.
-
When riding shotgun, the vehicle plays a seated animation on the lower body while the weapon controls the upper body. If the user changes weapons, a new weapon Animation Blueprint will control the upper body while the lower body continues to play from the vehicle.
-
A weapon can override the upper body pose, which will then be combined with the lower body pose from the main graph, then a custom additive animation (for example, idle noise) will be played on top of the full body pose from the weapon.
In Fortnite, weapons can override a bunch of different points in the main graph. For example, a State Machine for locomotion with states like Jump, Fall, Land, and Zipline, is used.
Rather than duplicating this State Machine for each weapon, the State Machine lives in the main graph, and weapon Animation Blueprints have a Layer they can override for each state.
If a weapon doesn't need to override some states, it simply doesn't connect anything to the output pose in the corresponding Layer.
Additionally, Animation Blueprints containing Layers have their own Event Graphs. So if we need to process data for a specific vehicle, we can keep it contained in that vehicle Animation Blueprint's Event Graph.