Choose your operating system:
Windows
macOS
Linux
While the Control Rig is the scriptable rigging system, Control Rig Blueprints are the Assets where you provide your scripted functionality and set up the rigging parameters. After enabling the Control Rig Plugin, you can create a Control Rig Blueprint from the Content Browser from the Add New button (or right-click context menu) under Create Advanced Asset > Animation > Control Rig .

After creating the Asset, you will be prompted to select a Parent Rig:

Usually, you will want to select the base class
ControlRig
and click
Create
. Any Control Rig Blueprints that you create can be assigned as the Parent Rig. This enables you to inherit any functionality defined within the parent in your new Control Rig Blueprint. After assigning a name to your new Control Rig Blueprint and double-clicking to open it up, you will be presented with the main Control Rig Editor.
Control Rig Editor UI

-
Menu / Main Toolbar - These are the same as the Blueprint Editor and provide easy access to common commands needed when editing, such as Saving and Opening Assets, showing or hiding various Rigging Editor Windows, Compiling the Control Rig Blueprint, assigning various Class Settings and Class Default properties.
-
Viewport - The Viewport is similar to the Animation Editor Viewport and provides the ability to change various Viewport Options, View Modes, Show and Character Options, and LOD options.
-
Rig / Hierarchy - The Rig tab enables you to add new Rig Units while the Hierarchy tab enables you to import a Skeletal Mesh to use as the Hierarchy. On the Hierarchy tab, you can also add new joints, rename or remove joints from the right-click context menu.
-
Event Graph / Rig Graph - The Event Graph is similar to the Event Graph featured in the Blueprint Editor and provides a way to execute script at runtime to drive parameters. The Rig Graph is similar to the AnimGraph of an Animation Blueprint in that it enables you to set up various types of animation related node networks. In the Rig Graph however, nodes are referred to as Rig Units .
-
Details / Preview Scene Settings - The Details panel (like the Blueprint Editor's Details Panel) enables you to edit and change property values on Rig Units and Variables. The Preview Scene Settings panel grants access to tools that enable you to quickly change the way your scene looks in the Viewport and functions similar to the Animation Editor's Preview Scene Settings tab.
Importing a Skeletal Mesh Hierarchy
If it is a Skeletal Mesh you wish to manipulate with the Control Rig system, the quickest way to get up and running is to import the Skeletal Mesh
Hierarchy
into the Control Rig Blueprint.
To do this, right-click in the Hierarchy panel and select
Import
. From the Import roll-out menu, click the
None
drop-down box and select the Skeletal Mesh hierarchy you wish to import.

The system will automatically create the Hierarchy based on the Skeleton associated with the selected Skeletal Mesh. The naming convention can be set in the Control Rig window of the
Mesh Editor (Window > Control Rig)
which enables you to configure the mapping configuration for the selected Control Rig.

After importing a Skeletal Mesh, the Joint Hierarchy for the mesh will be displayed:

Right-click on a Joint to provide additional contextual options:

In the Joint context menu, you can add a new Joint as a child of the selected Joint, delete the Joint, duplicate the Joint, rename the Joint, or import additional Meshes to add to the Hierarchy.
After importing the Skeletal Mesh and generating the Hierarchy, you will need to assign the Skeletal Mesh as the
Preview Mesh
to see it inside the Viewport. You can do this from the
Preview Scene Settings
tab.

After importing your Skeletal Mesh Hierarchy and assigning the corresponding Preview Mesh, you will want to click the Compile button to compile your Blueprint. This will enable you to properly get a reference to the Hierarchy you have created inside the Rig Graph where you can start to manipulate the Joints with Rig Units.
Control Rig Graph
Once you have generated a Hierarchy for the Control Rig, you can manipulate the Joints inside the Rig Graph by getting a reference to the Hierarchy and using various Rig Units to drive those Joints as desired. From the right-click context menu, search for Rig Hierarchy Ref (you can also locate it under the New Variable > Structure category of the context menu).

You can rename the Variable inside the
Details
panel. Below we name it
Base_Hierarchy
.

With a reference to the Hierarchy, you can use different
Rig Units
to perform operations on or manipulate the Joints.
Types of Rig Units
There are several different types of Rig Units, which are mostly classified into two categories:
-
Operators - These consist of Data Types, Math Expressions or Motion Systems (Constraints, FKIK, IK Spline and similar types).
-
Manipulators - These are special types of Rig Units that enable you to control a Transform from an external source (giving you the ability to animate or manipulate Joints).
Inside the graph, right-click to access the context menu, where you will see the following sections of Rig Units:

Example - Two Bone IK / FK
Suppose we wanted to set up and move a character's arms. We can do this with a reference to our Hierarchy, a
TwoBoneIK/FK
to define the Joints and a
Control Rig
Unit to control those Joints.
You can find the TwoBoneIK/FK Rig Unit under the Transforms section.

On the
TwoBoneIK/FK
Rig Unit, you can define the
Start Joint
and
End Joint
as well as assign the
Hierarchy Ref.
Below, we connect the Rig Hierarchy Reference variable (which we have called Base Hierarchy).

With this setup, we are looking to manipulate the following Joints in our Hierarchy:

The Transform to use as the target is referred to as the
End Effector
and has a pin available on the
TwoBoneIK/FK
Rig Unit. The Transform will be driven by a dedicated
Control
Rig Unit.
Below, we use the
Control
Rig Unit and plug the
Result
pin into the
End Effector
on our
TwoBoneIK/FK
. We also for clarity, rename the Control to RightArm_Effector as this will be the Control used for driving the Right Arm.

You can now select the Control, then in the Viewport manipulate it by moving the widget. You could also add a second Control as the
Pole Target
(as we've done in the video below) to control the rotation of the arm. The Pole Target only takes in location. You can expand additional parameters on the Rig Unit by clicking the expand icon next to
Result
(which enables us to take the
Translation
pin and plug it in to the Pole Target).
When you Compile your Blueprint, you may notice (in this example) the arm snap back to the origin point. You can provide the initial transform for the Control Rig Units by supplying the Init Transform information.
From the
Rig Hierarchy Ref
, using
Get Joint Transform
you can specify which Joint you want to get Transform information from (for example the End Joint or hand_r in our example). Below we use the hand_r
Initial
transform data as the Control Rig Units
Init Transform
.

While this setup will enable you to control the right arm of the character, if you wanted to control the left arm, you could duplicate the Rig Unit network and change the Start/End Joints to the left arm.
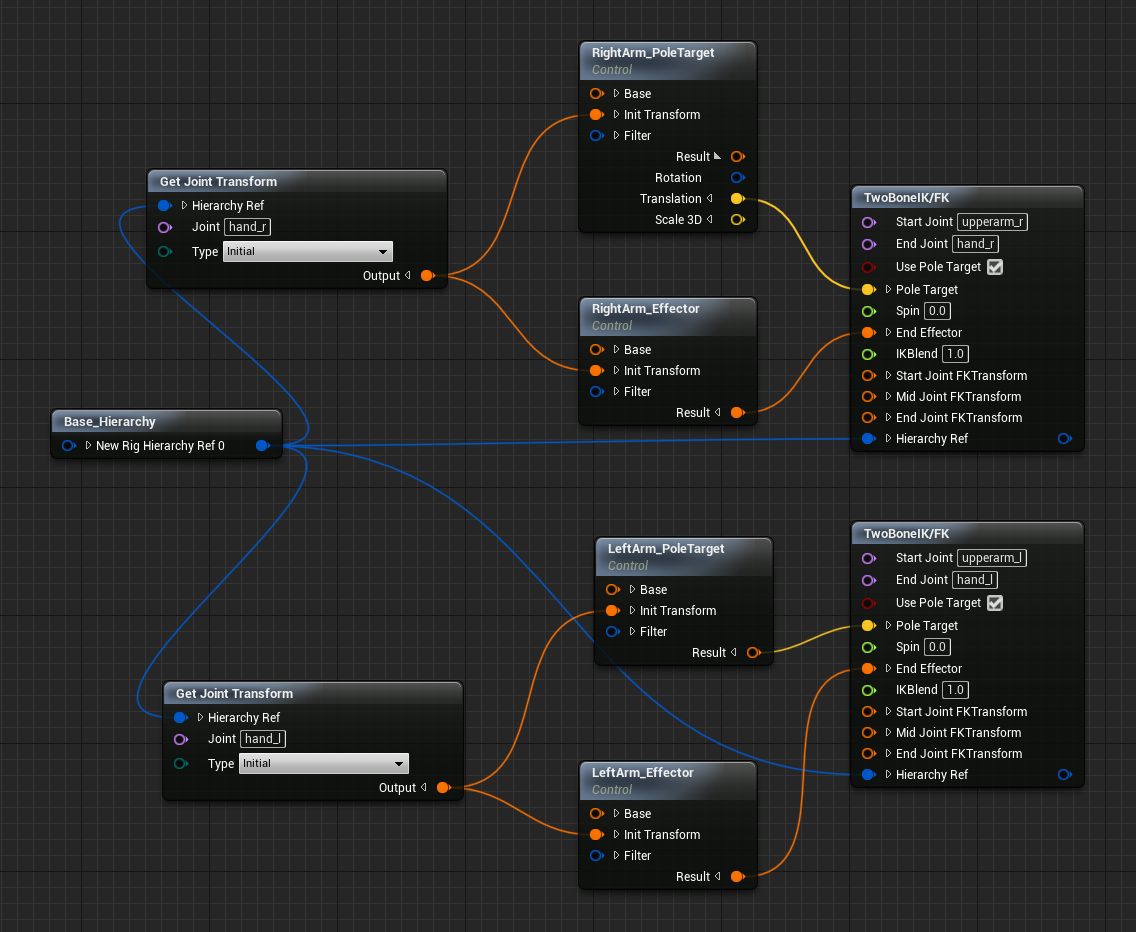
Click image for full view.
Example - Apply FK
If you want to control an individual Joint, you can use the
Apply FK
node, a reference to the Hierarchy and a
Control
Rig Unit (similarly to the Two Bone IK/FK example).

On the
Apply FK
Rig Unit, we are applying the Transform in
Global Space
. The Joint we are affecting here is the neck_01 (neck Joint of our character). By adding the
Control
Rig Unit as the Transform, we can manipulate the Joint in the Viewport using the widget.