Choose your operating system:
Windows
macOS
Linux
Live Link provides users with the ability to stream various types of data from a variety of sources and apply that data directly to Actors within their level. To improve these workflows, Unreal Engine 4 (UE4) uses several features designed to streamline the process of applying Live Link data to the Actors in your level.
-
Live Link Presets save your source settings for later use.
-
The LiveLink Controller Component enables using LiveLink controllers. These simplify applying Live Link information to your Actors and several Blueprint nodes have been added to facilitate gathering this data.
-
The LiveLink Skeletal Animation Component exposes the OnLiveLinkUpdated event node which retrieves information on Subjects and Sources every time Live Link updates, and can perform a number of other functions through Blueprint.
For more information on enabling Live Link and setting up your connections, please see the Live Link Plugin documentation.
Prior to UE version 4.23, the LiveLink Skeletal Animation Component was called the Live Link Component .
Live Link Presets
UE4 obtains Live Link data from a variety of sources created in the Live Link Connection window. Once created, these sources can be saved as Presets and accessed via Blueprints using the Apply to Client node.

Using this node, a Live Link preset can load when your application launches.
Live Link presets can also be activated via the Presets button in the Live Link panel or in the Project Settings by setting the Default Live Link Preset in the Plugins - Live Link section of the menu. A preset may also be applied via command line using ‘LiveLink.Preset.Apply Preset=/Game/Folder/MyLiveLinkPreset.MyLiveLinkPreset'.
Live Link Components
Live Link Skeletal Animation Component
When you add a Live Link Skeletal Animation Component to an Actor Blueprint from the Components panel, it doesn't get parented to other Components. It sits inside your Blueprint and gives you access to the On Live Link Updated Event .

The On Live Link Updated event is triggered any time the Component is updated, including inside the Editor.

The On Live Link Updated node effectively takes the place of your Tick Event , but it runs inside the Editor as well. For example, if you want to drive some data live inside the Editor, this node will support that.
Live Link Controller Component
The Live Link Controller Component is a component that sits inside of your character Blueprint and provides the ability to use Live Link Controllers. These controllers automatically fetch data from your Live Link subject and apply it to a corresponding component in your Actor via a Live Link Controller.

Using a Live Link Controller
Live Link controllers provide a quick method of taking Live Link data and pushing it to an Actor in your scene. Each controller consumes data from a Live Link subject and applies it automatically to the actor of your choice. Controllers come in three different varieties defined by the role:
-
Transform
-
Camera
-
Light See below for details on the different Live Link controllers.
Transform
The Transform controller quickly captures and applies transform data from a Live Link subject to an Actor in your level.

This controller provides the following options:
|
Setting |
Description |
|---|---|
|
World Transform |
Sets the transform of the component to world space. Uncheck for local space. |
|
Use Scale |
Uses scale data from Live Link. |
|
Sweep |
Sweeps the root component and checks for blocking collision, triggering overlaps along the way and stopping short of the target if blocked. |
|
Teleport |
Teleports the physics state (if physics collision is enabled).
|
Camera
The Camera controller applies camera settings and movement data directly from a Live Link subject with the camera role to a Camera Actor in your level.

Camera settings that can be animated include:
-
Field of View (in degrees)
-
Aspect Ratio (width / height)
-
Focal Length
-
Aperture of the camera in terms of f-stop
-
Focus distance of the camera in cm (works only with manual focus)
-
Projection mode of the camera (perspective, orthographic, etc)
Light
The Light controller applies Light settings directly from a Live Link subject with the Light role to a Light Actor in your level.

Light settings that can be animated include:
-
Color temperature (in kelvin).
-
Total energy (in lux).
-
Filter color.
-
Inner cone angle (in degrees for a spotlight).
-
Outer cone angle (in degrees for a spotlight).
-
Light visible influence (for pointlight and spotlight).
-
Soft radius for light source shape (for pointlight and spotlight).
-
Length of light source shape (for pointlight and spotlight).
Additional controllers may be added or created using external plugins. For more information on external Plugins, please see our Plugin documentation.
Applying a Controller to an Actor
Applying a Live Link Controller begins with adding the Live Link Controller component to your Actor:

This section requires that you have connected to a Live Link source. For more information on connecting to your source, please see our Live Link Plugin documentation.
Use the following steps to add the component through the Details panel:
-
Select the Actor in your level.
-
In the Details panel click the + Add Component button and search for the Live Link Controller component.
-
Once added, select the component from the component list and open the Subject Representation drop down menu. Select the subject from the list that you want to use as the source of data for this Actor. Unreal will select the Component to Control for you based on your selection. This can be adjusted if needed.
With the controller set up, your Actor will begin receiving data from the selected Live Link subject automatically.
Common Blueprint Nodes
Live Link data can be accessed via a variety of Blueprint nodes.
Get Live Link Subjects
There are times when you will need to get a list of Subjects to use with the Evaluate Live Link Frame node. When this happens, you can use Get Live Link Subjects :

This returns an array of Subjects that the Evaluate Live Link Frame function will find valid.
Evaluate Live Link Frame
Calling the Evaluate Live Link Frame function enables you to get the Live Link data associated with the provided Subject Name. This function gives you execute pins for whether the current frame is valid or not, as well as static and frame data that can be accessed from the Data Result output. This data is determined by the type of Role chosen to evaluate the subject.
The example below shows data being accessed directly from the data structure pin.

Using Data from Evaluate Live Link Frame
Evaluate Live Link Frame opens the way to using several Blueprint functions to evaluate the data that it provides. The resulting data depends on the Role being evaluated. When the Animation Role is evaluated, you see the following:
-
Get Basic Data
-
Get Curves
-
Get Metadata
-
Get Root Transform
-
Get Transform by Index
-
Get Transform by Name
-
Number of Transforms
-
Transform Names
Get Basic Data
The Get Basic Data node returns the base structure of the Subject that is stored in the current Subject frame.
Get Curves
The Get Curves function enables you to get all the Blend Shapes or Animated Curves and returns a Map of the Name to Value for each entry.

You could use a
Find
and enter a Name to retrieve the value of a curve (or use the boolean to determine if it was found or not).

Get Metadata
The Get Metadata function returns the Subject Metadata structure stored in the Subject Frame which you can break apart to retrieve information:

String Metadata is a Map to named strings on the subject, for example you may want to pass through the type of an object being streamed as a named string. Also included with the metadata is the Scene Timecode and Scene Framerate , whose structures you can break to obtain the information you need.
|
Output |
Description |
|---|---|
|
String Metadata |
A map of named strings used to provide additional information about a frame or subject, for example "Type": "Camera". |
|
Scene Timecode |
Timecode value associated with the current frame.
This is not guaranteed to be unique, for example editing a single frame in MotionBuilder will result in that frame's timecode being sent for multiple frames. |
|
Scene Framerate |
Corresponding Framerate to the Scene Timecode. |
Get Root Transform
The Get Root Transform function will return the Root Transform for the Subject Frame as a Live Link Transform (or the identity if there are no transforms).

This returns a Live Link Transform instead of a standard Transform as you can call additional functions on it (outlined below):
|
Function |
Description |
|---|---|
|
Child Count |
Returns the number of Children for a given Live Link Transform. |
|
Component Space Transform |
Returns the Transform value in Root Space for a given Live Link Transform (relative to the root of your model). |
|
Get Children |
Returns an array of Child Live Link Transforms for a given Live Link Transform. |
|
Get Parent |
Returns the Parent Live Link Transform if one exists or an Identity Transform if no Parent exists. |
|
Has Parent |
Returns whether a given Live Link Transform has a Parent Transform. |
|
Parent Bone Space Transform |
Returns the Transform value in Parent Space for a given Live Link Transform (how it's stored internally and relative to whatever the Parent bone is). |
|
Transform Name |
Returns the Name of a given Live Link Transform. |
Get Transform By Index
The Get Transform By Index function returns the Live Link Transform stored in a Subject Frame at a specified index (the function returns an Identity Transform if the Transform Index is invalid).

Get Transform by Name
The Get Transform by Name function is similar to Get Transform by Index but takes in Transform Name data.

Number of Transforms
The Number of Transforms function returns the number of Transforms within the Subject Frame.

One use case for this would be to use it in conjunction with the Get Transform By Index to loop through and retrieve each of your Live Link Transforms (similar to the example below):
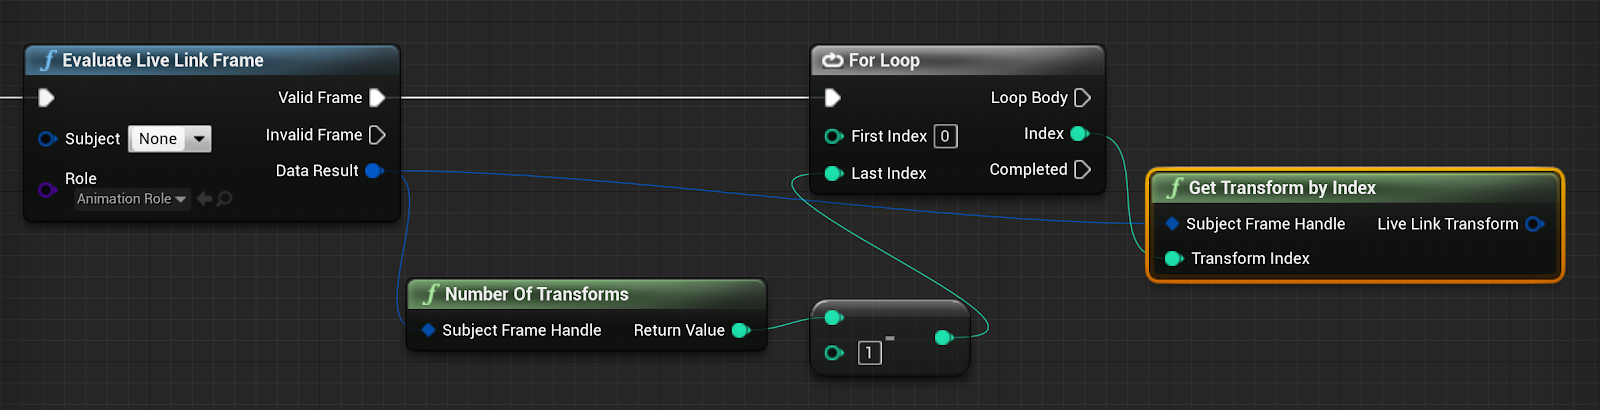
Click image for full view.
Get Transform Names
The Get Transform Names function returns an array of names for all the transforms in a frame.

Applying a Live Link Preset with Blueprints
A common use of Blueprints with Live Link is to use the Apply to Client node to assign a Live Link preset to a Skeletal Mesh at runtime:
-
Start by creating your Live Link preset in the Live Link Panel. For more information on presets, please see our Live Link Plugin documentation.
-
In your character blueprint, create a reference to your preset by making a new variable and setting the Variable Type to Live Link Preset in the Details panel.
-
Compile your Blueprint and set the default value of your new variable to your saved Live Link Preset.
-
Drag your variable into your Blueprint and choose Get from the menu.
-
Drag off from the variable and search for the Apply to Client node.
-
Connect the Event Begin Play node to Apply to Client .