Choose your operating system:
Windows
macOS
Linux
Animation Notifications ( AnimNotifies or just Notifies ) provide a way for animation programmers to setup events to occur at specific points during an Animation Sequence . Notifies are commonly used to add effects like footstep sounds during a walk or run animation or spawning a particle system during animation. However, they can have any number of different uses, as the system can be extended with custom notification types to cater to the needs of any type of game.
Add Notify...

Different types of Notifies cause different events to be triggered. Camera effects, particle effects, sounds, for example can all be triggered at any point during an animation through the use of a Notify. Adding a Notify can be done by right-clicking on a Notify Track at the point in the animation you want the Notify to occur, and then choosing the type of Notify to add.
For more information on adding/editing Notifies, see the Animation Sequence Editor page.
Skeleton Notifies
Skeleton Notifies serve as a catch-all for anything an artist may want to do within a Animation Blueprint at a certain point in an animation. They are created by right-clicking on a Notify track, choosing Add Notify... then selecting New Notify... from the context menu.

You will be prompted to enter a name for the newly created Notify.

All of your created Skeleton Notifies will be displayed under the Skeleton Notifies menu.

Selecting a Skeleton Notify will added it to the Notifies Track.

Skeleton Notifies enable you to create a Notify Event of the same name in the Event Graph or Transition Graphs in the State Machine for a Skeletal Mesh's Animation Blueprint . To add your Skeleton Notify, right-click anywhere in your Event or Transition Graphs and select your Notify from the Add Anim Notify Event menu.
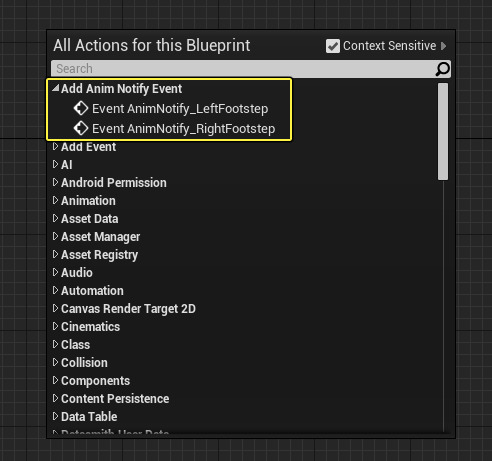
An Event node will be added to the Graph which will be executed when the Notify is called from the animation it resides in.

Clothing Simulation Notifies
There are several native Notifies that can be added to control Clothing Simulation at a given point in an animation.

-
Pause Clothing Simulation will pause the simulation of clothing.
-
Resume Clothing Simulation is used to continue simulation of clothing after having been paused.
-
Reset Clothing Simulation will initialize clothing simulation back to its default state.
Below is an example video illustrating the use of Clothing Simulation Notifies.
Play Particle Effect
The Play Particle Effect Notify spawns and plays a particle system at a given Socket location and at a specific point along an animation's timeline. This is useful for such effects as causing a cloud of dust to appear around a player's feet when they move, fire to spew from an exhaust pipe when the player uses a Nitro-Boost power-up, or other such effects.

A Play Particle Effect Notify does not use the Animation Blueprint to control behavior. Instead, it uses a few properties defined in the Details panel to determine what Particle System is used and from what Socket the particles will originate.

|
Property |
Description |
|---|---|
|
PSTemplate |
This holds the particle system that will be spawned at the Notifies set point in time. |
|
Socket Name |
This contains the Skeletal Mesh socket that will be used as the spawn point for the particle system. |
|
Attached |
Determines if the effect should attach to the bone/socket. |
|
Location Offset |
Location offset from the socket. |
|
Rotation Offset |
Rotation offset from the socket. |
|
Notify Color |
Changes the color of the Notify on the Notify bar. |
Once set up, the associated Particle System will play, using the Socket location as the spawn point.

Play Sound
The Play Sound Notify provides a simple means to get your sound effects synced with animation. Much like Play Particle Effect, this Notify has properties that can be set in the Details panel, which allow for fast and easy sound effect setup. This is useful for such things as mechanical sounds when a robot moves, the rustle of cloth during character motion, and similar types of effects.

The Play Sound Notify uses the following properties defined in the Details panel to determine what sound effect is used and from what Socket or Bone the sound will originate.

|
Property |
Description |
|---|---|
|
Sound |
This is the sound asset to play. |
|
Volume Multiplier |
This scaling multiplier is applied to the volume of the sound effect. |
|
Pitch Multiplier |
This scaling multiplier is applied to the pitch of the sound effect. |
|
Follow |
If checked, the sound effect source will follow the Static Mesh as it moves. If unchecked, the sound remains behind at the location it was spawned. |
|
Attach Name |
This contains the Skeletal Mesh socket or bone that will be used as the spawn point for the sound effect. |
|
Notify Color |
Changes the color of the Notify on the Notify bar. |
Reset Dynamics
The Reset Dynamics Notify can be used to restore any AnimDynamics that are applied to the Skeletal Mesh, back to their original state when called upon from the animation.

You can also change the color of this Notify in the Notifies Track window through the Details panel.

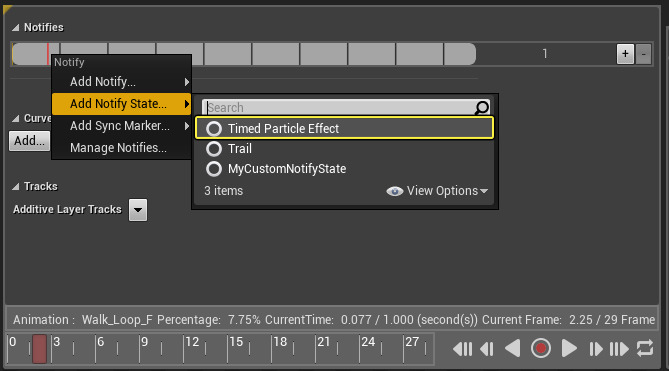
Add Notify State...

Anim Notify States ( Notify States ) work much like the standard Notifies above. They have 3 distinct events: a begin, a tick, and an end. They start straightforward, firing at the moment the Notify begins and ends, and the Event Graphs in them fire off when their time comes up in the animation. The tick fires off every animation update until the end event is hit. The major difference between normal Notifies and Notify States is that Notify States are self-contained Blueprints .
Additional things to considered with Notify States:
-
You are guaranteed to start with a Notify Begin Event.
-
You are guaranteed to end with a Notify End Event.
-
You are guaranteed to have Notify Tick wrapped between a Notify Begin and a Notify End event.
-
The order between different Anim Notifies (normal or state) is not guaranteed. If you put two Anim Notify States next to each other, the first one is not guaranteed to end before the next one starts. Only use this for individual actions which do not rely on other Notifies.
-
Negative play rates are supported. Notify Begin is still called first regardless, and Notify End called last.
If you are modifying something every frame, it should go in the Tick Blueprint. If you need to set variables, flags, or properties, to some value before the ticks hit, it should go in the Begin Blueprint. And finally, the End Blueprint can be used to change variables, flags, or properties after the final tick hits.
Timed Particle Effects
The Timed Particle Effect is very similar to the Play Particle Effect Notify in that they both allow you to play a Particle Effect at any given point in an animation, the difference however is that with a Timed Particle Effect, you are given the ability to define the length of the effect inside the Notify itself.
In the image below, a Timed Particle Effect is assigned to an animation. By left-clicking on the handle bar at the end (or at the start), you can drag to increase or decrease the length of the effect.

The properties of a Timed Particle Effect are the same as the Play Particle Effect Notify and can be adjusted inside the Details panel.
Animation Trails
Animation Trails (or AnimTrail for short) are emitters that allow you to leave trails behind moving objects in a scene. They do this by sampling the positions of two sockets on a Skeletal Mesh each tick and stitching triangles between the sockets, down the length of the trail.

Below is an example of Animation Trails in use with an animated character.
To use an AnimTrail emitter you must:
-
Create a Particle System that contains an emitter with AnimTrail type data.
-
Create and add a Notify State of the Trail type to an animation.
Once you have added an AnimTrail, you can adjust its properties from the Details panel:

|
Property |
Description |
|---|---|
|
PSTemplate |
This is the particle system containing the anim trail that was described above. |
|
First Socket Name |
This is the name of the first Bone/Socket defining the trail. |
|
Second Socket Name |
This is the name of the second Bone/Socket defining the trail. |
The above properties are required but the below are optional. They allow you to alter the width of the trail during the animation. You could also attach the trail to sockets that move as you need but this may not be ideal. This method is based on providing a width scale value. A width scale of 1.0 will keep the trail the same width, 0.0 will cause a trail of zero width.
|
Property |
Description |
|---|---|
|
Width Scale Mode |
This alters the way width is applied. The pictures below show how this works. The example shows a Sine like curve going from 0 to 1 in the middle and back to 0 again. |
|
Width Scale Curve |
The width value comes from a curve sampled each tick. This property is the name of that Curve. See below for details on creating that curve. |

The left image depicts From Centre which scales outwards from center, the middle image shows From First Socket which scales away from the first socket and the right image demonstrates From Second Socket which scales away from the second socket.
There are also some debug rendering options available:
|
Property |
Description |
|---|---|
|
Render Geometry |
This toggles the rendering of the main trail geometry. |
|
Render Spawn Points |
This toggles the debug rendering of the primary spawn points for the trail. i.e. the positions sampled from the sockets at each tick. |
|
Render Tangents |
This toggles the debug rendering of the curve tangents. |
|
Render Tessellation |
This toggles debug rendering of all vertices on the curve. This shows how the curve is tessellated between the spawn points. |
You can also change the Notify Color to change the color used in the Notify Track window.
Custom Notify States
Creating Custom Notify States (which are the same as the native Notify States but are custom Blueprints that you can provide any logic you need to occur during an animation) is done the same as adding a regular Notify.Before you can use a custom Notify State, you must first create a Blueprint Class of the Anim Notify State class. Once created, right-click in the Notify Track of an animation and select Add Notify State... then select your custom Notify.

An AnimNotifyState Blueprint Class called MyCustomNotifyState (above) was created so that we may select it as the Notify State to use in our animation. Once you have created your Anim Notify State Blueprint, you can open it and begin implementing the functions that determine how your Notify is used (below).

It is not necessary to implement every function, but at the bare minimum you should implement Received Notify Tick or both Received Notify Begin and Received Notify End . If implementing just Received Notify Begin or Received Notify End , you could simply use a standard Animation Notify.
Below is the Notify Begin override:
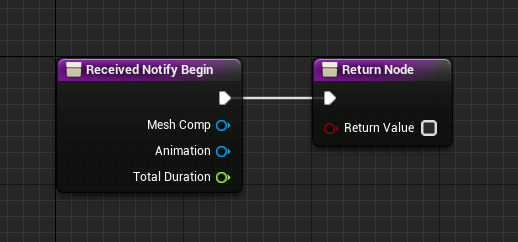
Below is the Notify End override:

Below is the Notify Tick override:

Below is a description of how each pin type is used in the override functions:
|
Pin |
Description |
|---|---|
|
Mesh Comp |
This is the Skeletal Mesh Component of the Animation Sequence or Montage that is triggering this Anim Notify State. |
|
Anim Seq |
This is the specific Animation Sequence that is triggering this AnimNotifyState. |
|
Frame Delta Time |
Only in the Received Notify Tick function, this will give you the time since the last animation update. |
There is currently no way to retrieve the length of the Anim Notify State within a Blueprint.
Add Sync Marker...
If you are looking for a way to keep related animations synchronized with one another, you can use
Sync Groups
. Animations can also be synchronized using
Sync Markers
within the related animations. To add a Sync Marker, right-click in the Notifies Track window and select
Add Sync Marker...
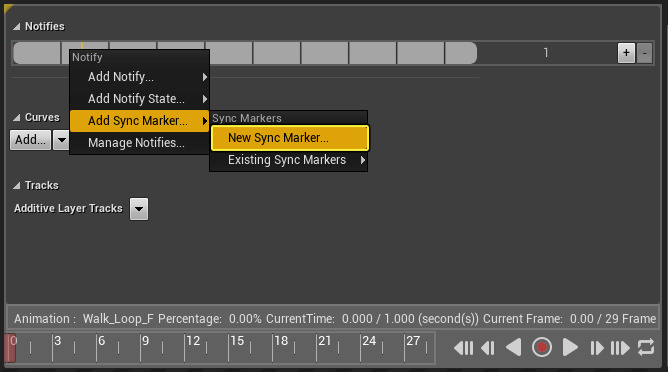
You will be prompted to enter a name for your Sync Marker:

After entering a Sync Marker Name, you will find it under the Existing Sync Markers sub-menu.
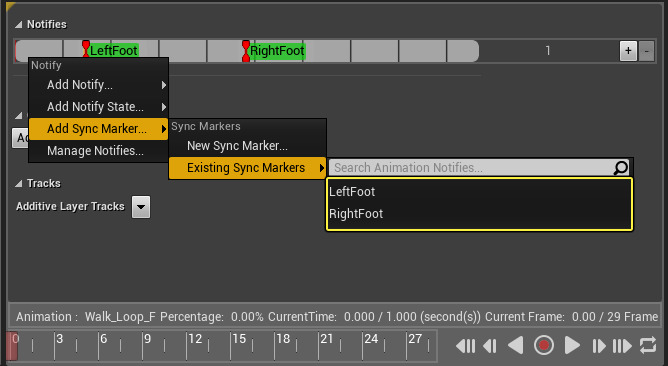
You can then add your created Sync Markers to other animations.
Some elements to consider when working with Sync Markers:
-
Only animations within the same Sync Group are synced, and the Leader drives the positions of followers within the same Sync Group.
-
The play rate is always that of the master animation (play rate adjustment is currently not available).
-
Only markers common to all animations within a group are synced.
-
For example, if one animation is missing the "Right Foot Down" markers, those markers will be ignored for all animations when determining that frame's position.
-
-
Position is synced based on the relative position of the Leader with respect to its common markers.
-
For example, if the Leader is 25% of the way between its left and right foot markers, the followers will be synced to 25% of the way of their respective left and right markers.
-
-
Marker based sync is used automatically when animations in a Sync Group have enough matching markers. Otherwise, the original scaled length syncing behavior is used.
-
AnimMontages also support marker-based sync while blending out, so you can transition back to other animations seamlessly.
-
You can find the Sync Group setting Asset Details panel in the AnimMontage.
-
Sync Markers can also be added automatically by setting up and applying Animation Modifiers within your animation.
Manage Notifies...
If you want to add new, rename or remove existing Skeleton Notifies you can do so from the Manage Notifies option when right-clicking on the Notifies track.

The Animation Notifies window will appear and display any Notifies you have created.

Right-click to create new Notifies, or right-click on a Notify to rename or delete it.
Through the Manage Notifies window you can also see what animations are currently using the selected Notify from the Details panel by clicking the Scan button.

Any animations that use the selected Notify will be displayed in the Details panel.

Additional Notify Properties
In addition to the properties that can be modified in the Anim Notify section of the Details panel for each type of Notify (when applicable), the properties below can also be used to define how your Notify is used.

|
Trigger Settings |
|
|---|---|
|
Notify Trigger Chance |
Defines the chance of triggering the Notify (0=No Chance, 1=Always Triggers). |
|
Trigger on Dedicated Server |
If disabled, this Notify will be skipped on Dedicated Servers. |
|
Trigger on Follower |
If enabled this Notify will trigger when the animation is a follower in a Sync Group (by default, only the Sync Group leaders notifies the trigger). |
|
Notify Filter Type |
Defines a method for filtering notifies (stopping them from triggering). Can be set to filter by the meshes current LOD. |
|
Event |
|
|---|---|
|
Trigger Weight Threshold |
Determines how much much weight the animation sequence needs to have to trigger the Notify. |
|
Montage Tick Type |
The method to determine how the Notify is handled, Queued or Branching Point (See Montage Tick Type section below). |
Montage Tick Type
The key difference between Queued and Branching Point settings for the Montage Tick Type is that Queued Notifies is asynchronous, while Branching Points are synchronous. What this means to the end user is that Branching Points come with a much higher degree of precision for where they will take place along the animation timeline.
High precision is important when you need to jump to a specific animation at a very precise moment in time. While you could use a Queued Notify to do the same job, the asynchronous nature of Queued Notifies means that the event could be fired at the incorrect animation frame, which can lead to hitches and jumps in your motion.
Due to their synchronous nature and the precision resulting from it, Branching Points are more performance expensive than Queued. You should only use them when an event must be fired at a precise moment along the animation timeline, such as jumping directly to another animation that matches up frame-to-frame. If being off by a frame (or some percentage of one) is not important, you should use Queued instead.