Choose your operating system:
Windows
macOS
Linux
Animation State Machines allow you to think of your Animation Blueprint in a more modular sense than you would without it. Users define a series of various states in which the character or Skeletal Mesh could possibly exist. Next, they define the circumstances in which the character or Skeletal Mesh may enter and exit each state, similar to a flow chart.
For instance, you may have a flow chart that defines the process of your character's animation that may look something like this:

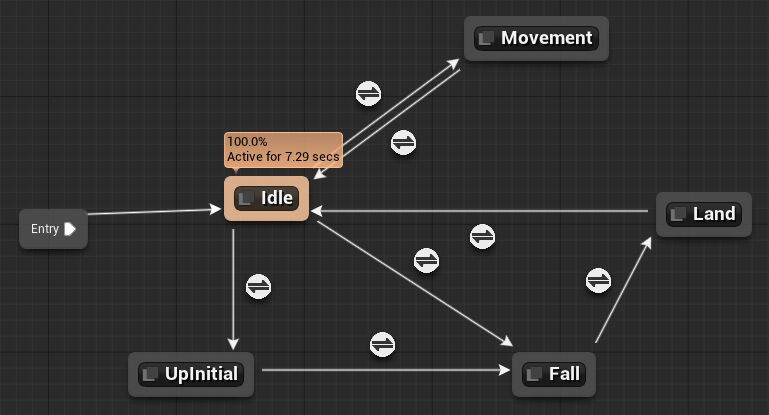
If you were to set up a State Machine for the above flow, it might end up looking something like this:

Anatomy of a State Machine
State Machines are comprised primarily of a network of states and the rules that define transitions into and out of them. Each state, along with each rule set, is its own condensed Blueprint network. This makes it very easy to handle complex animation blending without having to use an overly complicated AnimGraph .
States
Conceptually, it is best to think of a state as an organized portion of an AnimGraph that we know the character or Skeletal Mesh will be blending into and out of on a regular basis. You can then transition into and out of this part of the graph. For instance, you may have an Idle state for your character's animation, and that state may just contain a single animation.
Here is such an Idle state seen from the State Machine.

Double-clicking on that state opens a graph where you define what will be the Final Animation Pose

Once the character started moving however, they could transition into a Movement state - which could define moving laterally across a surface, like walking or running.

Within, this state may contain a BlendSpace that is being defined by the character's speed and direction of movement.

States have no pins in and of themselves, because they are intended to have a more freeform layout.
By dragging a wire from its outer border, you can connect states or create new states (similar to Blueprint).

Transition Rules
Once you have your states defined, you need to be able to control how your Skeletal Mesh is going to transition from one state to another which is where Transition Rules come into play. Transition Rules are created automatically along the wires that connect states.

Transition Rules can perform any number of checks and tests against variable values, all with the purpose of outputting a True/False value. This Boolean output determines whether the animation can move through the transition or not.

Above, we are testing the value of a character's Speed. Once it reaches a value greater than 10, we enable the transition. In this case, the character is allowed to move from an Idle state to a Movement state. We can then use a completely separate rule to transition back to Idle.
For example, here we have a transition rule moving back from Movement to Idle.

Inside, we check to see if the same value we used to transition into the Movement state is no longer true.

Conduits
Conduits serve as a more advanced and sharable transition resource. Where a Transition Rule is going to be a simple 1-to-1 relationship form one state to another, a Conduit can have 1-to-many, many-to-1, or many-to-many. Conduits appear on the graph and look similar to a State but have a different icon preceding the Conduit's name (below).

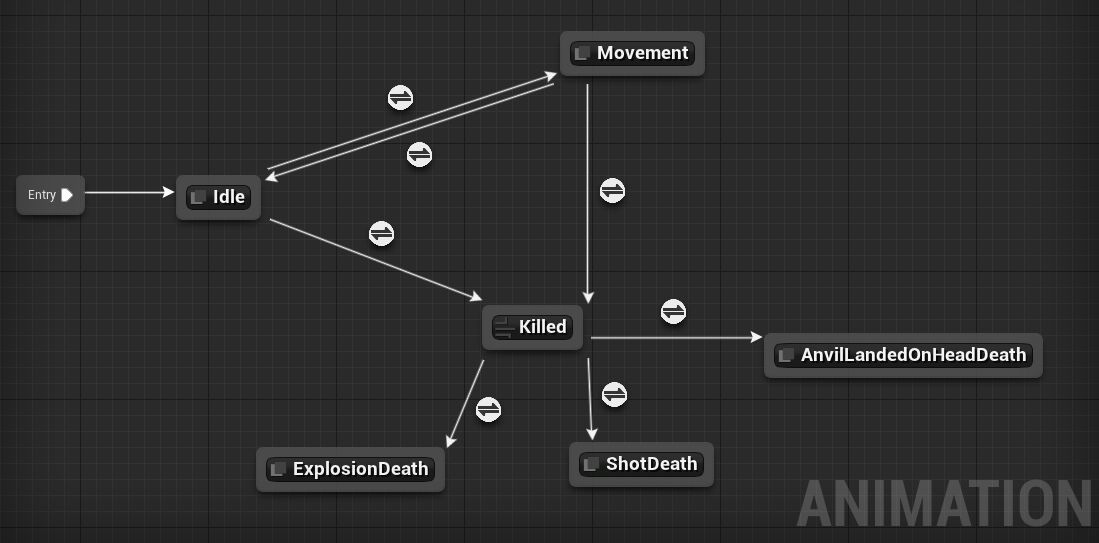
An example use case for a Conduit could be a situation where you have multiple animations that could play when a character is killed.
You could start with a simple Transition Rule that says when the health of that character is less than or equal to 0, then go to a Death state. However, if instead of a State, the transition went into a Conduit, you could perform a series of checks to see how the player was killed (shot, stabbed, explosion, hit by a car, anvil on the head, etc.) and branch from there into various independent death States.
A simplified version of that graph may look something like below:

Inside, a Conduit graph looks just like a Transition Rule:

The actual transition rules that exit the Conduit can then determine the type of death and allow blending to the appropriate state.
Mouse-Over Previewing
One of the features of a State Machine is its ability to provide previews on mouse-over for the State Machine itself, as well as for its component nodes. For example, if you hover your mouse over a State Machine, a preview window will pop up giving you a high-level view of the State Machine. This is similar to a collapsed Blueprint network.

These previews also extend to the various States and Transition Rules within a State Machine. Hovering over them will show you a preview of what is inside.

In the case of Transition Rules, you will see not only a preview of the nodes, but also a breakdown of the rule in words.
