Choose your operating system:
Windows
macOS
Linux
At the most fundamental level, an Actor is any Object that you can place in a level and this page will show you the various methods in which you can place those Actors inside your levels.
When you create a new project, the level that is loaded when you open your project is typically a blank slate. To build the desired environment or populate the world, you must place Actors in the level. You can do this in two different ways, both of which involve using the Content Browser and results in a new instance of the Actor being created. Each instance in the level can then be moved around or have its properties modified.
Adding Actors to your level automatically also adds them to the list in the World Outliner , which is a panel that is by default located in the upper-right corner of the Unreal Editor. For more information about the World Outliner , see World Outliner .
Using the Place Actors Panel
This section will show you how to place Actors from the Place Actors panel.
-
When you open your project, the Place Actors panel should already be open.
![Place0.png]()
-
If not, open the Windows menu and click Place Actors to re-open the panel.
![Place0a.png]()
-
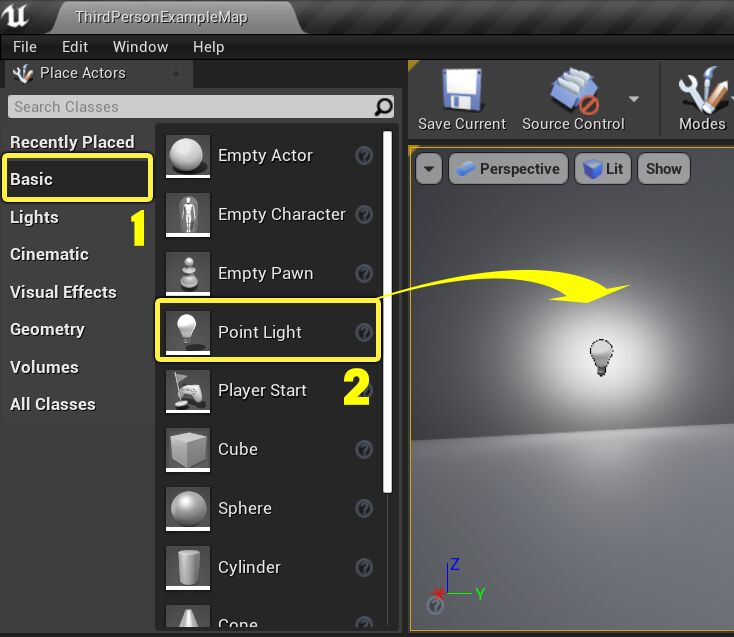
In the Place Actors panel (1), click the Basic tab (2) then Left-click and drag an Actor (3) into the Level Viewport .
![Place1.png]()
Each Actor displayed on each tab of the Place Actors panel can be dragged-and-dropped into a level.
Interface

Search

The Search bar lets you find an Actor by name directly.
Filters Tabs

These tabs allow you to quickly filter down to the asset type that you need.
|
Name |
Description |
|---|---|
|
Recently Placed |
Contains a rolling history of up to the last 20 types placed. |
|
Basic |
Contains general common types such as triggers, cameras, etc. |
|
Lights |
Contains all Light types. |
|
Cinematic |
Contains the cinemaic camera and related Actor types |
|
Visual Effects |
Contains common visual , or rendering-related, types such as fog, decals, etc. |
|
Geometry |
Contains all Brush geometry primitive types. |
|
Volumes |
Contains all placeable Volume types. |
|
All Classes |
Contains all placeable Actor types. |
Asset View

The Asset View shows icons for each of the various assets currently available for placement as Actors, after all filters and search criteria have been applied. The area is scrollable by right-mouse dragging or using the scrollbar on the right of the panel.
Placing Actors Using the Context Menu
This section will demonstrate how to place Actors from the Content Browser in your level through a Context Menu .
-
Inside your project, in the lower left corner of the screen you will see the Content Browser .
![Place2.png]()
-
Locate the asset you wish to place, this could be: Blueprints , Static Meshes , Particle Effects , Sound Cues , Skeletal Meshes , etc.
-
Left-click on the asset so that it is highlighted.
![Place3.png]()
-
Inside the Level Viewport , Right-click anywhere to bring up the Context Menu and select the asset under the Place Actor section.
![Place4.png]()
After selecting the asset from the Context Menu , you will see it appear inside your level.
You also have the option of adding a different type of asset even when you have a specific asset selected in the Content Browser . You can see the types of assets you can add by opening the flyout menu in the Add Actor section of the Context Menu as seen in the image below.

If you have one or more Actors selected in the Viewport , and an asset selected in the Content Browser , you can opt to replace the selected Actors in the level with the selected asset by clicking the asset's name in the Replace Selected Actors with section of the Context Menu as seen in the image below. This may be useful if you want to do sweeping changes and swapping multiple assets out at once.

Placing Actors Using Drag and Drop
In addition to being able to add specific types of Actors from the Content Browser to a level through the Viewport Context Menu , you can also add an asset to your level by dragging it from the Content Browser and dropping it into one of the Viewports , in the location where you would like to place the Actor. When you start to drag the asset into the Viewport , the cursor will change so that you know that type of asset will be dropped into the Viewport .
-
Inside your project, in the lower-left corner of the screen you will see the Content Browser .
![Place2.png]()
-
Find the asset you want to add, then Left-click on and drag-and-drop it into the Level Viewport .
![Place5.png]()
When you drag and drop an asset from the Content Browser , the following types of Actors are created for the associated type of asset:
-
Blueprint - Places an instance of the Blueprint
-
Particle System - Places an Emitter
-
Skeletal Mesh - Places a SkeletalMeshActor
-
Static Mesh - Places a StaticMeshActor
-
Sound Cue - Places an AmbientSound
-
Sound Wave - Places an AmbientSound
Placing Actors from the Class Viewer
A more advanced method of placing Actors is by using the Class Viewer , which is a hierarchical list of classes used by the Editor.
-
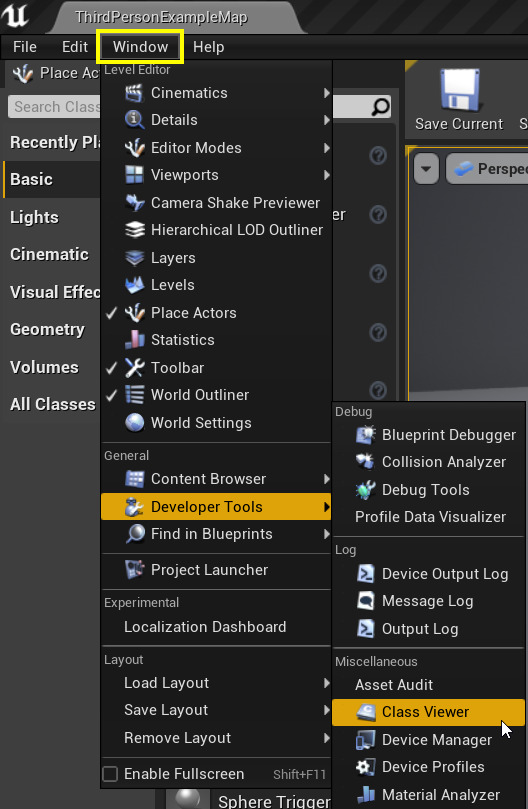
To open the Class Viewer , click Window then Developer Tools and under Miscellaneous , select Class Viewer .
![Place6.png]()
The Class Viewer window will open.
![Place7.png]()
Any Actor that can be placed in the level will be tinted in Blue in this window.
-
Select the asset you wish to place, then drag-and-drop it in the Level Viewport .
![Place8.png]()
For more information on working with the Class Viewer , refer to the
Duplicating Actors using the Translation Widget
Actors can be quickly duplicated in the Viewport using the Translation Widget .
-
Select the Actor.
-
Alt-Left-Click and hold a Translation Widget arrow.
![AltDuplicate1.png]()
-
Drag out a duplicate of the original Actor in the direction of the arrow.
![AltDuplicate2.png]()
For more information on working with the Translation Widget , refer to the Transforming Actors documentation.


