Choose your operating system:
Windows
macOS
Linux
Foliage Tool enables you to quickly paint or erase sets of Static Meshes or Actor Foliage on filter-enabled Actors and geometry.

For examples of the Foliage tool in action, see the Foliage section of the Landscapes Content Examples Content Example.
Foliage Edit Mode
To use the Foliage tool, click the Foliage option ( Shift+3 ) in the Modes dropdown menu.

This will open the Foliage Mode panel.

Foliage Types

Select the Add Foliage Type dropdown buttton to add the following:
|
Foliage Type |
Description |
|---|---|
|
Actor Foliage |
Foliage type that places Blueprint or Native Actor instances in the scene. |
|
Static Mesh Foliage |
Foliage type that uses mesh instancing. This type is best for non-destructive foliage. |
Static Meshes placed with Foliage Edit Mode are automatically grouped together into batches that are rendered using hardware instancing where many instances can be rendered with only a single draw call, while Actor Foliage comes at the same rendering cost as placing normal Actors into a scene.
Actor Class
After creating new Actor Foliage, you need to assign a Blueprint to its Actor Class property in the Actor Foliage > Actor menu.

Mesh List
The Mesh List is the area in which Static Meshes that are to be used as foliage are placed. To add a Static Mesh to the Mesh List, you must drag the Static Mesh from the Content Browser into the area that says Drop Foliage Here .

The yellow Foliage Type highlight will only display when you are trying to add the correct type. If you do not see this, then what you are trying to add will not work.
To adjust the properties of a Static Mesh that is used as foliage, select the Static Mesh in the Mesh List and then press the small Magnifying Glass icon in the lower right-hand corner of the foliage tool. This will expose the selected Static Meshes details.

Once pressed, you should see something that looks similar to the image below.

Selecting Foliage Meshes
Foliage Meshes in the Mesh list can be enabled or disabled by hovering the mouse over the mesh in the list and then checking or unchecking the checkmark box in the upper left-hand corner.

You can also select Foliage Meshes by clicking them in the Mesh list. This will put an orange highlight around them. Then, in the options panel below, you can adjust various properties for all selected Foliage Meshes.

If you need to add non-interactive foliage into a scene, use Static Mesh Foliage. Unlike Actor Foliage, Static Mesh Foliage is implemented with Mesh instancing, which is better for rendering performance.
Brush Settings
The Tool Bar displays properties related to the foliage tool that is currently selected.
Not every setting is displayed with every foliage tool.

|
Brush Option |
Description |
|---|---|
|
Size |
The size of the brush in Unreal units. |
|
Density |
The target density at which you will add instances when using Left Mouse button.
|
|
Erase Density |
The target density you would like to achieve when you erase instances using Ctrl+Shift+click .
|
Filters determine the Actor type that can accept foliage meshes when using this tool. By default, the Editor enables the following filters: Landscape , Static Meshes , and BSP . Generally, enabling a filter makes it possible to add a foliage mesh if you use the tool on that Actor type, and disabling a filter indicates that a foliage mesh should not be added to that Actor type.
|
Filter |
Description |
|---|---|
|
Landscape |
Enable this filter to place foliage on Landscapes. |
|
Static Meshes |
Enable this filter to place foliage on Static Meshes. |
|
BSP |
Enable this filter to place foliage on BSP geometry. |
|
Foliage |
Enable this filter to place foliage on other foliage. |
|
Translucent |
Enable this filter to place foliage on translucent geometry. |
Tablet pressure sensitivity is supported. Pen pressure will modulate the number of foliage mesh instances being added or removed after considering all other parameters.
Foliage Tools
There are five tools available by selecting the appropriate button in the Toolbar at the top of the foliage window.
|
Item |
Description |
|---|---|
|
|
Selection tools - used to select individual instances, all instances, deselect, and lasso select groups for moving, deleting etc. |
|
|
Paint tool - used for adding and removing foliage instances from the world. |
|
|
Reapply tool - used to change the parameters of instances already painted in the world. |
|
|
Single tool - used to place a single instance of the selected foliage using the paint brush. |
|
|
Fill Tool - used to determine the number of meshes to place with the Paint tool. |
|
|
Erase Tool - used to erase the selected foliage. |

Select Tool

When the Select tool is active, you can select individual instances of foliage meshes by clicking them. You can select multiple Foliage meshes at a time by holding down the Ctrl button while clicking Foliage meshes in the level.
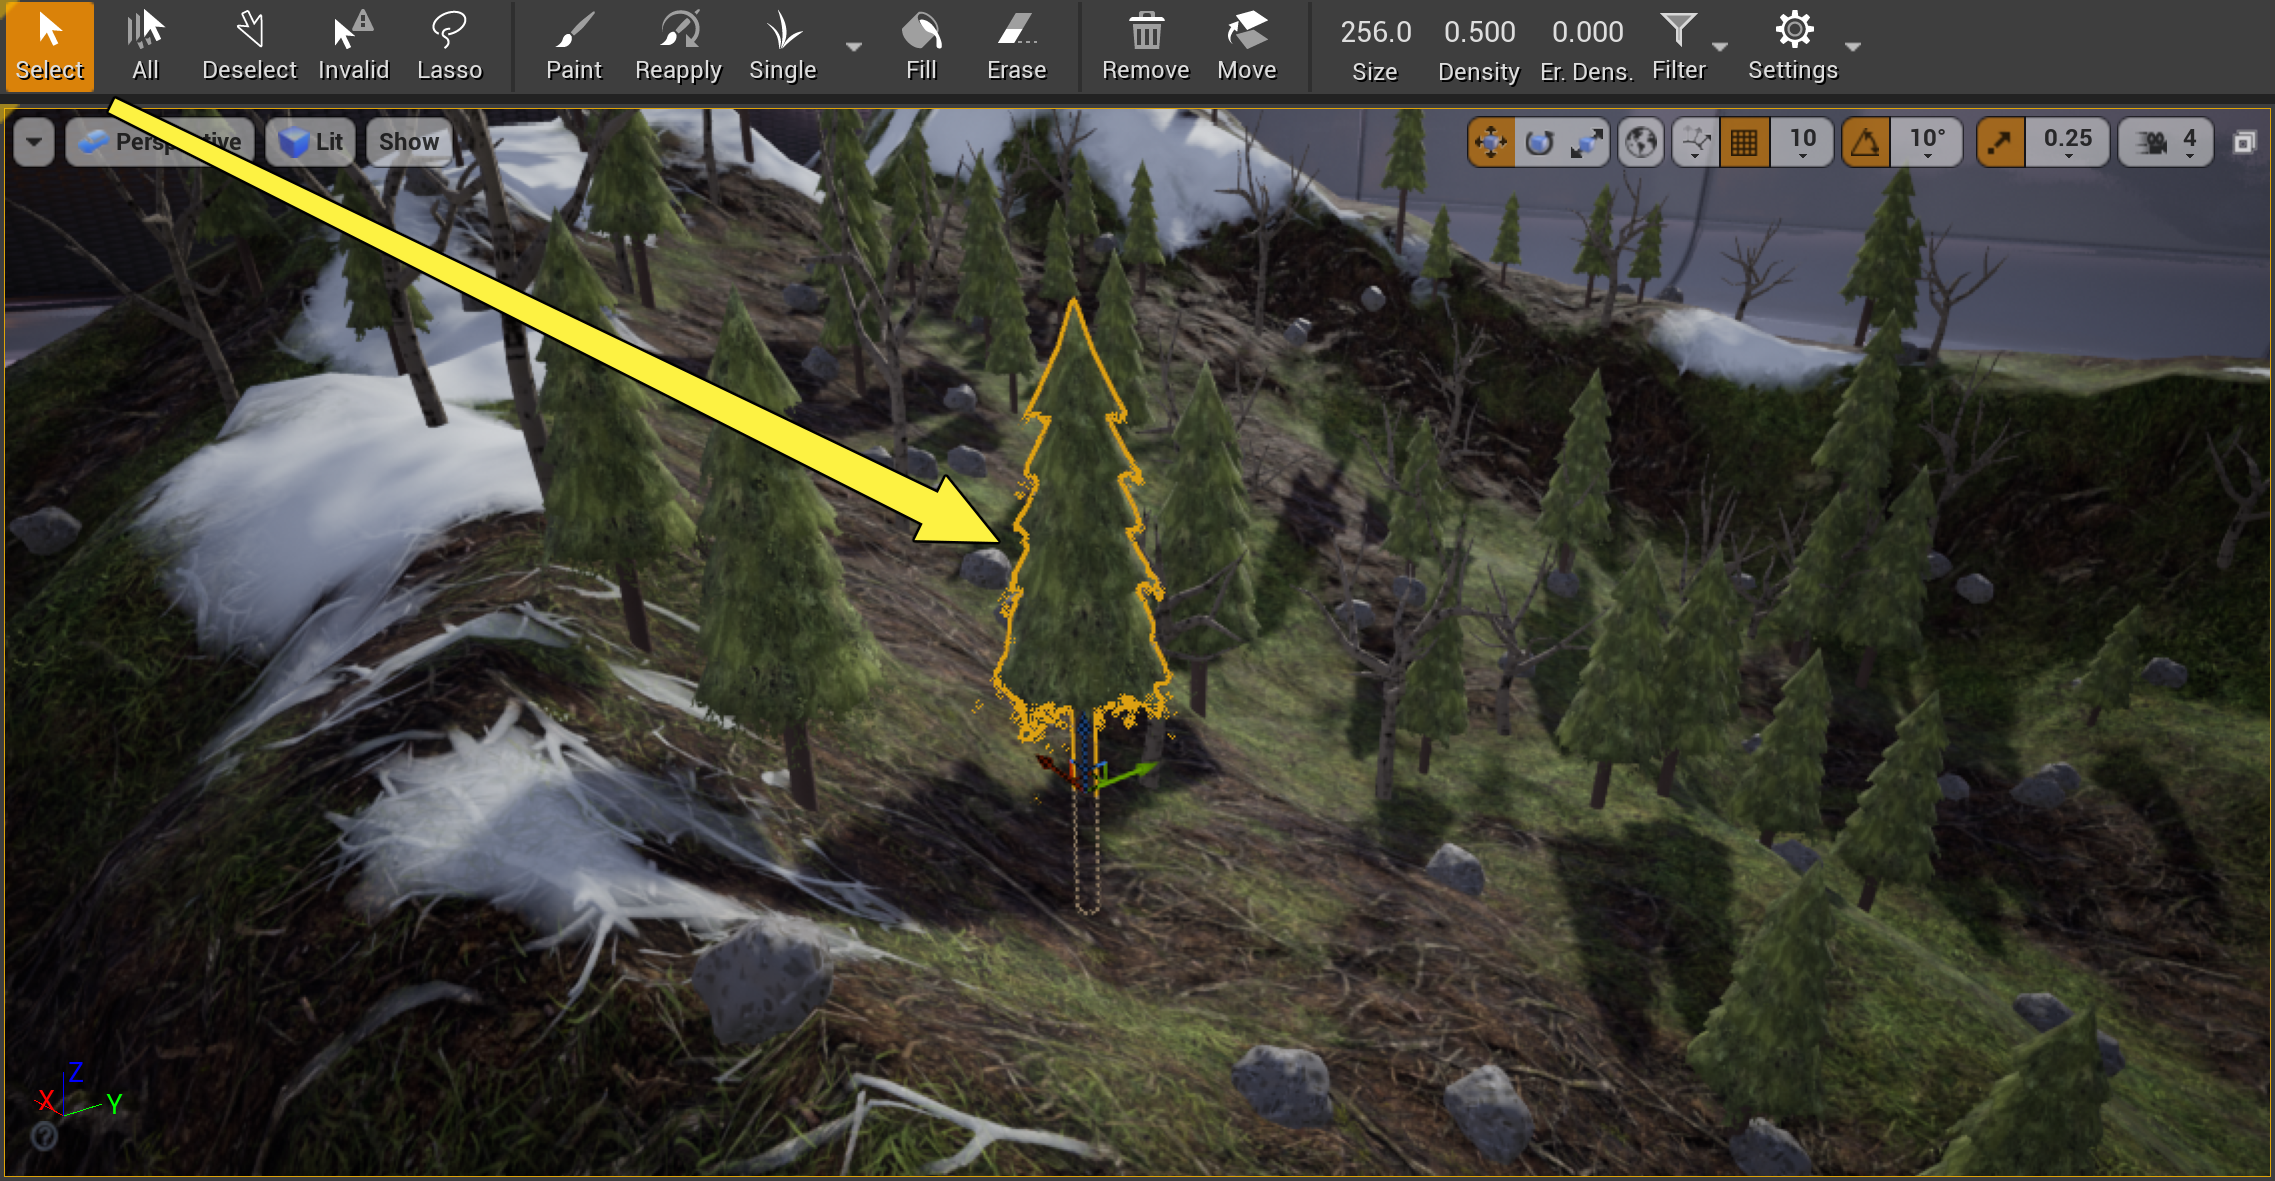
Once you have selected one or more instances, you can perform the following actions on them.
|
Action |
Result |
|---|---|
|
Drag a widget axis |
The selected instances will move following the widget, be rotated or scaled depending on the widget mode. |
|
Alt+drag a widget axis |
The selected instances will first be duplicated and then will move following the widget. |
|
Delete key |
The selected instances will be deleted. |
|
End key |
The selected instances will attempt to snap to the floor. They will be aligned to the normal if originally placed with this setting enabled. |
Using the various Select buttons, you can select all Foliage Mesh Actors, select any invalid Foliage Meshes, or clear the current selection.

Paint Tool

The Paint tool is Foliage Edit Mode's default tool. You can use it to paint instances of the Static Meshes in the Meshes list in your level. When Foliage Edit Mode is active, a transparent sphere brush is drawn in the level indicating where the foliage brush will operate. In the image below, you can see an example of what the Foliage paint brush looks like.

Foliage painting also works in the VR Editor. For the controls for Foliage painting in VR, see the VR Mode Controls .
To use the Foliage Painting mode, your Level must contain either a Landscape Terrain or Static Meshes with Collision enabled.
To add foliage to the brush area:
-
Click the left mouse button and drag over the area where you want to add foliage. All currently selected meshes in the mesh list will be added according to their current parameters and settings.
When painting meshes, the engine performs a number of line traces inside the sphere parallel to your viewing direction, meaning any surface you can see inside the sphere will be a potential target for foliage instances.
To erase foliage from the brush area:
-
Hold down Shift , click the left mouse button, and drag over the area where you want to remove foliage.
Paint Settings
Each Static mesh in the Mesh List has a number of properties that control how instances are placed, scaled or rotated when the selected Static mesh is painted. The properties are accessible by selecting the Static Mesh or Static Meshes you want in the Mesh List and then adjusting the properties displayed below.
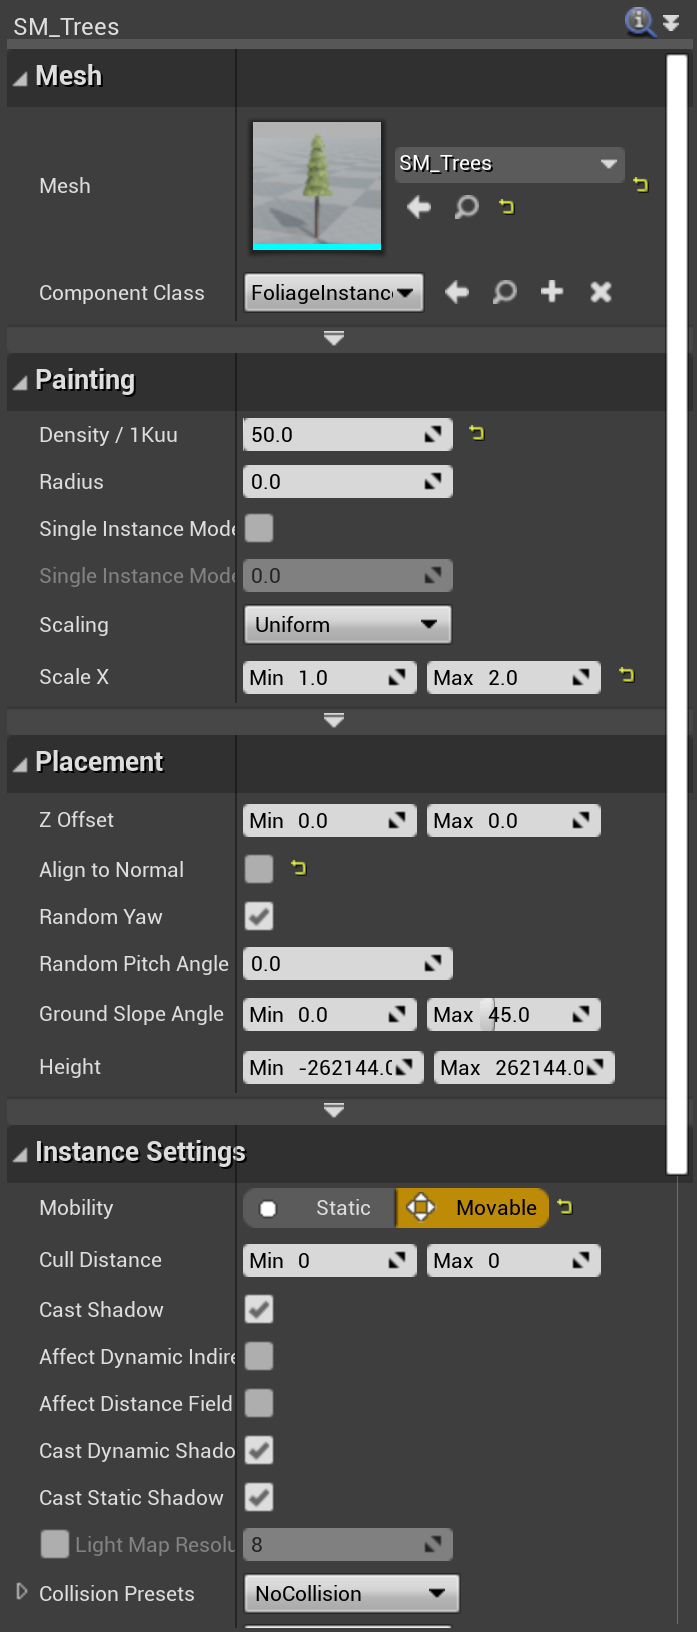
Here is a high-level description of what each section is used for:
|
Property |
Description |
|---|---|
|
Mesh |
This is where you input which type of Static Mesh should be used. |
|
Painting |
This is where you can adjust properties like the minimum distance between foliage meshes, the density at which meshes will be added, and whether the Foliage meshes should be scaled. |
|
Placement |
This controls how the Foliage meshes will be placed when painted in the level. |
|
Instance Settings |
Use this to adjust the behavior of this instance instead of properties derived from the Static Mesh in the Content Browser. |
Reapply Tool

Use the Reapply tool to selectively change certain parameters for Foliage meshes already placed in the world. When you paint over Foliage meshes with the Reapply tool active, the Foliage meshes that are selected in the Mesh List will be updated to reflect the changes made in the Reapply tool.
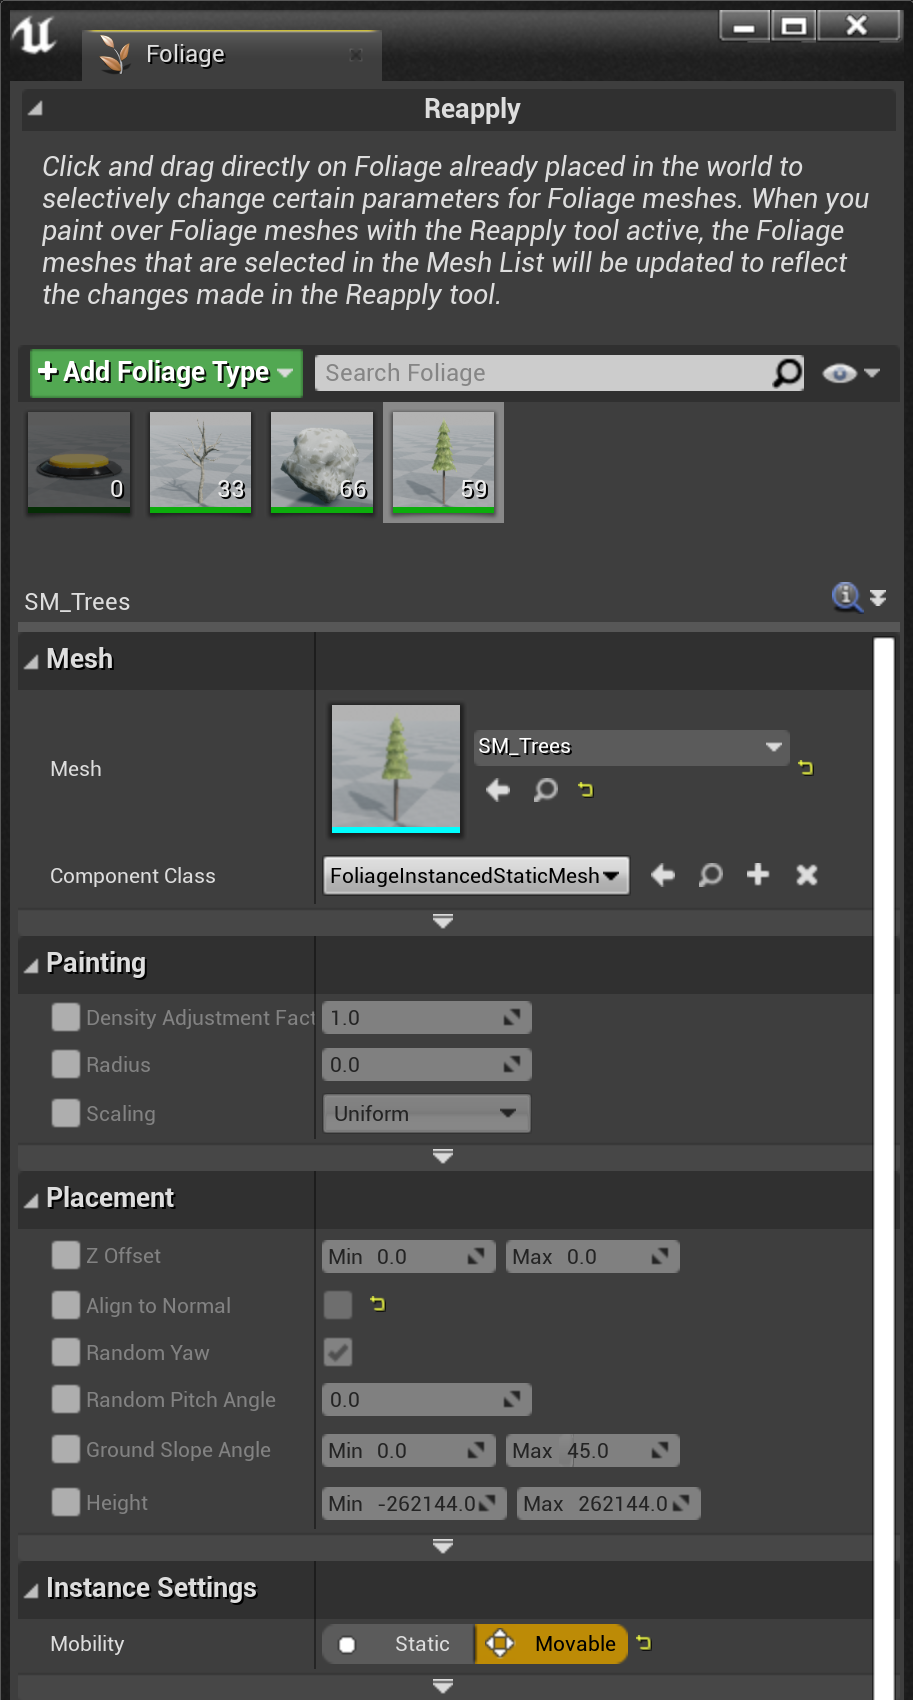
If a checkbox is set, the corresponding parameter will be reapplied when painting the brush over existing instances. Most settings are the same as when using the Paint Tool, except for a few differences:
|
Item |
Description |
|---|---|
|
Mesh |
This is where you input which type of Static Mesh should be used. |
|
Painting |
This is where you override what should happen when you are adding Foliage meshes to the level. |
|
Placement |
This is where you override how Foliage meshes are placed in the level. |
Single Tool

Use the Single tool to place a single instance of the selected Foliage mesh or meshes. This can be used to fill in gaps in the foliage or create specific terrain features. If more than one mesh is selected, the tool will place the meshes on top of each other in the same location.

Fill Tool

The Fill tool is used to cover an entire Static Mesh Actor in your level with the selected Foliage meshes. The Fill tool works a lot like the Paint tool with the key difference being that you can cover an entire Actor in Foliage in a single click. To use the Fill tool, press the Left Mouse button on the Static Mesh you want to be covered with foliage. The more mouse button clicks you make, the more Foliage will be added. To remove Foliage, hold down the Shift key and use the Left Mouse button to click on the Static Mesh you want to remove Foliage from.
Below we can see the SM_Tree foliage mesh apllied to a floor static mesh:
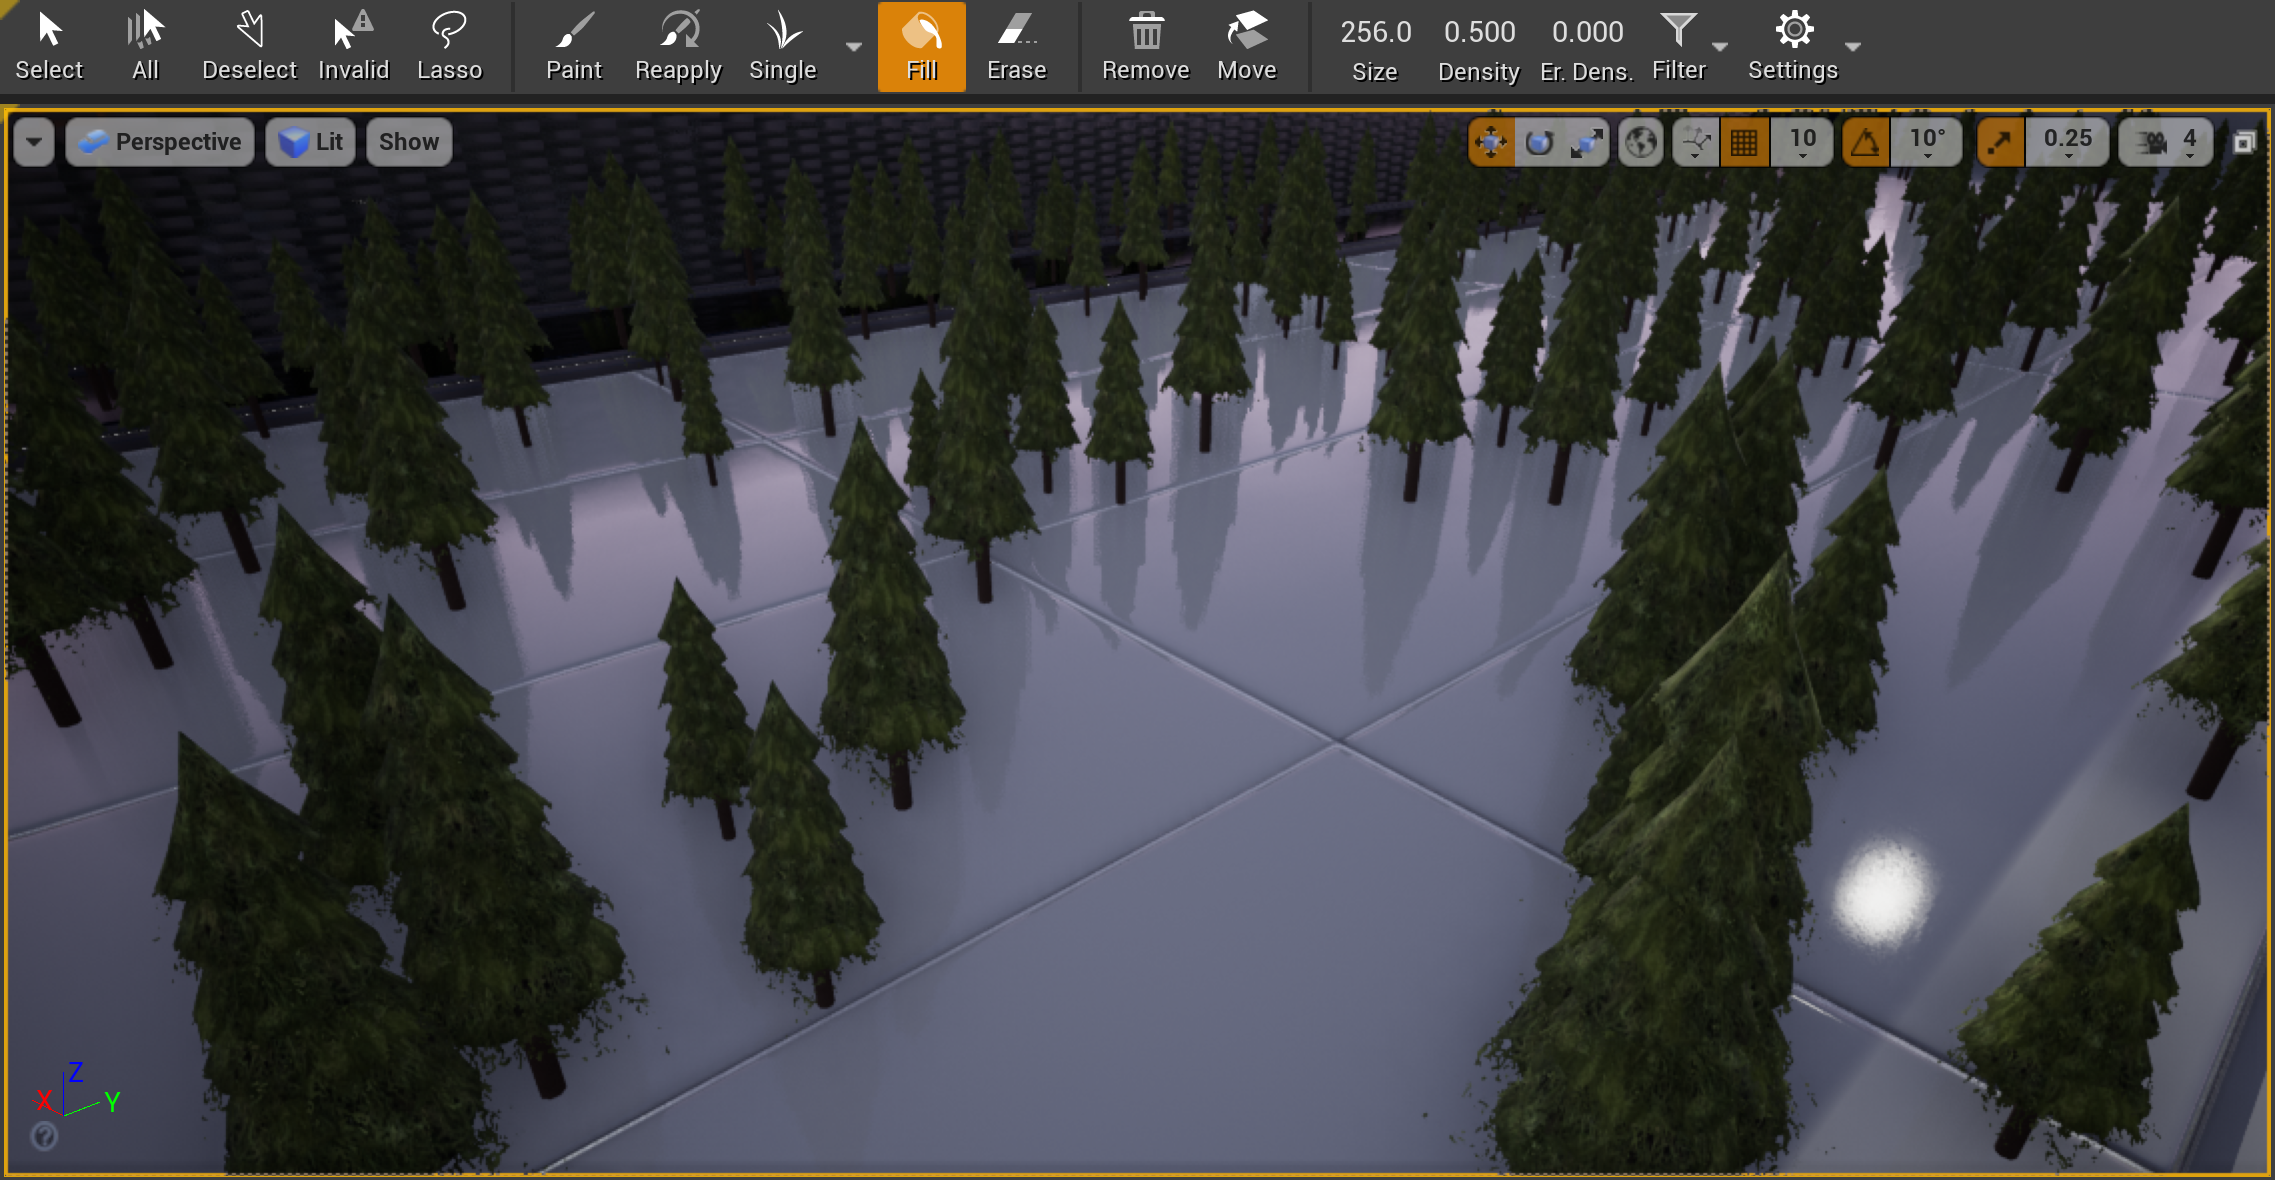
If you are having issues getting Foliage meshes to erase with the Fill tool, make sure that you are clicking on the Actor that they are placed and not on the Foliage meshes that were added.
Erase Tool
The Erase tool allows for the removal of only the selected mesh from an area of foliage. To use the Erase tool, select the static mesh or meshes you would like to remove and brush the translucent sphere over an area. Only the selected static meshes will be removed.


Culling
Because foliage instances are rendered as clusters in a single draw call, each cluster is either rendered or not rendered based on occlusion. If you set a value in the End Cull Distance parameter, the clusters will also be culled beyond that distance. However, this will cause groups of meshes to disappear abruptly as the entire cluster goes out of range.
This can be reduced by adding a Start Cull Distance parameter and then setting up the Material appropriately. In the vertex shader, a per-instance fading factor is calculated, which goes from 1.0 at the start distance to 0.0 at the end distance. This is accessible in the Material using a PerInstanceFadeAmount node. If you connect that to an opacity or masking value, you can use it to fade instances over a distance before they reach the Cull Distance End and are removed from rendering.
The example Material below multiplies the Material mask by the fading factor to thin out the foliage mesh's leaves until they completely disappear.

LOD
Static Mesh LOD is supported on foliage. There are a few caveats:
-
You should ensure your Static Mesh has only one entry in the Elements array (visible under LOD0).
-
Note that light and shadow maps are shared between all LOD levels, so all LODs need to use the same unwrapping.
-
Currently, the entire cluster of instances change LODs simultaneously. We may add support for distance-based fading per instance in the future.
Lighting
Each individual mesh instance has its own shadow and/or light map generated by Lightmass, and these are tiled together for each precomputed batch. There are several settings on the Static Mesh that should be checked for precomputed lighting to operate well with instanced foliage. Lightmass is less forgiving when generating shadow maps for instanced meshes, and incorrect settings could lead to black meshes after rebuilding lighting.
-
Light Map Coordinate Index - This must be set to a valid UV channel that has a unique UV unwrapping. The Static Mesh Editor's Generate Unique UVs feature, which you can access from the Window menu, can quickly generate a unique unwrapping.
-
Lightmap Resolution - This must be a small enough number so that all the shadow maps for instances in a single cluster (by default 100) can be tiled together without exceeding the maximum texture resolution (4094x4096).
Foliage Scalability
Foliage Static Meshes can use the Scalability System to increase or decrease the amount of Foliage Instances that are currently being rendered on screen. To add this functionality to your project you will need to do the following:
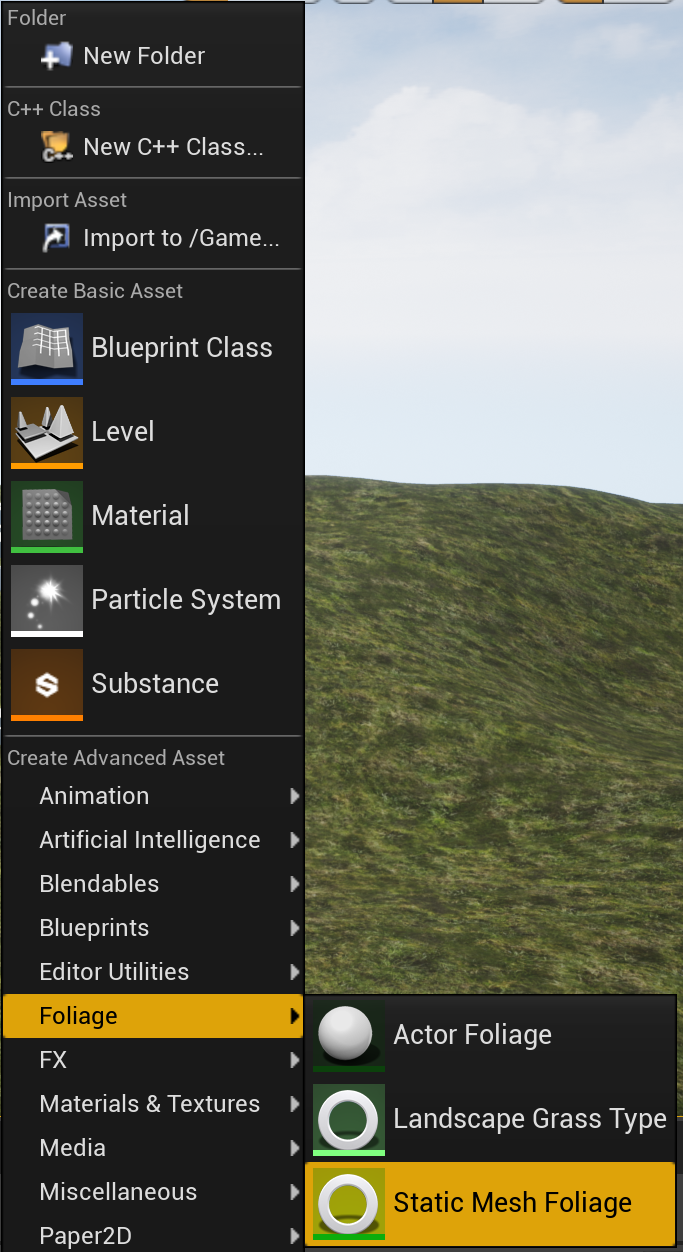
-
Right-click in the Content Browser. Under the Create Advanced Asset section, expand the Foliage section and select the Static Mesh Foliage option.
![Foliage_Scalability_00.png]()
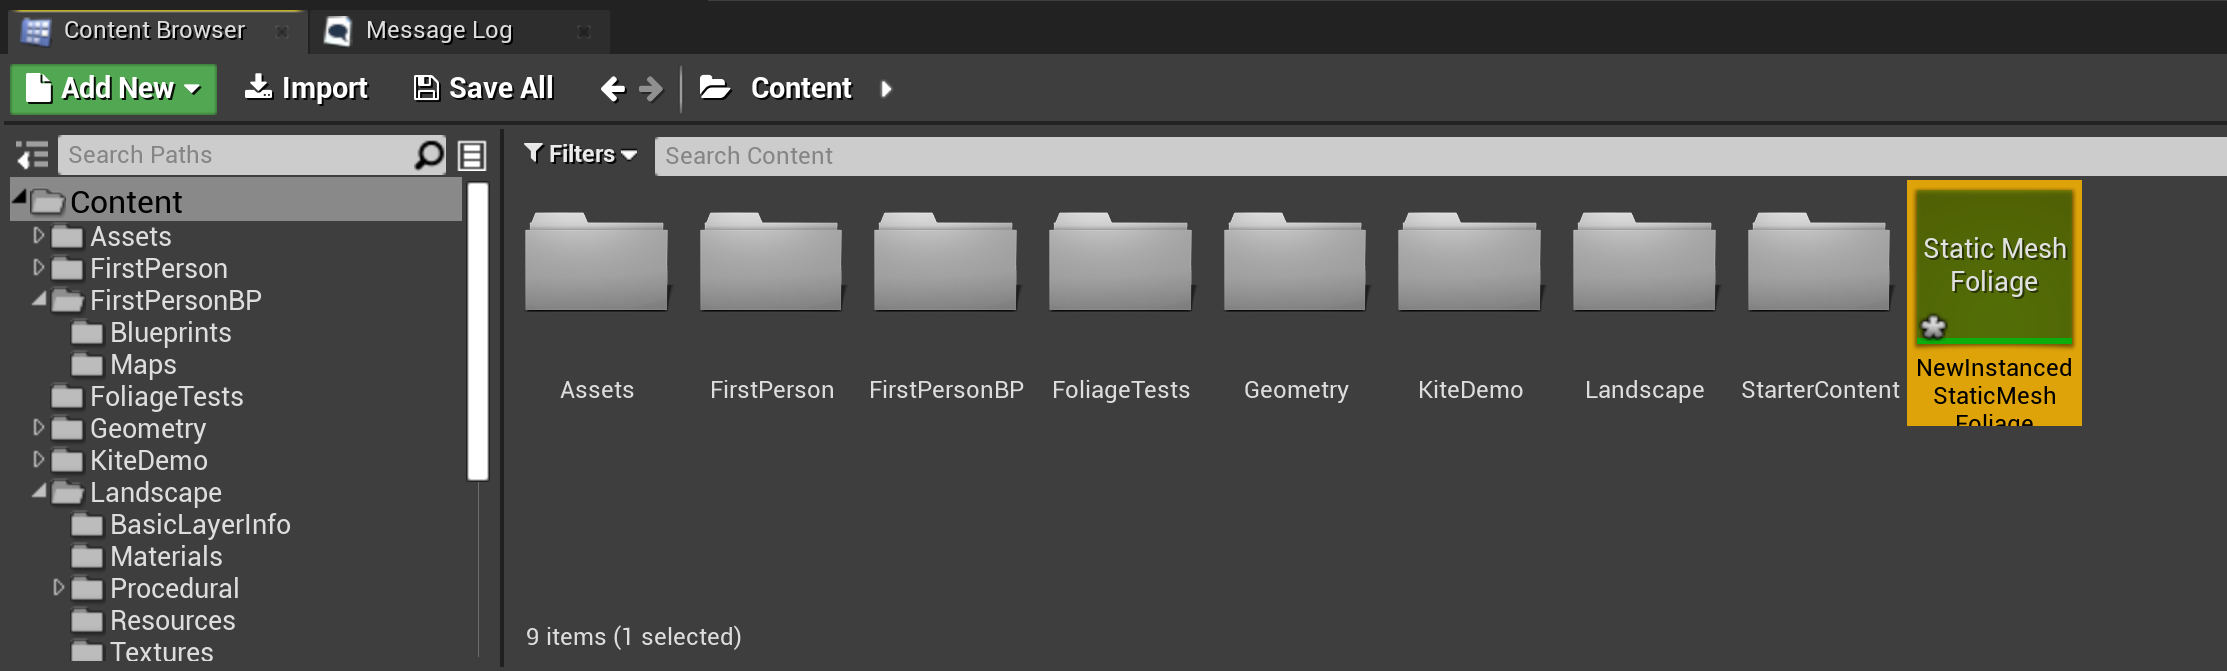
-
Input a name for the Static Mesh Foliage (for this example we are using FT_Box ) and double-click on the FT_Box Foliage Type to open it.
![Foliage_Scalability_01.png]()
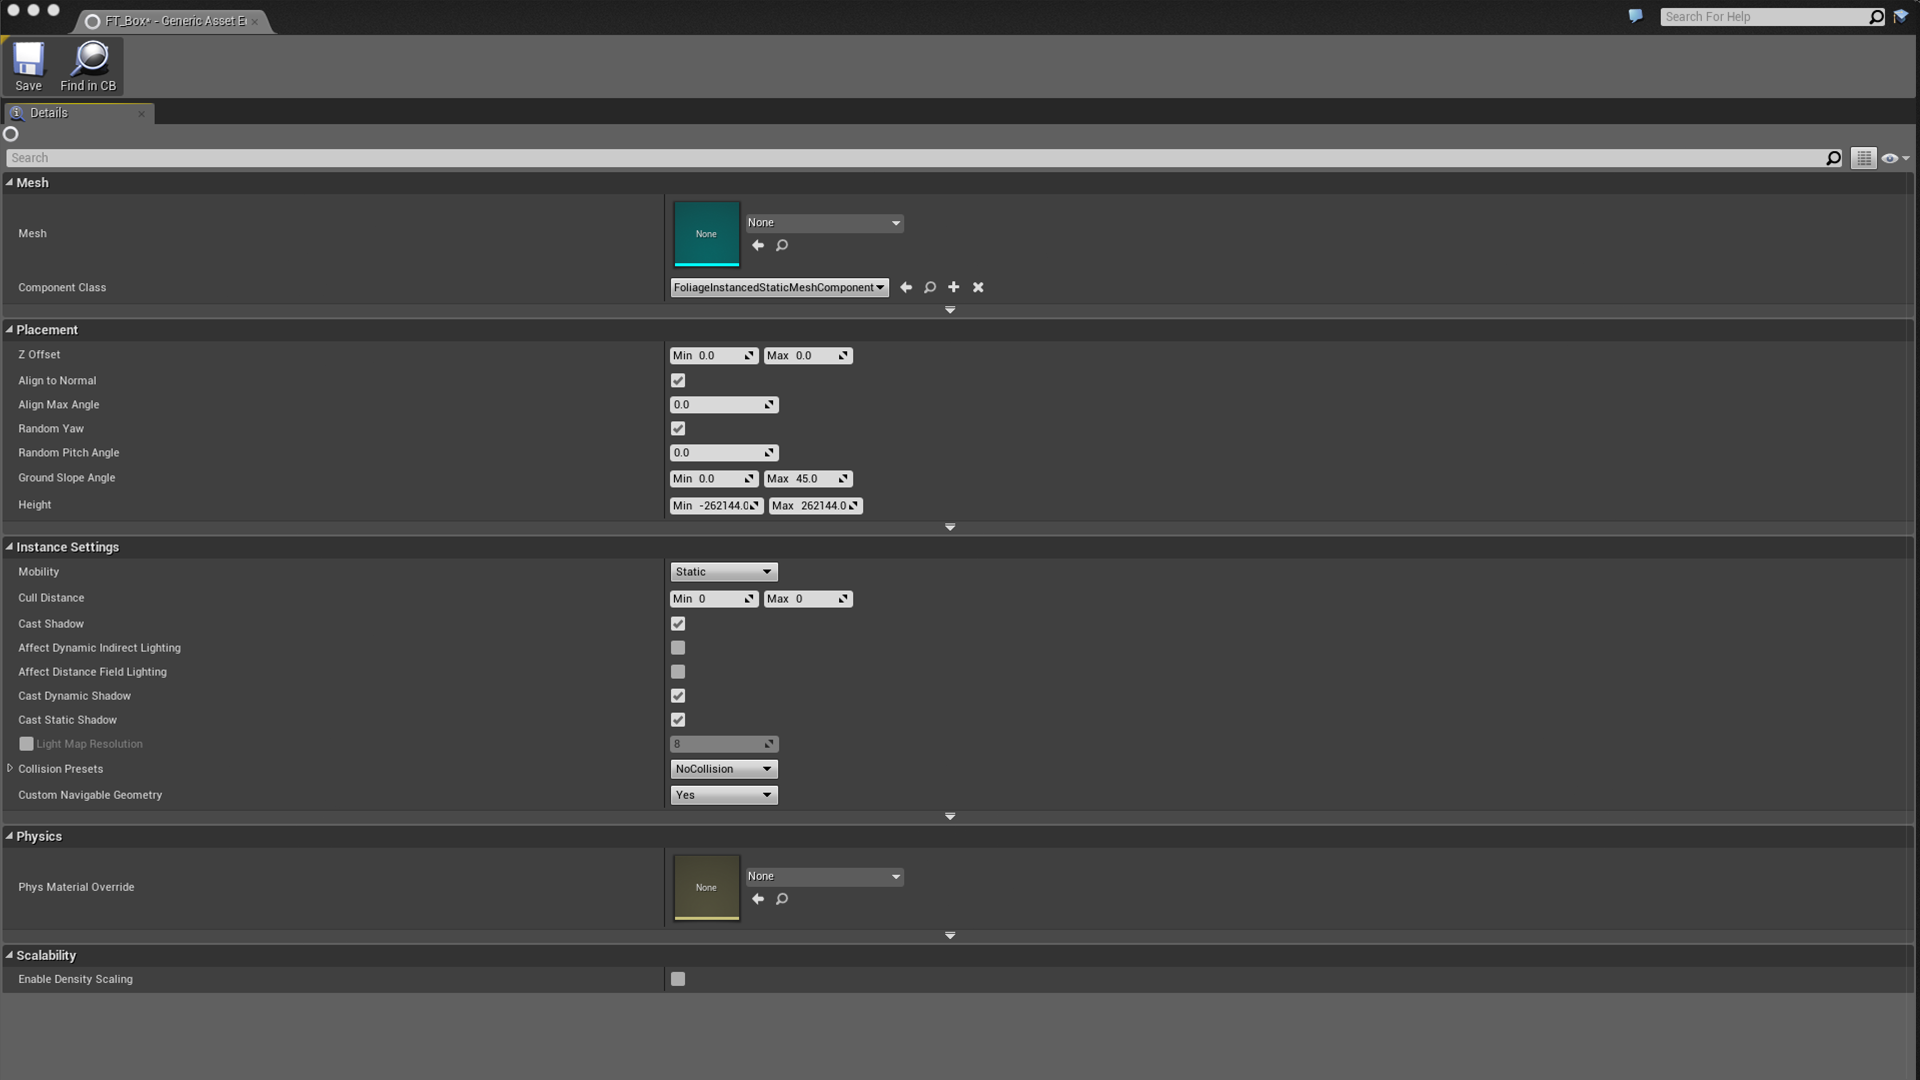
-
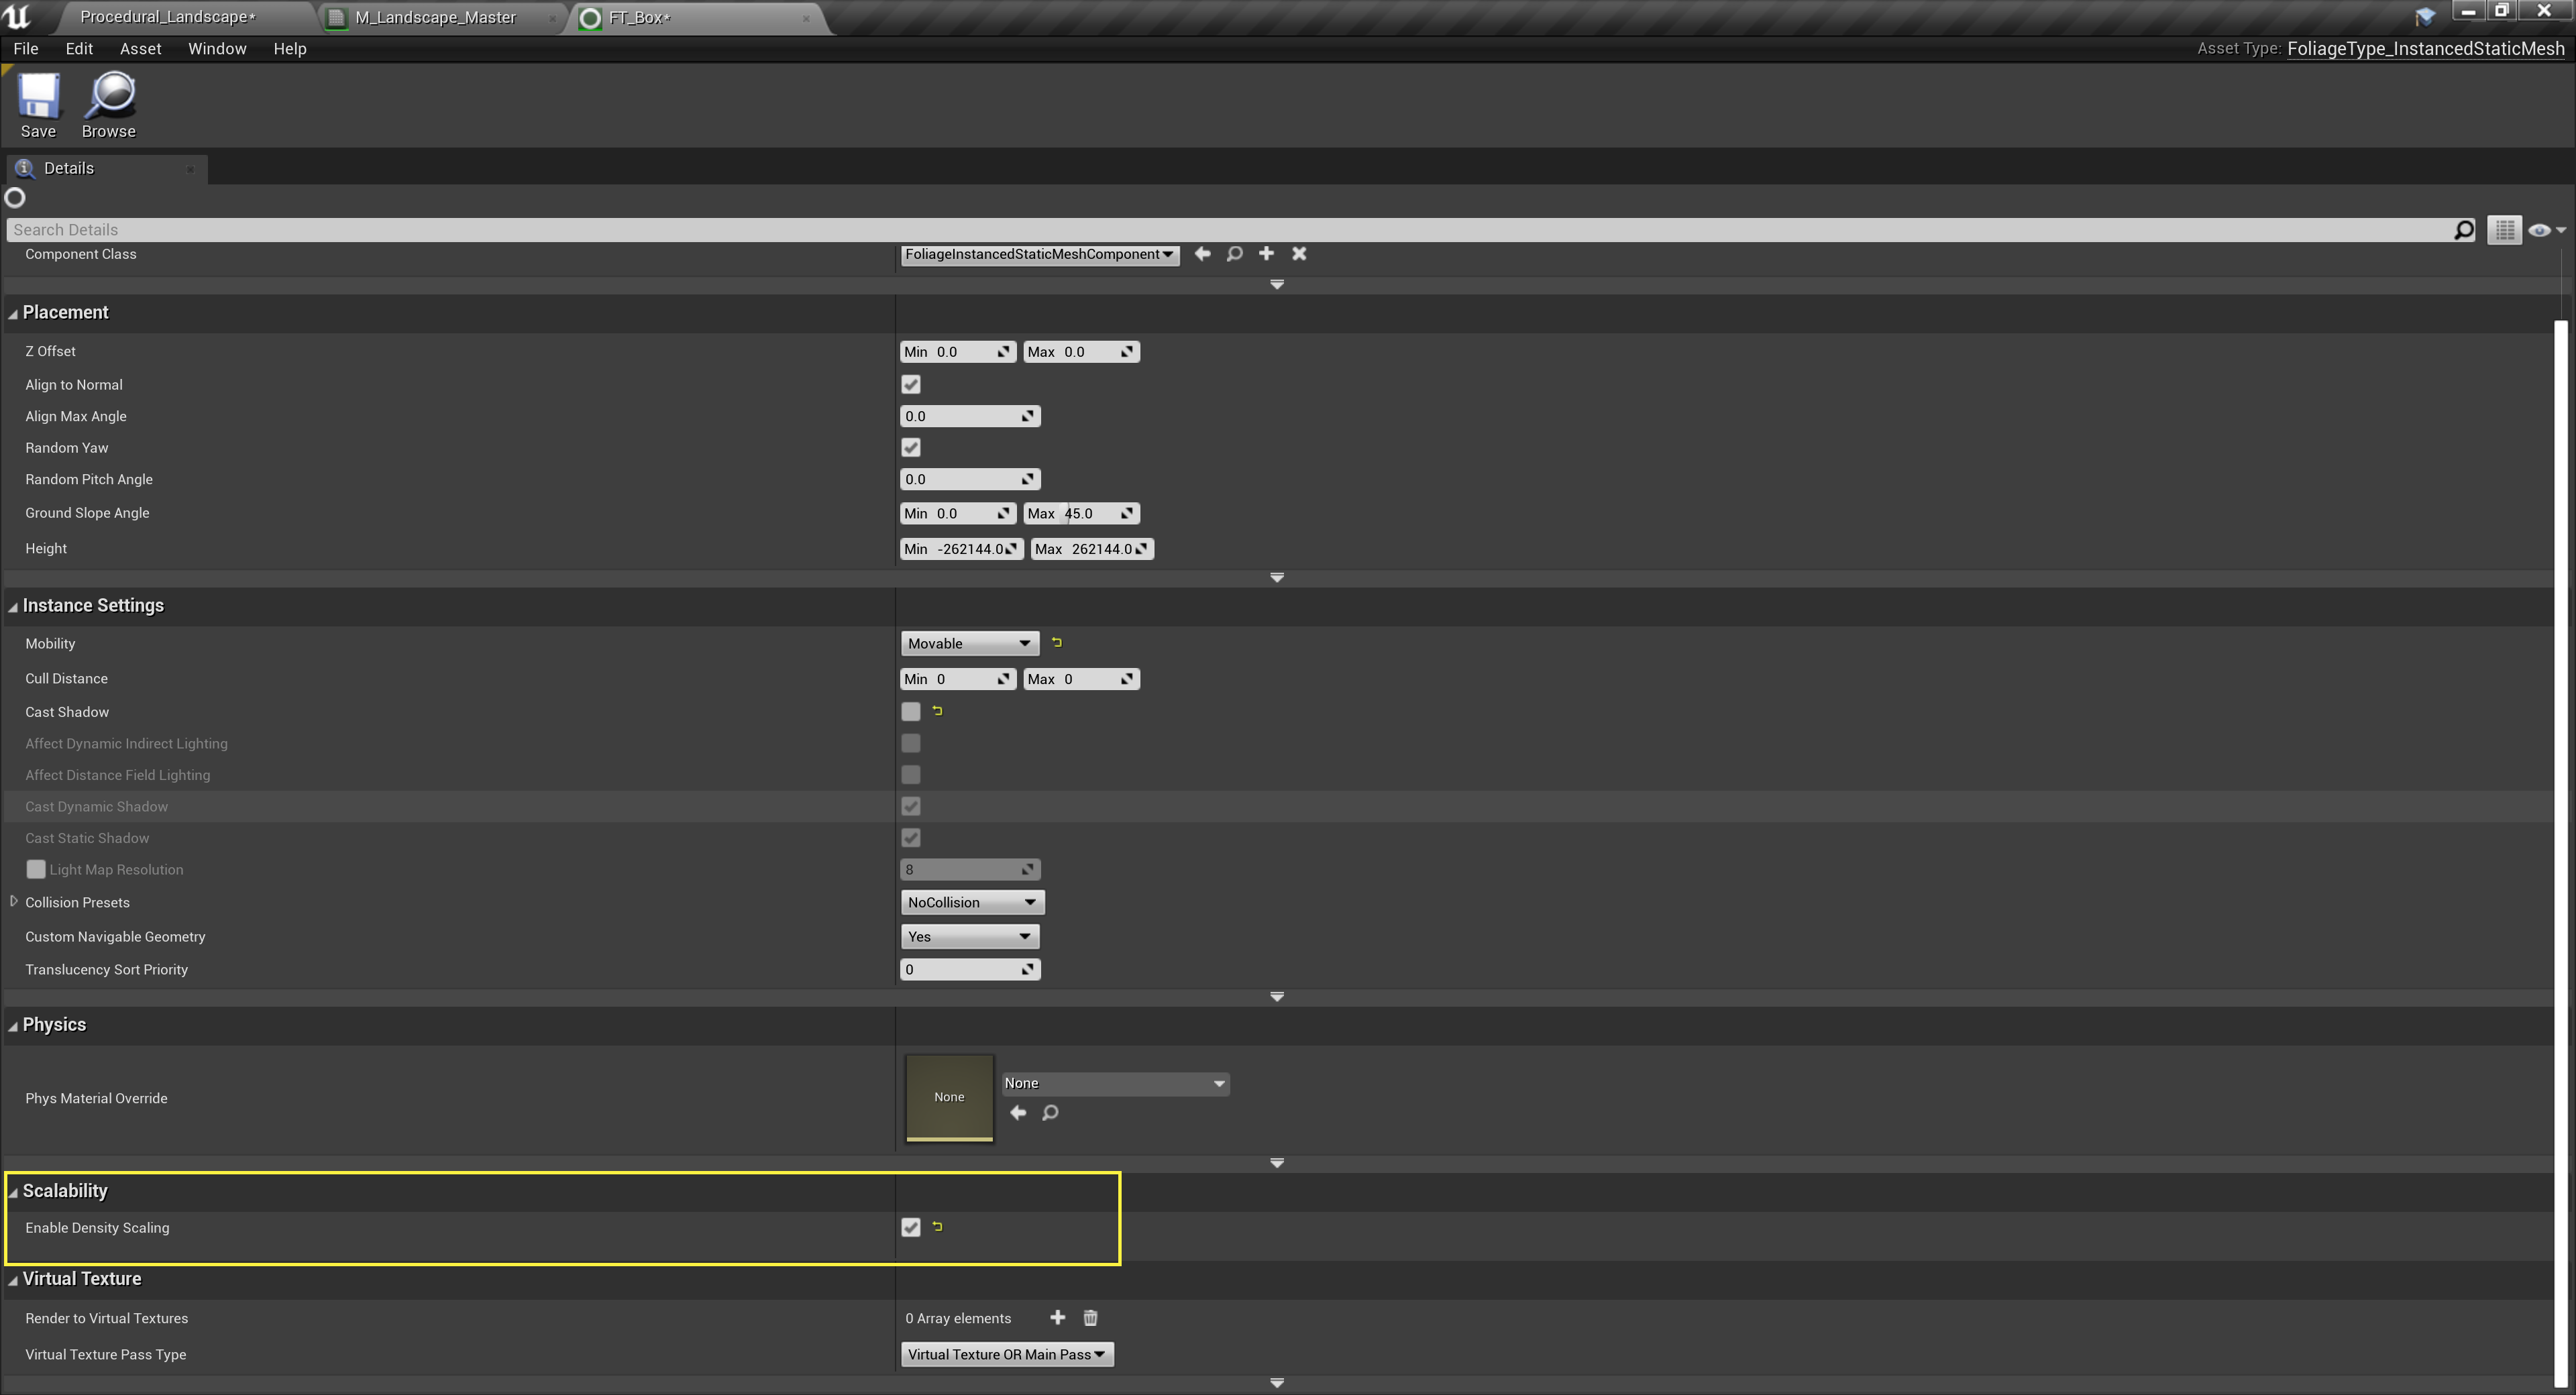
Once FT_Box is opened, expand the Mesh and Scalability sections.
![Foliage_Scalability_02_Windows.png]()
![Foliage_Scalability_02_Mac.png]()
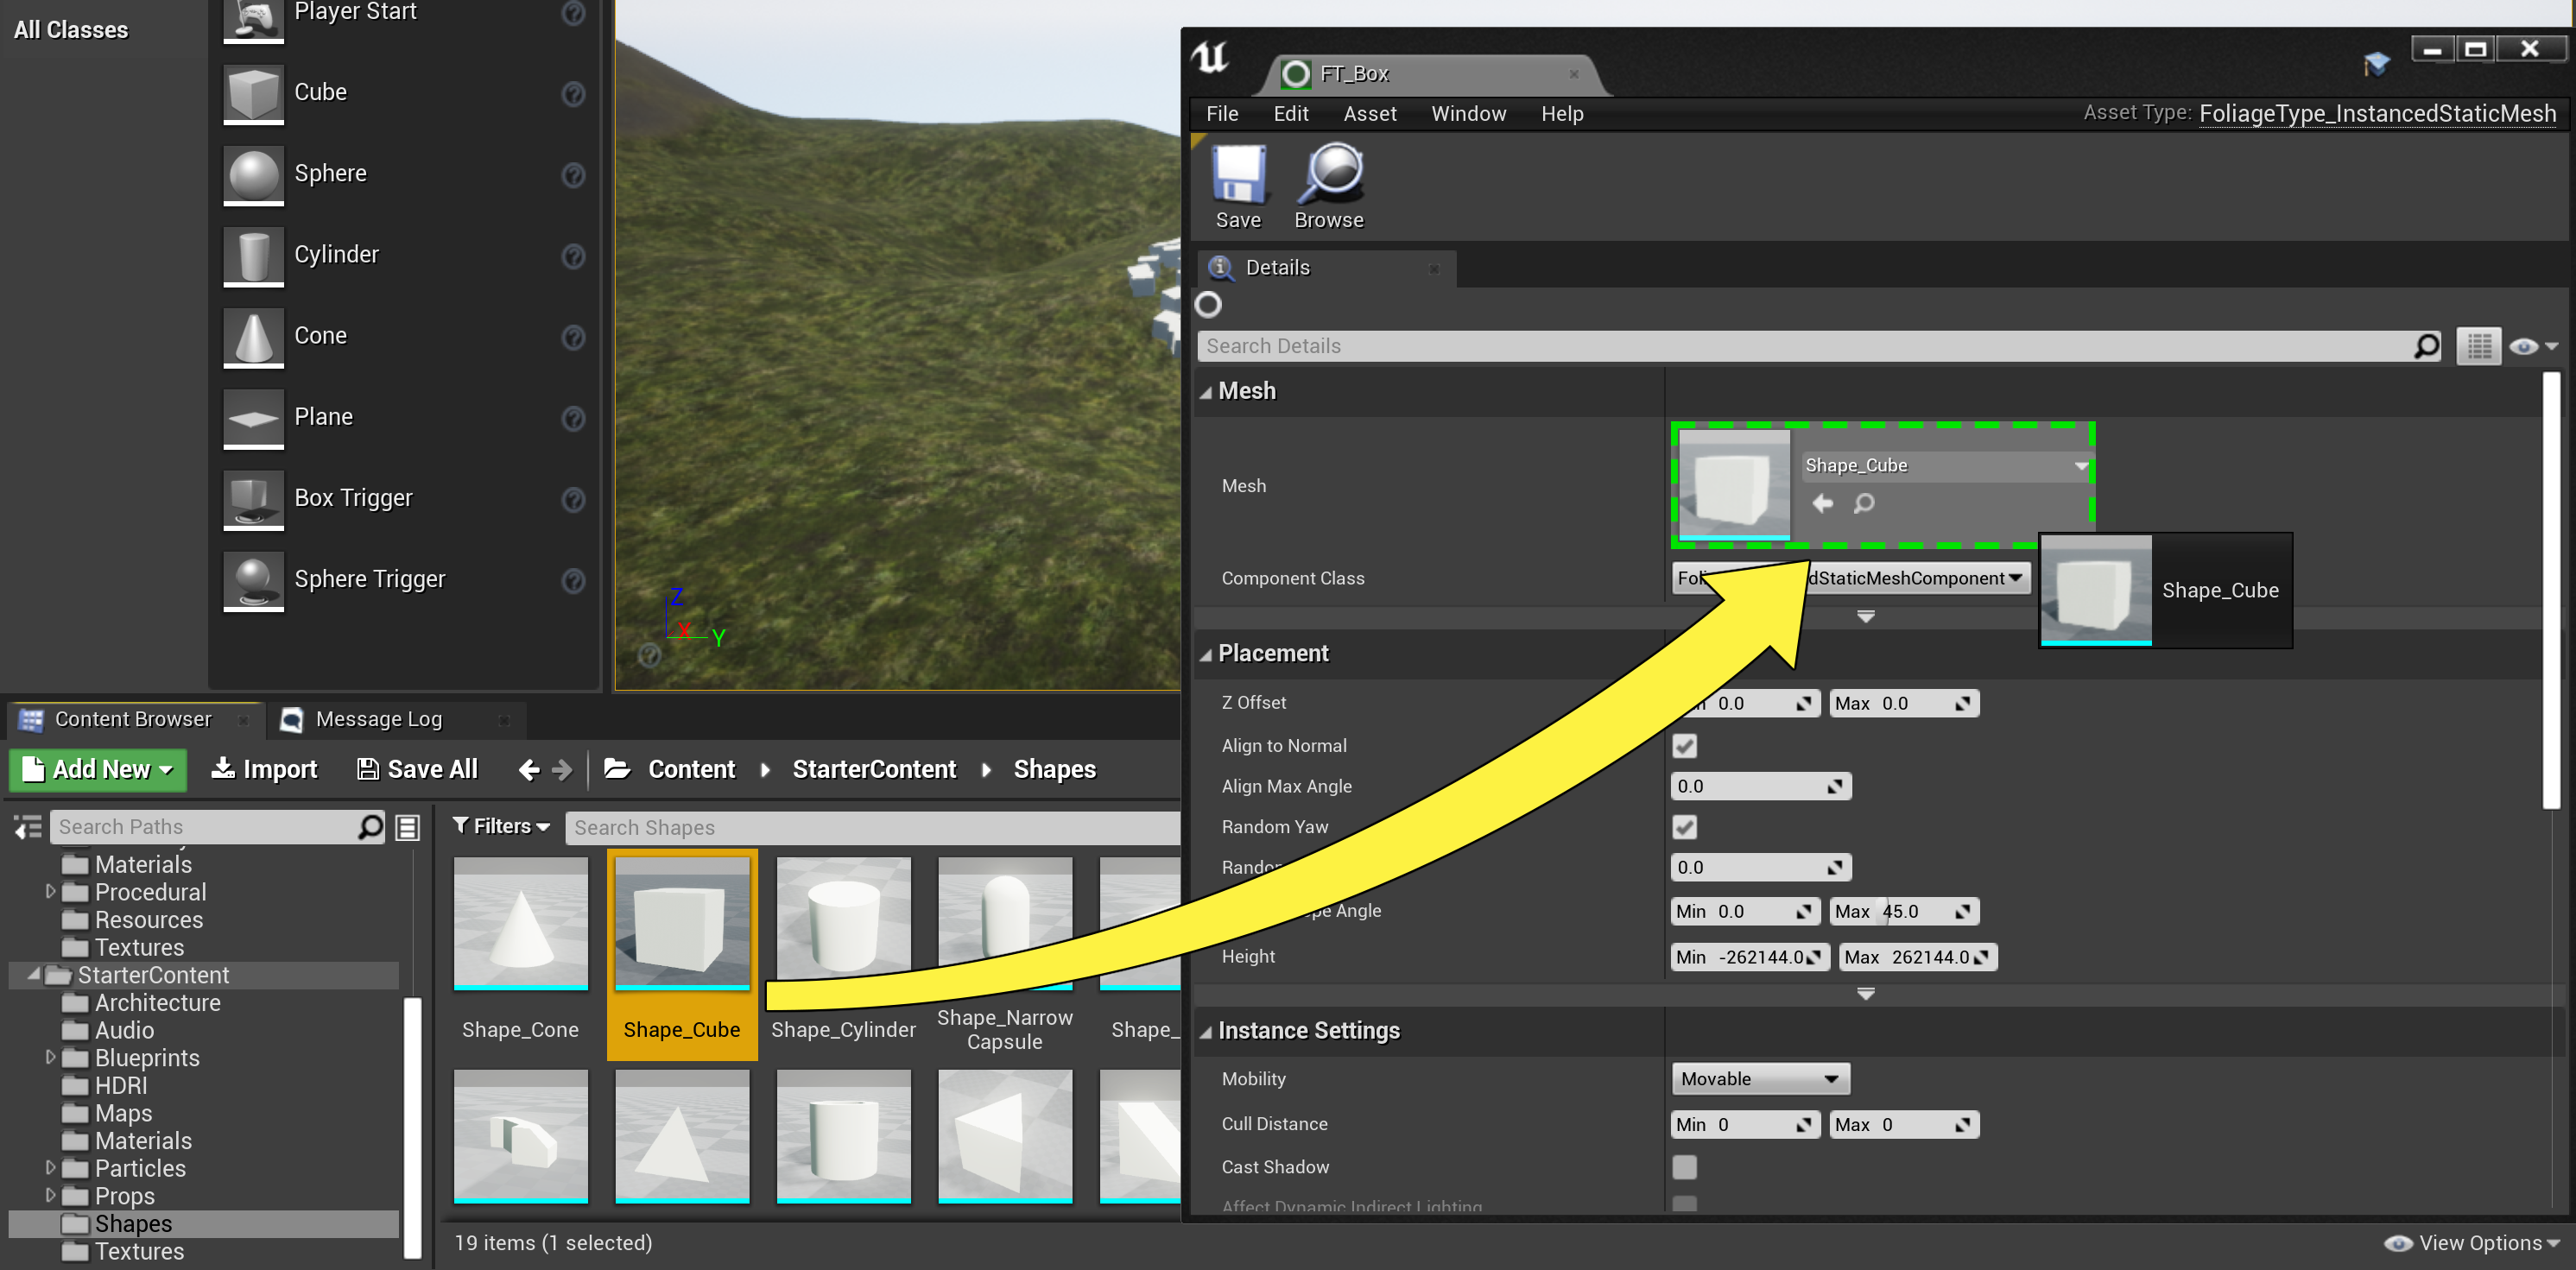
-
In the Content Browser select a Static Mesh (for this example we are using the Shape_Cube that comes with the Starter Content). In the FT_Box Foliage Type, under the Mesh section, drag the Shape_Cube from the Content Browser to the Mesh option.
![Foliage_Scalability_03_Windows.png]()
![Foliage_Scalability_03_Mac.png]()
-
In the Scalability section of the FT_Box Foliage Type, click on the box that is next to Enable Density Scaling to allow the Scalability System access to this Static Mesh.
![Foliage_Scalability_04_Windows.png]()
![Foliage_Scalability_04_Mac.png]()
The Enable Density Scaling option should typically only be enabled for detail foliage without collision such as small rocks and bushes. It should be disabled for Foliage Types with collision such as trees as the collision for removed instances will continue to exist in the game.
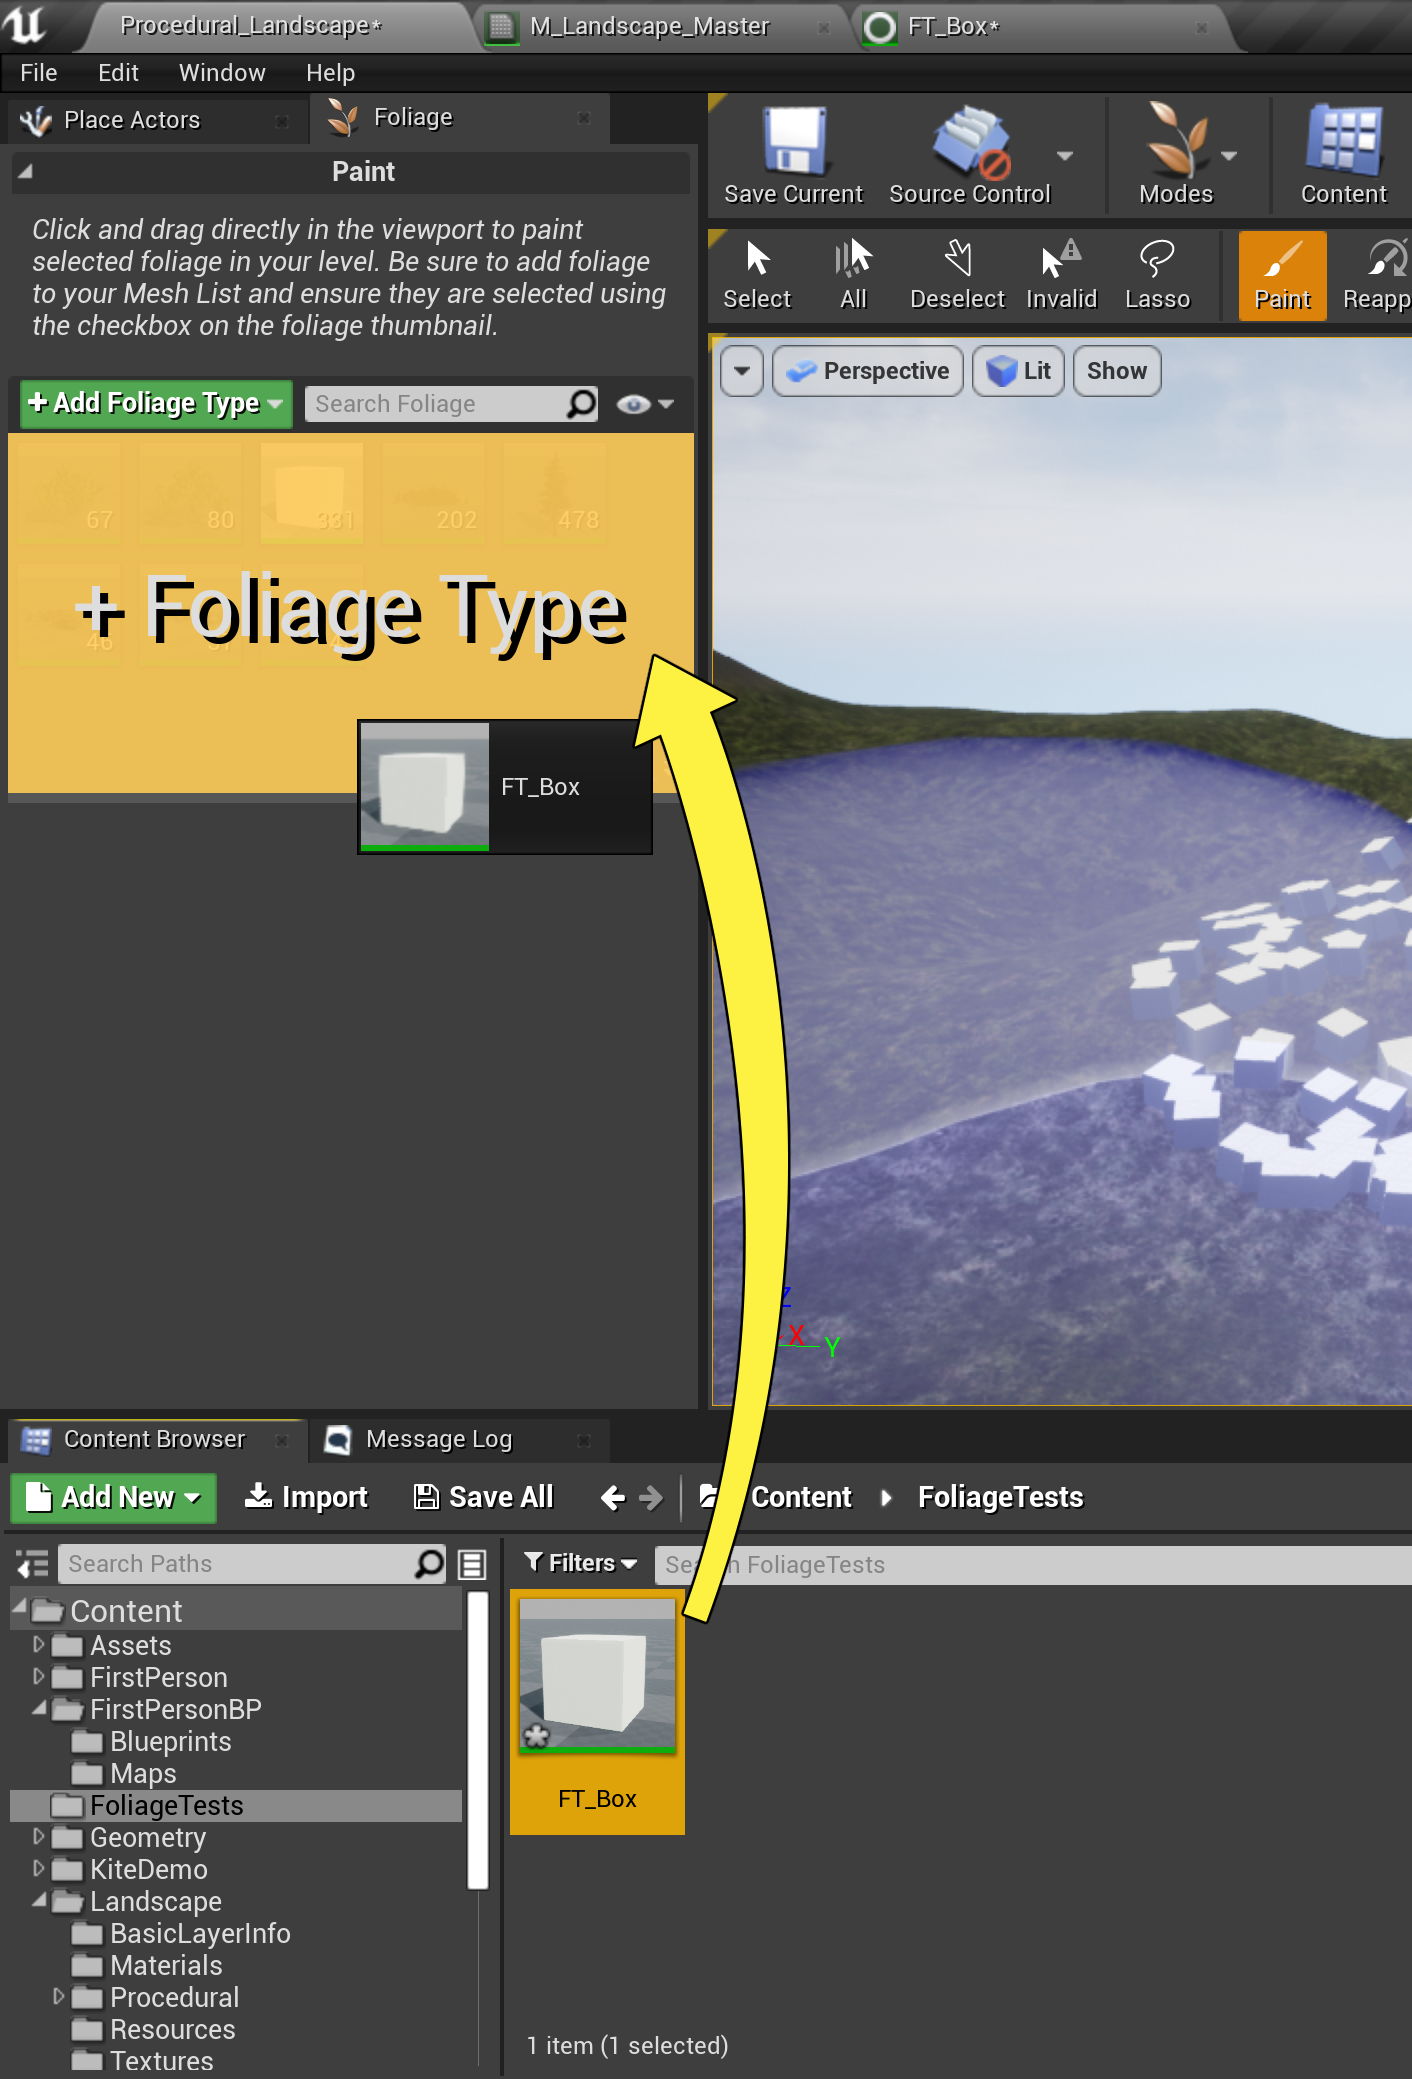
-
In the Modes dropdown, select the Foliage Tool . Select and drag the FT_Box Foliage Type from the Content Browser to the area that says Drop Foliage Here .
![Foliage_Scalability_05.png]()
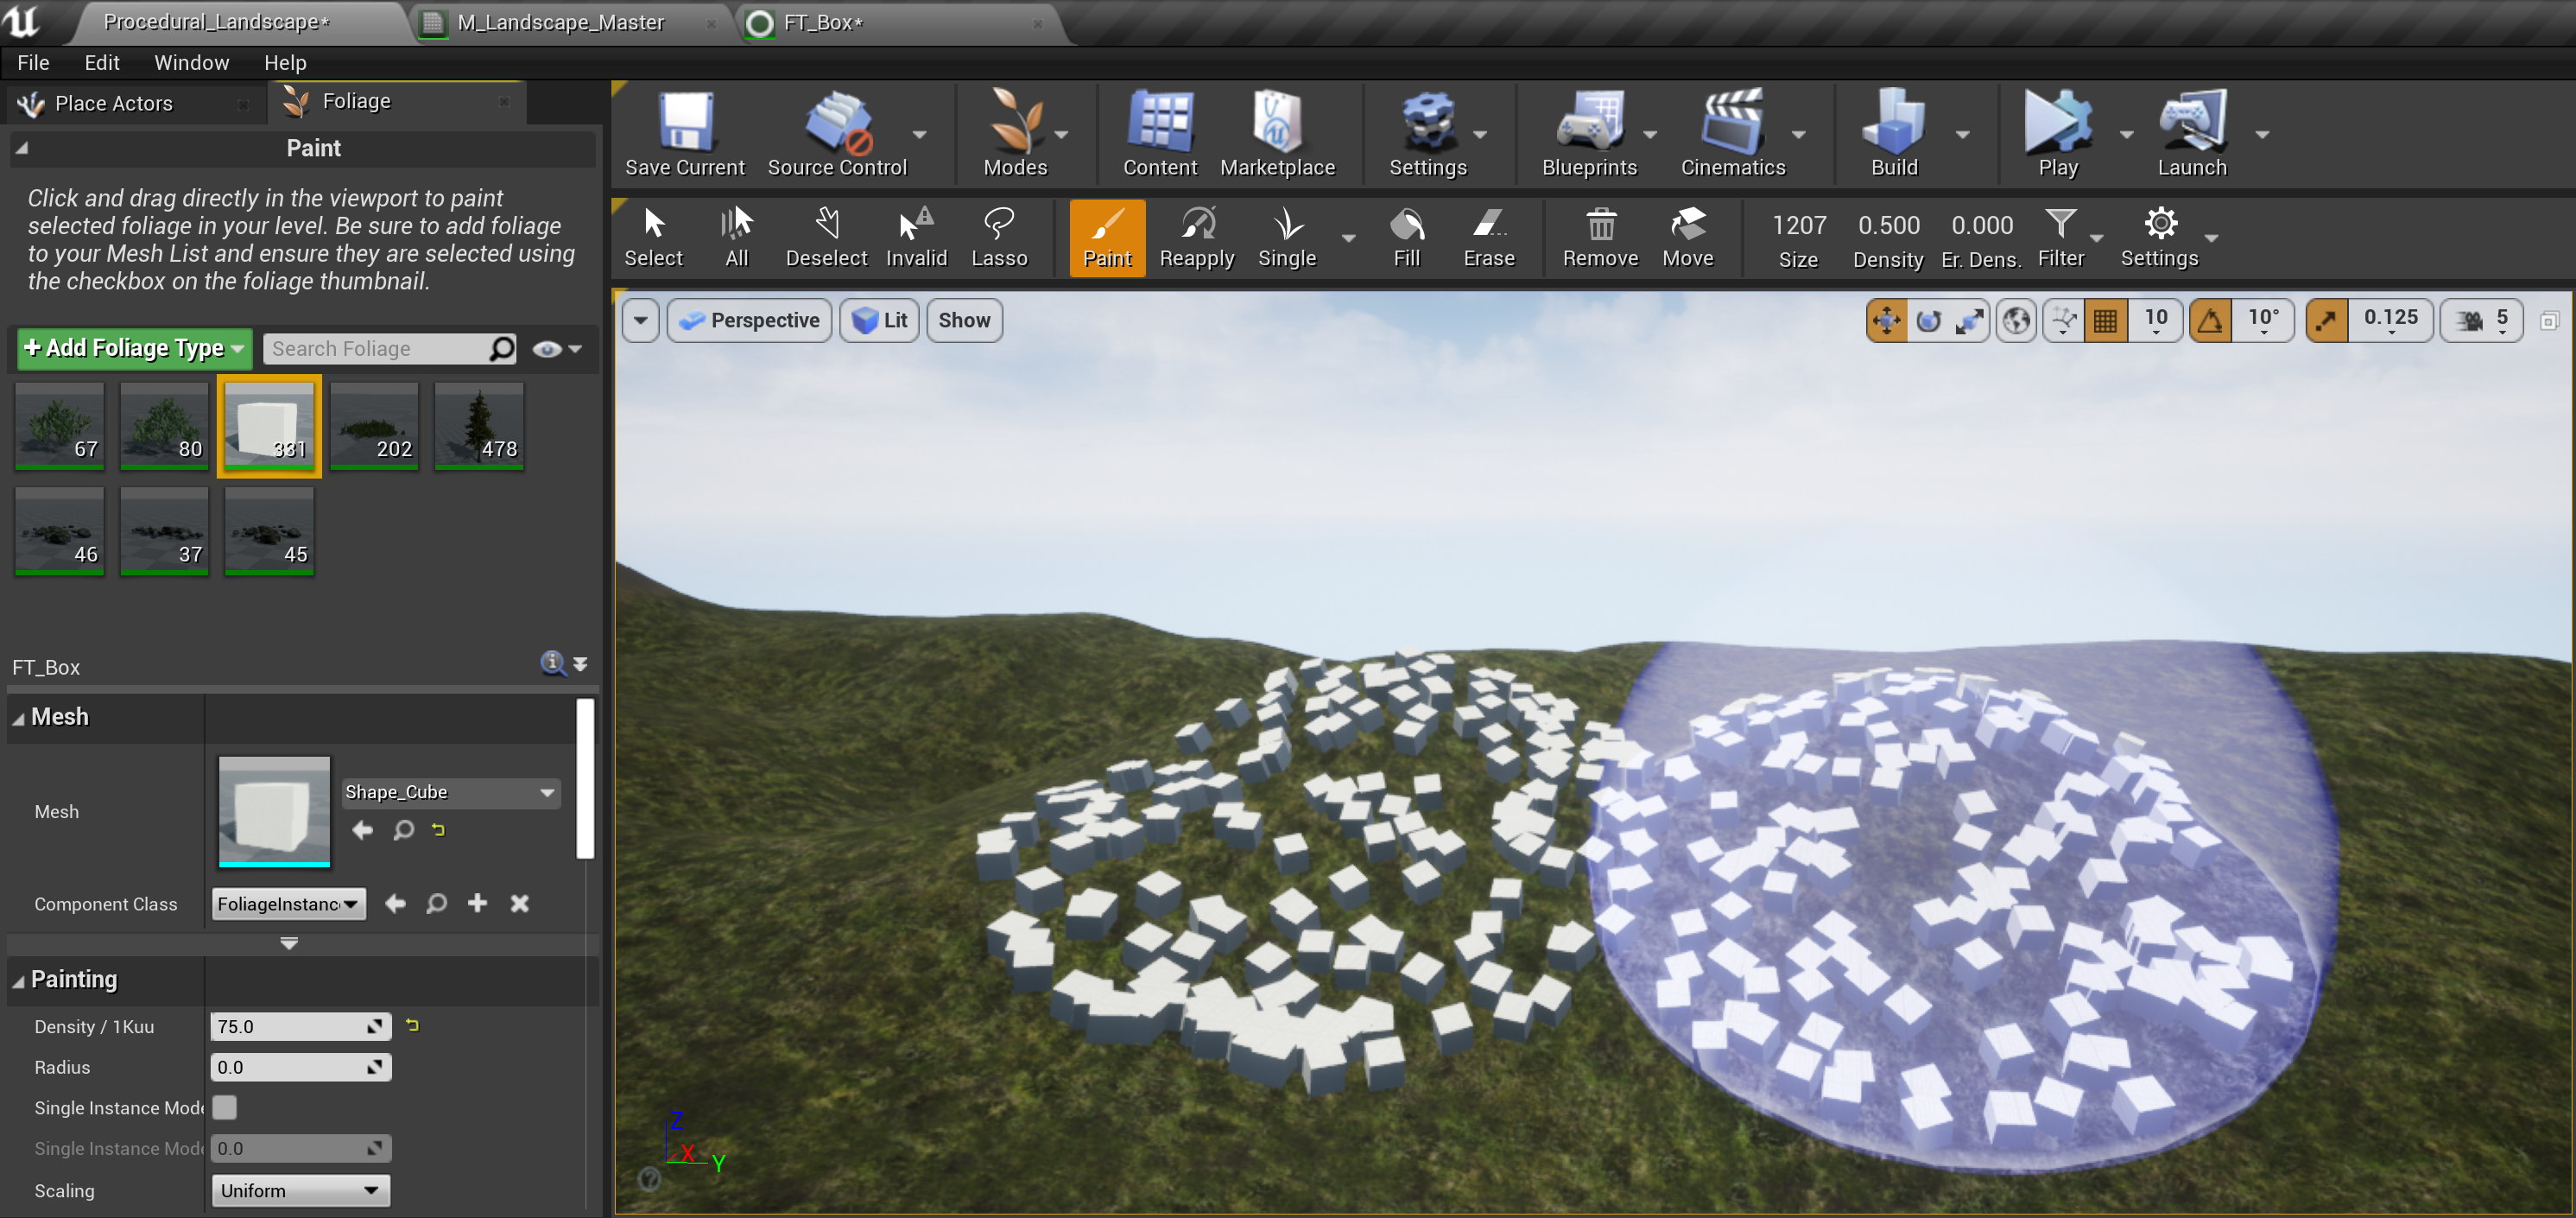
-
Select the FT_Box Foliage Type you placed in the Foliage Type list to select it. In the viewport, hold down the Left Mouse Button to begin painting the FT_Box Foliage meshes onto a surface.
To use the Foliage Painting mode, your Level must contain either a Landscape Terrain or Static Meshes with Collision enabled.
![Foliage_Scalability_06.png]()
-
On the Toolbar , click on the Play button to launch the level. Navigate to a location where Foliage has been added.
![Foliage_Scalability_07.png]()
-
You can control the density at which the Foliage is rendered by pressing the Backtick key (`) to open up the Console and entering the following command followed by a decimal number in the 0 to 1 range.
-
foliage.DensityScale
Adjusting the Foliage Density Scale setting and seeing the results update in real time does not work in any of the Editor viewports. The only way to see the Foliage Density update in real time is to input the command while the project is in a game mode like PIE, Simulate, or Standalone.
-


Below, the density of the Foliage changes as the foliage.DensityScale setting is set to 0.1, 0.2, 0.3, 0.4, 0.5, 0.6, 0.7, 0.8, 0.9, 1.0.
Drag the slider to adjust the foliage.DensityScale setting from 0.1 to 1.0.


