Choose your operating system:
Windows
macOS
Linux
In order to use Hierarchical Level of Detail (HLOD) Meshes, there are two processes you must perform in order to set up HLOD Meshes in your Level. First, you must Generate Clusters which groups Actors in your level together based on the settings you specify in the Cluster Generation Settings .
After Generating Clusters, you can then Generate Proxy Meshes out of those clusters. The process of Generating Proxy Meshes can take a long time based on the complexity of your scene or the settings specified in the Mesh Generation Settings .
In this how-to, we go through an example of building HLOD Meshes by Generating Clusters and Generating Proxy Meshes.

Steps
-
After you define your Cluster Generation Settings for the HLOD levels you need, click the Generate Clusters button.
![BuildHLODMesh_Step01.png]()
Once the process starts, you will see a progress bar appear that indicates the LOD level being generated.
![BuildingHLOD_Clusters-1.png]()
-
After clustering completes, the clustered LOD Actors will be populated inside the HLOD Outliner window.
![BuildingHLOD_ClusterActors.png]()
You can expand an LOD Actor to view the clustered Static Meshes by clicking the expand arrow to the left of the name.
![BuildingHLOD_ClusterActorsExpanded.png]()
You can also see the clusters in the Viewport by selecting an LOD Actor (and Static Meshes) from the HLOD Outliner .
![BuildHLODMesh_Visible.png]()
Click image for full view.
If you want to make changes to a given cluster, you can adjust the Cluster Generation Settings to your desired settings and Generate Clusters again. You can also use the HLOD context menus to define settings for LOD Actors or what to do with a Static Mesh Actor in a cluster.
-
Once you are satisfied with the clusters, click the Generate Proxy Meshes button.
![BuildHLODMesh_GenerateButton.png]()
Once the process starts, a progress bar will appear and indicates the LODActor and LOD Level being worked on out of the total number of Proxy Meshes that will be generated.
![BuildHLODMesh_GenerateBuilding.png]()
Depending on your HLOD Settings, the complexity of your scene, and your computer specifications, this process can take a long time to complete. As a frame of reference, a system with a 12-core i7 processor, a GTX-980 video card, and 64 GB of RAM took 10 to 12 minutes with default settings on both HLOD Levels, with 100+ LOD Actors per HLOD level.


Generate Clusters
Cluster generation uses the settings from the individual HLOD Levels to decide how it should group Static Mesh Actors in the scene together. This generation process can take some time depending on the settings use, the number of Actors being groups, whether materials are generated, and generally on your hardware's specs.
-
Once you've setup your specific settings for the individual HLOD levels you need, click the Generate Clusters button.
![image_3.png]()
Once the process starts you'll see a progress bar appear that indicates the LOD level being generated.
![image_4.png]()
-
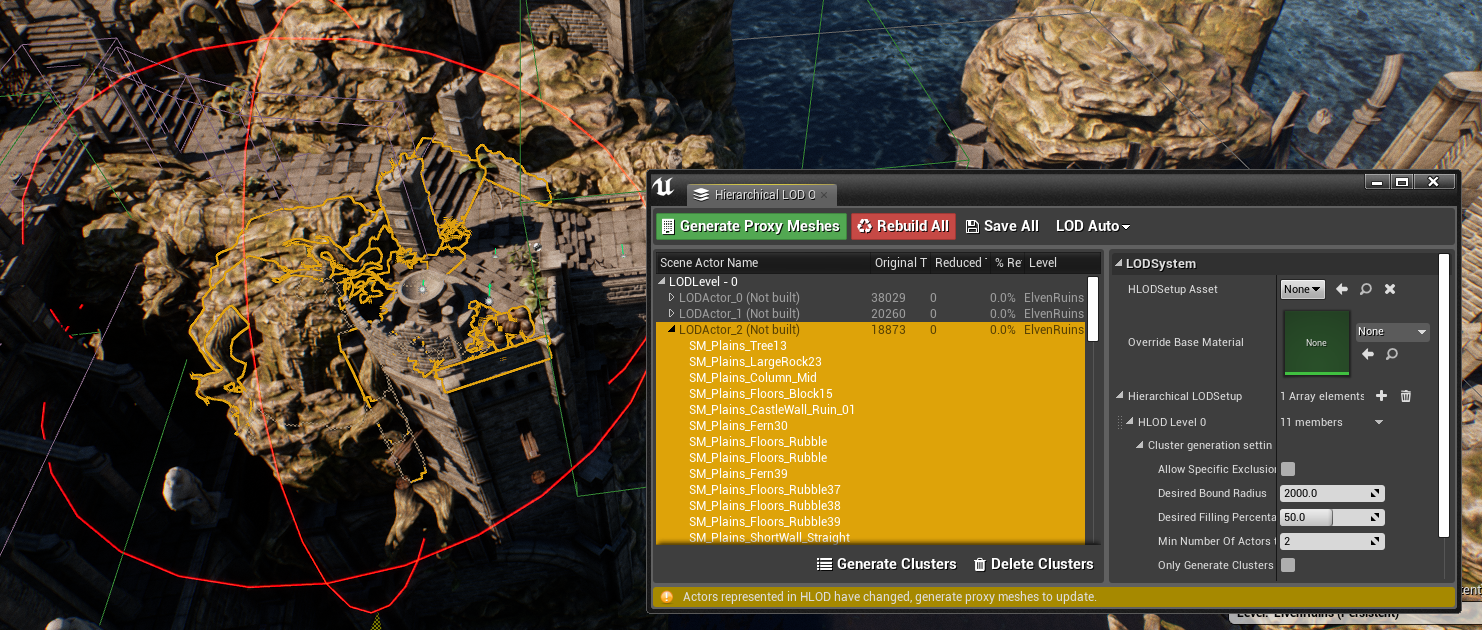
Now that the process has completed you'll see the HLOD Outliner populated with all the clustered Actors .
![image_5.png]()
-
You can expand the individual LODActors to see what Static Meshes make up this cluster by clicking the arrow button to the left of the name.
![image_6.png]()
-
You can visualize the clusters in the level by selecting a LODActor from the HLOD Outliner and locating it in the editor viewport.
![image_7.png]()


To visualize how the generated clusters work in the editor you can use the Forced Viewing Level slider to see the HLOD in action without the need to have it transition at a specific screen size. This is helpful for troubleshooting any issues appearing on screen that may be part of the generated cluster.

Should you run into any issues you don't like with the generated cluster you can expand the specified cluster and select the offending Static Mesh Actor . You can then click and drag it to another cluster, or you have the option to Remove or Exclude it from the generation of the cluster by right-clicking on the Actor's name in the list.
Actors can also be excluded on a per-instance basis by selecting them in the level and in their Details Panel set the option for Enable Auto LODGeneration to false.
Further, if you wish to add an Actor to a Cluster you can click and drag from the World Outliner to the Cluster you wish it to be included in.

Repeat this process while adjusting the values in the HLOD's level Cluster Generation Settings until you are happy with the clusters being generated, then continue on to the next section: Generate Proxy Meshes .
Generate Proxy Meshes
After you're happy with the results of the generated cluster you can move on to the option to Build the clusters into a Proxy Mesh. This proxy mesh will be a newly created Static Mesh Actor that combines materials (if enabled), has it's own lightmaps, and it's own editable static mesh that can be opened in the static mesh editor.
-
If you're ready to build the proxy meshes you can now click the button "Generate Proxy Mesh" button to start the process.
![image_13.png]()
Once the process starts you'll see the progress bar appear that indicates the HLOD Level being worked on and the number of Proxy Meshes being generated. This progress bar does not show all the HLOD Levels and total number of proxy meshes being created, only that specific level.
![image_14.png]()
Depending on your HLOD Level settings, the number of proxy meshes being created, and your system specs this process can take a while, even for high-end machines!


As a reference the Proxy Mesh Generation process for my machine (12-core i7 processor, GTX-980, and 64GB of RAM) took ~10-12 minutes with default settings for both HLOD Levels and ~100+ LODActors per HLOD level.