Choose your operating system:
Windows
macOS
Linux


In order to understand and use the content on this page, make sure you are familiar with the following topics:

At the end of this guide, you'll have a room similar to the one pictured above.
The focus of the Unreal Editor Quick Start Guide is to walk you through the basics of working with Unreal Engine 4.
After going through this tutorial, developers will know the following:
-
How to navigate viewports
-
How to create a new level
-
How to place and edit actors in levels
-
How to build and run levels
1. Required Setup
In the Project Browser , you can create new projects based off several different template types, or open any previously created projects or samples that you have downloaded. Let's create a new project.
-
After Installing Unreal Engine and launching the Unreal Editor, the Project Browser appears. Under New Project Categories , select a development category. For this quick start, let's create a project from the Games category, then click Next .
![Select Category]()
Click image for full size.
![Select Category]()
Click image for full size.
-
In the second page of the Project Browser, select the Blank template, then click Next .
![Select Category]()
Click image for full size.
![Select Category]()
Click image for full size.
-
On the final page of the Project Browser, select the Blueprint and With Starter Content settings, enter a Folder location and Name for your project, then click Create Project .
![Select Category]()
Click image for full size.
![Select Category]()
Click image for full size.


2. Navigating the Viewport
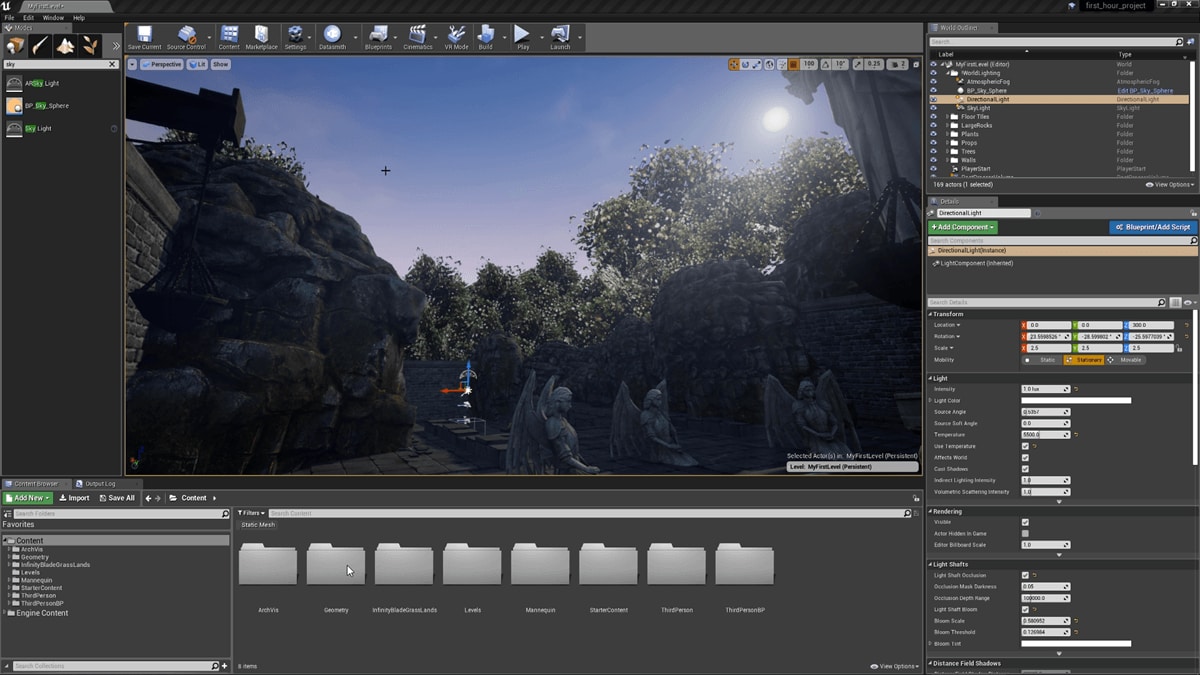
With the project open and ready to go, the first thing you may notice is the Viewport in the center of the Unreal Editor.

Inside the Viewport is where you will do most of your level construction. The template project that we selected in the previous step includes a small sample Level and some assets for us to get started with. Using this little area as a point of reference, take a moment to get used to the Viewport Camera Controls by using the most common methods of navigating the Viewport in Unreal Engine 4.
Standard Controls
These controls represent the default behavior when clicking and dragging in the viewports with no other keys or buttons pressed. These are also the only controls that can be used to navigate the orthographic viewports.
|
Control |
Action |
|
|---|---|---|
|
Perspective |
||
|
LMB + Drag |
Moves the camera forward and backward and rotates left and right. |
|
|
RMB + Drag |
Rotates the viewport camera. |
|
|
LMB + RMB + Drag |
Moves up and down. |
|
|
Orthographic (Top, Front, Side) |
||
|
LMB + Drag |
Creates a marquee selection box. |
|
|
RMB + Drag |
Pans the viewport camera. |
|
|
LMB + RMB + Drag |
Zooms the viewport camera in and out. |
|
|
Focusing |
||
|
F |
Focuses the camera on the selected object. This is essential to make the most out of tumbling the camera. |
|
To switch to an Orthographic View , click the Perspective drop-down then select an Orthographic View Mode.

WASD Fly Controls
All of these controls are only valid in a Perspective viewport, and by default you must hold RMB to use the WASD game-style controls.
|
Control |
Action |
|---|---|
|
W / Numpad8 / Up |
Moves the camera forward. |
|
S / Numpad2 / Down |
Moves the camera backward. |
|
A / Numpad4 / Left |
Moves the camera left. |
|
D / Numpad6 / Right |
Moves the camera right. |
|
E / Numpad9 / Page Up |
Moves the camera up. |
|
Q / Numpad7 / Page Dn |
Moves the camera down. |
|
Z / Numpad1 |
Zooms the camera out (raises FOV). |
|
C / Numpad3 |
Zooms the camera in (lowers FOV). |
Orbit, Dolly, and Track
Unreal Editor supports Maya-style pan, orbit, and zoom viewport controls, making it much easier for Maya artists to jump into the tool. If you are unfamiliar, here is a breakdown of the keys:
|
Command |
Description |
|---|---|
|
Alt + LMB + Drag |
Tumbles the viewport around a single pivot or point of interest. |
|
Alt + RMB + Drag |
Dollies (zooms) the camera toward and away from a single pivot or point of interest. |
|
Alt + MMB + Drag |
Tracks the camera left, right, up, and down in the direction of mouse movement. |
The use of the F key is not limited to Maya-style controls. You can always press F to focus on a selected object or group of objects.
3. Create a New Level
Next we will create a new Level that we will use to build our game environment in. While there are several different ways in which you can create a new Level, we will use the File Menu method, which lists level selection options.
-
Inside the Unreal Editor, click the File Menu option then select New Level... .
![FileMenu_Windows.png]()
![FileMenu_Mac.png]()
This will open the New Level dialog window:
![NewLevel_Windows.png]()
![NewLevel_Mac.png]()
The Default level includes some of the commonly used assets for constructing levels, the VR-Basic level includes some assets for constructing levels with the VR Editor, and Empty Level is a completely blank level with no assets. For the purposes of this guide we are going to start from scratch with a completely blank slate.
-
Click the Empty Level to select it.


4. Placing Actors in the Level
In this step, we will begin placing Actors (for example, lights or geometry) into our empty level. We will cover the two most common ways of adding Actors to the level: through Select Mode and through the Content Browser . After completing this step, you will know how to place Actors inside your own levels and can begin manipulating those Actors to create your environment.
-
In the Place Actors panel on the left, click the Geometry category and select the Box .
![ModesPanel.png]()
-
Left-click and drag the Box into the Level Viewport .
![placeBox.png]()
When you release the Left Mouse Button , the Box is added to the level.
![place2.png]()
-
In the Details panel (lower-right window of the editor), with the Box still selected, set Location and Rotation all to 0 .
-
Set the Scale to 4 x 4 x 0.1 .
![resize_floor.png]()
We will use this as the floor on which the player can walk around.
-
In the Place Actors panel select the Lights tab, then drag-and-drop a Directional Light into the level on top of the floor.
![placeLight.png]()
-
On the Translation Tool , click and drag the Z-Axis (blue) on the gizmo up, away from the surface of the floor.
![moveLight.png]()
If the Directional Light becomes unselected, you can re-select it by Left-clicking on it in the Level Viewport .
-
In the Place Actors panel, select the Visual Effects tab and drag-and-drop an Atmospheric Fog into the level.
![placeFog.png]()
The Atmospheric Fog Actor will add a basic sky to the level and the level will become illuminated instead of dark.
-
In the Place Actors panel, select the Basic tab and drag-and-drop a Player Start into the level.
![placeStart.png]()
-
In the Place Actors panel, select the Volumes tab and drag-and-drop a Lightmass Importance Volume into the level.
![placeVolume.png]()
The Lightmass Importance Volume is used to control and concentrate lighting and shadowing effects within the volume. When placing the Lightmass Importance Volume in the level, the default size of the volume does not cover our playable area, so we will need to scale it up.
-
Inside the Level Viewport , press R to switch to the Scale Tool .
-
Click and drag the white box in the center of the Scale Tool so that the Lightmass Importance Volume encapsulates the floor.
![scaleVolume.png]()
-
Inside the Content Browser under Content > StarterContent > Props , drag-and-drop the SM_TableRound into the level.
![placeTable.png]()
Try to place the table in the center of the floor using the Move Tool (press W if it is not selected).
-
Also under Content > StarterContent > Props , drag-and-drop the SM_Chair into the level.
![addChair.png]()
-
With the SM_Chair selected inside the Level Viewport , press E to access the Rotation Tool .
![Rotate1.png]()
-
Left-click and drag the blue axis arc (the gizmo will update to show degrees) and rotate the chair to face the table.
![Rotate2.png]()
-
Using the placement methods above, create a small scene by adding more Actors from the Modes Panel and Content Browser .
![placeThings.png]()
Try adding some lights, props, walls and a roof (found under the Content > StarterContent > Architecture folder).


Need help punching out the holes for windows and doors? Check out our video on Adding Windows & Doors .
5. Editing Placed Actors
With several different Actors placed inside our level, the next step involves
Once you have finished this step, you will have seen where to access and modify the properties of Actors, so that you can begin editing and experimenting with different settings inside your own levels.
-
Select the Directional Light Actor by Left-clicking on it in the Viewport.
![selectDL.png]()
-
In the Details Panel under the Light category, enable Atmosphere Sun Light :
![enableSun.png]()
Depending on the rotation of your Directional Light Actor, the sky color will change. If you rotate the Viewport around, you will see that the sun now aligns with the Directional Light Actor. This is a real time process, so you can rotate the Directional Light Actor (press E to switch to Rotation Mode ) and the sky will change color from night to sunrise, daytime, and sunset.


Next we will change the Material on one of your placed Static Mesh Actors by first selecting it.
-
With your Actor selected, in the Details panel under Materials , click the drop-down box under Element 0 .
![material_1.png]()
-
In the pop-up window, select the M_Brick_Clay_New Material.
![material_2.png]()
-
All Actors in your level have many properties for you to adjust inside the Details panel. Explore changing their settings!
![beforeBake.png]()
Try changing the Light Color of your lights, applying more Materials or changing the Scale of the Actors in your level.


6. Running the Build Process
By now you may have noticed the "Preview" labels in the shadows and the light leaking under walls.

This is because all the lights in the scene are static and use precomputed, or baked lighting, which has not been calculated yet. The "Preview" text is there to remind you that what you are seeing in the viewport currently is not what you will see in the game.
In this step, we will go through the Build process which will build all levels (precompute lighting data and visibility data, generate any navigation networks and update all brush models). We will also take a look at Light Quality settings inside of the Build Options , which we can use to adjust the quality of our lighting when it is built.
-
From the Main Toolbar, click the down-arrow next to the Build option.
![buildOptionsButton.png]()
-
Under Lighting Quality , choose the Production setting.
![productionLighting.png]()
This will give us the highest quality lighting but is the slowest in terms of computation time and will increase the time it takes to Build the game. Our level is small, so it should not impact us too much, but keep this in mind when you are working on larger levels as you may want to leave it on a mid-low level setting while creating your level and switching it to Production in a "final pass" on your level.
-
Wait for the Build to complete.
![wait.png]()
You will see the progress in the lower-right corner of the Unreal Editor as seen in the image above. Once the Build process is complete, the level lighting will update to give you a better indication of the final result.
![built.png]()
-
From the Main Toolbar, click the Play Button to play in the editor.
![PlayInEditor.png]()
Using WASD to move and the Mouse to turn the camera, you can fly around your level.


7. On Your Own!
At this point, you should have created a Build of the level lighting and previewed your game with the Play in Editor feature. Each of the steps leading up to this point have been aimed at getting you quickly up to speed on how to perform the most common actions when constructing levels inside the Unreal Editor.
Using the methods that were provided during the course of this guide, try to do the following on your own:

-
Change the lighting of the level to a moonlit, night scene.
-
Add another room, attached to the first room.


-
On the attached room, try to make it elevated and join them with stairs.
-
Add some bushes, a couch, shelves and a front door.

-
Add different kinds of lights with different colors.
-
Use different Materials on some of your Actors.
For more information on the topics covered in this quick start guide, see the Building Virtual Worlds .
As for specifics covered in this quick start:
-
For more information on the Level Editor, see: Level Editor
-
For more information on Viewports, see: Viewports
-
For more information on the Editing Modes available in Unreal Editor, 4 see: Level Editor Modes
-
For more information on the Content Browser, see: Content Browser
-
For more information on the Details Panel, see: Details Panel
-
For more information on Building, see: Lightmass
-
For more information on Lighting, see: Lighting Quick Start Guide