Choose your operating system:
Windows
macOS
Linux
The Unreal Editor Landscape Quick Start Guide walks you through creating a new Landscape, sculpting the Landscape, creating new Materials for the Landscape, and painting those Materials on the Landscape.
1 - Working with the Landscape Tools
The Landscape system inside of Unreal Engine 4 (UE4) is a collection of tools that allow you to create expansive outdoor environments. But before we dive into creating our first Landscape, let us first familiarize ourselves with some of the tools and keyboard inputs that are most commonly used to interact with the Landscape system.
Opening the Landscape Tool and Working with Modes
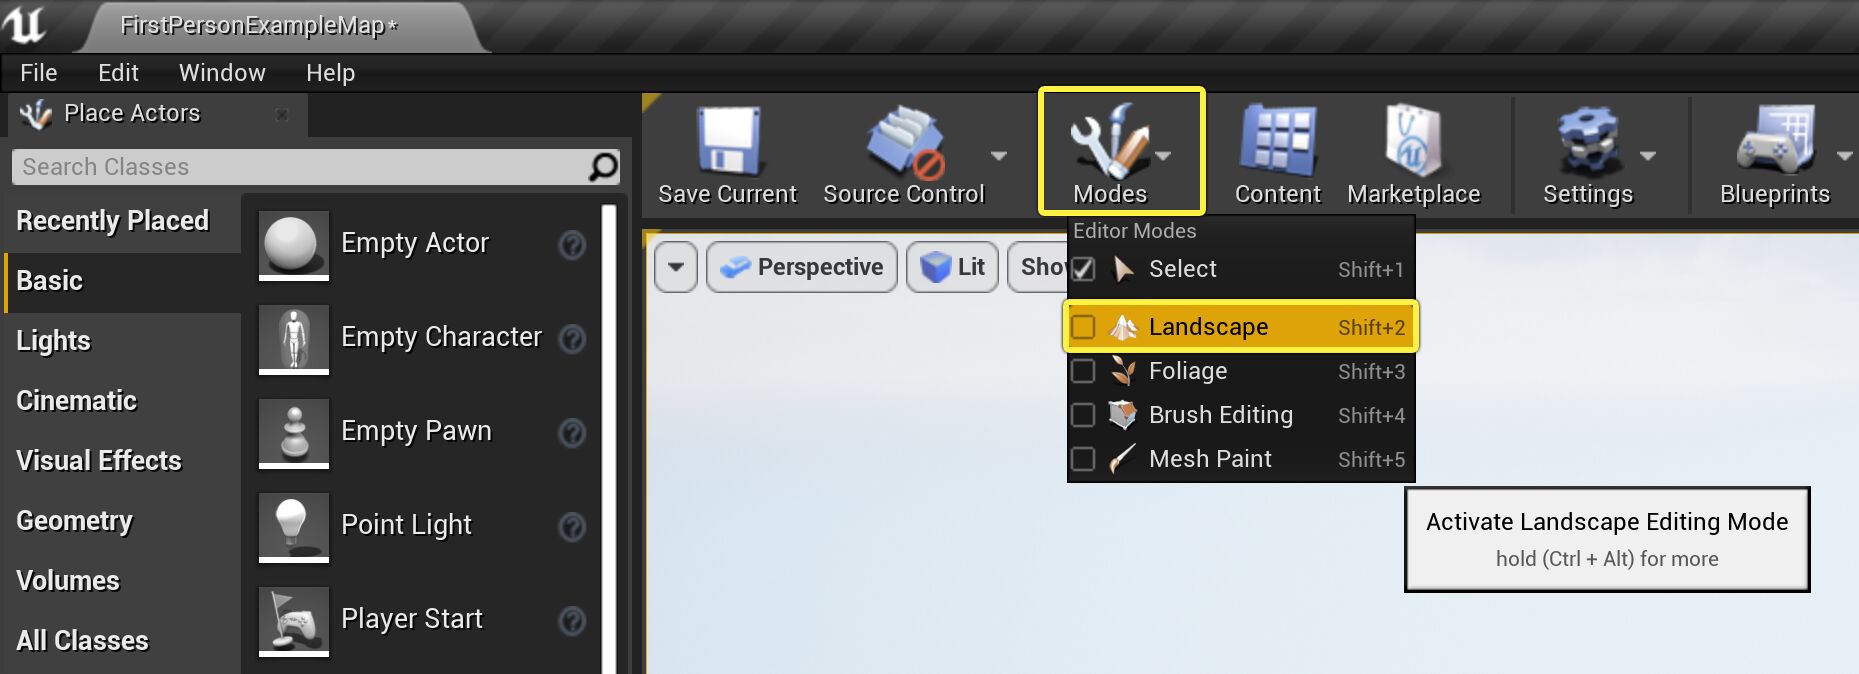
All of the tools that are used to interact with the Landscape system can be found under the Landscape option that is located in the Modes dropdown menu. To enable the Landscape tools, open the Modes dropdown and choose the option from the menu.
The Landscape tool has three modes, Manage , Sculpt , and Paint that are accessible by clicking on their icons at the top of the Landscape's toolbar window. Each mode will allow you to interact with the Landscape in a different manner. Here is a very quick rundown of what each mode allow you to do.
|
Icon |
Mode |
Description |
|---|---|---|
|
|
Manage mode |
Enables you to create new Landscapes, and to modify Landscape components. Manage mode is also where you work with Landscape Gizmos to copy, paste, import, and export parts of your Landscape. For more information about Manage mode, see Manage Mode . |
|
|
Sculpt mode |
Enables you to modify the shape of your Landscape, by selecting and using specific tools. For more information about Sculpt mode, see Sculpt Mode . |
|
|
Paint mode |
Enables you to modify the appearance of parts of your Landscape by painting textures on it, based on the layers defined in the Landscape's Material. For more information about Paint mode, see Paint Mode . |
Interacting with the Landscape Tools
While each of the three modes within the Landscape tools allows you to interact with the Landscape differently, but the keyboard and mouse keys that you use are similar. Here is a rundown of some of the most common keys, key combinations, and mouse buttons that are used when working with the Landscape tool.
|
Common Controls |
Operation |
|---|---|
|
Ctrl |
Allows you to select Landscape components. |
|
Left Mouse Button |
Heightens or increases the heightmap or selected layer's weight. For example, in Sculpting mode, this will raise the Landscape heighmap. In Paint mode this will apply the selected material to the Landscape. |
|
Shift + Left Mouse Button |
Lowers or decreases the heightmap or selected layer's weight. For example, in Sculpting mode, this will lower the Landscape heightmap. In Paint mode, this will erase the selected material that was applied to a particular section of the Landscape. |
|
Ctrl + Z |
Undoes last action. |
|
Ctrl + Y |
Redoes last undone action. |
2 - Creating a new Landscape
Creating a New FPS Blueprint Project
Before we begin to create our first Landscape, lets create a new project First Person Project. If you are unfamiliar with how to create a new project, check out the following page on Creating a New Project .
Creating a Landscape
-
First, create a new First Person project if you have not done so already. While you can use other templates for this tutorial, the First Person will make it a little easier to inspect your Landscape. After choosing the First Person option, click the Next button.
![T_Creating_a_new_FPS_BP_Project1.png]()
-
Make sure your project is set up to use Blueprints and contains the Starter Content folder. Choose a location where your project will be stored on your computer and make sure it has a proper name. Finally, click the Create Project button to continue.
![T_Creating_a_new_FPS_BP_Project2.png]()
-
Once you have created your new project and the editor has been loaded, create a new level using File > New Level and select the Default Level from the New Level Template.
![T_Creating_A_New_Level.png]()
-
With your new level now created, select the Floor from the level and press the Delete key to remove it from the level.
Make sure that you select your player start and move it up slightly in the Z-axis. This will make sure that your player does not start under your newly created Landscape.
Once completed, you should now have something that looks similar to the following image.
![T_Blank_Level.png]()
-
With the level cleared out and the player start moved up in the Z-axis slightly, it is now time to create a new Landscape. To create a new Landscape, click on the Landscape option in the Modes dropdown menu.
![T_Activating_Landscape_Mode.png]()
-
Once you have clicked on the Landscape option, you should see the following set of Landscape tools displayed in the Landscape panel.
![T_Landscape_Tools.png]()
-
For this tutorial, we will just focus on creating a Landscape using the default settings. If you would like to know more about the various settings in the Manage mode of the Landscape tool, please refer to Creating Landscapes . For now, make sure that your settings match the image below and then press the Create button to create the Landscape.
![T_Fillworld_Create_Landscape.png]()
When done, you should have something that looks like this.

3 - Sculpting the Landscape
Sculpting the
Landscape
is a time consuming process. All of the tools used for sculpting can be found under the
Sculpt
tab in the Landscape toolbar. If you would like to know more about what each of the Sculpting Tools does in detail, take a look at the
Sculpt Mode
page. For quick reference, here is a list of the most common key and mouse interactions that are used when sculpting the Landscape.
|
Common Controls |
Operation |
|---|---|
|
Ctrl |
Allows you to select Landscape components. |
|
Left Mouse Button |
Heightens or increases the heightmap or selected layer's weight. For example, in Sculpting mode, this will raise the Landscape heighmap. In Paint mode, this will apply the selected material to the Landscape. |
|
Shift + Left Mouse Button |
Lowers or decreases the heightmap or selected layer's weight. For example, in Sculpting mode, this will lower the Landscape heightmap. In Paint mode, this will erase the selected material that was applied to a particular section of the Landscape. |
|
Ctrl + Z |
Undoes last action. |
|
Ctrl + Y |
Redoes last undone action. |
For this part of the Landscape tutorial, we are going to start with a completely flat section of the Landscape and then build up the details as we go along. The goal here is not to exactly mimic what was created in the tutorial but to get you familiar and comfortable with using the various Landscape tools.
There could be a lot of various reasons as to why what you do in this tutorial does not come out exactly the same as what you see in the following screen shots. Working with the Landscape tools requires a lot of trial and error so your results will vary, sometimes greatly, from what you are seeing in the following set of images. The most important thing to get out of this tutorial is to understand how each of the Landscape tools work and how all the tools work together to give you the final product.
-
To begin, first find a section of the Landscape that you would like to work with. For this tutorial, we are not going to be filling in the entire Landscape but just a section of it. For ease of use, set a camera bookmark by pressing Ctrl + 1 on the keyboard. This will set a camera bookmark which will make it easier for you to gauge how your Landscape is coming along by giving you a camera view to always come back to. At any time during your editor session, if you press the 1 Key, your camera will be returned to the exact same position that you set.
![T_Landscape_Flat.png]()
-
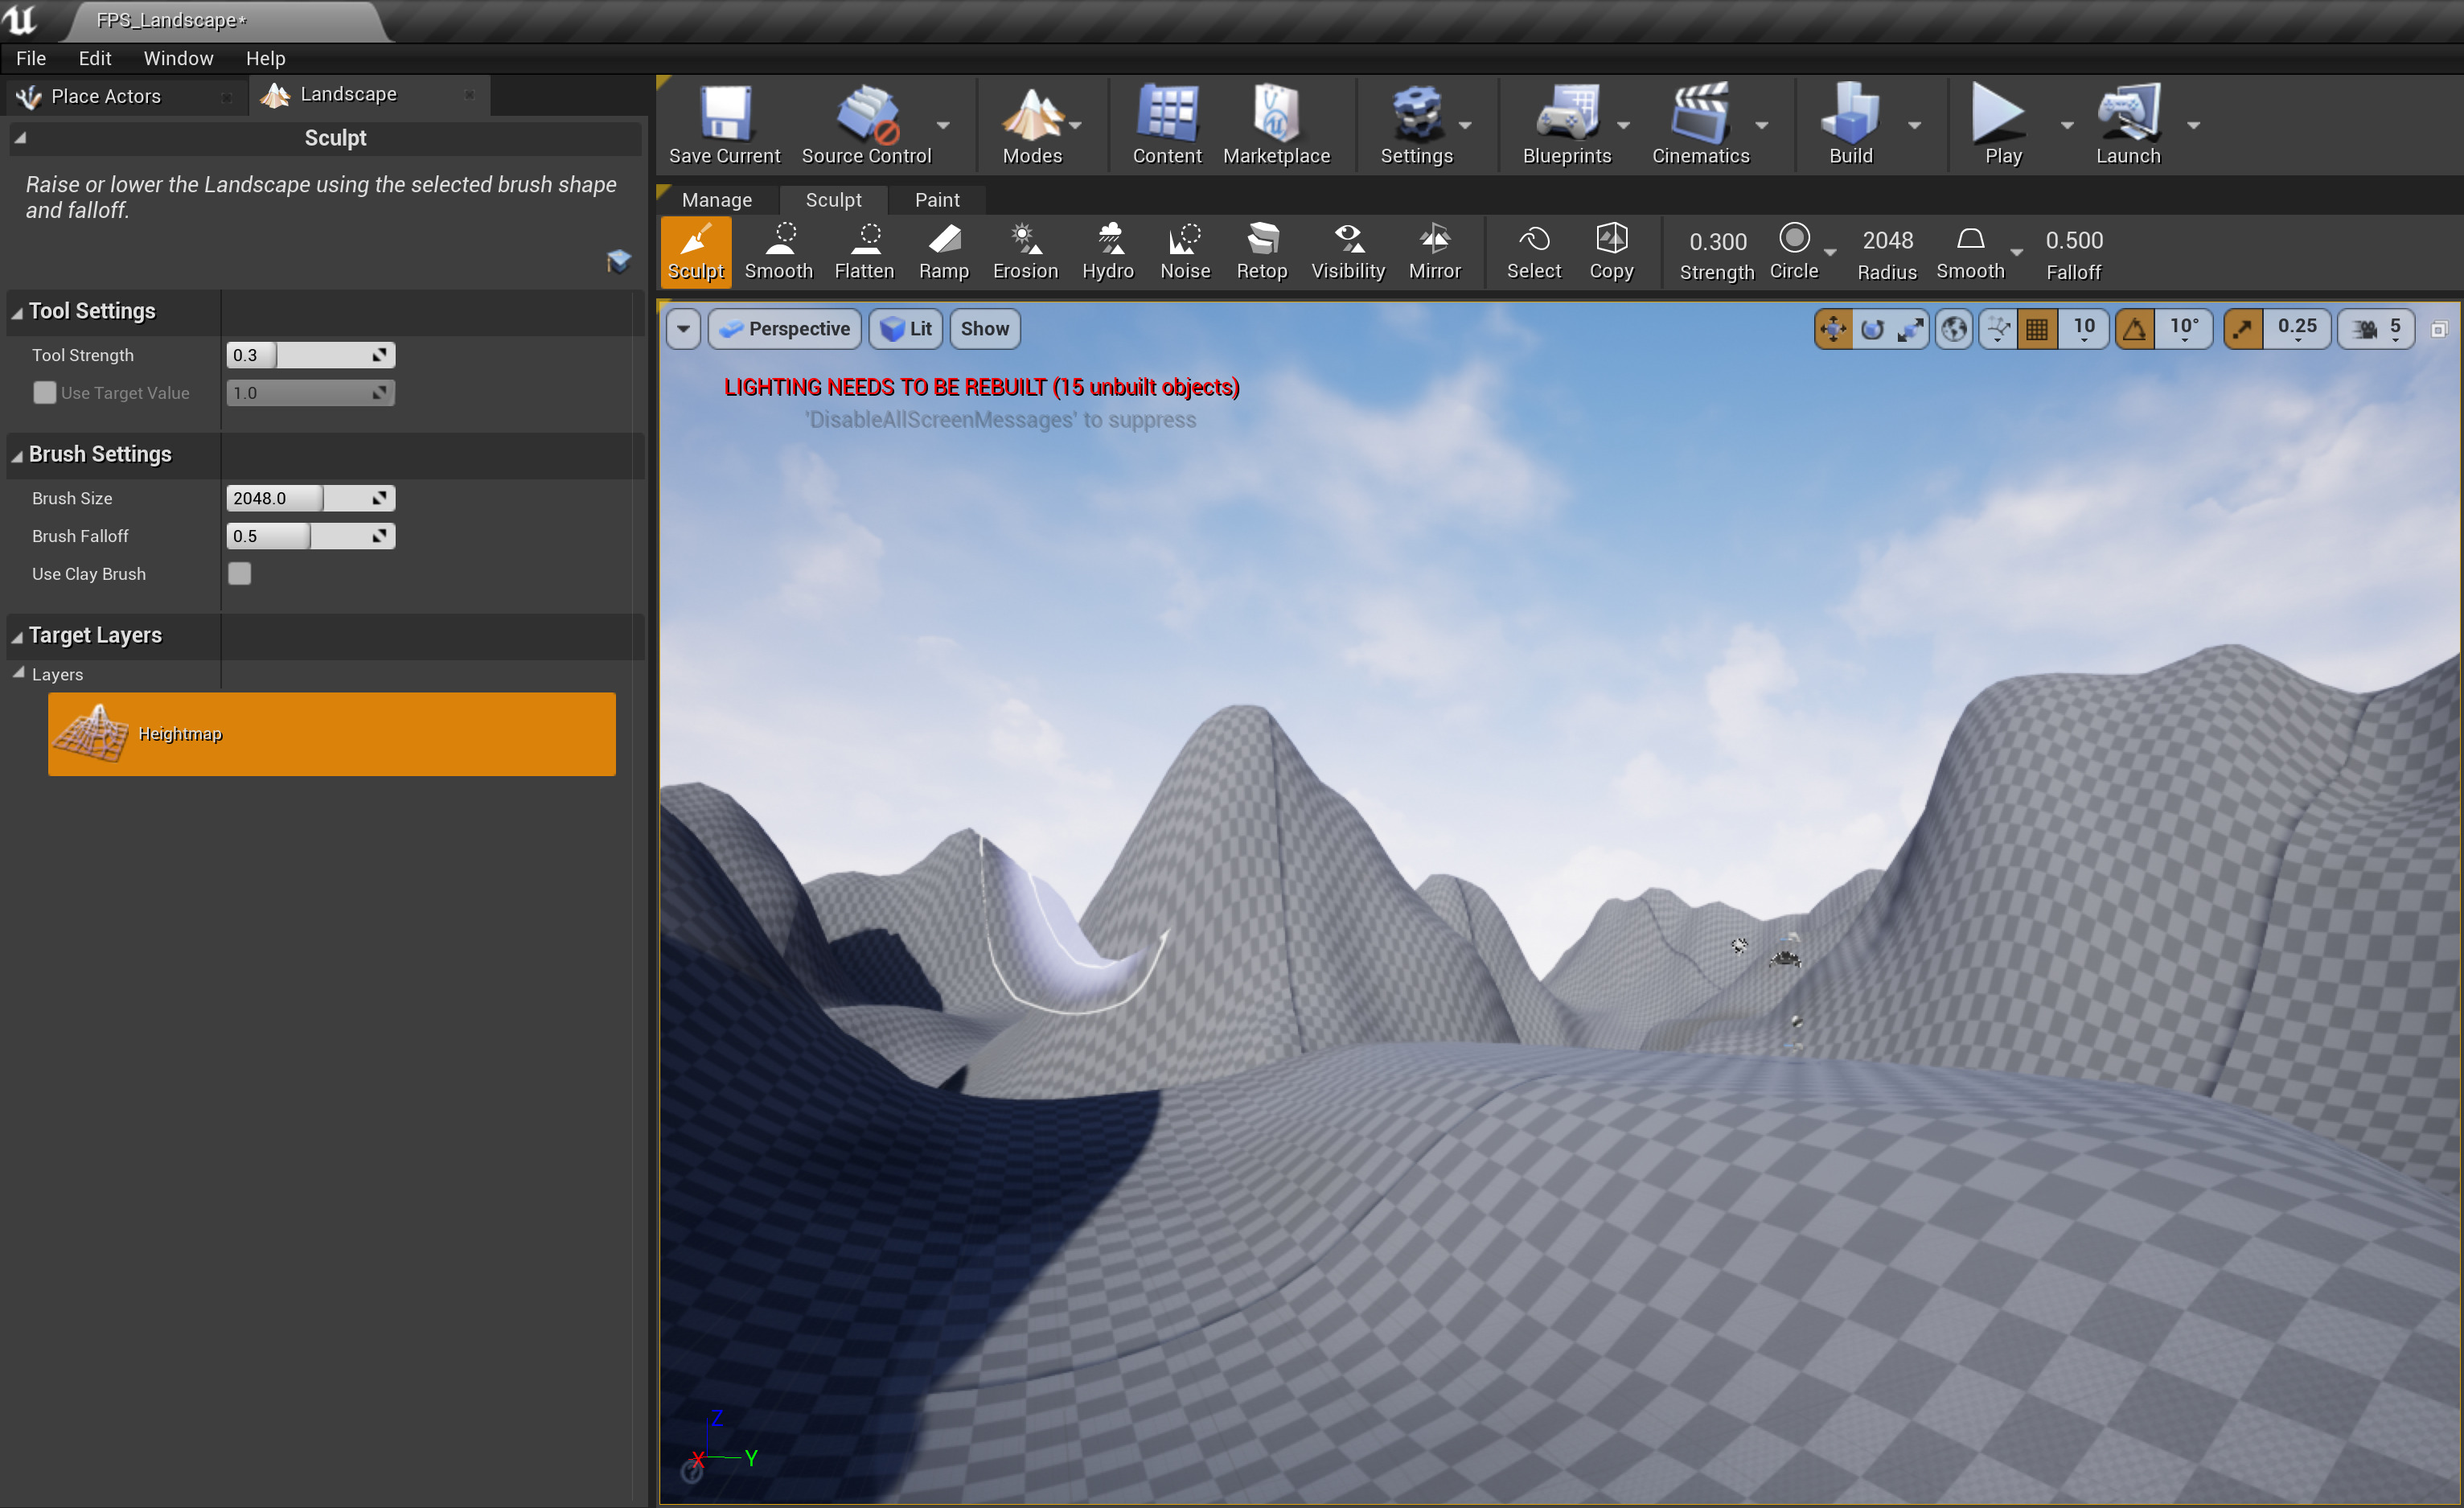
With the bookmark set, begin painting in the larger details for hills and valleys using the Sculpt Tool . You can find the brush size and strength settings that were used for this step listed below and when completed, you should have something that looks like the following. You can change the value of the Brush Size and Strength either in the Landscape panel or the Landscape toolbar located just above the viewport.
Remember that you use Left Mouse Button to raise the Landscape height and Shift + Left Mouse Button will lower the height of the Landscape.
Tool Used
Brush Size
Strength Setting
Scupt Tool
8192
0.29
![T_Landscape_Sculpt_Tool.png]()
-
Once the the hills and valleys are blocked out, it is time to use the Smooth Tool to help refine the look and feel of them. Using this tool will smooth your Landscape features and make them seem more natural. Be careful not to smooth away all your features! You can find the brush size and strength settings that were used for this step listed below and when completed, you should have something that looks like the following.
Tool Used
Brush Size
Strength Setting
Smooth Tool
2048
0.29
![T_Landscape_Smooth.png]()
-
Now that the Landscape is smoothed out, it is time to add some flat mesa like sections using the Flatten Tool . The Flatten Tool captures the height information of the location of your first click and raises/lowers the heightmap to meet that point as you drag around the brush. You can find the brush size and strength settings that were used for this step listed below and when completed, you should have something that looks like the following.
Tool Used
Brush Size
Strength Setting
Flatten Tool
2048
0.29
![T_Landscape_Flatten.png]()
-
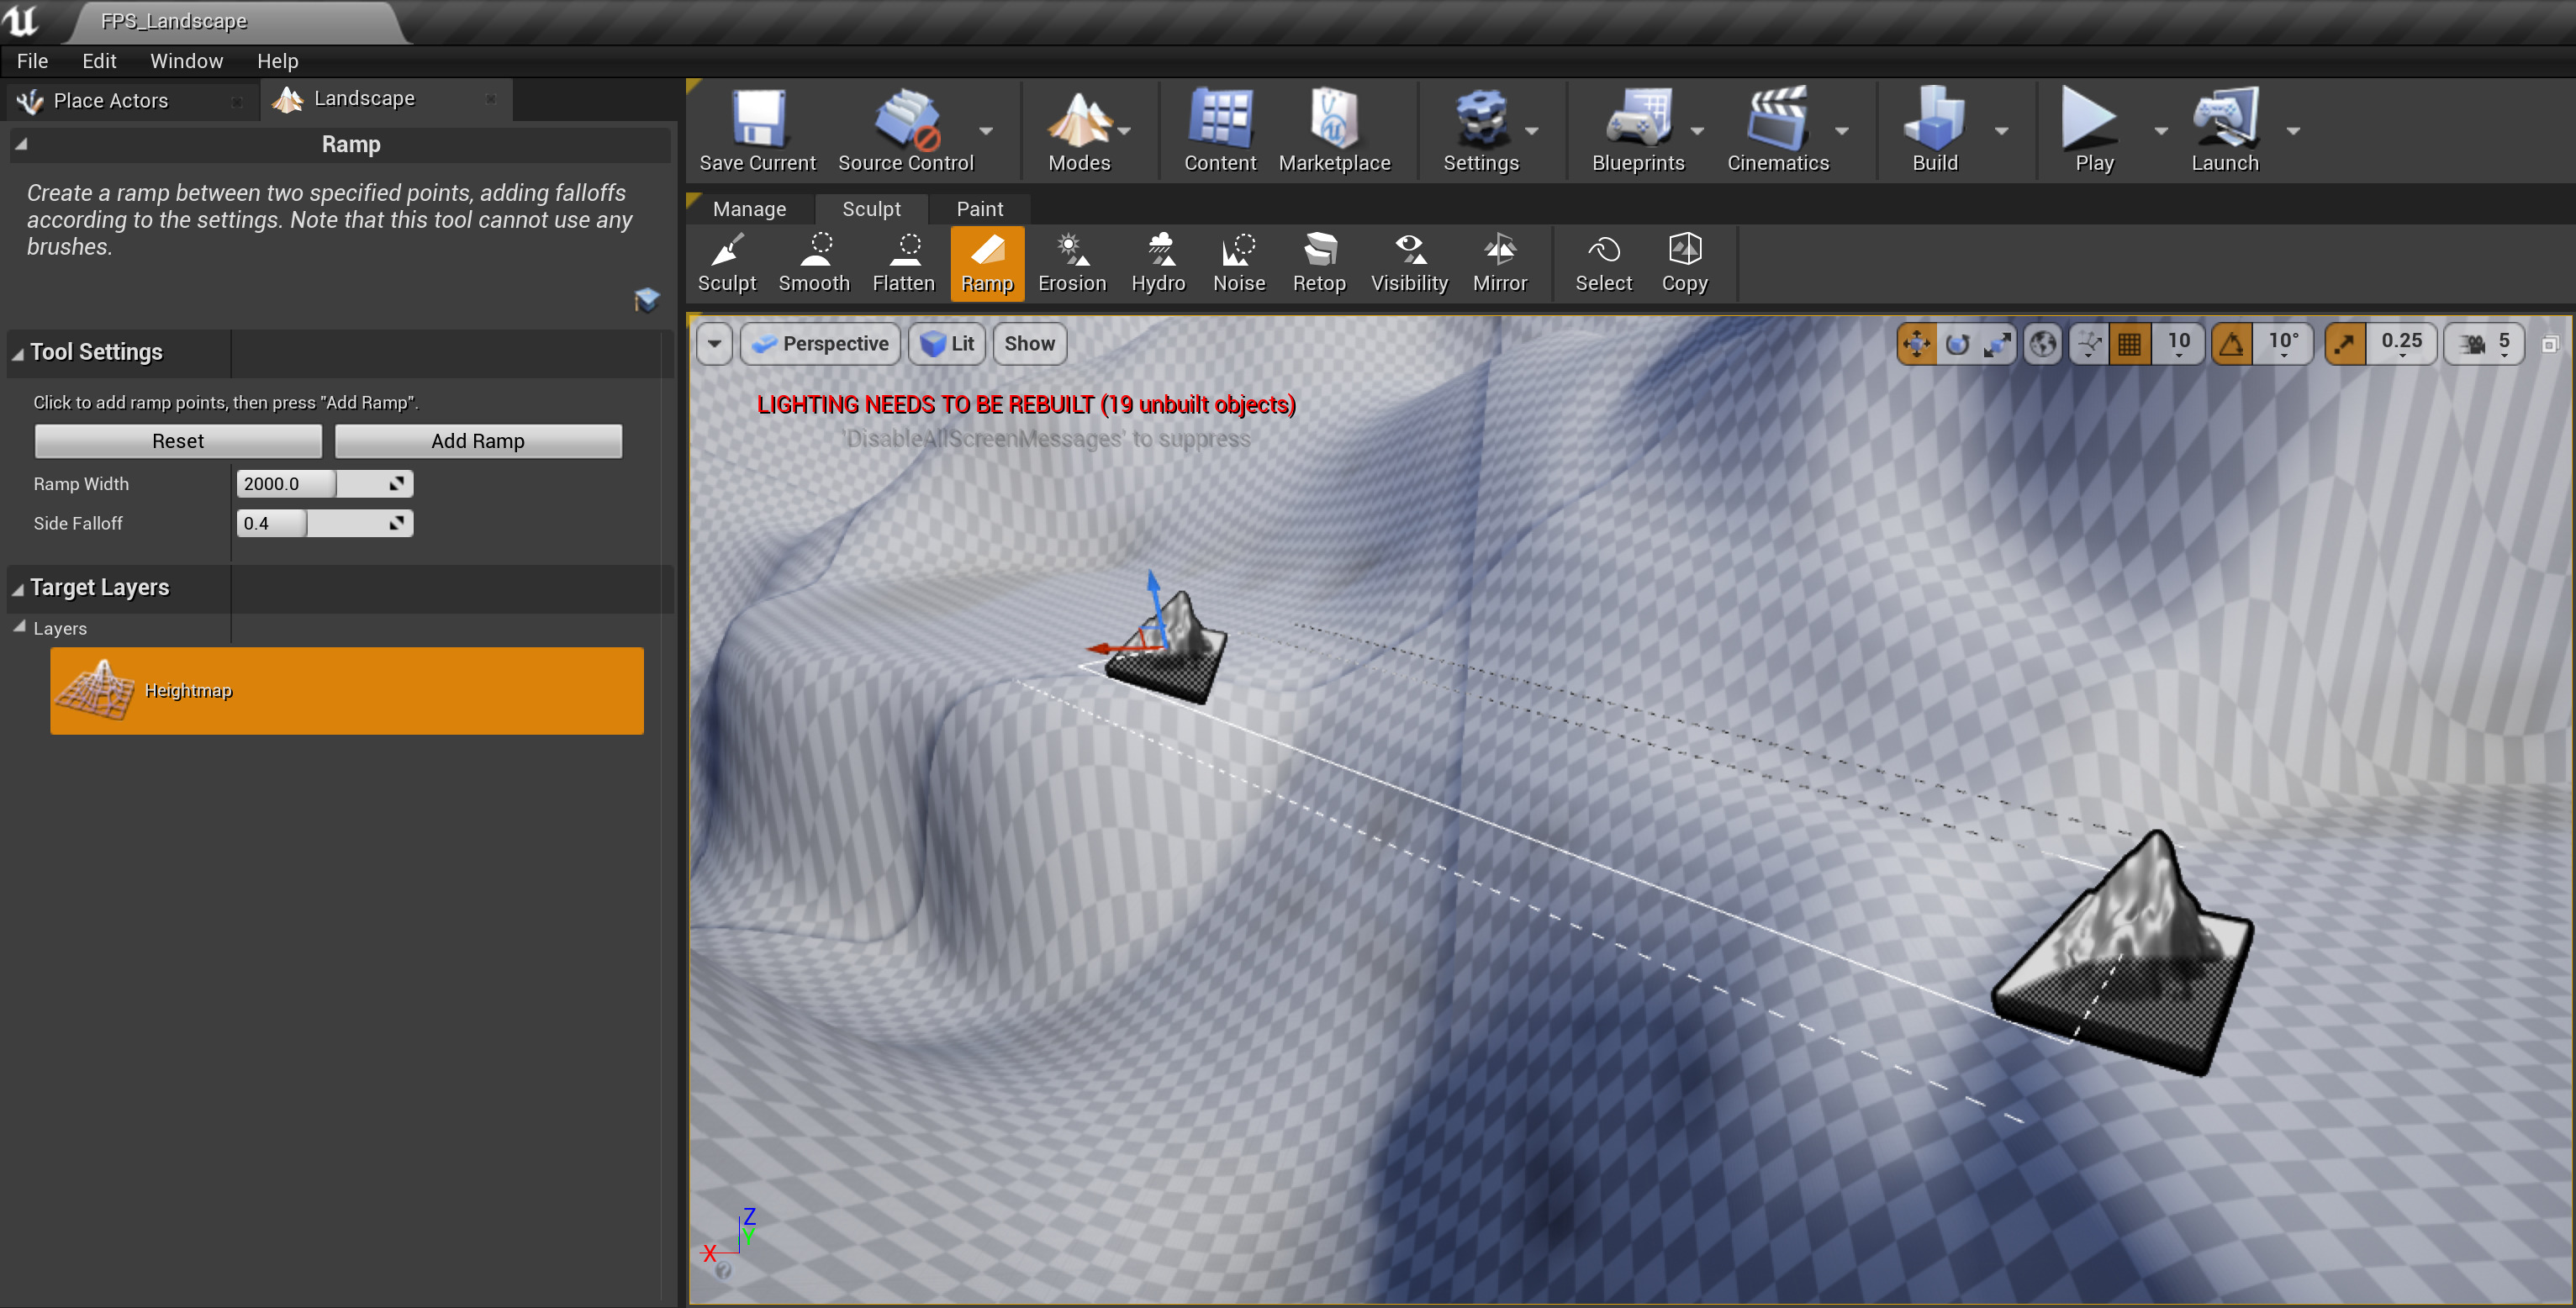
It is time to use the Ramp Tool to add some flat ramps between the mesas. This tool works by designating a start point and an end point for your ramp and then clicking the Add Ramp button to create a flat path between the two points. Each point can be moved any direction to create a ramp that fits each unique situation. You can find the brush size and strength settings that were used for this step listed below and when completed, you should have something that looks like the following. If it is not very clear where the Ramp was used, it has been highlighted in yellow.
Tool Used
Ramp Width
Side Falloff
Ramp Tool
2000
0.40
![T_Landscape_Ramp.png]()
-
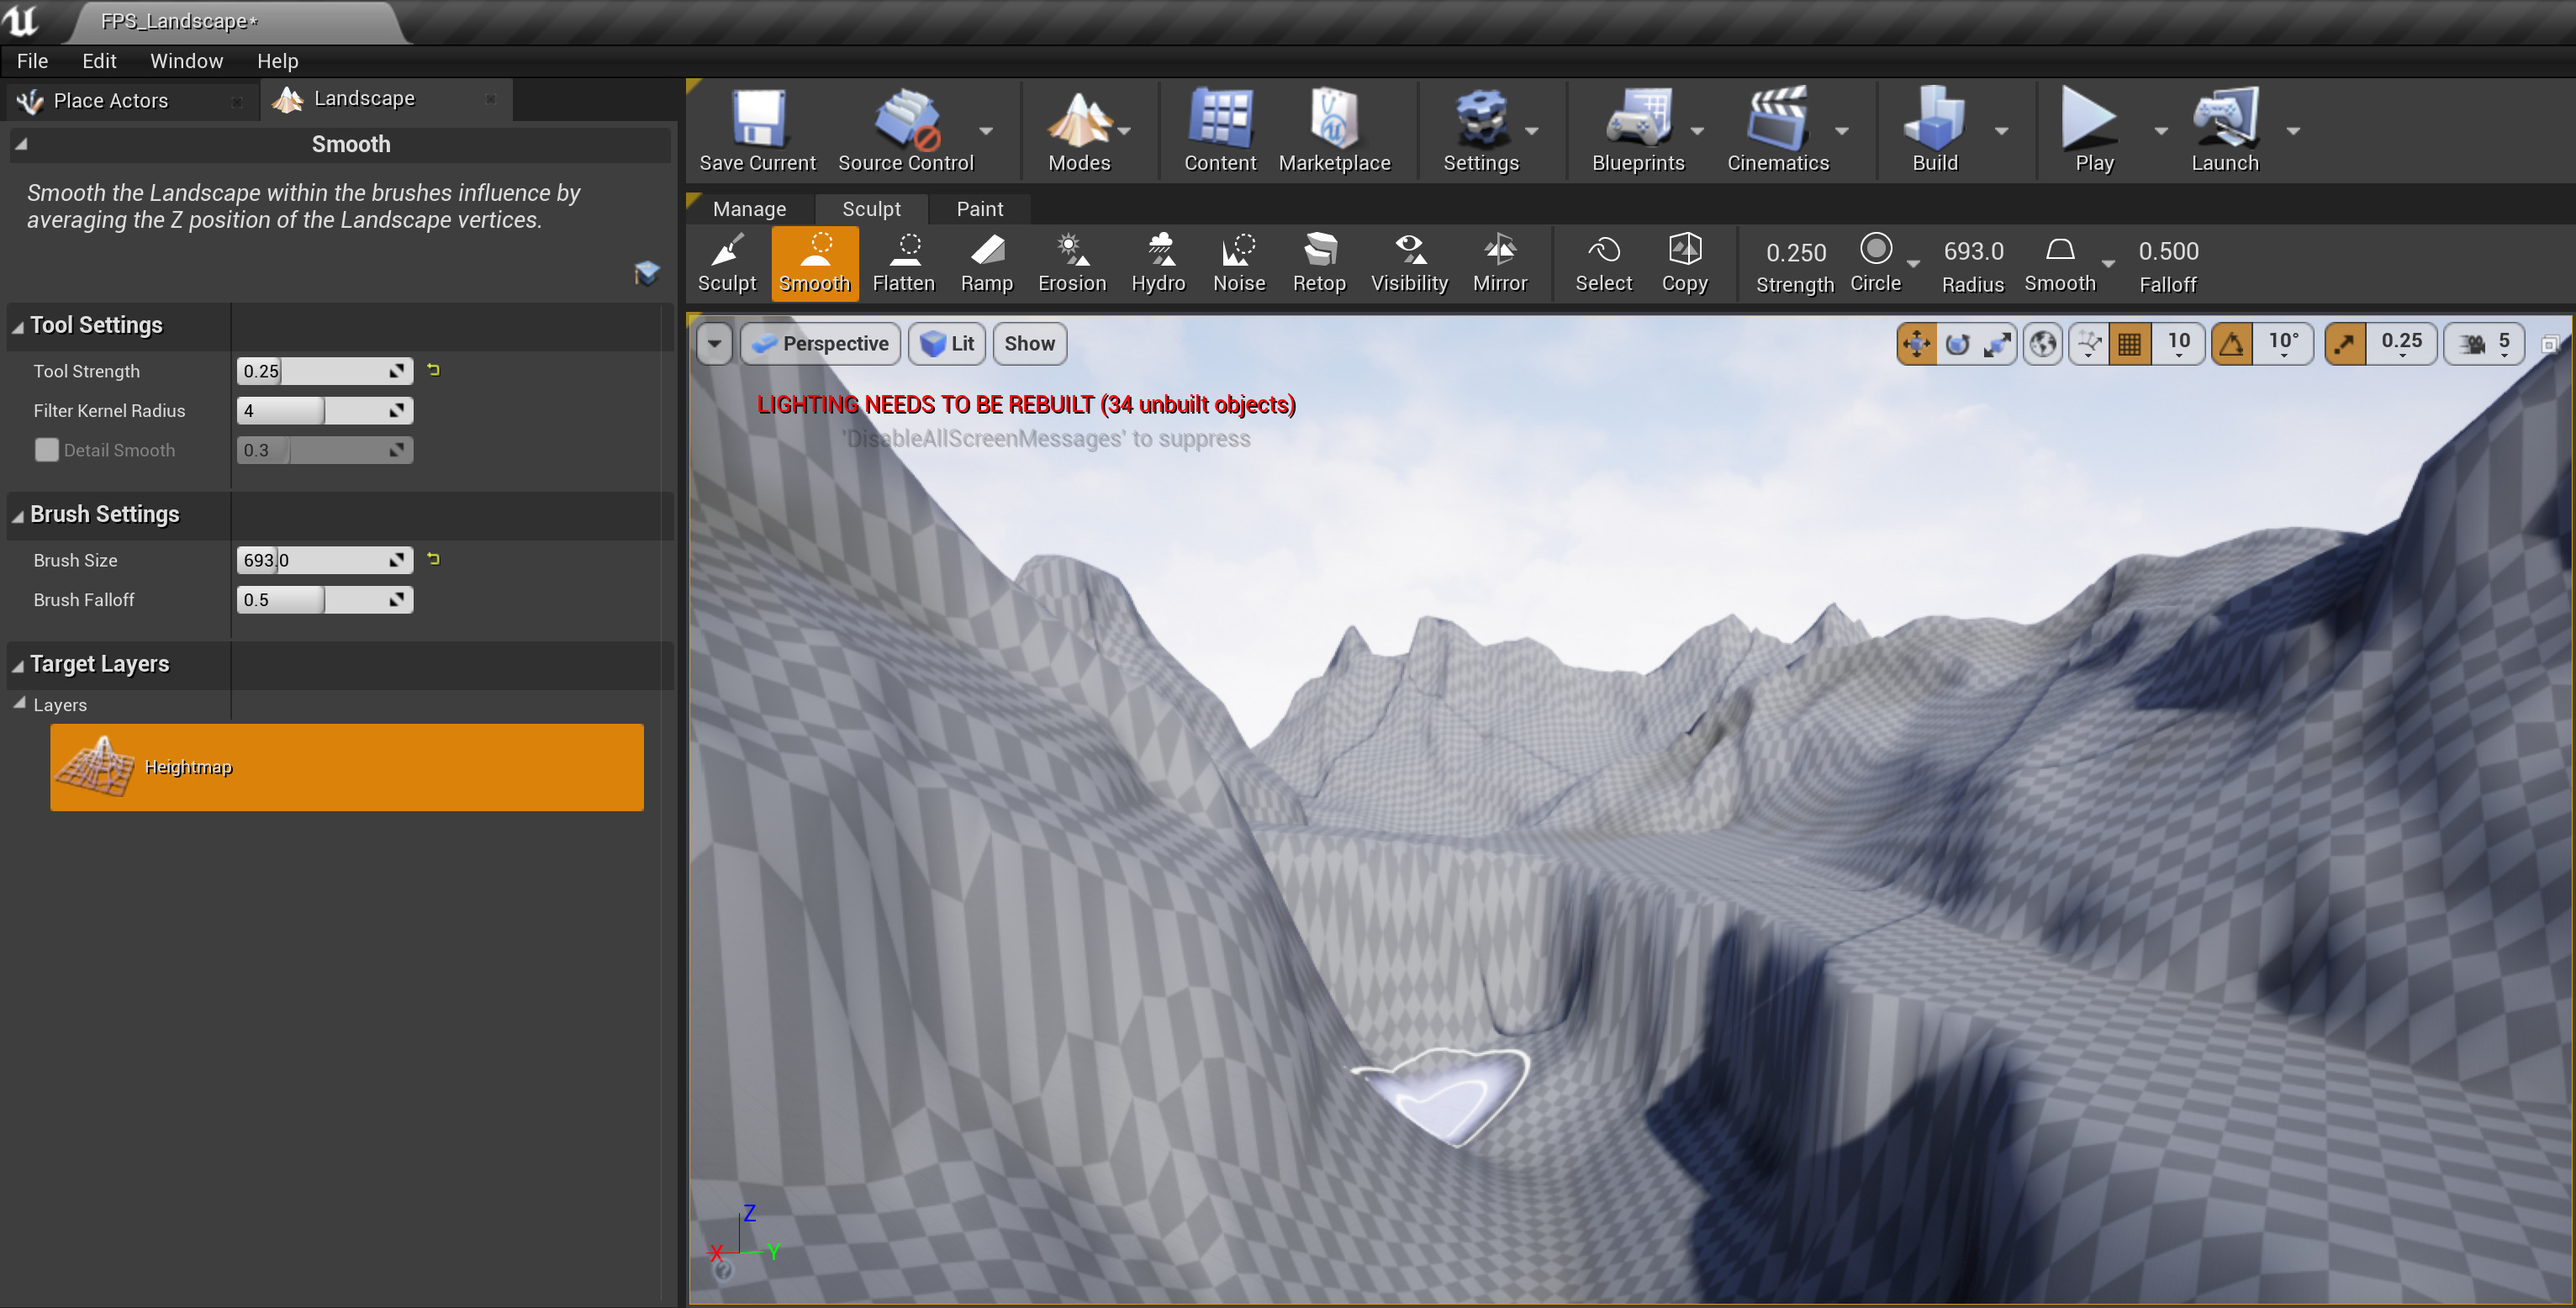
Next, we are going to add some erosion effects to the Landscape to give it a weathered look using the Erosion Tool which works by simulating erosion done by wind. This tool is perfect for shaving away parts of your hills to create mountain peaks and ridges. You can find the brush size and strength settings that were used for this step listed below and when completed, you should have something that looks like the following.
Tool Used
Brush Size
Strength Setting
Erosion Tool
693
0.25
![T_Landscape_Erosion.png]()
-
In the next step, we will take the erosion that was just added in the previous step and push it further by adding some Hydro Erosion to the Landscape. The Hydro Erosion Tool is different than the Erosion Tool as it is for simulating how water will erode Landscape details over time. Like the Smooth Tool , be careful not to erode away all your detail. You can find the brush size and strength settings that were used for this step listed below and when completed, you should have something that looks like the following.
Tool Used
Brush Size
Strength Setting
Hydro Erosion
2048
0.29
![T_Landscape_HydroErosion.png]()
-
To break up the surface of the Landscape even more, we will use the Noise Tool . The Noise Tool adds random noise to the surface of the Landscape by randomly moving the Landscape vertices up or down or both at the same time. You can find the brush size and strength settings that were used for this step listed below and when completed, you should have something that looks like the following.
Tool Used
Brush Size
Strength Setting
Noise Tool
2048
0.29
![T_Landscape_Noise.png]()
-
For the final step in the Landscape sculpting part of the tutorial, we will re-use the Smooth Tool to help smooth out some of the more jagged areas of the Landscape to give it a more natural look. While you might not need to do this step yourself, this was done to help even out some of the areas that appear too deep or areas that the player might get stuck in if they fall into. You can find the brush size and strength settings that were used for this step listed below and when completed, you should have something that looks like the following.
Tool Used
Brush Size
Strength Setting
Smooth Tool
1121
0.16
![T_Landscape_Smooth_Cleanup.png]()
4 - Creating Landscape Materials
Folder Setup
We have finished sculpting the Landscape, it is time to add some Materials to it so that it better resembles something that we see in the real world. But before you do this, you need to first setup some folders to organize the content that you create and migrate into your project.
If you would like to know more about how to setup folders in Unreal Engine 4, please refer to the following page about Folders .
-
Start by creating a new folder called Landscape in your project's Content folder.
-
Then inside the Landscape folder, create the following three folders:
-
Materials
-
Resources
-
Textures
-
When completed, you should have something that looks like the following.

Migrating Textures
Now that we have the folders in place, it is time to Migrate some Textures from the Landscape Mountains learning project so that we have some Textures to work with. This project can be found under the Learn tab in the Epic Games Launcher. If you would like to know more about how to Migrate content from one project to another one, please check out the following page on how to
When Migrating content between projects, you could possibly end up with additional folders that you do not want. To fix this, select the Textures that you want inside of the Content Browser and then drag them from their current location into the folder that you want them to be placed in. This is purely a house keeping step and will have no impact on the outcome of the tutorial.
You can find the textures located in the following folder located in the Landscapes Content example project.
/Game/ExampleContent/Landscapes/Textures/
The Textures that you will be Migrating over from the Landscape Content Example project are as follows.
-
T_ForestGround_D
-
T_ForestGround_N
-
T_GroundGrass_D
-
T_GroundGrass_N
-
T_Noise_N
Once you have the textures migrated over, make sure they are placed in the
Textures
folder that was created in the steps above.
Creating the Landscape Material
Creating a Material for our Landscape can be done in the following steps.
-
Navigate to the Materials folder in the Content Broswer .
-
Right-click in the Content Browser and select Material from the Create Basic Asset list.
-
Name the newly created Material something that will allow you to easily find it, like Landscape_Material for example.
If you have not already done so, please check out the Materials pages to gain a more in-depth understanding of how materials work inside of Unreal Engine 4.
When this is complete, you will have something that looks like this:

With our new Landscape Material created, open up the Material by Double-clicking on it inside of the Content Browser . When you do, you should see something like this come up on the screen:

It is time to start adding nodes inside of the Material Editor. The first node that you are going to want to create is a LandscapeLayerCoords UV node. This node will help to generate UV coordinates that will be used to map the Landscape Material to the Landscape Actor.

The quickest way to find nodes specific to Landscape is to search for them in the Materials Palette box using Landscape as the key word.

The next Material nodes that we are going to add are going to be for the textures for the ground's Base Color and Normal maps. For the snow, we are just going to use a Vector Parameter ( V + Left-click ) that uses an off White color. To make sure that no Metallic information is used, a Constant ( 1 + Left-click ) of 0 is used and plugged into the Metallic input. Finally, for the Roughness , we set a Scalar Parameter ( S + Left-click ) so that this value can be tweaked via a Material Instance . Finally, make sure that you connect the LandscapeCoords to the UV's of each of the Texture Samples . When completed, your node network should look like this:
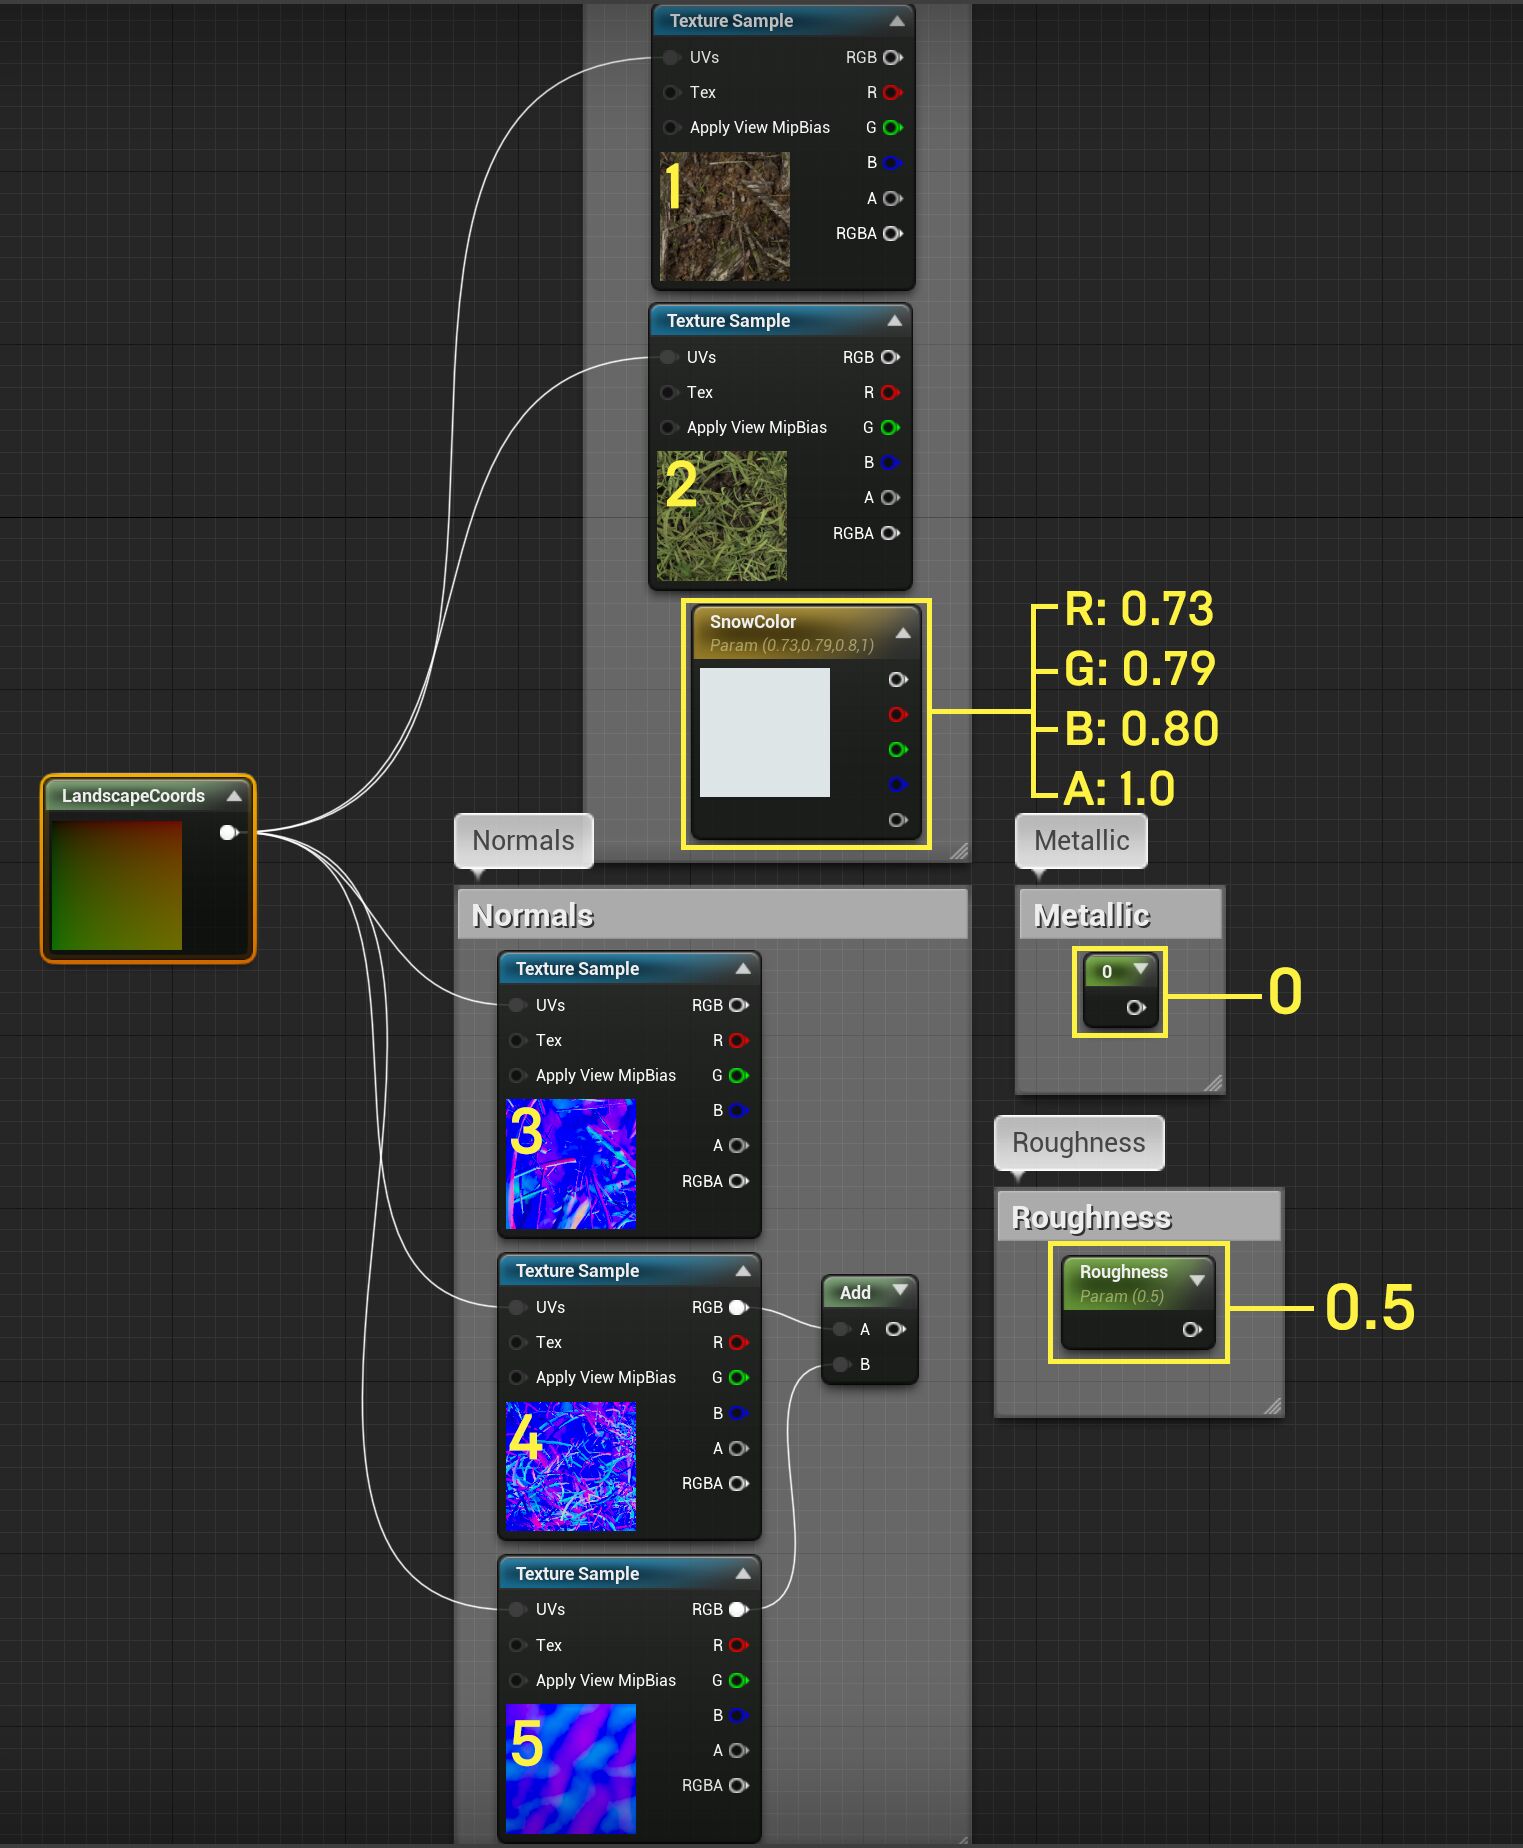
To add the Texture Sample nodes for the various textures, select the desired texture in the Content Browser and then press T + Left-click in the Material Editor 's graph to create the node.
To find more information about these keybindings, take a look at the Edit > Editor Preferences > Keyboard Shortcuts window and select the Material Editor - Spawn Nodes section.
|
Number |
Texture Name |
|---|---|
|
1 |
T_ForestGround_D |
|
2 |
T_Ground_Grass_D |
|
3 |
T_ForestGround_N |
|
4 |
T_Ground_Grass_N |
|
5 |
T_Noise_N |
After the Material nodes have been added and the LandscapeCoords connected to the textures UVs, it is time to add and setup the Landscape Layer Blend node. The Landscape Layer Blend node allows for the blending of layers via Weight blending, Height blending, or Alpha blending. Weight blending uses each layer's painted weight to determine which to display. We use Weight blending where we want two surfaces to blend seamlessly into each other, such as rock into sand. Height blending uses the same weight information along with an additional height value taken from the Texture Sample's Alpha channel and is best used when one material needs to clearly sit on top of another, such as the Grass and Snow sitting on top of the Soil layer. Finally, Alpha blending uses the painted weight information with an Alpha layer to determine the final result.
The following table shows what Textures are associated with which Layer Name and what Blend Type they use.
When you first place down a Landscape Layer Blend node, it will be blank like in the image below labeled one. To add Layers , you need to select the node in the Material Graph and then in the Details panel, click on the Plus icon that is in-between the word Elements and the Trash Can icon. This icon is highlighted yellow in the image labeled two. How many textures you are using will determine how many Layers you will want to have.


Layer Blend Base Color
|
Texture |
Layer Name |
Blend Type |
Preview Weight |
|---|---|---|---|
|
T_ForestGround_D |
Soil |
LB Weight Blend |
1.0 |
|
T_Ground_Grass_D |
Grass |
LB Height Blend |
0.0 |
|
Snow as a Vector 3 |
Snow |
LB Height Blend |
0.0 |

Layer Blend Normal
|
Texture |
Layer Name |
Blend Type |
Preview Weight |
|---|---|---|---|
|
T_ForestGround_N |
Soil |
LB Weight Blend |
1.0 |
|
T_Ground_Grass_N |
Grass |
LB Height Blend |
0.0 |
|
T_Noise_N |
Snow |
LB Weight Blend |
0.0 |

For more in-depth information about using the Landscape Layer Blend node or to troubleshoot any issues, please read the Terrain Expressions page.
Once the Layer Blend nodes have been set up, it is time to connect the Texture maps to them. Height blended materials will have both a Layer connection and a Height connection to accommodate the need for the additional height information. When completed, you should have something that looks like the following.
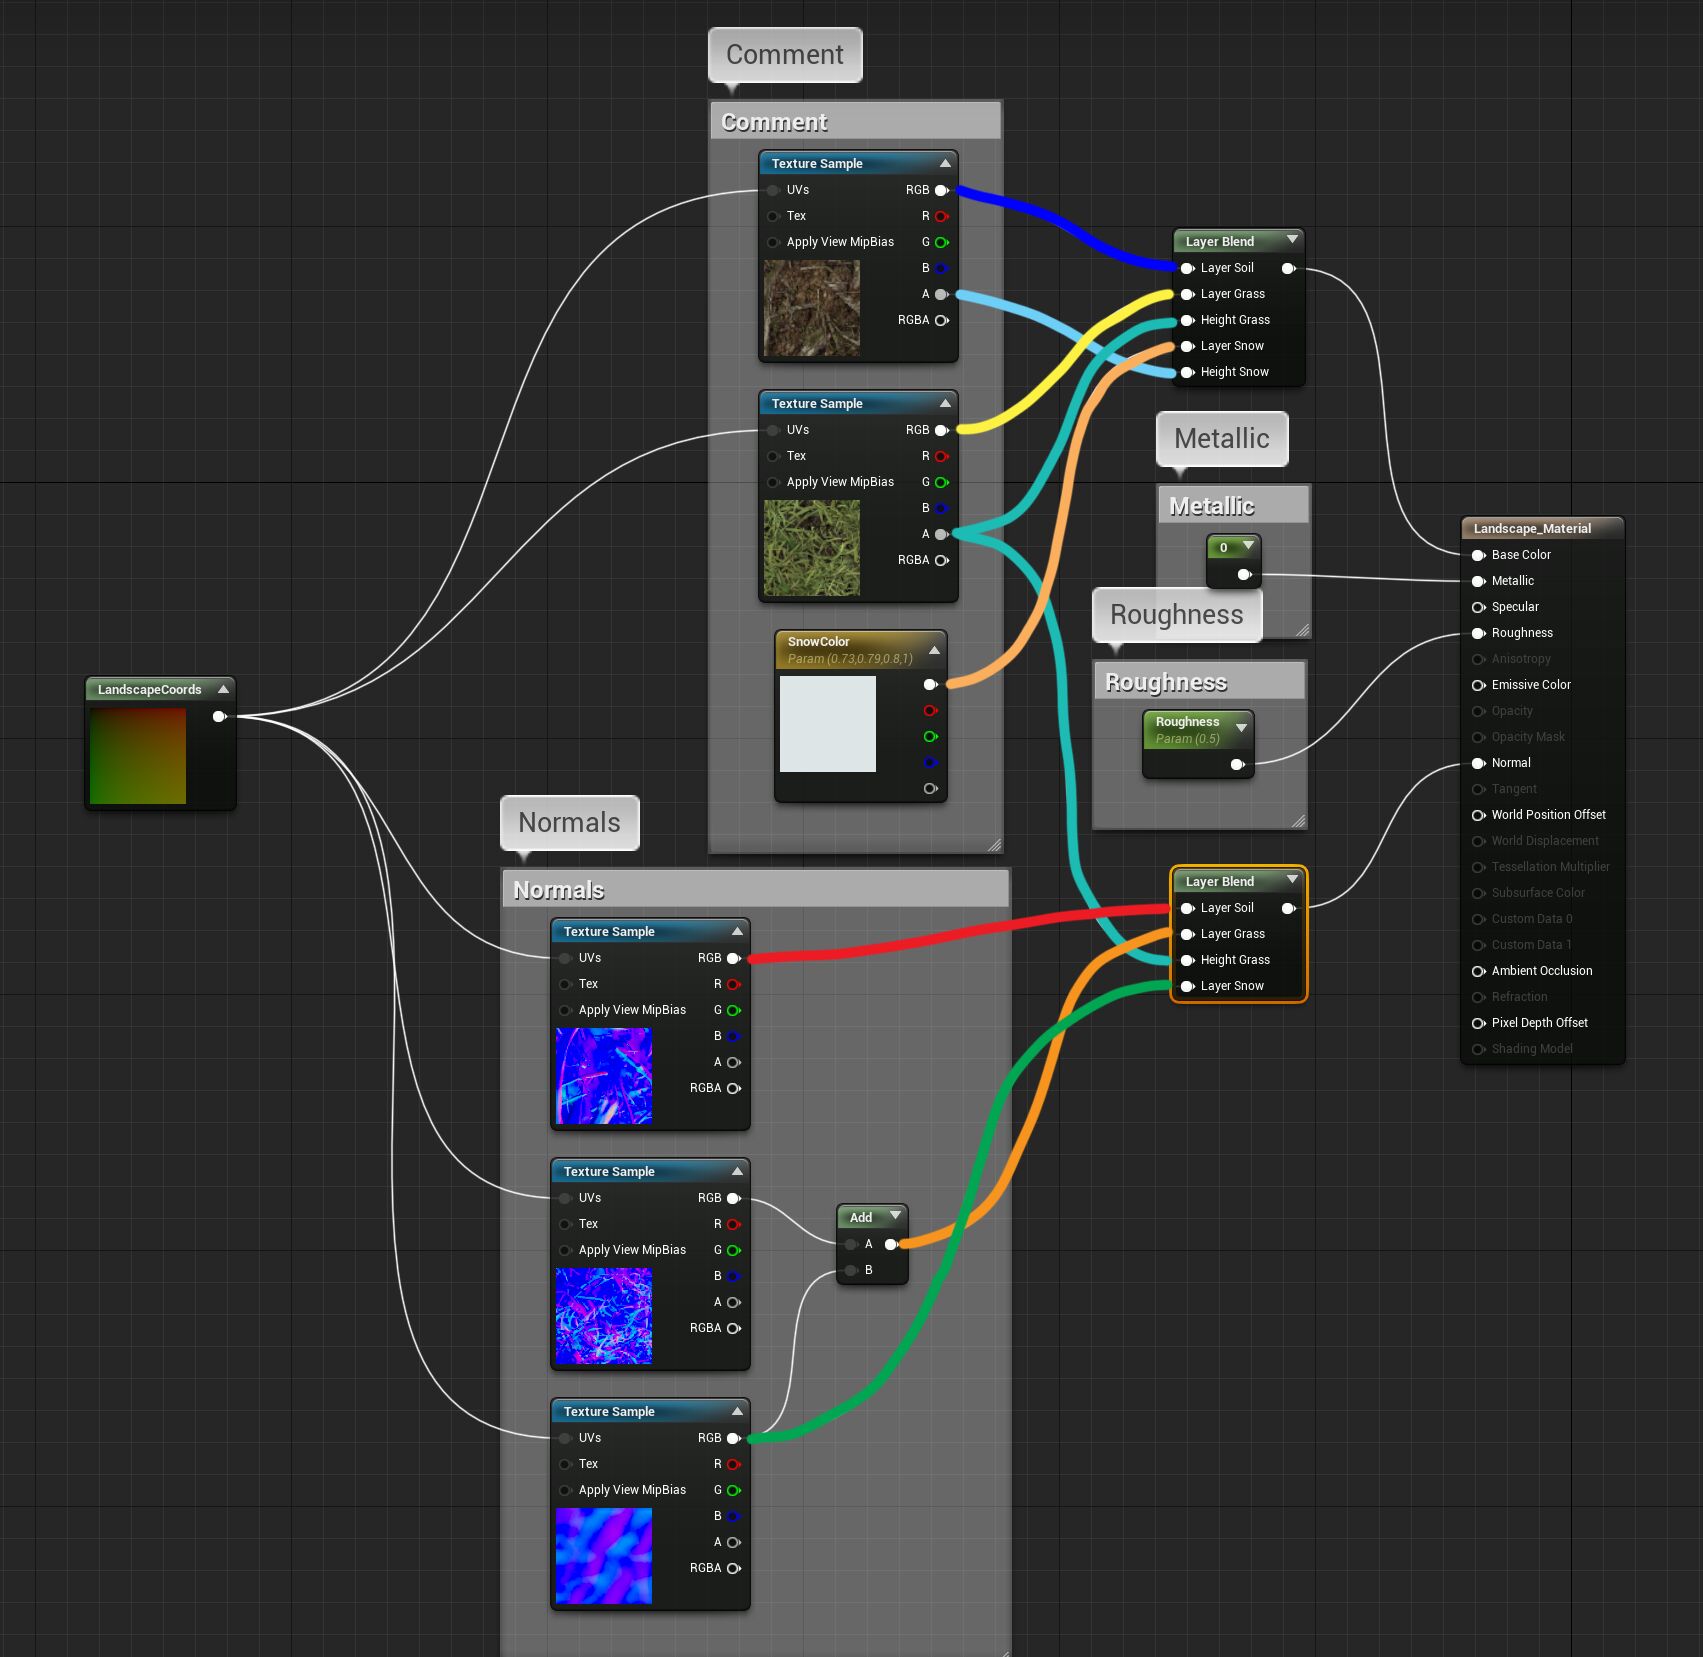
The material connections were colored in Photoshop to help better illustrate where everything needed to be connected. Currently there is no way to change the color of lines connecting Material nodes inside of Unreal Engine 4.
5 - Painting Landscape Materials
With the Landscape material created, it is time to apply the Material to the Landscape and begin using the Paint tools.
Landscape Painting Prep
Before we can begin painting the Landscape, there is some setup that needs to be done first. Start by applying your Landscape Material to the Landscape:
-
Find your Material in the Content Browser . This should be located under a folder labeled Materials that was created in the previous section. Click on it so that it is selected.
![T_Landscape_Materail_In_CB.png]()
-
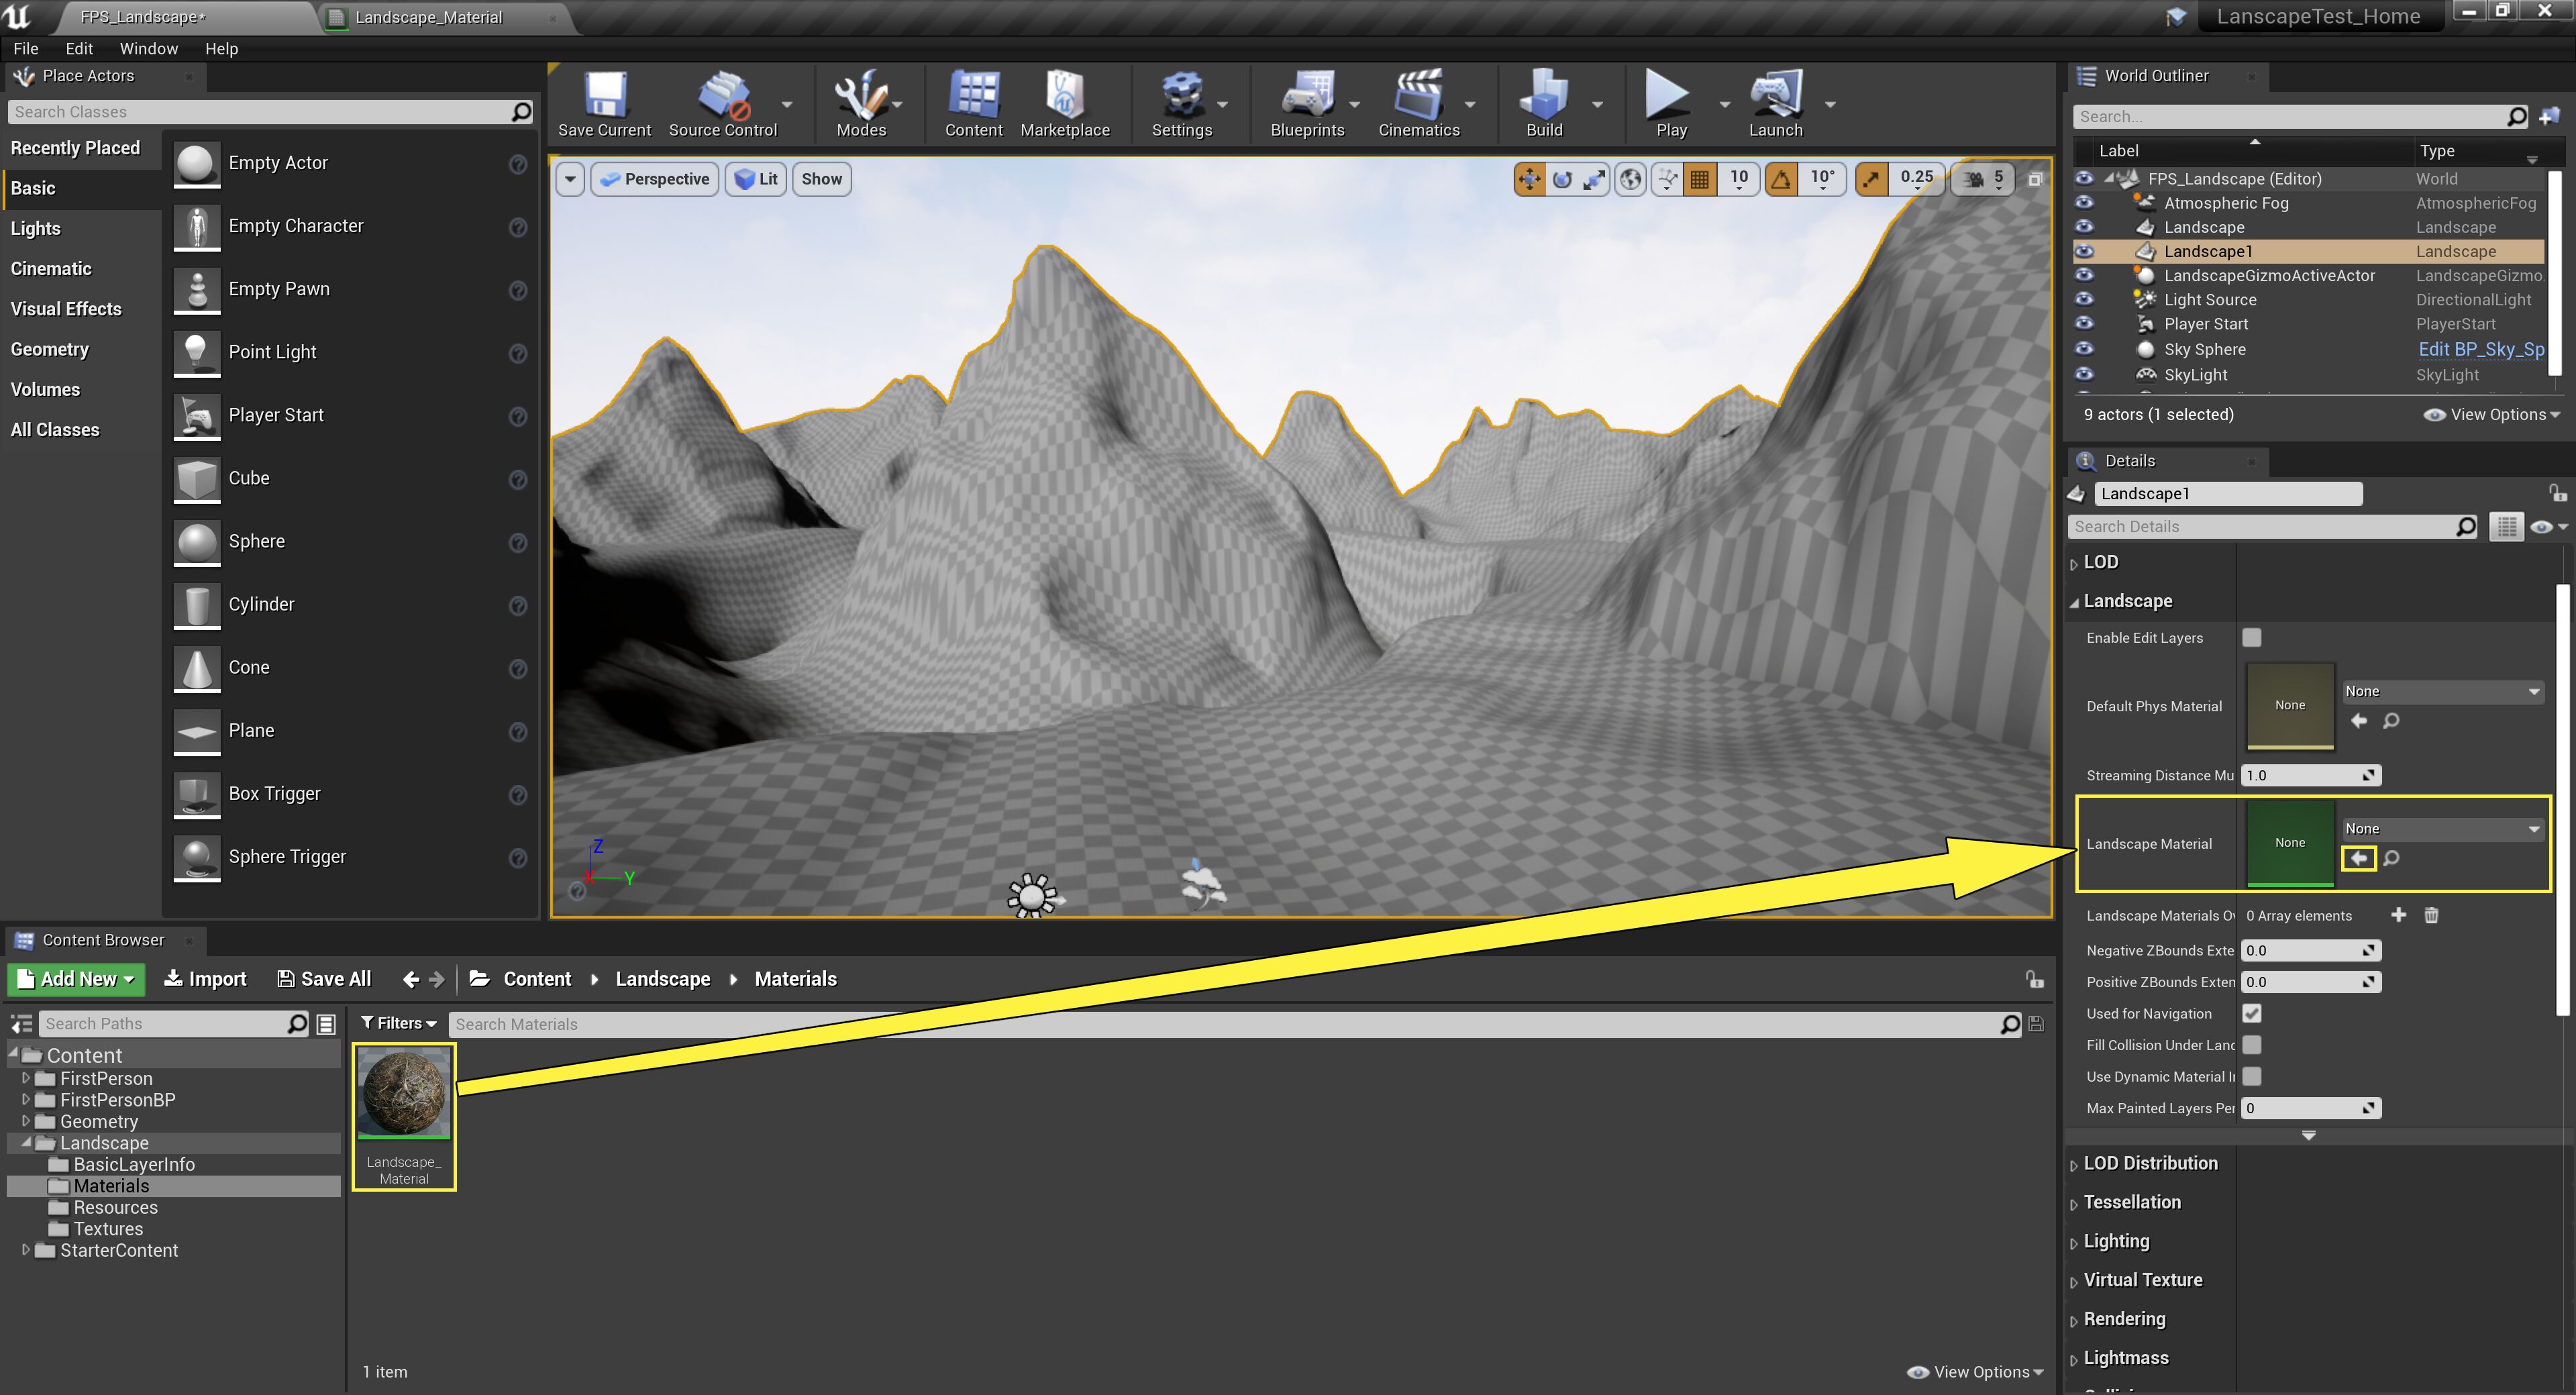
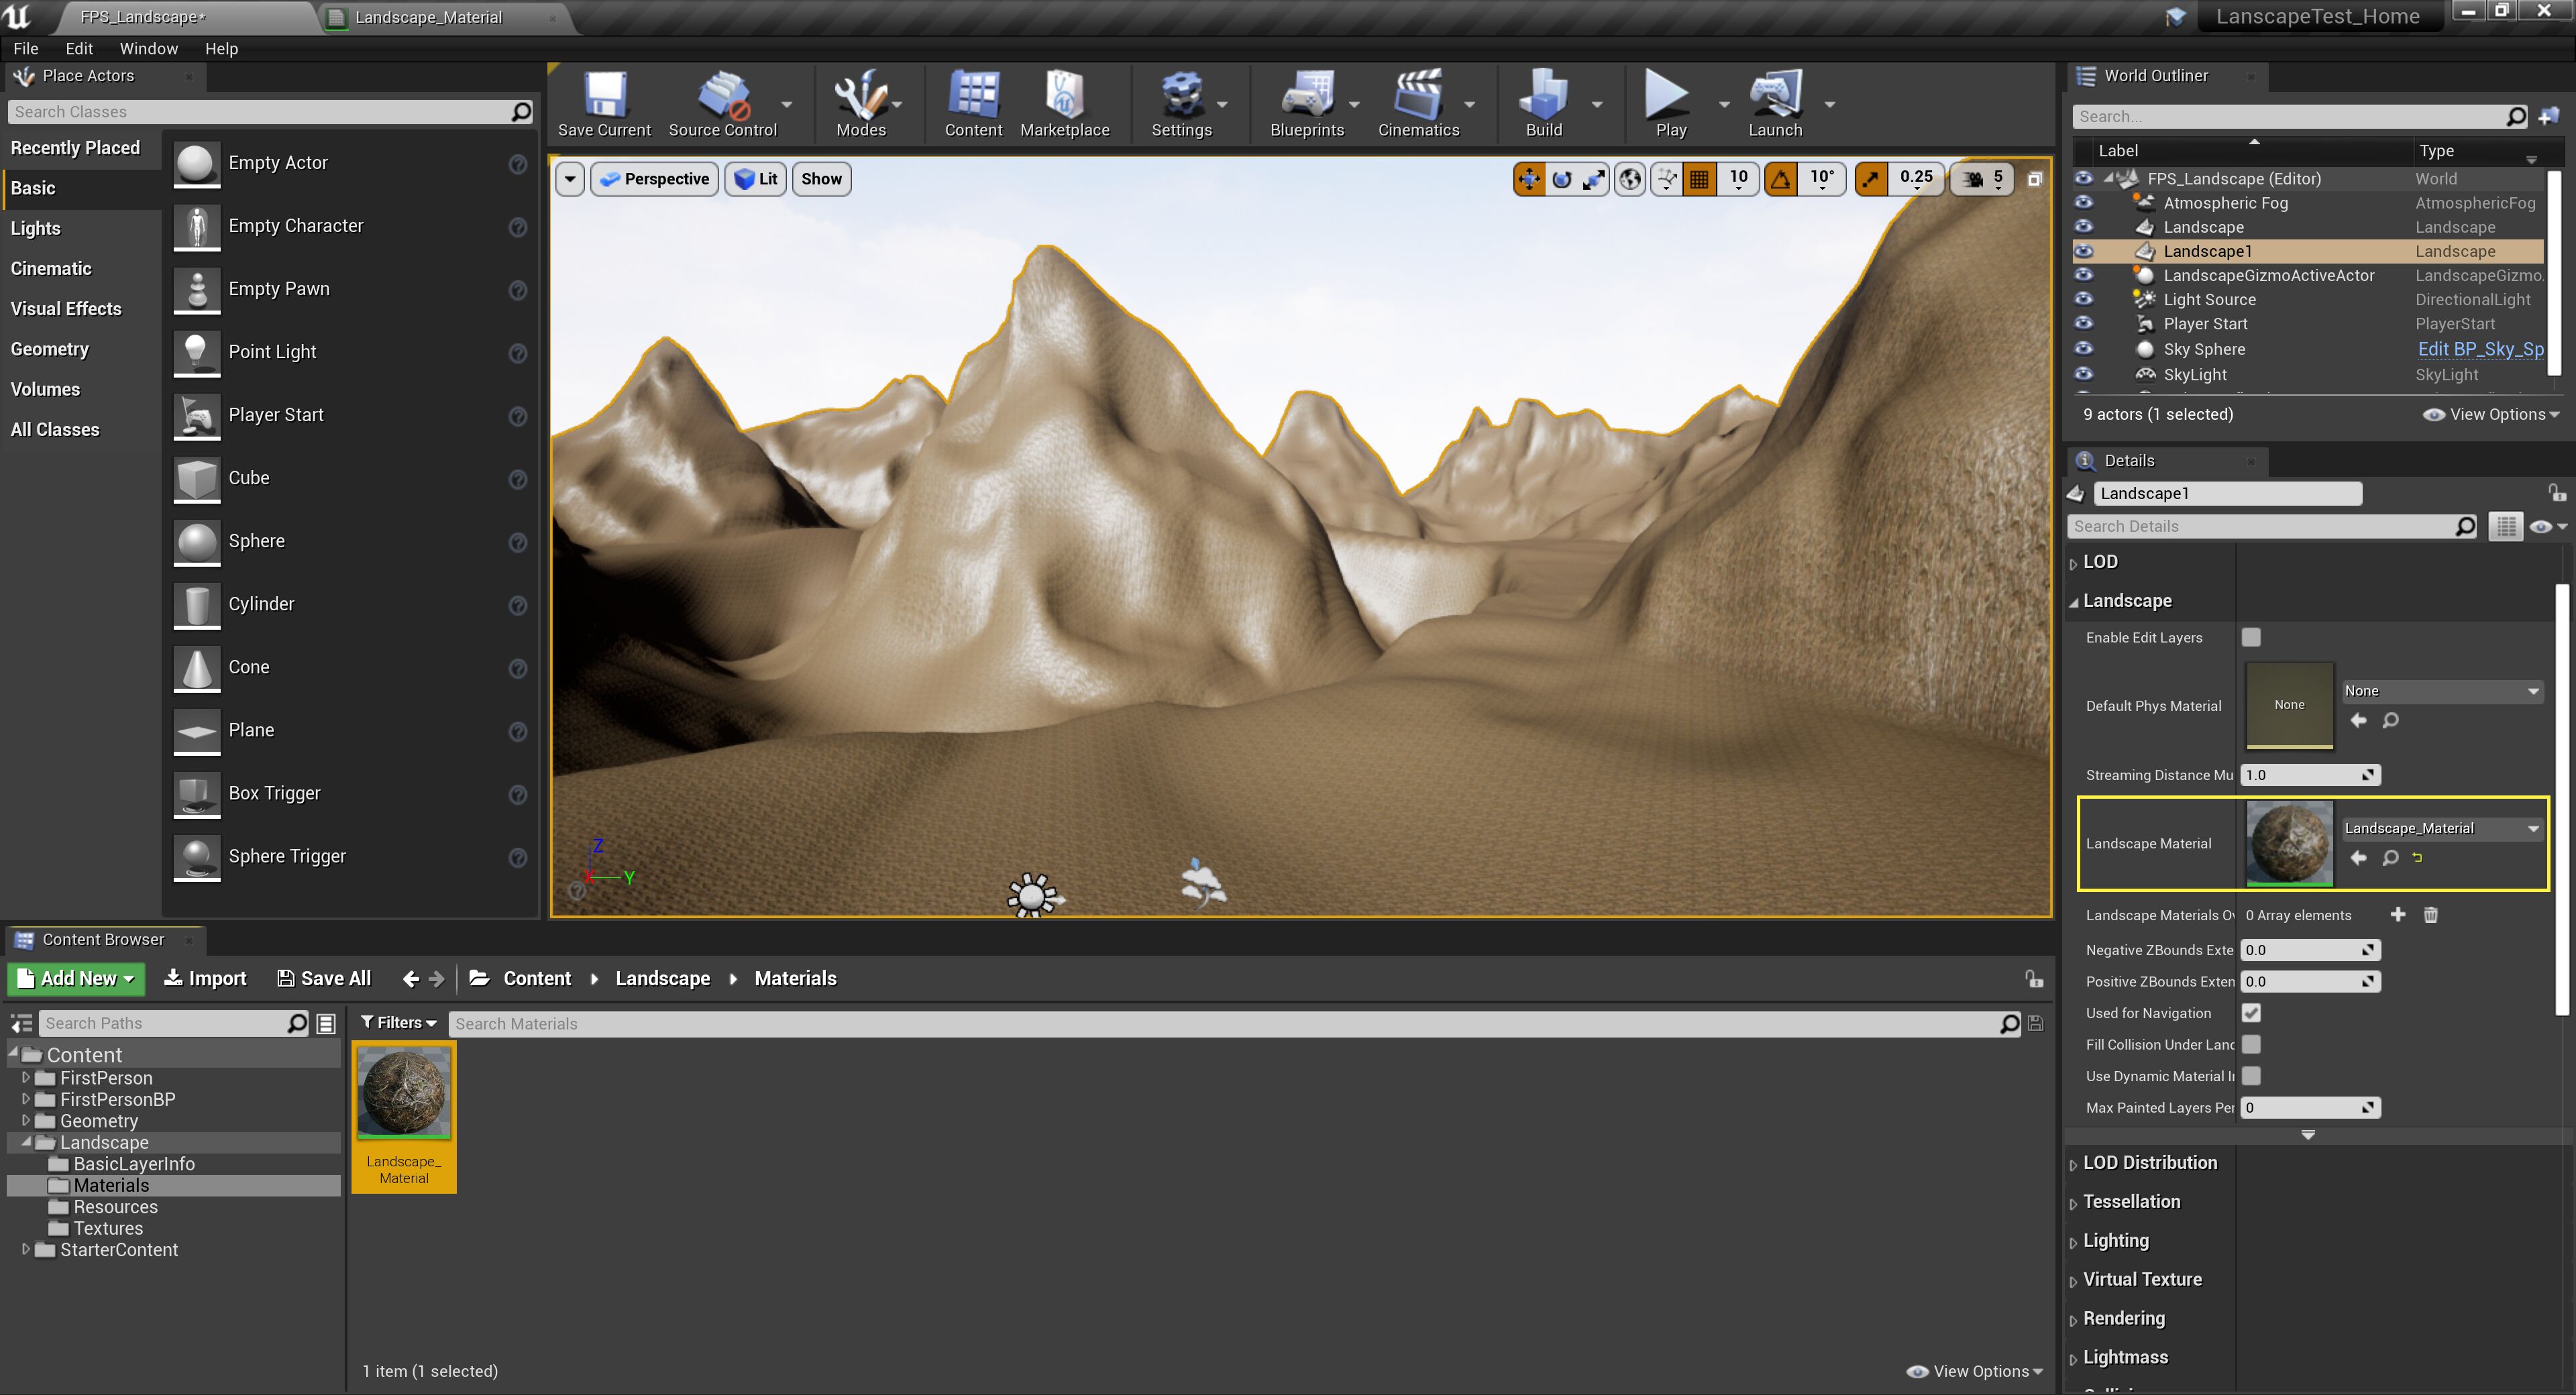
With the Landscape Material selected in the Content Browser , select the Landscape in the world. Then in the Details panel, expand the Landscape section and look for the Landscape Material input.
![T_Landscape_Material_Input.png]()
-
Apply the Material to the Landscape using the Use Selected Asset from the Content Browser arrow icon. You can also drag the Material asset from the Content Browser to the Details panel and drop it on the Landscape Material input.
![T_Landscape_Assign_Material.png]()
-
When completed, you should have something that looks like this:
![T_Landscape_With_Material_Applied.png]()
If you see black lines in your Landscape, they come from having Un-Built lighting. If you re-build your level's lighting, the black lines will go away.
Now that the Landscape Material is applied, it is almost time to stat painting but before we can do that, we must first create and assign three Landscape Layer Info Objects . If you try to paint before you assign the Landscape Layer Info Objects , you will get the following warning message.

You need to create three Landscape Layer Info Objects , one for each Texture that you want to paint. Here is how you do it:
-
First, make sure that you are in Landscape Paint mode.
![T_Landscape_Paint_Mode.png]()
-
In the Landscape panel, under the Target Layers section, you should see three inputs labeled Soil, Grass, and Snow .
![T_Landscape_Target_Layers.png]()
-
To the right of the names, there is a Plus Sign icon. Clicking that will bring up another menu that will ask what type of layer you would like to add. For this example, pick the Weight-Blended Layer (normal) option.
![T_Landscape_Blend_Layer.png]()
-
When you select the Weight-Blended Layer (normal) option, you will be prompted with a pop-up box that is asking you where you want to save the newly created Landscape Layer Info Objects . Select the Resources folder that is under the Landscape folder and then press the OK button.
![T_Landscape_Layer_Info_Save.png]()
-
Once you have completed the first one, repeat the same process for the other two. You should have something that looks like the following:
![T_Landscape_Finshed_Layers.png]()
Now with the Landscape Layer Info Objects created and applied, we can begin to paint our Landscape.
Painting the Landscape
Before you begin to paint the Landscape, here is a re-cap of some of the most used commonly used keyboard and mouse inputs that you will use when painting the Landscape.
|
Common Controls |
Operation |
|---|---|
|
Left Mouse Button |
Performs a stroke that applies the selected tool's effects to the selected layer. |
|
Ctrl+Z |
Undo last stroke. |
|
Ctrl+Y |
Redo last undone stroke. |
The main tool that you will use for applying textures to your Landscape is going to be the Paint Tool . To find out more about all of the tools that you can use to paint on the Landscape, check out the Paint Mode documentation.
To apply a Material to the Landscape, press and hold the Left Mouse Button to apply whatever you have selected to the area under the brush.
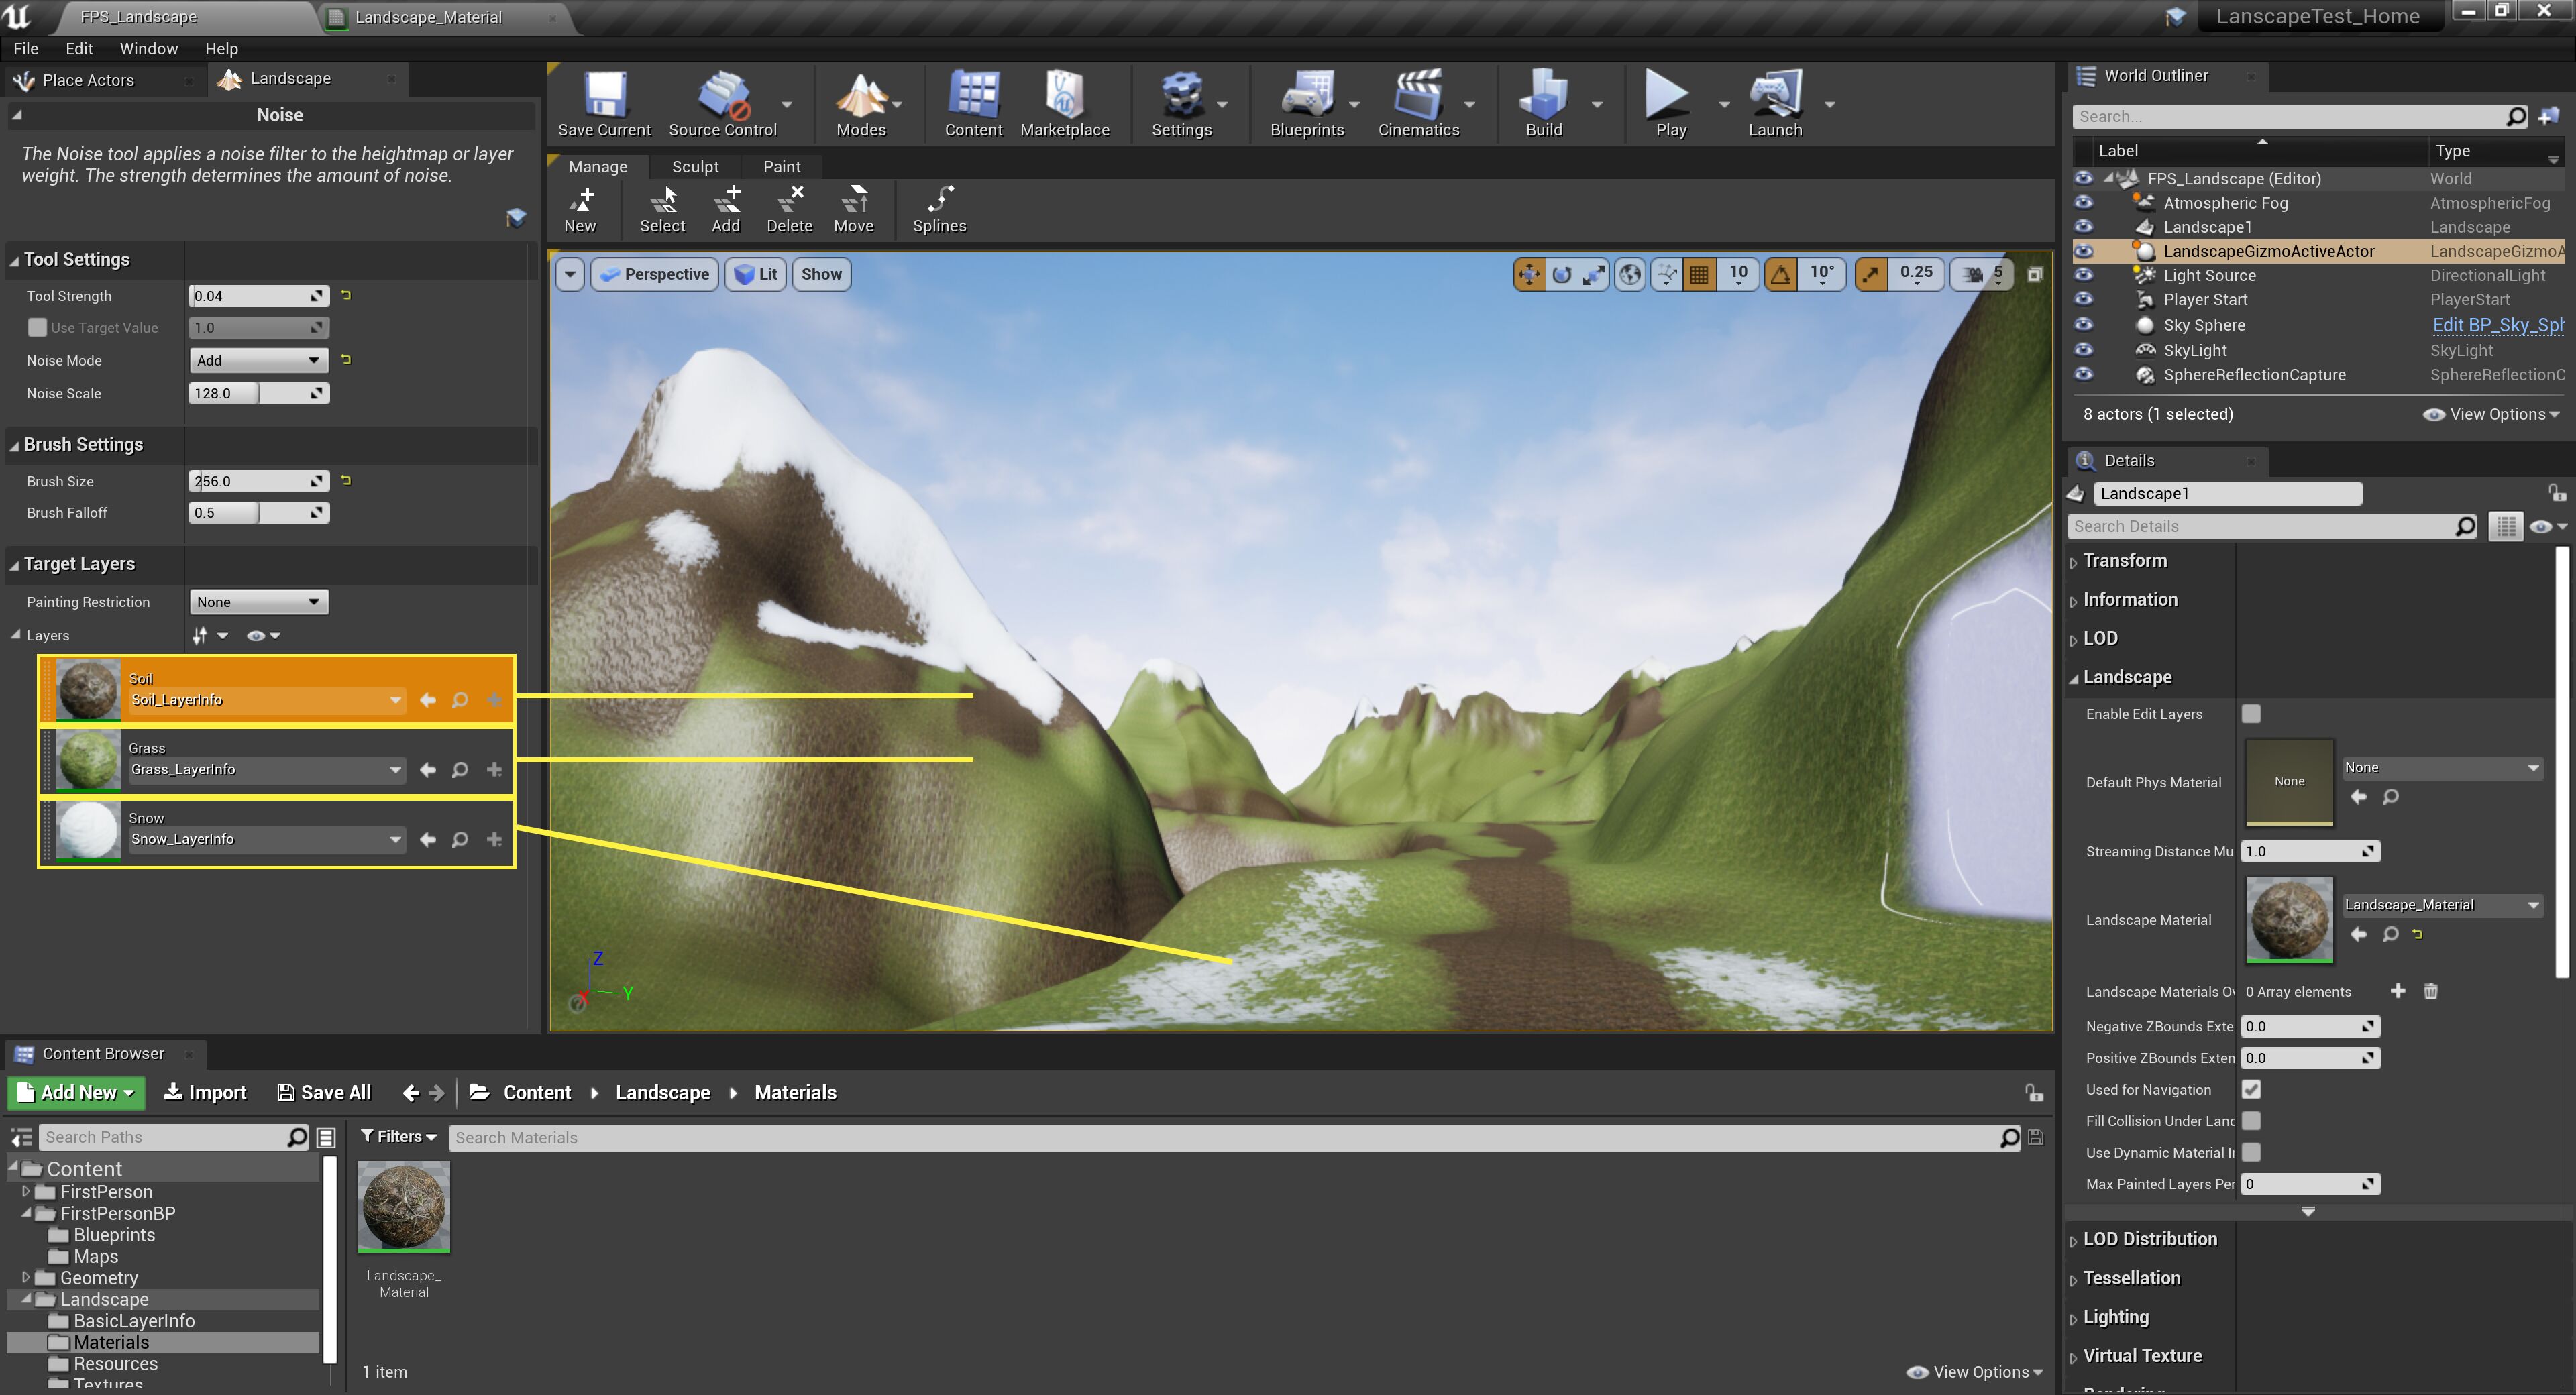
To select a new texture to paint, make sure you are in Landscape Painting Mode then under the Target Layers section, select which texture you want to paint with by clicking on it in the list. Whichever texture is highlighted will be painted on the Landscape. In the image below, you can see the Soil layer is highlighted meaning that this is the texture that will be painted to the Landscape.
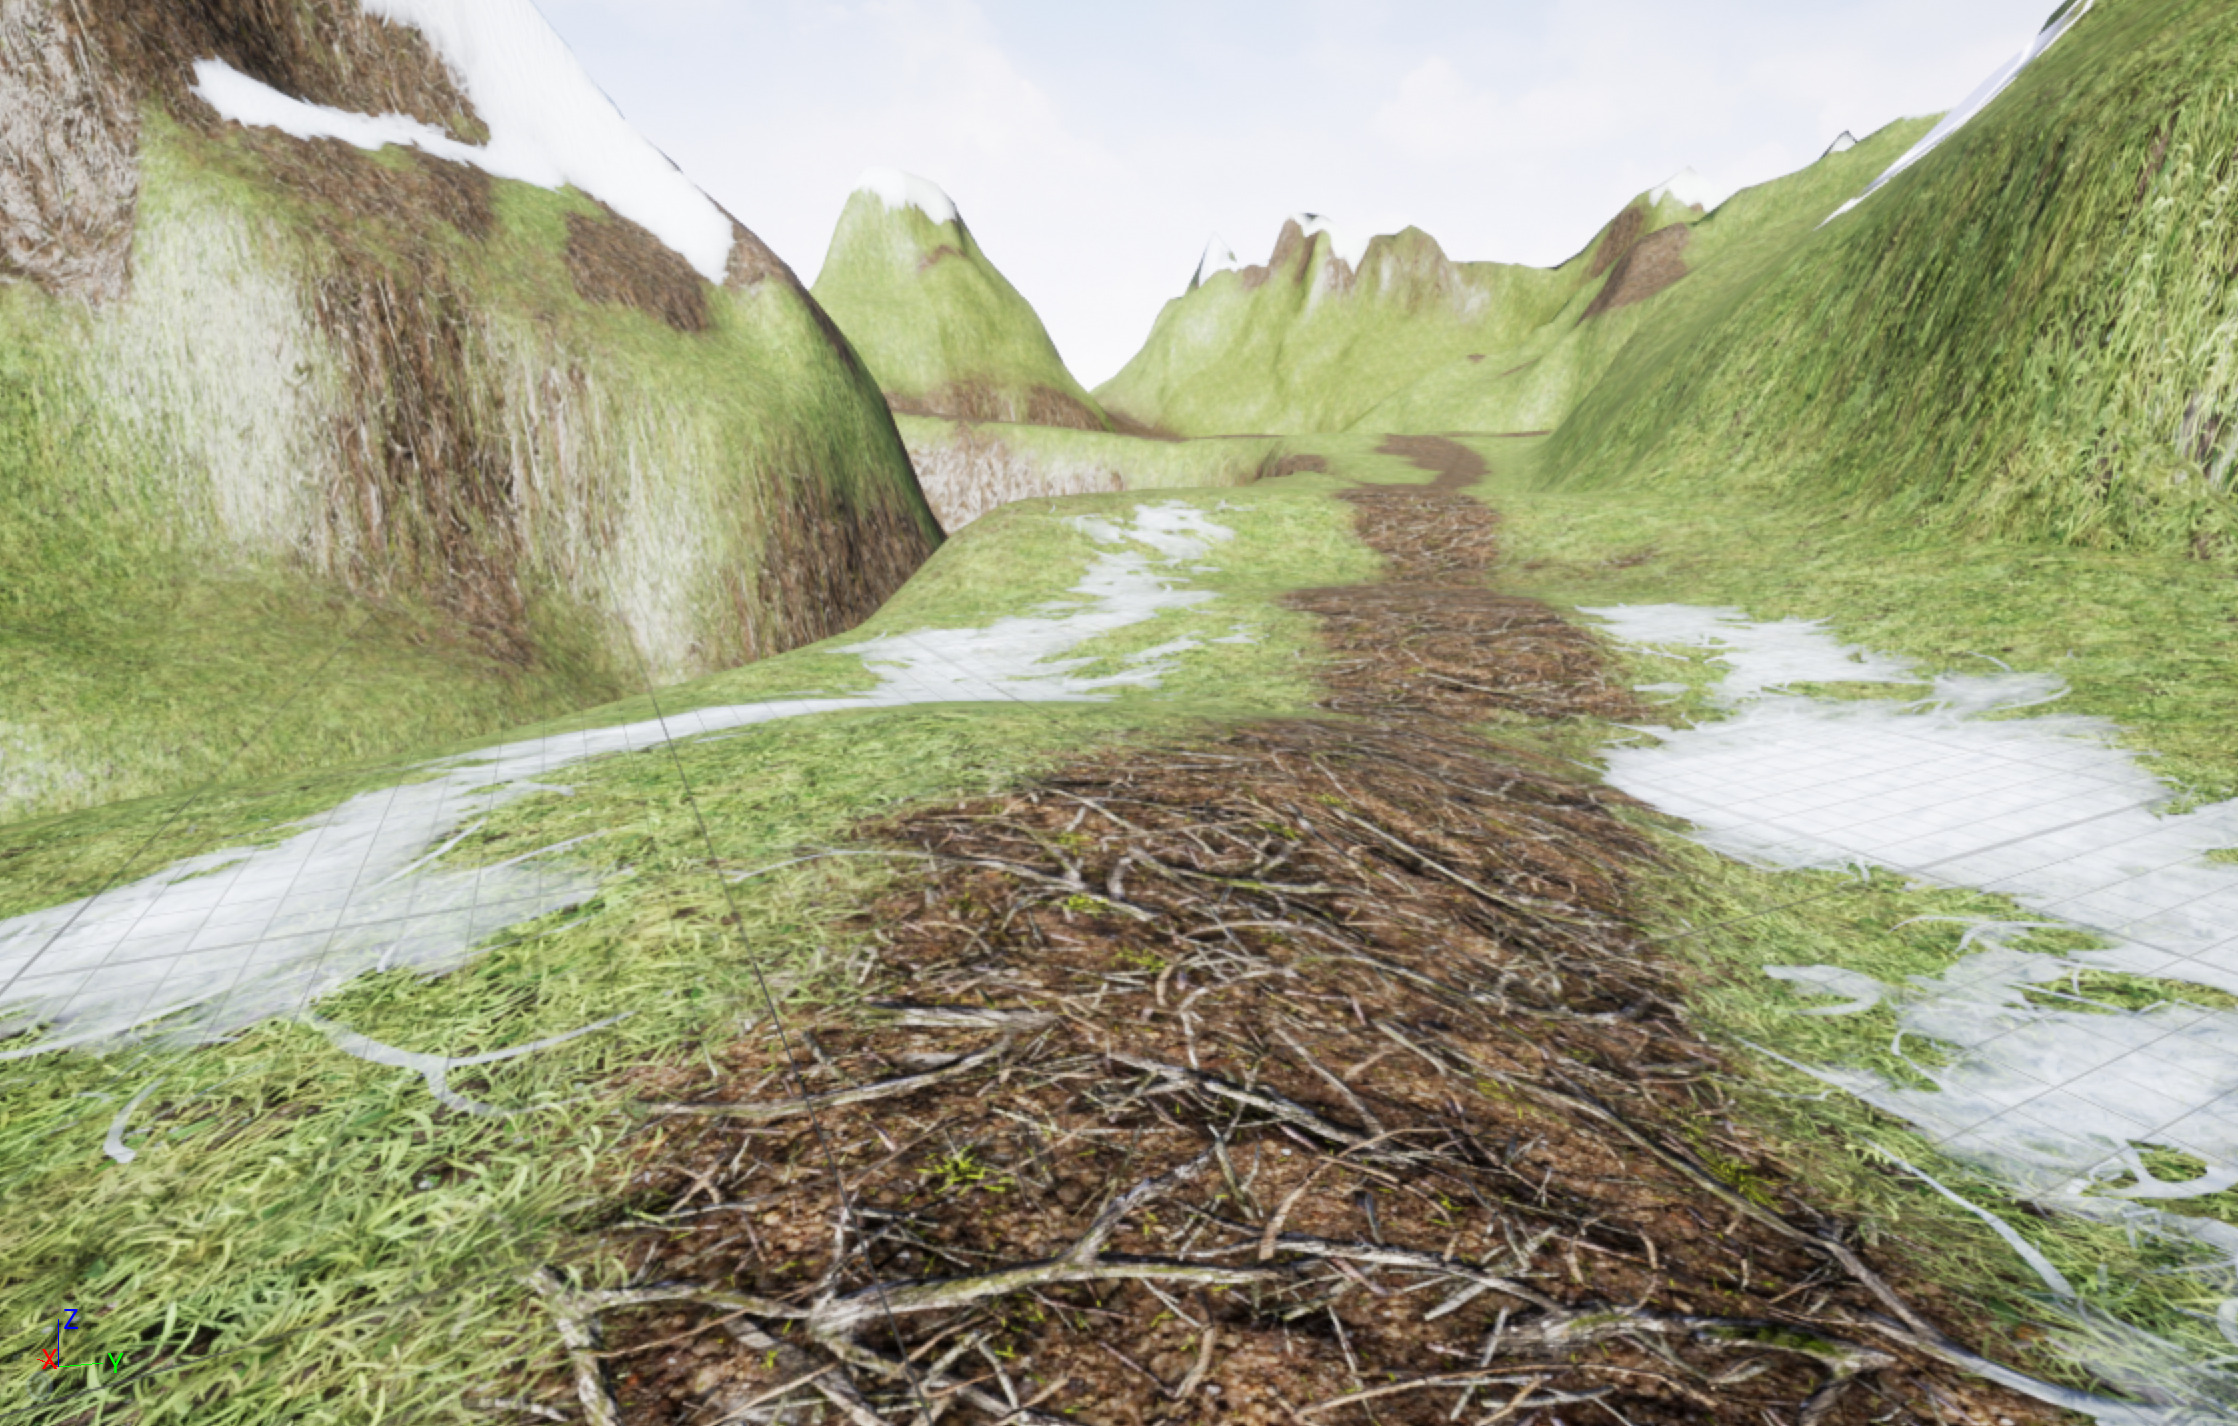
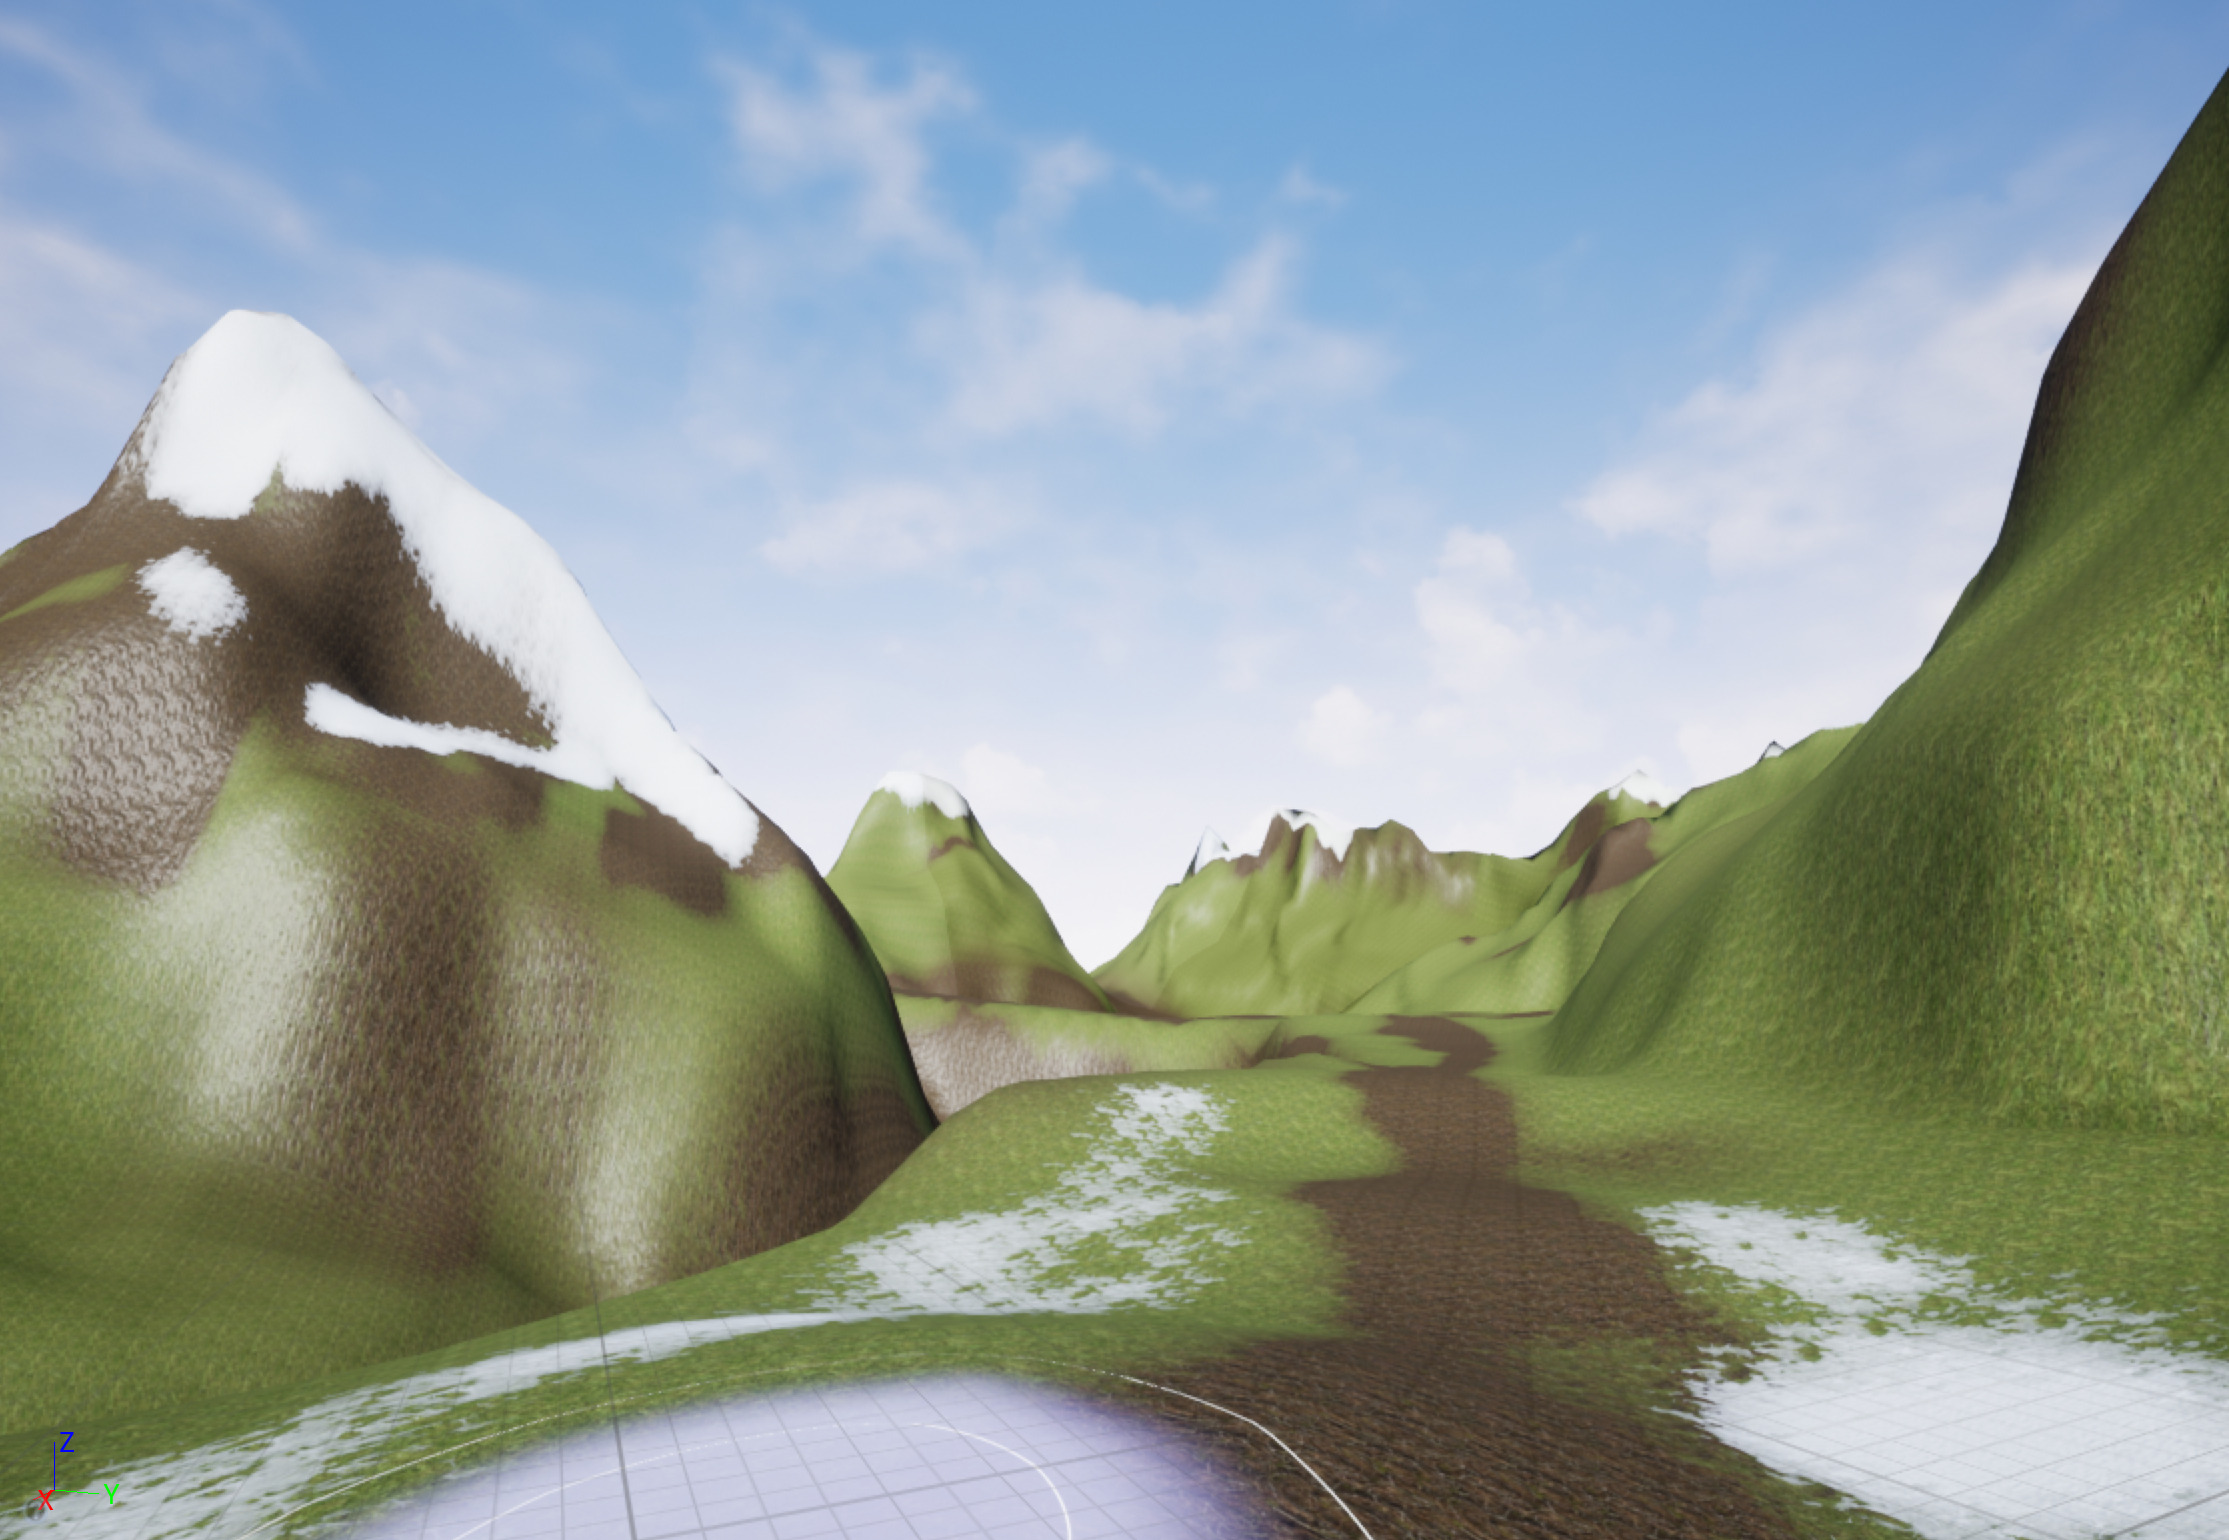
When you finish painting, you should have something that looks like this.
Possible Issues and Workarounds
When you first start painting on your Landscape you might run into an issue where the base Material disappears or turns black, like in the following picture:

This happens when there is no Paint Layer data on the Landscape when you first start to paint. To fix this issue, continue to paint over the Landscape generating the Paint Layer data as you go. If you would like to fill in the entire Landscape, first select a large brush size, like 8192.0, pick a layer that you want to use as a base and paint over the entire Landscape once. This will create Paint Layer data and allow you to continue to paint without anything turning black.
Another issue that you might run into is that the scale of the Textures on your Landscape are either too big or too small. To fix this, open your Landscape Material and select the Landscape Coords node. With that node selected, adjust the Mapping Scale in the Details panel and save the Material. Once the Material is re-compiled, check the scale out in the viewport. If the scale is not to your liking, then repeat the processes above until you get the results you want.

Here is a comparison between a Mapping Scale of 0.5 on the Left and 5.0 on the Right.
6 - Landscape Tips and Tricks
While the quick start tutorial above will get you up and running with a Landscape, it barely scratches the surface of what the Landscape tools can do. This section aims to show you some tips and tricks for using the Landscape Tool as well as some external tools that you can use to generate your Landscape.
Tips & Tricks
-
When using the Paint Tools , you might find it easier to paint over what you would like to erase than to try and erase it using Shift + Left Mouse Button .
-
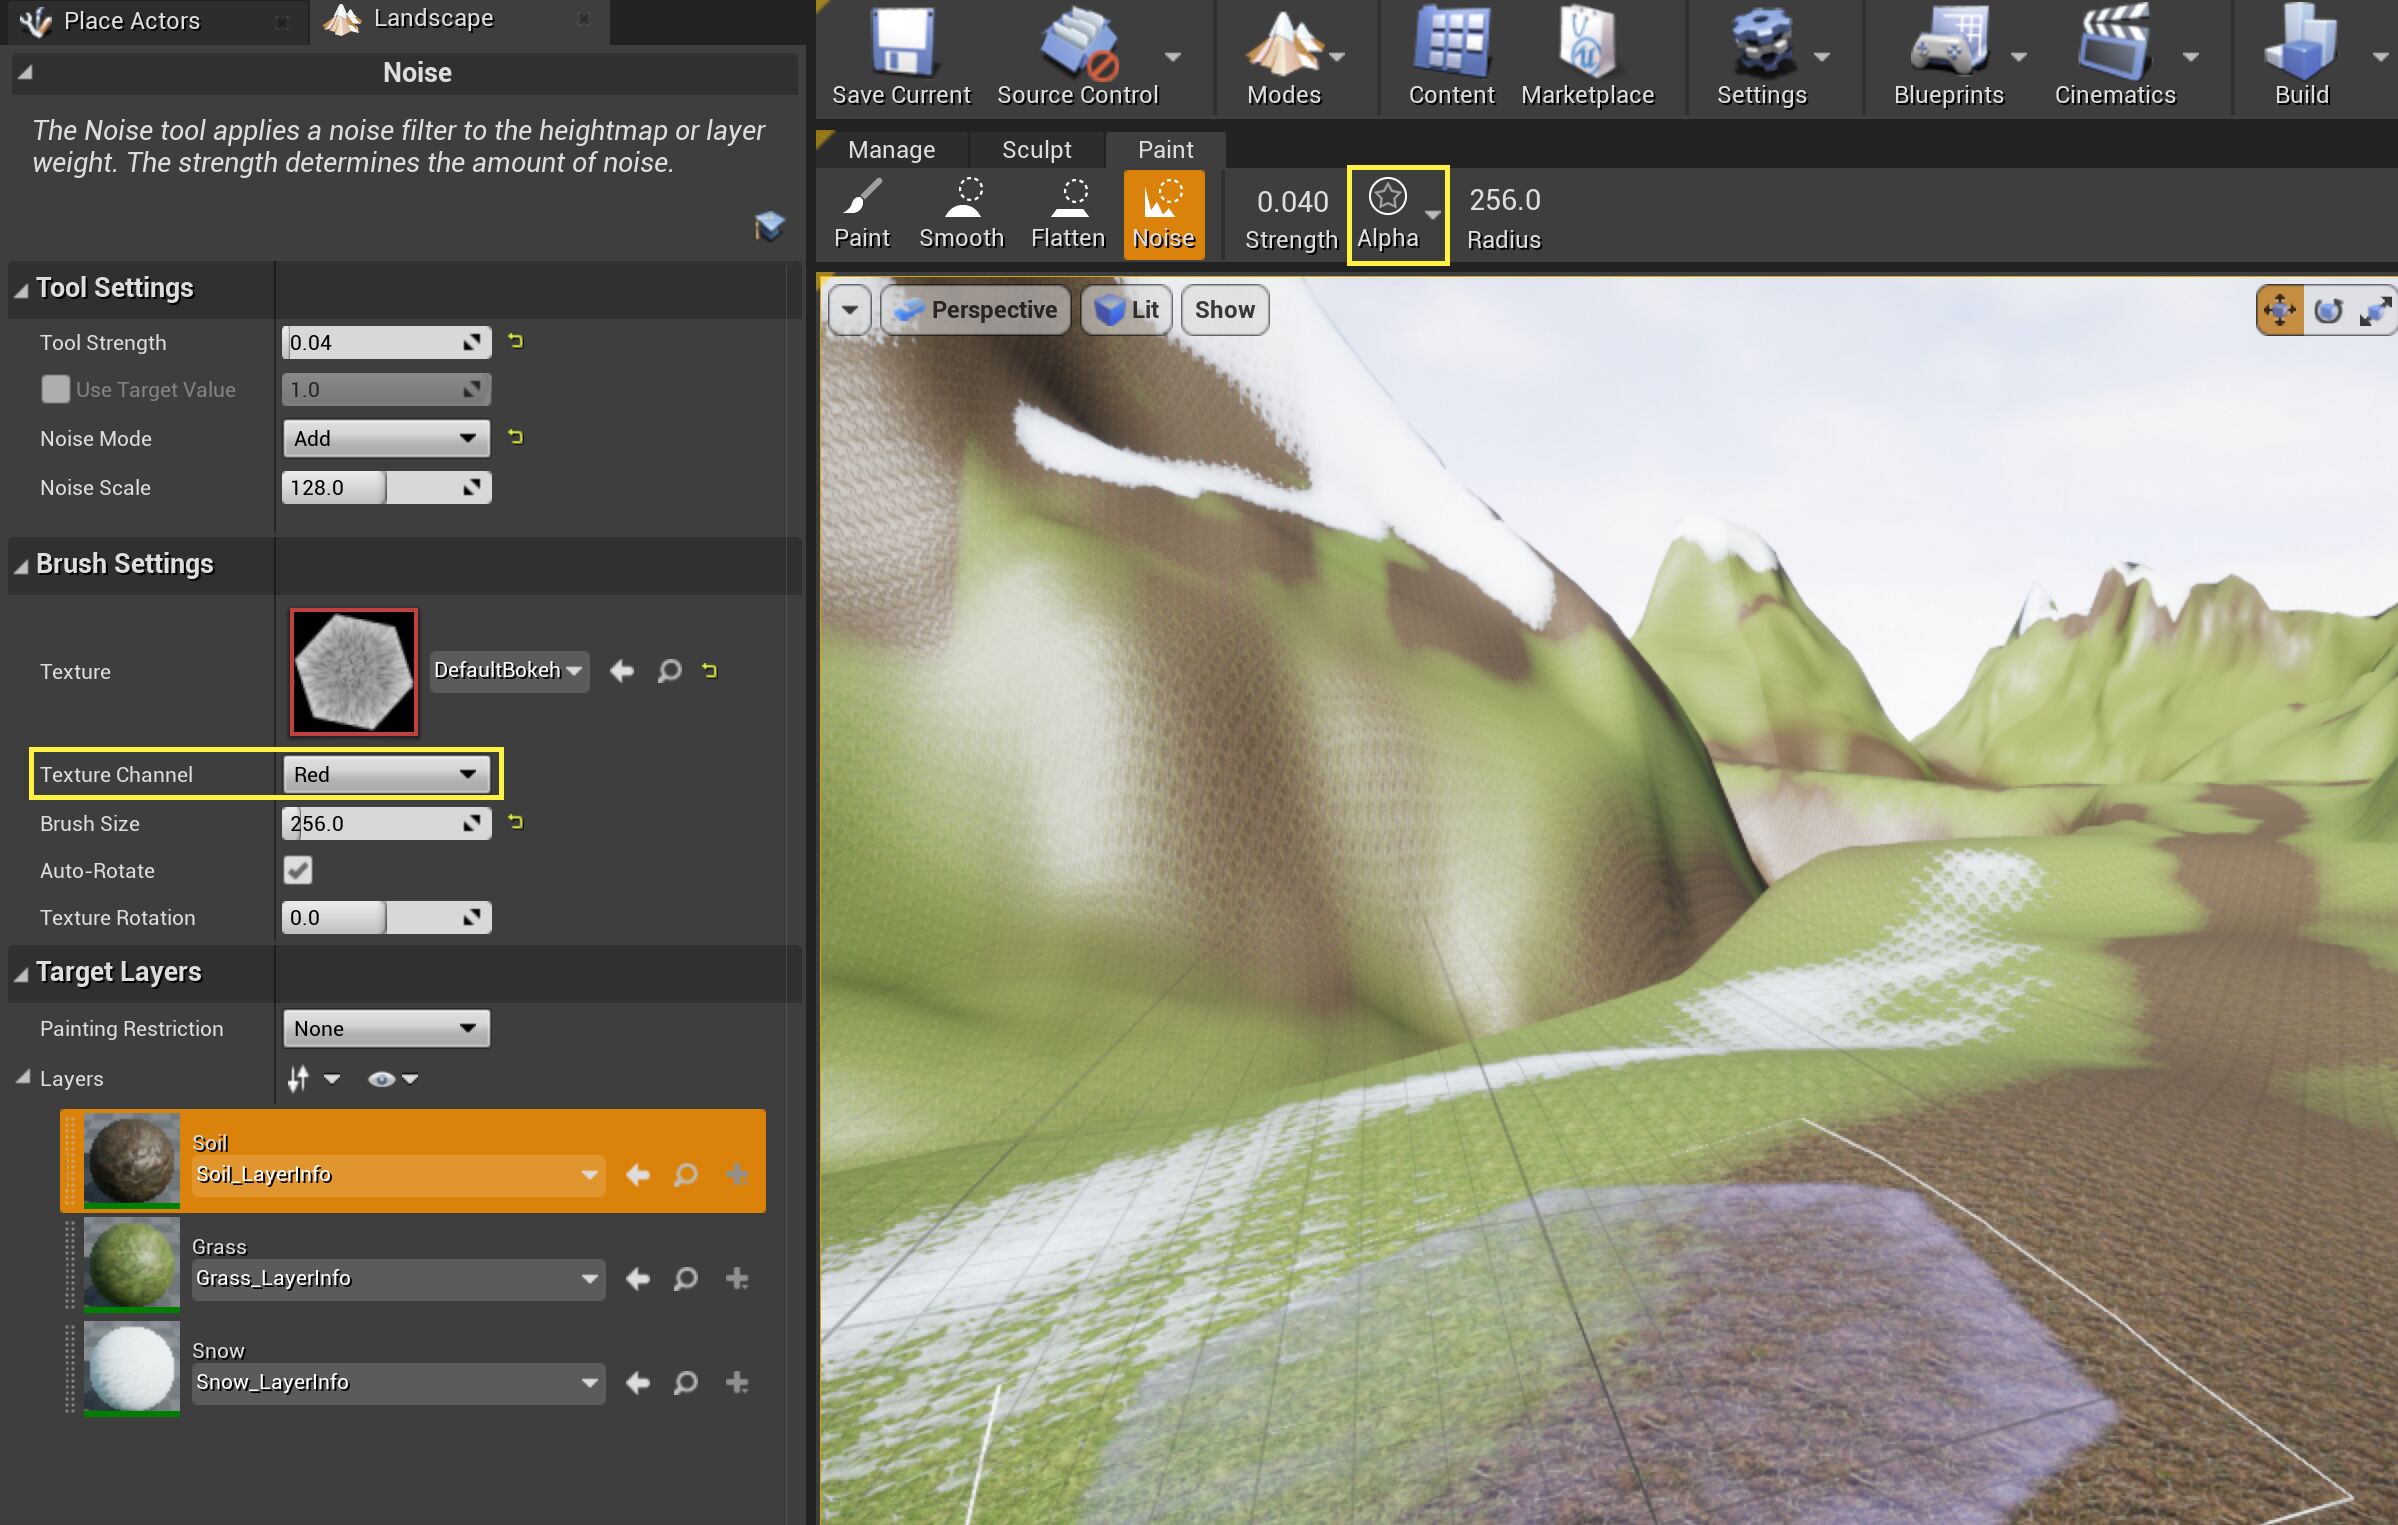
When using the Alpha Brush , remember that you can change what the pattern that the brush uses by selecting a different RGB channels from the Texture Channel drop down menu. This is very handy because you can pack up to three different Alpha patterns in a single texture.
![T_Landscape_Tips_Tricks_00.png]()
-
Landscape compiles shaders separately for each component based on which layers are painted on them. For example, if you have a component with a dirt layer on it but no trace of the grass layer has been painted on it, the textures for the grass layer are left out of the material for that component, making it cheaper to render. So when you do an optimization pass, it can be worthwhile to go over a Landscape and look for components that only have a tiny trace of a given layer and erase them to reduce material complexity.
-
Another issue to watch out for when painting layers is to avoid having too many textures on one component. The material editor stats show the limit of how many texture samples you are allowed to use, but for Landscape materials the masks for each layer count as texture samples too and do not show in the stats. If a component starts showing the default texture (Grey Squares) when you paint a new layer onto it, it is likely that it is gone over the texture sample limit and either needs to have a layer erased or the material needs to be optimized to use less textures.
-
You can change the LOD Distance Factor for individual Landscape components so they will simplify at closer or further distance thresholds. Things like mountain peaks or anything with a distinct silhouette will LOD most noticeably as you move further away, so you can reduce the LOD bias for those components to preserve their shape. You can also raise the LOD bias for low-detail areas like flat plains that will not look noticeably different with less tessellation.
World Composition
Unreal Engine 4 (UE4) now offers the ability to create massive worlds made using Landscape that can easily be managed by using the World Composition tool. World Composition was designed to help simplify the management of large worlds, especially if those worlds are made using the Landscape system. To find out more about the World Composition tool, please refer to the official document that you can find here:
External Creation Tools
While the default Landscape tools do have the ability to meet all of your sculpting and painting needs, there could be some situations where you might want some extra control over your Landscape's look and feel. The following is a list of software packages that could help you obtain the results you are looking for if you cannot get them from using the Landscape tools.
|
Procedural terrain generation in Houdini uses a collection of heightfield nodes to let you use layer shapes and add noise to define the look of your digital landscapes. Use advanced erosion tools for more control over details such as fluvial lines, river banks, debris, and new hierarchical scattering for more efficient placement of elements into landscapes. You can then export height and/or mask layers to create terrain in UE4, or you can wrap up your terrain networks into Houdini Digital Assets that will open up in UE4 using the Houdini Engine plug-in. When Digital Assets include heightfield nodes, they will integrate seamlessly with Unreal Engine's native Terrain tools. |
|
|
While primarily a tool for digital sculpting and painting 3D meshes, Mudbox can also be used to generate heightmap data for your Landscape. You can read more about how Mudbox might be able to help you out with your Landscape by checking out their website. |
|
|
Terragen is another powerful fully procedural terrain creation software. Much like World Machine, it can be used to build, texture, and export both heightmaps and textures for your Landscape. You can read more about how Terragen might be able to help you out with your Landscape by checking out their website. |
|
|
World Machine is a powerful procedural terrain creation software. It can be used to build, texture, and export both heightmaps and textures for your Landscape. You can read more about how World Machine might be able to help you out with your Landscape by checking out their website. |
|
|
Zbrush is another digital sculpting and painting tool that can be used to generate heightmap data for your Landscape. You can read more about how Zbrush might be able to help you out with your Landscape by checking out their website. |


