Choose your operating system:
Windows
macOS
Linux
Play In Editor supports multiple worlds, so that you can test networked play. The editor spawns multiple worlds within the already loaded instance of UE4, which results in fast iteration time and allows you to debug Blueprints for each world.
Setting up Networked Testing
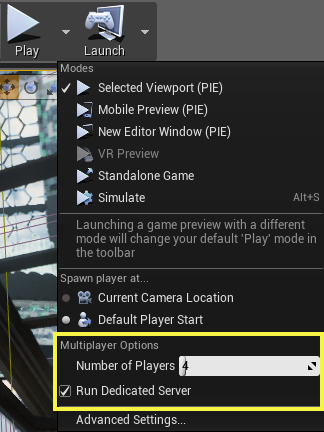
In the Play In dropdown menu in the Level Editor Toolbar or Blueprint Editor Toolbar , you can set how many client worlds to create when you begin a Play In Editor session. In addition, you can specify whether or not to run a dedicated server.

The Number of Clients field allows you to specify the total number of players you want to test. If this is set to 1, and the Run Dedicated Server checkbox is unchecked, your Play In Editor session will allow you to test standalone, non-networked gameplay.
The other basic networking option provided in the dropdown menu is the Run Dedicated Server checkbox. When this is checked, a "dedicated server" world is launched, although there is no display or local player for the dedicated server. Using the dedicated server means that none of your clients will be running as a listen server. The dedicated server allows you to check for dedicated server only bugs, such as code that relies on a local player. A simple test configuration for Blueprints that have functionality that relies on servers and clients is to have Number of Players set to 1, and Run Dedicated Server set to true . There is only one window to test play in, but it has the full functionality of a client connected to a dedicated server.
After setting these options, pick your preferred Play In Editor mode to begin testing gameplay. If you have more than one client world and select the Viewport display type for your Play In Editor session, one client world will be shown in the viewport, and all others will be shown in new windows. The example image below shows testing with 4 players and a dedicated server.
Click to see full-size image:
You can use Shift+Tab and Control+Tab to cycle the focus between your client windows.
Advanced Settings
The number of client worlds, as well as whether or not to use a dedicated server, can also be set in the Level Editor - Play In Settings window . Here, you can also specify any command line options to be sent to the preview session. You can also revert to the previous networked Play In Editor behavior by unchecking the Use Single Process checkbox.
|
Setting |
Description |
|---|---|
|
Launch Separate Server |
Launches a separate server even if the net mode doesn't require it. This allows you to test offline --> server workflows by connecting to a server from the offline game. |
|
Play Net Mode |
Sets the net mode used for Play In Editor session:
|
|
Run Under One Process |
Spawns multiplayer windows under a single instance of UE4. This will load much faster but have the potential for more issues. |
|
Enable Network Emulation |
Applies the selected network emulation settings when starting the game for the purpose of testing how your game handles network issues:
|
|
Client |
Applies the selected client settings when starting the game:
|
|
Server |
Applies the selected server settings when starting the game:
|
Debugging Blueprints
When running under a multiple world scenario, there is now an additional dropdown menu in the Blueprint Editor to select the world to debug:

The world list will filter Actors in the Actor list. For example, with "All Worlds" selected, you will see Actors from every world in the other drop down list. By selecting one of the other worlds, you will only see Actors in that world instance.
This also affects break points. For example, setting the debug world to Client 1 will make it so that only breakpoints will trigger on Actors in Client 1's world.
You can see the client number for a preview window by looking at the window title. For example, in the networked play image above, one window is titled ShooterGame Game Preview Client 1 (64bit/PCD3D_SM5)) .
When All Worlds is selected, any world can trigger break points. When those break points are triggered, the Blueprint editor will display which world it is debugging:


