Choose your operating system:
Windows
macOS
Linux


Planar Reflections
UE4 has support for real-time Planar Reflection that can give more accurate looking reflections than Screen Space Reflections (SSR) provide but come with a higher rendering cost. This higher rendering cost is due to how Planar Reflection works, as Planar Reflection actually renders the level again from the direction of the reflection.

Screen Space Reflections VS Planar Reflections
Screen Space Reflections (SSR) are much more efficient than Planar Reflections when it comes to rendering, but are also much less reliable.The image comparison below shows the limits of SSR versus Planar Reflections.


-
Screen Space Reflections: The image on the left shows the limitation of Screen Space Reflections. Notice the significant amount of 'leaking' that happens at the edges of the image or the part of the pool towards the camera view where reflections start to fade out. This happens because SSR can not reflect objects that are off-screen.
-
Planar Reflections: The image on the right shows the same level, however, this time, Planar Reflections have been enabled. Notice how there is no leaking in the image, even at the sides and edges of the pool, the reflection is consistent and accurate. This is because Planar Reflections can reflect objects that are off-screen regardless of camera view.
Enabling Planar Reflections
To use enable and use Planar Reflections in your project you will need to do the following:
-
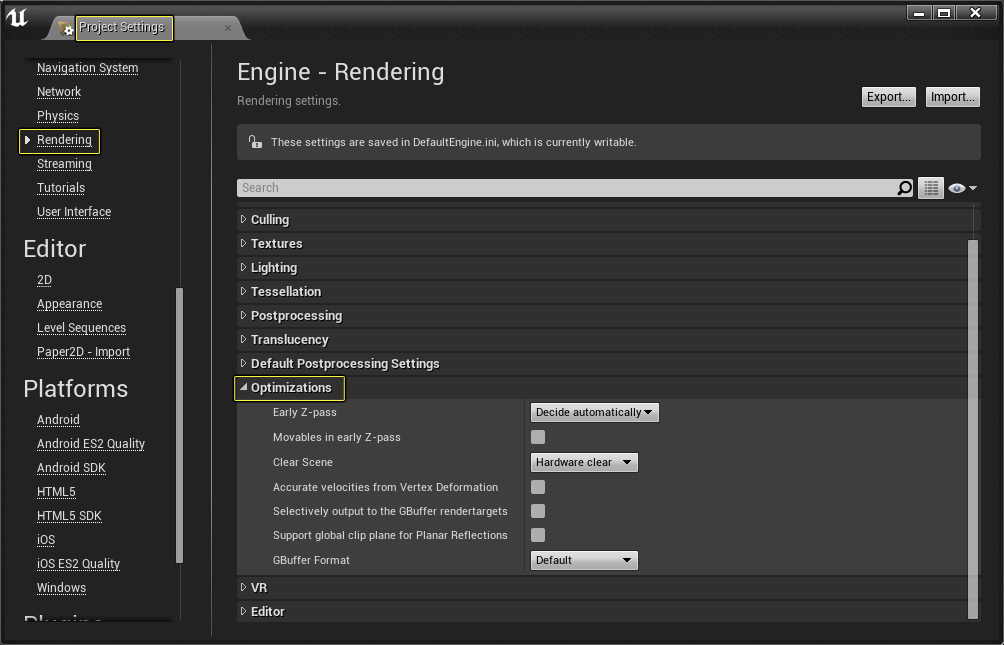
From the Main Toolbar go to Edit > Project Settings and from the Project Settings menu, go to the Rendering > Optimizations section.
![PR_Project_Settings_00.png]()
-
Click on the check box next to Support global clip plane for Planar Reflections and re-start the UE4 Editor when prompted.
![PR_Enable_PR_00.png]()
Failing to re-start the UE4 Editor after Planar Reflections are enabled will result in Planar Reflections not working.
-
Once the UE4 Editor restarts, go to the Place Actors panel and in the Visual Effects tab, select and drag a Planar Reflection Actor to the level.
![Adding_Planar_Reflection_Actor.png]()
-
With the Planar Reflection Actor now placed in the level, you can now use the G key to hide and unhide the Actor. You can also use the Move , Rotate , and Scale tools to better position and size the Planar Reflection Actor to meet your levels needs.


Any nearby reflective Materials will automatically be affected by the Planar Reflection Actor as soon as it is added to the level. Static Meshes that are placed in the level will also have their normals used to distort the reflection, allowing for the simulation of waves.
Planar Reflection Actor Properties
The Planar Reflection Actor has a number of properties that when adjusted can significantly affect the look of the reflection. The following table outlines these properties and how they will change the look of the Planar Reflection.

|
Properties |
Description |
|
|---|---|---|
|
Normal Distortion Strength |
Controls the strength of normals when distorting the planar reflection. |
|
|
Prefilter Roughness |
The roughness value to prefilter the planar reflection texture with. This is useful for hiding low resolutions. Larger values have a larger GPU cost. |
|
|
Distance from Plane Fadeout Start |
Receiving pixels at this distance from the reflection plane will begin to fade out the planar reflection. |
|
|
Distance from Plane Fadeout End |
Receiving pixels at this distance from the reflection plane will have completely faded out the planar reflection. |
|
|
Angle from Plane Fade Start |
Receiving pixels whose normal is at this angle from the reflection plane will begin to fade out the planar reflection. |
|
|
Angle from Plane Fade End |
Receiving pixels whose normal is at this angle from the reflection plane will have completely faded out the planar reflection. |
|
|
Show Preview Plane |
Toggles the visibility of the reflection plane while working in the Editor. This does not affect the planar reflection. |
|
|
Advanced Properties |
||
|
Prefilter Roughness Distance |
The distance at which the prefilter roughness value will be achieved. |
|
|
Screen Percentage |
Downsample percent can be used to reduce GPU time rendering the planar reflection. This directly affects the quality of the reflection produced by the planar reflection. |
|
|
Extra FOV |
Addtional Field of View (FOV) used when rendering to the reflection tetxure. This is useful when normal distortion is causing reads outside the reflection texture. Larger values increase rendering thread and GPU cost, as more objects and triangles have to be rendered into the planar reflection. |
|
|
Render Scene Two-Sided |
Whether to render the scene as two-sided, which can be useful to hide artifacts where normal distortion would read "under" an object that has been clipped by the reflection plane. With this setting enabled, the backfaces of a mesh woul dbe displayed in the clipped region instead of the background which is potentially a bright sky. Be sure to add the water plane to the Hidden Actors if enabling this, as water plane will not block the reflection. |
|
|
LOD Distance Factor |
Scales the distance used by Level of Detail (LOD). Set to values greater than 1 to cause the scene capture to use lower LODs than the main view to speed up the scene capture pass. |
|
Planar Reflections Actor Scene Capture Properties
The Planar Reflection Actor also has a number of properties that enable you to control the performance cost of the realtime reflection that is captured.

|
Property |
Description |
|
|---|---|---|
|
Primitive Render Mode |
Controls what primitives get rendered into the scene capture.
|
|
|
Hidden Actors |
A list of selected Actors available in the level to hide in the scene capture. |
|
|
Show Only Actors |
A list of Actors available in the level that will be rendered by this scene capture when using the Primitive Render Mode for Use ShowOnly List . |
|
|
Capture Every Frame |
Whether to update the capture's contents every frame. If disabled, the component will render once on load and then only when moved. |
|
|
Capture on Movement |
Whether to update the capture's contents on movement. It is disabled if you are going to capture manually from Blueprint. |
|
|
Always Persist Rendering State |
Whether to persist the rendering state even if Capture Every Frame is disabled. This enables velocities for Motion Blur and Temporal Anti-Aliasing (TAA) to be computed. |
|
|
Max View Distance Override |
Sets the maximum render distance (in centimeters) for primtives rendered in the scene capture when values are greater than 0. This can be used to cull distance objects from a reflection if the reflecting plane is in an enclosed areas like a hallway or room. |
|
|
Capture Sort Priority |
Sets the capture priority within the frame to sort scene capture on GPU to resolve interdependencies between multiple capture components. The highest value will come first. |
|
|
Profiling Event Name |
Sets a name for the profiling event when profiling the GPU. This is useful to know which planar reflection is being used when using multiple ones in your levels. |
|
|
Advanced Properties |
||
|
General Show Flags |
Common feature show flags that toggles some features and Actors from being rendered to the scene capture. For example, Anti-aliasing, Fog, Static and Skeletal Meshes, and more. |
|
|
Advanced Show Flags |
Common advanced feature show flags that toggles some features and Actors from being rendered to the scene capture. For example, Foliage, Instanced Static Meshes, Paper 2D Sprties, and more. |
|
|
Post Processing Show Flags |
Toggles show flags for Bloom, Eye Adaptation, and Motion Blur from being rendered to the scene capture. |
|
|
Light Types Show Flags |
Toggles show flag for Sky Lighting from being rendered to the scene capture. |
|
|
Lighting Components Show Flags |
Toggles show flags for Ambient Occlusion and Dynamic Shadows from being rendered to the scene capture. |
|
|
Lighting Features Show Flags |
Toggles common show flags for Lighting features from being rendered to the scene capture. For example, Distance Field Ambient Occlusion (DFAO), Light Functions, Screen Space Reflections, and more. |
|
|
Hidden Show Flags |
Toggles show flags for Lighting and Post Processing from being rendered to the scene capture. |
|
Planar Reflection Limitations
While Planar Reflections offer some very realistic reflections, this features does have a number of limitations which are listed below.
-
Planar Reflections cause your entire scene to be rendered twice, so you'll want to budget half your frame time for it on the Rendering thread and GPU!
-
Limit the number of Planar Reflections placed in the world. Often times, one will still be too much.
-
Size it appropriately, which enables it to be culled when not visible.
-
The cost to render the Planar Reflection Actor comes directly from what is currently being rendered in the level. Scenes that are triangle and draw call heavy will suffer the most performance issues when this feature is enabled because those costs don't scale with Screen Percentage.
Planar Reflection Performance
While enabling and using Planar Reflections in your project will give you crisp and reasonably accurate reflections, this option will have a direct impact on the project's performance. In the following section, we will take a look at the performance impact enabling Planar Reflections will have in a high-end PC project as well as a project that is geared towards mobile devices.
To show off, the performance impact Planar Reflections have we will be using the 4.12 version of the Kite & Infinity Blade Grass Lands project that can be found in the UE4 launcher.
Planar Reflection Performance & Kite Demo
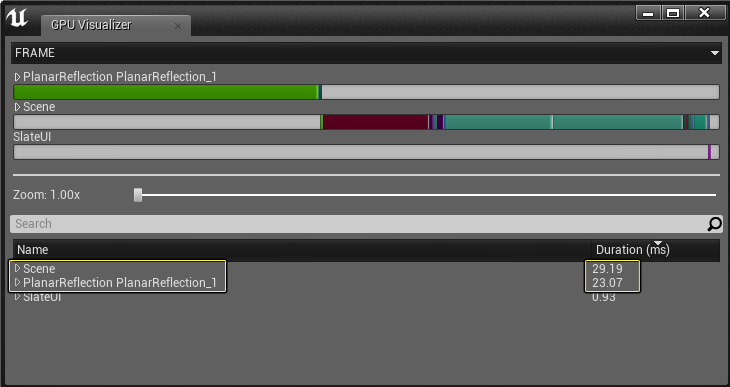
Due to the size and varying height of the Kite demos Landscape terrain, adding and then scaling a single Planar Reflection Actor to encompass the entire level would not work and could lead to very poor performance. Instead, Planar Reflection Actors were strategically placed and scaled to fit areas of the level that needed them. In the following image, we can see what the visual impact Planar Reflections have on water used the Kite demo.


While the visual impact Planar Reflections have on the level is quite dramatic, so is the impact they have on performance. If you take a look at the left hand image below, Planar Reflection Off , you will see that the entire level is taking 31 ms to render. If you take a look at the right hand image, Planar Reflections On , you will see that the entire level is taking 29.19 ms to render. On top of that, Planar Reflection are adding an additional 23.07 ms of rendering time bring the total time to render the scene with Planar Reflections enabled to around 52 ms.
|
|
|
|---|---|
|
Planar Reflection Off |
Planar Reflection On |
|
Click for full image |
Click for full image. |

The reason why Planar Reflections are taking around 31 ms to render is due to the fully dynamic lighting and shadowing used in Kite. Levels that make use of Stationary / Precomputed lighting and shadowing will be much more efficient when rendered again for the Planar Reflection.
Planar Reflection Performance & Infinity Blade Dungeons
Due to the size and layout of the Infinity Blade Elven Ruins map, only one Planar Reflection was needed and it was scaled to match the already existing water Static Mesh that was placed in the level. In the following images, we can see the visual impact adding a Planar Reflection has on the look of the water in the Elven Ruins map.


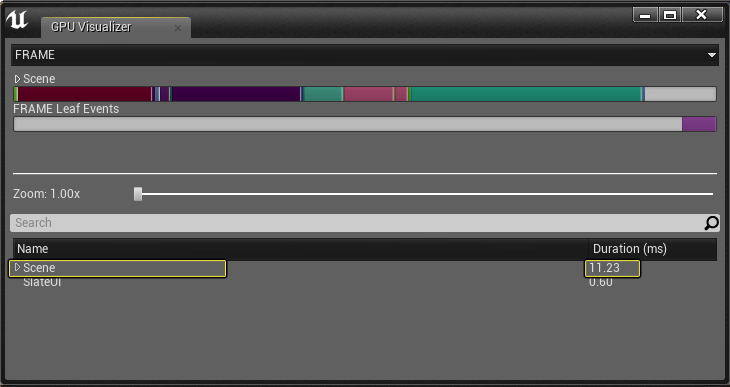
While adding a Planar Reflection makes the water look more lifelike, the impact it has on performance is quite small when compared to the Kite Demo. If you take a look at the image on the left hand side below, Planar Reflections Off, you can see that without Planar Reflections the scene is costing around 11 ms to render. If you take a look at the image on the right hand side, Planar Reflections On, you can see that with Planar Reflections cost around 1.67 ms to rendering bring the total time to render the level to around 13 ms.
|
|
|
|---|---|
|
Planar Reflection Off |
Planar Reflection On |
|
Click for full image |
Click for full image. |
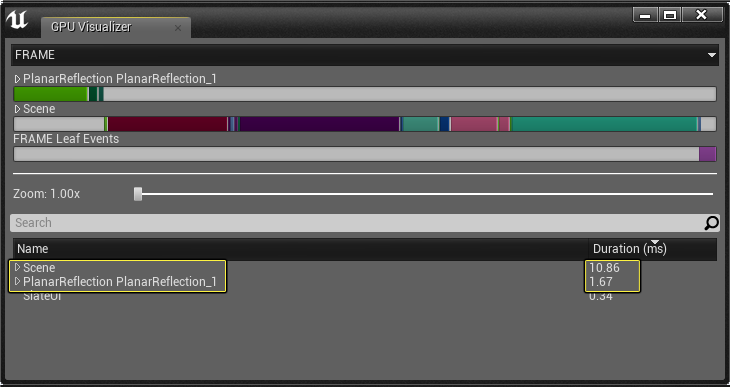
The reason that Planar Reflections only cost 1.67 ms to render in the Elven Ruins map versus the 23.07 ms that it takes to render the Planar Reflections in the Kite Demo is due to how the Static Meshes and Materials that are used in the Elven Ruins were built. Since the Elven Ruins map and its content was designed for mobile devices, close attention was paid to the amount of triangles and Material instructions each asset used. Because of this, when Planar Reflections are enabled in the Elven Ruins map, they will cost less as the assets that are used in the map are greatly reduced in complexity and size when compared to the Kite Demo assets.