Choose your operating system:
Windows
macOS
Linux
Sometimes being called "rumble" or controller vibration, Force Feedback refers to the vibration of a device (such as gamepads or controllers), often being used in games to convey a force occurring in the game to the player. A simple example is when an explosion occurs in the game and force feedback is used to simulate the shockwave, which gives an additional dimension to a player's immersion.
Once implemented, Force Feedback will work on all platforms where it is supported. This includes iOS (as of 4.10), Android, and controllers.
Force Feedback Effect Assets
A Force Feedback Effect Asset contains the properties used to define a specific force feedback effect. This enables designers to customize the force feedback to each situation it is used in.
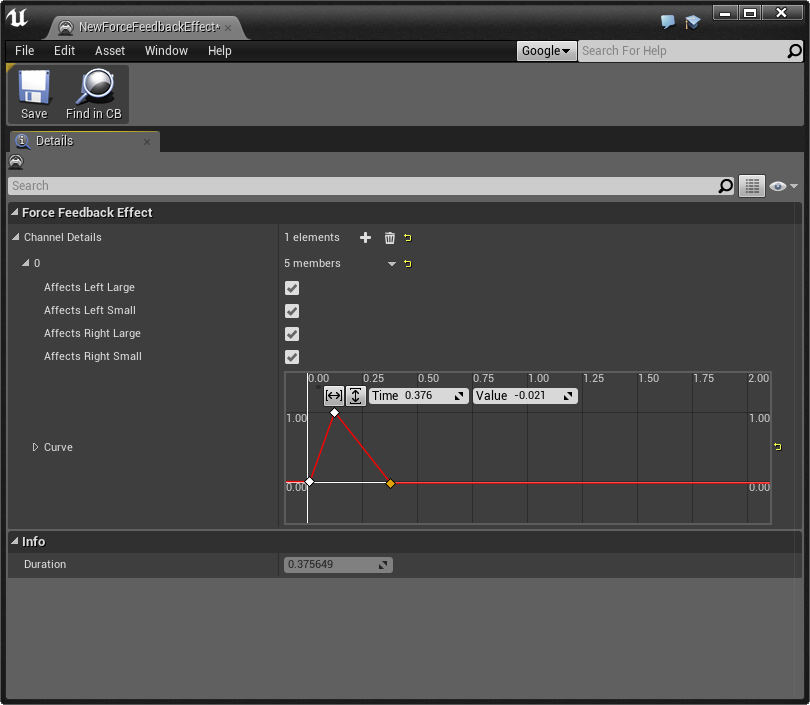
Each Force Feedback Effect can have multiple channels, each of which can play a different effect. For instance, one channel could play a large, long vibration on the right side of the controller, while a second channel could play small, short bursts on the left side. The pattern of the effect for each channel is controlled by a curve. This curve can be edited here with right-click, or the internal curve editor can be opened by double-clicking in the curve's graph.

For information on Curves, Keys, creating external Curve Assets, and using the Curve Editor, check out the
The duration of the force feedback effect will be calculated automatically, based on the position of the last key in the curves for all channels. For example, if there are 3 channels and the last key in each is at 1.25, 1.5, and 1.75, then the duration for the overall effect will be 1.75.
Channel Properties
Each channel has the following properties that control how the effect for the channel is played.
|
Item |
Description |
|---|---|
|
Affects Left Large |
If true, the left large motor will be used to play the effect. |
|
Affects Left Small |
If true, the left small motor will be used to play the effect. |
|
Affects Right Large |
If true, the right large motor will be used to play the effect. |
|
Affects Right Small |
If true, the right small motor will be used to play the effect. |
|
Curve |
A curve that controls the intensity of the effect over time. In other words, this defines the pattern of the vibration. Values above 0.0 will vibrate, while values below 0.0 will not vibrate. |
Creating a Force Feedback Effect Asset
Force Feedback Effect assets are created using the Content Browser :
-
In the Content Browser , click Add New and choose Miscellaneous > Force Feedback Effect , and open the asset you have just created.
![CreateForceFeedbackEffect.png]()
-
By default, the asset will have one channel but you can add more. For each channel, select the combination of the four outputs that the channel will affect.
![FFChannels.png]()
-
Hold Shift and click the Left Mouse Button on the curve to add one or more keys.
![curve.png]()
-
Manipulate the keys by entering values directly or dragging them in the curve editor.
To adjust the curves between the keys, right-click on the curve segment to change its curve function, then adjust the tangent lines as usual.


Playing Force Feedback
Preview in Editor
You can preview your Force Feedback Effect in the editor by clicking the "play" button that appears in the middle of the Force Feedback Effect's icon when you mouse over it.

Directly to a Player
Force Feedback is implemented in the base
PlayerController
class. You will need access to the local Player Controller in order to play Force Feedback on the target device or controller.
Playing Force Feedback in Blueprints
-
Get a reference to your Player Controller, either with a Get Player Controller node or a saved reference.
![effect_controller.png]()
-
Drag off of the output pin of the reference, then type
Play Force Feedbackinto the context menu and select Client Play Force Feedback .![effect_play.png]()
The force feedback will be replicated to the owning client if called on the server.
-
Specify the Force Feedback Effect to use directly on the node or with a connected variable.
![effect_select.png]()
-
Check Looping if you want the effect to loop.
![effect_looping.png]()
-
Optionally, set a unique name for the effect via the Tag field. This feature allows you to stop the effect; if an effect with the same name is already playing, it will be stopped and the new effect will play instead.
![effect_tag.png]()


Playing Force Feedback in C++
Call
ClientPlayForceFeedback
on the local Player Controller, passing it the Force Feedback Effect to use as well as whether or not the effect should loop, and an optional name for the effect. If a name is provided, and another Force Feedback Effect with the same name is played before the original effect ends, the original will be stopped immediately and the new effect will play instead.
At a World Location
To play a Force Feedback Effect that changes intensity based on distance from the observing player, place a Force Feedback Component in the world at the intended source of the effect. A Force Feedback component plays a Force Feedback Effect on command, but also has a physical location in the world. Like sound or light, the intensity of the force experienced by the player will change with the player's distance from the source, according to a data-defined attenuation setting.
Force Feedback Components can be attached to any actor via the usual code or Blueprint editor methods, but they can also be added as they are needed during live gameplay. This can be accomplished by calling the utility functions
UGameplayStatics::SpawnForceFeedbackAtLocation
(to spawn at a given world location), or
UGameplayStatics::SpawnForceFeedbackAttached
(to attach to a specific pre-existing component). These functions will return the spawned Force Feedback Component, so you can continue to manipulate it if you like. However, if you have no use for the component after it finishes playing the effect, you can use the "Auto Destroy" option to have it remove itself once the effect ends.