Choose your operating system:
Windows
macOS
Linux
To create Character Movement , several parts are needed, each working together to produce the end result of a character moving around in your game. You will need a character, inputs for that character, how the character responds to inputs from a player, animations for the character moving, transitions to and from animations, and the logic behind the transitioning between animations.
In this "How To" guide, we intend to show you how you can set all this up from scratch in Blueprints where at the end of the guide, you will have a playable character that exhibits different forms of Character Movement.
Implementation Guide
This Quick Start guide covers all the steps needed to create a fully playable and animated character through Blueprints . By the end of this guide, you will have a character that can walk, run, crouch and crouch walk, go prone, jump from a stationary standing position, or jump while moving.
For an example of the finished product, click the video sample below.
For the steps below, we are using the Animation Starter Pack , which is available for free on the Marketplace , as it contains several animations that can be used to create character movement. Once you have downloaded the Animation Pack, you can add it to an existing project (preferably a New Blank Project) via the Add to project button in the Launcher then specifying which project you want to add the assets to.

To get started, follow the steps below.
1. Character Setup
To get started, we will create some assets that will be used by our character. First we will create an Animation Blueprint (we will populate it later in this process), which will be used to drive the animations of the character, then we will create our Character Blueprint , which will hold the logic behind our character's actions and how it responds to input.
For this project, we are using the Animation Starter Pack which is available for free in the Marketplace . Once you have downloaded the Animation Starter Pack, you can add it to an existing project via the Add to project button in the Launcher then specifying the project you want to add the assets to.
For this project, we are using the Blank Project Template in order to start with a fresh project.
-
With your project open, Right-click in the Content Browser and select New Asset then Animation then Animation Blueprint .
![Characters_1b.png]()
-
In the Target Skeleton window, select the UE4_Mannequin_Skeleton asset.
![Characters_1c.png]()
-
Give your Animation Blueprint a name, such as MyAnimationBlueprint .
-
Right-click in the Content Browser , create a Blueprint Class then select Character as the class.
-
Give it a name, such as MyCharacter , then open it up.
-
In the Components window, click the Mesh Component.
![ClickMesh.png]()
-
In the Details panel, click the None box next to Skeletal Mesh and assign the SK_Mannequin_Skeleton Skeletal Mesh.
![Characters_2a.png]()
-
Set the Location and Rotation under Transform for Z to -90 and assign the Animation Blueprint created in step 1.
![Characters_3.png]()
-
Click the Add Component button, then add a Spring Arm Component.
-
In the Details panel, set the Location of Z to 50 , the Socket Offset for Z to 30 , and check Use Pawn Control Rotation .
![Characters_4.png]()
The Spring Arm Component will be used with a Camera to create a Third Person Perspective.
-
Click the Add Component button, then add a Camera Component.
-
In the Components Window , click on and drag the Camera onto the Spring Arm to make it a child of the Spring Arm Component.
![MakeCameraChild.png]()
-
In the Details panel for the Camera under Transform , set the Location and Rotation values to zero.
![Characters_5.png]()
-
In the Component Window , click on the Character Movement Component.
-
In the Details panel, search for Rotation and under Character Movement , check the boxes shown below.
![Characters_6.png]()
-
Next search for Walk Speed , then set the Max Walk Speed to 200 and Max Walk Speed Crouched to 160 .
![Characters_7.png]()
You can change these values to whatever you would like, but this should serve as a good starting point.
-
In the My Blueprint window, click the Create Variable button and create a Bool called JogPressed .
-
Create four more Bool variables: CrouchPressed , PronePressed , JumpPressed , and DisableMovement .
![Characters_8.png]()
-
Compile and Save , then close the Blueprint.


2. Input and the Game Mode
Here we will set up the Input (game controls) to control the character and create a Game Mode that will use our character.
-
Right-click in the Content Browser and create a new Blueprint Class of the Game Mode class and name it MyGame .
-
Open the MyGame Blueprint, then click the Class Defaults button from the toolbar.
![SelectClassDefaults.png]()
-
In the Details panel under Classes , set the Default Pawn Class to use the MyCharacter Blueprint.
![GameMode_1.png]()
-
Compile and Save , then close the Blueprint.
-
From the Main Editor Window, click Edit from the Menu Bar and select Project Settings .
-
In Project Settings, click Input under the Engine section.
-
Under Bindings , add four Action Mappings and four Axis Mappings .
-
For the first two Axis Mappings , click the plus sign next to each one to add an additional mapping to the group.
![Input_1.png]()
Your empty bindings should look like above.
-
Set up your Bindings similar to below (make sure to set the Scale for A , S , and Mouse Y to -1.0 ).
![Input_2.png]()
Here we set inputs for Jump , Crouch , Jog , and Prone for the Action Mappings and MoveForward , MoveRight , Turn , and LookUp for the Axis Mappings . You can set these as shown or select your own inputs for each.
For more details on this process, see How to Set Up Inputs in Blueprints for more information.
-
Click the Maps & Modes option under the Project section of Project Settings.
-
In Maps & Modes under Default Modes , set the Default GameMode to use the MyGame Game Mode.
![GameMode_2.png]()
For more details on Game Modes, see Setting Up a Game Mode for more information.
-
After setting both the Input and Game Mode settings, close the Project Settings Window.


3. Finishing Character Setup
In this section, we will finish setting up the Character by implementing the scripts that control our Character based on Player Input.
-
Open the MyCharacter Blueprint.
-
In the graph, Right-click and add the InputAxis MoveForward and InputAxis MoveRight Events.
-
Hold Control and drag in the DisableMovement variable and connect it to the Condition on a Branch on each Event.
-
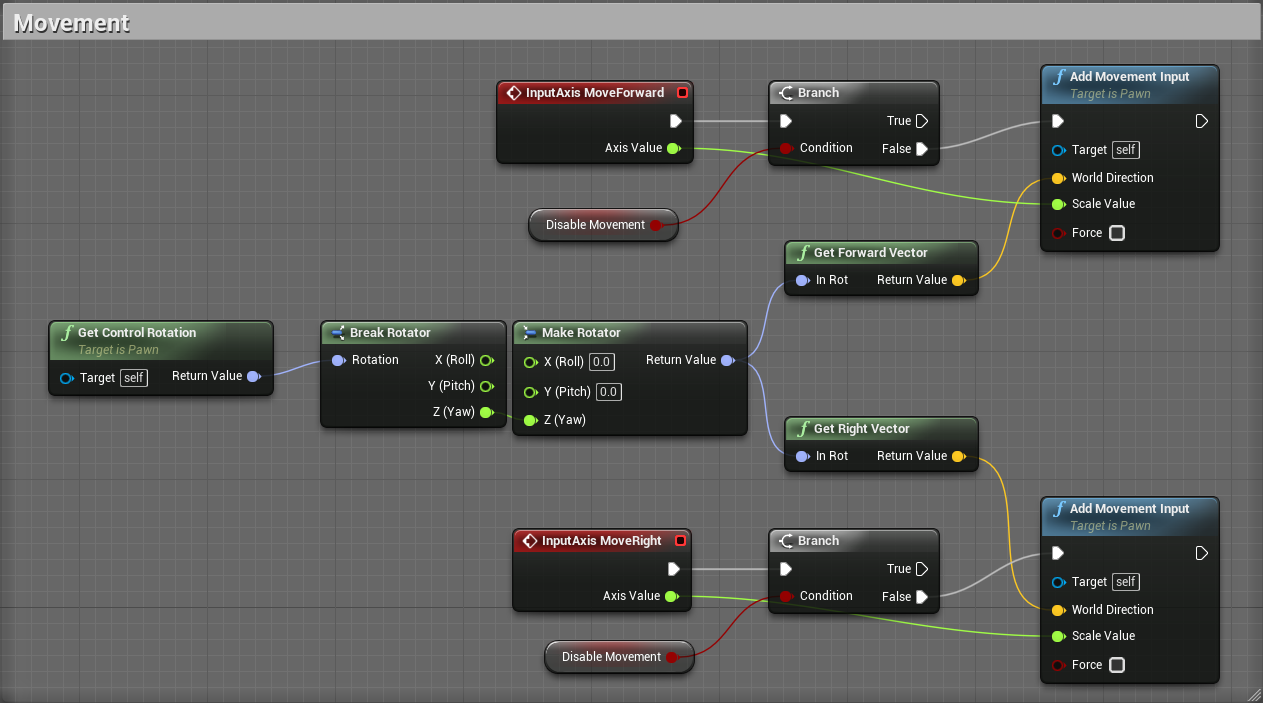
Set the rest of node network up as shown below.
![Character_Movement.png]()
Click image for full view.
Here, we allow character movement only if DisableMovement is False , to prevent character movement where no animation exists. For example, we have a Prone Idle animation, but we do not have a Prone Crawl animation. To prevent players from sliding around the ground when prone, we will disable movement.
-
Right-Click and add the InputAxis Turn and InputAxis LookUp Events.
-
Connect the Turn Event to an Add Controller Yaw Input node and the LookUp Event to a Add Controller Pitch Input node.
![Character_MouseInput.png]()
-
Right-click in the graph and add the InputAction Jog Event.
-
In the MyBlueprint window, click the Show Inherited Variables checkbox and Control + drag the CharacterMovement into the graph.
![Character_JogA.png]()
-
Hold Alt and drag in the Jog Pressed variable, then hold Control and drag in the Crouch Pressed variable.
-
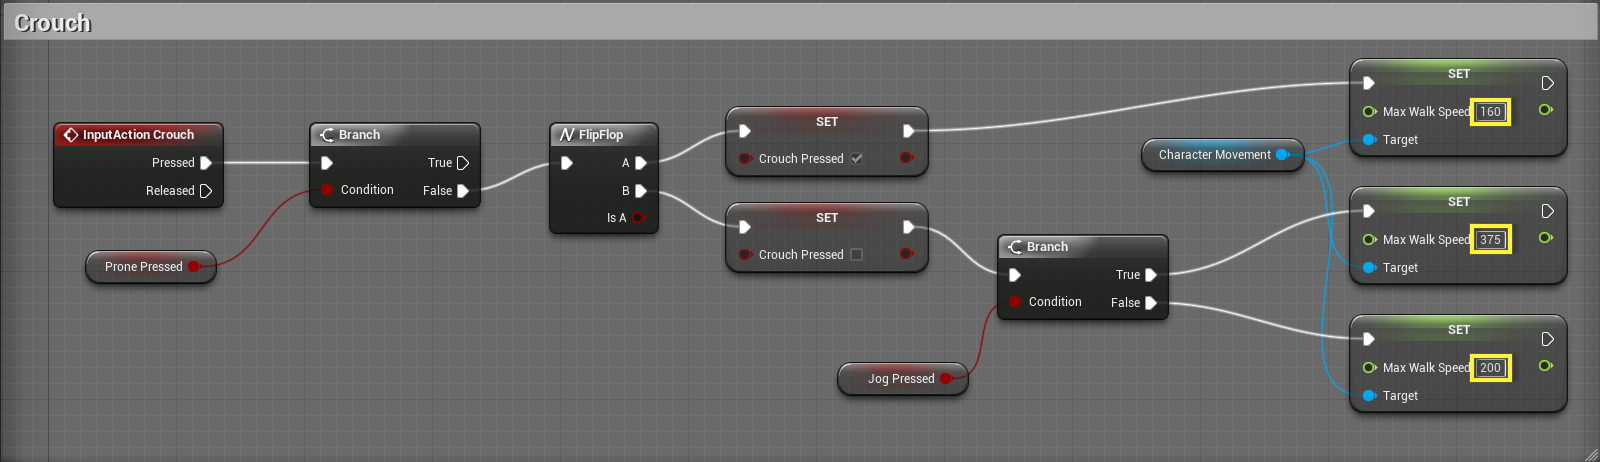
Set up the node network making sure to check Jog Pressed in the appropriate Set node as shown below:
![Character_JogB.png]()
Click image for full view.
When Jog is Pressed , we set Jog Pressed to True . Then with the Character Movement Component, we set the character's Max Walk Speed to 375 (you can adjust this value to increase/decrease jog speed).
When Jog is Released , we check if we are crouched, and if so we set the maximum walk speed to 160 (our crouch walk speed). If the character is not crouched, we will set the maximum walk speed to 200 (our default walking speed). This allows the character to enter a jog from either a crouch or walking state and return to it appropriately.
-
Right-click in the graph and add the InputAction Crouch event.
-
Hold Alt and drag in the Crouch Pressed variable, then hold Control and drag in the Jog Pressed and Prone Pressed variables.
-
Set up the node network making sure to check Crouch Pressed in the appropriate Set node as shown below:
![Character_Crouch.png]()
Click image for full view.
For the Crouch script, we first check if we are currently prone, in which case we will not allow the character to crouch. (Because we do not have an animation to go from Prone to Crouch and vice-versa. If you had the animations, you would probably want to allow the player to enter a Prone state from Crouch.)
We used a FlipFlop node as a toggle for our crouch rather than requiring a sustained crouch button press (this is optional depending on the method you prefer). When first pressed, we set Crouch Pressed to True and set the Max Walk Speed to 160 . When pressed a second time to toggle the crouch off, we check if we are entering a jog from a crouch state (if so, we set the maximum walk speed to 375 ) if not, we set the maximum walk speed back to 200 .
-
Right-click in the graph and add the InputAction Prone Event.
-
Hold Alt and drag in the Prone Pressed and DisableMovement variables.
-
Hold Control and drag in the Crouch Pressed variable.
-
Set up the node network making sure to check Prone Pressed in the appropriate Set node as shown below:
![Character_Prone.png]()
Click image for full view.
For the Prone script, we first check if we are currently crouched and if so, not allowing the character to enter a prone state (as mentioned, since we do not have the transition animations). We then used a FlipFlop node again to toggle between prone states.
When pressed the first time, we set Prone Pressed and DisableMovement both to True to allow our character to enter the prone state and disable its movement. When pressed a second time, we are setting Prone Pressed to False to exit the prone state. We then add a bit of a delay (set to 1.4 ) before re-enabling movement (to prevent the player from moving around while the animation plays of returning to a standing state).
-
Right-click in the graph and add the InputAction Jump Event and drag in the CharacterMovement Component from the MyBlueprint window.
-
Hold Alt and drag in the Jump Pressed variable, then Control drag in the DisableMovement and CrouchPressed variables.
-
Set up the node network, making sure to check "Jump Pressed" in the appropriate Set nodes as shown below:
![Character_Jump.png]()
Click image for full view.
For the Jump script, we first check if we are either prone or crouched. If neither are True , then we use the CharacterMovement Component to determine our current velocity and if it is greater than 0, which would mean that we are moving.
We then set how high the character can jump based on whether or not they are moving by setting the JumpZVelocity to 365 (for a moving character) or 340 while the character is stationary. In either case, we set Jump Pressed to True when it is pressed, and set Jump Pressed to False when Jump is released.


4. Creating Blend Spaces
The next thing we will do to create movement for our character is to create Blend Spaces for each of our movement states walking, jogging, and crouch walking). Blend Spaces are special assets that allow for blending of animations based on the values of two inputs. In our case, we will blend between forward/backward and left/right movement based on the character's movement speed or direction.
For more information on Blend Spaces, refer to the Blend Spaces documentation.
The steps below will show you how to set up the movement Blend Spaces:
-
Right-click inside the Content Browser , select Animation , then select Blend Space to create a new asset.
![Blendspace_1.png]()
-
In the Pick Skeleton window, select your Skeleton ( UE4_Mannequin_Skeleton ), then name the asset Walk_BS .
-
Open the Walk_BS Blend Space, then under Parameters , set the X Axis Label to Direction and Y Axis Label to Speed .
-
Set the X Axis Range to -180 to 180 and the X Axis Divisions to 4 .
-
Set the Y Axis Label to Speed , the Y Axis Range to 0 to 200 and Y Axis Divisions to 4 .
-
Once you have set the values for both the X and Y Axis, click the Apply Parameter Changes button.
![Blendspace_2.png]()
After clicking apply, the grid space to the left of the Parameter window will update to use our input values that will be used to determine the blending between our movement animations.
-
In the Asset Browser window, search for rifle ironsights animations (we will be using these motions for our character).
![Blendspace_3.png]()
-
Locate the Walk_Fwd_Rifle_Ironsights animation, then drag-and-drop it to the bottom-center position on the grid space.
![Blendspace_4.png]()
This will create a point of reference on the grid space.
-
Drag the Walk_Lt_Rifle_Ironsights and Walk_Rt_Rifle_Ironsights animations into the grid to the left/right of the walk forward point.
![Blendspace_5.png]()
Walk_Lt_Rifle_Ironsights (L), Walk_Fwd_Rifle_Ironsights (F) and Walk_Rt_Rifle_Ironsights (R) are shown on the grid.
-
Drag in the Walk_Bwd_Rifle_Ironsights animation and place it on the bottom left end and bottom right end points.
-
Along the top of the grid, repeat the same layout as the bottom from left-to-right (Bwd, Lt, Fwd, Rt, Bwd).
![Blendspace_6.png]()
Moving your mouse inside the grid now, you should start to see the character walking and blending between directions.
-
In the Anim Asset Details , under Sample Interpolation , set the Target Weight Interpolation Speed Per Sec to 2.0 .
![Blendspace_7.png]()
This will smooth out the blending when shifting between directions.
-
Save then close the Walk_BS Blend Space window.
-
In the Content Browser , Right-click on the Walk_BS asset and select Duplicate .
-
Rename the copy to Jog_BS and open it up.
-
Under Parameters , change the Y Axis Range max value from 200 to 375 then click Apply Parameter Changes .
![Blendspace_8.png]()
The 375 value refers to the speed of our Jog that we set inside the MyCharacter Blueprint.
-
The grid will update to use the maximum speed value, however the points on the grid remain in their previous position.
![Blendspace_9.png]()
-
Left-click on and drag each of the points up to the top of the grid at their respective locations.
-
In the Asset Window , search for Jog animations.
-
Replace the walk animations on the grid with jog animations by dragging a Jog animation onto a Walk point on the grid.
![Blendspace_10.png]()
Along the bottom and top of the grid we are using the Jog (Bwd, Lt, Fwd, Rt, Bwd) Rifle animations.
-
Save then close the Jog_BS Blend Space window.
-
Duplicate the Jog_BS and rename it to Crouch_BS , then open it up.
-
Under Parameters , change the Y Axis Range maximum value from 375 to 160 then click Apply Parameter Changes .
-
In the Asset Browser , search for rifle ironsights .
-
Replace each of the points on the grid with their respective Crouch_Walk animations.
![Blendspace_11.png]()
-
Save then close the Crouch_BS Blend Space window.


5. Animation Blueprint - Idle and Walk States
In this section, we will set up the Animation Blueprint that will determine what animations to play based on the actions that are taken in game by the player. We will then set up a State Machine , create an Idle and Walk state and set up the transition between each state.
For more information on Animation Blueprints, refer to the Animation Blueprints documentation.
These steps show you how to set up the Animation Blueprint:
-
Locate and open your MyAnimationBlueprint asset.
-
In the My Blueprint window, create four Bool variables ( IsJumping , IsCrouching , IsJogging , and IsProne ).
-
Create 2 Float variables ( Speed and Direction ).
![AnimBP_1.png]()
-
In the My Blueprint window, Double-click the EventGraph to open the Event Graph tab.
-
On the Event Graph , recreate the setup below, then click the Compile button.
![AnimBP_EventGraph.png]()
Click image for full view.
In the graph above, we are getting the direction of the player character and their speed and assigning them to variables that will be used inside the Animation Blueprint. We are also getting variables from our MyCharacter Blueprint (by dragging off the Try Get Pawn Owner node and Casting to our Character Blueprint) which corresponds to actions taken by the player. Those variables are then passed to variables inside the Animation Blueprint that will determine when to transition to/from Animation States.
-
Click the Anim Graph tab, Right-click in the graph and search for and add a new State Machine .
![AnimBP_AnimGraph2.png]()
-
Give the State Machine a name, then connect it to the Final Animation Pose node.
![AnimBP_AnimGraph3.png]()
-
Double-click on the State Machine to open it.
-
In the Asset Browser window, search for Idle and drag the Idle_Rifle_Hip asset into the graph.
![AnimBP_AnimGraph4.png]()
-
Connect the Entry node to the Idle_Rifle_Hip node, then click Compile .
![AnimBP_AnimGraph5.png]()
You should see the character enter the idle position in the preview window after clicking compile.
-
In the Asset Browser , search for the Walk_BS and drag it into the graph.
![AnimBP_Walk1.png]()
-
Double-click on the Walk_BS , then from the My Blueprint tab, hold Control and drag in the Speed and Direction variables.
![AnimBP_Walk2.png]()
Connect as shown above. Here we are providing the Blend Space with values from our character.
-
Close the Walk_BS tab, then on the State Machine graph, create a Transition from Idle_Rifle_Hip to Walk_BS .
![AnimBP_Walk3.png]()
-
Create a Transition from Walk_BS to Idle_Rifle_Hip , then Double-click on the Transition Rule for Idle_Rifle_Hip to Walk_BS .
![AnimBP_Walk4.png]()
The Transition Rule determines when the State Machine can move between Animation States.
-
Inside the Transition Rule , recreate the graph shown below.
![AnimBP_Walk5.png]()
In the script above, we are checking to make sure the player character is currently not in the air (either from falling or jumping) and that their current speed is greater than 160, if so we will allow the transition from Idle to Walk to occur.
-
Return to the State Machine graph and open the Transition Rule for Walk_BS to Idle_Rifle_Hip .
-
Inside the Transition Rule , recreate the graph shown below.
![AnimBP_Walk6.png]()
Here we are allowing the transition to occur if the character's speed is less than 160.
-
Compile and Save the Animation Blueprint.


6. Animation Blueprint - Crouch States
In this section, we continue working on the Animation Blueprint and the State Machine focusing on the Crouch states.
-
In the MyAnimationBlueprint on your State Machine graph, drag in the Crouch_BS Blend Space from the Asset Browser .
-
Create a Transition from Crouch_BS to Walk_BS and from Walk_BS back to Crouch_BS .
![AnimBP_Crouch2.png]()
-
Double-click on the Crouch_BS and drag in the Direction and Speed variables and connect them to the Blend Space.
![AnimBP_Crouch3.png]()
-
Return to the State Machine graph and open the Transition Rule for Walk_BS to Crouch_BS and recreate the graph below.
![AnimBP_Crouch4.png]()
Here we are allowing the player to enter crouch walking when crouched is pressed and their speed is greater than 0.
-
Return to the State Machine graph and open the Transition Rule for Crouch_BS to Walk_BS and recreate the graph below.
![AnimBP_Crouch5.png]()
Above we are returning the player to a walking state when they are no longer crouched and their speed is greater than 0.
-
Return to the State Machine graph, then in the Asset Browser drag into the graph the Crouch_Idle_Rifle_Hip animation.
![AnimBP_CrouchIdle1.png]()
-
Create a Transition from Crouch_BS to Crouch_Idle_Rifle_Hip and from Crouch_Idle_Rifle_Hip back to Crouch_BS .
-
Also create a Transition from Crouch_Idle_Rifle_Hip to Idle_Rifle_Hip , and from Idle_Rifle_Hip back to Crouch_Idle_Rifle_Hip .
![AnimBP_CrouchIdle2.png]()
Here we are providing transitions for our crouch walk to enter crouch idle (and from crouch idle to crouch walk). We are also setting a transition from our crouch idle to a standing idle (and from standing idle to a crouch idle).
If needed, you can move the nodes around on your graph to get a better picture of the transitions.
-
Open the Transition Rule for Idle_Rifle_Hip to Crouch_Idle_Rifle_Hip .
-
For this Transition , we are only requesting that IsCrouch be True .
![AnimBP_CrouchIdle3.png]()
-
Return to the State Machine graph, then open the Transition Rule for Crouch_Idle_Rifle_Hip to Idle_Rifle_Hip .
-
For this Transition , we are only requesting that IsCrouch be False .
![AnimBP_CrouchIdle4.png]()
-
Return to the State Machine graph, then open the Transition Rule for the Crouch_BS to Crouch_Idle_Rifle_Hip .
![AnimBP_CrouchIdle5.png]()
-
In the Transition Rule , recreate the graph below.
![AnimBP_CrouchIdle6.png]()
If the player is crouched and their speed is 0, then they will enter the crouch idle animation.
-
Return to the State Machine graph, then open the Transition Rule for the Crouch_Idle_Rifle_Hip to Crouch_BS .
![AnimBP_CrouchIdle7.png]()
-
In the Transition Rule , recreate the graph below.
![AnimBP_CrouchIdle8.png]()
If the player pressed crouch and their speed is greater than 0, they will enter the crouch walk Blend Space.
-
Compile and Save the Animation Blueprint.


7. Animation Blueprint - Jog State
Continuing in the Animation Blueprint and State Machine , in this section we set up the Jog state and transitions to/from it.
-
In your State Machine graph, in the Asset Browser , drag into the graph the Jog_BS .
![AnimBP_Jog1.png]()
-
Open the Jog_BS and drag in the Speed and Direction variables and connect as shown.
![AnimBP_Jog2.png]()
-
Return to the State Machine graph.
-
Create Transitions from Crouch_Idle_Rifle_Hip to Jog_BS and Jog_BS to Crouch_Idle_Rifle_Hip .
![AnimBP_Jog3.png]()
-
Open the Transition Rule for Crouch_Idle_Rifle_Hip to Jog_BS and recreate the graph below.
![AnimBP_Jog3b.png]()
If Is Jogging is True and the player's speed is greater than 0, they will enter the Jogging Blend Space.
-
Return to the State Machine graph, open the Transition Rule for Jog_BS to Crouch_Idle_Rifle_Hip .
-
Inside the Transition Rule create the graph below.
![AnimBP_Jog3c.png]()
Here we are allowing the player to enter a Jog State from Crouch (once they stop jogging they return to Crouch).
-
Return to the State Machine graph, and create Transitions from Crouch_BS to Jog_BS and Jog_BS to Crouch_BS .
![AnimBP_Jog3d.png]()
-
Open the Transition Rule for Crouch_BS to Jog_BS and create the graph below.
![AnimBP_Jog5.png]()
This checks if the player is crouched and presses Left Shift (our Jog key), that we transition them to the Jog state.
-
Return to the State Machine graph and open the Transition Rule for Jog_BS to Crouch_BS .
![AnimBP_Jog5b.png]()
-
Inside the Transition Rule , recreate the graph below.
![AnimBP_Jog6.png]()
Here we check if the player is jogging and presses C (our Crouch key), that we transition them to the Crouch walk state.
-
Return to the State Machine graph and create a Transition from Jog_BS to Idle_Rifle_Hip .
![AnimBP_Jog7.png]()
-
Open the Transition Rule for Jog_BS to Idle_Rifle_Hip and create the graph below.
![AnimBP_Jog8.png]()
-
Return to the State Machine graph and create Transitions from Jog_BS to Walk_BS and Walk_BS to Jog_BS .
![AnimBP_Jog9.png]()
-
Open the Transition Rule for Jog_BS to Walk_BS and recreate the graph below.
![AnimBP_Jog10.png]()
-
Return to the State Machine graph and open the Transition Rule for Walk_BS to Jog_BS .
-
Inside the Transition Rule , recreate the graph below.
![AnimBP_Jog11.png]()
-
Compile and Save the Animation Blueprint.


8. Animation Blueprint - Jump States
Next, we configure the Jump states inside the State Machine . We are going to have two Jump states, one for when the player is standing still and presses the Jump key and another for when the player is moving (Jogging, Crouch Walking, or Walking). We will use two different animations, one for stationary and one for movement.
-
In the State Machine graph, drag in the Jump_From_Jog animation from the Asset Browser .
![AnimBP_Jump1.png]()
-
Create to/from Transitions between Jog_BS and Jump_From_Jog .
-
Open the Transition Rule for Jog_BS to Jump_From_Jog and create the graph below.
![AnimBP_Jump2.png]()
-
Return to the State Machine graph and open the Transition Rule for Jump_From_Jog to Jog_BS .
-
Inside the Transition Rule graph, Right-click and add the TimeRemaining for 'Jump_From_Jog' node.
![AnimBP_Jump3.png]()
-
Finish the rule by recreating the graph below.
![AnimBP_Jump4.png]()
This allows us to check what the remaining time is on the Jump from Jog animation and if it is less than or equal to 0.1, we will allow the transition from the jump to the Jog Blend Space. This is a handy way of making sure that the jump animation has finished before transitioning to another state.
-
Return to the State Machine graph and create to/from Transitions between Walk_BS and Jump_From_Jog .
![AnimBP_Jump5.png]()
-
Open the Transition Rule for Walk_BS to Jump_From_Jog and recreate the graph below.
![AnimBP_Jump6.png]()
-
Return to the State Machine graph and open the Transition Rule for Jump_From_Jog to Walk_BS .
-
Inside the Transition Rule recreate the graph below.
![AnimBP_Jump7.png]()
-
Return to the State Machine graph, then drag in the Jump_From_Stand animation from the Asset Browser .
![AnimBP_JumpStand1.png]()
-
Create to/from Transitions between Idle_Rifle_Hip and Jump_From_Stand .
-
Open the Transition Rule for Idle_Rifle_Hip to Jump_From_Stand .
![AnimBP_JumpStand2.png]()
-
Inside the Transition Rule , recreate the graph below.
![AnimBP_JumpStand3.png]()
Here we are checking to see if the player has pressed the jump key and that they are not currently crouched.
-
Return to the State Machine Graph, then open the Transition Rule for Jump_From_Stand to Idle_Rifle_Hip .
-
Inside the Transition Rule recreate the graph below.
![AnimBP_JumpStand4.png]()
This will return the character to idle once the jump animation has finished.
-
Compile and Save the Animation Blueprint.


9. Animation Blueprint - Prone State
In this final section, we finish our State Machine by adding a Prone state along with the transition to/from it.
-
In the State Machine graph, drag in the Stand_To_Prone animation from the Asset Browser .
![AnimBP_StandToProne1.png]()
-
Create a Transition from Idle_Rifle_Hip to Stand_To_Prone and click on the Transition Rule .
![AnimBP_StandToProne2.png]()
-
Open the Transition Rule for Idle_Rifle_Hip to Stand_To_Prone and recreate the graph below.
![AnimBP_StandToProne3.png]()
-
Return to the State Machine graph, then drag in the Prone_Idle animation from the Asset Browser .
![AnimBP_ProneIdle1.png]()
-
Create a Transition from Stand_To_Prone to Prone_Idle .
-
Drag in the Prone_To_Stand animation from the Asset Browser and create a Transition from Prone_Idle to Prone_To_Stand .
-
Create a Transition from Prone_To_Stand to Idle_Rifle_Hip .
-
Click on the Transition Rule for Stand_To_Prone to Prone_Idle .
![AnimBP_ProneIdle2.png]()
-
In the Details panel for the Transition Rule , set the Duration under BlendSetting to 0.0 .
![AnimBP_StandToProne1b.png]()
-
Open the Transition Rule for the Stand_To_Prone to Prone_Idle .
-
Inside the Transition Rule , recreate the graph below.
![AnimBP_ProneIdle3.png]()
We are checking if prone is still True and if the animation of entering prone is over before entering an idle prone state.
-
Return to the State Machine graph and open the Transition Rule for Prone_Idle to Prone_To_Stand .
![AnimBP_ProneIdle4.png]()
-
Inside the Transition Rule , recreate the graph below.
![AnimBP_ProneIdle5.png]()
If prone is no longer true , we are starting the sequence of returning to the standing position.
-
Click on the Transition Rule for Prone_To_Stand to Idle_Rifle_Hip .
![AnimBP_ProneToStand1.png]()
-
In the Details panel for the Transition Rule , set the Duration under BlendSetting to 0.0 .
![AnimBP_ProneToStand1b.png]()
-
Open the Transition Rule for Prone_To_Stand to Idle_Rifle_Hip and create the graph below.
![AnimBP_ProneToStand2.png]()
Make sure that the == node is set to False (unchecked) which states that Prone is no longer true.
-
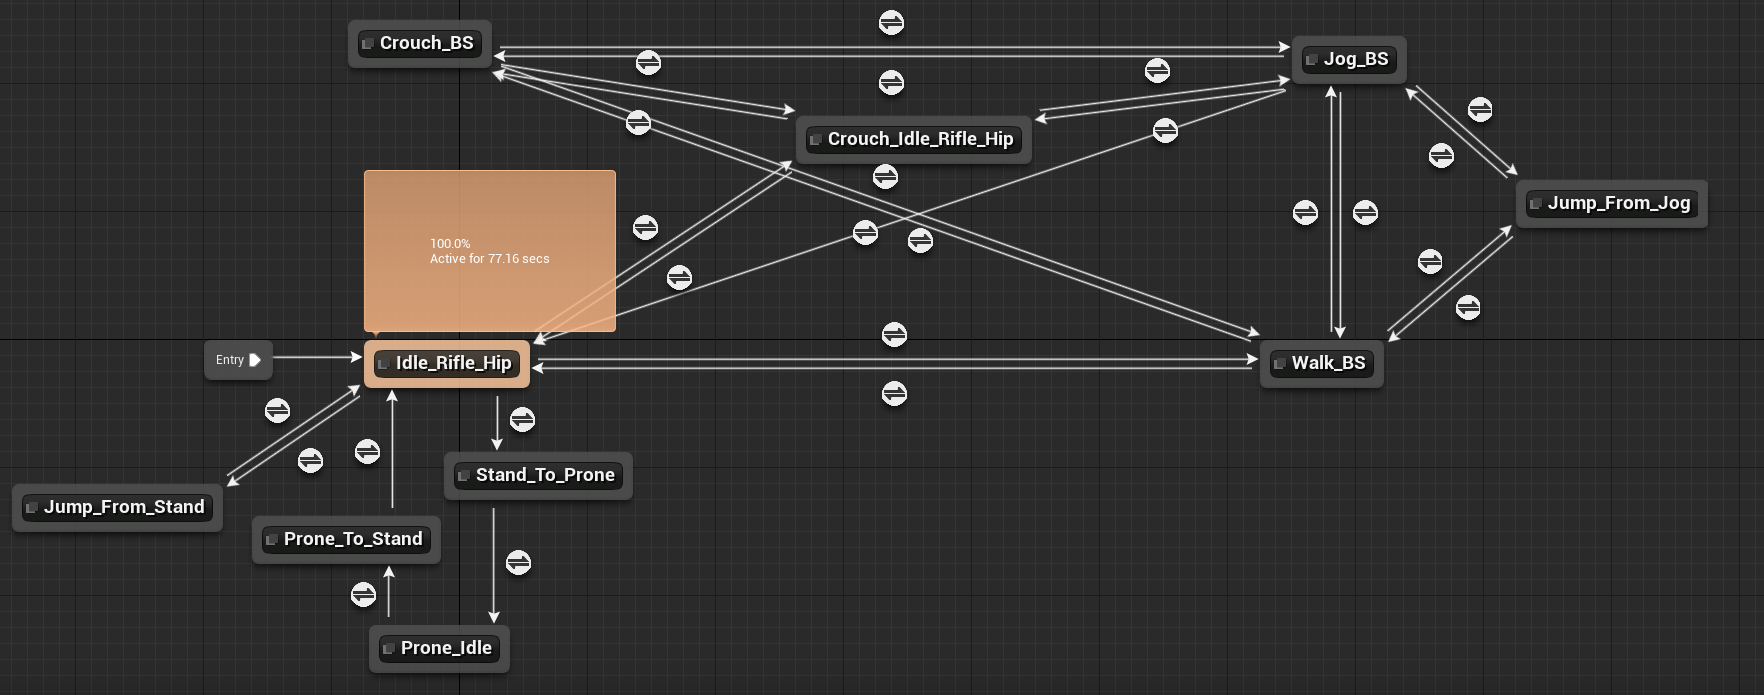
Your full State Machine graph should look similar to below (arrangement of nodes may differ from your setup).
![AnimBP_StateMachineFull.png]()
Click image for full view.
-
Compile and Save the Animation Blueprint.
-
Return to the Content Browser and the AnimStarterPack folder, then open the Prone_To_Stand animation.
-
Inside the Anim Asset Details window, set the Rate Scale value to 1.4 under the Animation section.
![ProneToStand_Rate.png]()
This will increase the playback rate of the animation slightly and improve the look when going from prone to standing.
-
Click the Save button in the Content Browser and Main Toolbar to save your assets and the level.
-
Click the Play button to play in the editor.


You should now have a fully animated character that can move around your level in a number of different ways. You should be able to walk, crouch walk, jog, jump (from a stationary or moving position), or go prone from a Standing or Jogging state.
There are several other states that can be added to this State Machine (for example, Death and Reload) or you could swap out the existing motions with your own. In either case, you should now have an understanding of how to set up Character Movement in Blueprints , define animation states with an Animation Blueprint , and how to blend animations through Blend Spaces .