Choose your operating system:
Windows
macOS
Linux
This page will show you how to set up and use different forms of Replicated Functions .
There are 3 primary types of replicated functions: Multicast , Run on Server , and Run on owning Client . Multicast functions should be called on the server, where they are executed, and then forwarded automatically to clients. Server functions are called by a client and then only executed on the server. Client functions are called by the server and then only execute on the owning client.
Multicast
For this example, we are using the Blueprint Third Person Template with Starter Content .
The steps below illustrate how to set a Multicast Replicated Function.
-
Increase the number of players by clicking the down arrow next to Play and changing Number of Players to 4 .
![HowTo2.png]()
You can change the size of the windows that are generated for multiplayer inside the Advanced Settings option.
-
In the Content Browser under Content/ThirdPersonBP/Blueprints , open the ThirdPersonCharacter Blueprint.
-
Right-click in the graph and add a Space Bar Key Event and a Spawn Actor from Class node.
-
Right-click and add a Get Actor Transform node and connect as shown below with Class set to Blueprint_Effect_Fire .
![HowTo3.png]()
When pressed, this will spawn a fire effect at the player character's position.
-
Compile and Save , then close the Blueprint and then click the Play button to play in the editor.
-
In game, locate the window that is the Server and press Space Bar to jump.
![HowTo4.png]()
You will see that only the server window spawns the fire effect and the other players do not see the effect spawned. When attempting to jump with the other players, they too only spawn the fire effect locally and each of the other players are not aware that an effect has been spawned. Additionally, we have not attached the fire effect to the character so it only spawns at the characters location at the time Space Bar is pressed.
You can press Shift + F1 to gain Mouse Control and jump between game windows during Multiplayer testing.
-
In the ThirdPersonCharacter Blueprint, Right-click on Pressed for the Space Bar node and break the connection.
-
Right-click and search for then add a Custom Event and call the event MulticastSpawn .
-
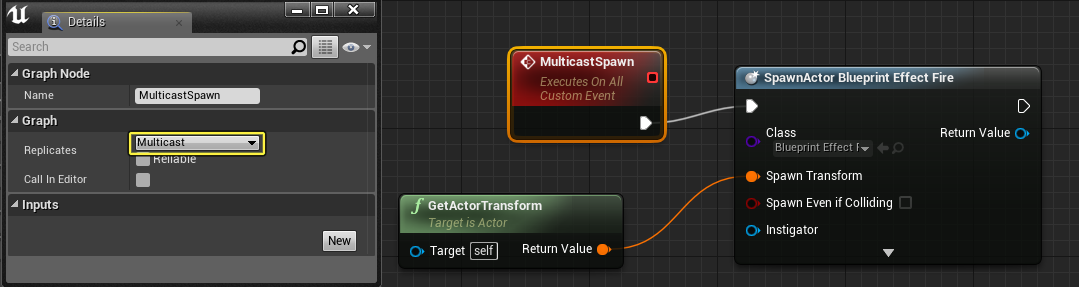
Click on the custom event, then in the Details panel set the Replicates drop-down menu to Multicast and connect as shown.
![HowTo5.png]()
Click to see full-size image.
The last few steps should result in the above where we have set our custom event to use Multicast Replication.
-
Off the Space Bar Key Event, search for and add the call function MulticastSpawn .
![HowTo6.png]()
If you do not see the custom event you created, click the Compile button and search for it again.
-
Compile and Save , then close the Blueprint and then click the Play button to play in the editor.
-
In game, locate the window that is the Server and press Space Bar to jump.
![HowTo7.png]()
You should now see that when you press jump with the player that is the server, that the fire effect is spawned not only on the server but on all clients as well. Attempting to jump with other players still only spawns the effect locally, as we have not told the server that the client has spawned the effect. The next section, Run on Server will show you how to set that up.


Run On Server
For this example, we are continuing from the Multicast Replication example above.
The steps below show how to set up a Run on Server replicated function.
-
In the Content Browser under Content/ThirdPersonBP/Blueprints , open the ThirdPersonCharacter Blueprint.
-
Select the MulticastSpawn Custom Event and change the Replicates drop down option to Run on Server .
![HowTo8.png]()
Click to see full-size image.
We also updated the name of the Graph Node to Run On Server for consistency.
-
Compile and Save , then close the Blueprint and then click the Play button to play in the editor.
-
In game, locate any game window other than Server and press Space Bar to jump.
![HowTo9.png]()
Notice that the fire effect is only spawned only on the server, regardless of which player jumped, and no other players can see it but the server. While we have told this script that it should execute on the server, which it did, we need to make sure that the effect itself is set to replicate so that it gets passed to all clients as well as the server.
-
Inside the Content/StarterContent/Blueprints folder, open the Blueprint_Effect_Fire Blueprint.
-
With Class Defaults selected from the Main Toolbar, in the Details panel, check the Replicates checkbox.
![HowTo10.png]()
-
Compile and Save , then close the Blueprint and then click the Play button to play in the editor.
-
In game, locate any game window other than Server and press Space Bar to jump.
![HowTo11.png]()
We have effectively sent a message to the server to run a portion of script on the server to spawn an Actor, since that Actor is set to replicate, we can see it on all clients as well.


Run On Owning Client
For this example, we are continuing from the Multicast Replication example above.
What we will do in this example is create a variable that only gets updated on a specific client when a server event occurs.
The steps below show how to set up a Run on owning Client replicated function.
-
Inside the Content/ThirdPersonBP/Blueprints folder, open the ThirdPersonCharacter Blueprint.
-
In the MyBlueprint window, create a new variable and name it Inventory then click Compile .
![Inventory.png]()
-
In the Details panel for the variable, set it to a String , Editable , Replicated , and enter Empty for the Default Value .
![HowTo12.png]()
Setting this variable to Replicated ensures that it will be replicated over the network to connected machines. We are going to use this to simulate a character picking up an item in a multiplayer game when they enter a trigger volume and removing the item when they leave the trigger volume.
-
Add a P Key Event connected to a Print String , then hold Control and drag in the Inventory variable and connect as shown.
![HowTo13.png]()
-
Compile and Save then close the ThirdPersonCharacter Blueprint.
-
From the Place Actors panel in the Basic tab, drag a Box Trigger into your level.
![HowTo14.png]()
When a player character enters the trigger, we will update the variable we created, but only in the client that enters the trigger box.
-
In the Details panel for the Box Trigger under Rendering , un-check Actor Hidden In Game .
![UnHideBox.png]()
This will allow us to see the box in the level when we play in the editor making it easier to test.
-
Click the Box Trigger so that it is selected, then open the Level Blueprint from the Main Toolbar.
![HowTo15.png]()
-
Right-click in the graph, then search for Begin Overlap and select the Add On Actor Begin Overlap event.
![HowTo16.png]()
-
Repeat the previous step, but search for and add the Add On Actor End Overlap event.
-
Connect each node to the Switch Has Authority node.
![HowTo17.png]()
The Switch Has Authority node checks where the script that is currently running is executing from, then can branch into two different directions based on whether the script is running on the network Authority (usually the Server) or a Remote machine (a client).
More often than not, you will want to use Authority for things you only want to occur on the server (these are usually gameplay critical, such as adjusting health values for players or giving out awards or loot items as you do not want to allow clients to determine when those types of changes are to occur to prevent cheating).
In this example, we are going to update a text variable, that could just as easily be a variable that contains the player's health or a variable for an item collected.
-
Right-click in the graph and add a Custom Event called Add Item .
-
Set the Replicates option to Run on owning Client and add an input called Character set to Actor .
![HowTo18.png]()
If you see an error warning on the node after creating it, click the Compile button to remove the error.
-
Create another Custom Event called Remove Item with the same settings as the Add Item event.
-
Connect the Add Item and Remove Item nodes as shown below off the two overlap events.
![HowTo19.png]()
Here we are stating that when overlapping the trigger, if the overlap occurs on the server, run the Add Item event on the server and replicate it to the owning client (which is the character that overlaps the trigger). The "it" is the script that is called when Add Item is fired off and is only executed on the server but replicated to the client. When the character leaves the trigger box, again determined by the server, run the Remove Item event on the server and replicate it to the owning client.
-
Off the Add Item event, add a Print String (text set to Item Added ) then drag off Character and Cast To ThirdPersonCharacter .
![HowTo20.png]()
-
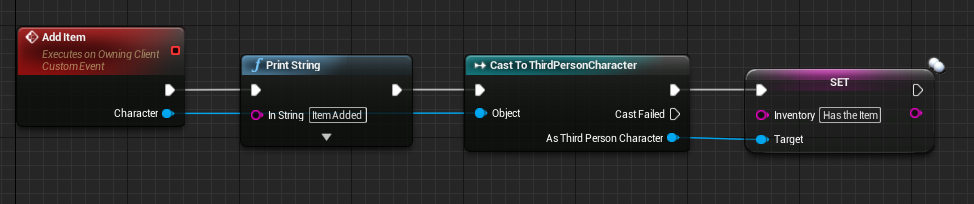
Off the As Third Person Character pin, search for and add the Set Inventory node with the text set to Has the Item .
![HowTo21.png]()
Click to see full-size image.
Here we are taking the event that is executed on the server and is replicated to the client which prints to the screen "item added" then sets the Inventory text variable for the owning client to "Has the item".
-
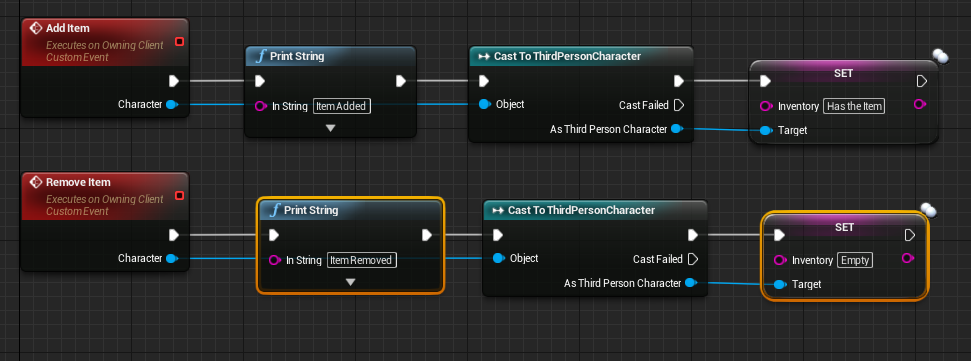
Copy the three nodes following the Add Item event and connect them to the Remove Item event.
-
Change the Print String to Item Removed and the Inventory text variable to Empty .
![HowTo22.png]()
Click to see full-size image.
Now when the character leaves the trigger, the text variable is updated on the server and replicated to the owning client.
-
Compile and Save , close the Level Blueprint then play in the editor.
In the video above when the game is launched, pressing P to print the text variable to the screen displays it as "empty" for each of the characters. However when one of the characters enters the trigger box, the text "item added" is displayed. When that character presses P, the text changes to say "has the item" while each of the other characters still displays "empty". When the character leaves the box, the text "item removed" is displayed and when they press P again, the text now changes back to "empty".
This example illustrates how you can run events on the server and replicate those events to individual clients.