Choose your operating system:
Windows
macOS
Linux
Unreal Engine uses NVIDIA's NvCloth solver which is a low-level clothing solver responsible for the particle simulation that runs clothing. This clothing solver allows integrations to be lightweight and very extensible because we now have direct access to the simulation data.

With the Clothing Tools available within the Editor, the workflow enables developers to work directly with Unreal Engine to author their content without the need for external dependencies.
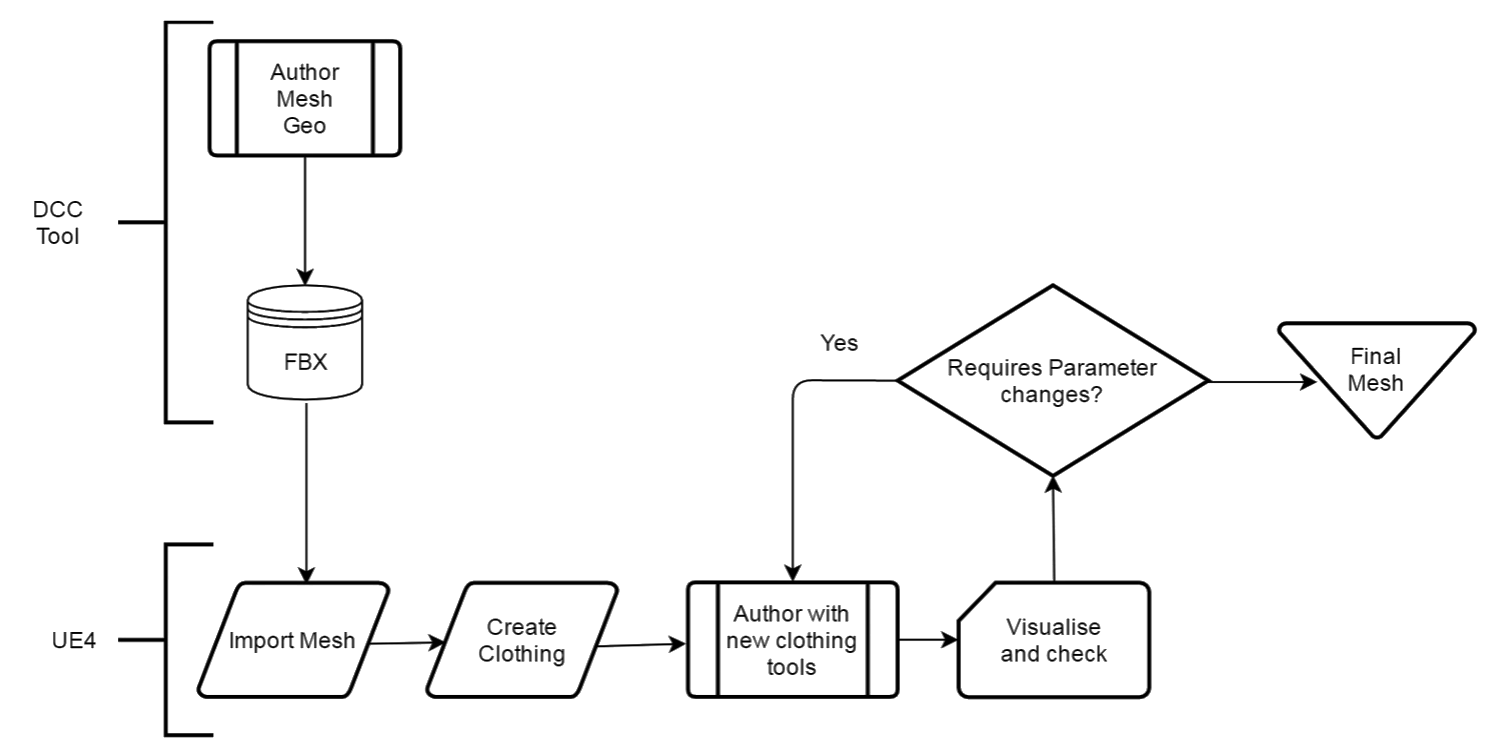
Unreal Engine Cloth Workflow. Click image for full size view.
This workflow enables you to create your content once and then do all the creation editing of the clothing directly inside of Unreal. It makes the creation and iteration of testing content that much quicker, and you also avoid any disconnects between where the content was created versus where it's being used by being able to see all of your edits for your clothing simulation happening in real-time and as they will appear in your game.
Cloth Painting Workflow
Using the workflow of creating cloth in-Editor, the Cloth Paint Tool enables you to quickly create clothing for your characters using any existing material element of a Skeletal Mesh.

Click for full image.
-
Section Selection - Use this to select the Material IDs that will be used for painting cloth onto.
-
Cloth Paint Panel - This section includes all the necessary tools and properties you can use when painting clothing.
Follow the steps below to learn the process to create your clothing assets, assign them to your character, and along with the basics of painting on your render mesh.
Create and Assign a Cloth Asset
To start working with clothing, you will first need to create a clothing asset from your Level of Detail (LOD) section and assign it to your render mesh so that you can paint on it.
Follow the steps below to get started:
-
In the Skeletal Mesh Editor, click the Section Selection button from the main toolbar. It will enable you to select the different parts of your Skeletal Mesh that have their Material Element assigned.
![Highlighted section selection button in the user interface]()
Click for full image.
-
Use the left-click to select a part of your mesh that you want to use as cloth. Then right-click to open the context menu to create your Cloth Asset.
![Right-clicking on a cloth asset in the viewfinder to open the context menu]()
Click image for full size.
-
From the context menu, select Create Cloth Asset from Selection and then fill in the following areas of the menu:
![The parameters to be filled in when creating a cloth asset from a selection]()
-
Asset Name - Give your asset a name so that you can easily find locate it later.
-
Remove from Mesh - If you've got a separate mesh piece of geometry you want to be associated as cloth, you can enable this option. If not, you can leave this unchecked.
-
Physics Asset - If this cloth asset is for a character, use its Physics Asset here to get proper collision for the cloth simulation.
Once you're happy with the settings, click the Create button.
![Clicking create after setting the parameters]()
-
-
Right-click on the section again to bring up the context menu and hover over the Apply Clothing Asset and select from the available clothing assets to apply. It will associate any clothing assets created with the section you've selected.
![Appying a clothing asset using the context menu]()


Painting On Your Cloth
Once you're ready to paint on your cloth, you can use the following controls to Paint on your selected cloth asset.
-
Paint - Left Mouse Button
-
Erase - Shift + Left Mouse Button
-
Cloth Preview - H
If you've used the NVIDIA's PhysX DCC Plugin to create Clothing for 3DS Max or Maya, or similar painting tools in other programs, the controls should feel familiar for this operation.
-
In the Skeletal Mesh Editor, go to the file menu and select Window , then select Clothing from the list.
![Selecting clothing in the main windows menu]()
This will open the Clothing panel.
![The clothing panel with main parameter categories expanded]()
-
Click the Activate Cloth Paint button from the toolbar to enable properties you can use to paint for your selected Cloth Asset.
![Highlighting the activate cloth paint button in the toolbar]()
-
In the Clothing panel, select your assigned Cloth Asset from the Clothing Data list.
![Selecting a cloth asset from the clothing data list]()
-
In the Cloth Painting section, you can select a Paint Tool type to use and then set a Paint Value (by default, the Brush paint tool will be used). Then left-click and drag across the surface of your mesh to start painting.
Hold the H keyboard shortcut to preview your painted cloth.
Paint Tools


The Tool selection enables you to choose from the brushes available to cloth paint.
Brush
The Brush tool enables you to paint a radius and strength value on your cloth as you drag across cloth asset.

Use the Paint Value to control the strength of the brush when you are painting the cloth. This value controls how much the painted area will react like cloth based on this value. A value of 0 would mean that the skinned vertex could not move and a value of 100 would allow the skinned vertex to move one meter from its original position.

For additional information about this tool and its properties, see the Brush Properties reference here.
Gradient
The Gradient tool enables you to paint a gradual blend between a set of cloth values that are selected.

To paint a gradient, perform the following steps:
-
Use the Left-Mouse Button to paint your Gradient Start Value . This is indicated by a Green dot over the painted vertice.
-
Hold the Ctrl + Left-Mouse Button to paint your Gradient End Value . This is indicated by a Red dot over the painted vertice.
-
When you are finished painting, press the Enter key to paint your gradient.

For additional information about this tool and its properties, see the Gradient Properties reference here.
Smooth
The Smooth tool enables you to blur or soften the contrast between painted cloth values.

Use the Strength value to adjust how strong or soft the blurring effect is to create a soft gradient between painted areas.

For additional information about this tool and its properties, see the Smooth Properties reference here.
Fill
The Fill tool enables you to replace areas with similar values with another value.

Use the Fill Value to set a value to fill the vertices in the area with. Use Threshold to set a value that the fill operation should use when sampling the vertices to replace.


For additional information about this tool and its properties, see the Fill Properties reference here.
Cloth Properties
The Cloth Config properties enable you to adjust your cloth to simulate different types of materials, such as that of burlap, rubber, or many other types of cloth materials.

For additional information about the configuration properties for clothing, see the Cloth Config Properties reference here.
Masks
A Mask is a parameter set that can be swapped out for your clothing asset.

This parameter set represents the following Targets (or parameter sets):
-
Max Distance is the maximum distance any point on the cloth can move from its animated position.
-
Backstop Distance is the offset used from any point on the cloth to limit movement within the Max Distance.
-
Backstop Radius uses a sphere radius that when intersected with the Max Distance will prevent any painted point on the cloth from moving into that region.
-
Anim Drive Multiplier is used to drive springs that pull clothing towards its animated position, giving control to animators in cinematics or animation driven scenes.
-
This can also be driven at runtime using the interactor object that Blueprints can access on Skeletal Mesh Components.
-
The value set at runtime is multiplicatively combined with the painted values to get the final spring and damper strengths.
-
You can have multiples of each of these Targets but only one of each can be assigned at a time. This makes it possible to test different configurations very quickly in a non-destructive way.
To create a Mask and assign it to a Target, perform the following steps:
-
Click the Plus (+) button to create a new empty Mask.
![Create a new mask by clicking the plus button]()
-
Right-click on the New Mask and hover the mouse over Set Target to select from the available Targets list.
![Setting a target for a new mask]()
-
In the Mask window, you will now see the Target you selected listed as an active target for your cloth asset.
![Active target selected for cloth asset]()
-
You can also rename the Mask by clicking on the default name in the window and entering a new name.
![Renaming a mask by clicking the default name]()


You can also copy Skeletal Mesh Vertex Colors to the selected Clothing Parameter Mask via the context menu:

For additional information about masks, see the Mask Properties reference here.
Copy Clothing from Skeletal Mesh
If you have multiple Skeletal Meshes of a similar type, for example the cape on a character, you can use the Copy Clothing from SkeletalMesh option to copy and import the settings you've defined for cloth setup to another, saving you time by not requiring you to set up all parameters from the beginning.

Under Clothing Data , click Copy Clothing from SkeletalMesh and choose the Skeletal Mesh you want to copy clothing data from.
APEX (Legacy) Workflow and Assets
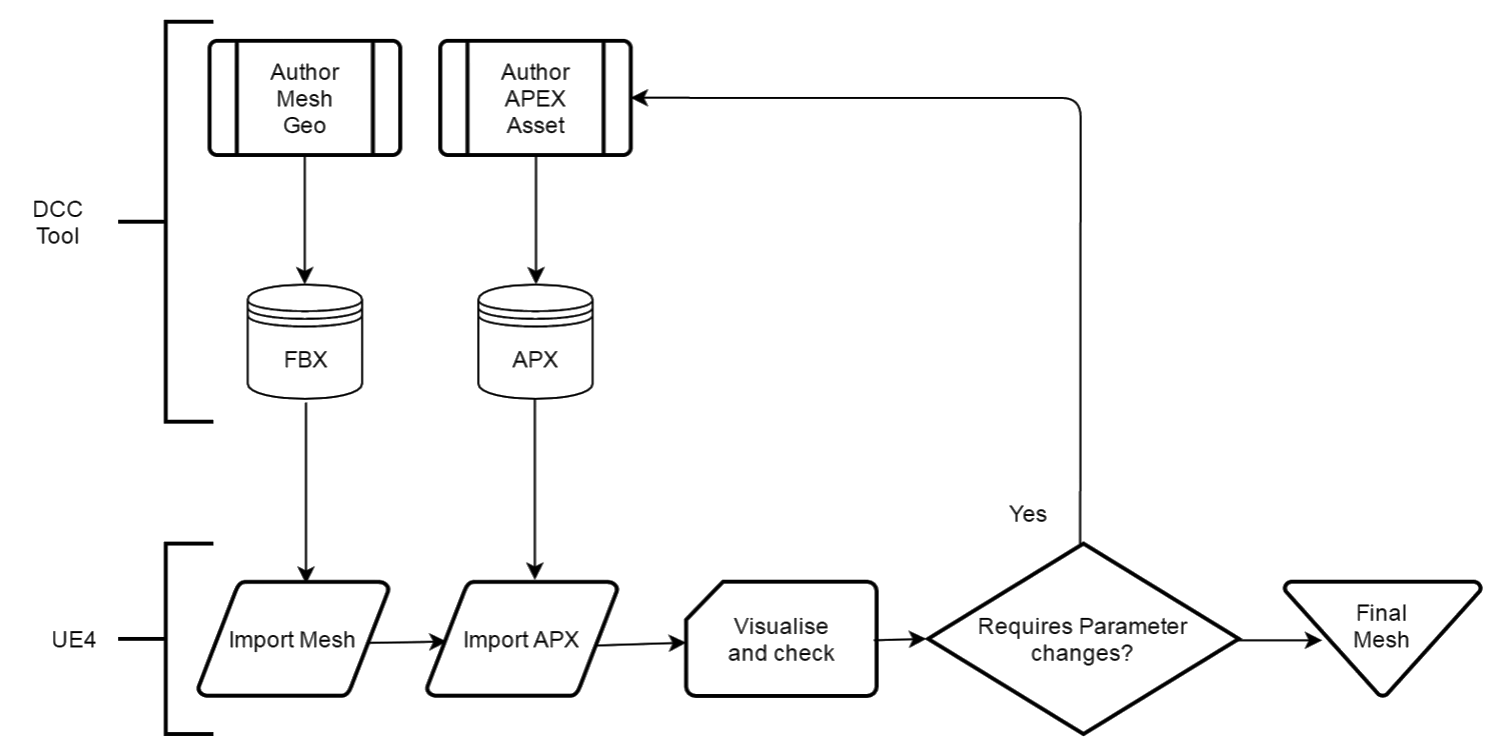
APEX Legacy Cloth Workflow. Click image for full size view.
With the legacy workflow using APEX Cloth, you were required to develop all your assets outside of Unreal using an external program (NVIDIA's Clothing Tool) or DCC Plugins that require specific software (3DS Max/Maya) to author this content. Only during the final stage of development would you bring your authored content into Unreal and assign it to your mesh which meant that if you had to correct anything you would have to go back to your program and re-author the content outside of the Editor.
If you are working with an older version of Unreal Engine (4.16 or earlier) or you have created your clothing asset using the APEX Clothing Tool provided by NVIDIA for 3DS Max or Maya, you can continue to use this workflow. There are two ways to go about importing your APEX cloth (.apx or .apb) files into the Editor.
In the Skeletal Mesh Editor , you can use the Asset Details and under the Clothing section, use the Add APEX clothing file... button.

Alternatively, you can enable the in-Editor Clothing Tool and under the Assets section of the Clothing window, use the plus (+) button to import your APEX file.

When you choose this method, your APEX cloth asset will be converted to the in-Editor tools and appropriately create and assign to your render mesh along with creating any masks for the different parameters like Max Distance and Backstop .