Choose your operating system:
Windows
macOS
Linux
Choose your implementation method:
C++
The meaning of "saving the game" can vary considerably from one game to the next, but the general idea of enabling players to quit the game and then resume where they left off at a later time is a part of most modern games. Depending on what type of game you're making, you may only need a few basic pieces of information, such as the last checkpoint the player reached and maybe which items the player has found. Or you may need much more detailed information, possibly involving things like a long list of the player's social interactions with other in-game characters, or the current status of a variety of quests, mission objectives, or subplots. Unreal Engine 4 (UE4) features a saving and loading system that revolves around one or more custom SaveGame classes that you create to meet your game's specific needs, including all of the information that you need to preserve across multiple play sessions. The system supports the ability to have multiple saved game files, and to save different SaveGame classes to those files. This is useful for separating globally-unlocked features from playthrough-specific game data.
Creating a SaveGame Object
To create a new SaveGame object, create a new Blueprint Class . When the Pick Parent Class dialog pops up, expand the Custom Classes dropdown, then select SaveGame . You can use the search box to jump directly to SaveGame. Name your new Blueprint MySaveGame.

In your new SaveGame object Blueprint, create variables for any information you would like to save.
In this example, there are also variables declared that will be used to store default values for the SaveSlotName and the UserIndex, so that each class that saves to this SaveGame object will not have to independently set those variables. This step is optional, and will cause there to be one save slot that gets overwritten if the default values are not changed.

You can set default values for the variables after the Blueprint is compiled.
Saving A Game
Once you have created a SaveGame class, you can populate it with variables to store your game's data. For example, you might create an integer variable to store the player's score, or a string variable for the player's name. When you save the game, you will transfer that information from the current game world into a SaveGame object, and when loading a game, you will copy it from the SaveGame object to game object like Characters, the Player Controller, or the Game Mode.
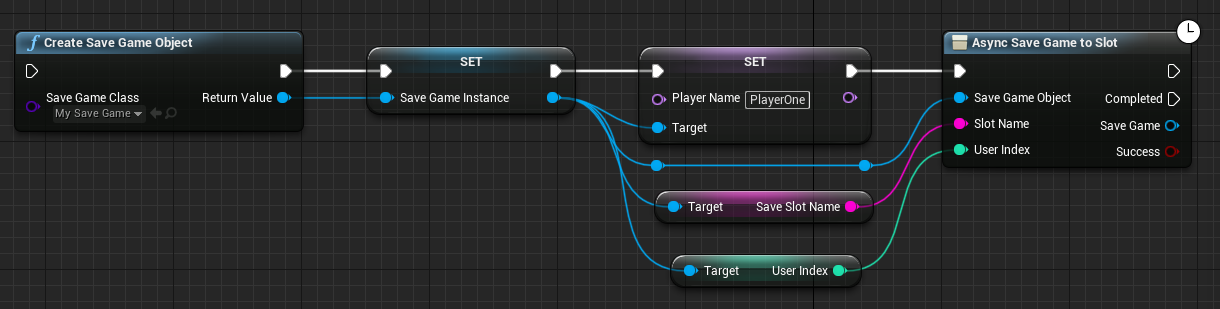
First, use the Create Save Game Object node to create an object based on your SaveGame class. Make sure you set the Save Game Class input pin's dropdown to the class you've created, which is MySaveGame in this example. The Create Save Game Object node will automatically change its output pin type to match the type you specify with the Save Game Class input pin. This enables you to use it directly, without a Cast To node. You may want to save the resulting object to a variable by using Promote to Variable so that you can easily reuse the object you just created later on.

Now that the Save Game Instance holds your custom SaveGame object, you can send information to it. For example, you can set the Player Name field to "PlayerOne". Continue to set fields in your SaveGame object until it contains all of the data you want to store in the saved game file.

When the SaveGame object is fully populated, use the ASync Save Game To Slot node to finish saving the game. You will also need to provide a file name and a user ID. The file name and user ID in this example will be the default values created earlier. Execution will continue from the top pin immediately, and from the second pin once the savegame operation is complete. The output pins will not be valid until the second pin has executed.

Async Save Game To Slot is the recommended way to save your game, due to its ability to avoid hitches even when saving larger amounts of data. However, if your savegame data is small, or if you are saving from a menu or pause screen, you can save the game with the Save Game To Slot node, shown below, instead.

The following screenshot shows the entire Blueprint process for saving a game with the MySaveGame class:
Click the image above to enlarge.
On development platforms, saved game files use the
.sav
extension and appear in the project's
Saved\SaveGames
folder. On other platforms, particularly consoles, this varies to accommodate the specific file system.
Loading A Game
To load a saved game, you must provide the save slot name and user ID that you used when you saved it. If the SaveGame you specified exists, the Engine will populate your SaveGame object with the data it contains and return it as a base SaveGame (class
USaveGame
) object. You can then cast that object back to your custom SaveGame class and access the data. Depending on what kind of data your SaveGame type contains, you may want to keep a copy of it, or simply use the data and discard the object.
As with saving, you can load synchronously or asynchronously. If you have a large amount of data, or wish to use a loading screen or animation during load time, we recommend the asychronous method. For small amounts of data that load quickly, a synchronous method exists.
To load syncronously, use Load Game From Slot . This node is straightforward and will return a valid SaveGame object if the slot name and user ID you provide identifies a valid SaveGame file. The game will stop while the load operation is in progress.

Async Load Game From Slot works in roughly the same way, but has two execution output pins. The first pin executes when the load operation begins, and the second executes when it completes. The variable output pins will not be valid until the second pin executes. The Success pin indicates whether or not the load operation succeeded, but you can also pass the returned object to an Is Valid node, or treat failure from the Cast To node to as a catch-all for any error in the loading process.
