Choose your operating system:
Windows
macOS
Linux


There may be instances in your project where you want your players to be able to interact with UI elements by dragging and dropping them onscreen. This could be to customize interface layouts (positioning health bars or unit frames) or interacting with gameplay systems like inventory screens (adding/removing items around). With UMG you can create these types of interactions with the DragAndDropOperation node and override some of the inherited Blueprint Functions based on your method of interaction.
In this example, we take a look at how a player can drag and reposition a health bar on screen with the Left Mouse Button. At the end of this guide, you will have a UI widget that you can drag around inside the viewport and drop at a new location.
In this tutorial, we will not be creating a functional Health Bar and this is intended for demonstration purposes only. See Displaying Health, Energy & Ammo to learn how to create a HUD.
1 - Project Setup
Before we get started, there are a couple assets that we need to create as part of our project setup. In this example, the element in our HUD that we want to drag and drop is the HealthBar . To do this, we will create a DragWidget in the same shape as our Health Bar rather than dragging the actual Health Bar around. This separates the Health Bar programming from the drag and drop function.
For this how-to guide, we are using the Blueprint Third Person template project.
-
In the Content Browser , create three Widget Blueprints called: DragWidget , HealthBar , and HUD .
![DragDrop1.png]()
-
Right-click in the Content Browser , create a new Blueprint Class for the DragDropOperation class, and call it WidgetDrag .
![DragDrop2.png]()
This specialized Blueprint Class enables us to pass through information as part of our drag and drop action.
-
Open the WidgetDrag Blueprint, and create a User Widget variable called WidgetReference . Check the boxes for Instance Editable and Expose on Spawn .
![DragDrop3a1.png]()
This will be used to hold the UMG Widget that we want to drag around on screen.
-
Create a Vector 2D variable called DragOffset . Check the boxes for Instance Editable and Expose on Spawn .
![DragDrop3b1.png]()
This offsets the location from where we start dragging and dropping the widget.
-
Compile and Save the WidgetDrag Blueprint.
-
Open the Drag Widget Blueprint, and create a User Widget variable called WidgetReference . Check the boxes for Instance Editable and Expose on Spawn .
![UpdatedDragDrop2.1.png]()
-
Compile and Save the DragWidget Blueprint.


With our project setup done, next we will start working on the HealthBar Widget Blueprint which is the piece of UI that we want to be draggable.
2 - Setting Up the Health Bar Widget
In this step, we determine when the Left Mouse Button is pressed and store the location where it was pressed in screen space. We also use the DetectDragIfPressed node to determine if the player is dragging with a specified key.
-
Open the HealthBar Widget Blueprint, and delete the Canvas Panel in the Hierarchy window.
-
Add a Size Box and add a Progress Bar to the box. In the Details Panel for the Size Box, set the Width and Height Override to 500x50 .
![DragDrop4a.png]()
You can also stylize the Progress Bar yourself by setting the preview to Desired on Screen . Then set the Percent to 1.0 so the progress bar is filled and changes color.
![DragDrop4b.png]()


2.1 - Scripting the On Mouse Button Down Function
This step enables us to determine if the player is dragging the Left Mouse Button.
-
In the Event Graph , add the OnMouseButtonDown and OnDragDetected overrides. This creates tabs for each of the overrides in the Event Graph.
![DragDrop5.1.png]()
There are several functions that you can override to call your own custom script. Here we will perform some checking when the Mouse Button is pressed and what happens when a widget drag is detected.
-
Select the OnMouseButtonDown tab. From the OnMouseButtonDown node, drag off the My Geometry pin and add the Absolute to Local node.
-
Drag off the Mouse Event pin and add the Get Screen Space Position node and connect the Return Value to the Absolute Coordinate pin.
![DragDrop6.png]()
This converts the absolute coordinates of the Health Bar widget to local space by getting the screen position where the mouse button registered a button down key press. This stores the location as a variable so we can determine where on the widget the player actually clicked and where it gets dropped.
-
Right-click the Return Value of the Absolute to Local node, and select Promote to Variable . Name the variable Drag Offset .
![DragDrop7.png]()
Don't worry if you see an error on the On Mouse Button Down node. Once we complete the function it will go away.
-
Right-click in the graph and add a Detect Drag if Pressed node. Set the Drag Key to Left Mouse Button .
-
Finish connecting the remaining pins.
-
Connect Mouse Event to Pointer Event .
-
Connect the Return Value pins from Detect Drag if Pressed to Return Node
-
Connect the Exec pins across the four nodes.
![DragDrop8.png]()
This determines if the player is dragging the Left Mouse Button, which will start the On Drag Detected script.
-
-
Compile and Save the HealthBar Blueprint.


2.2 - Scripting the On Drag Detect Function
In this step, we determine what happens when the player is, in fact, dragging the HealthBar around on the screen.
-
Select the OnDragDetected tab. From the OnDragDetected node, Right-click and add a Create Widget node. Set the Class to Drag Widget .
![UpdatedDragDrop1.png]()
-
From the Widget Reference pin, connect a Self node. Promote the Return Value to a variable called Dragged Widget and connect the pins.
![UpdatedDragDrop3.png]()
Now when we create the drag widget, it will have a reference to the existing Health Bar widget. We also promote the dummy drag widget to a variable so that we have access to it later and can remove it from the display when we choose to drop the widget.
-
Right-click and create a Drag & Drop Operation node. Set the Class to Widget Drag , and set Pivot to Mouse Down .
![UpdatedDragDrop4.png]()
Pivot determines where the Drag Widget Visual appears while being dragged relative to the pointer performing the drag operation.
-
Connect the following nodes to the DragAndDropOperation node pins.
-
Exec line from the Dragged Widget Set through to the Return Node
-
Self to Widget Reference
-
Dragged Widget to Default Drag Visual
-
Drag Offset to Drag Offset
![UpdatedDragDrop5.png]()
Above we indicated what Widget Blueprint is our reference and what the drag visual should be and provided an offset in which to start dragging. There is an offset pin on the node by default; however, we are using our own calculation to determine the position in which to start dragging when Mouse Button Down is pressed.
-
-
Compile and Save the HealthBar Blueprint.


Next, we need to do is to determine what happens when the player releases the Left Mouse Button and performs the OnDrop function.
3 - Setting up the On Drop Function
Here we set up our main HUD Widget Blueprint and override what happens when we perform the OnDrop function.
-
Open the HUD Widget Blueprint. In the Details panel for the Canvas Panel , set the Visibility to Visible .
![DragDrop13.png]()
We scripted the drag detection inside the Health Bar widget; however, when we release the Left Mouse Button we want to drop the bar in our HUD Widget Blueprint. In order for our HUD to receive the hit detection, we need to make the panel Visible.
-
From the Palette window, add the Health Bar widget to the Canvas.
![DragDrop14.png]()
-
In the Event Graph , add an OnDrop function override from the My Blueprint panel.
![DragDrop15.png]()
-
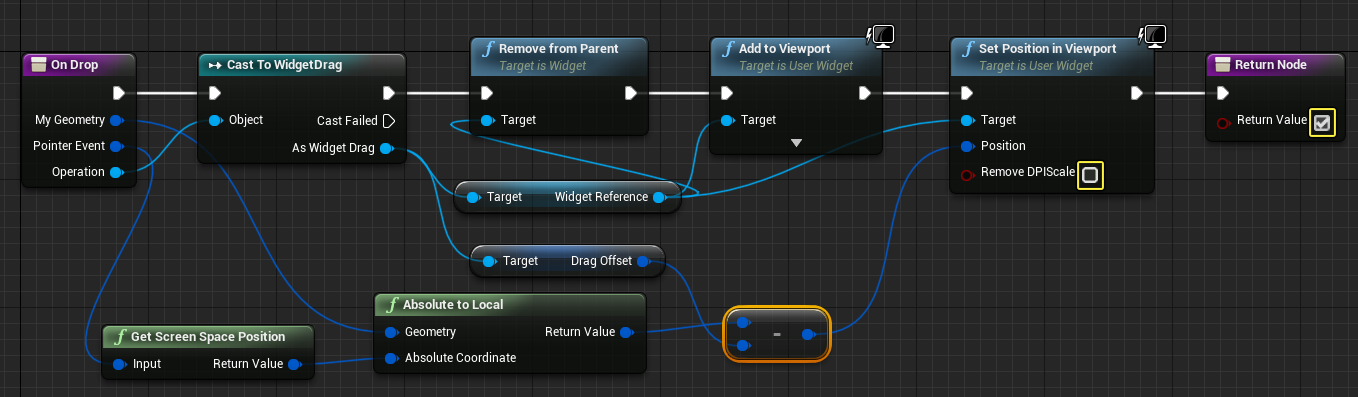
From the OnDrop node, drag off Operation and add a Cast to WidgetDrag node. Then, add a Get Widget Reference and connect the As Widget Drag pin to a Widget Reference and Drag Offset nodes.
![DragDrop16.png]()
This checks which type of operation is being performed as part of the OnDrop function. If it is Widget Drag we get the WidgetReference (which we passed through as the widget being dragged), as well as the DragOffset (or position in which we started the drag from).
-
From the My Geometry pin, add an Absolute to Local node. From the Pointer Event pin, add a GetScreenSpacePosition node.
![DragDrop17.png]()
This will tell us the position in 2D space where we released the Left Mouse Button to drop the widget. We will use this minus the DragOffset to determine where we should place the widget when it is dropped.
-
Add a Vector2D - Vector 2D node and subtract the DragOffset from the the Return Value of Absolute to Local .
![UpdateDragDrop1.1.png]()
-
Right-click and add Remove from Parent , Add to Viewport , and Set Position in Viewport nodes. Connect the Exec pins across all 3 modes in the order listed above, and connect the Set Position in Viewport node to the Return Node .
-
Make the following connections and adjustments:
-
Widget Reference pin to Target pin on all 3 nodes.
-
Return Value pin from the Vector2D - Vector 2D node to the Position pin.
-
Uncheck Remove DPIScale
-
Check Return Value
![UpdateDragDrop2.1.png]()
We uncheck Remove DPIScale and check the Return Value because we do not need to remove the DPI Scaling . We already handled this function, so we return as true. With this script, we first remove the existing Health Bar widget before re-adding it to the screen in the new location relative to our Drag Offset.
-
-
Compile and Save the HUD Widget Blueprint.


Our HUD is set up to handle dropping our dragged widget and it displays our Health Bar. Next, we set up our Dragged Widget to mimic the shape of our Health Bar as well as instruct our Character Blueprint to add the HUD to the viewport.
4 - Scripting the Drag Widget
In this step, we configure the DragWidget , which is the visual widget we will be dragging in the viewport.
-
Open the DragWidget Widget Blueprint and replace the Canvas Panel with a Size Box with a child Border .
-
Rename the SizeBox to WidgetSize , and set isVariable to true. Check both Width Override and Height Override .
![UpdateDragDrop3.png]()
We are going to set the Width and Height of the Size Box to reflect the size of our Health Bar widget.
-
Select Border , and set the Brush Color to Black with an Alpha of 0.5 for some transparency.
![UpdateDragDrop4.1.png]()
In this example, we will have a silhouette of our Health Bar as the drag visual while keeping the actual Health Bar in the same location.
-
In the Event Graph , off of Event Construct , add a Cast to HealthBar node. Drag in the Widget Reference and connect it to the Object pin.
-
From the As Health Bar pin, add a Get Desired Size node. Connect the Return Value pin to a Break Vector 2D node.
![UpdateDragDrop5.png]()
This gives us the size of our Health Bar and we can set the Size Box to the same size. We could have manually entered the overrides; however, if we change the size of our Health Bar we would then also have to change it here.
-
Right-click and add Set Height Override and Set Widget Override nodes and connect them respectively to the Cast to HealthBar node. Then, drag in the Widget Size node.
-
Connect the following pins:
-
Widget Size to both Target pins
-
Break Vector 2D X to In Height Override
-
Break Vector 2D Y to In Width Override
![UpdateDragDrop6.png]()
-
-
Compile and Save the DragWidget Blueprint.


5 - Adding the HUD Widget to the Viewport
Lastly, we need to add the HUD Widget Blueprint to the viewpoint in the Character Blueprint and enable the Mouse Cursor so we can see where we are dragging.
-
In the Content Browser under Content/ThirdPersonBP/Blueprints , open the ThirdPersonCharacter Blueprint.
-
Off the Event Begin Play node, add a Create Widget node and set the Class to HUD . Create an Add to Viewport node connect it to SET Show Mouse Cursor . Add a Get Player Controller node and connect the Return Value to the SET Target .
![DragDrop19.png]()
-
Compile , Save , and click the Play button to play with the drag and drop widget.

End Result
When you play in the Editor, you can left-click and drag the health bar on screen then drop it in a new location.
This is just an example of the elements you will need to start the Drag and Drop process. Additional checking may be needed to ensure that players do not drag the widget outside of Safe Zones or potentially on top of other widgets.