Choose your operating system:
Windows
macOS
Linux
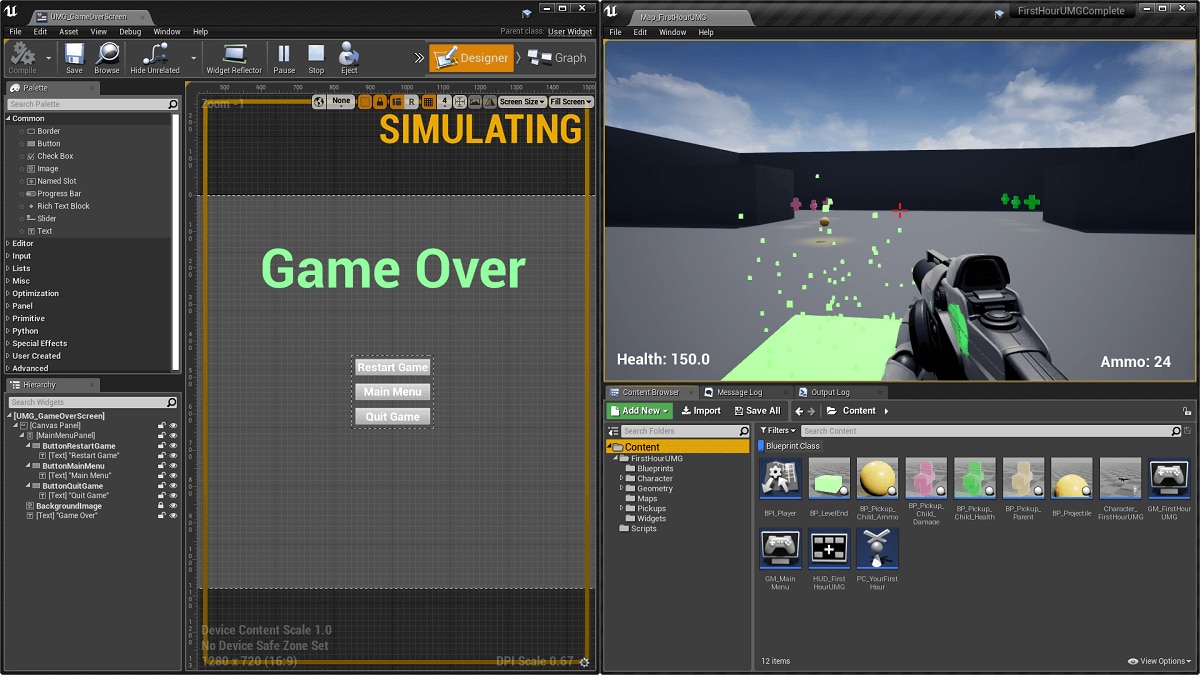


As you start to experiment with and create UI elements with Unreal Motion Graphics (UMG) you might ask yourself if you are doing things the most efficient way possible. While that largely depends on the scope of your project, this page will outline some of the things you may want to consider when setting up your UI.
For example, if you are creating a simplistic UI screen that has a handful of variables that are going to change frequently, you might consider using Property Bindings to drive those changes. However, if you have a more complex UI screen with several properties that are going to change at specific times, it might be better to use Event Based logic to perform those changes rather than checking them every frame to see if they should change.
Keep in mind that there are no "right" or "wrong" answers when it comes to creating content with UMG and you should go with what works best for you in your given situation. With that said, the topics covered on this page are things that you can consider when creating your content and then decide whether or not to implement them.
Target Resolution and Scale
When creating your content in UMG, have in mind the target resolution and build all your Widgets based off that resolution. For example if your target is 1080x1920, author each of your Widget Blueprints using this resolution setting inside UMG. You can set the working screen size from the ScreenSize drop-down menu.

Previewing what it will look like on other screen sizes is fine, but try to avoid building your screens on different screen sizes as that may lead to some things appearing to scale and some not appearing to scale. Speaking of scale, whenever you are creating content inside of UMG, try to create that content at a DPI Scale of 1.0.

You can see your current Screen Size and Scale on the Designer tab in the lower portion of the graph.
Not only will this ensure that everything you create appears at the same scale, it will make scaling to higher/lower screen sizes easier to perform if there is a unified scale applied to all your Widget Blueprints. Similar to working in different screen sizes, if you author one Widget Blueprint in one scale and another in a different scale when you go to scale them for different screen sizes, they might not scale as you expect.
Creating Art for UMG
Establishing a target resolution and scale is important before creating your art assets for UMG. If you create your assets without a resolution or scale in mind, you may have some textures that are bigger or smaller than they need to be. In either case you will need to make those assets conform to your UI and that may stretch or skew your textures leading to undesired effects.
As for your textures, try to minimize the amount of built-in padding in the imported texture.

This texture has quite a bit of padding around it making it difficult to get the true size of the window frame.
When using the texture above in a UI screen, if we were to try to rescale it for different screen sizes, the scale will be based on the size of the texture and not the window frame. If you need to add padding around an object, it�s better to use the padding options inside UMG to provide space around objects so that when you rescale things, they appear the proper scale.
Another issue with this image is the way that the art was created. Rather than one piece of art, this texture could have been split up into pieces (the wood frames separate from the corners and separate from the background).

The corners and wood panel should be their own textures and imperfections make it difficult to tile textures.
Ideally, the corners and wood panel would be their own textures so that you can tile them to make your background image as big/small as you need without stretching the image. Inside UMG you can set the texture Draw As option to different settings, this would have been a good chance to use the Border mode which supports tiling.

Please see the Textures for Mobile Platforms for more information on creating textures for mobile devices.
Tips and Tricks
This section highlights some tips and tricks you can use when working with UMG or assets for use with UMG.
Formatting Tip
When working with panels like Vertical or Horizontal Boxes, whether to use Fill or Auto for the Size of a Slot comes into play.

Above, a series of buttons across the top of a screen have been set to Auto to only use the amount of space it needs for layout.
When you select Auto for the slot size, you are saying that the Widget needs a specified amount of room to be properly displayed. Auto looks at each child of the Widget set to auto and determines how big each needs to be as well. This is useful in situations where you have several Widgets that need to be scaled inside a Scale Box, if set to auto, the Scale Box can then look at each child and determine how much to scale each by so that they all fit.
Fill on the other hand, does as the name implies and will attempt to take as much space as possible. In the image below, we've set both the top and bottom rows of buttons to Auto and the center Vertical Box containing the Main Menu buttons to Fill . This was done so that the top and bottom rows of buttons are pushed by the Vertical Box to the top and bottom of whatever the screen size is.

Using Render Transforms
Be wary when using Render Transforms to affect the translation, scale or other settings for a particular Widget.

Above, the Scale under Render Transforms is adjusted and driven by an Animation to create a pulsing effect.
Render Transforms are great for temporary transforms (such as animating a widget) but not necessarily good for permanent transforms. For example if you need to scale up the size of a Widget, do so by wrapping the Widget with a Scale Box instead of adjusting Scale through Render Transforms. A Scale Box will perform Layout Scale while Render Transforms (which are not calculated as part of Layout) will not so they will not be scaled properly when scaling for different resolutions and could lead to improper scaling of your Widgets.
Right-click Context Menu
On the Designer tab of a Widget Blueprint, you can right-click on a Widget in the Hierarchy to wrap or replace it with another Widget.

This makes it quick and easy to swap Widgets in or out without having to re-parent things.
You can also right-click on properties in the Details panel and copy/paste them.

This is helpful for copying/pasting things like the style of a Button.
Ctrl-Drag Anchors and Widgets
When working with a Canvas Panel, you can hold
Ctrl
while dragging your Anchor (or selecting it from the preset Anchors) to drag the Anchor and the Widget at the same time to the desired location.

The Anchor will auto position to the upper-left of the Widget when Ctrl dragging the Anchor/Widget.
Designer Preview Background
Inside any Widget Blueprint on the Designer tab, you can set a preview image to be used in the graph as your background.

Using a preview background can help ensure that you are scaling widgets to the right size.
To do so, select the Root in the Hierarchy , then under Details you can assign a texture to use.
User Widgets / Reusing Content
Whenever you create a Widget Blueprint with some content, it is considered a User Widget . These User Widgets will appear in the Palette window of the Designer tab under the User Created section and can be drag/dropped into the graph like any other Widget.

Above, a confirmation screen User Widget is added to a different menu screen.
Use this to your advantage when constructing your screens and content. If you have some functionality that is going to be used quite a bit throughout your project, make it its own Widget that you can drop into any other Widget to supply that functionality rather than building it into each area each time you need it.
Optimizations
Some optimizations you can consider when authoring your UI Screens include:
-
Use Textures instead of Materials for your art whenever possible.
-
Use Events to Drive UI updates whenever possible instead of Bindings or Tick events.
-
Use the Invalidation Box to cache Widgets that do not change very often.
-
Use the Widget Reflector ( Ctrl+Shift+W ) to get information and statistics about your Widgets.