Choose your operating system:
Windows
macOS
Linux


More often than not, Blueprint Arrays are the container-of-choice for most design scenarios. Arrays, being an ordered list of items where duplicates are allowed, offer developers a container that is both ordered and flexible. There are times though, when developers, working with pools of items, aren't worried with the order of each item belonging to the pools, rather, they might be concerned with the uniqueness of the items belonging to the pools that they're drawing data from. This is where a Blueprint Set can help.
At the end of this guide, you'll get some experience creating and editing Sets in the Blueprint scripting environment, querying and displaying items, and performing basic operations, including Intersections and Unions, on Blueprint Sets in Unreal Engine 4 (UE4).
1. Required Setup
Before you can start working with Blueprint Sets, you'll have to set up your project to display the container's contents.
-
Create a new Project using the Games > First Person template, using the following settings:
-
Blueprint enabled
-
Maximum Quality enabled
-
Desktop/Console enabled
-
With Starter Content enabled
-
-
Name your project, ExampleSetProject .
-
Double-click the Blueprints folder from the project's Content Browser .
![Step1_2.png]()
Click for full image.
-
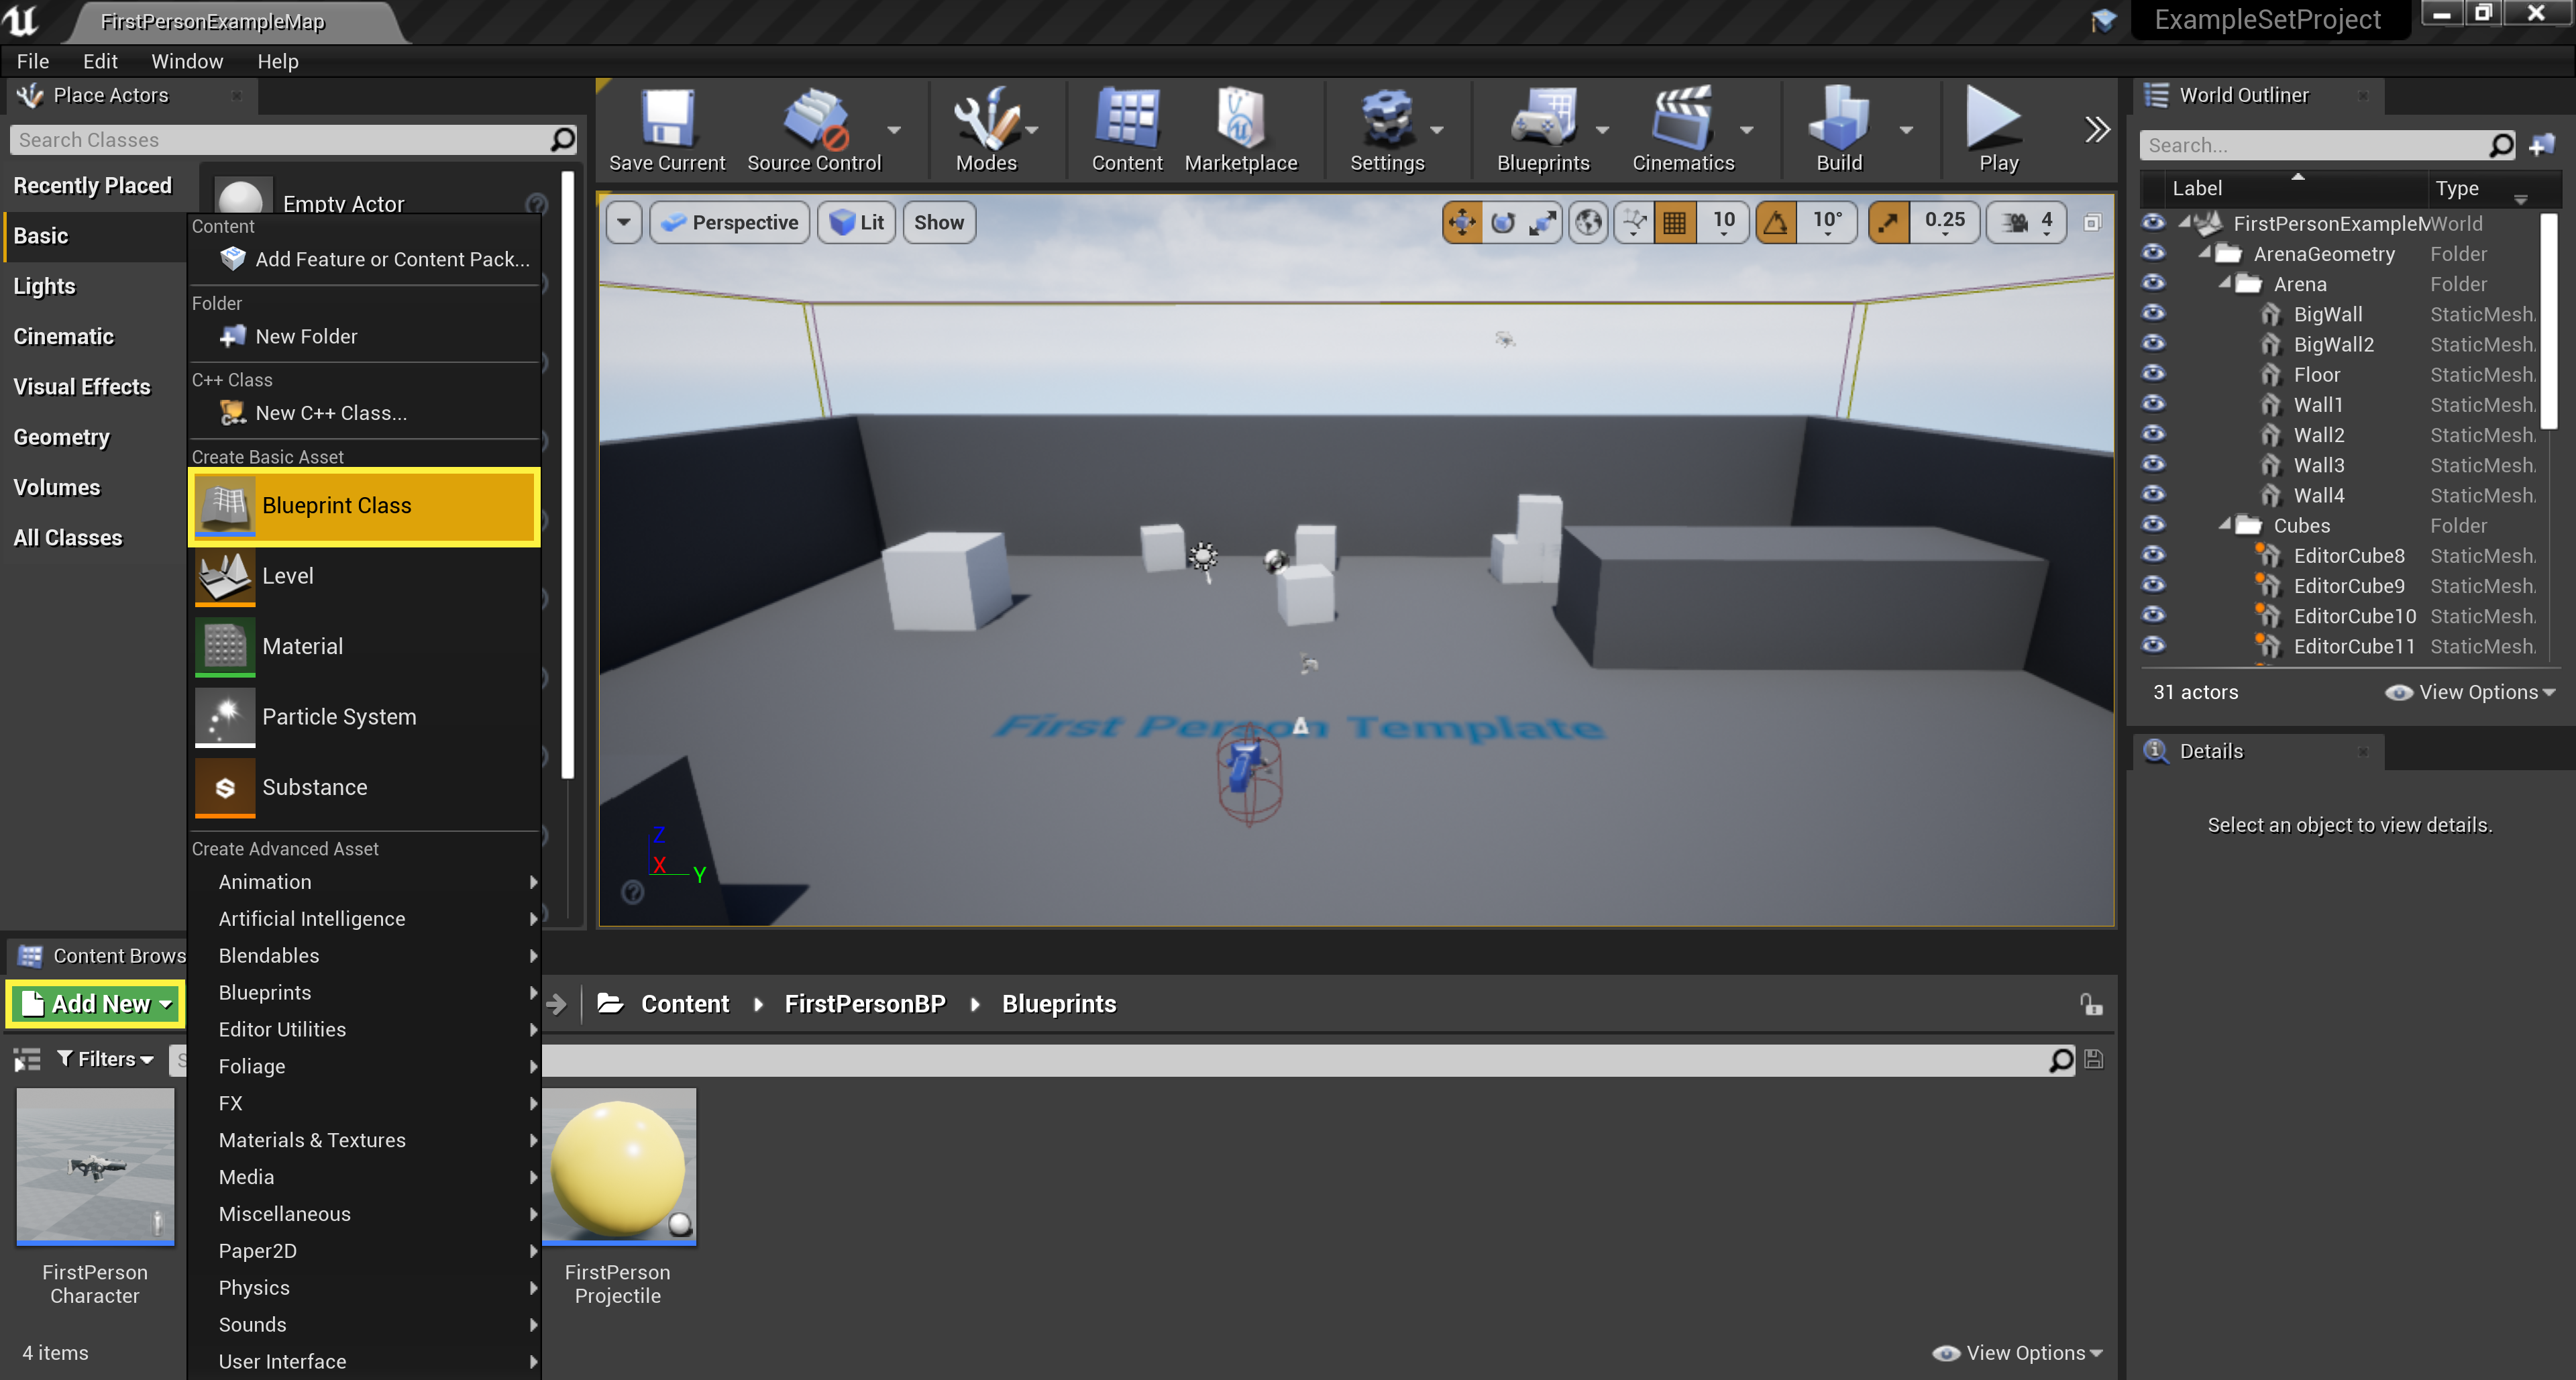
From the Content Browser , go ahead and click the Add New button, hovering your mouse curser over the Blueprint Class , which is located under the Create Basic Asset pop-up menu.
![Step1_3.png]()
Click for full image.
-
After the Pick Parent Class menu opens, click the All Classes arrow to search for the TextRender Actor Blueprint Class.
![Step1_4.png]()
-
Enter
TextRenderActorin the Search Bar , selecting the TextRenderActor Blueprint Class before clicking the Select button.![Step1_5.png]()
-
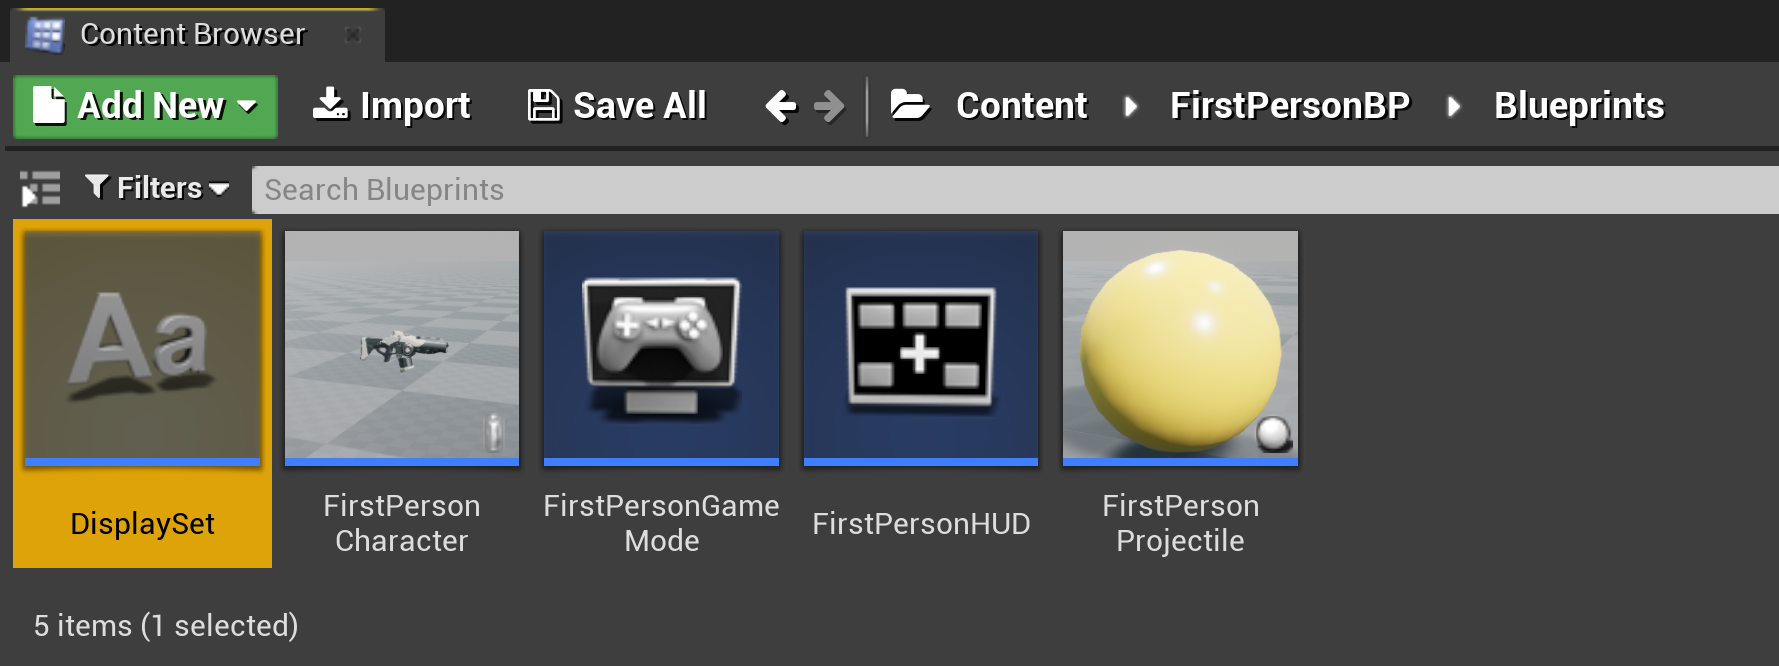
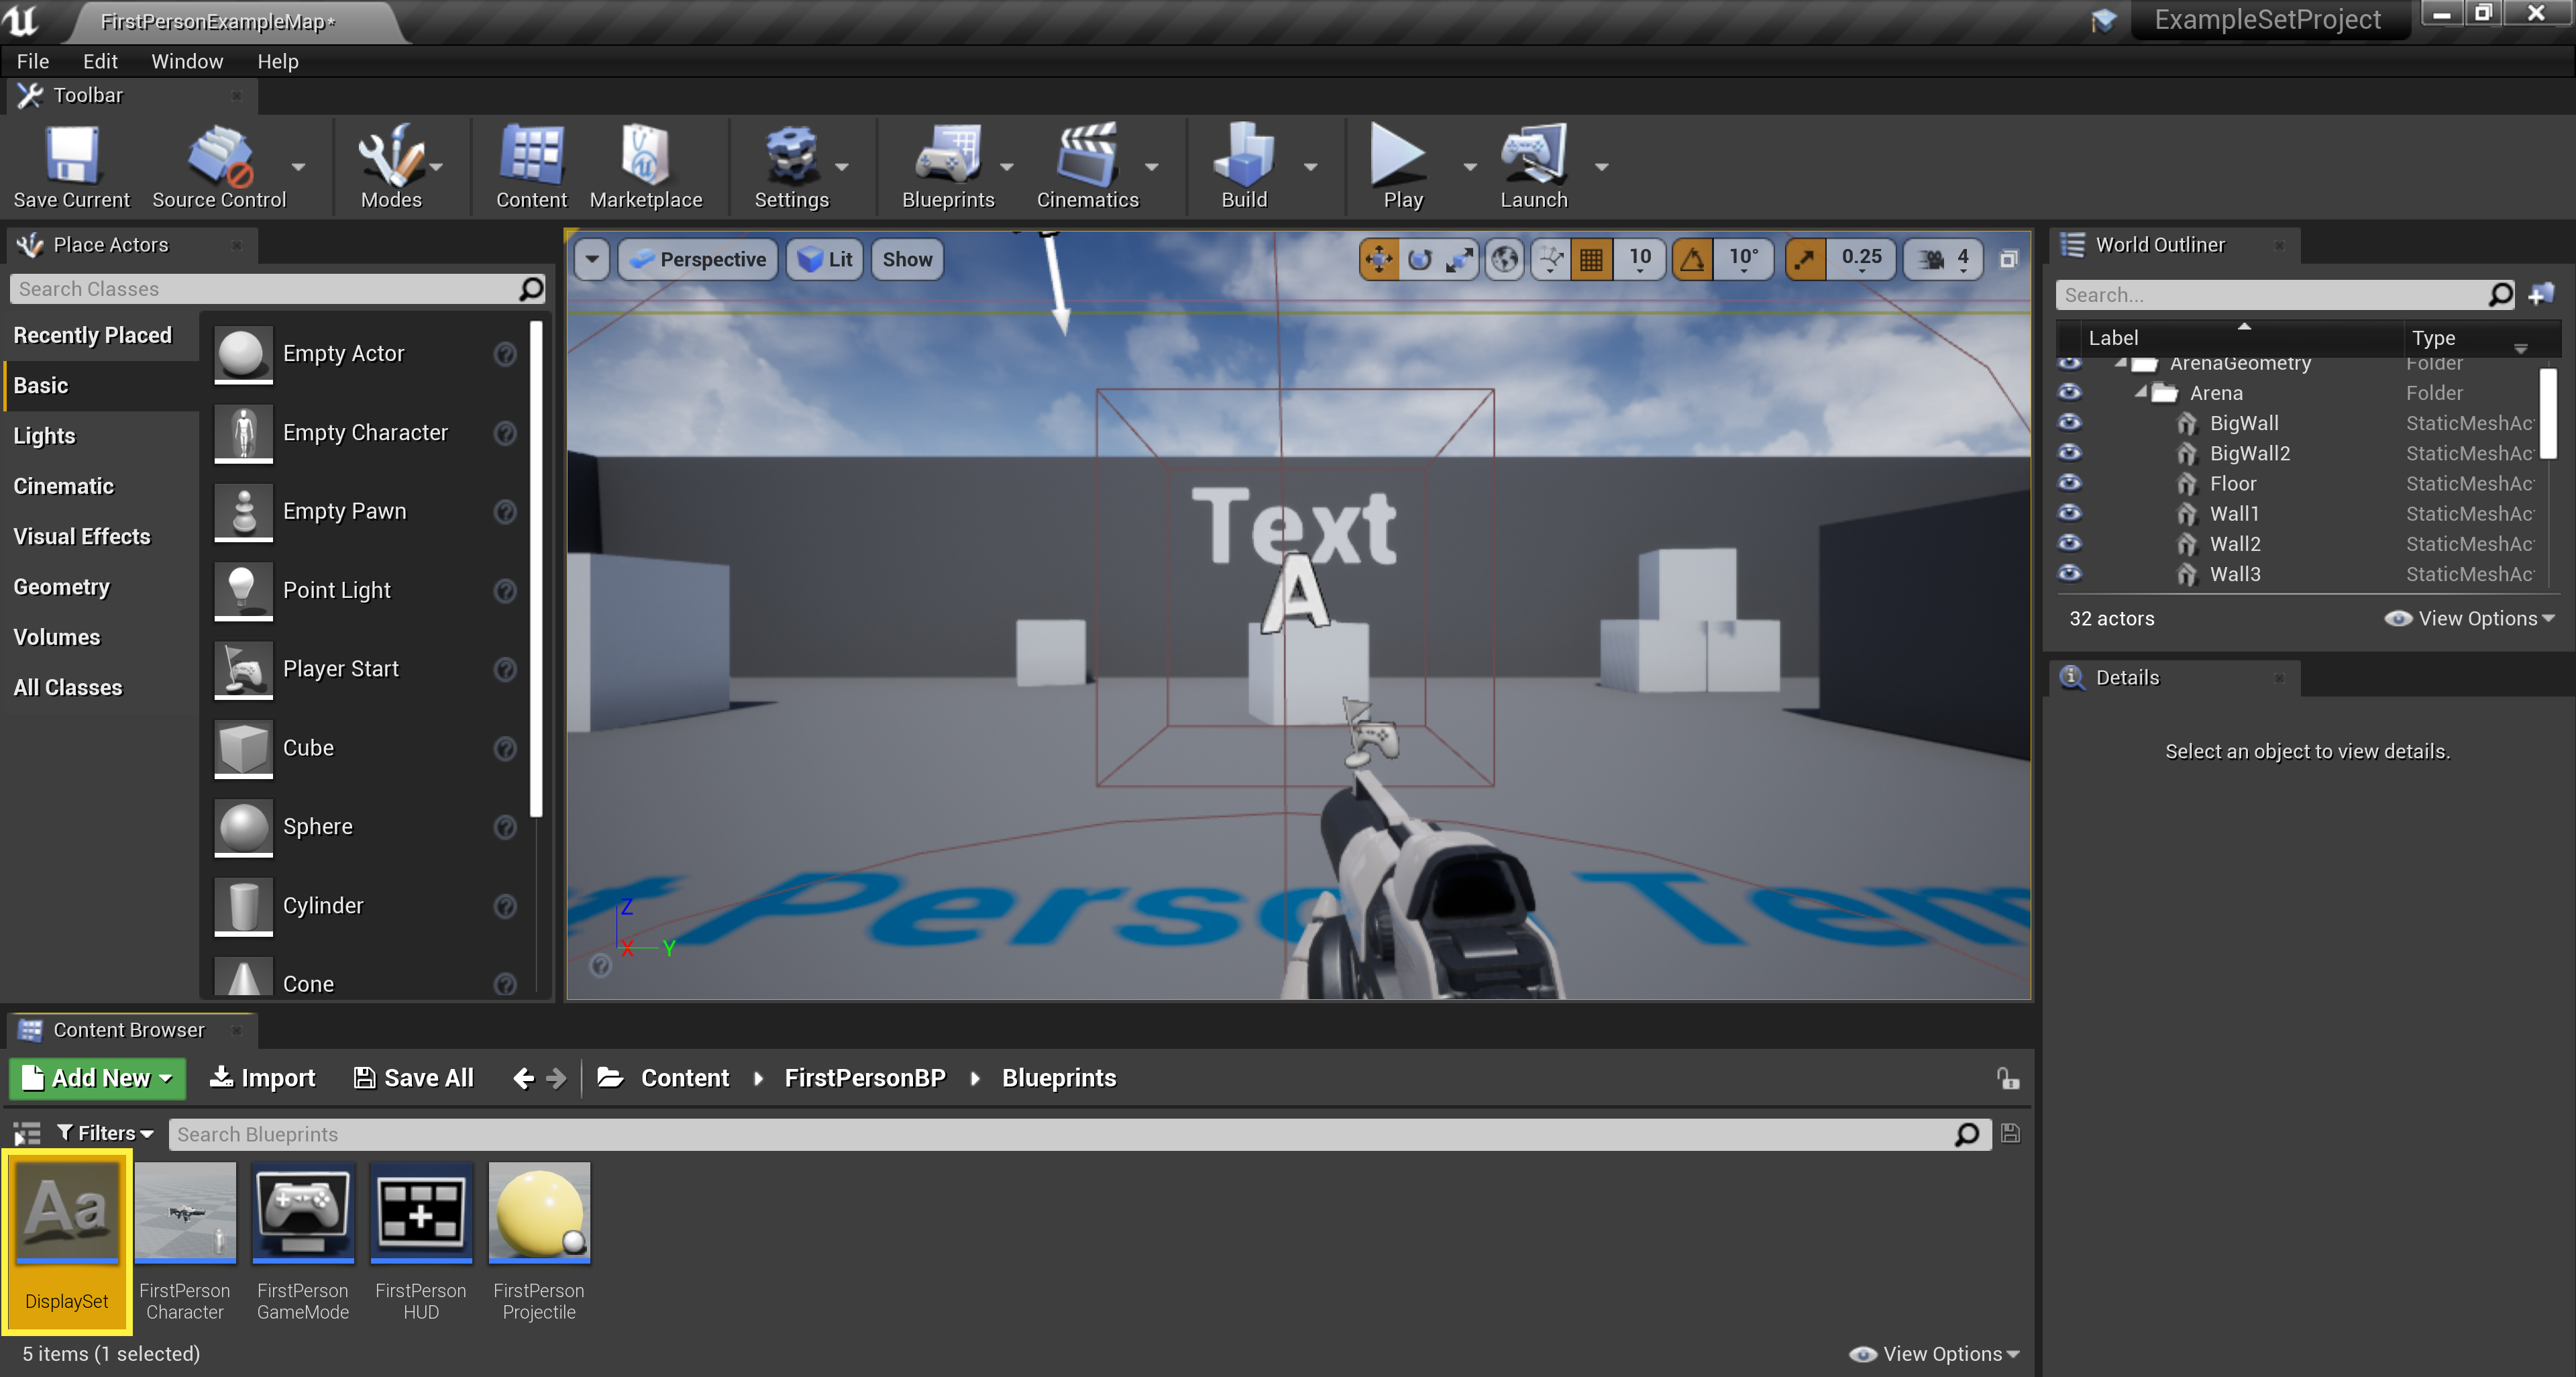
At this point, you should have a new TextRender Actor located in your project's Content Browser . Go ahead and name the new Actor
DisplaySet.![Step1_6.png]()
-
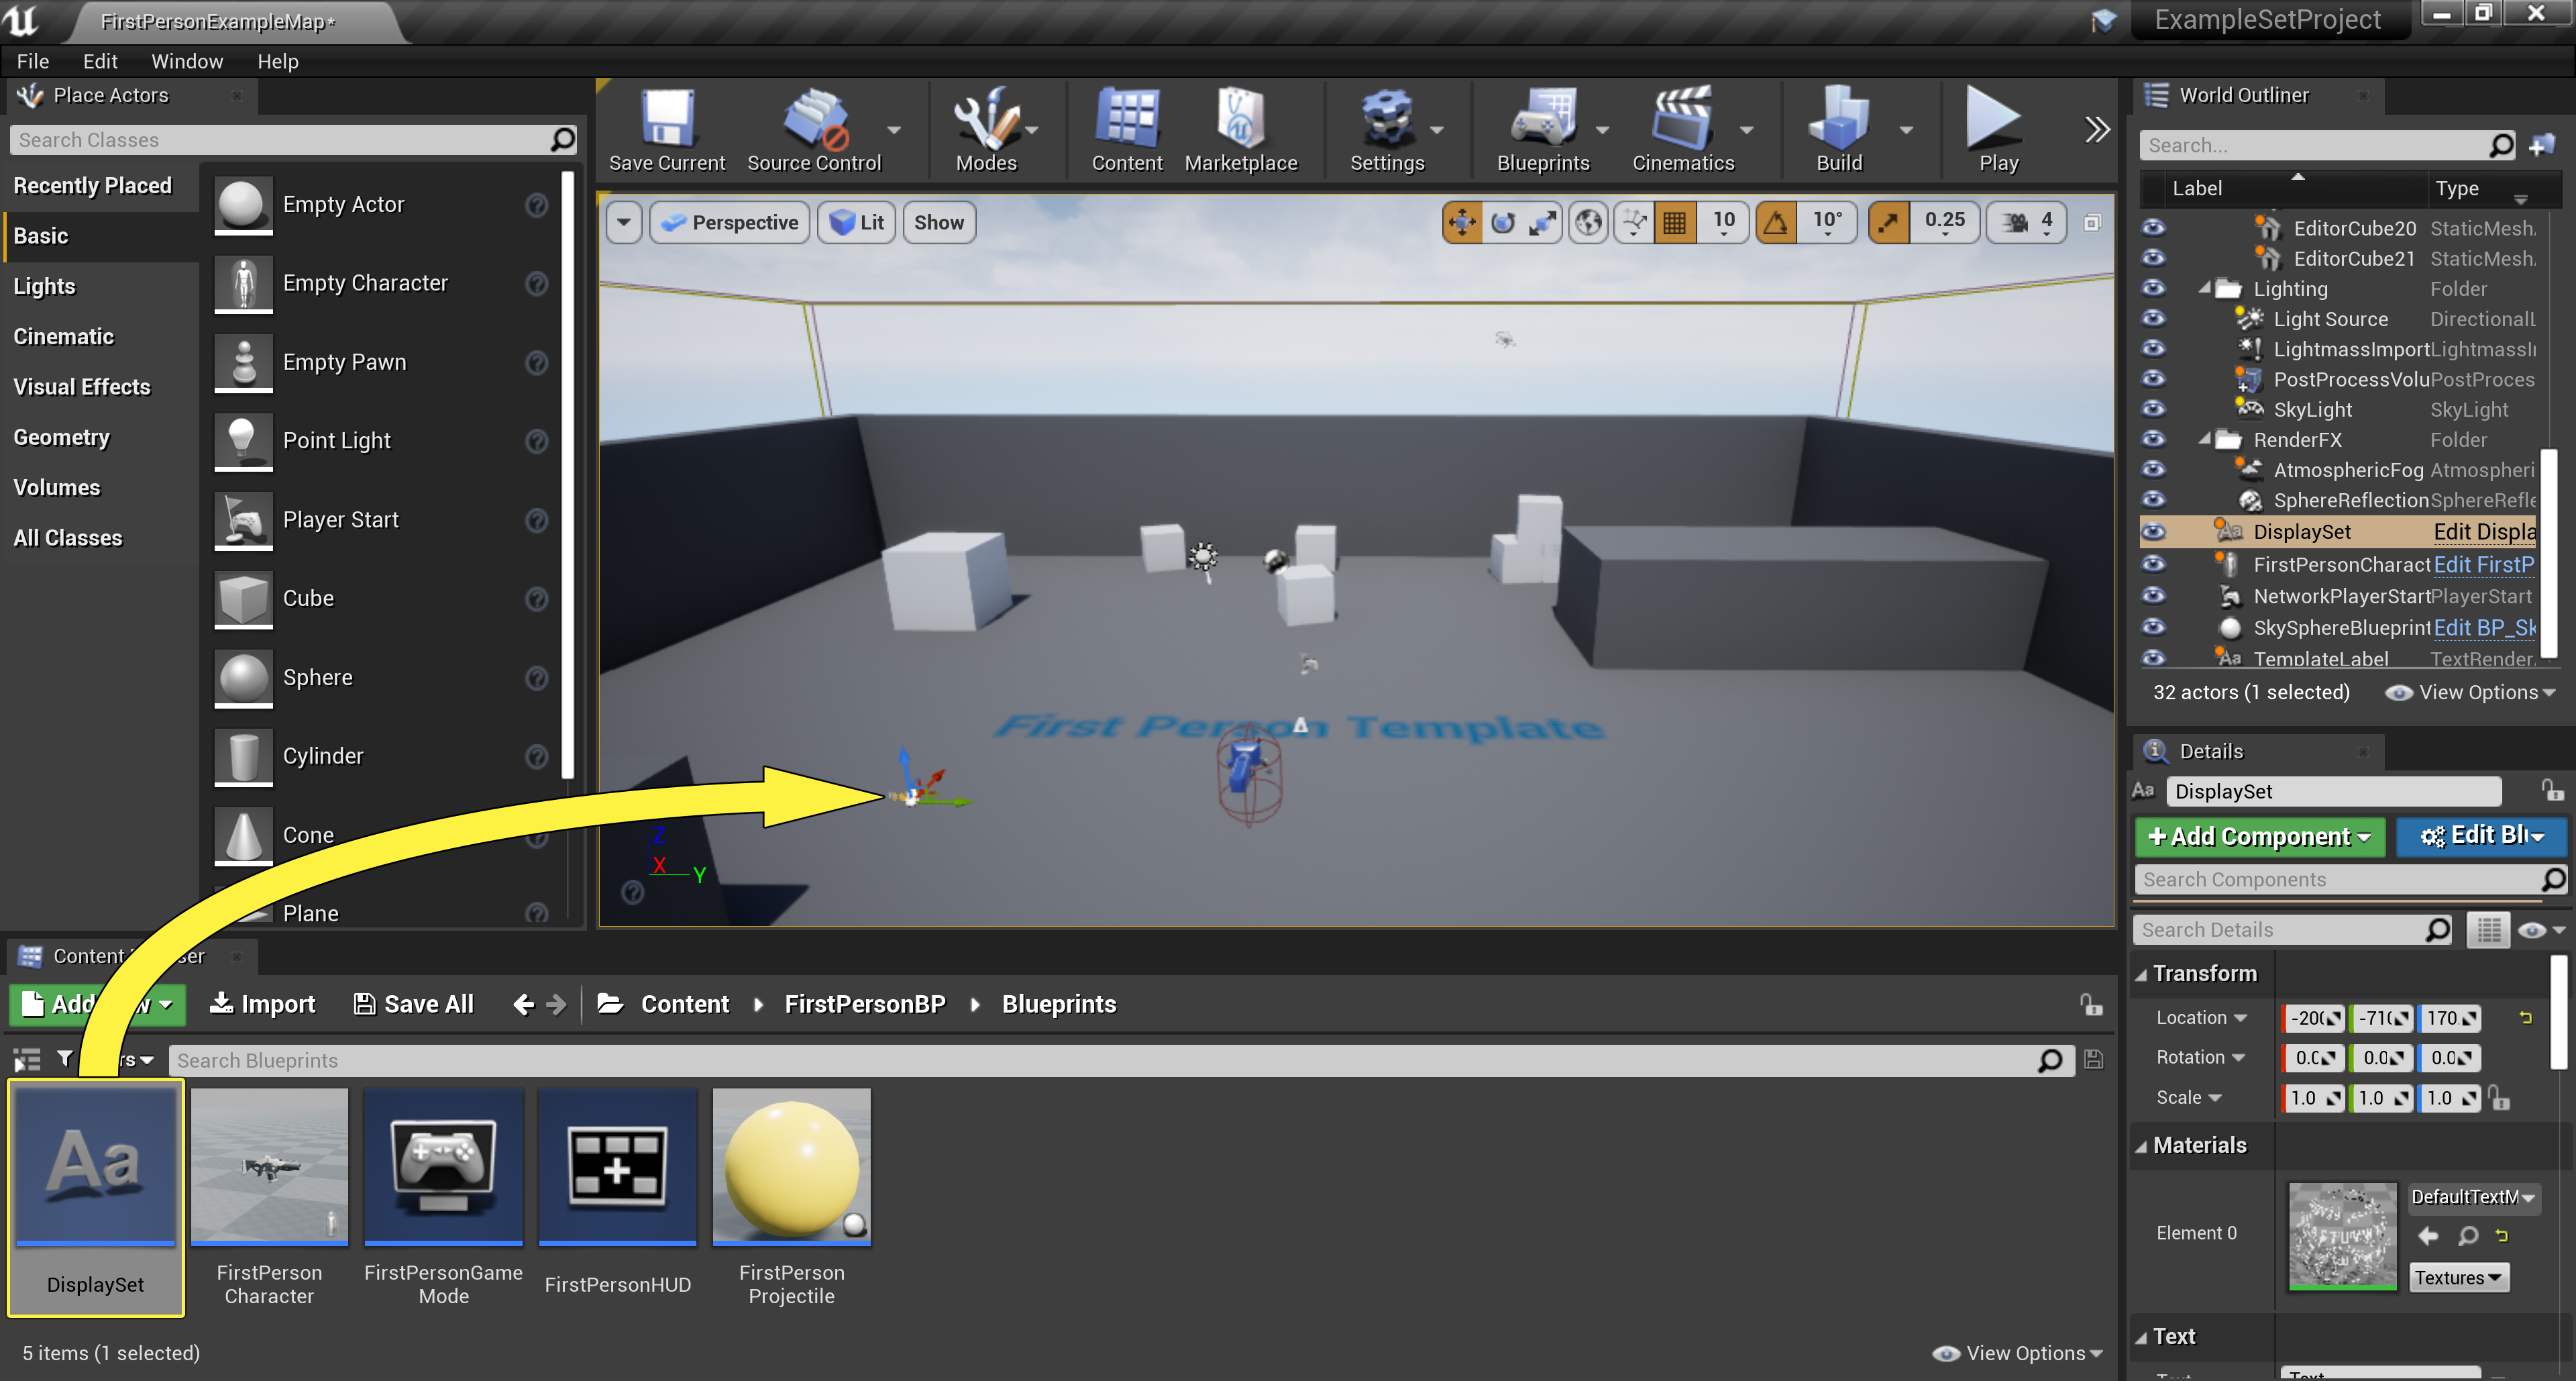
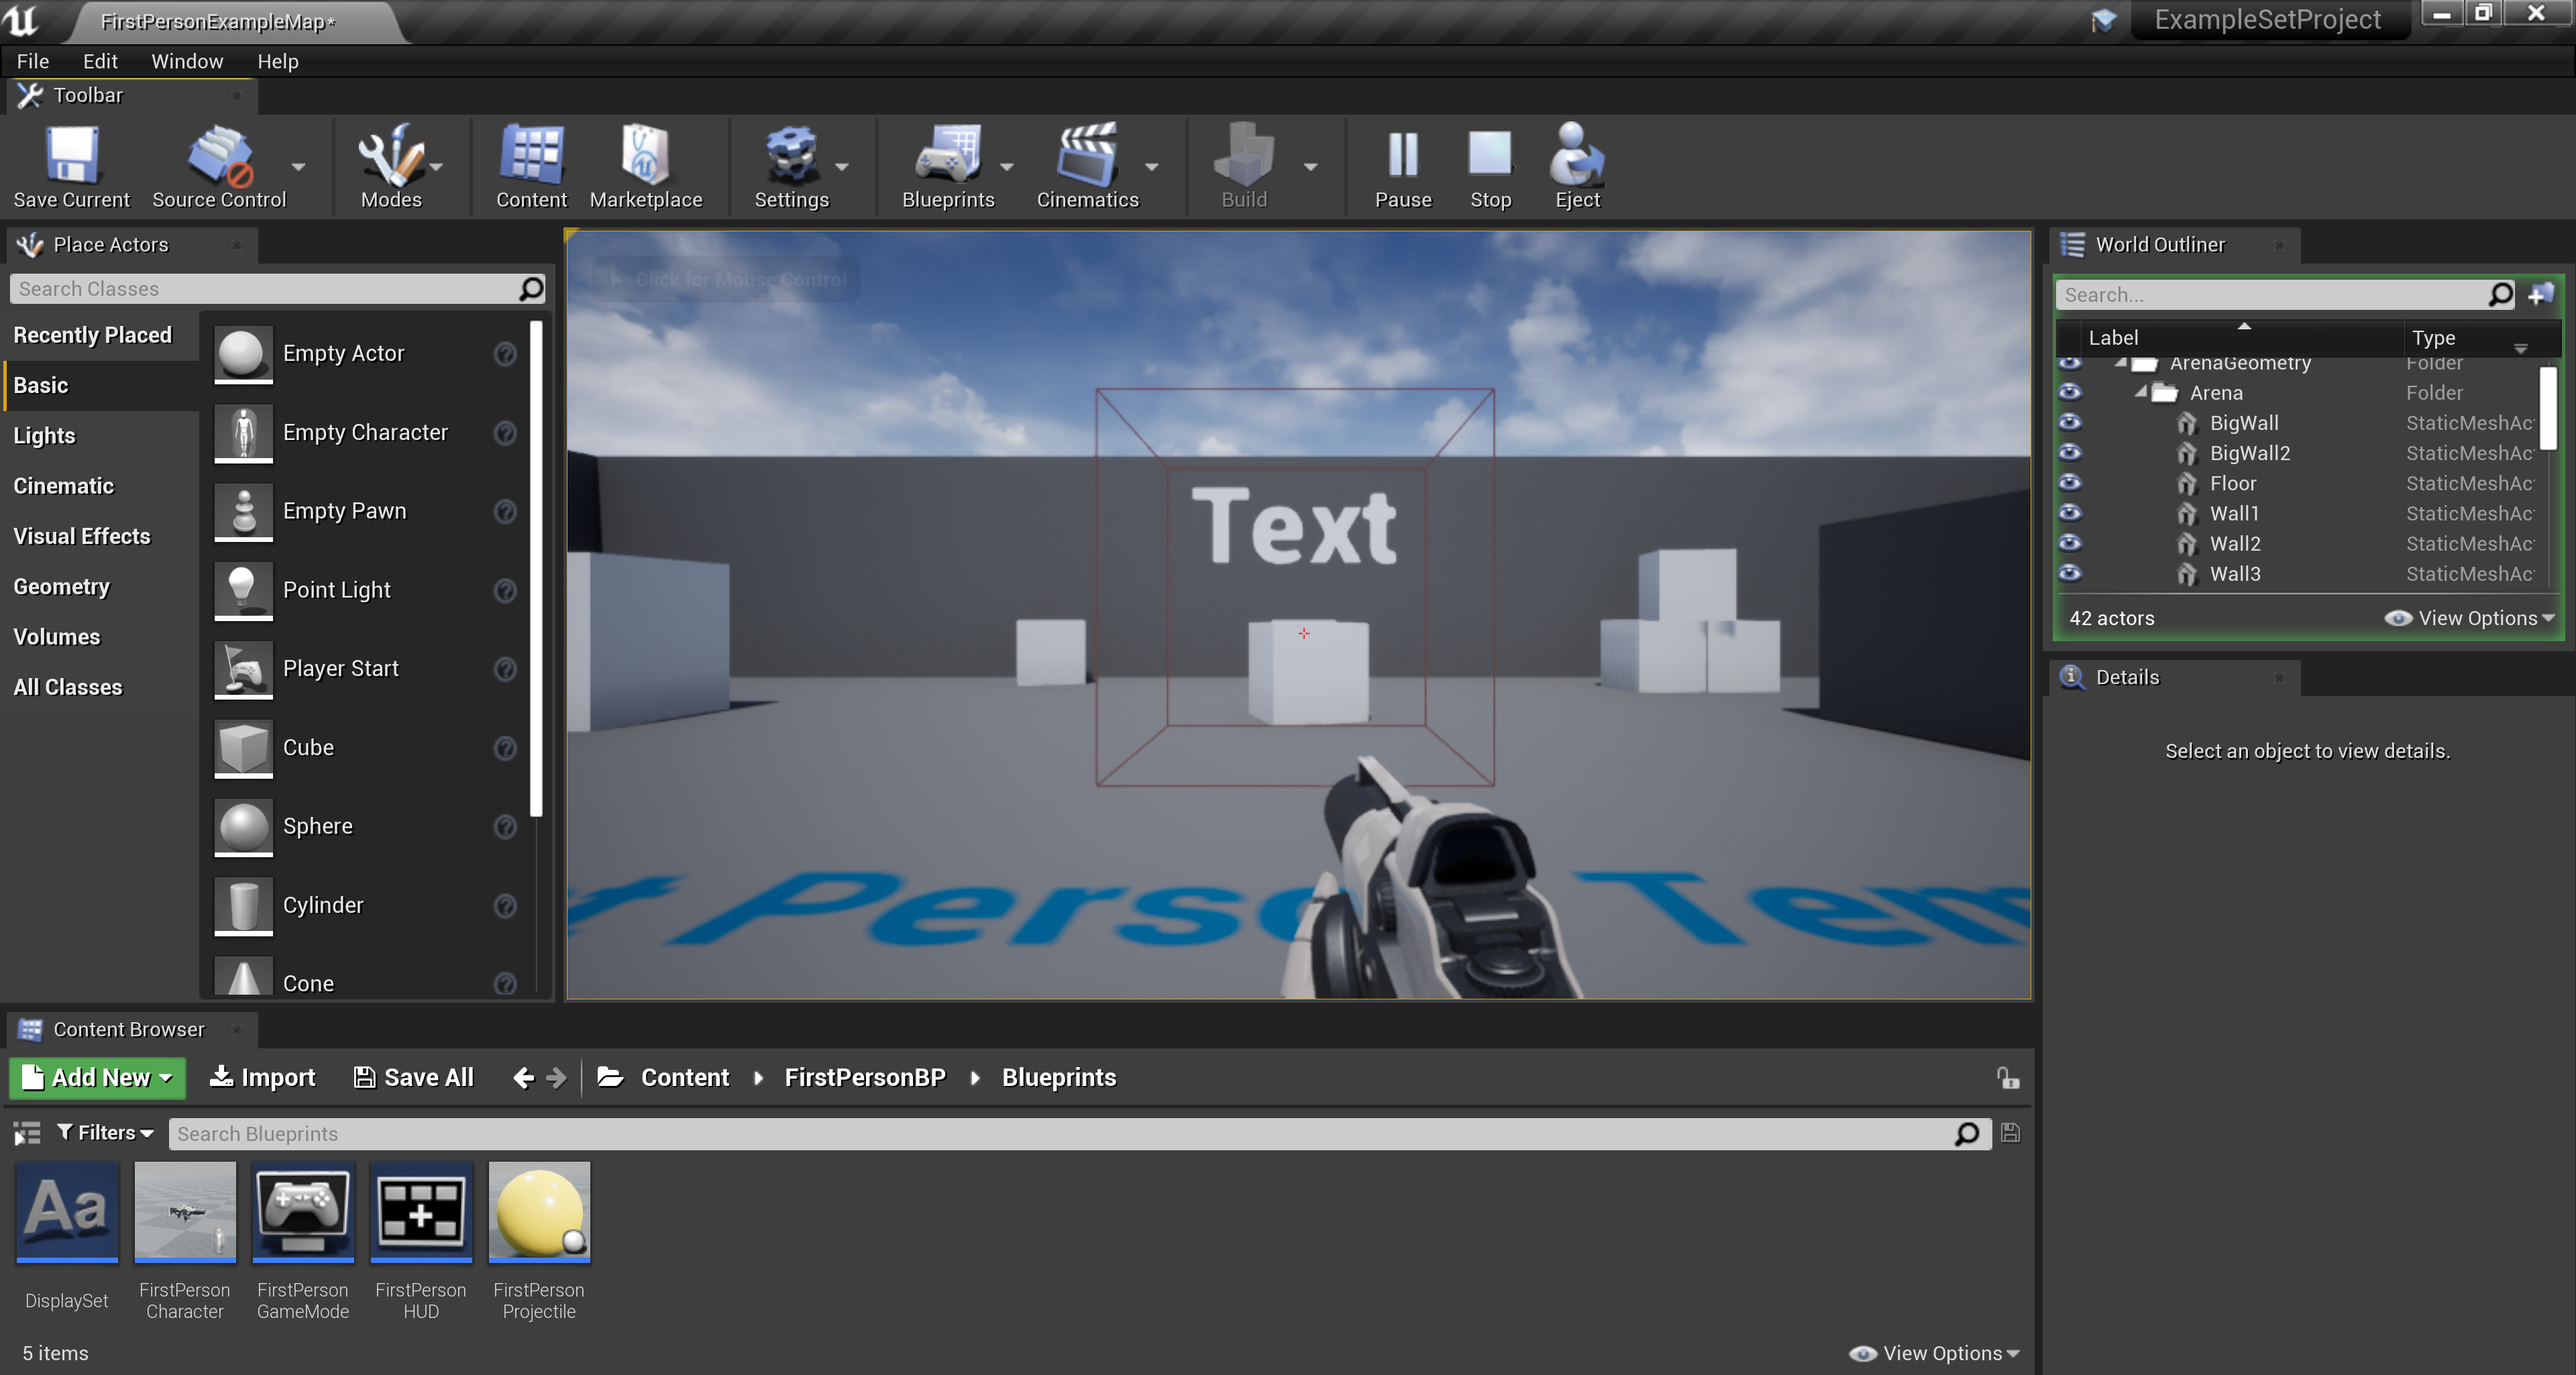
Now, drag the
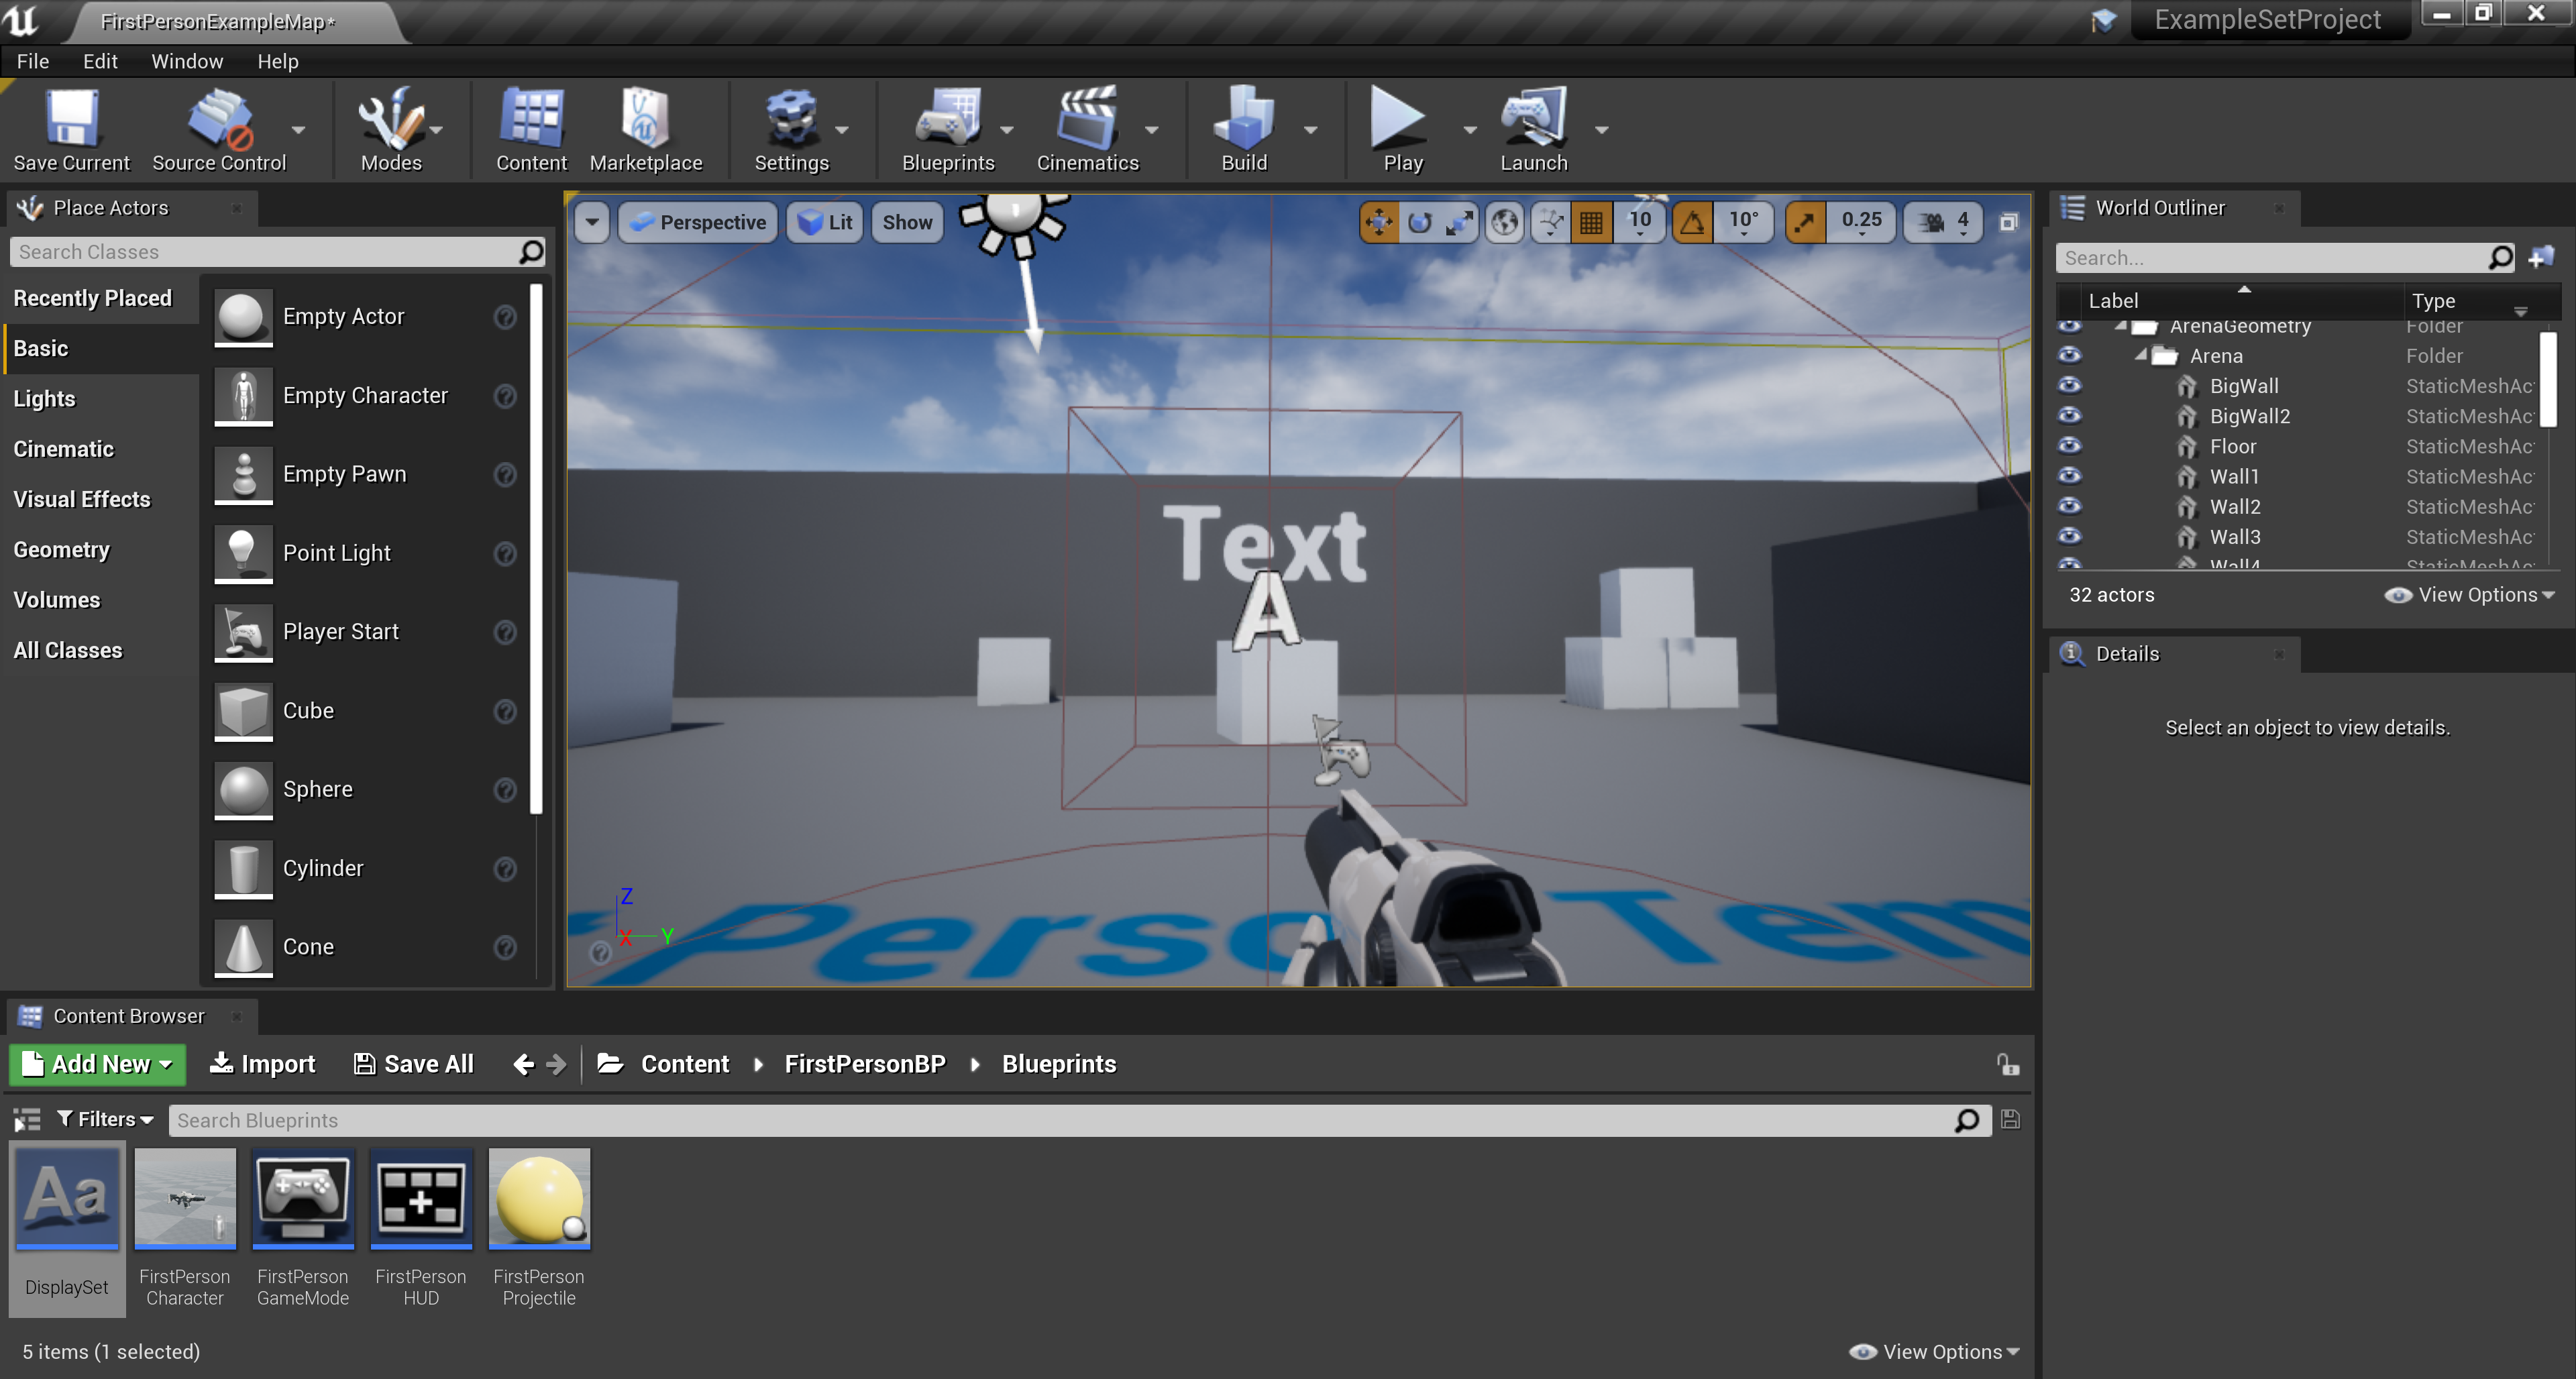
DisplaySetTextRender Actor into Unreal Editor's Perspective (3D) Viewport .![Step1_7.png]()
Click for full image.
-
With the DisplaySet TextRender Actor selected, click the + Add Component button (located in the Details panel), and enter
Box Collisioninto the Search Bar .![Step1_8.png]()
Click for full image.
-
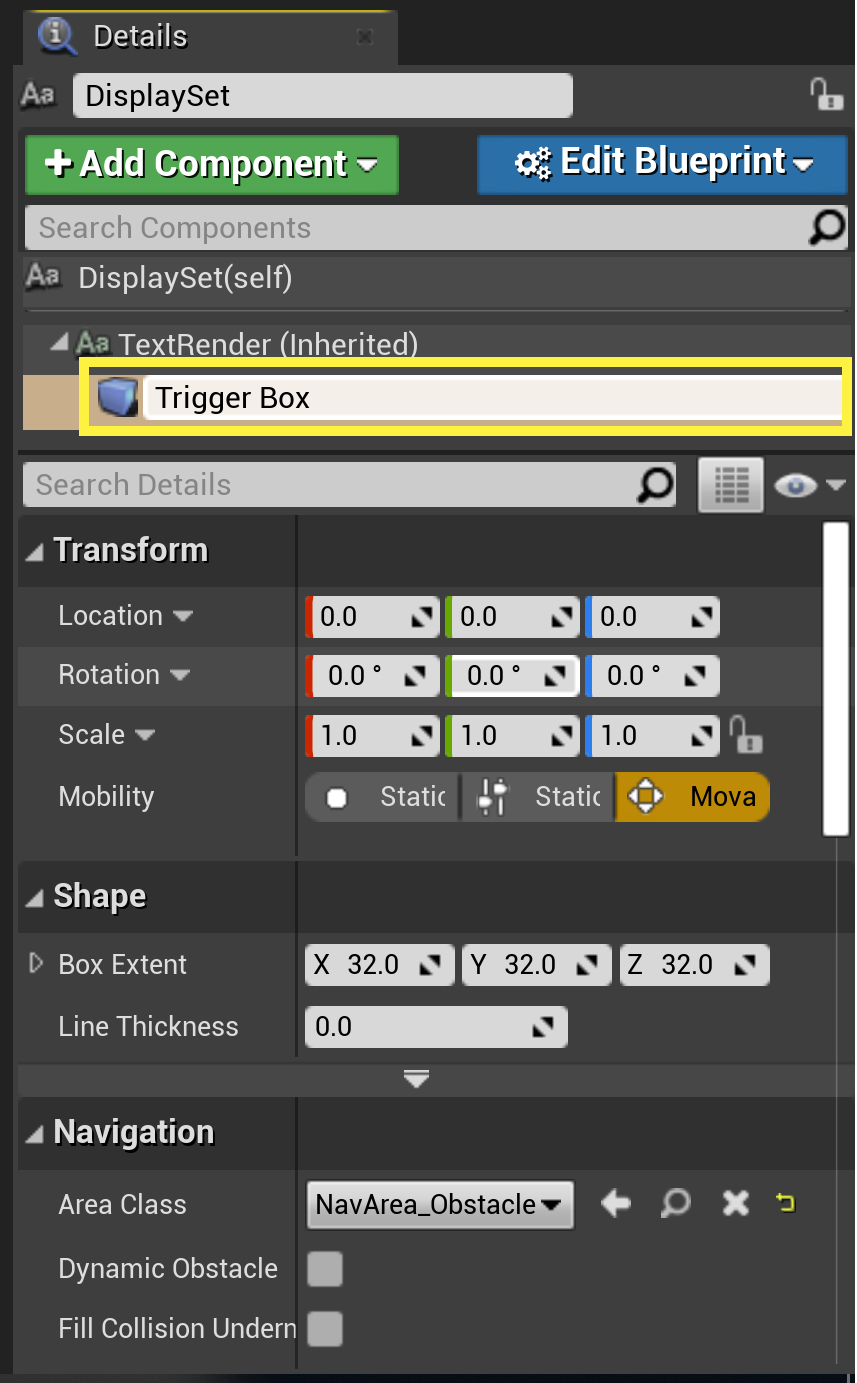
After adding the Box Collision Component to the TextRender Actor, name the new Component,
Trigger Box.![Step1_9.png]()
-
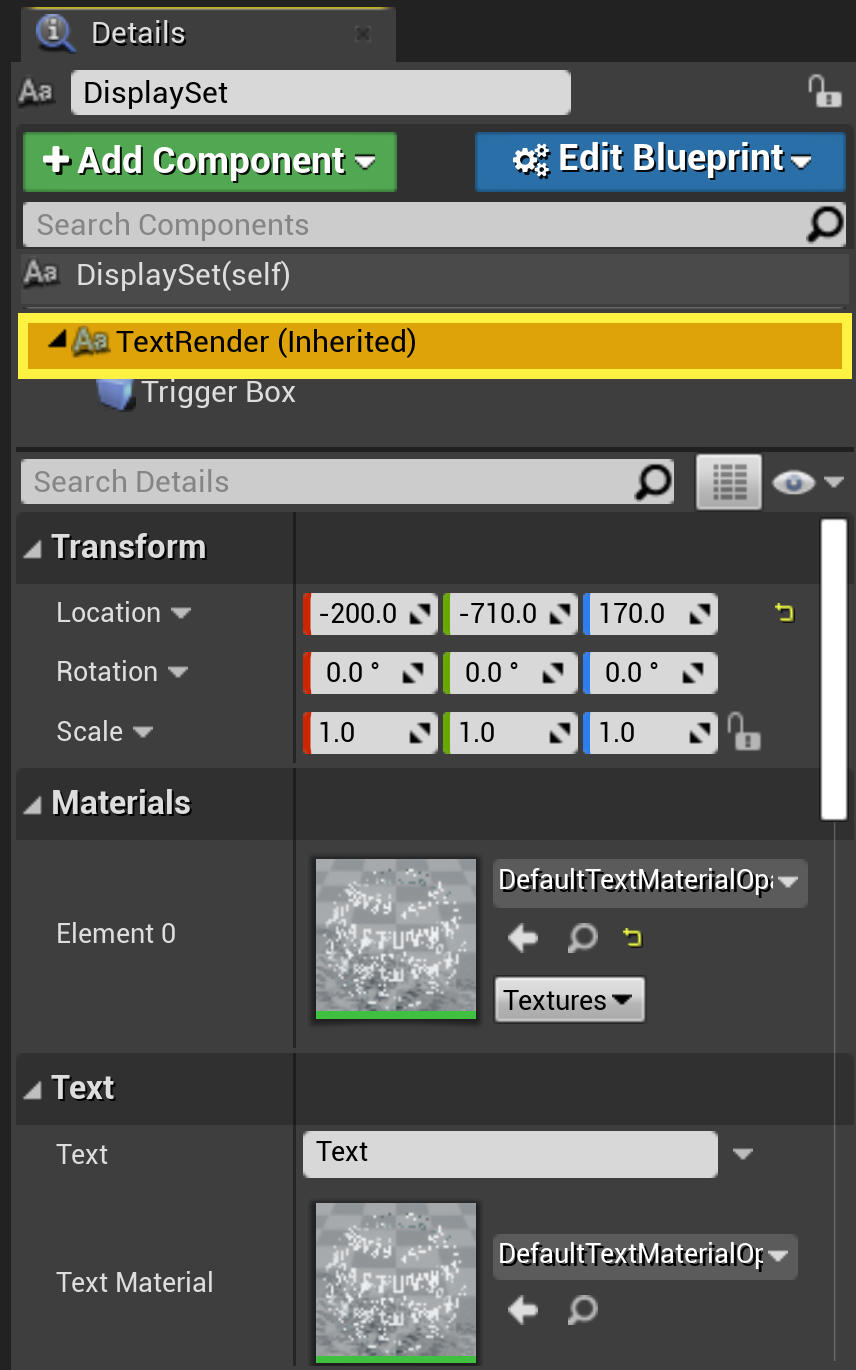
Now, select the TextRender Component to view the Actor's Transform in the Details panel.
![Step1_10.png]()
-
Update the Display Set Actor's Transform to reflect the following values:
![Step1_11.png]()
-
Now, change the Display Set Actor's Horizontal Alignment to be Center aligned (rather than Left aligned, which is the default Horizonal Alignment value).
![Step1_12.png]()
-
Currently, the Trigger Box Component is Hidden in Game . Go ahead and clear the Hidden in Game check box (located in the Rendering menu of the Details panel) so that you can view the Box Collision Component in-game.
![Step1_13.png]()
Having the ability to view Box Collision Components in-game is a great way to debug any potential issues with the underlying logic driving a triggered event.
-
If you enter PIE (or Play in Editor) mode, you'll notice that your projectiles will have a collision response to the Display Set collision box. Currently, we only want the Display Set collision box to trigger an event that allows us to display the contents of your Set containers. To do this, go to the Collision menu (located in the Details panel), click the Collision Presets drop-down list box, and select the Custom... option.
![Step1_14.png]()
-
Finally, update the Collision Presets to reflect the following values:
![Step1_15.png]()


Section Result
Click for full image.
By now, you've created a new project, having also set up a new TextRender Actor, which will display the contents of a Blueprint Set container that you'll create, edit, and display in the next step.
2. Creating and Displaying a Blueprint Set
Now that you've set up a TextRender Actor in your newly created project, you're ready to create a Blueprint Set container, the contents of which you'll display in-game.
-
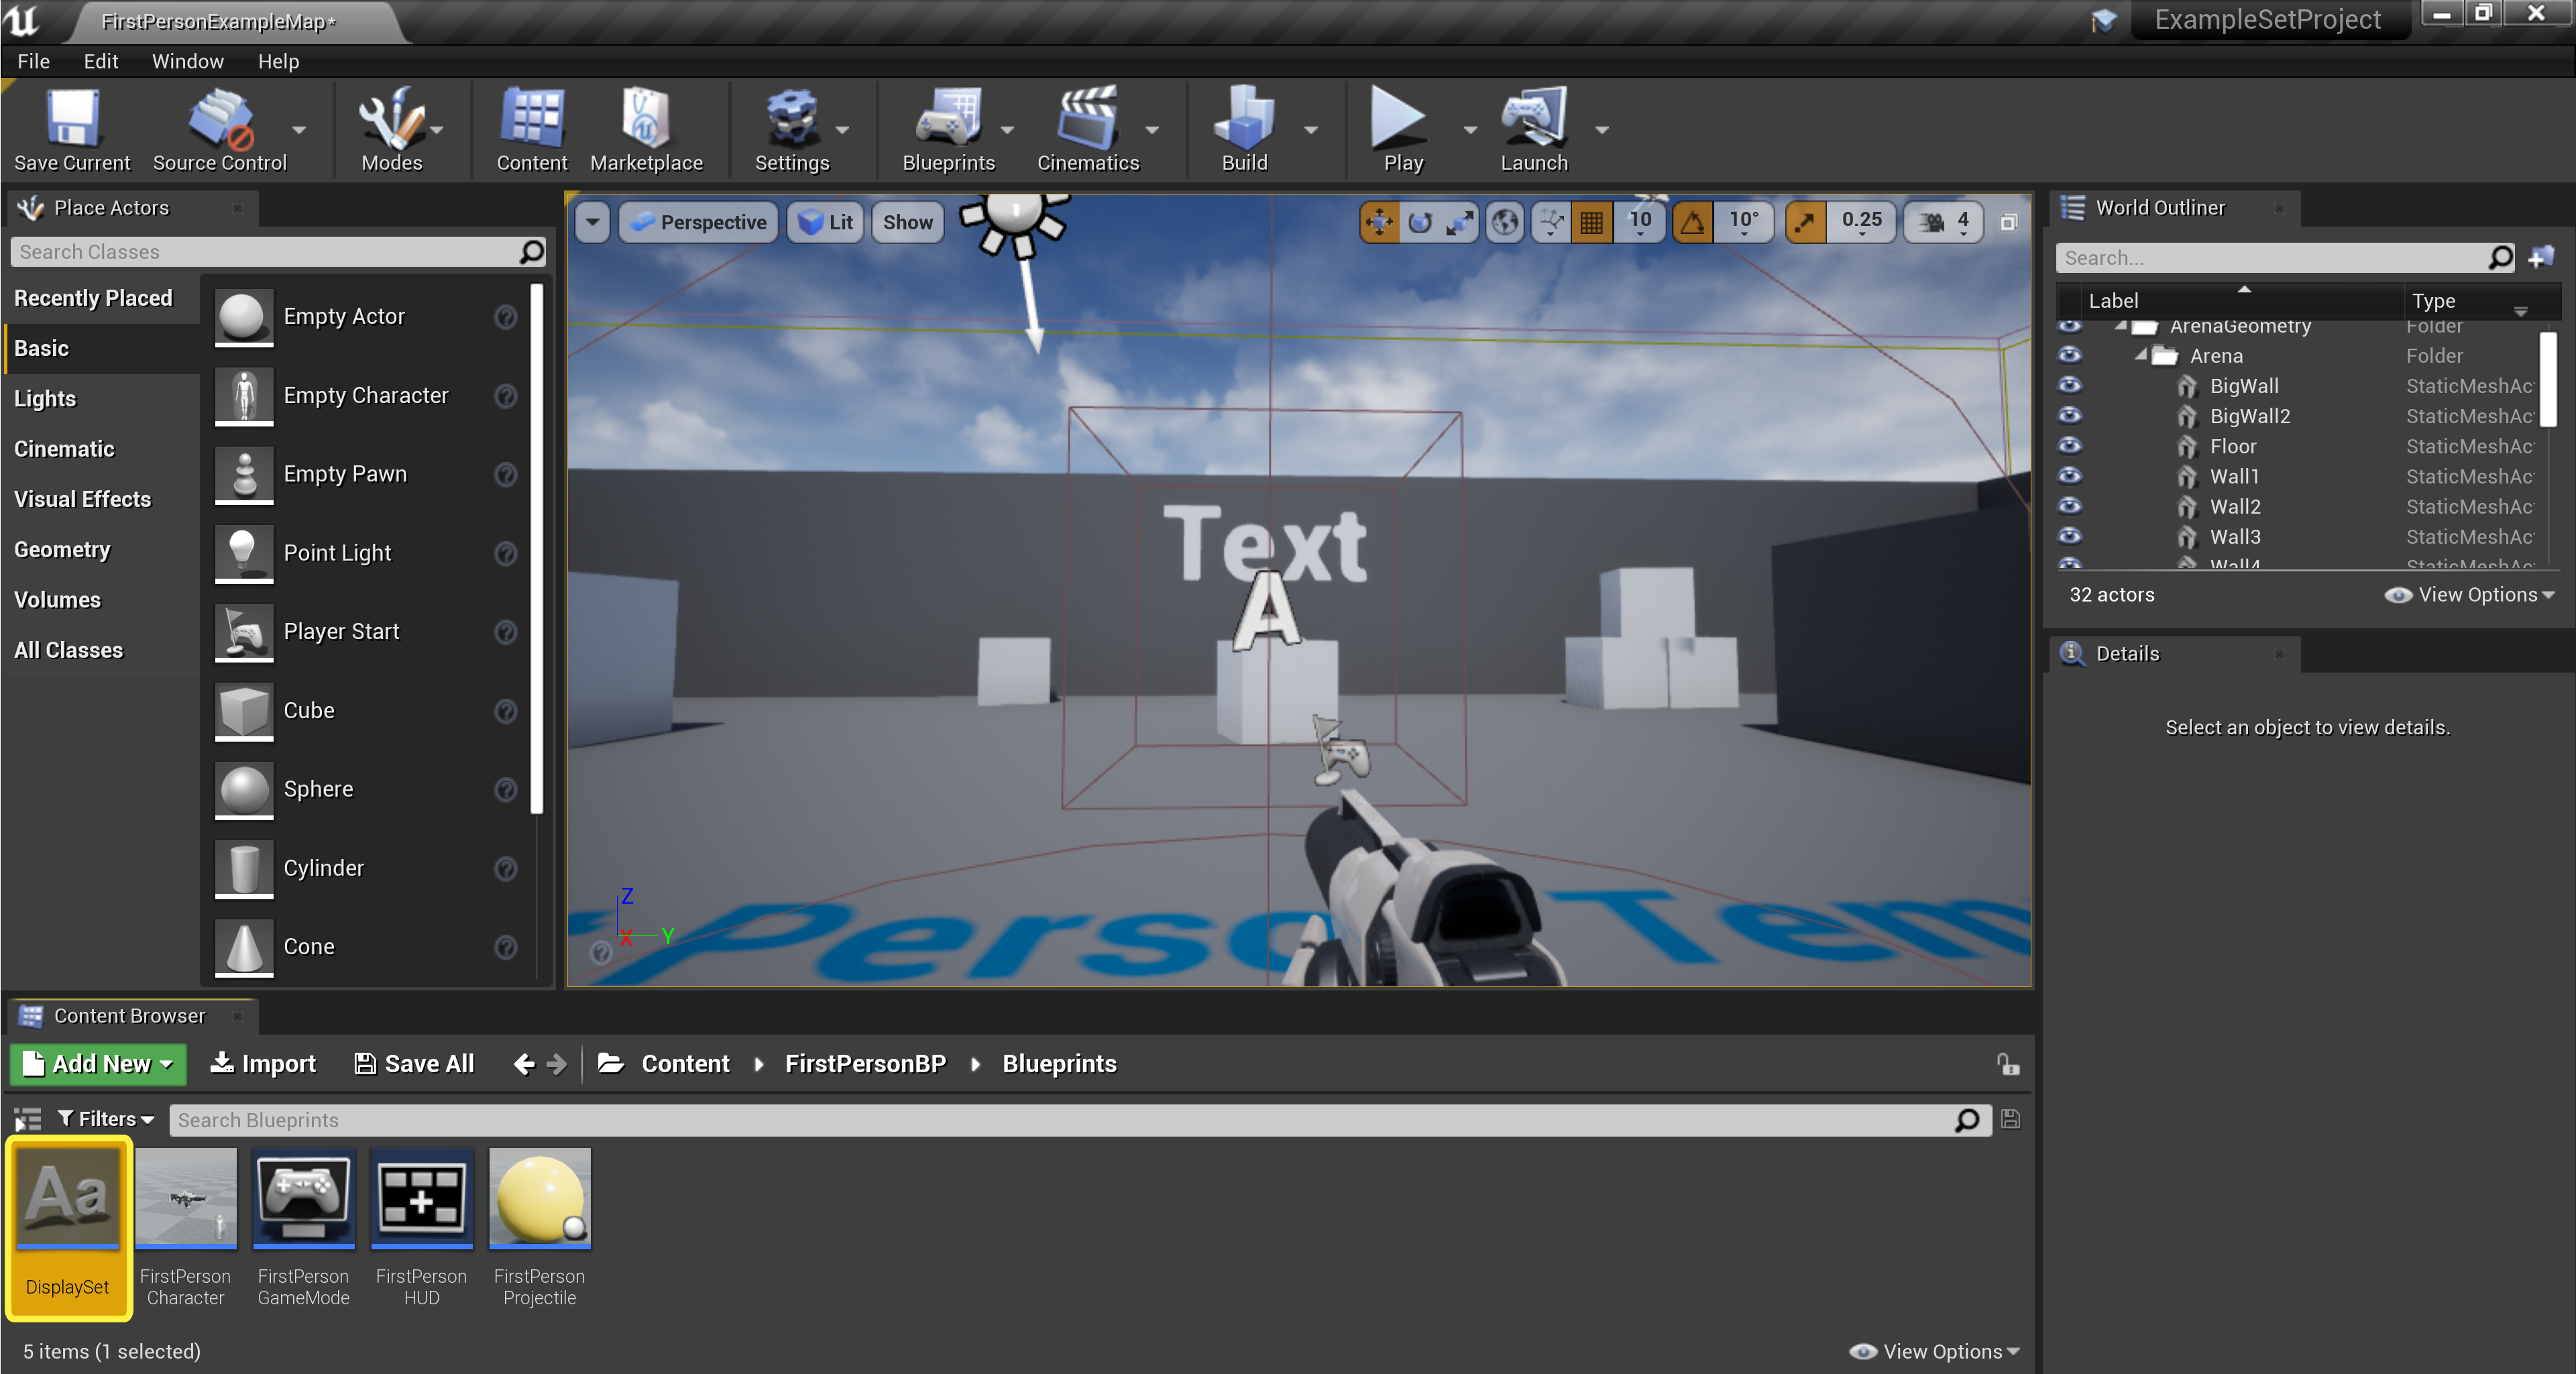
From your project's Content Browser , double-click the Display Set TextRender Actor to open its Blueprint Event Graph .
![Step2_1.png]()
Click for full image.
-
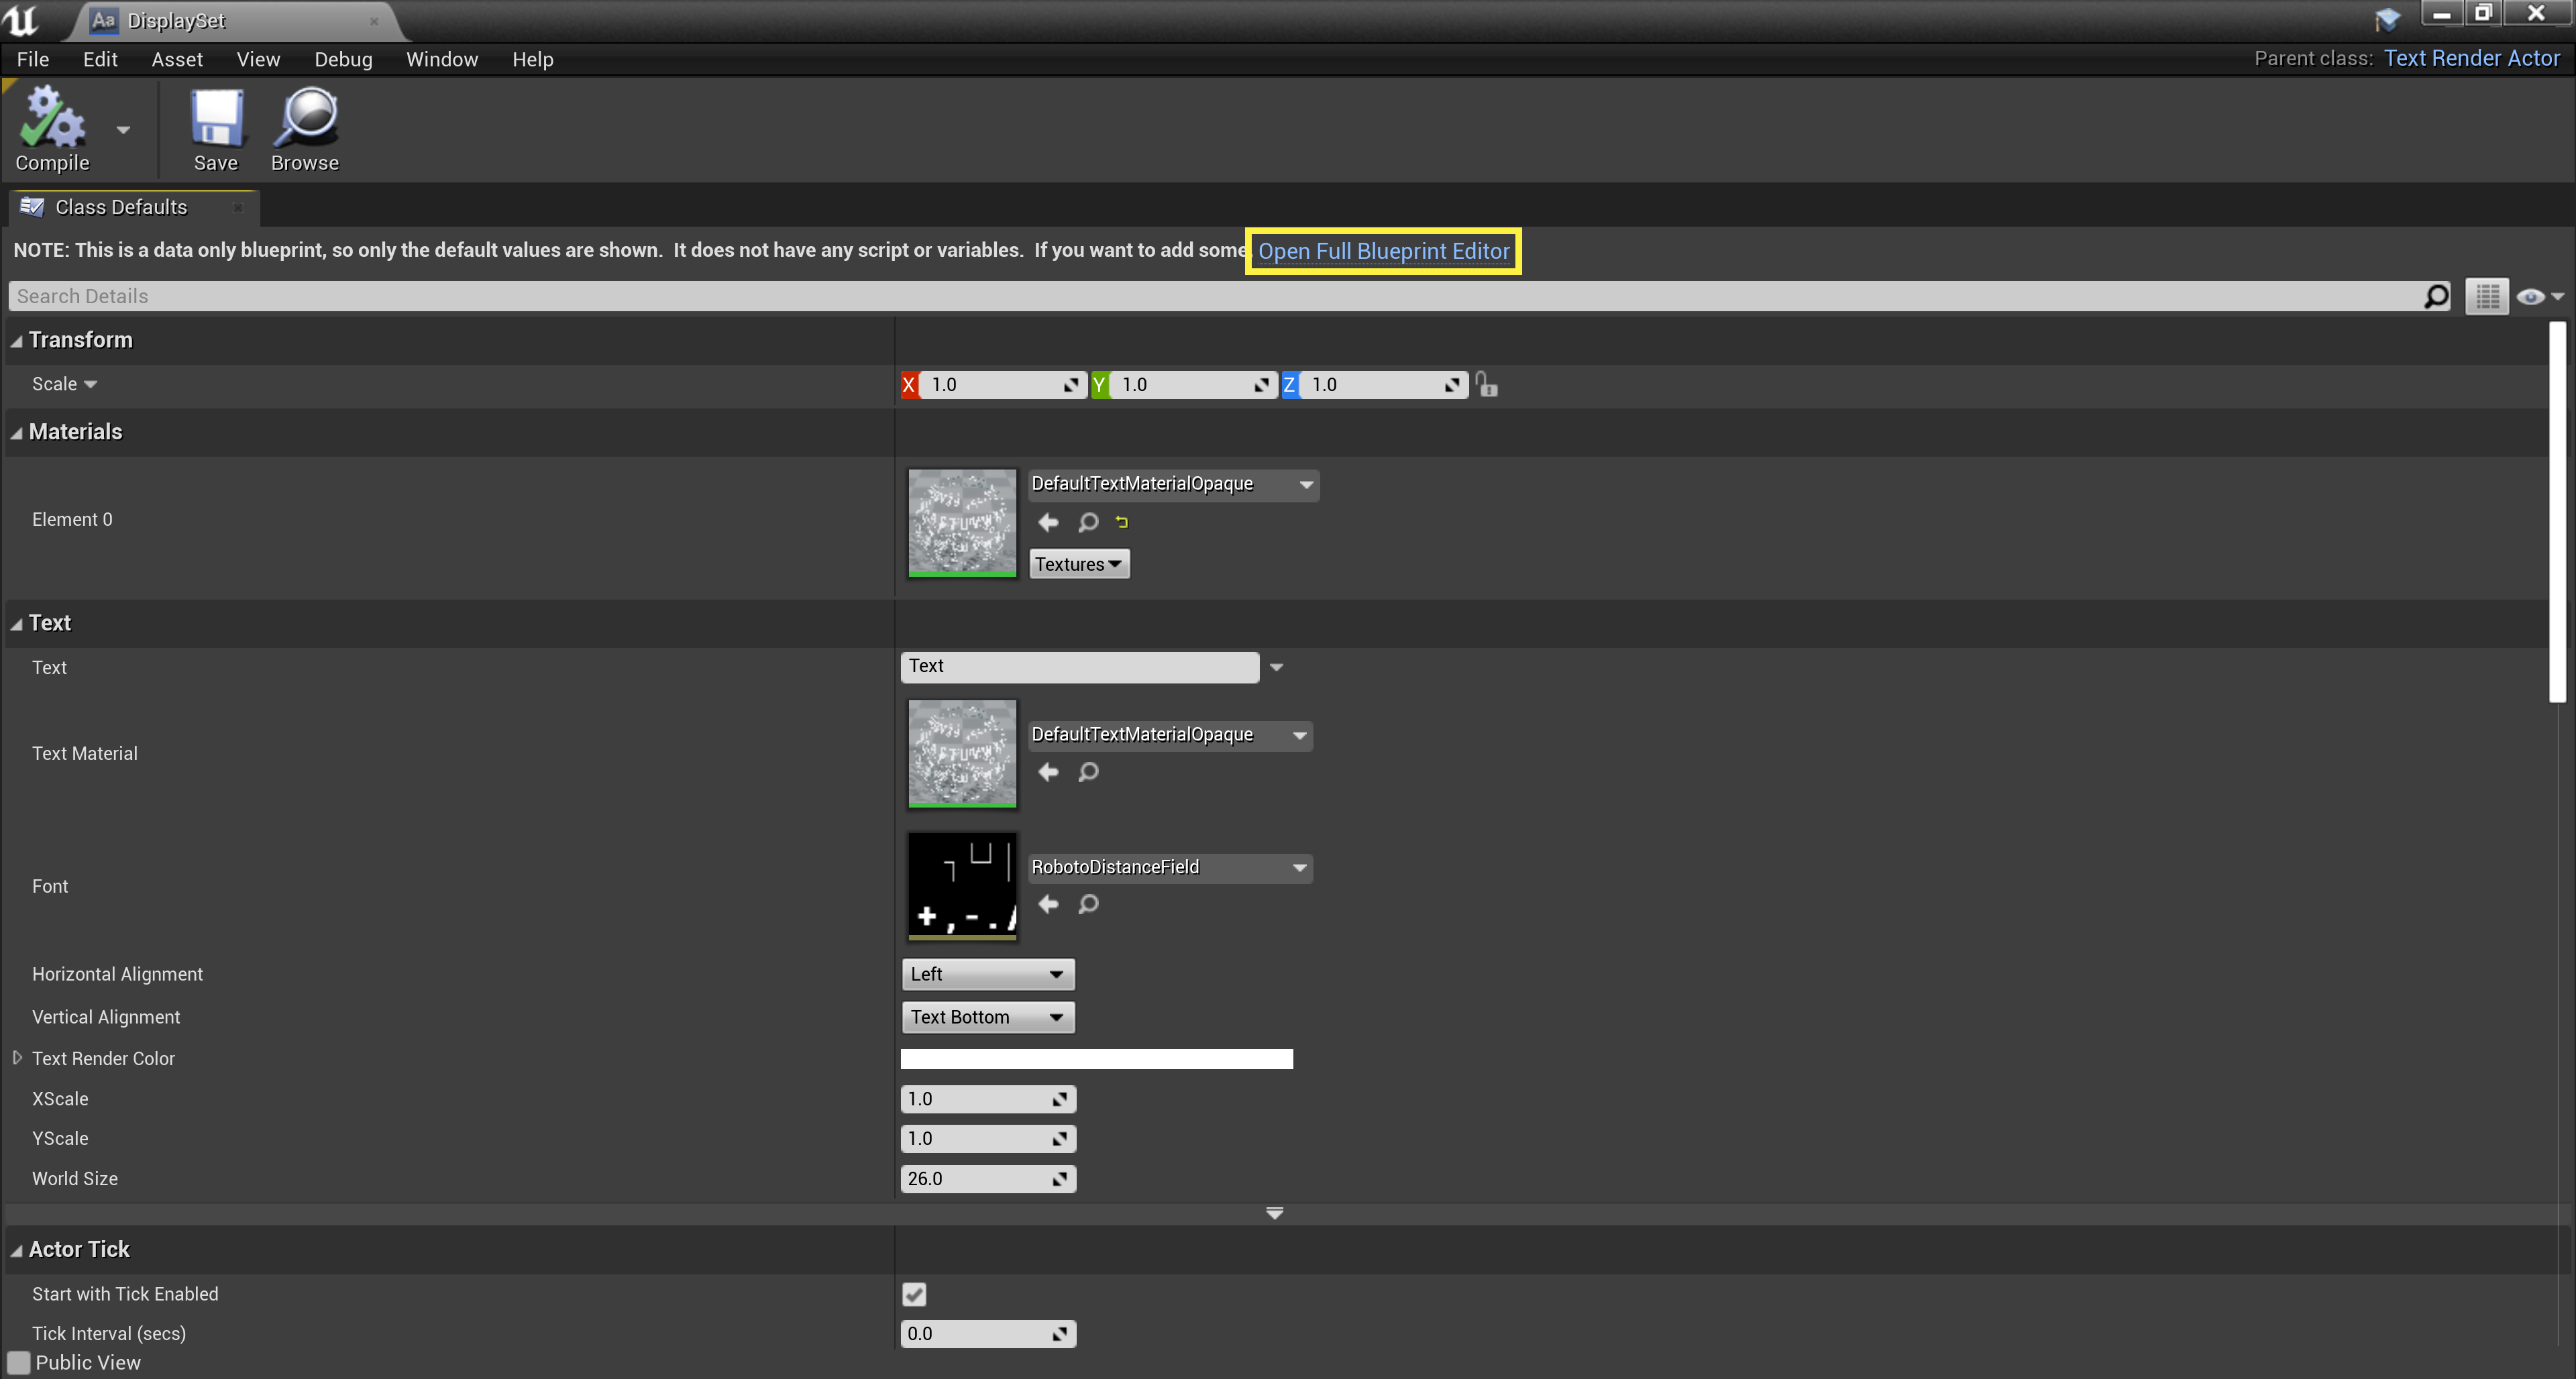
If you see the following screen, go ahead and click the Open Full Blueprint Editor link to get started.
![Step2_2.png]()
Click for full image.
-
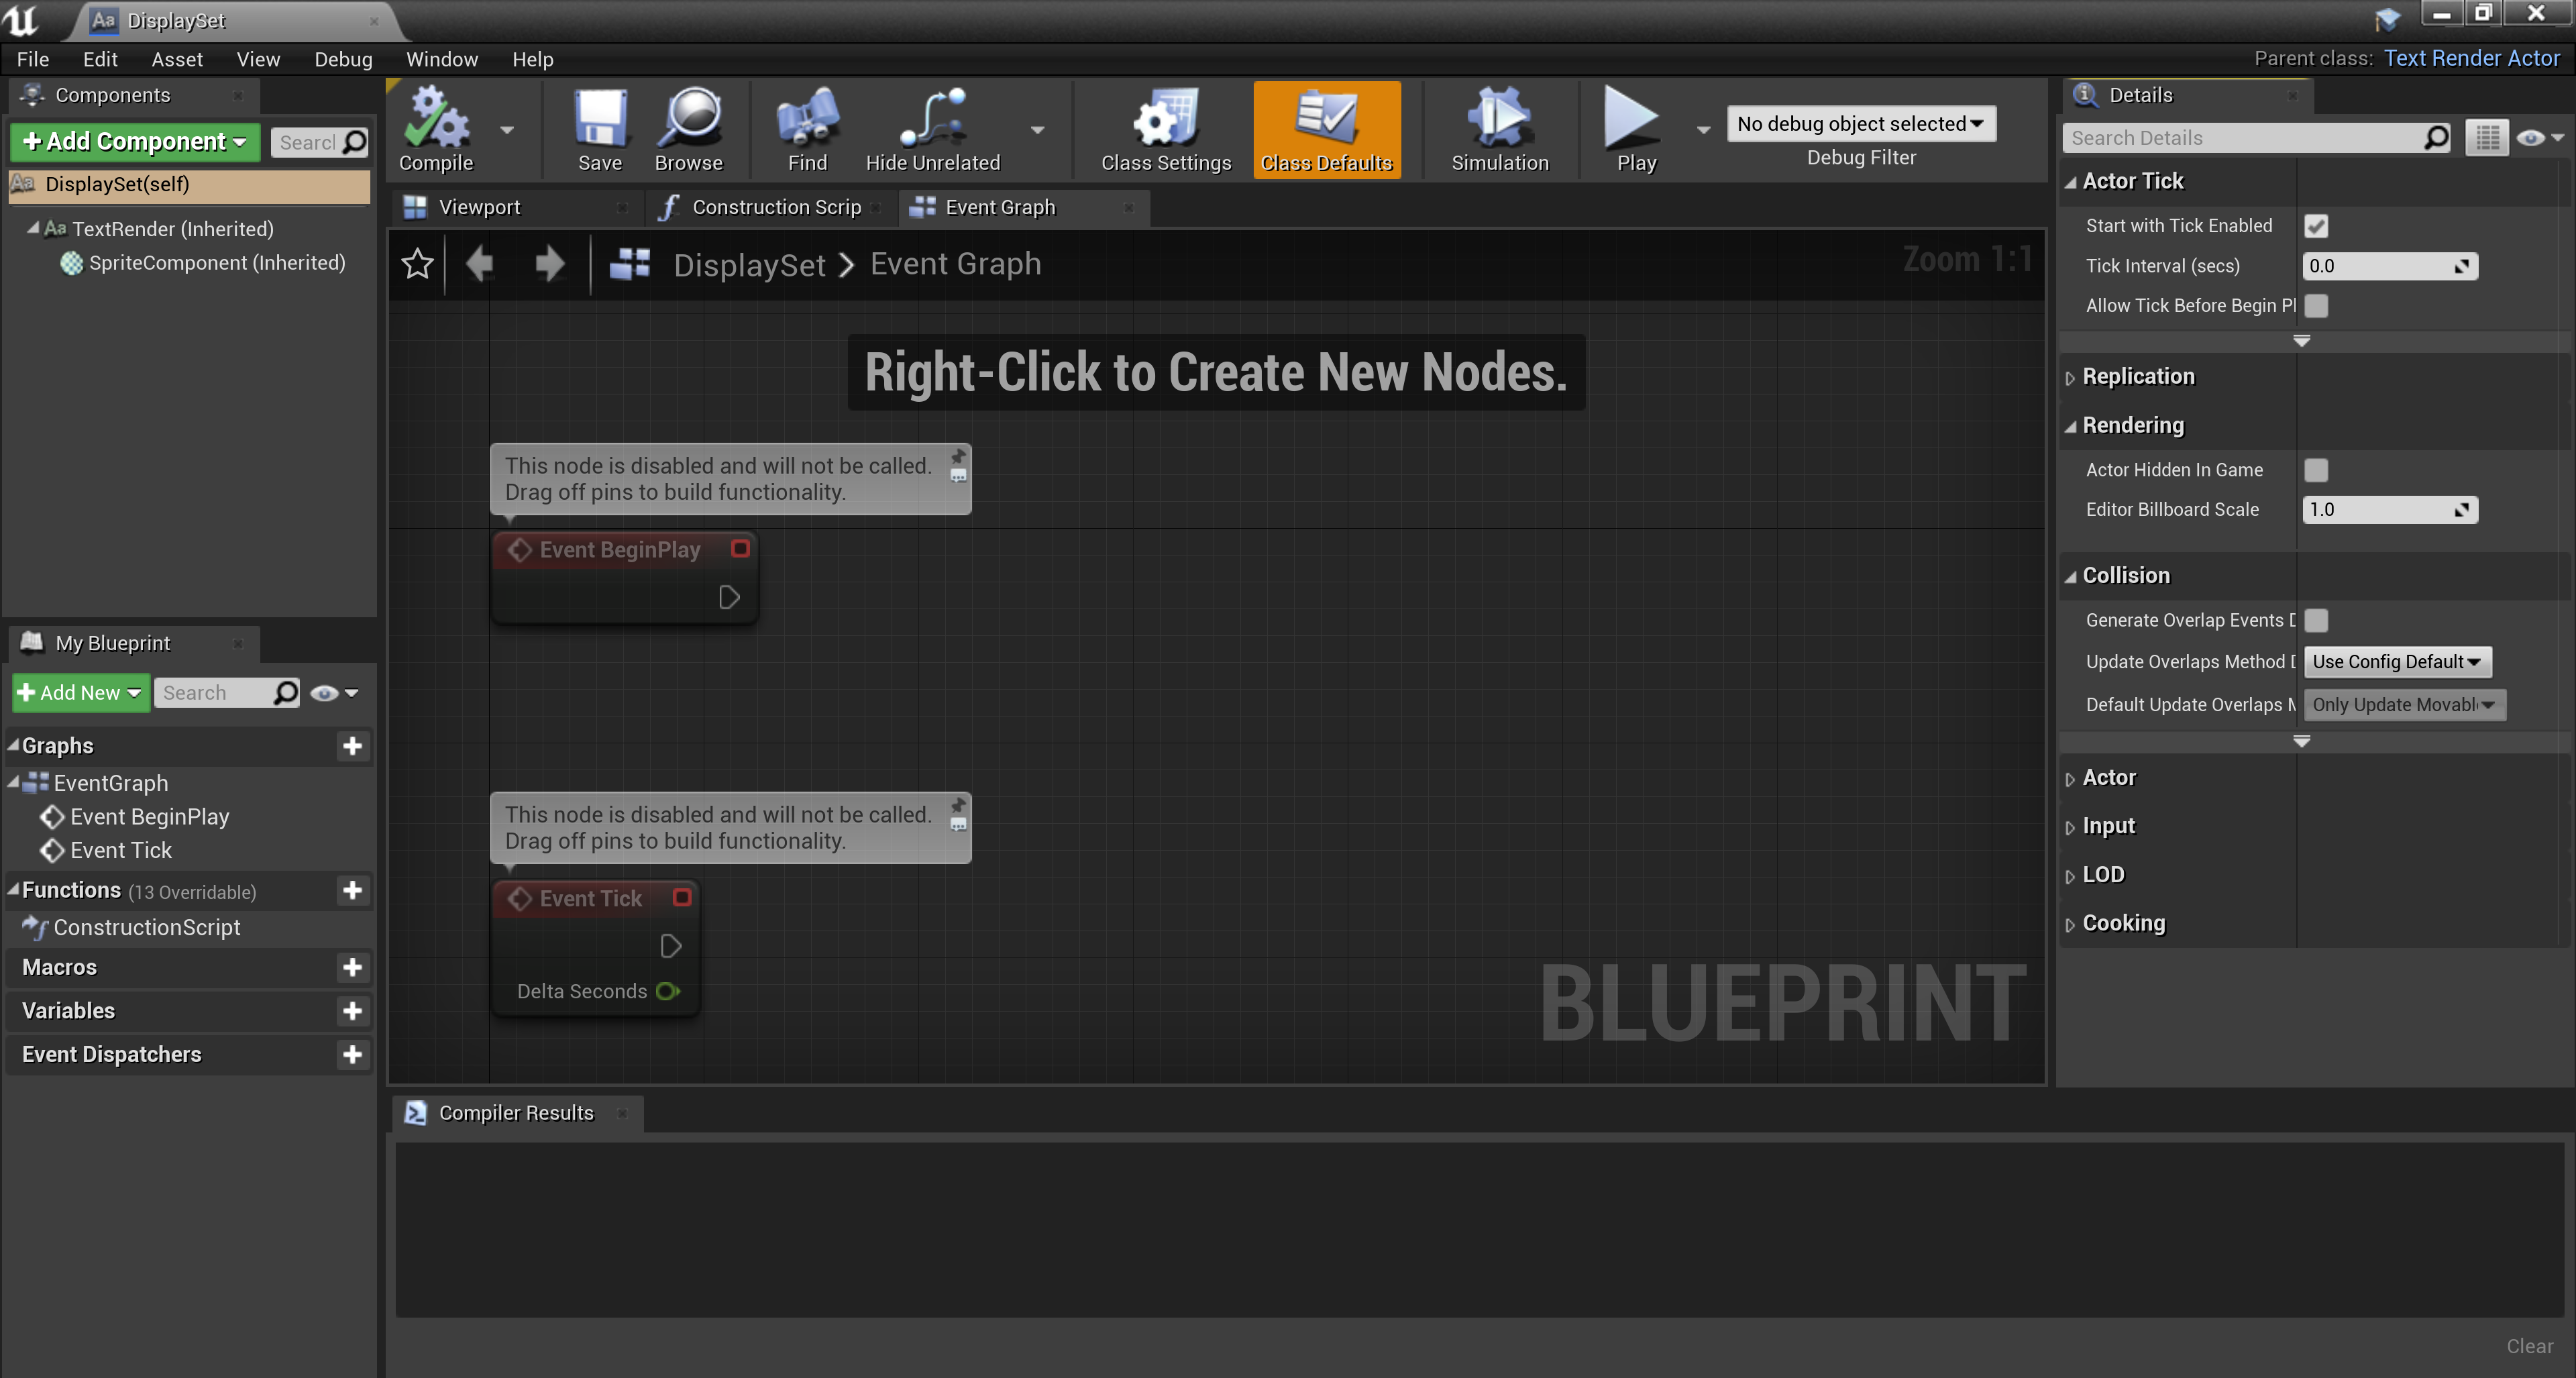
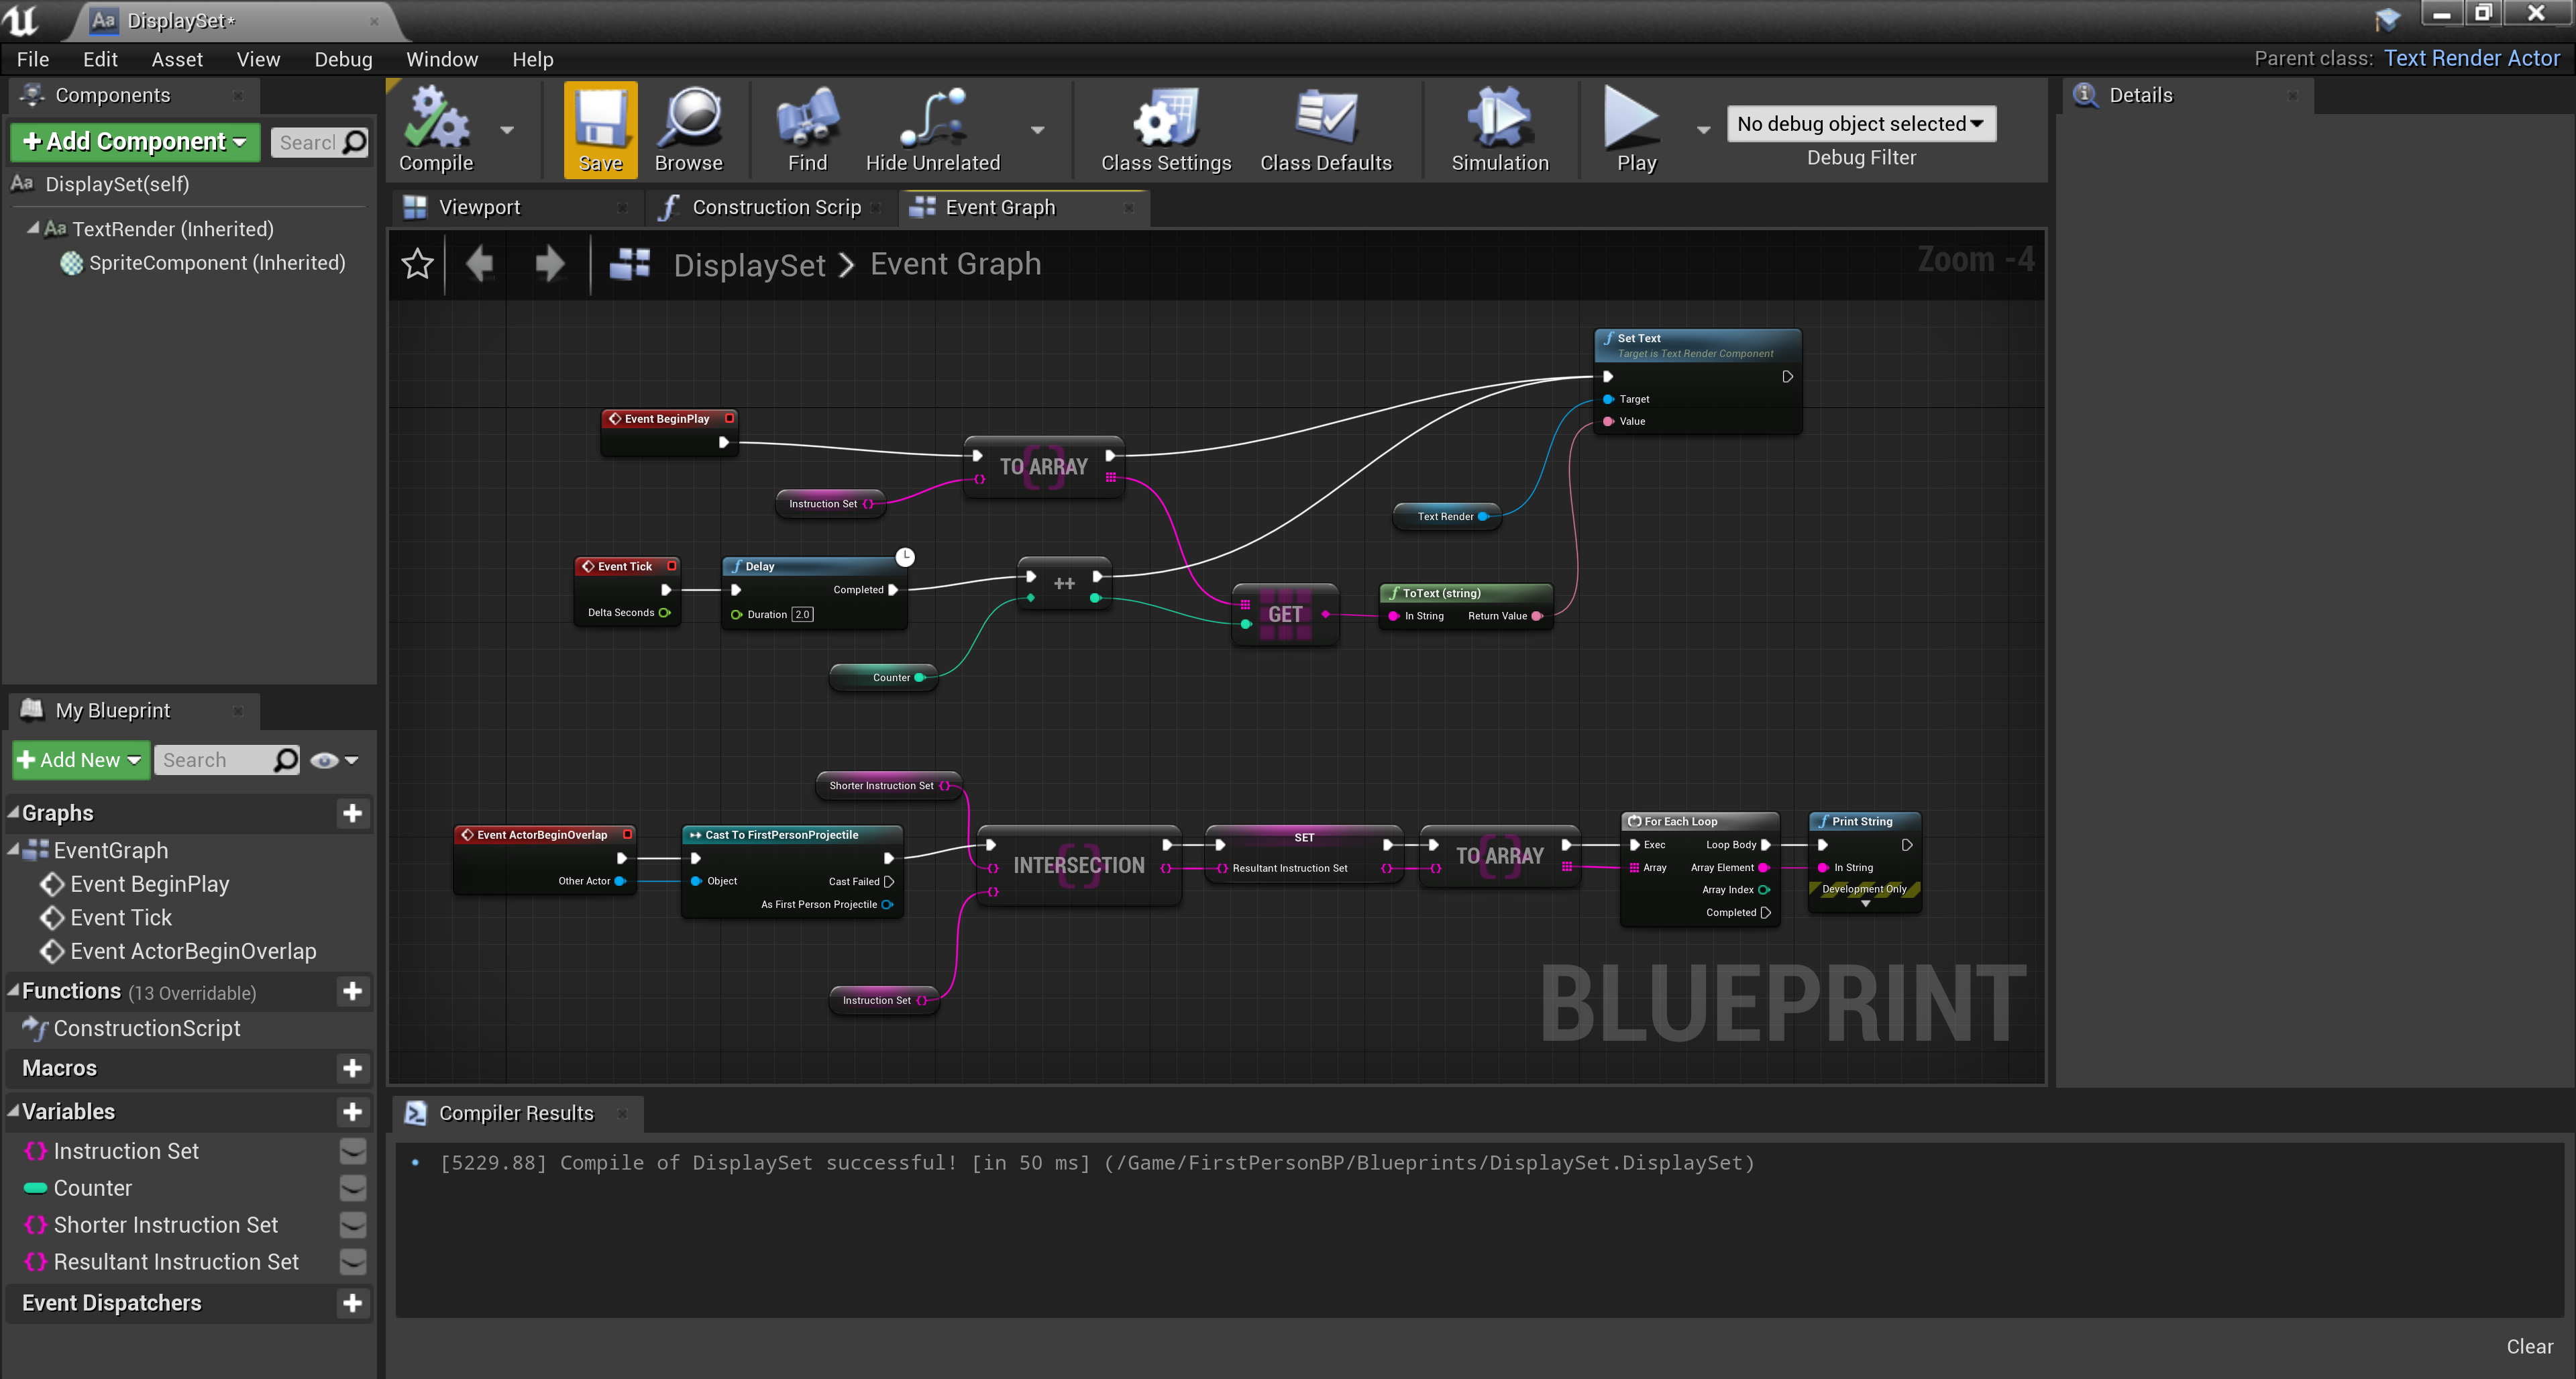
You should see the Display Set TextRender Actor Blueprint Event Graph , where you'll be able to add a Blueprint Set and its diplay logic.
![Step2_3.png]()
Click for full image.
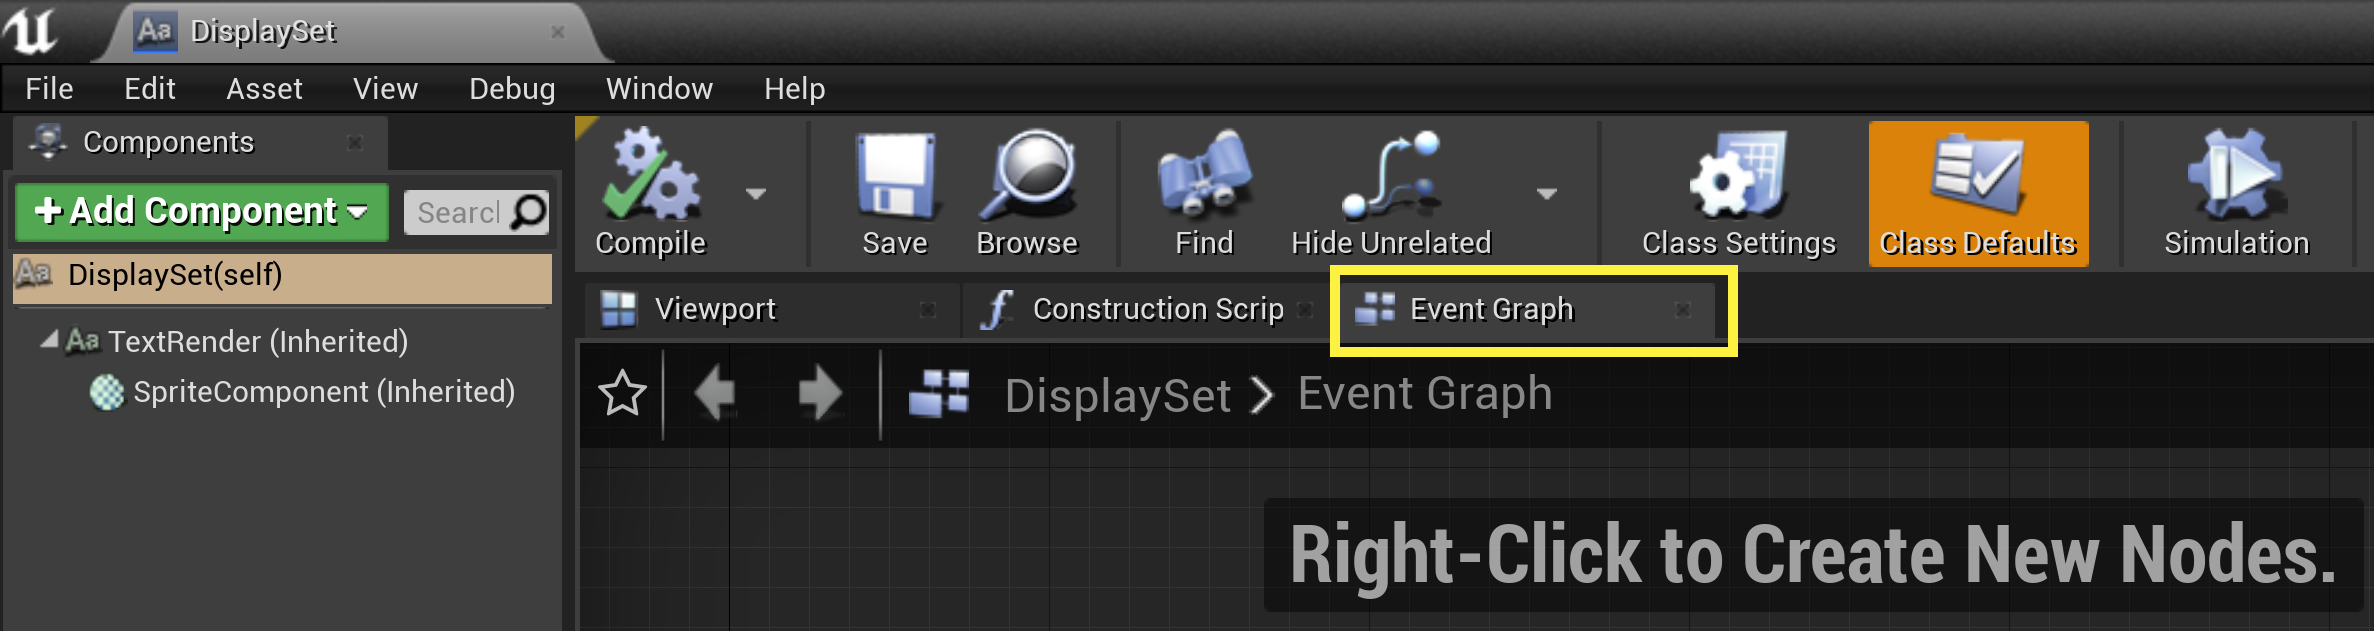
If you don't see the aforementioned screen, go ahead and click the Event Graph tab to open the Actor's Blueprint Event Graph Editor.
![Step2_3Note.png]()
Click for full image.
-
Now is the time to create a Blueprint Set container, where you'll store some items that you'll display later on. To create a new Blueprint Set, click the + Add New button (located in the My Blueprint panel) and select Variable from the drop-down list.
![Step2_4.png]()
Click for full image.
-
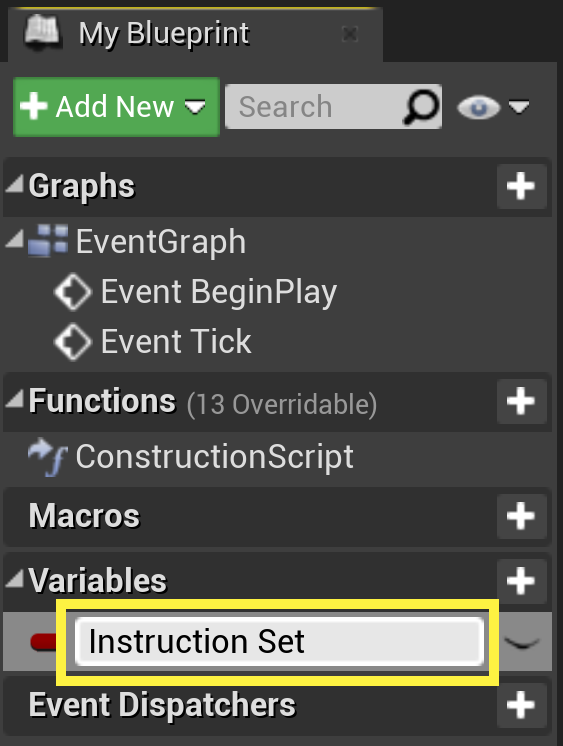
Name your new variable,
Instruction Set.![Step2_5.png]()
-
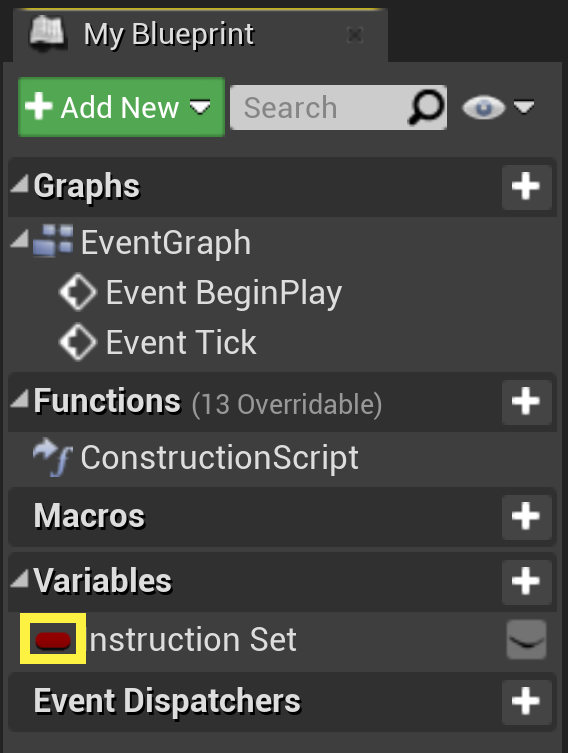
Click the variable's pin type button, which is located next to the variable's name.
![Step2_6.png]()
-
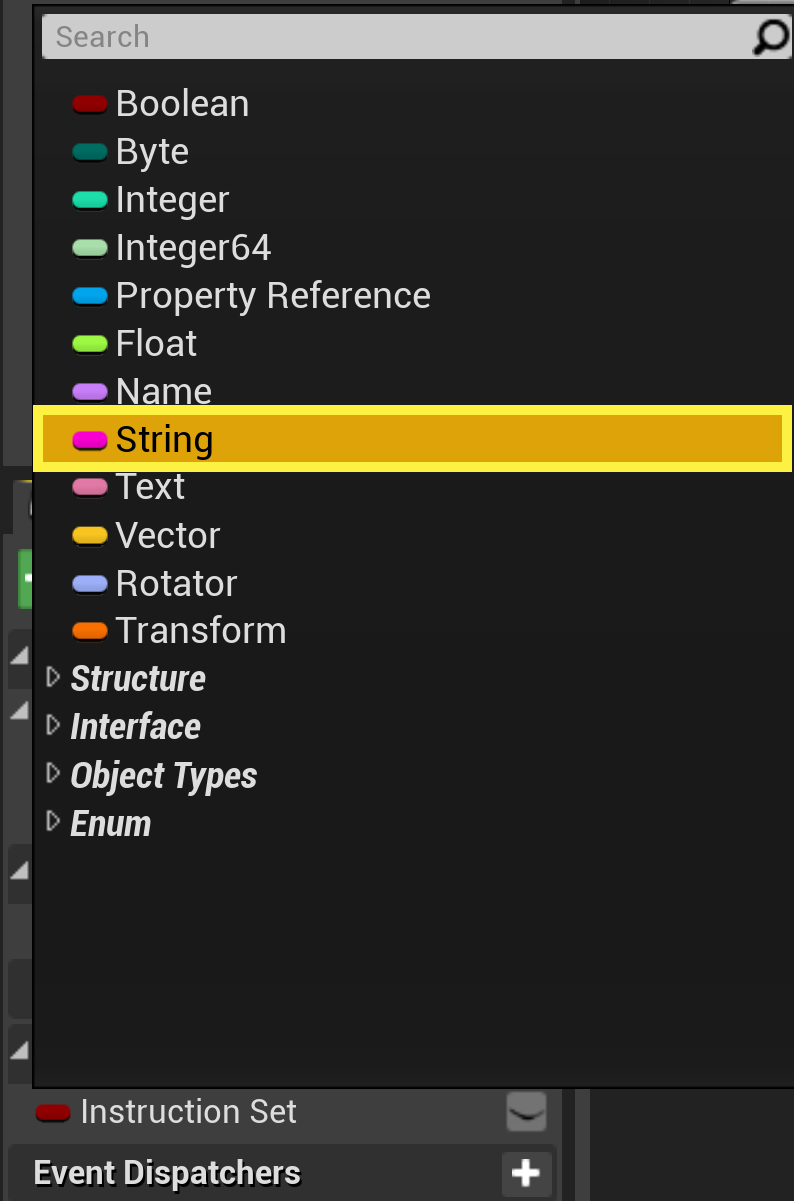
Now, select the String variable type from the drop-down list.
![Step2_7.png]()
-
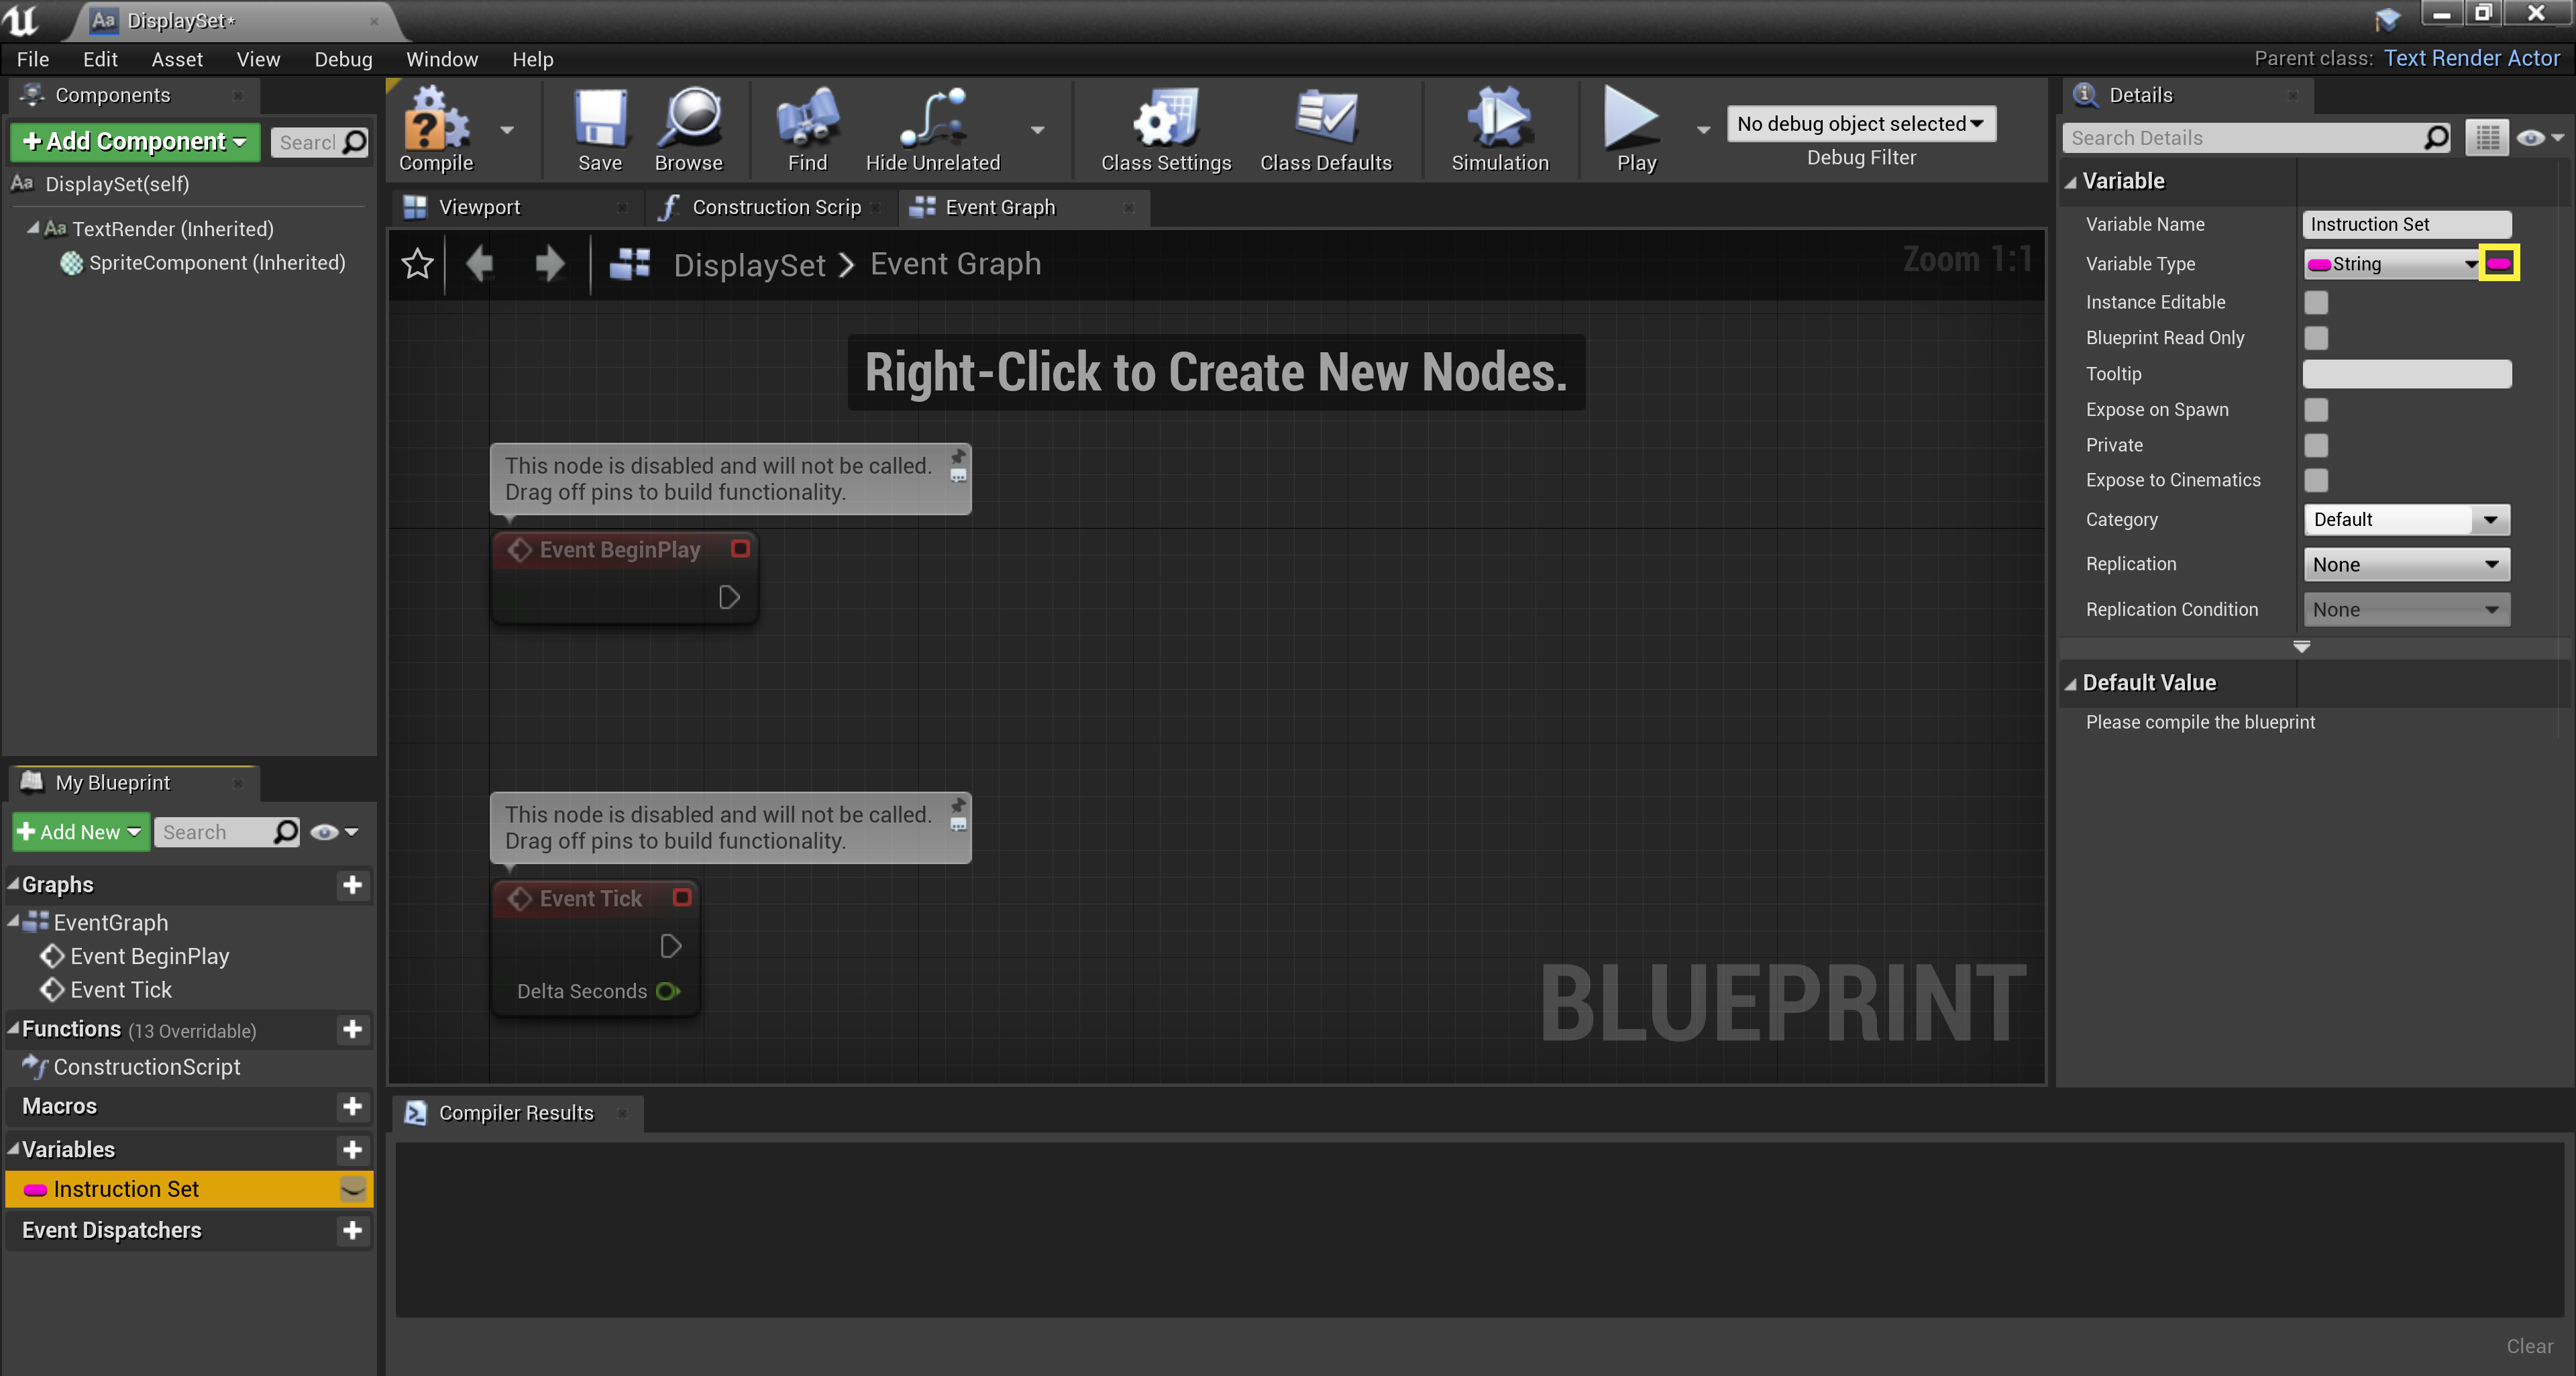
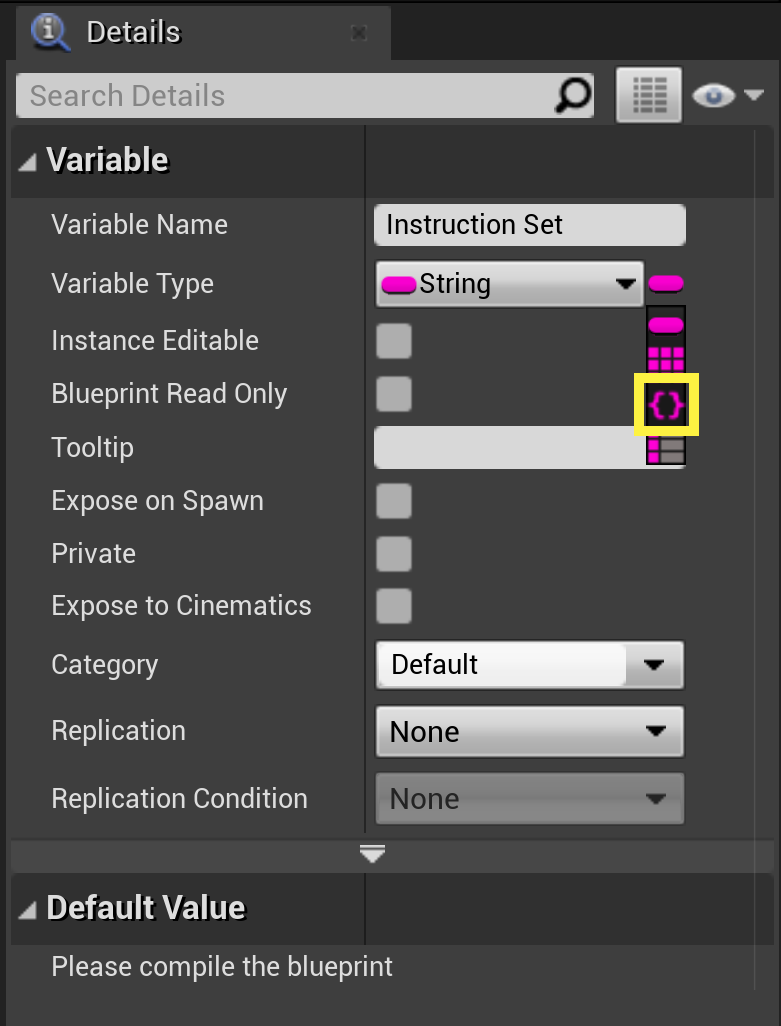
Click the variable's container type button, which is located next to the Variable Type drop-down list in the Details panel.
![Step2_8.png]()
Click for full image.
-
Now, select the Set container type from the drop-down list.
![Step2_9.png]()
-
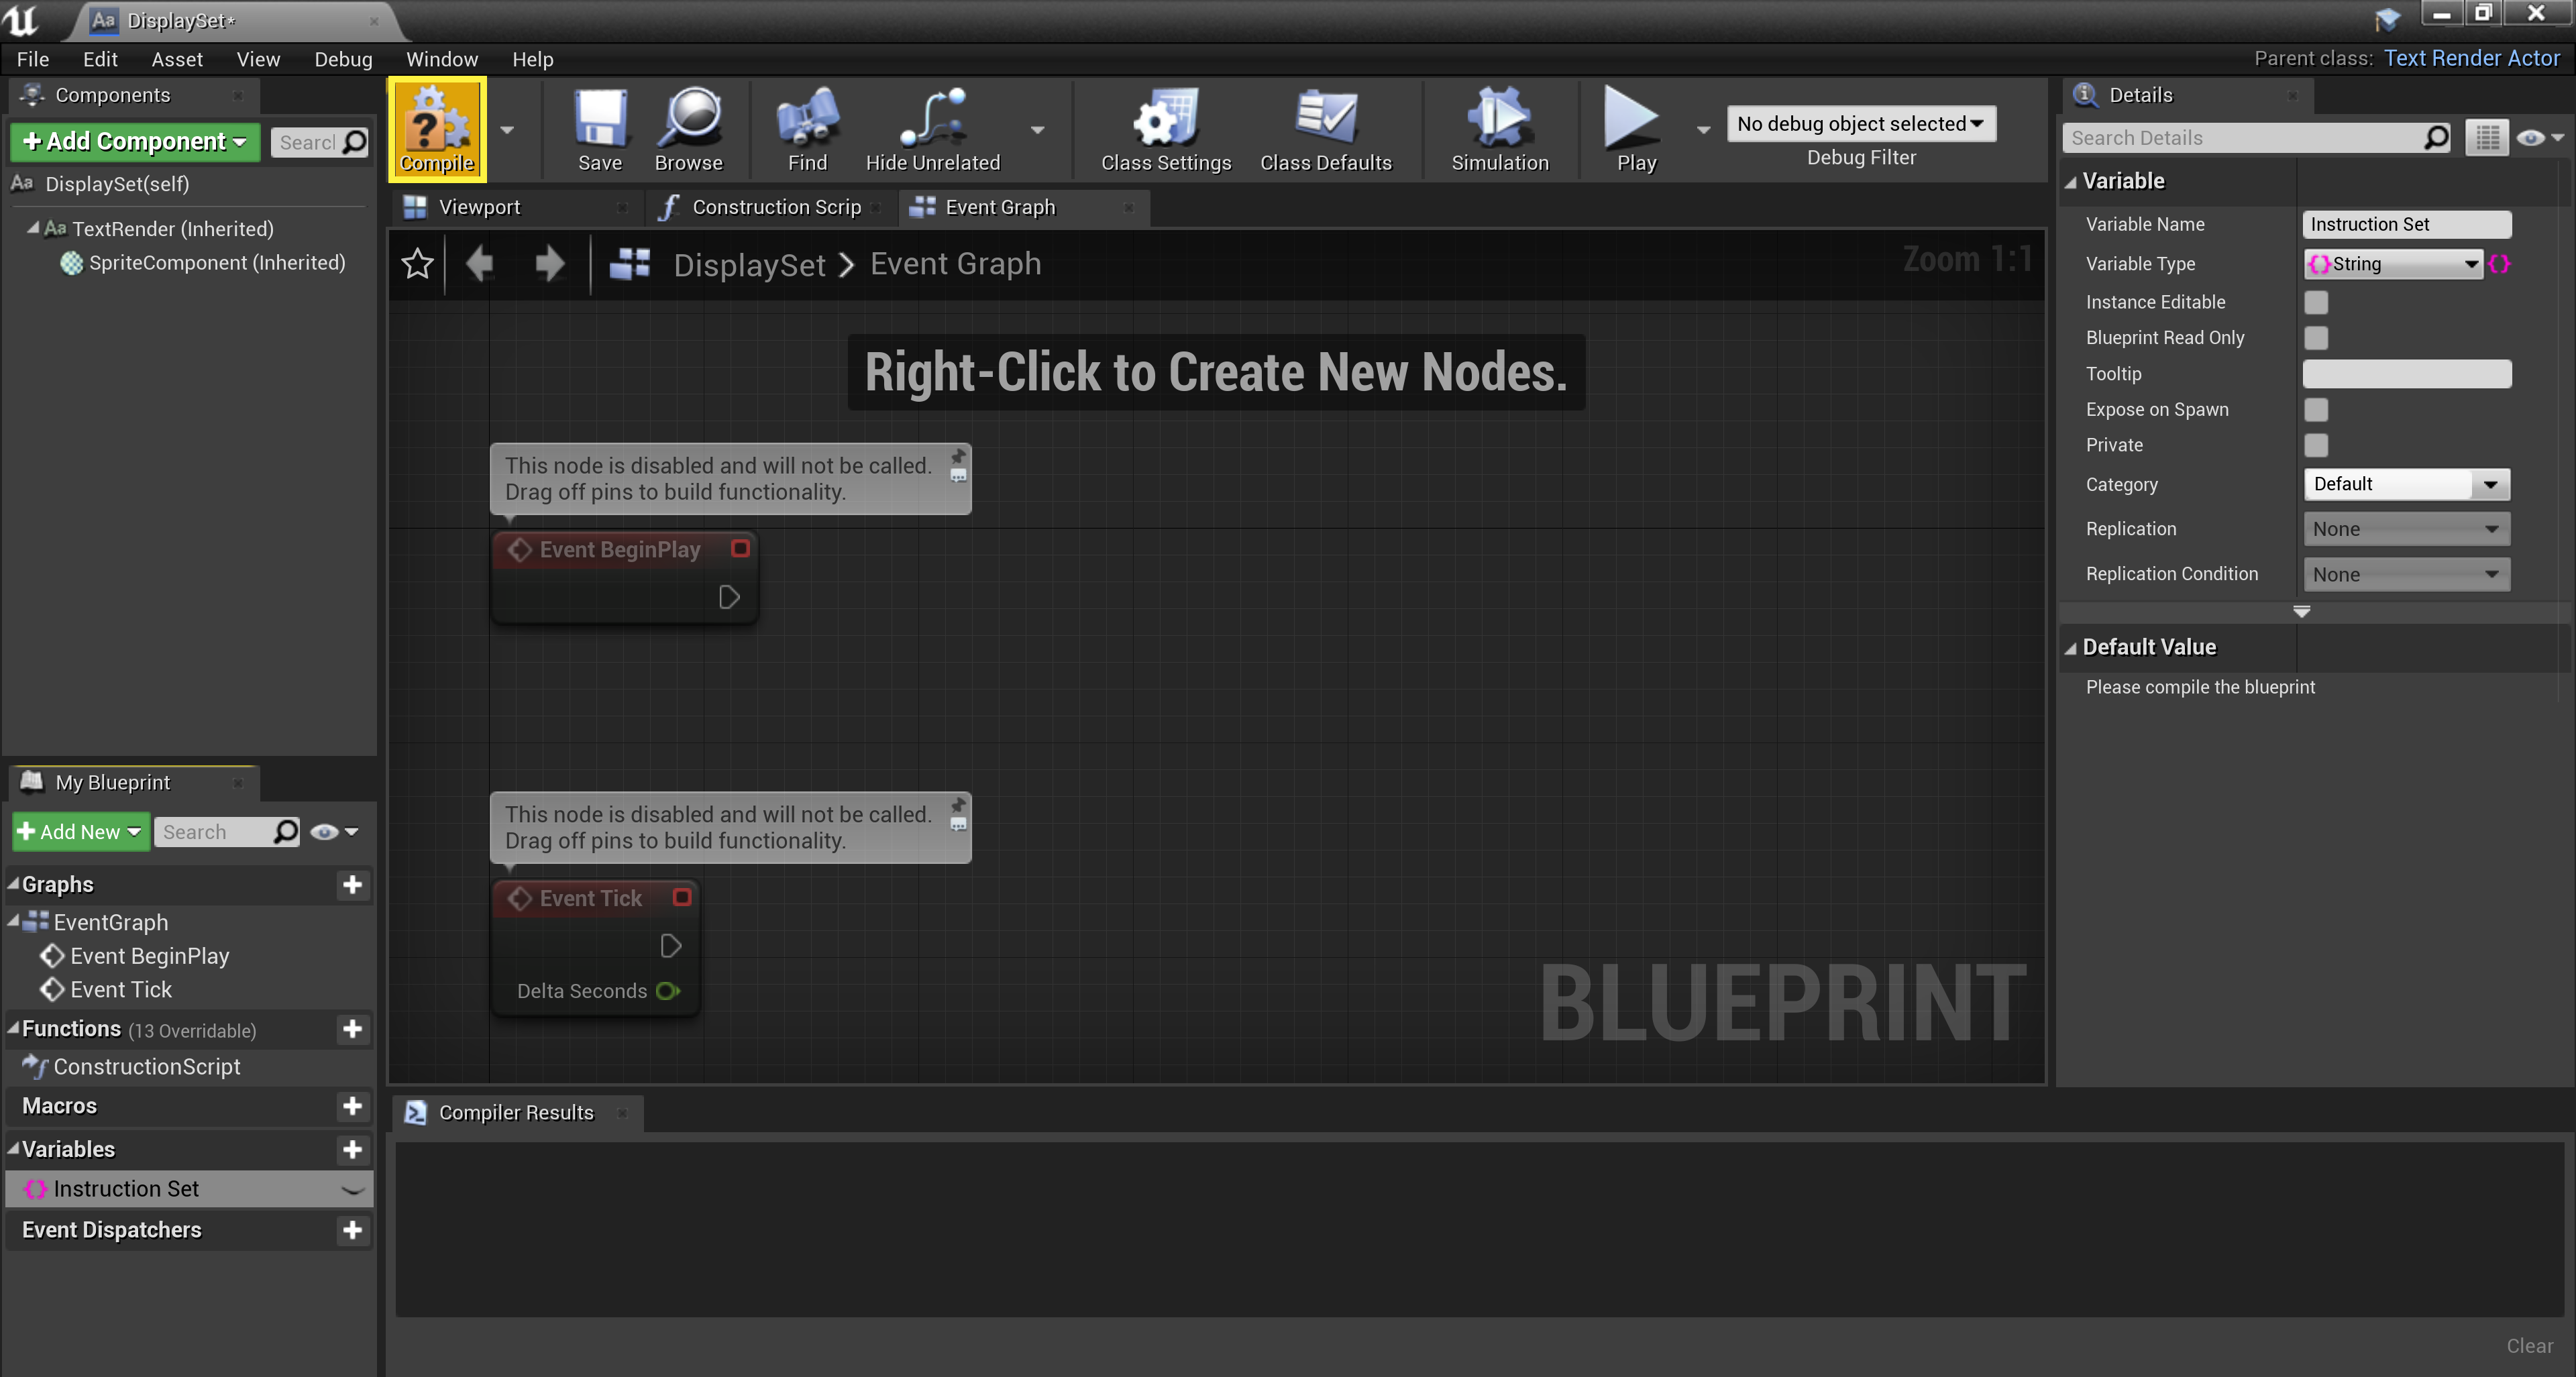
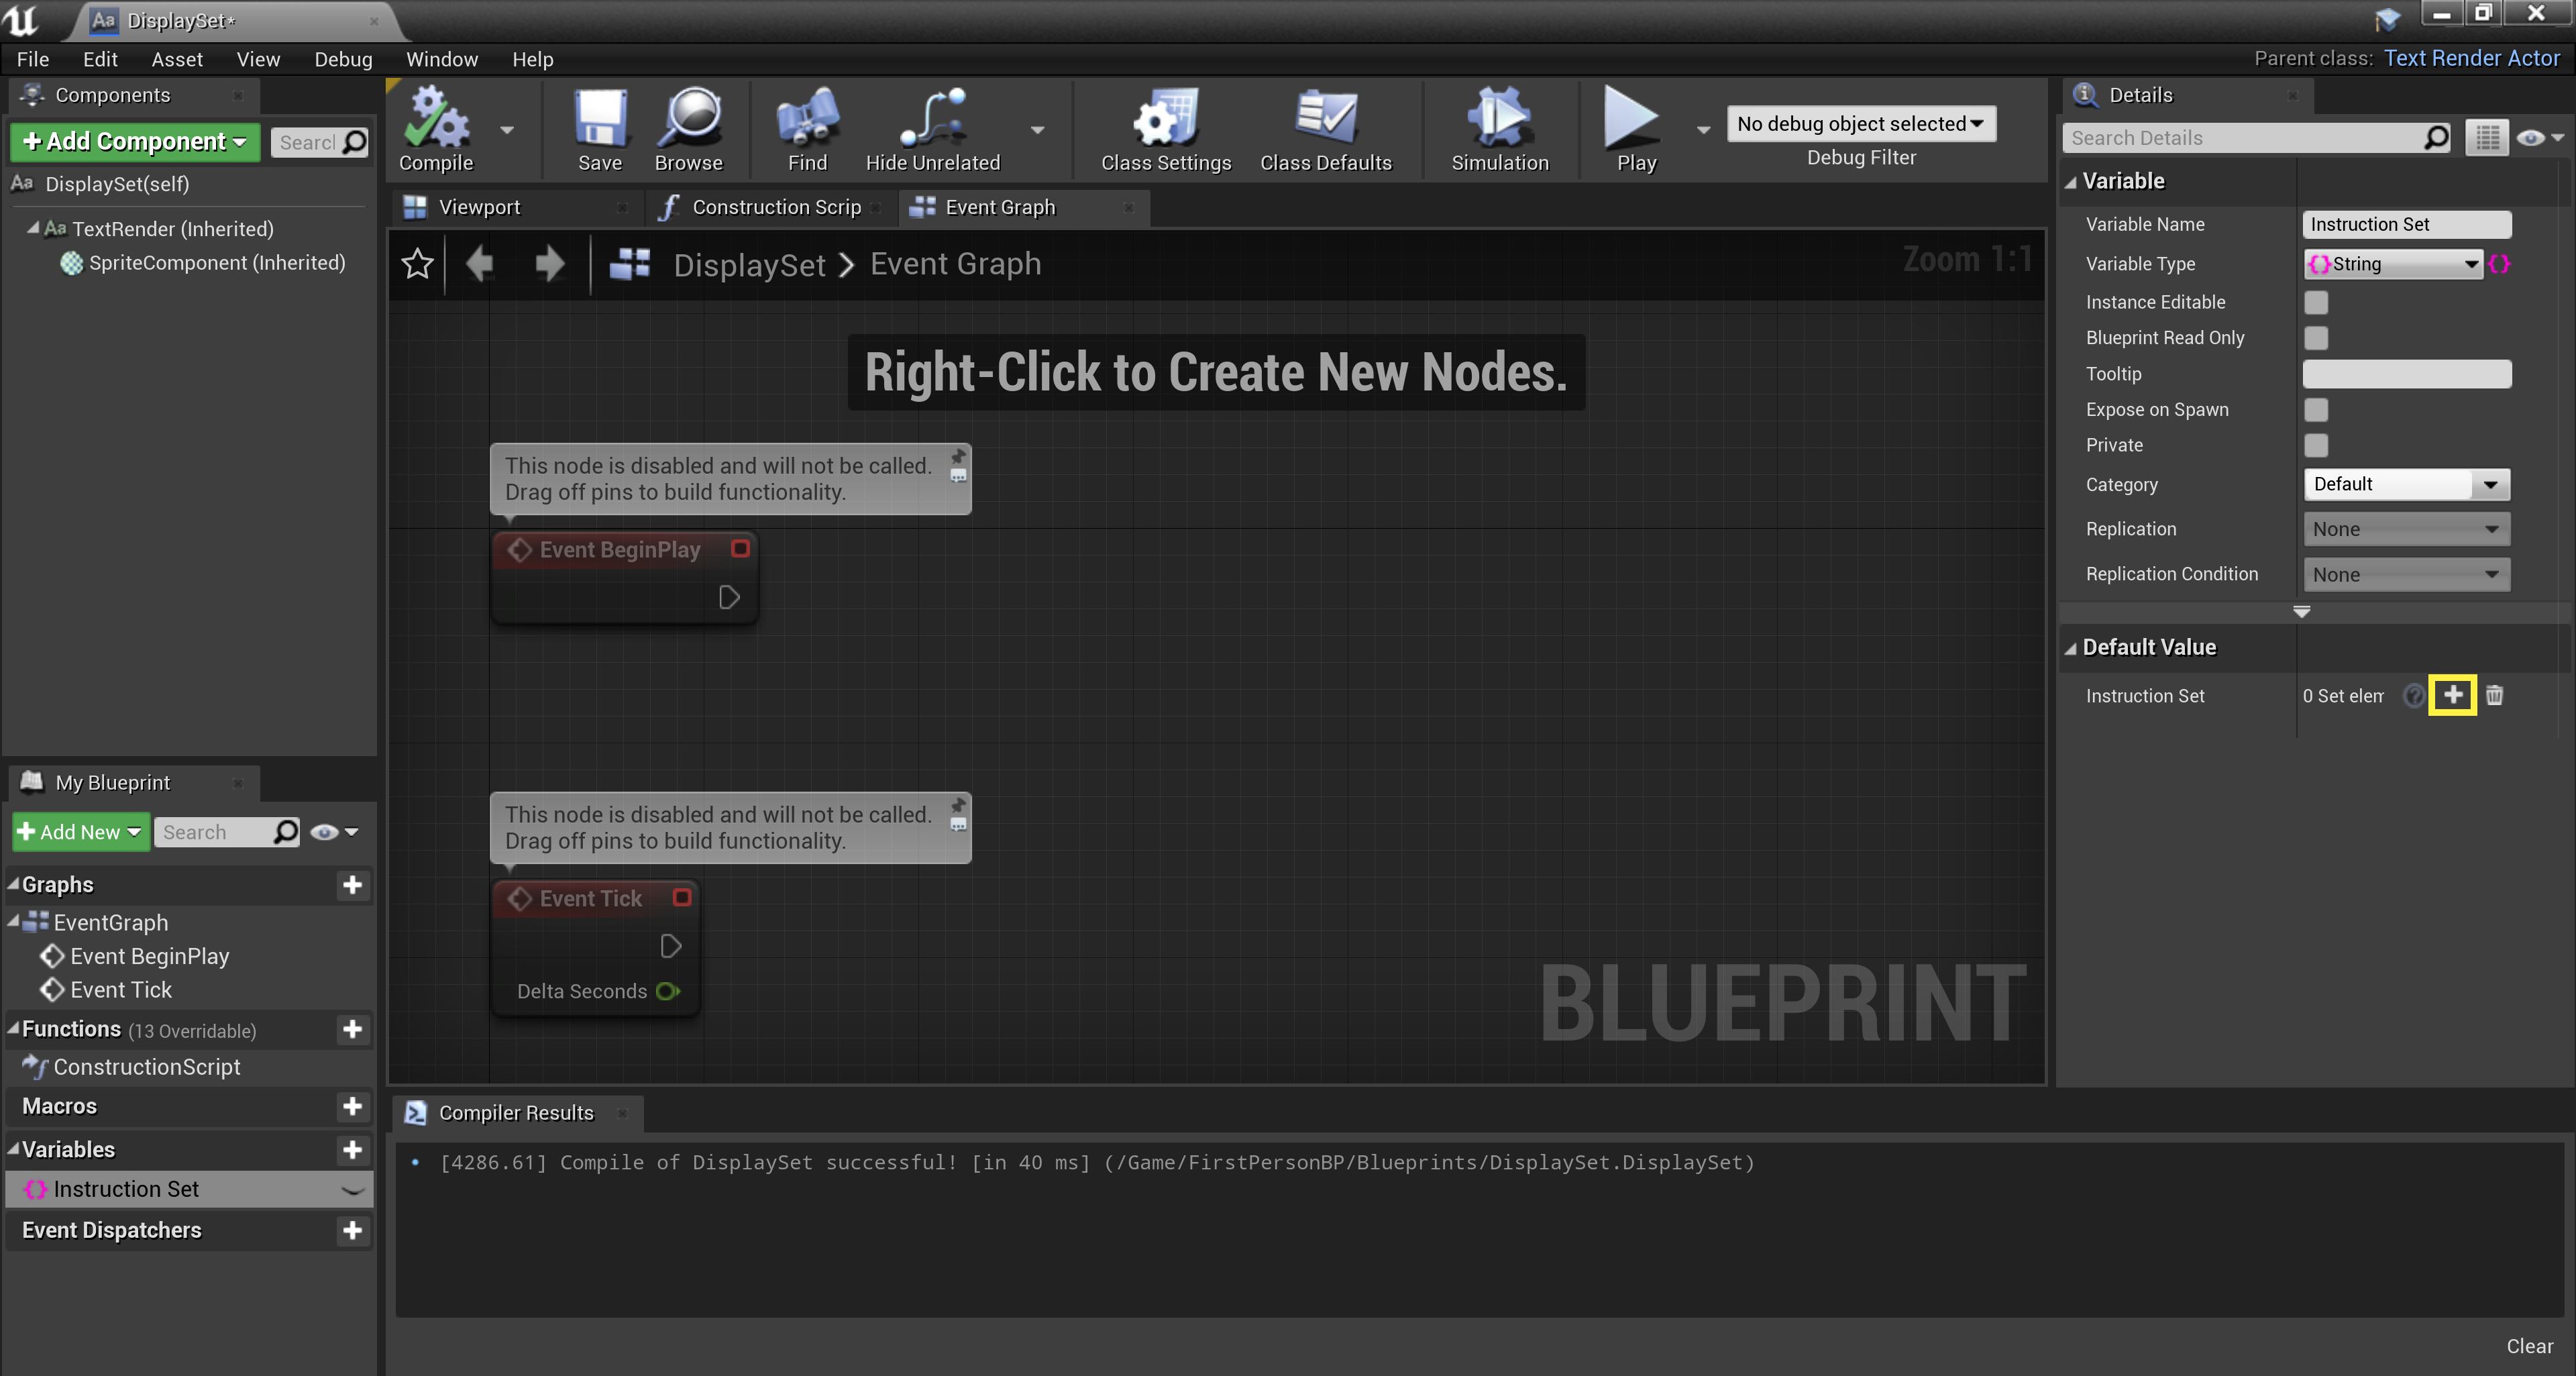
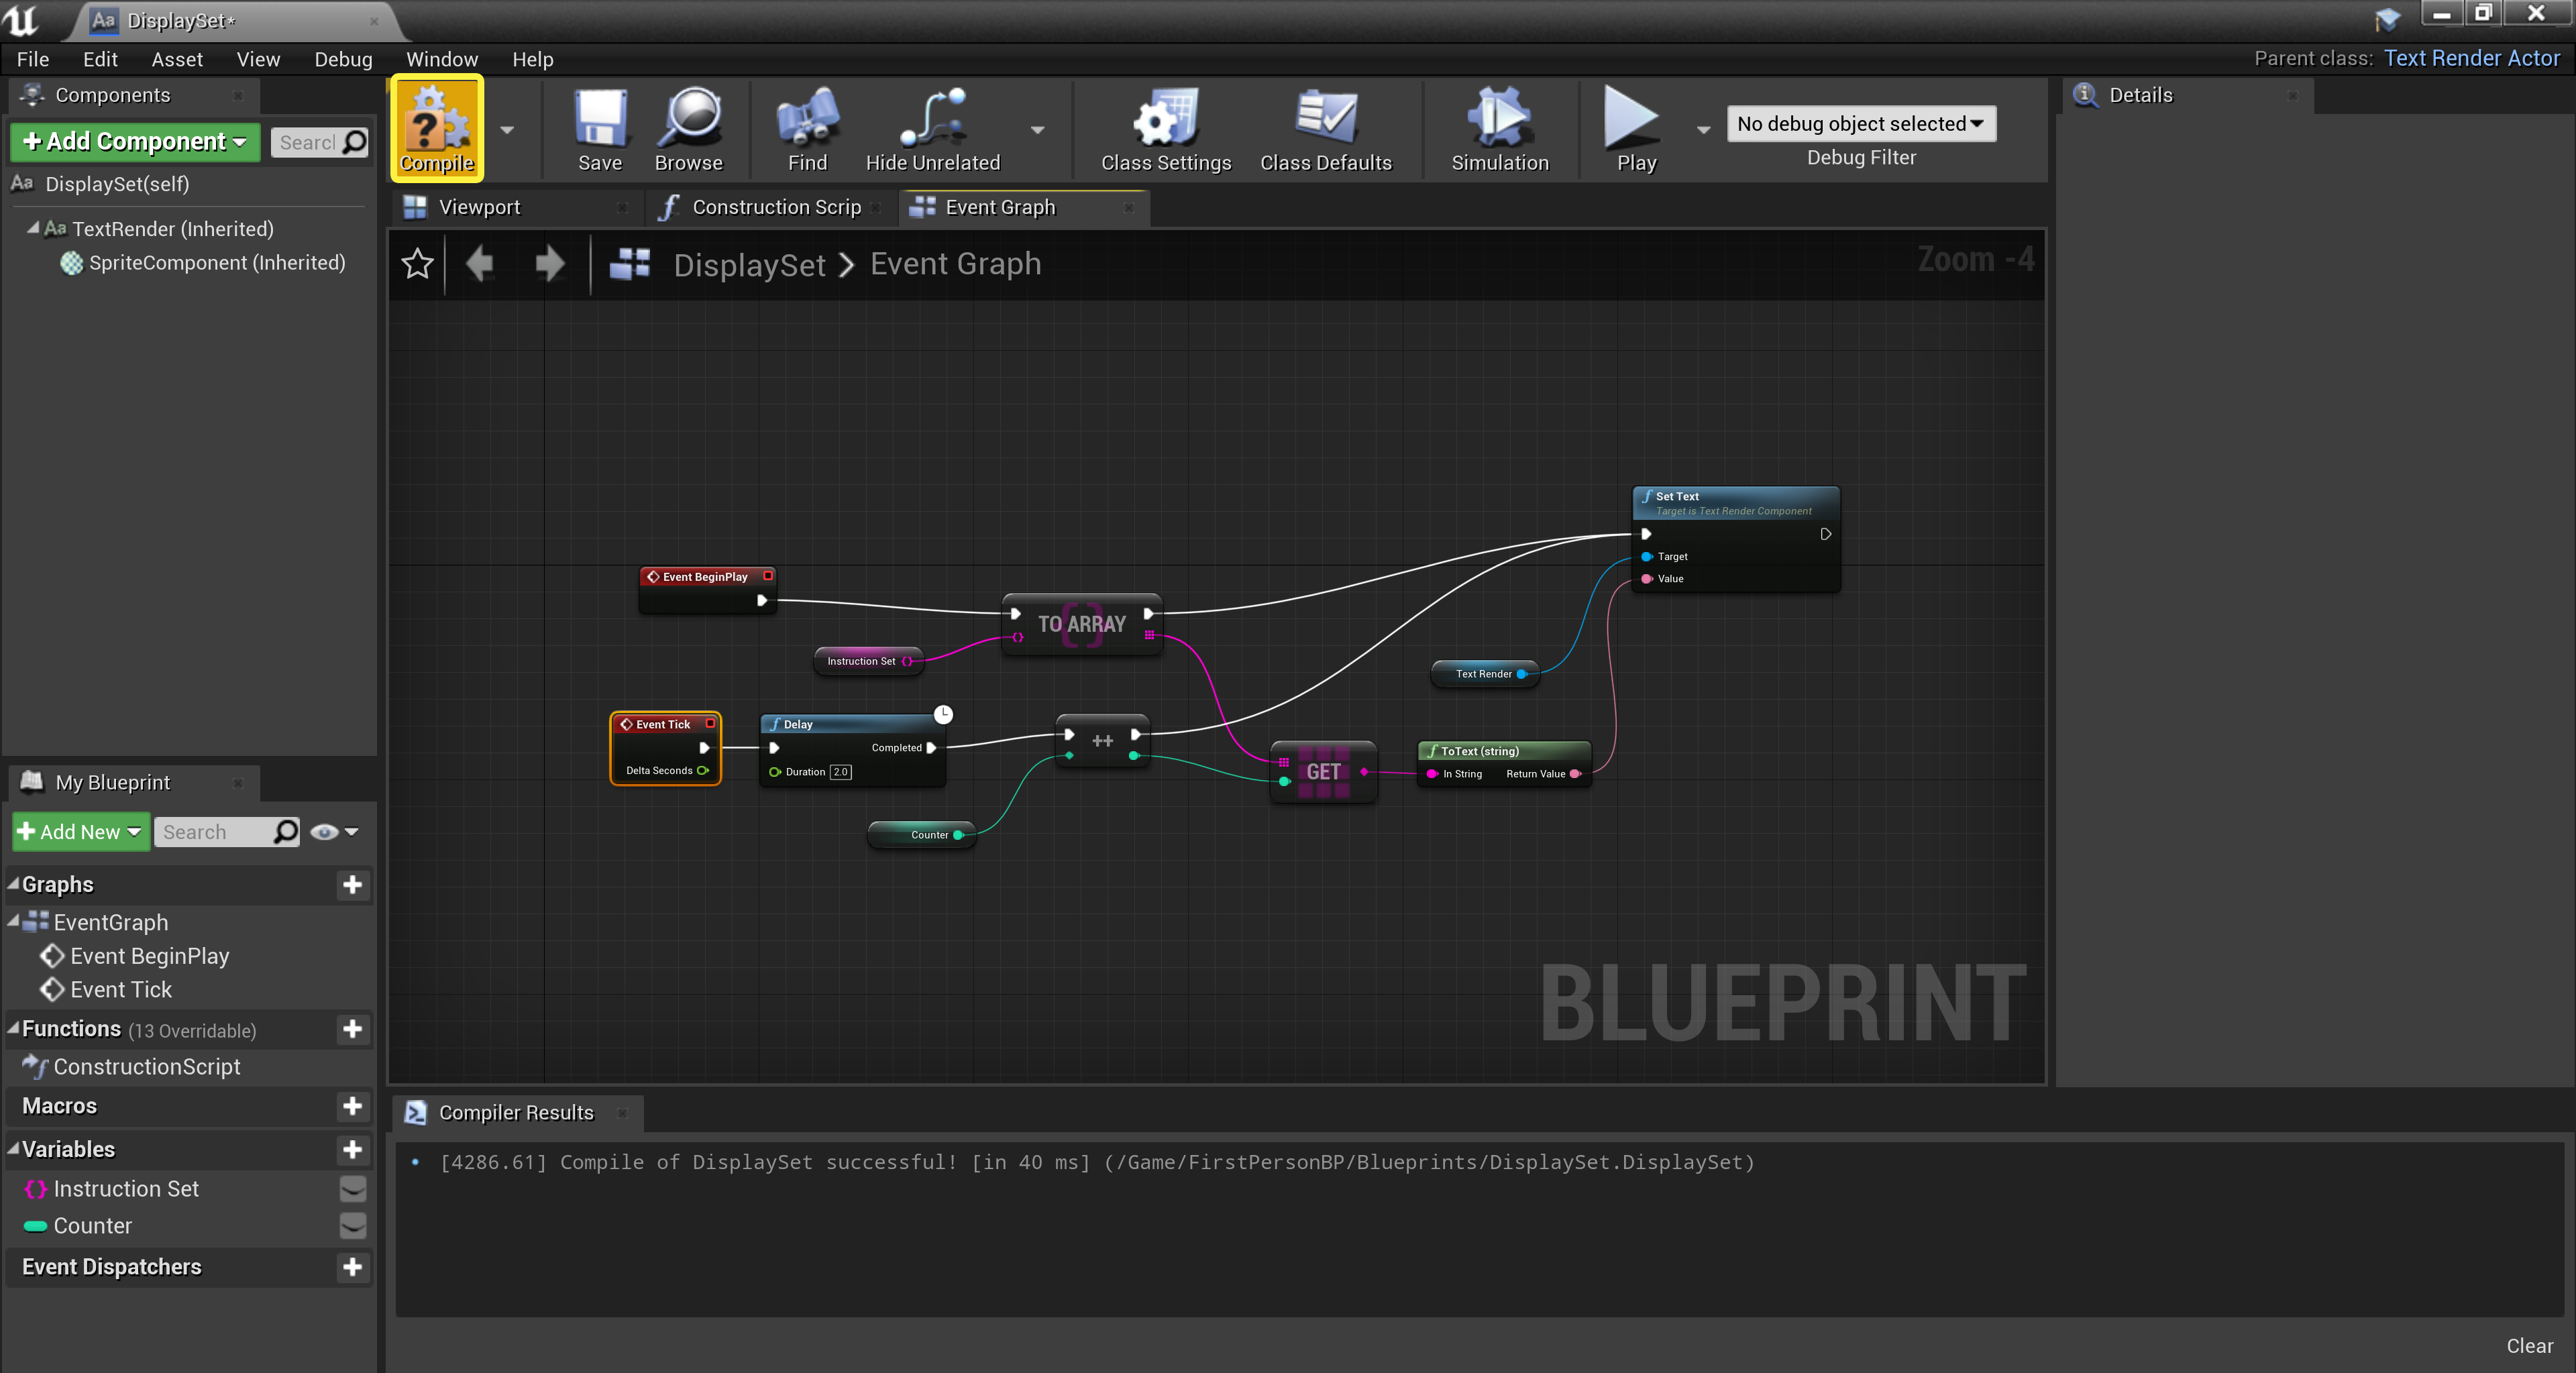
At this point, the Blueprint Graph reminds you that you need to compile the Blueprint in order to define the items that you're going to store inside of the container. Go ahead and click the Compile button to get started.
![Step2_10.png]()
Click for full image.
Compiling the Blueprint replaces the container's Default Value message with an interface, enabling you to populate your container with unique items (or elements) of String type.
-
If you already haven't done so, go ahead and click the Save button to save all of the work that you've done so far.
![Step2_11.png]()
Click for full image.
In general, it's always a good practice to save early, and save often.
-
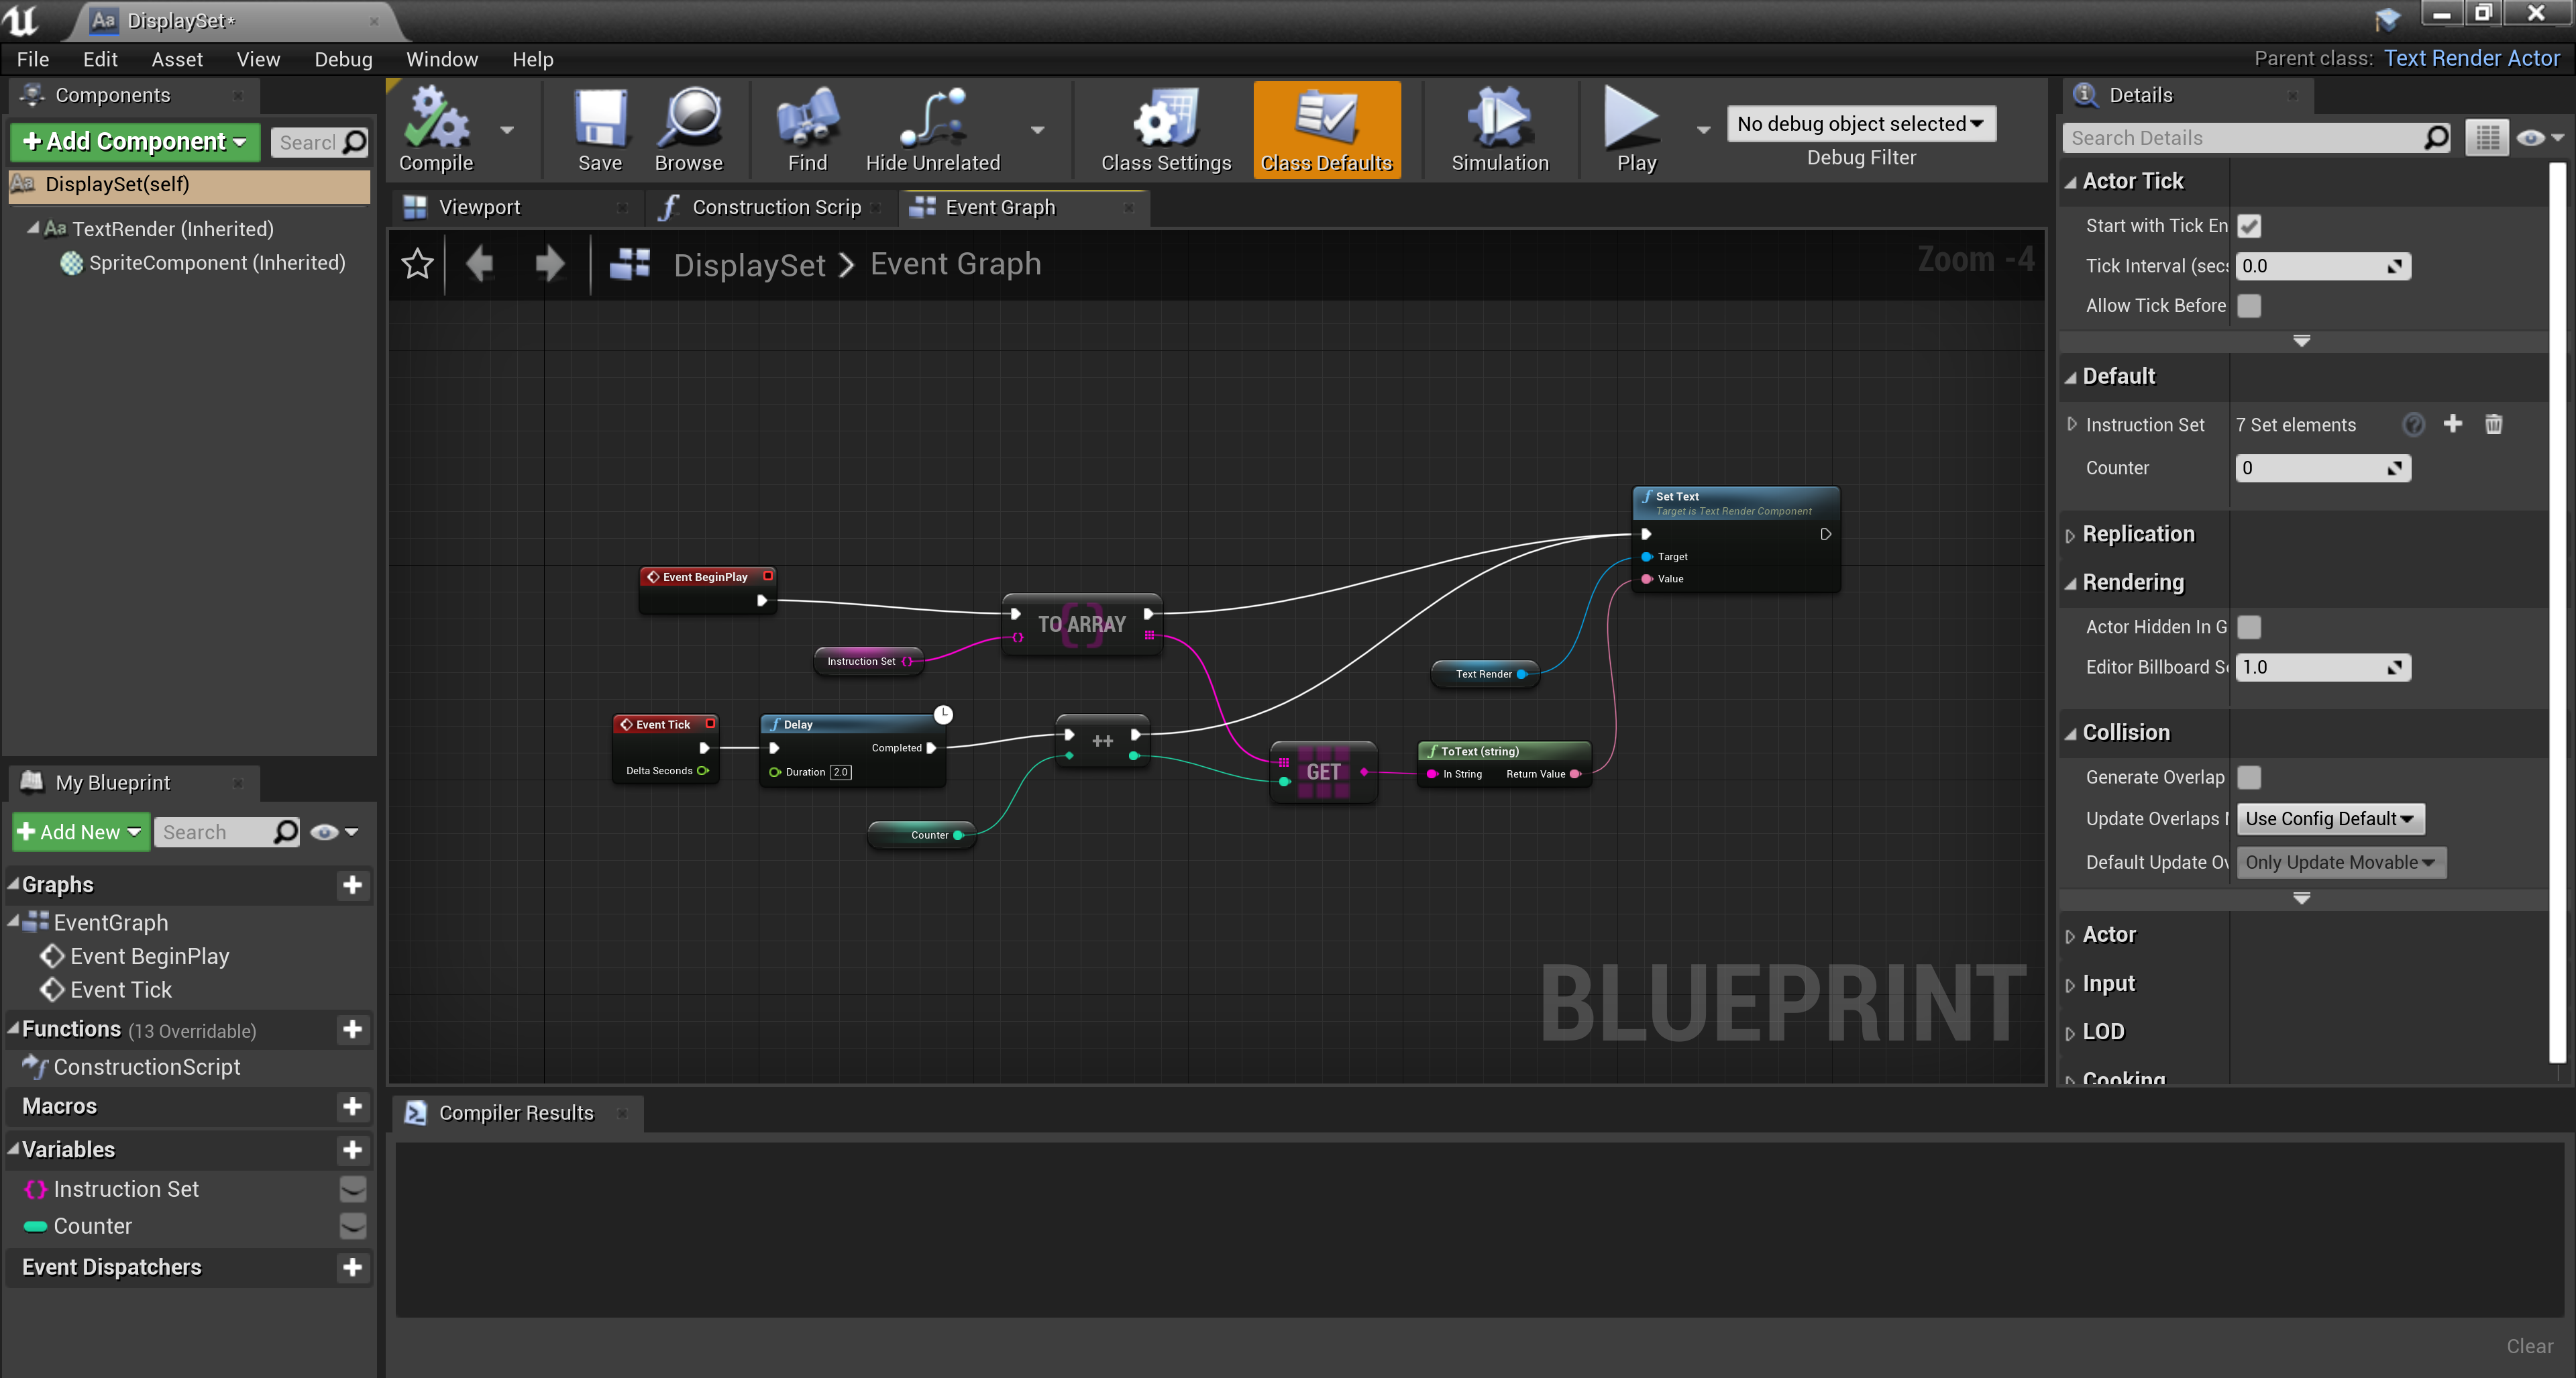
Click the + (Adds Element) button (located in the Default Value menu of the Details panel) to add a String type item to your newly defined Instruction Set container.
![Step2_12.png]()
Click for full image.
-
Define your container's new item, defining the item as
Click.![Step2_13.png]()
-
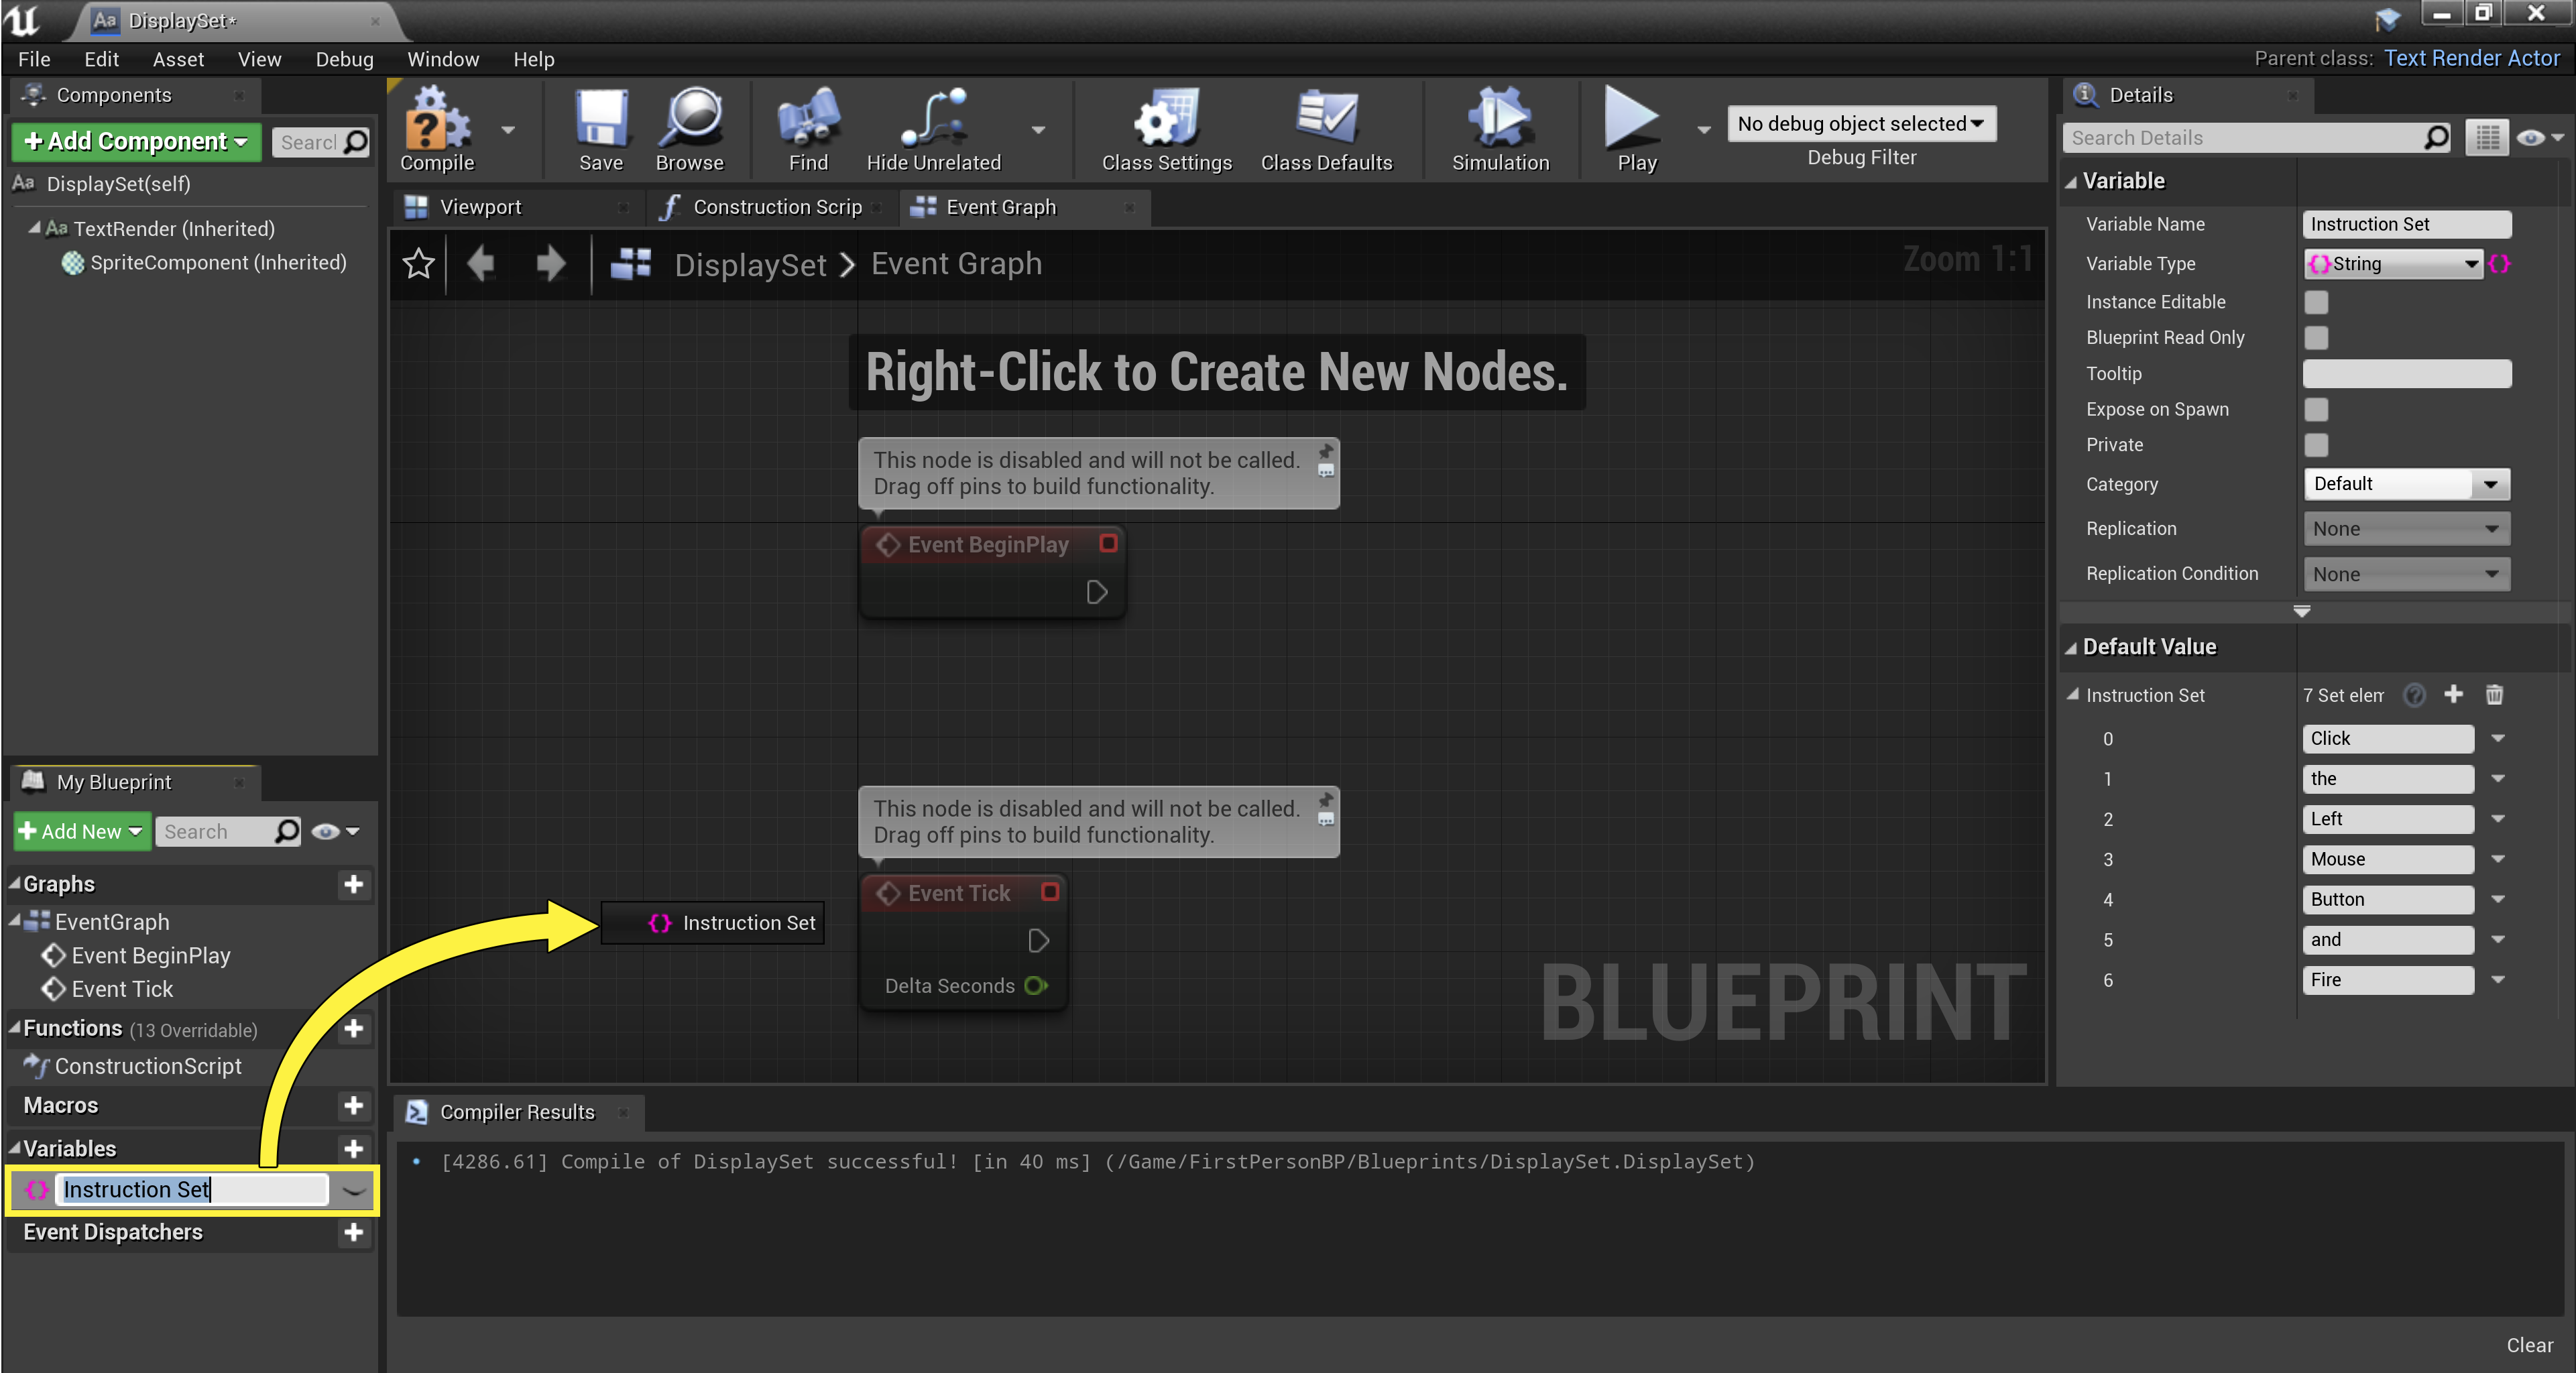
Repeat the previous two steps, making sure to fill your Instruction Set container with the following items:
![Step2_14.png]()


Scripting the Logic
Before you can display the contents of your newly created Blueprint Set, you'll need to write the necessary logic.
-
Now that you've defined your container, go ahead and drag the Instruction Set variable into the Blueprint Event Graph.
![Step2_15.png]()
Click for full image.
-
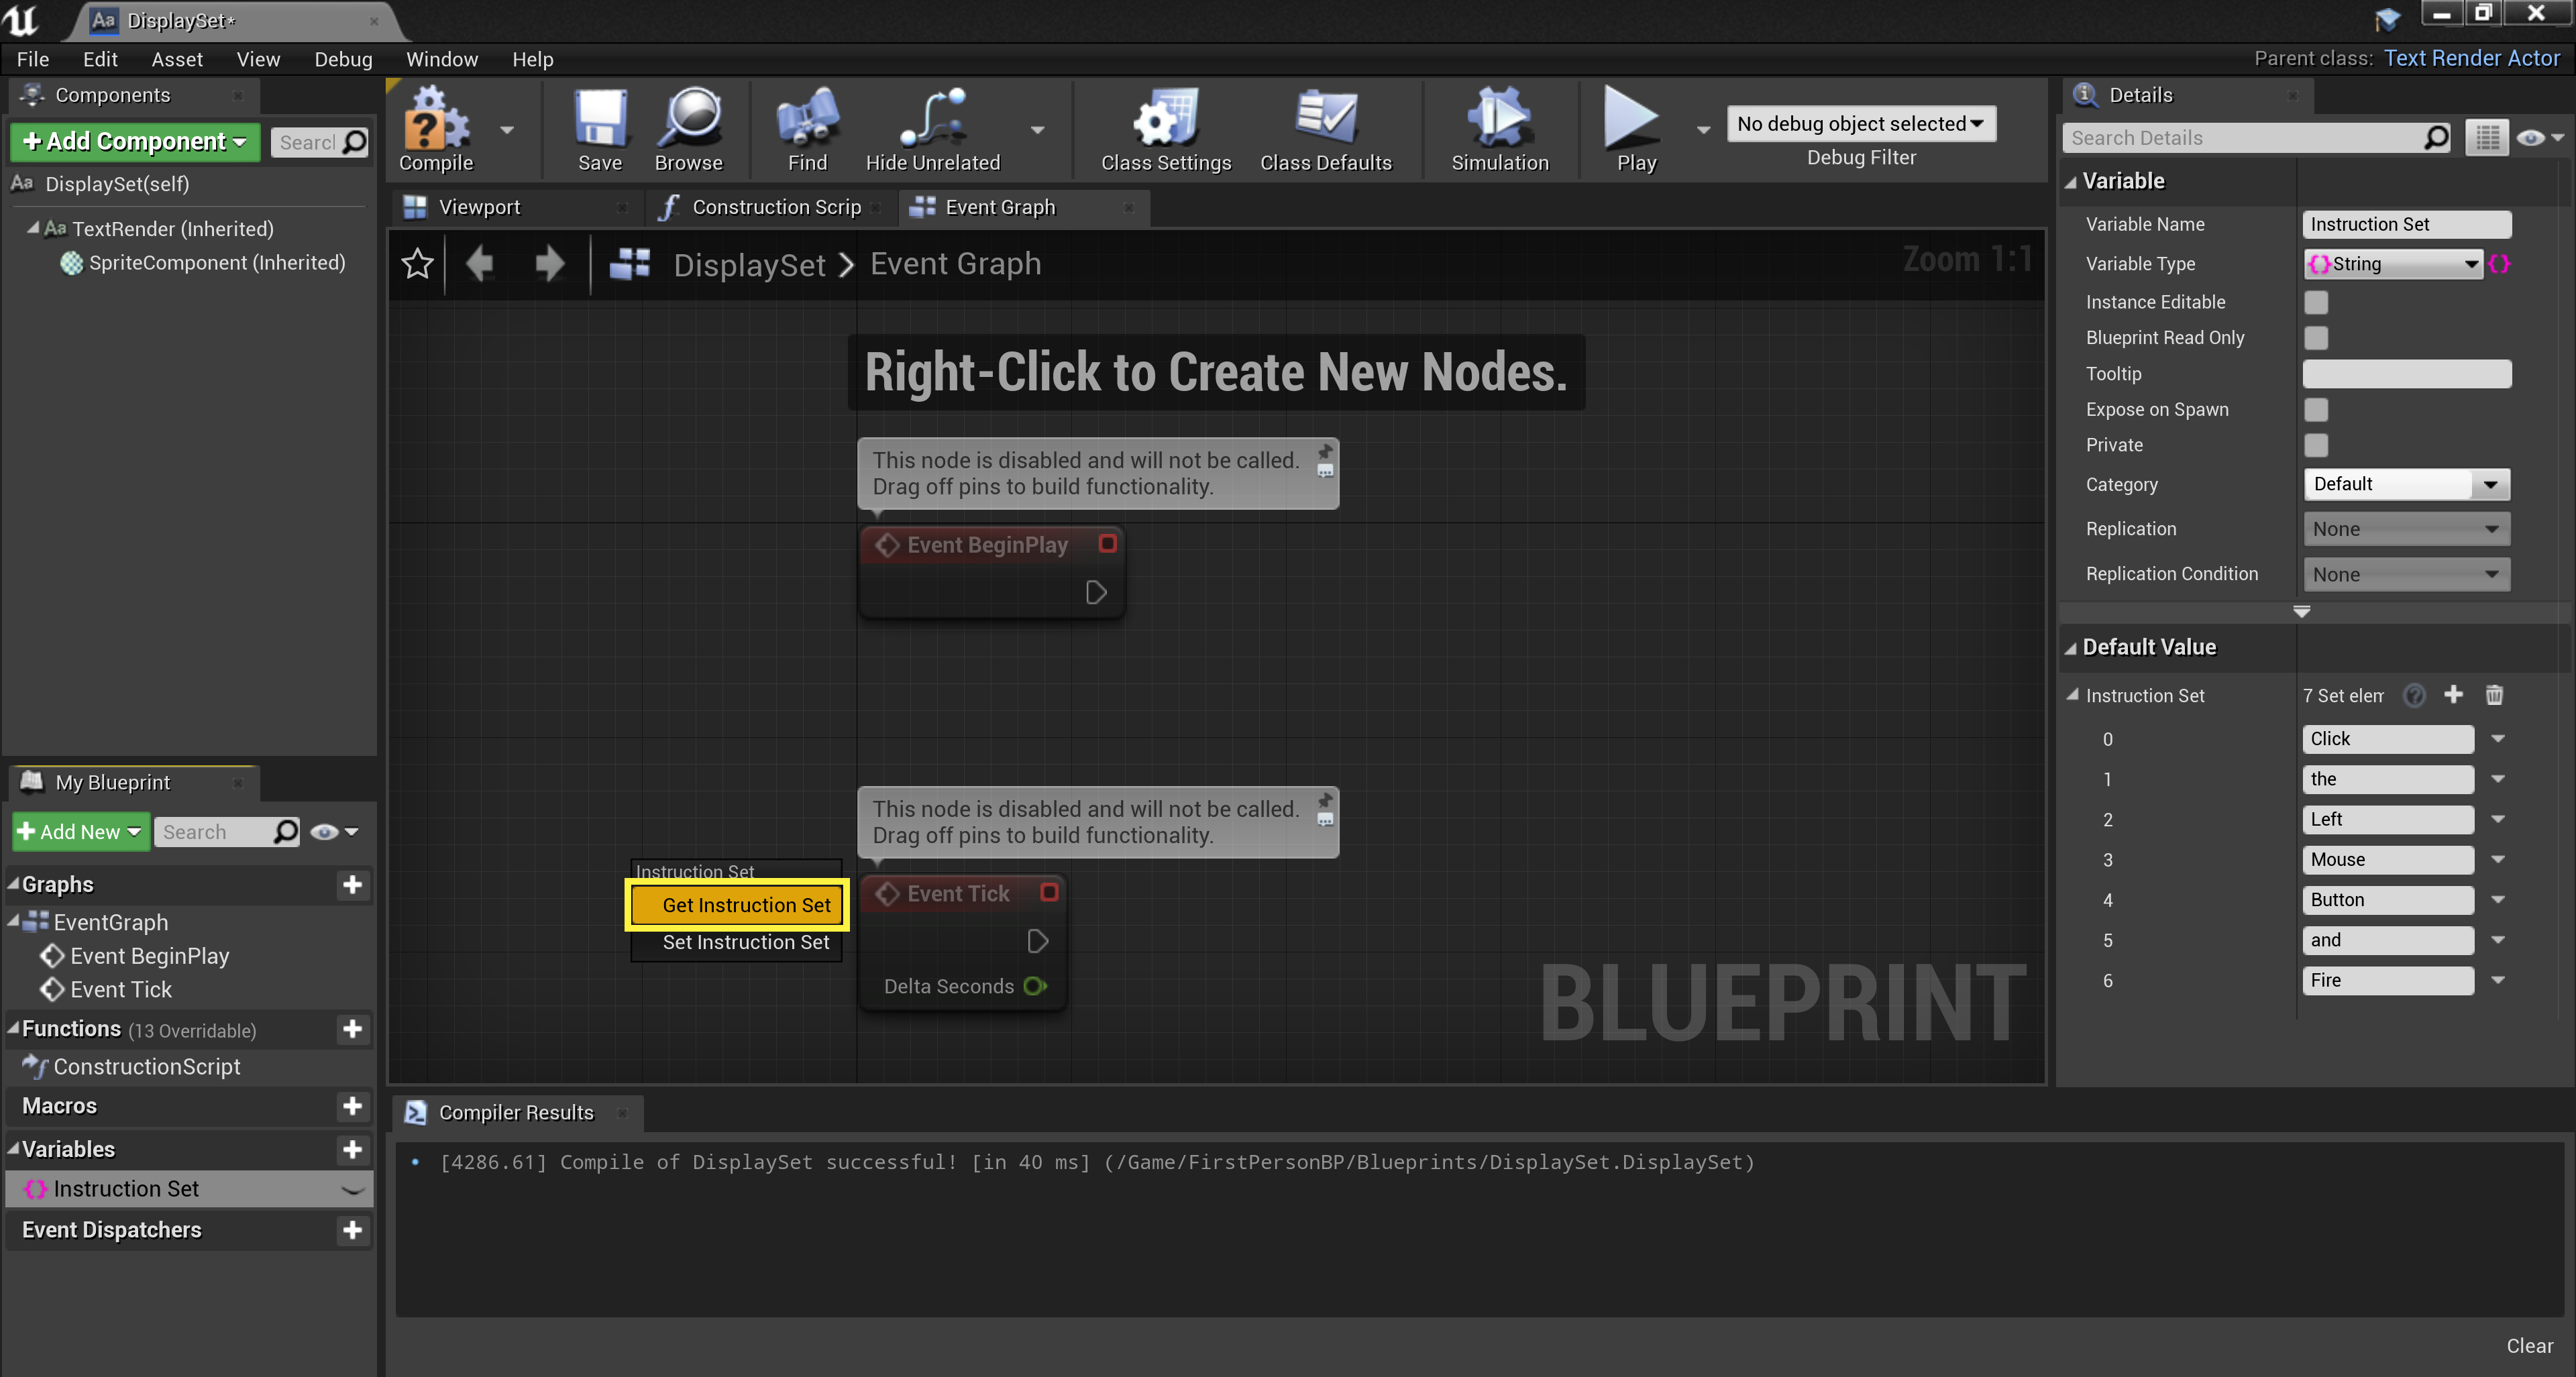
Select Get from the Instruction Set drown-down list.
![Step2_16.png]()
Click for full image.
-
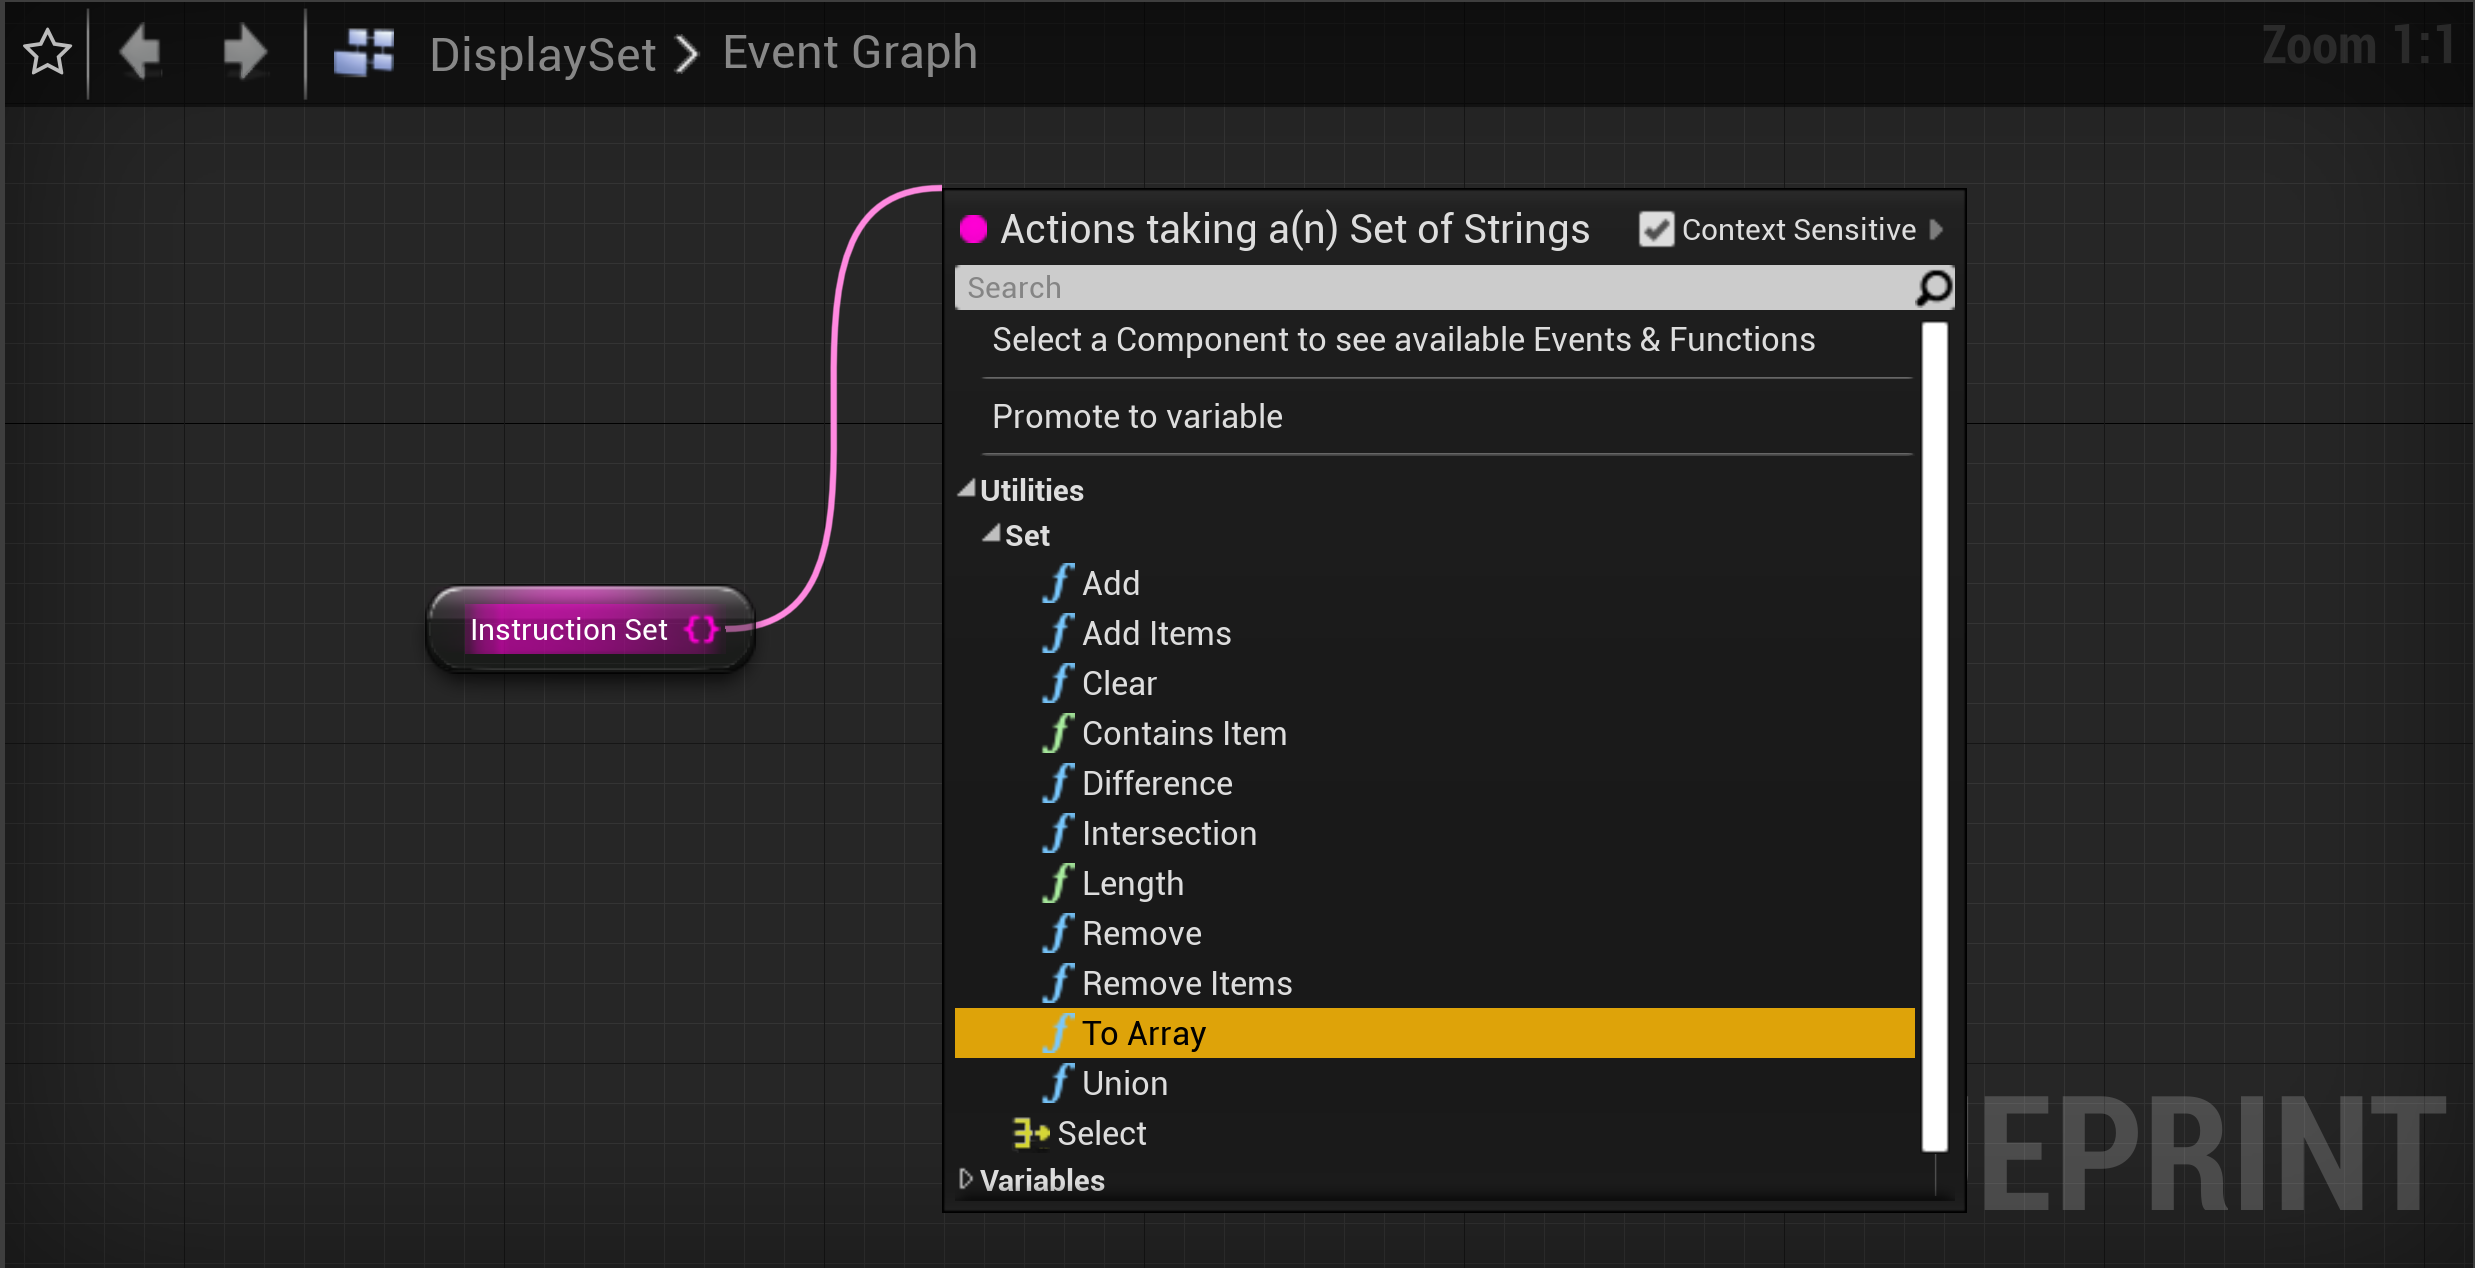
Drag off the Instruction Set node and add the To Array node from the Set Utilities interface.
![Step2_17.png]()
-
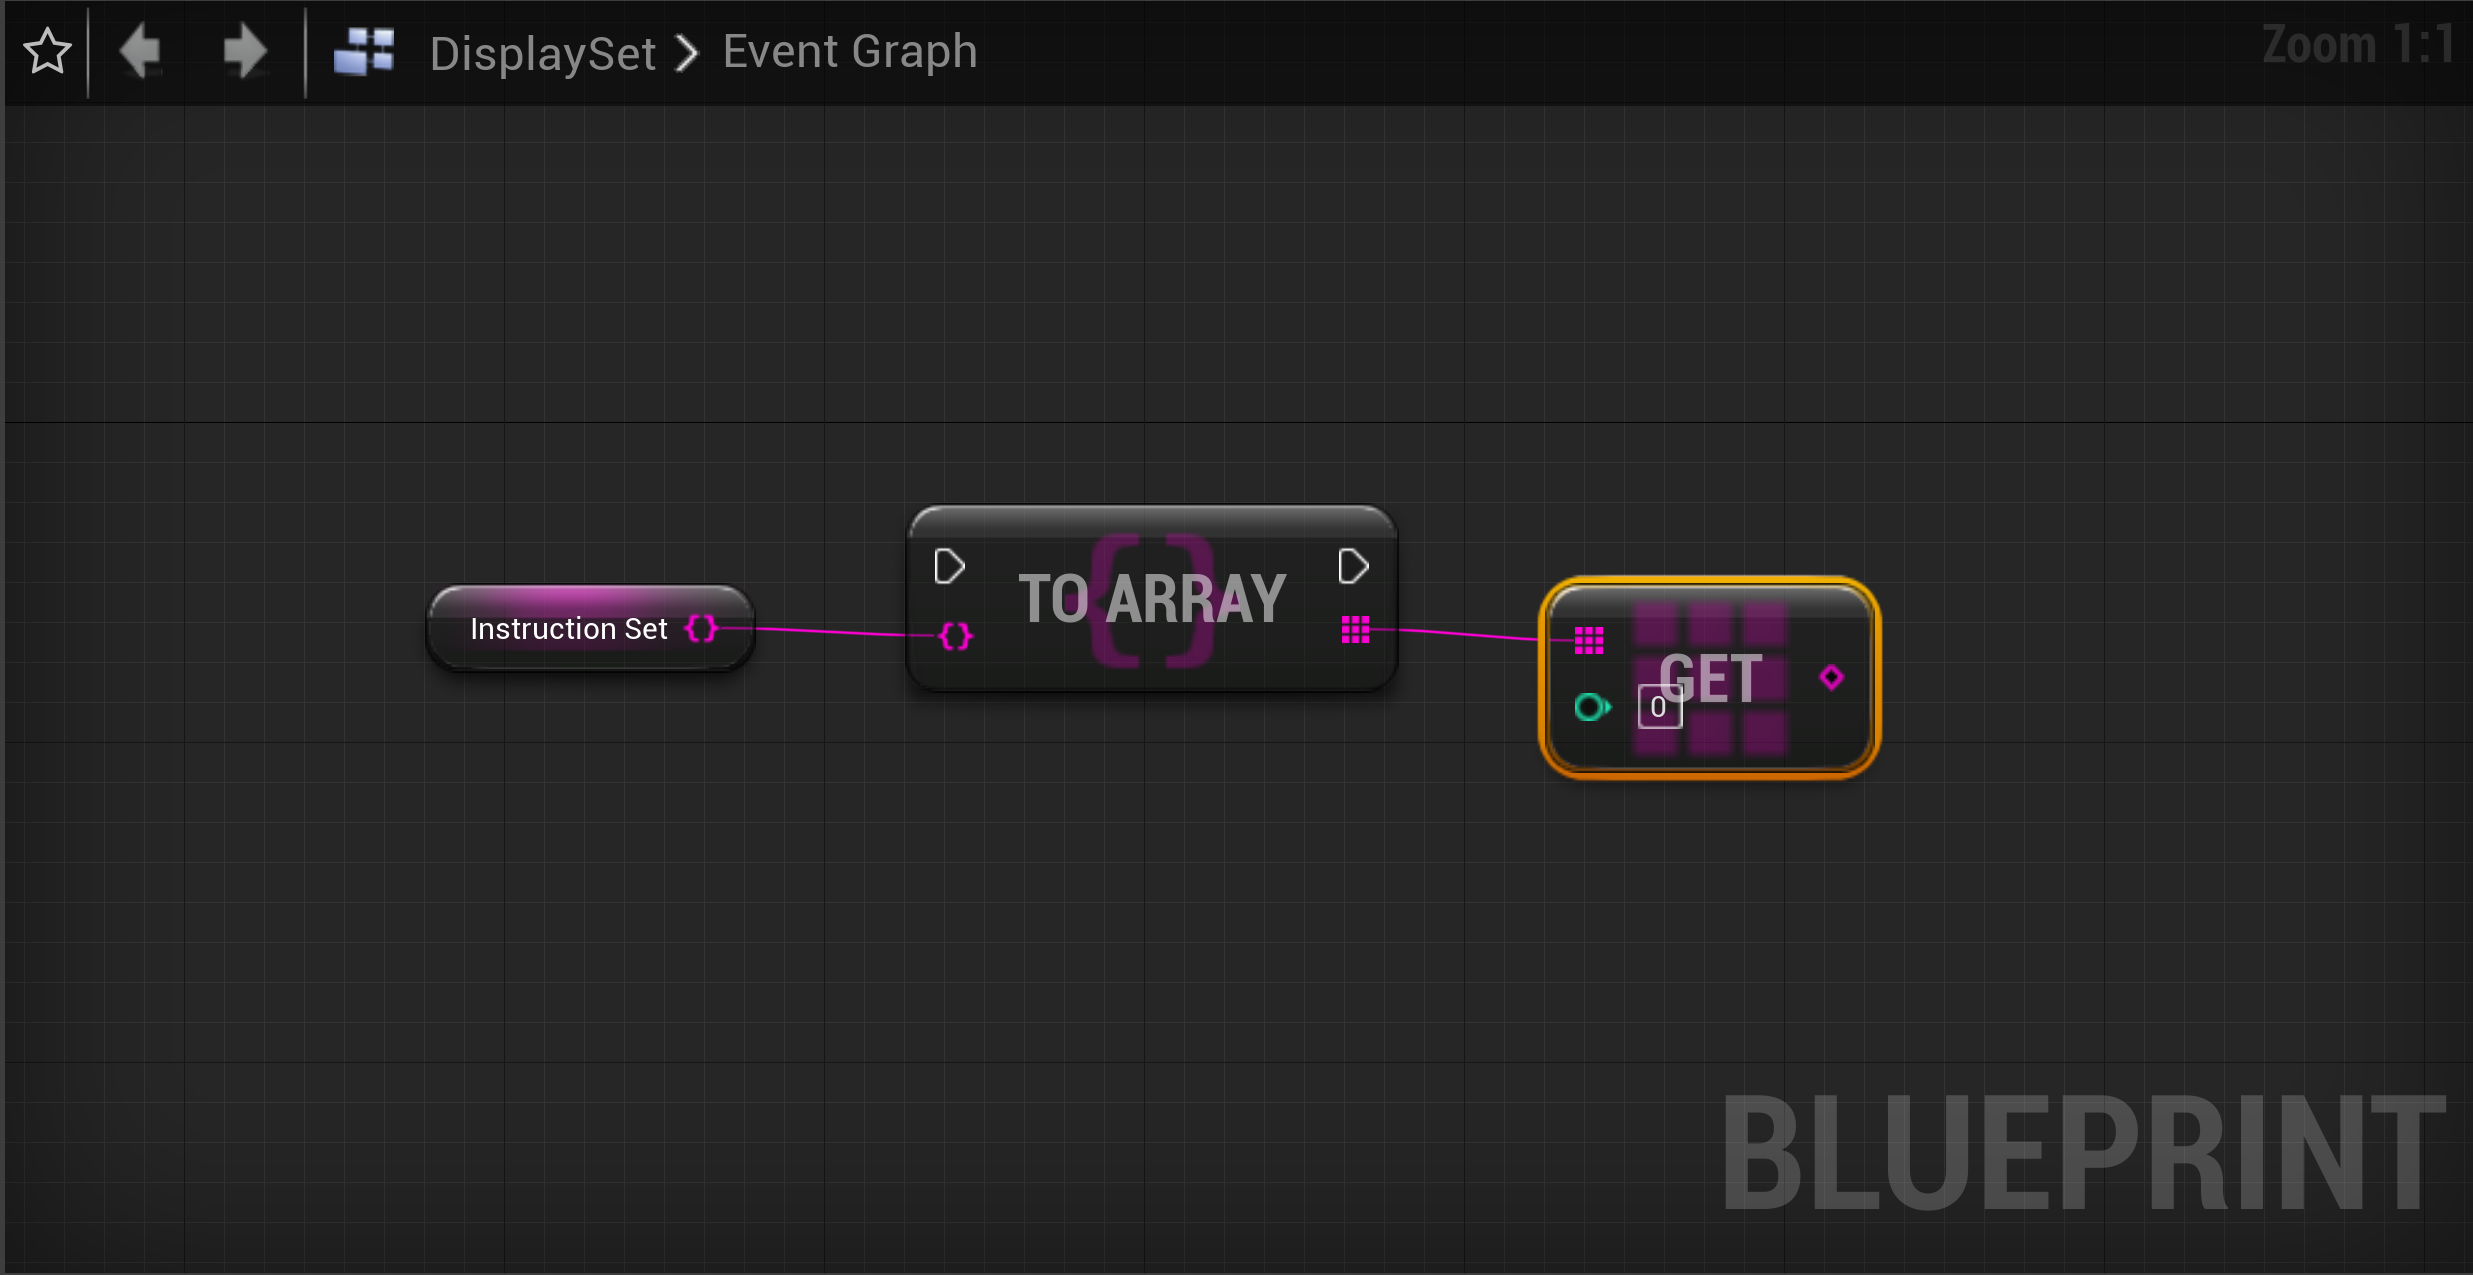
Go ahead and drag off the To Array node, connecting it to a Get node.
![Step2_18.png]()
There are several ways to get items from a Set. One way is to query the Set with a specific key and another way is to iterate through the items in a set. For this part in the tutorial, we'll go ahead and use a counter variable to iterate our way through the Instruction Set .
-
With the aforementioned note in mind, go ahead and click the + Add New button, selecting Variable from the drop-down list.
![Step2_19.png]()
Click for full image.
-
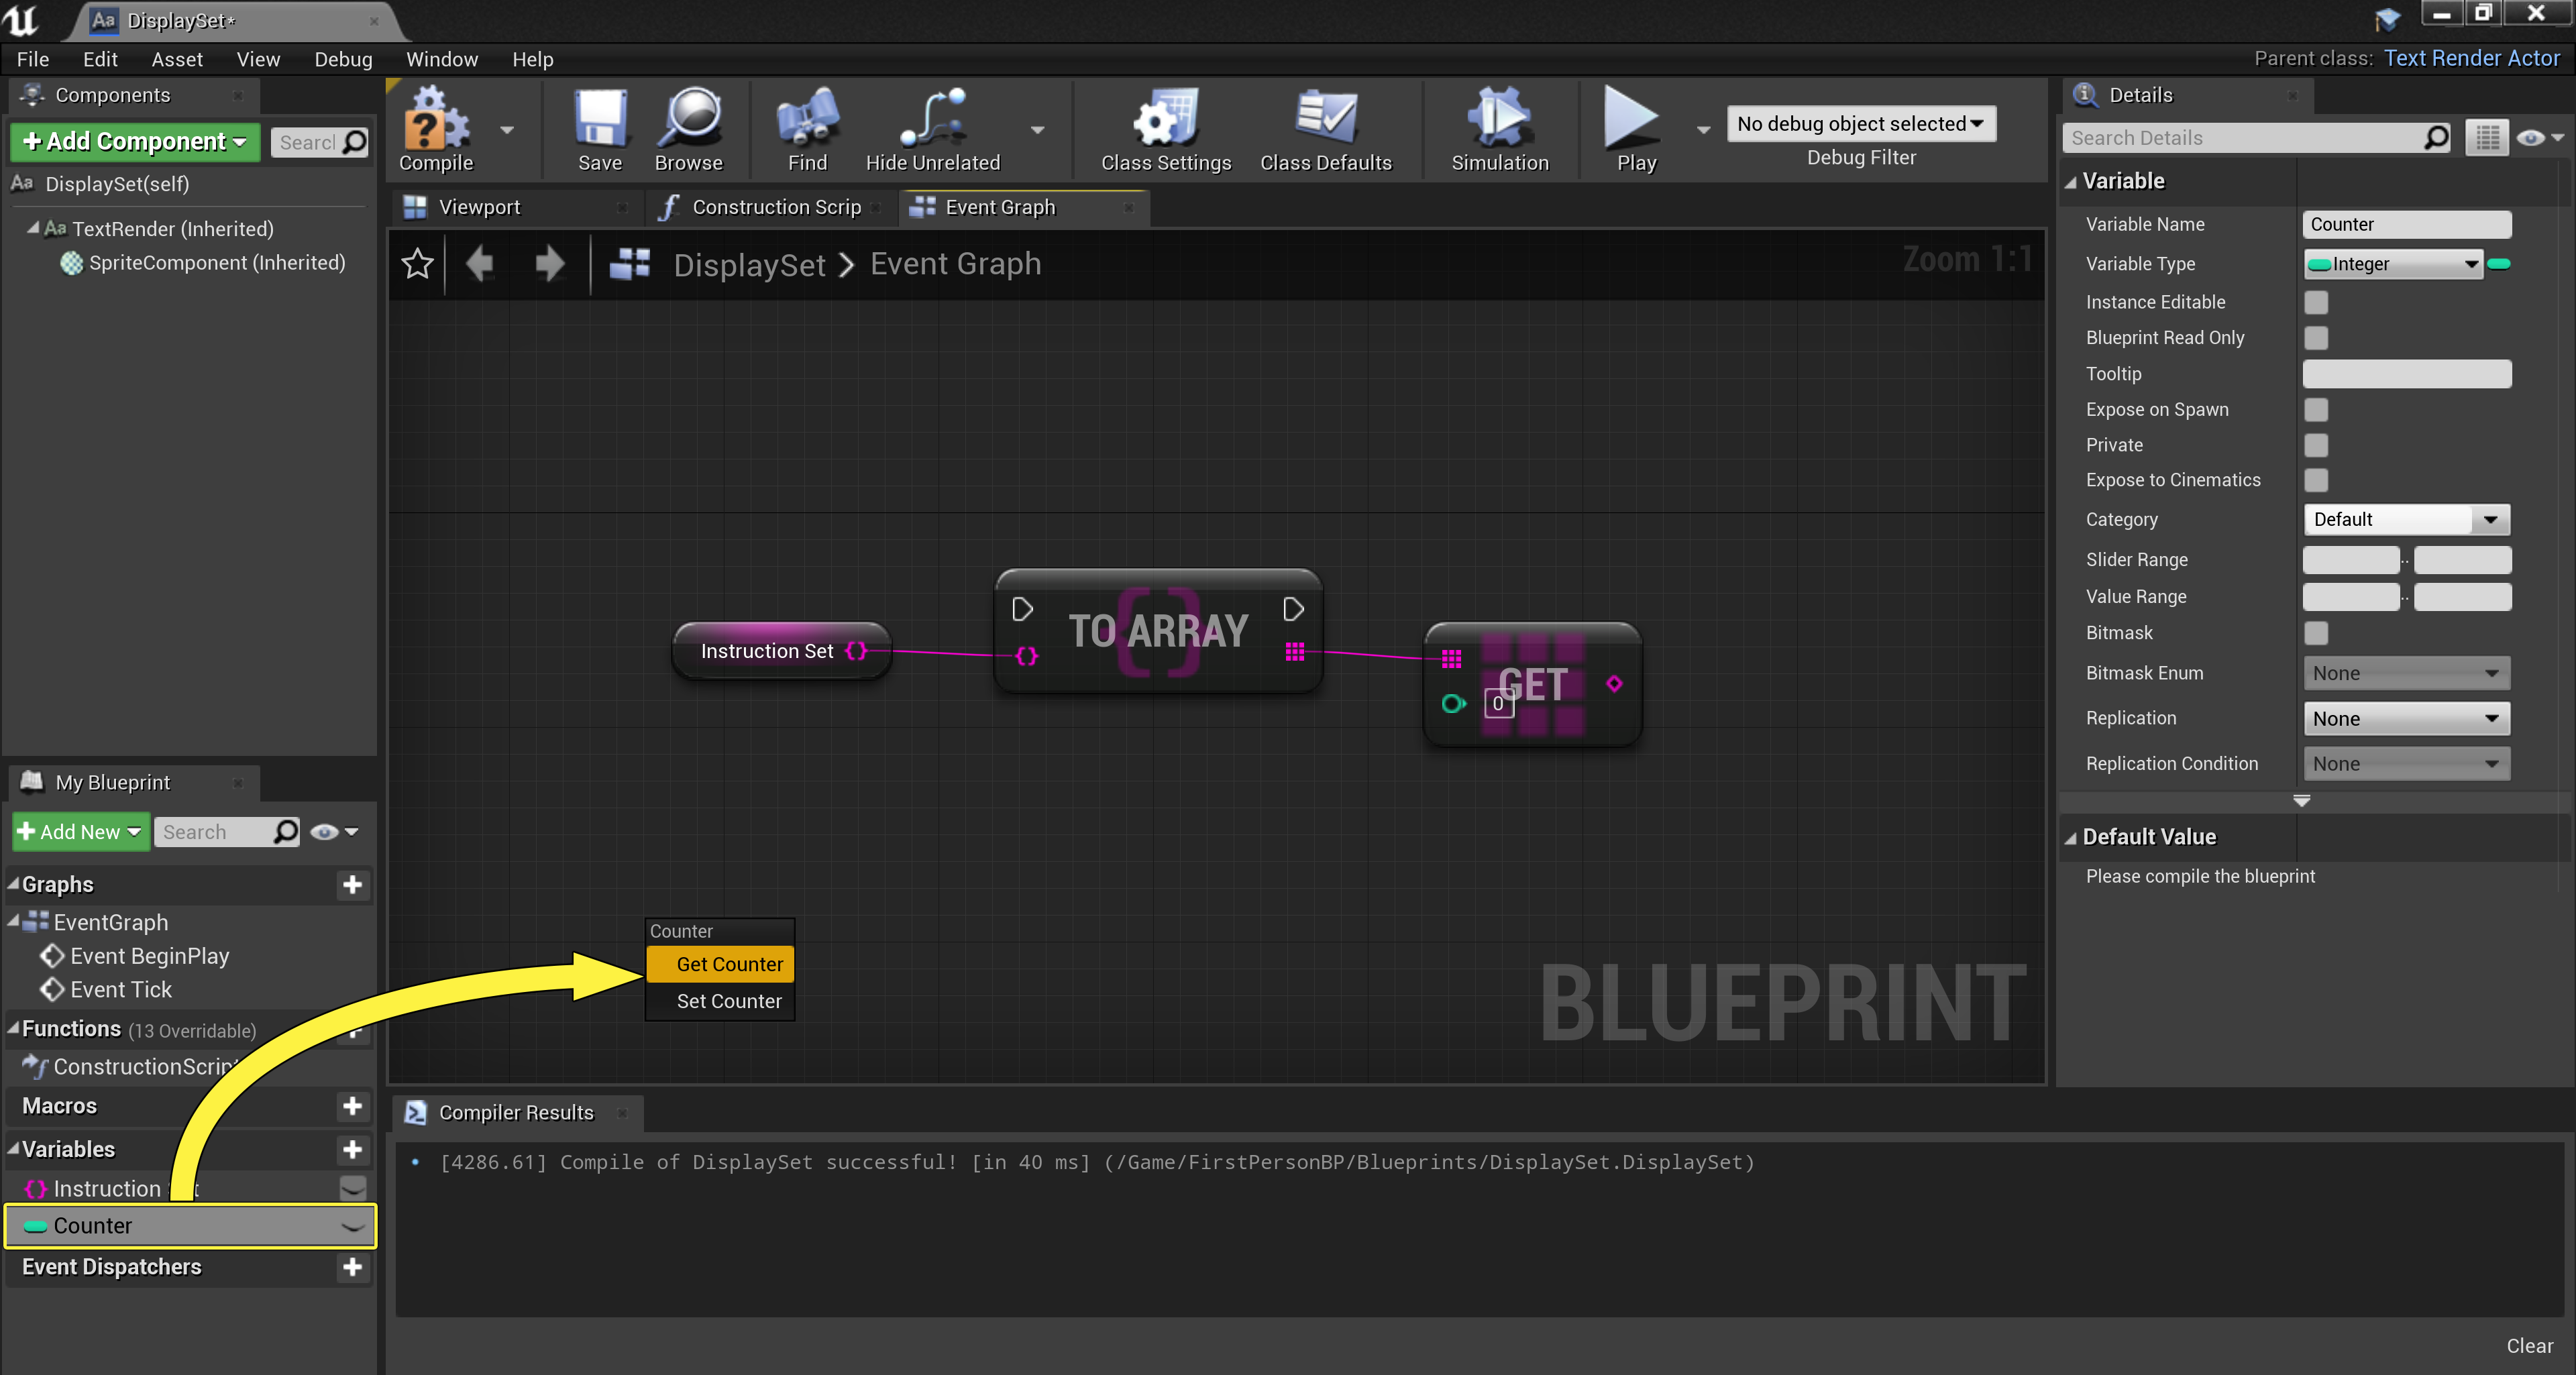
Make sure to set the new variable's type to an Integer type, giving it the name,
Counter.![Step2_20.png]()
-
After you've declared and defined your counter variable, drag Counter into the Blueprint Event Graph, and select Get from the drop-down list.
![Step2_21.png]()
Click for full image.
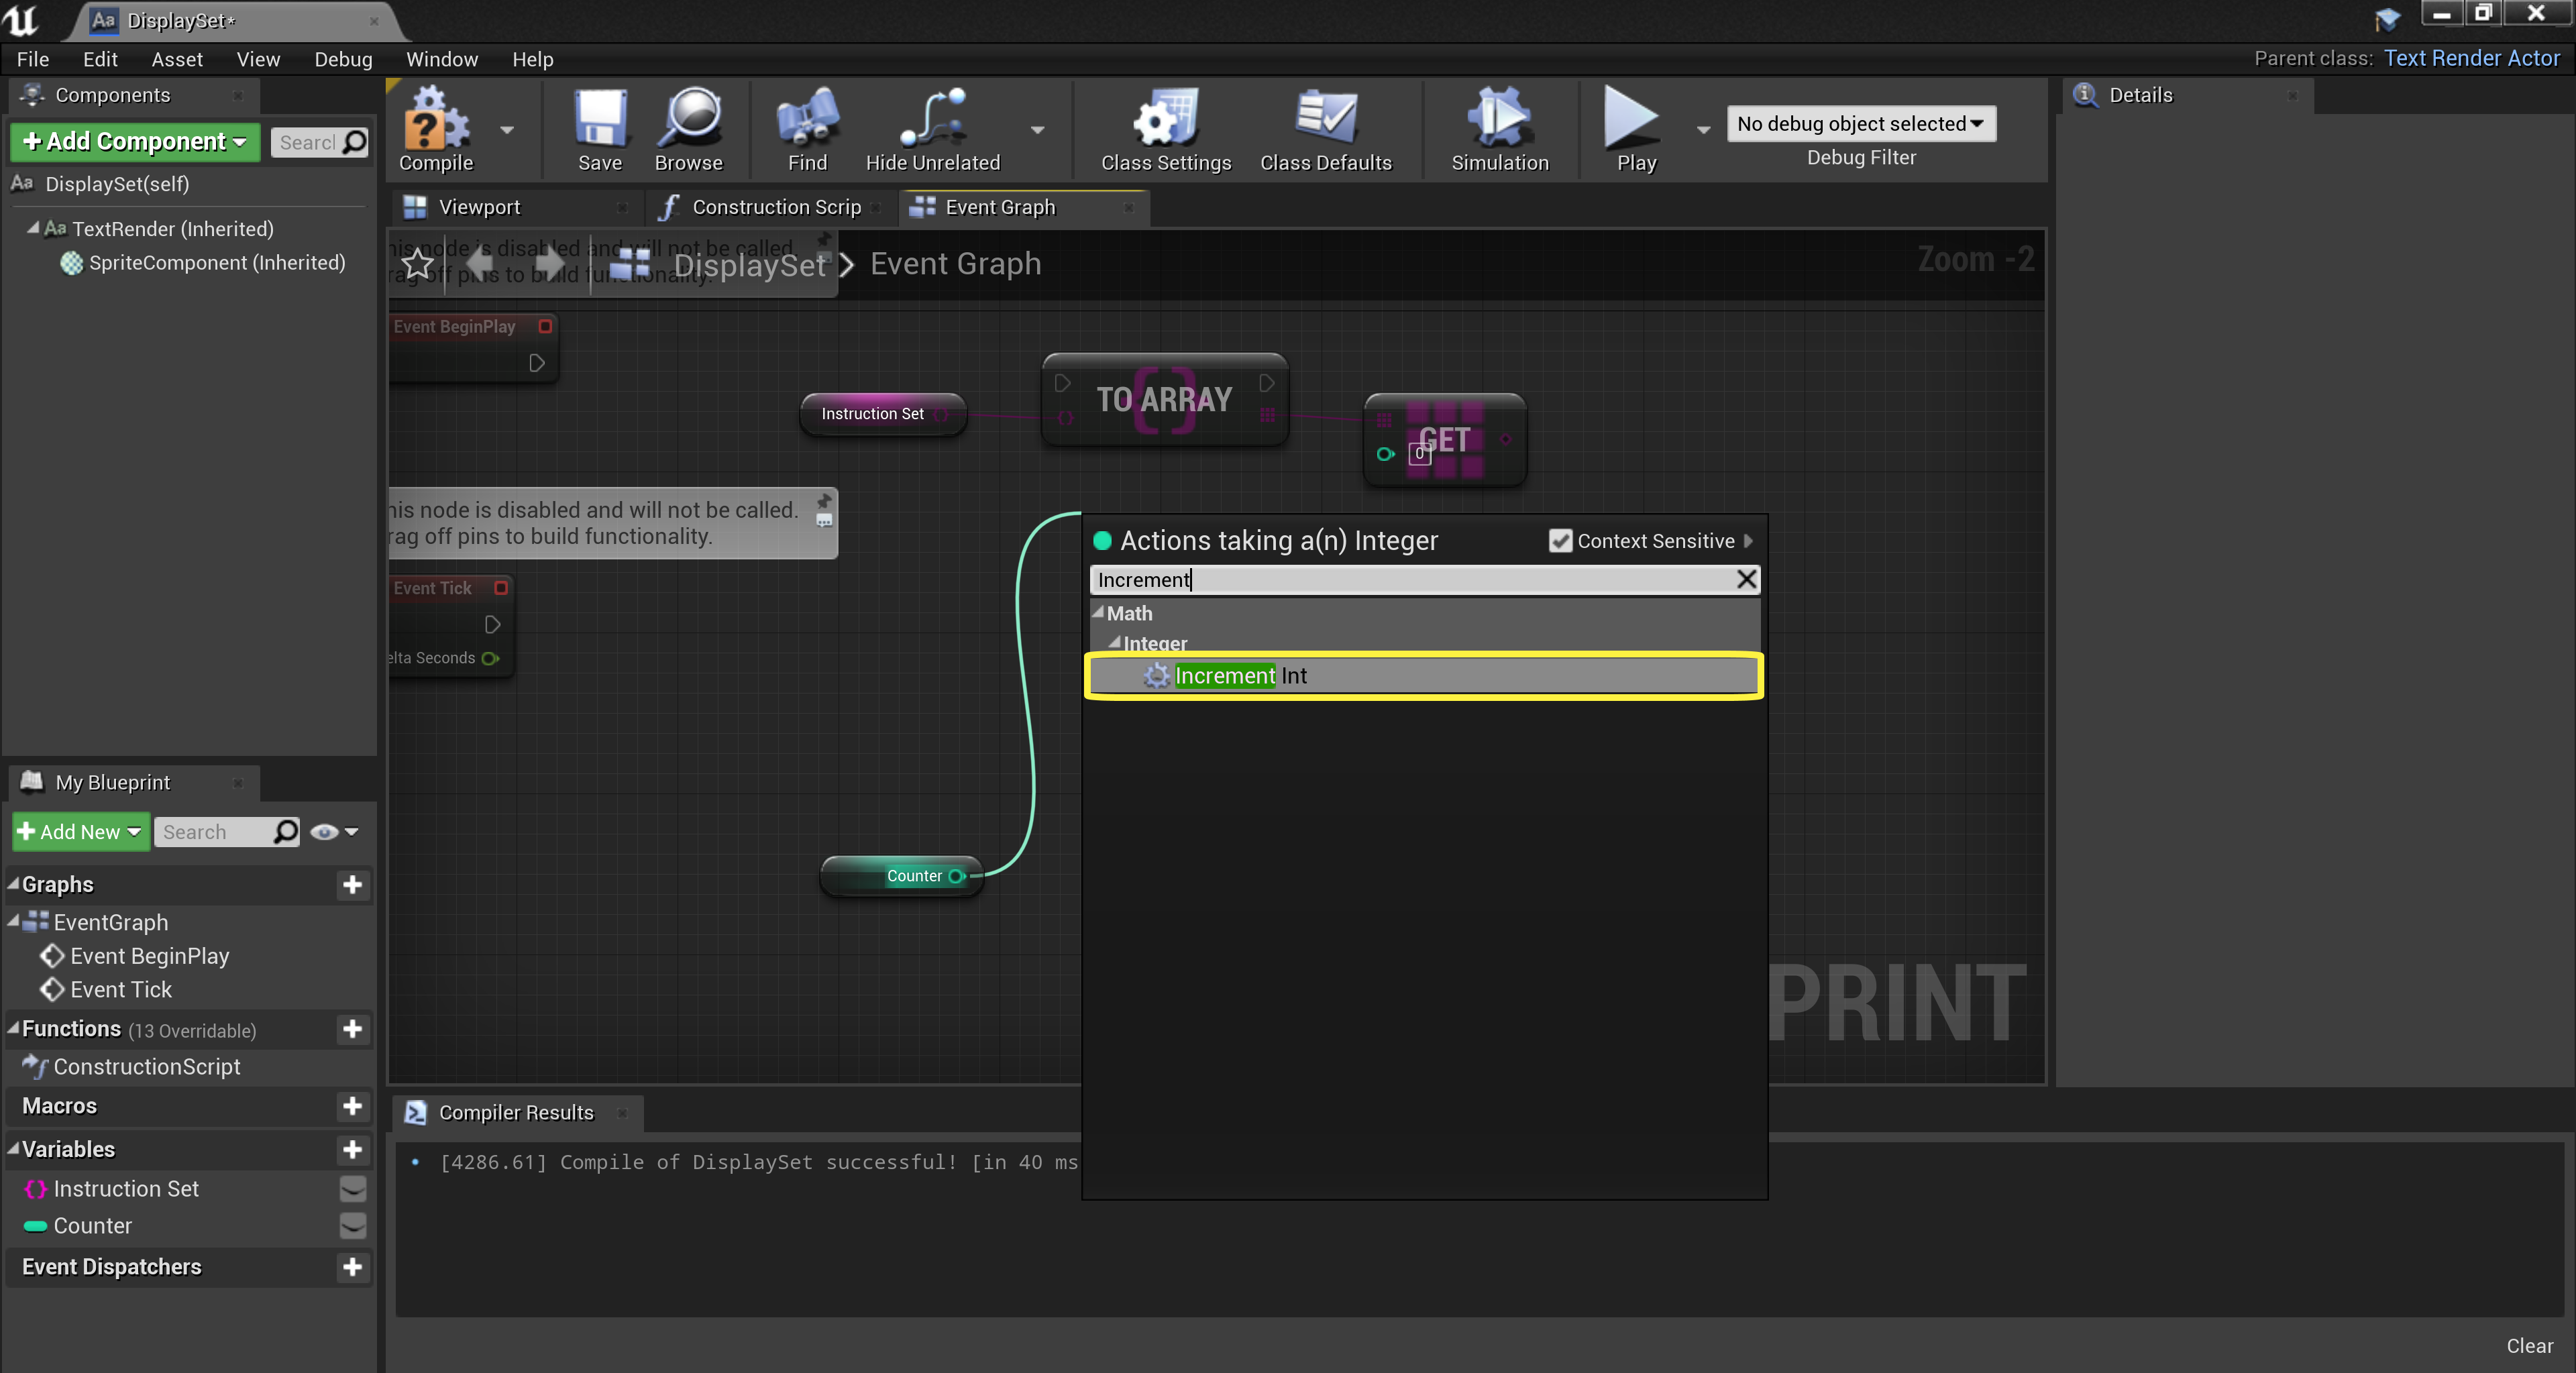
-
Drag off the Counter node, search for, and add the IncrementInt node.
![Step2_22.png]()
Click for full image.
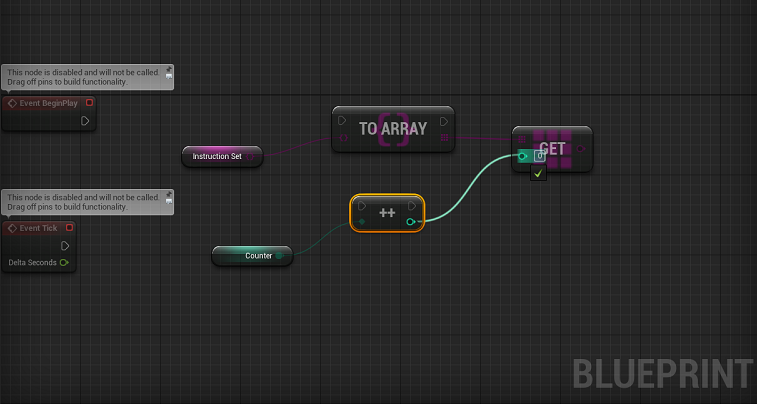
-
Now, go ahead and connect the IncrementInt node to the Get node.
![Step2_23.png]()
For the purposes of this tutorial, you're going to use a timer function to increment the Counter variable.
-
Drag off the Event Tick node, search for, and add the Delay node.
![Step2_24.png]()
-
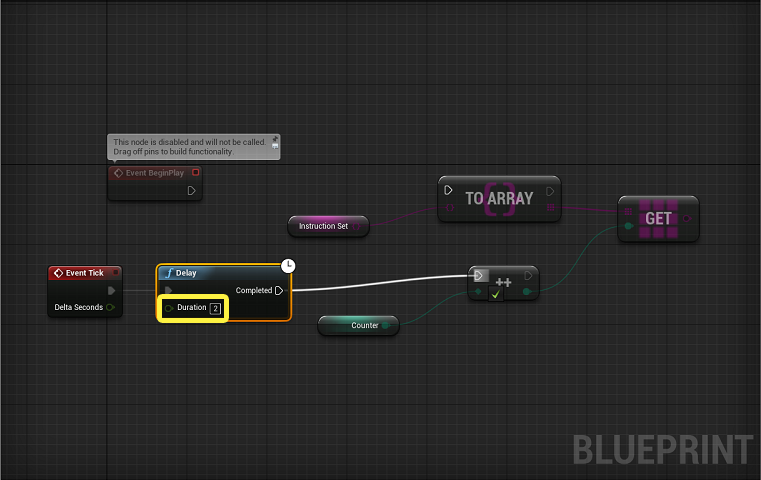
After you've set the delay duration to 2 seconds, connect the Delay node to the IncrementInt node.
![Step2_25.png]()
-
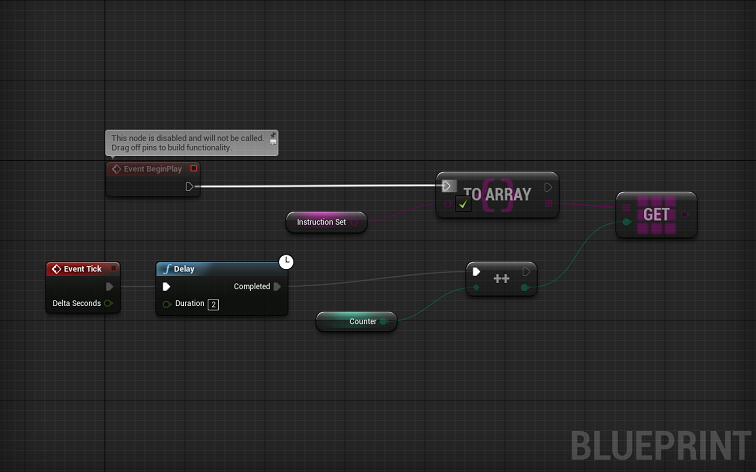
Go ahead and connect the Event BeginPlay node to the To Array node.
![Step2_26.png]()
-
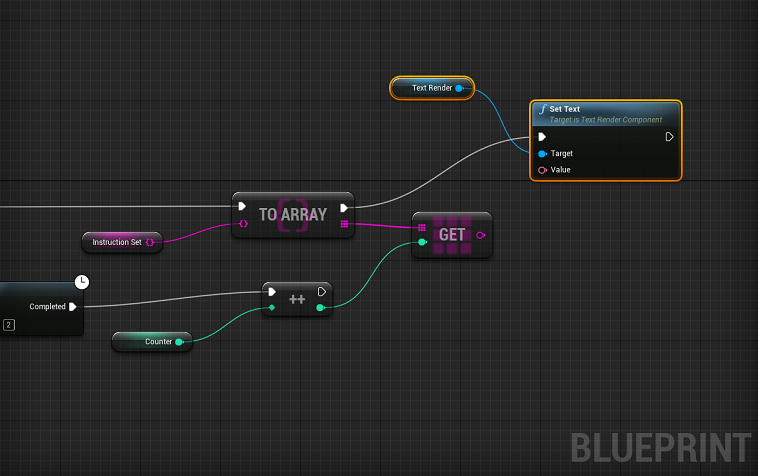
At this point, you're ready to drag off the To Array node to search for, and connect the Set Text node in order to display your container's contents in-game.
![Step2_27.png]()
-
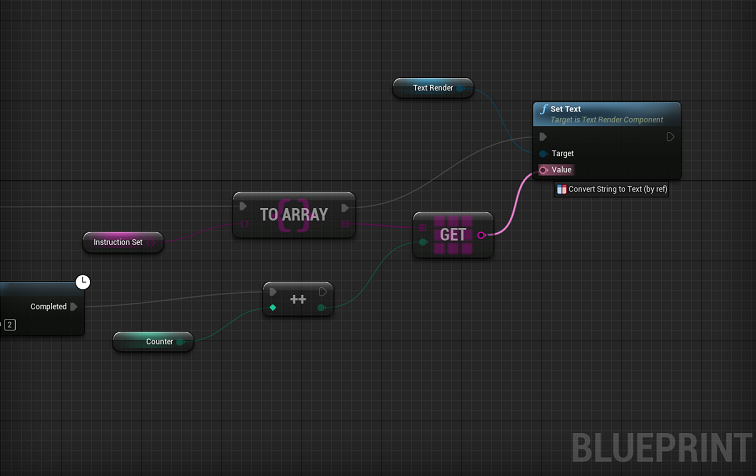
Connect the Get node to the Value pin (located in the Set Text node).
![Step2_28.png]()
-
Now, go ahead and connect the IncrementInt node to the Set Text node.
![Step2_29.png]()
-
After inspecting your completed script, go ahead and click the Compile button before going back to the Editor's Viewport interface.
![Step2_30.png]()
Click for full image.
-
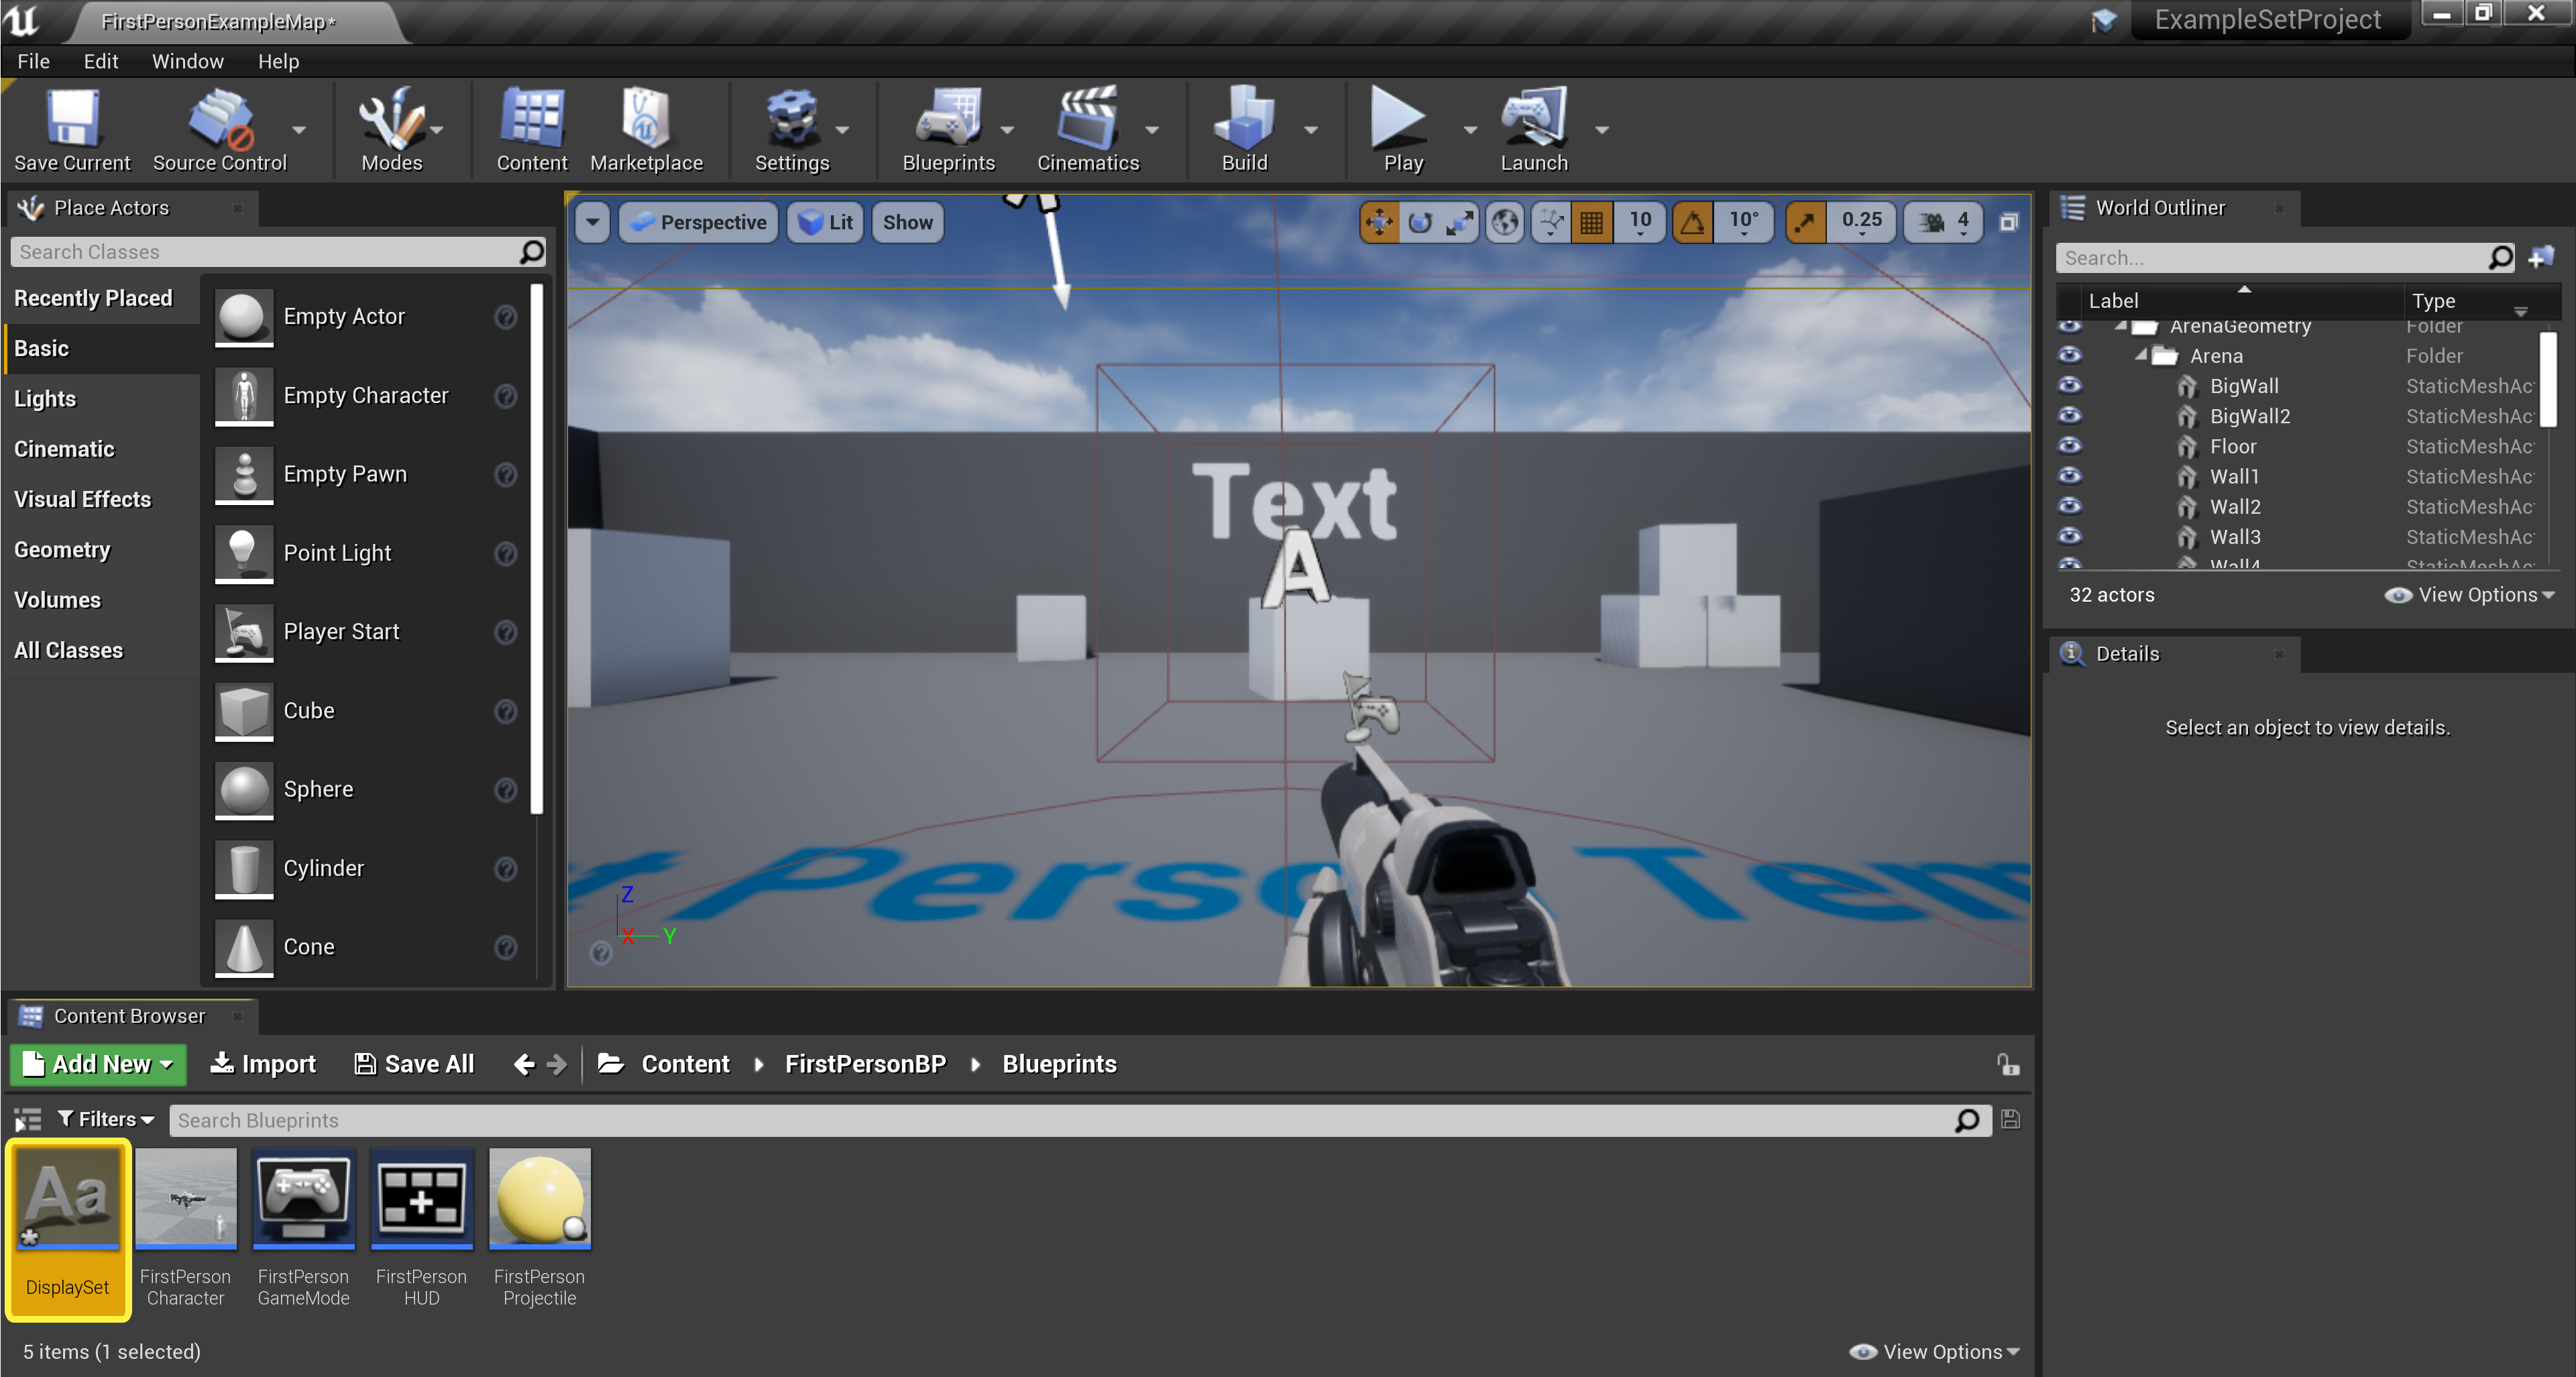
From the Editor's Viewport interface, click the Play button to see your newly implemented script at work.


Section Result
At this point in the guide, you've defined a new Blueprint Set, filled the container with items, and displayed them with some basic logic that you created in your TextRender Actor's Blueprint Event Graph. If you want to learn how to perform a slightly more advanced operation, please continue onto the next step, where you'll learn how to perform an Intersection of two Blueprint Sets.
3. Performing an Intersection
By now, you should have a TextRender Actor displaying the contents of a Blueprint Set that you defined in the previous step. In this step, you're going to learn how to perform an Intersection of two Blueprint Sets, ultimately printing the result of the Intersection in the game's Viewport .
-
From your project's Content Browser , double-click the Display Set TextRender Actor to open its Blueprint Event Graph .
![Step3_1.png]()
Click for full image.
-
You should see the Display Set TextRender Actor Blueprint Event Graph , where you'll be able to add a new Blueprint Set to Intersect with the existing Instruction Set , ultimately displaying a resultant Set to the Viewport .
![Step3_2.png]()
Click for full image.
-
At this point in the tutorial, you'll want to create a couple of Blueprint Set containers for the upcoming Intersection. Go ahead and right-click on the Instruction Set variable and select Duplicate from the drop-down list to create two new Blueprint Set variables, naming them
Shorter Instruction SetandResultant Instruction Set.![Step3_3.png]()
Performing an Intersection on two Sets (typically) involves a Resultant Set, which will contain only those items that are common to both Sets
-
You should now have two new Blueprint Set variables, which you duplicated from the existing Instruction Set variable. You should also notice that if you select one of your new Blueprint Sets (for example, Resultant Instruction Set ), the Default Value message, saying
Please compile the blueprint, should be visible.![Step3_4.png]()
Click for full image.
-
Go ahead and click the Compile button.
![Step3_5.png]()
Click for full image.
-
After compiling your Blueprint, you should see the Default Value message disappear, making way for some existing elements. As you know, you performed a duplication of the existing Instruction Set variable to create two new variables, thereby duplicating the elements that were originally contained in the original Blueprint Set into the newly created containers.
![Step3_6.png]()
Please note that you can create new variables without having to duplicate existing variables.
-
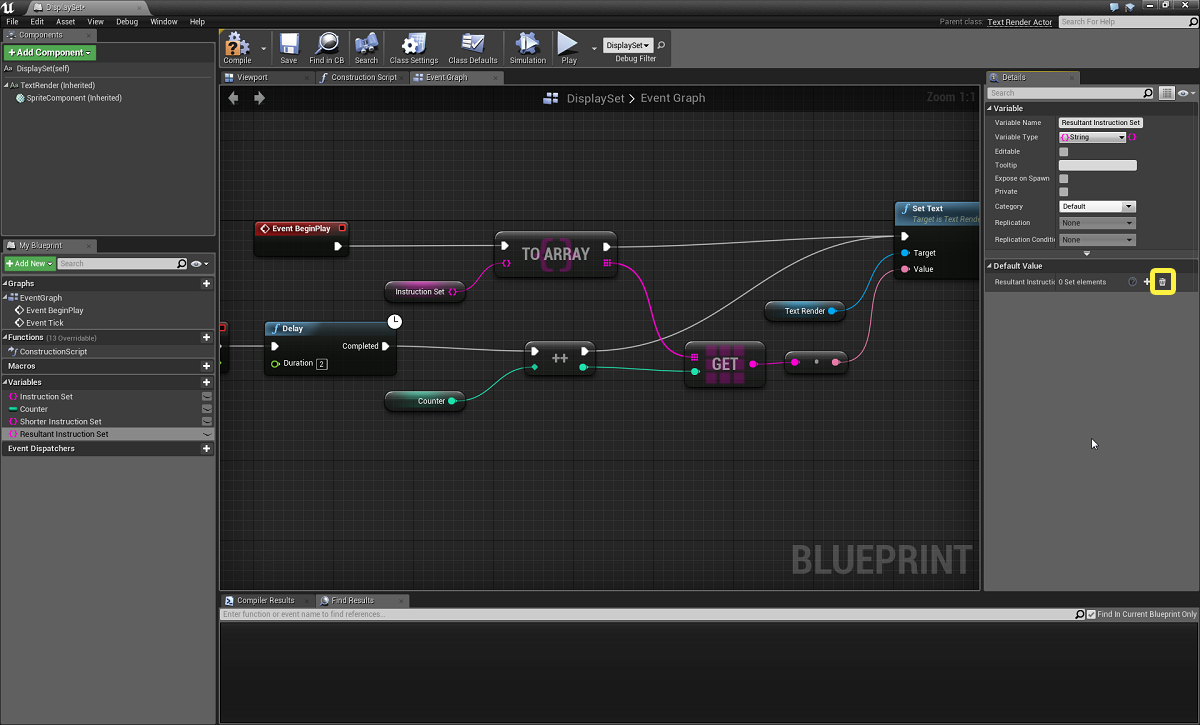
To clear the Resultant Instruction Set , go ahead and click the Removes all items button located in the Default Value menu.
![Step3_7.png]()
Click for full image.
-
Now, clear the items (or elements) from the Shorter Instruction Set .
![Step3_8.png]()
Click for full image.
-
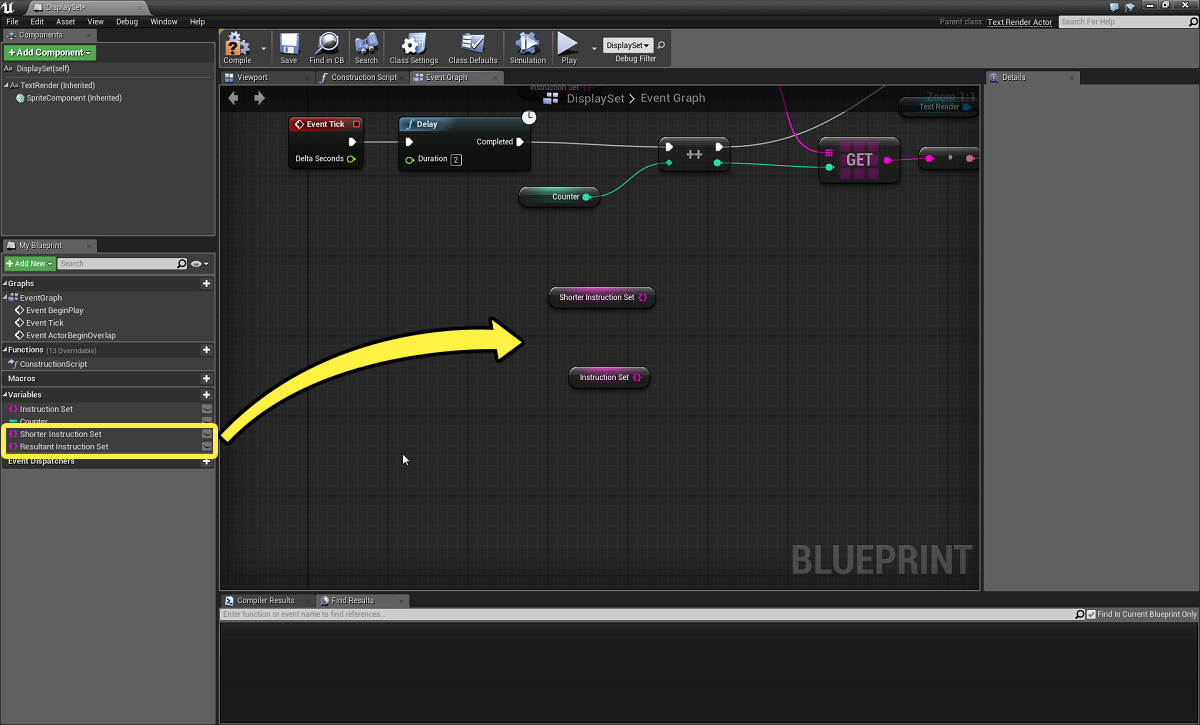
Before you can add new logic to the existing Blueprint Event Graph, go ahead and drag the Shorter Instruction Set and Instruction Set variables into the Blueprint.
![Step3_9.png]()
Click for full image.


Scripting the Logic
-
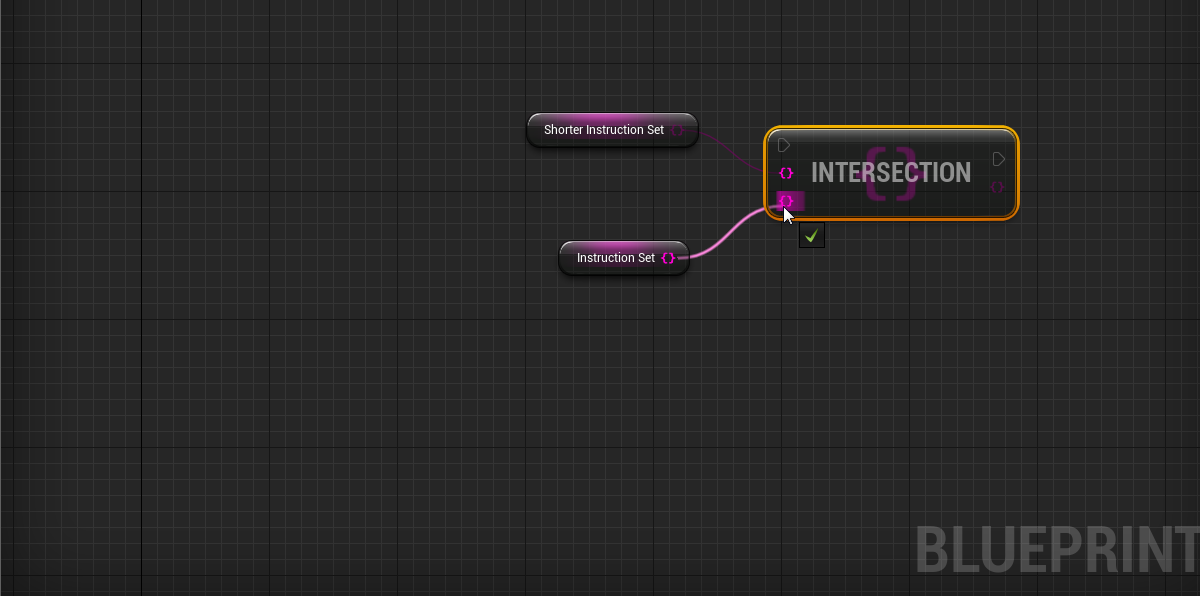
To get started with building your new logic, drag off the Shorter Instruction Set node and add the Intersection node from the Set Utilities interface.
![Step3_10.png]()
-
Now, connect the Instruction Set node to the Intersection node.
![Step3_11.png]()
-
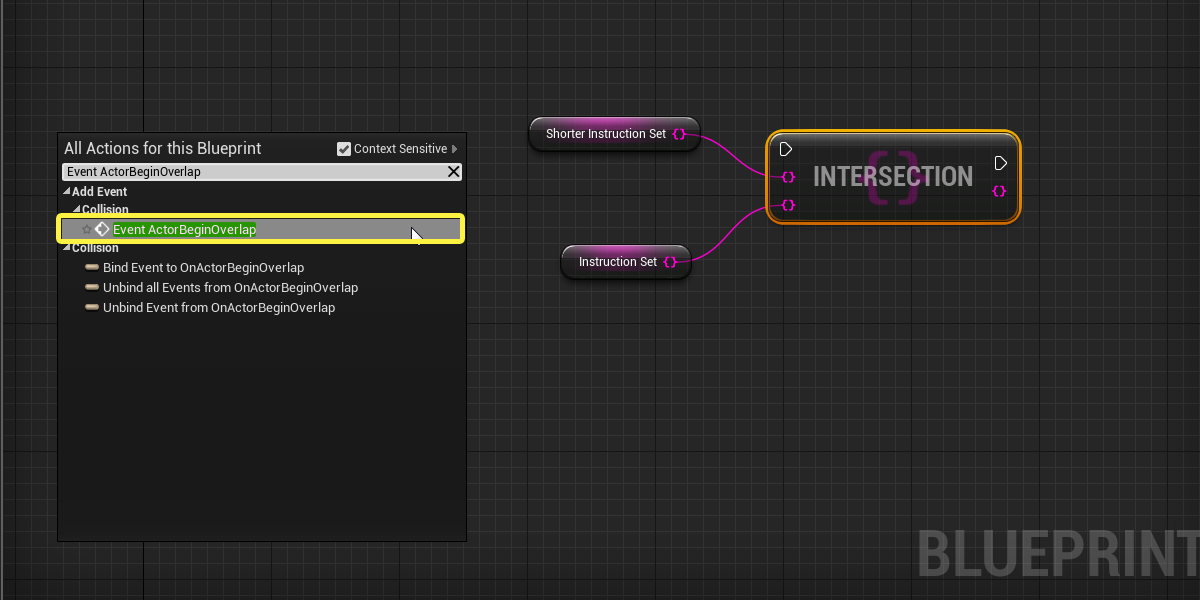
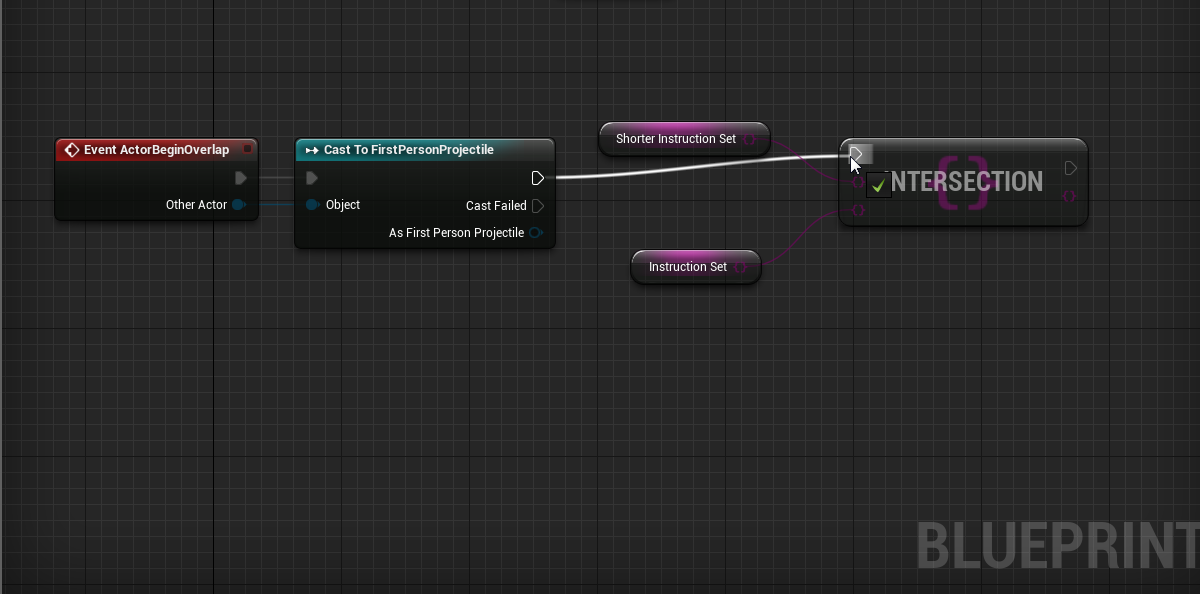
Right-click in the Blueprint Graph to open the Context Menu , where you'll search for and add Event ActorBeginOverlap .
![Step3_12.png]()
-
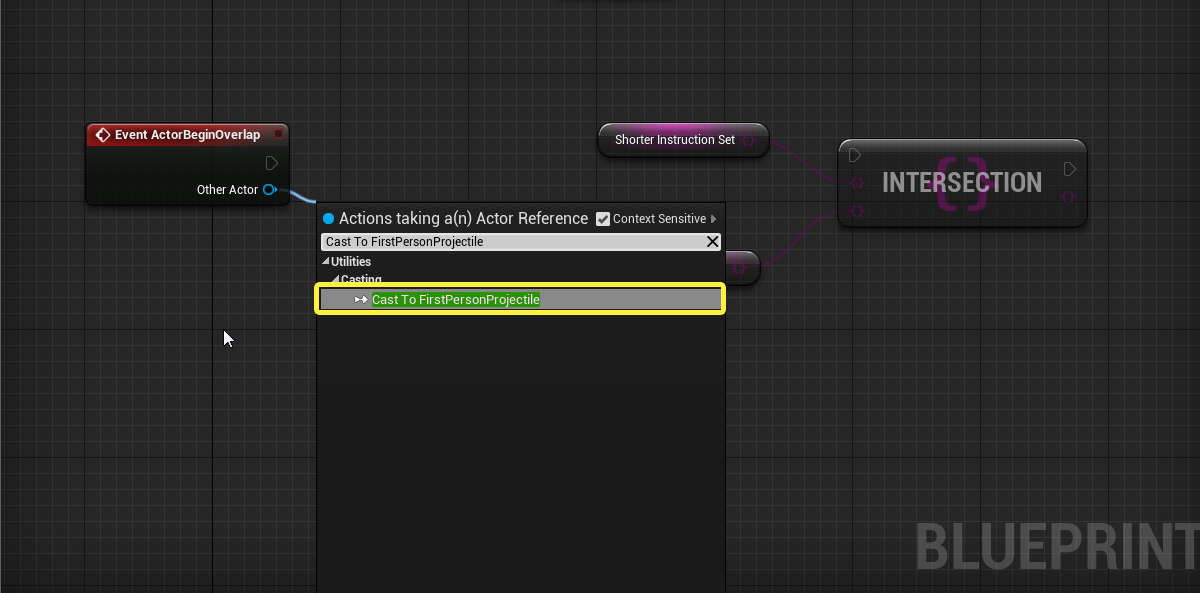
Drag off the Other Actor pin of the Event ActorBeginOverlap node, search for, and add the Cast To FirstPersonProjectile node.
![Step3_13.png]()
-
Now, connect the Cast To FirstPersonProjectile node to the Intersection node.
![Step3_14.png]()
Basically, this means that if the First Person Projectile successfully collides with this Actor's collision box, call the Intersection node.
-
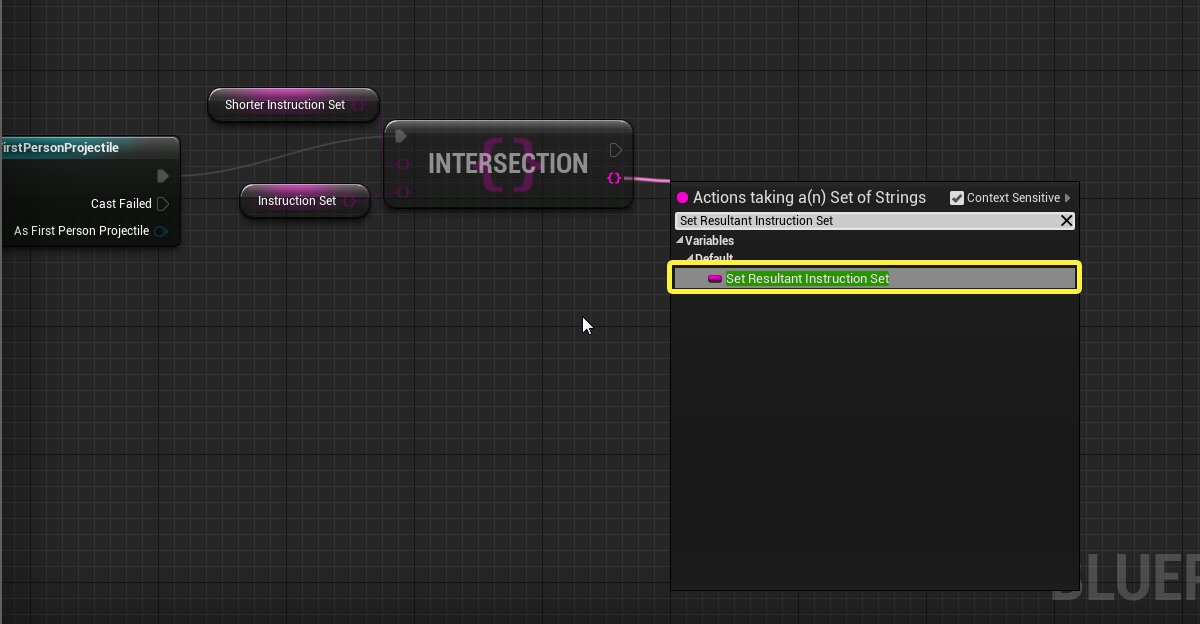
After the Intersection node performs its operation on the Shorter Instruction Set and the Instruction Set , you'll want to store the results in the Resultant Instruction Set container. To do this, go ahead and drag off the Intersection node and add the Set Resultant Instruction Set
![Step3_15.png]()
-
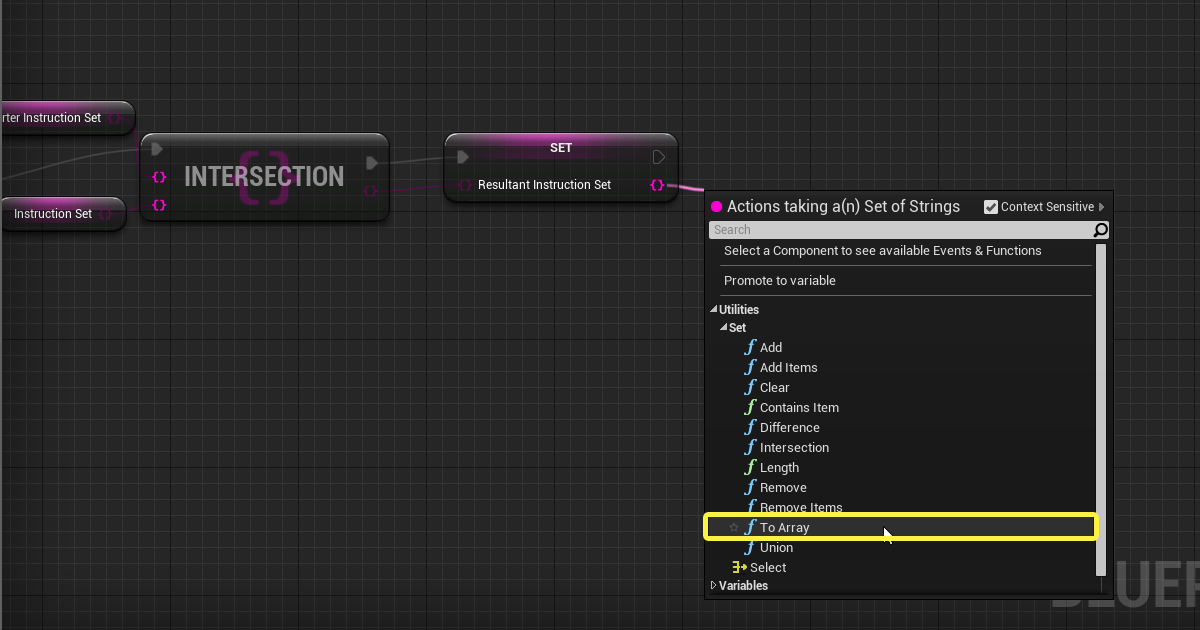
Drag off the Set Resultant Instruction Set node and add the To Array node from the Set Utilities interface.
![Step3_16.png]()
-
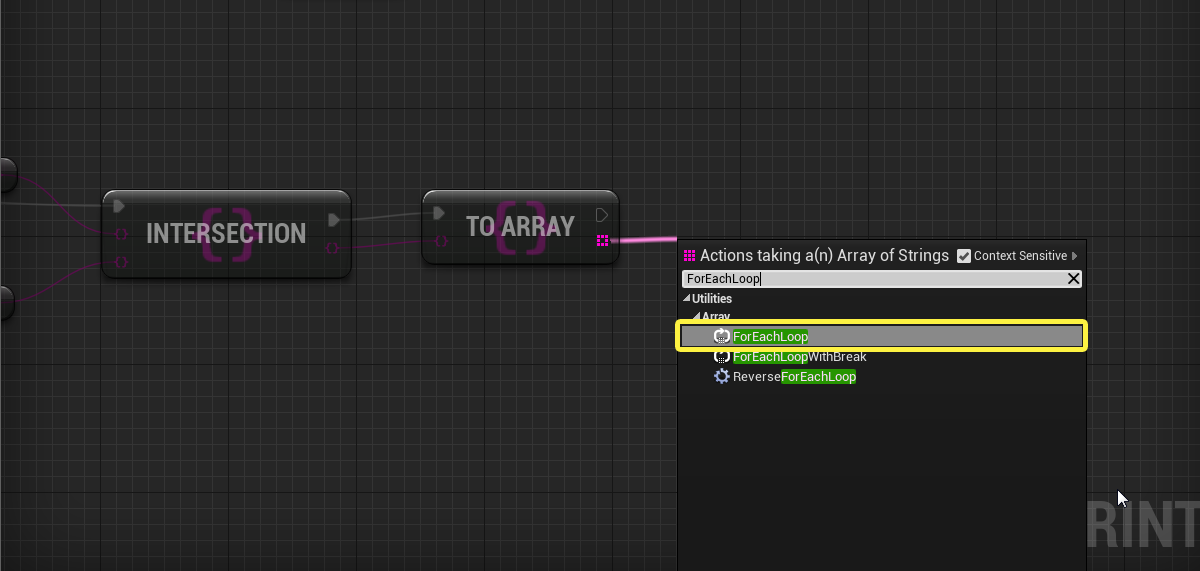
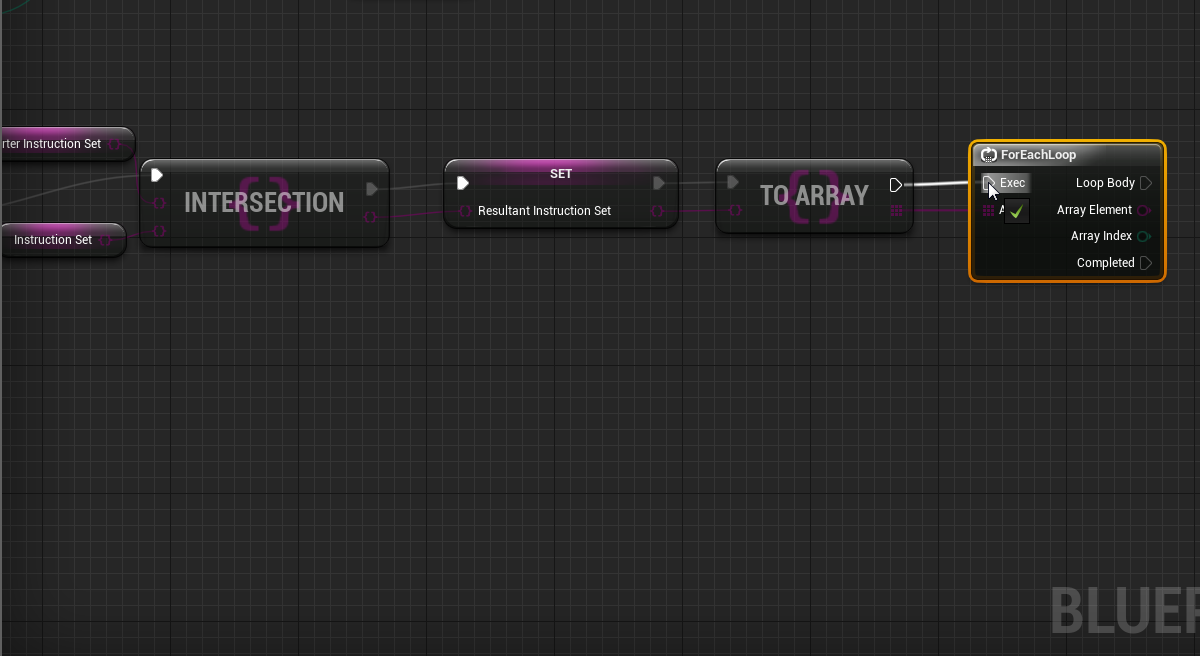
To iterate through the Array's elements, go ahead and drag off the To Array node and add the ForEachLoop node.
![Step3_17.png]()
-
Connect the To Array Node with the ForEachLoop node.
![Step3_18.png]()
-
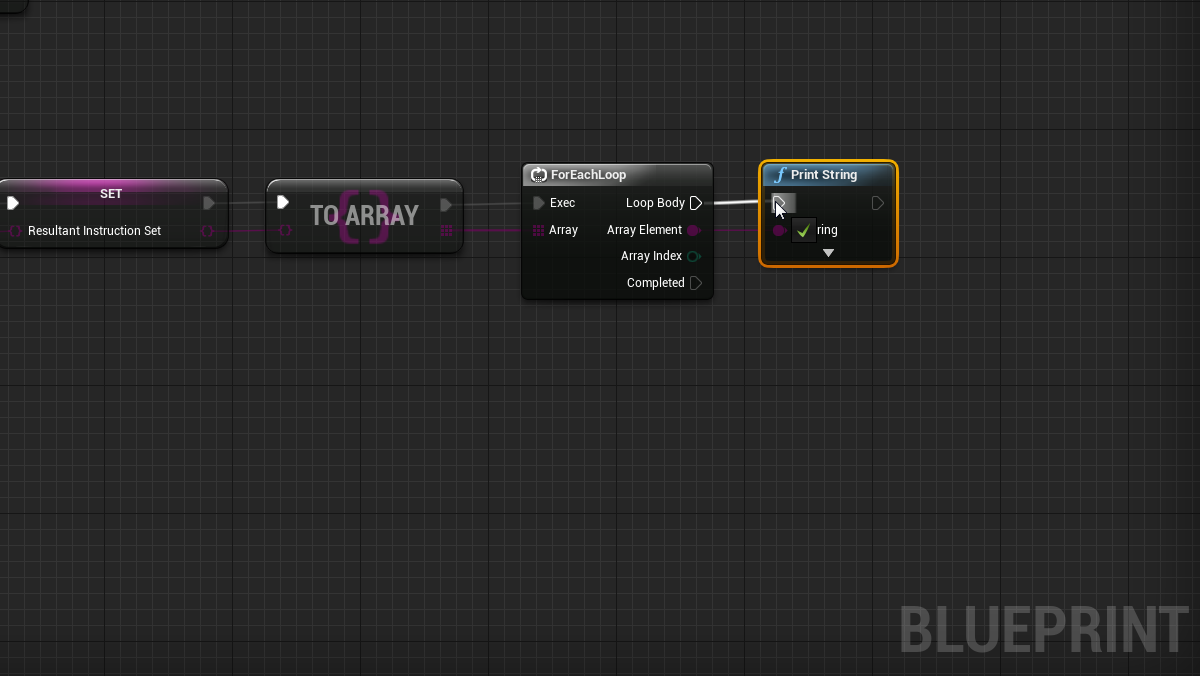
Now, you're ready to print the intersection's results to the Viewport . To do this, drag off the Array Element pin of the ForEachLoop node, search for, and add the Print String node.
![Step3_19.png]()
-
Connect the ForEachLoop node to the Print String node.
![Step3_20.png]()
-
At this point, you're ready to determine what the Resultant Instruction Set will contain. Let's say, for this example, that you want the Resultant Instruction Set variable to only contain
Click,Left,Mouse, andButton. The first thing you'll want to do, is to perform the intersection on paper:Instruction Set
Shorter Instruction Set
Resultant Instruction Set (A ∩ B)
Click
Click
Click
the
Left
Left
Left
Mouse
Mouse
Mouse
Button
Button
Button
and
Fire
As you can see from the paper-study you just performed, items common to both Instruction Set and Shorter Instruction Set are stored in the Resultant Set container. Whenever you're performing logical operations on Sets, it's good practice to perform the operation on paper (or a whiteboard) before scripting the logic into your Blueprint Graphs.
-
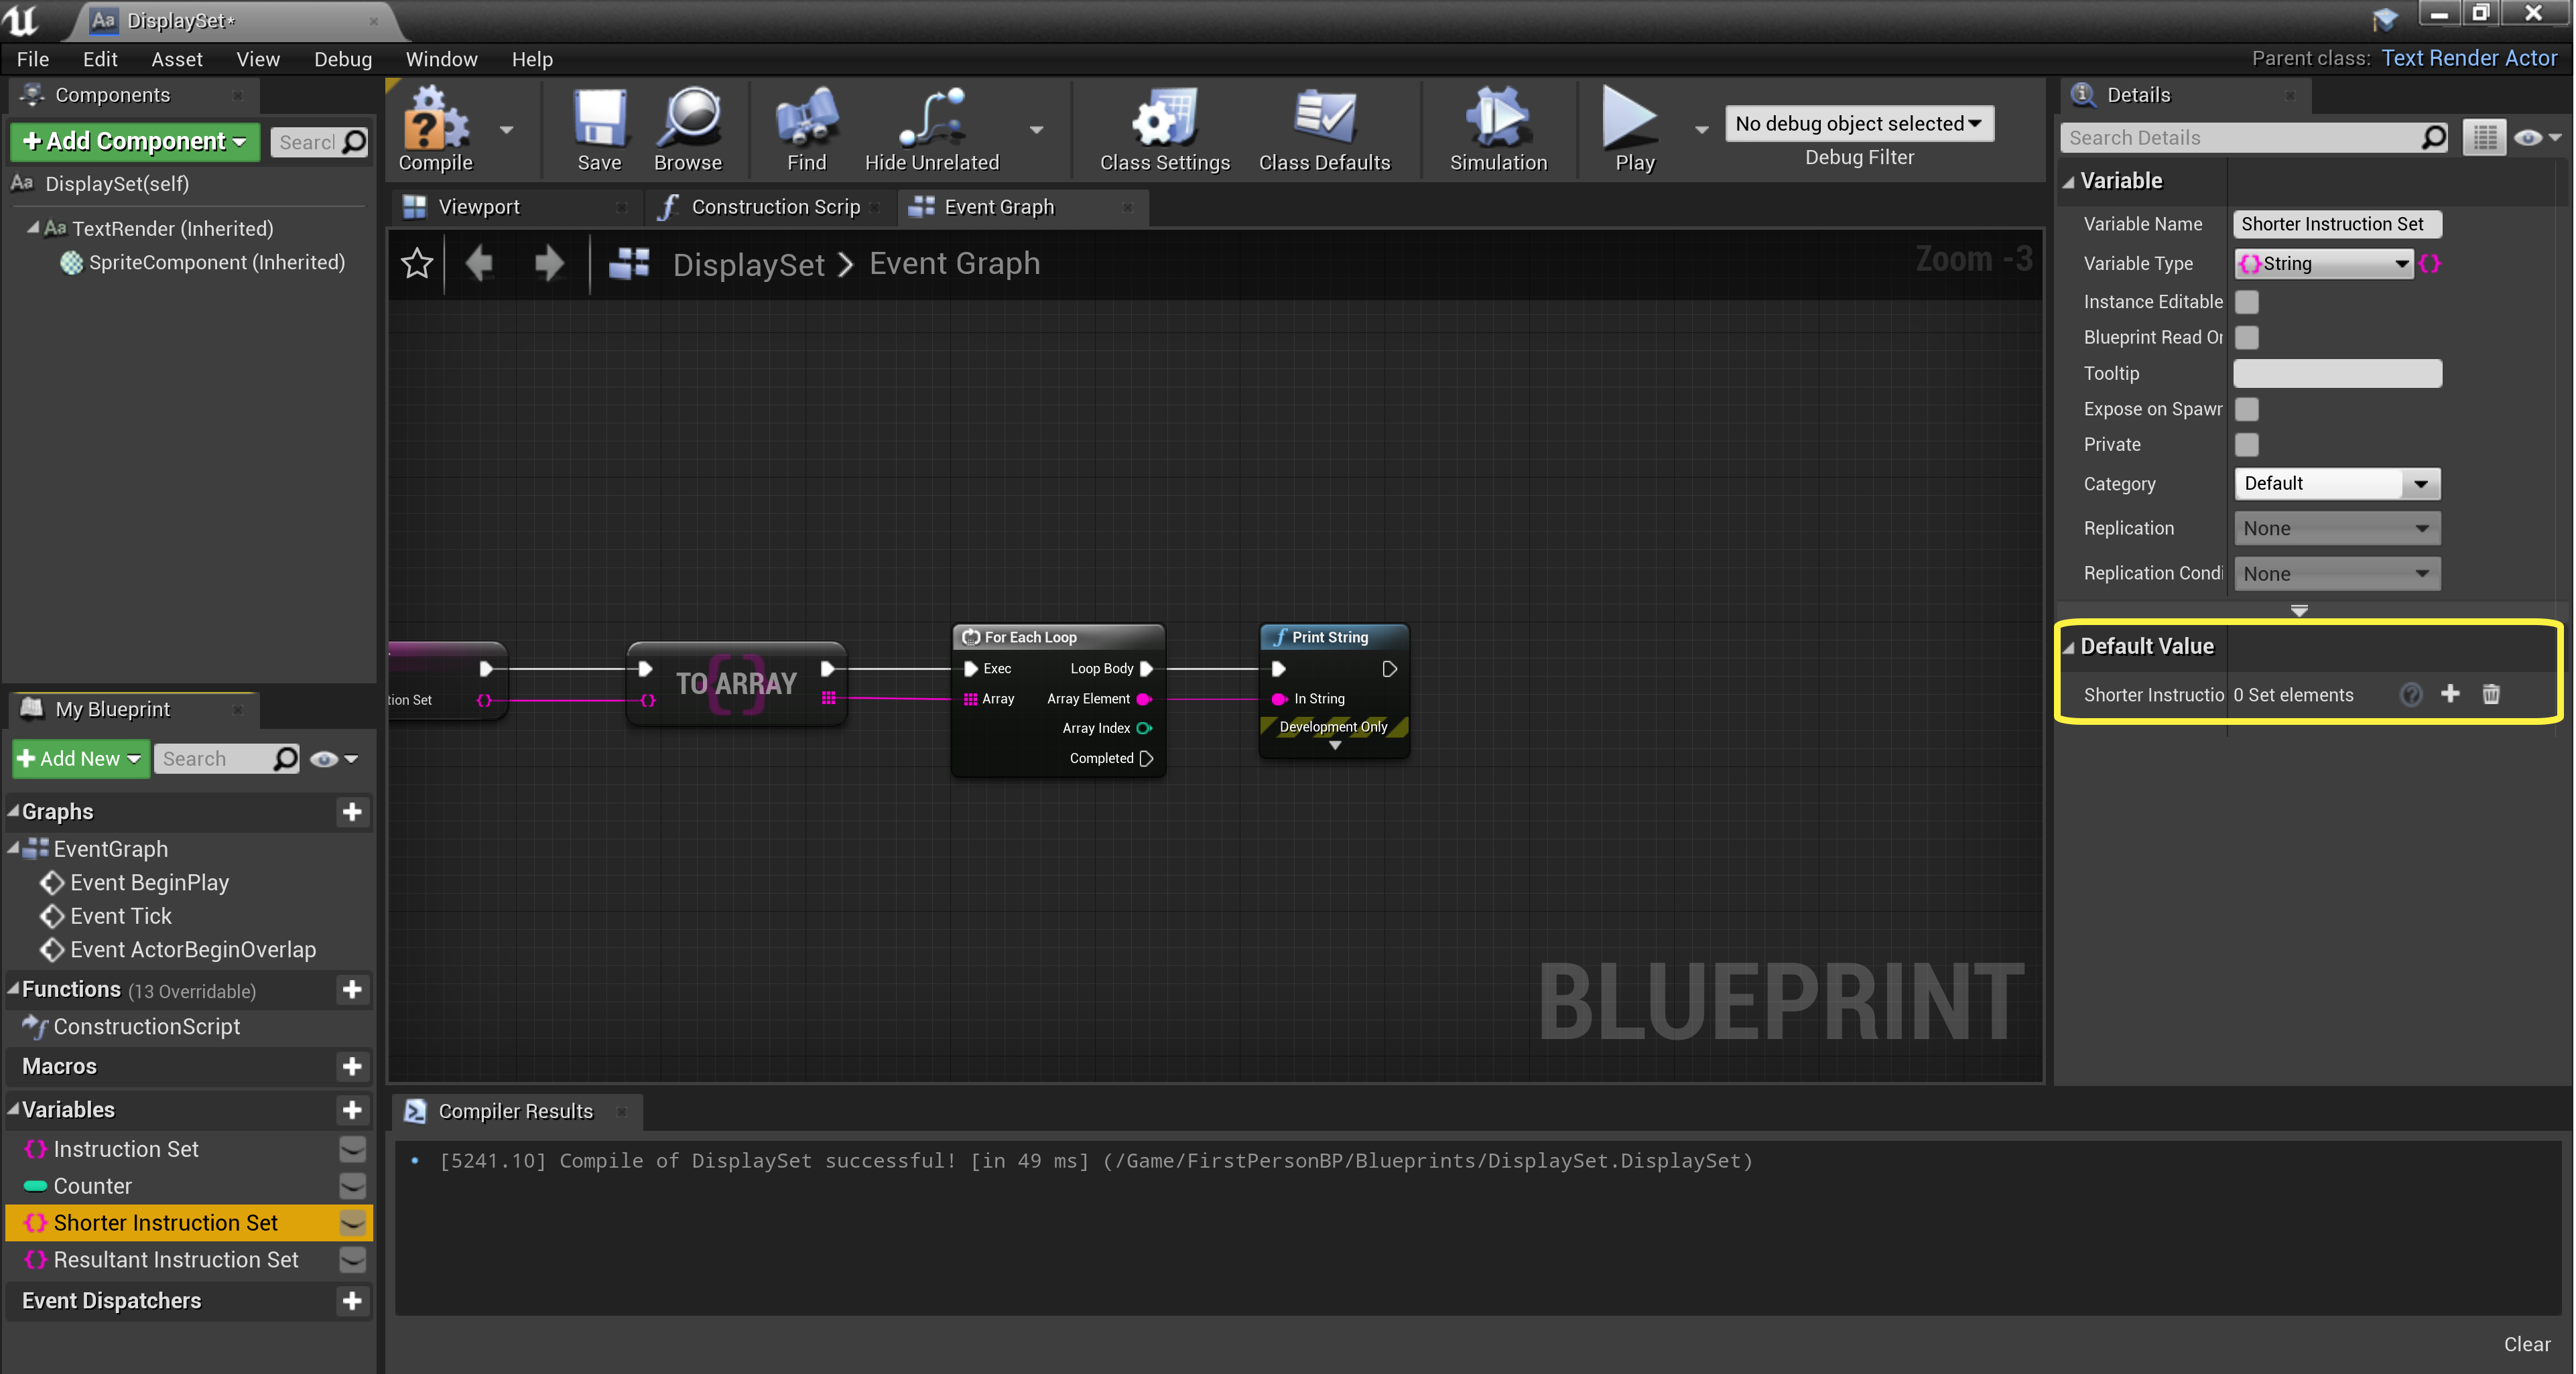
Now that you know what items you want to store in the Shorter Instruction Set container, go ahead and select Shorter Instruction Set to inspect the container's contents.
![Step3_21.png]()
Click for full image.
As you can see from the highlighted image, Shorter Instruction Set is currently empty. At this time, if you were to perform an intersection of Shorter Instruction Set with Instruction Set , the Resultant Instruction Set container would be empty.
-
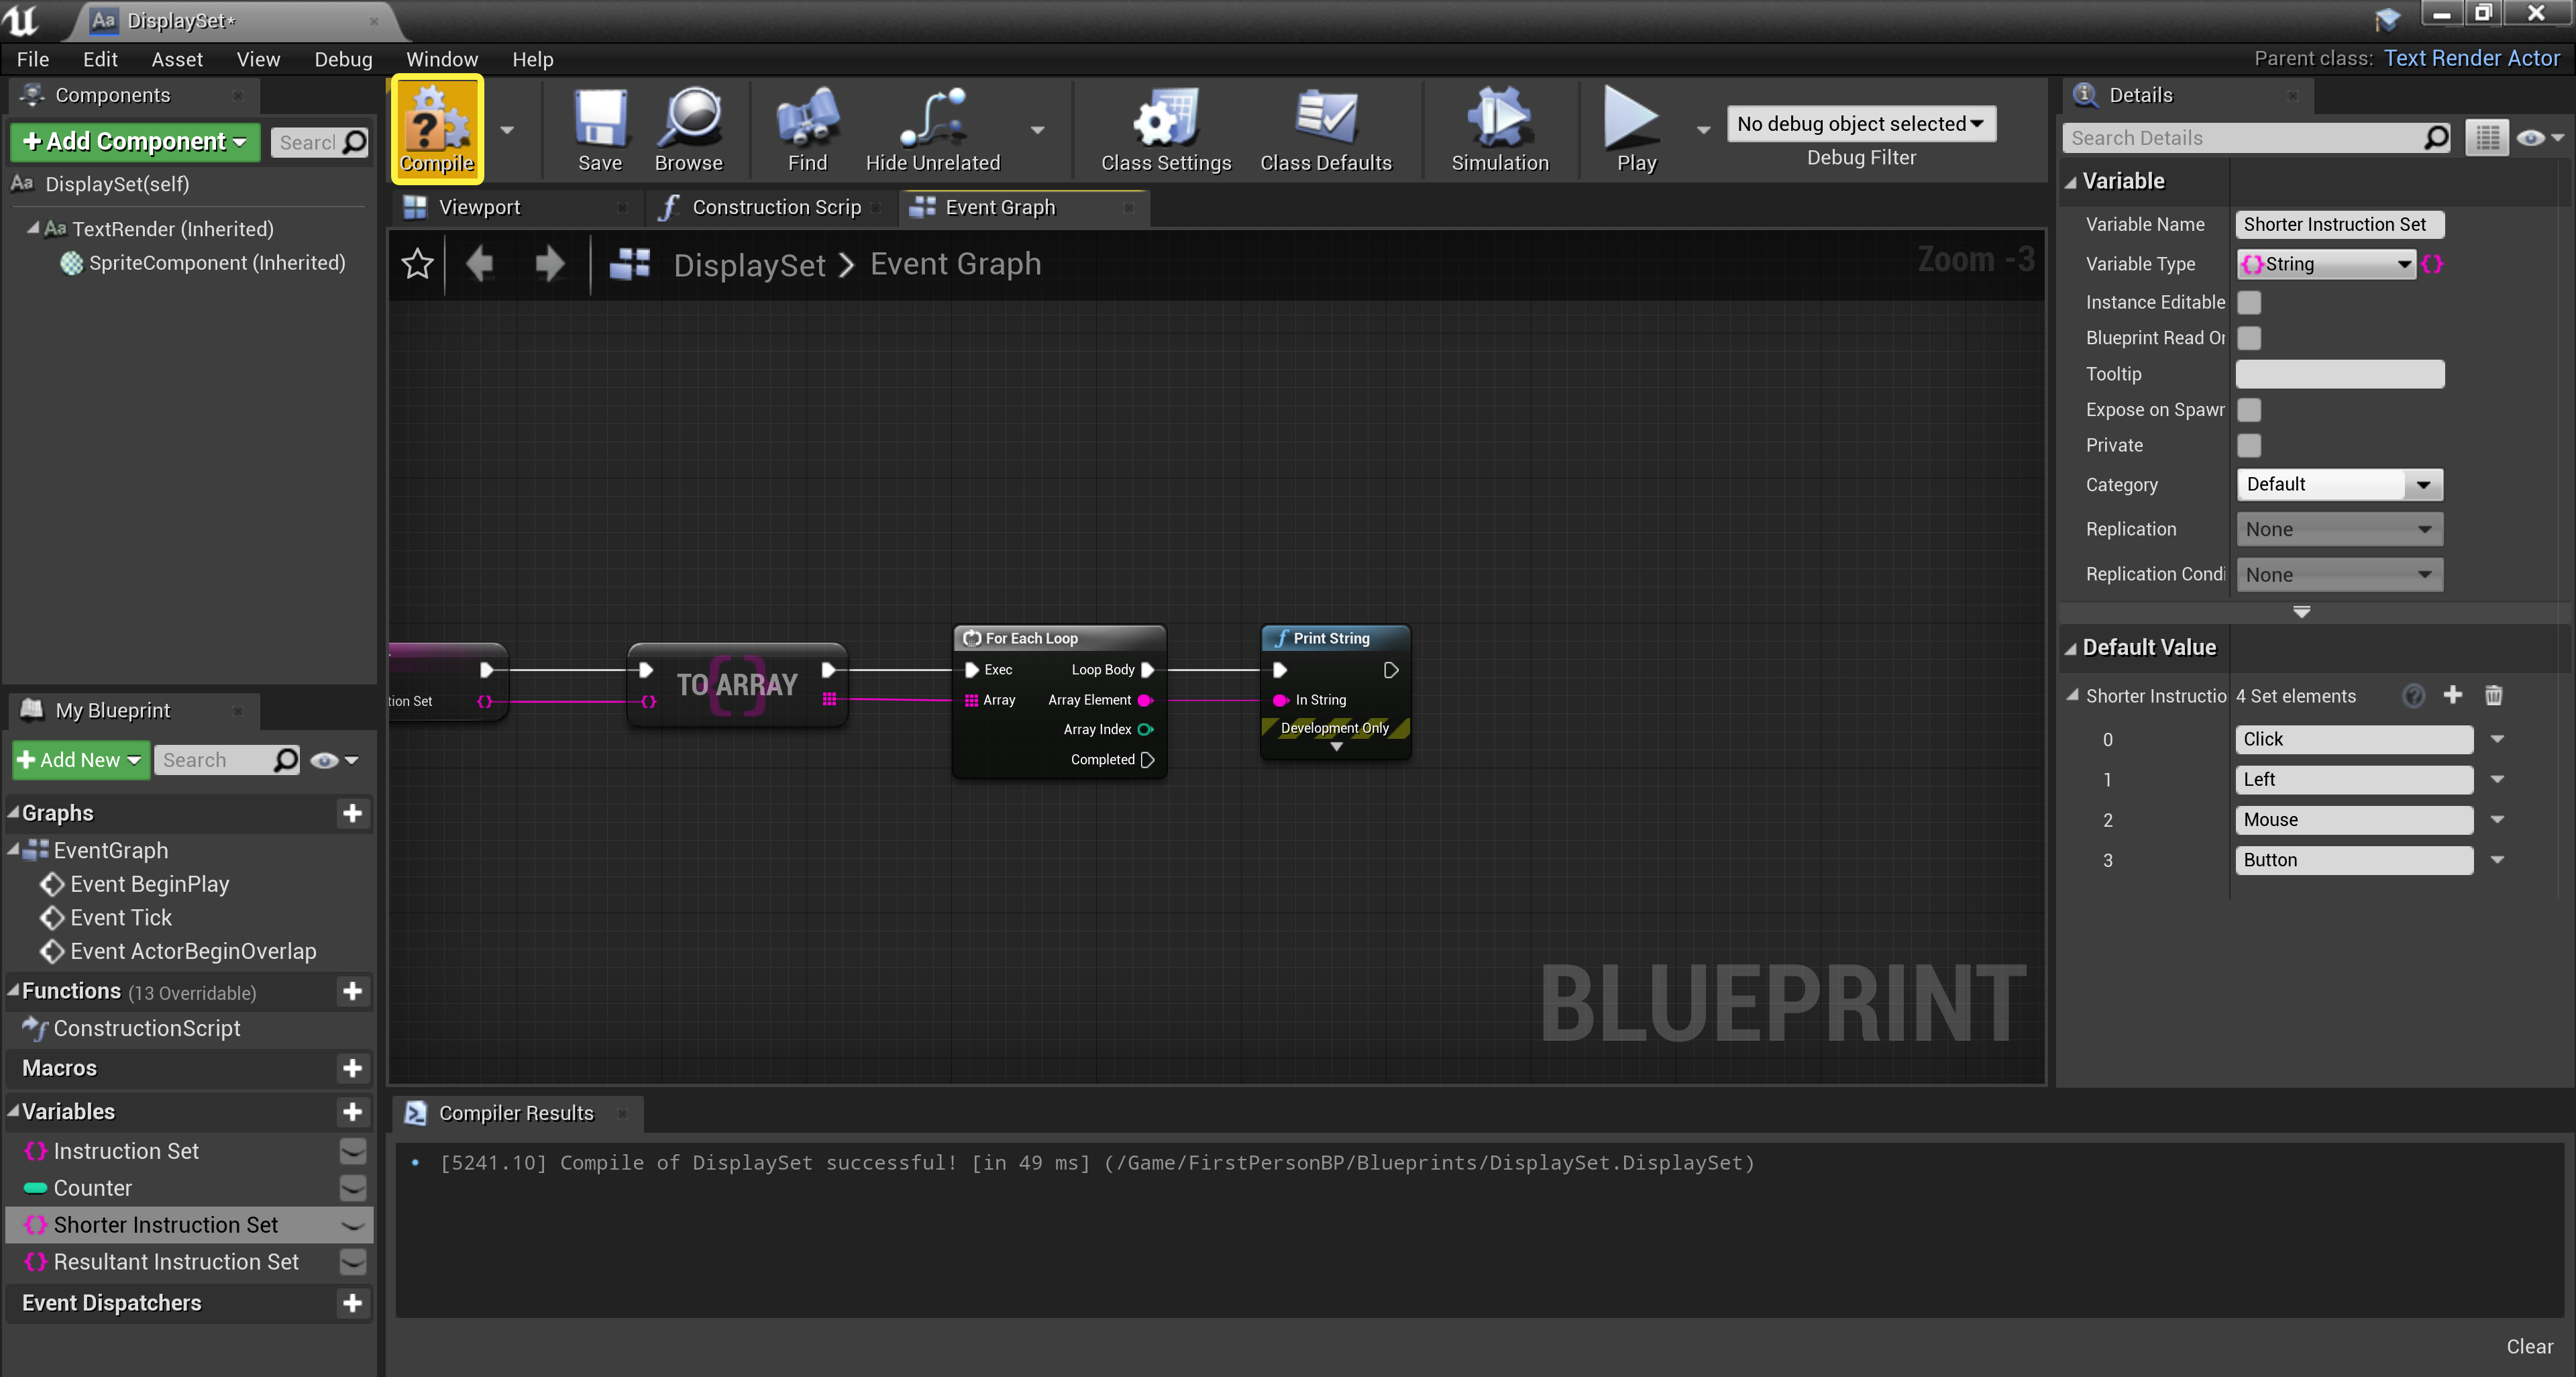
Go ahead and fill the Shorter Instruction Set container with the following elements:
![Step3_22.png]()
-
After inspecting your completed script, go ahead and click the Compile button.
![Step3_23.png]()
Click for full image.
-
Finally, click the Save button before going back to the Editor's Viewport interface.
![Step3_24.png]()
Click for full image.
-
From the Editor's Viewport interface, click the Play button to see the updated script at work.
![Step3_25.png]()
Click for full image.


Section Result
As you can see from the video, when a First Person Projectile collides with the Display Set collision box, the contents of Resultant Instruction Set are printed to the Viewport . Looking at the printed items, you'll notice that the items contained in Resultant Instruction Set are not in any predictable order, which is a property of Blueprint Sets. Check out the next step to learn how to perform a Union of two Blueprint Sets.
4. Performing a Union
In this step, the final one of this tutorial, you'll learn how to perform a Union of two Blueprint Sets, ultimately printing the result of the Union in the game's Viewport .
-
From your project's Content Browser , double-click the Display Set TextRender Actor to open its Blueprint Event Graph .
![Step4_1.png]()
Click for full image.
-
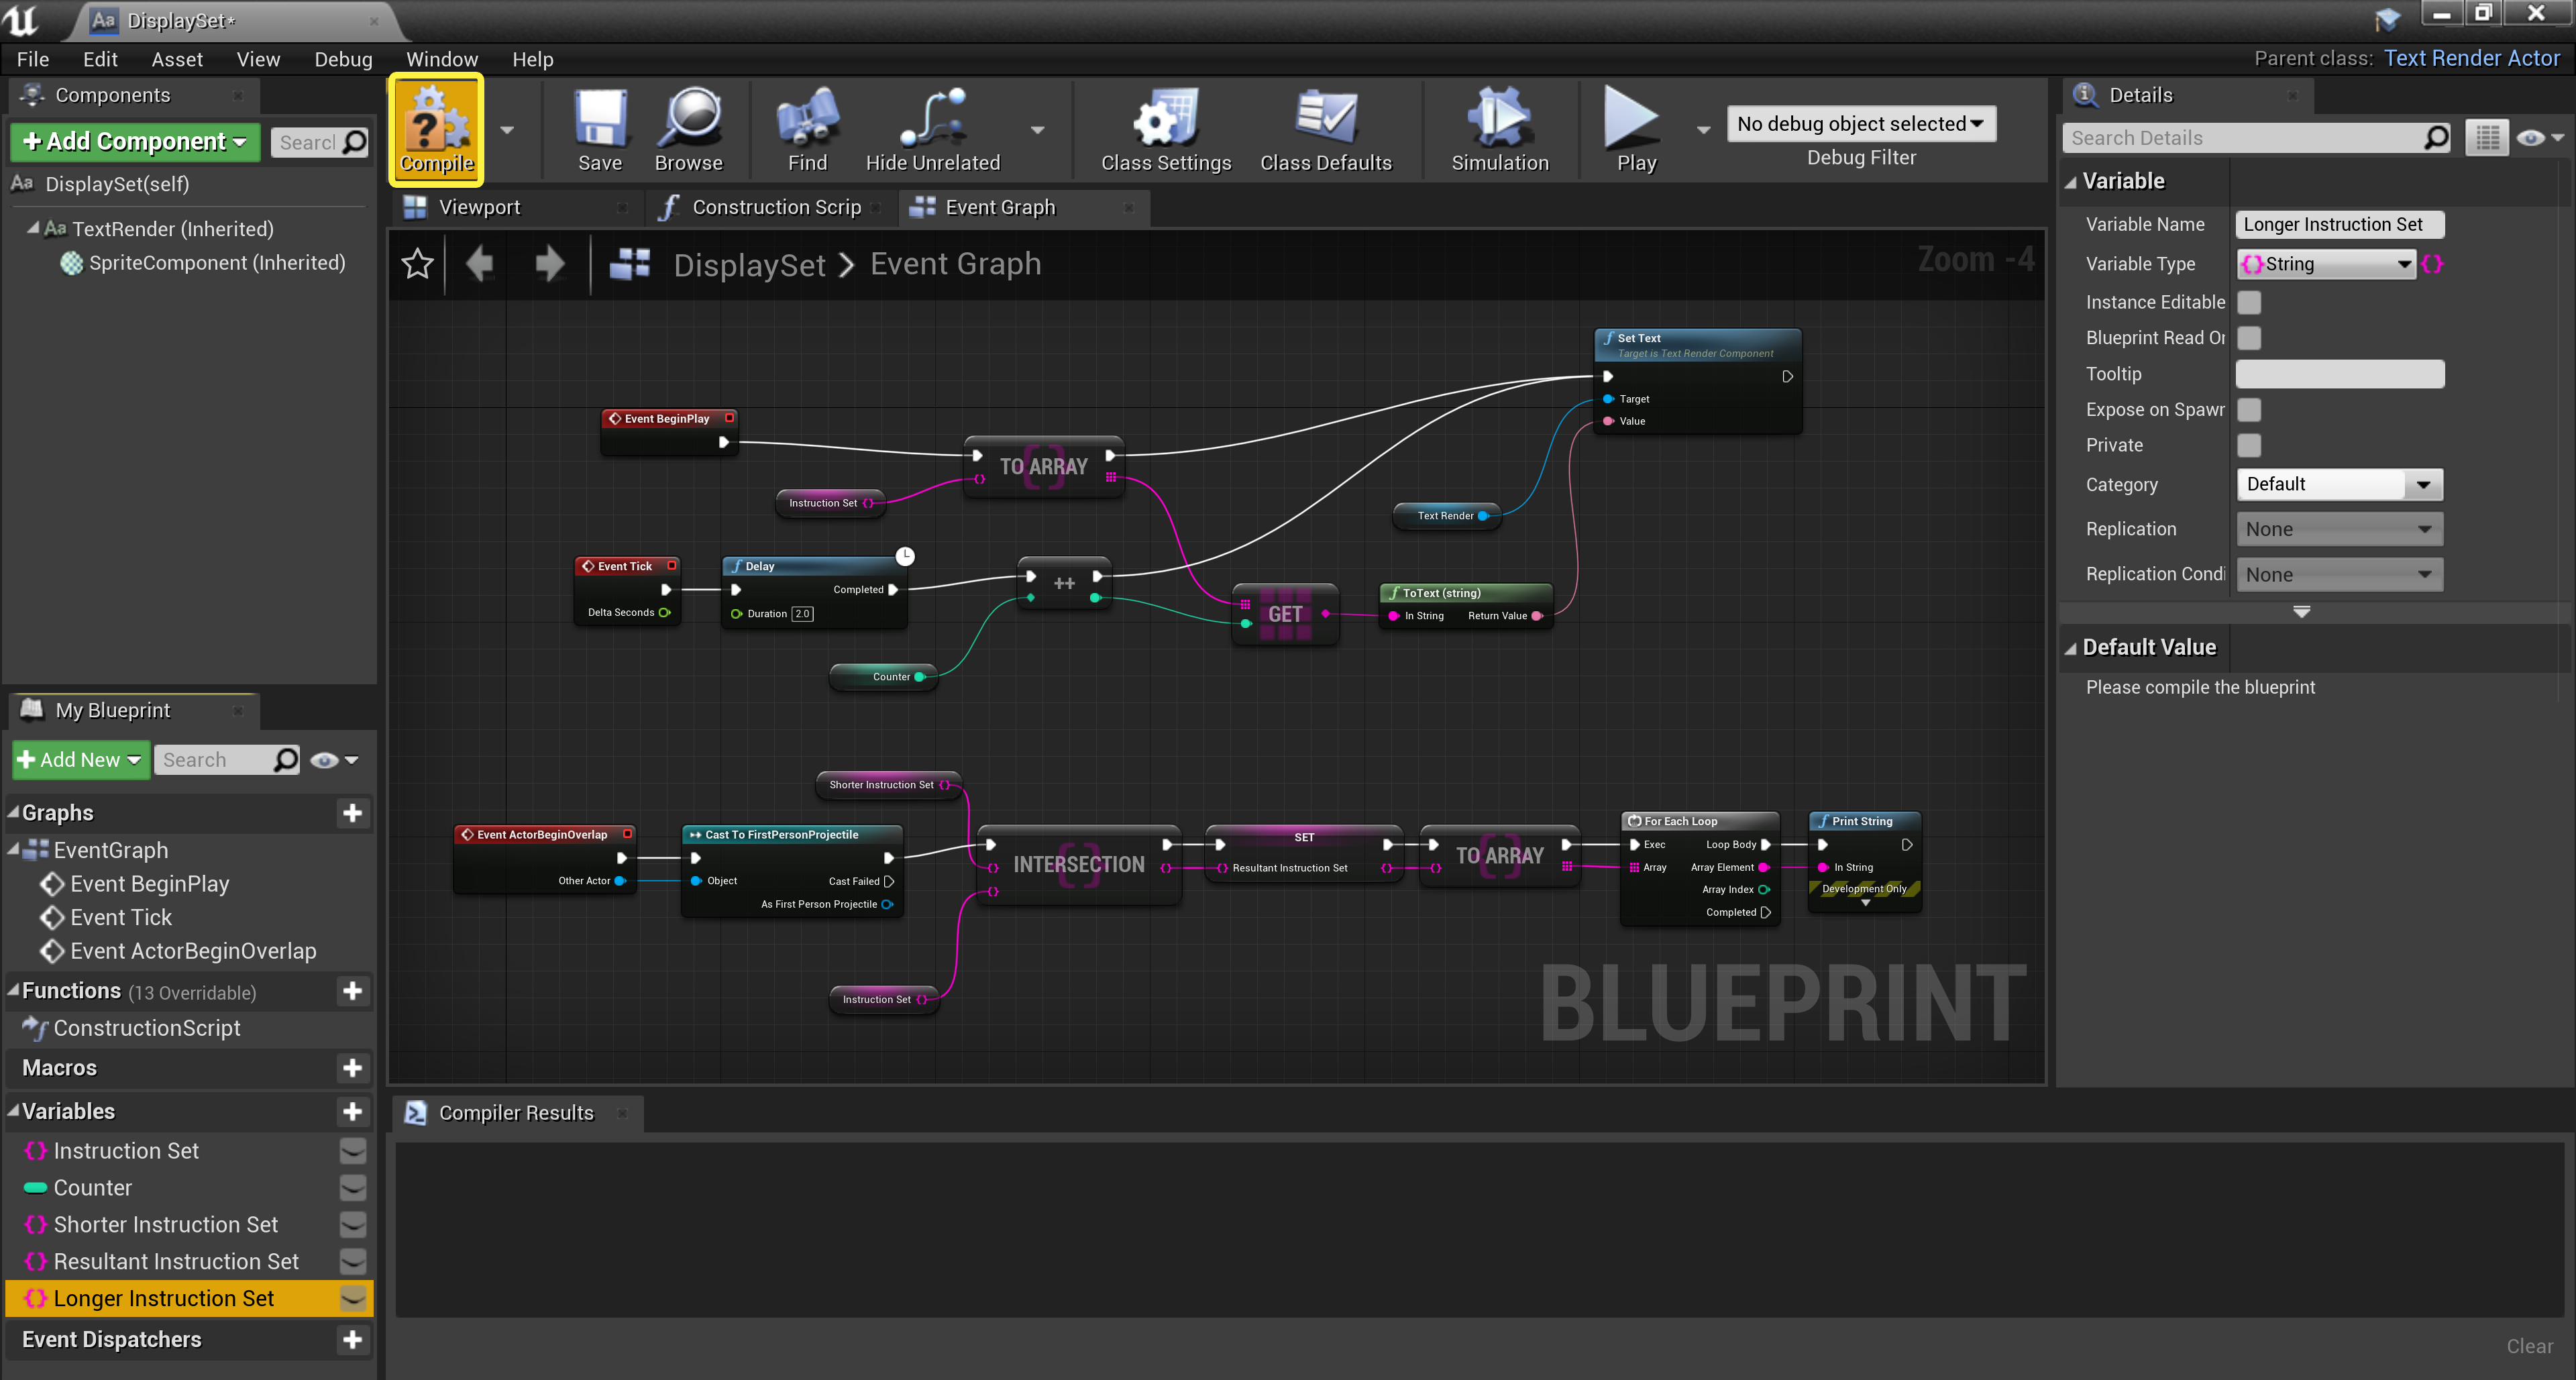
At this point in the tutorial, you'll want to create a new Blueprint Set container for the upcoming Union. Go ahead and right-click on the Shorter Instruction Set Variable and select Duplicate from the drop-down list to create a new Blueprint Set variable, naming it
Longer Instruction Set.![Step4_2.png]()
-
Now, go ahead and click the Compile button.
![Step4_3.png]()
Click for full image.
-
Click the Removes all items button to clear all of the items from the Longer Instruction Set .
![Step4_4.png]()
Click for full image.
-
Add the following items to your new Longer Instruction Set container:
![Step4_5.png]()
-
Drag the Longer Instruction Set and the Instruction Set variables into the Blueprint Graph.
![Step4_6.png]()
Click for full image.


Scripting the Logic
-
To get started with building your new logic, drag off the Longer Instruction Set and add the Union node from the Set Utilities interface.
![Step4_7.png]()
-
Connect the Instruction Set node to the Union node.
![Step4_8.png]()
-
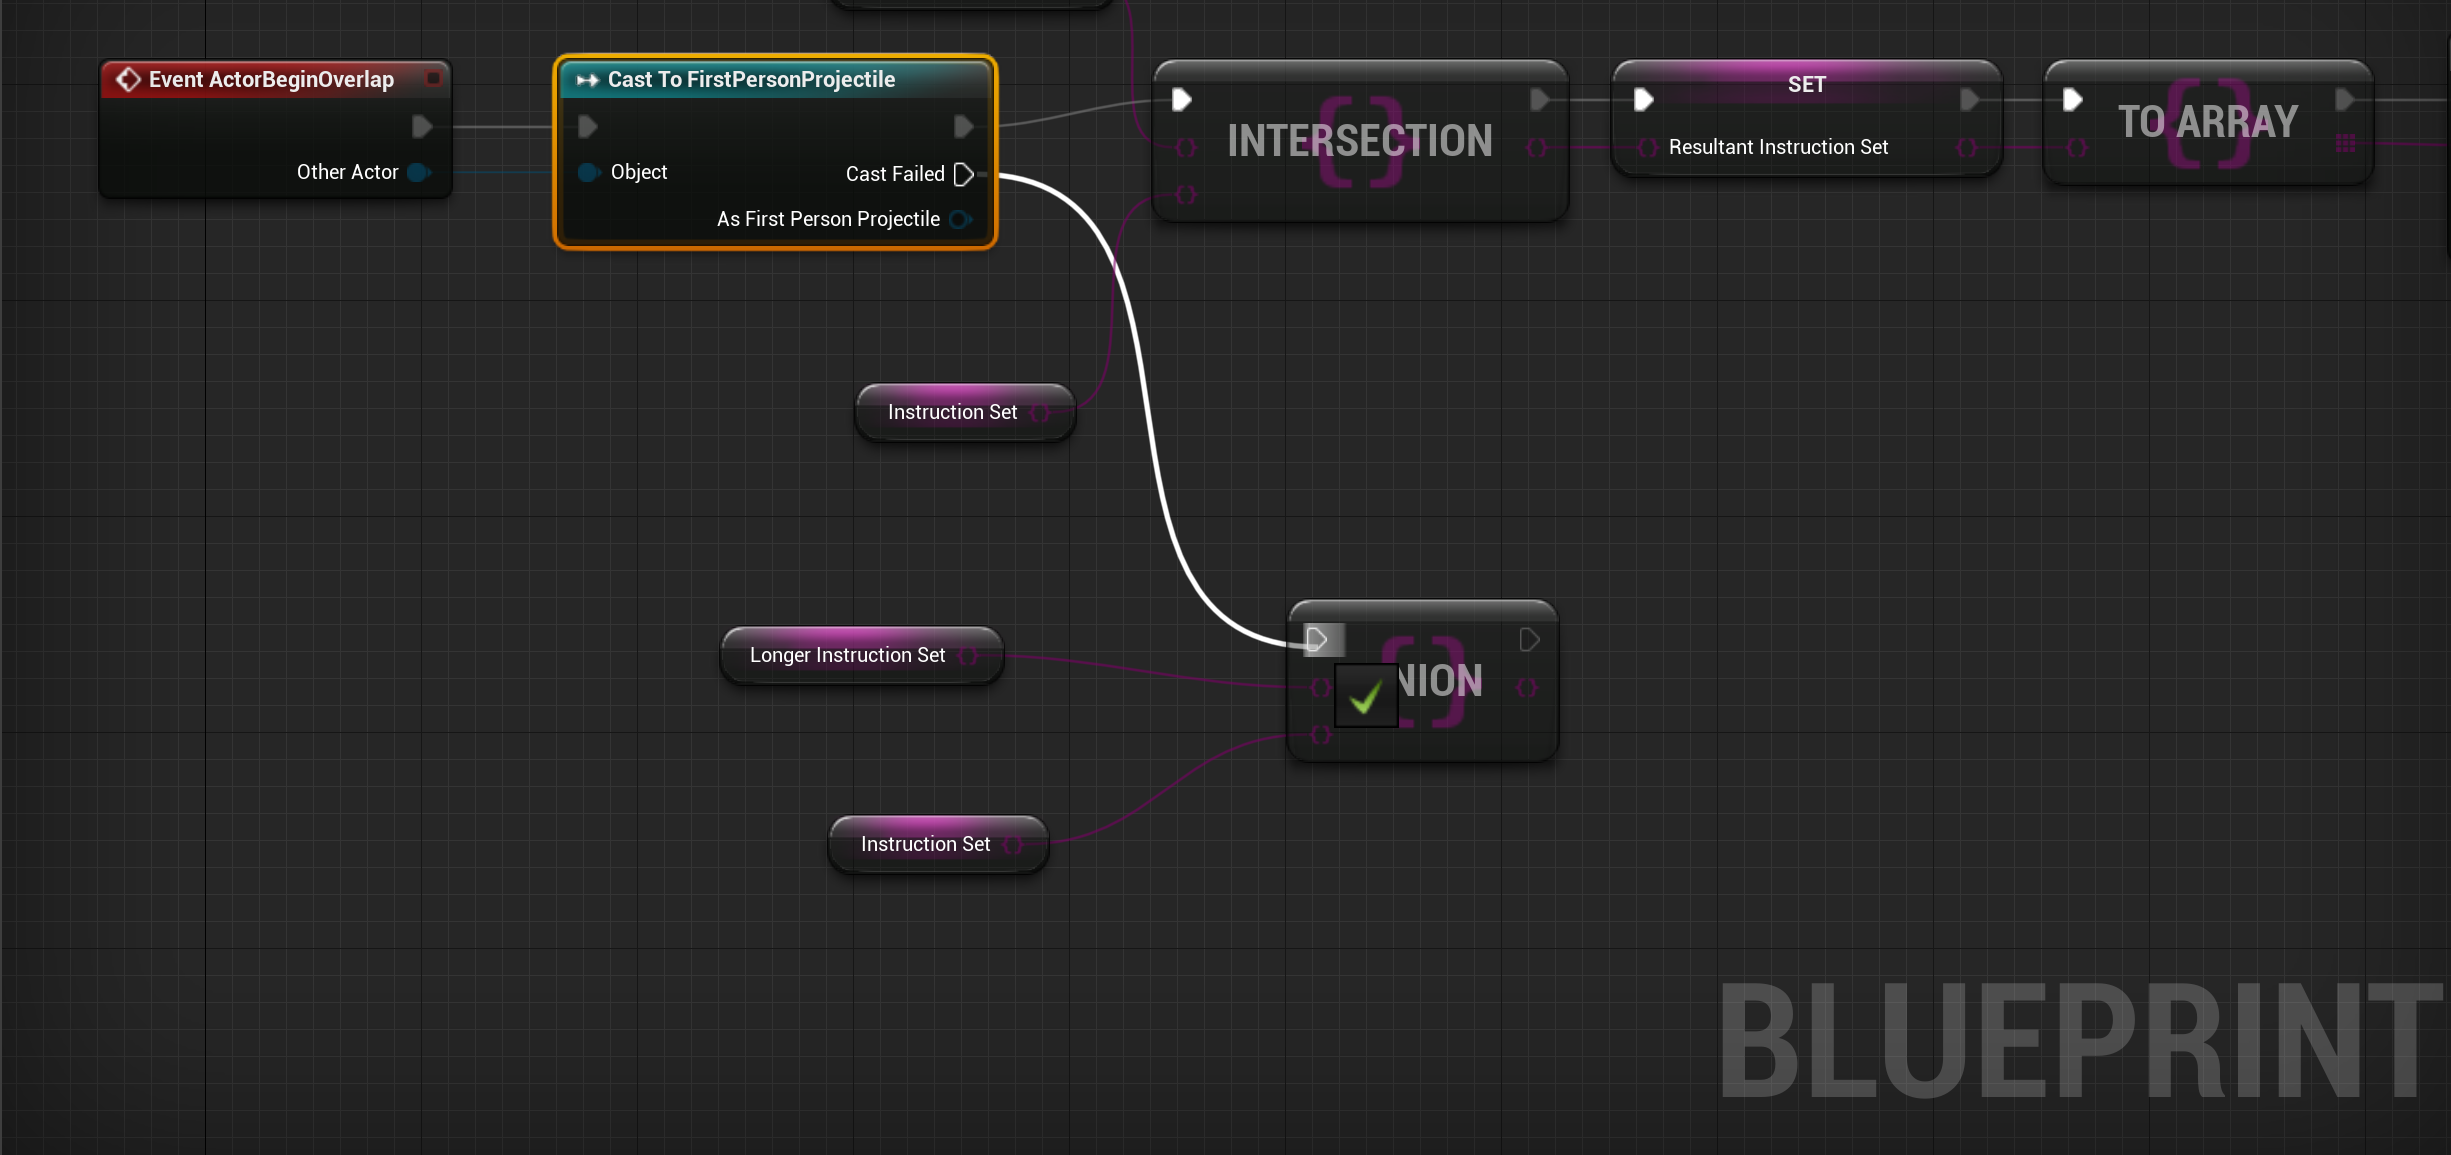
Connect the Cast Failed pin of the Cast To FirstPersonProjectile node to the Union node.
![Step4_9.png]()
-
Now, drag off the Union node, search for, and add the To Array node.
![Step4_10.png]()
-
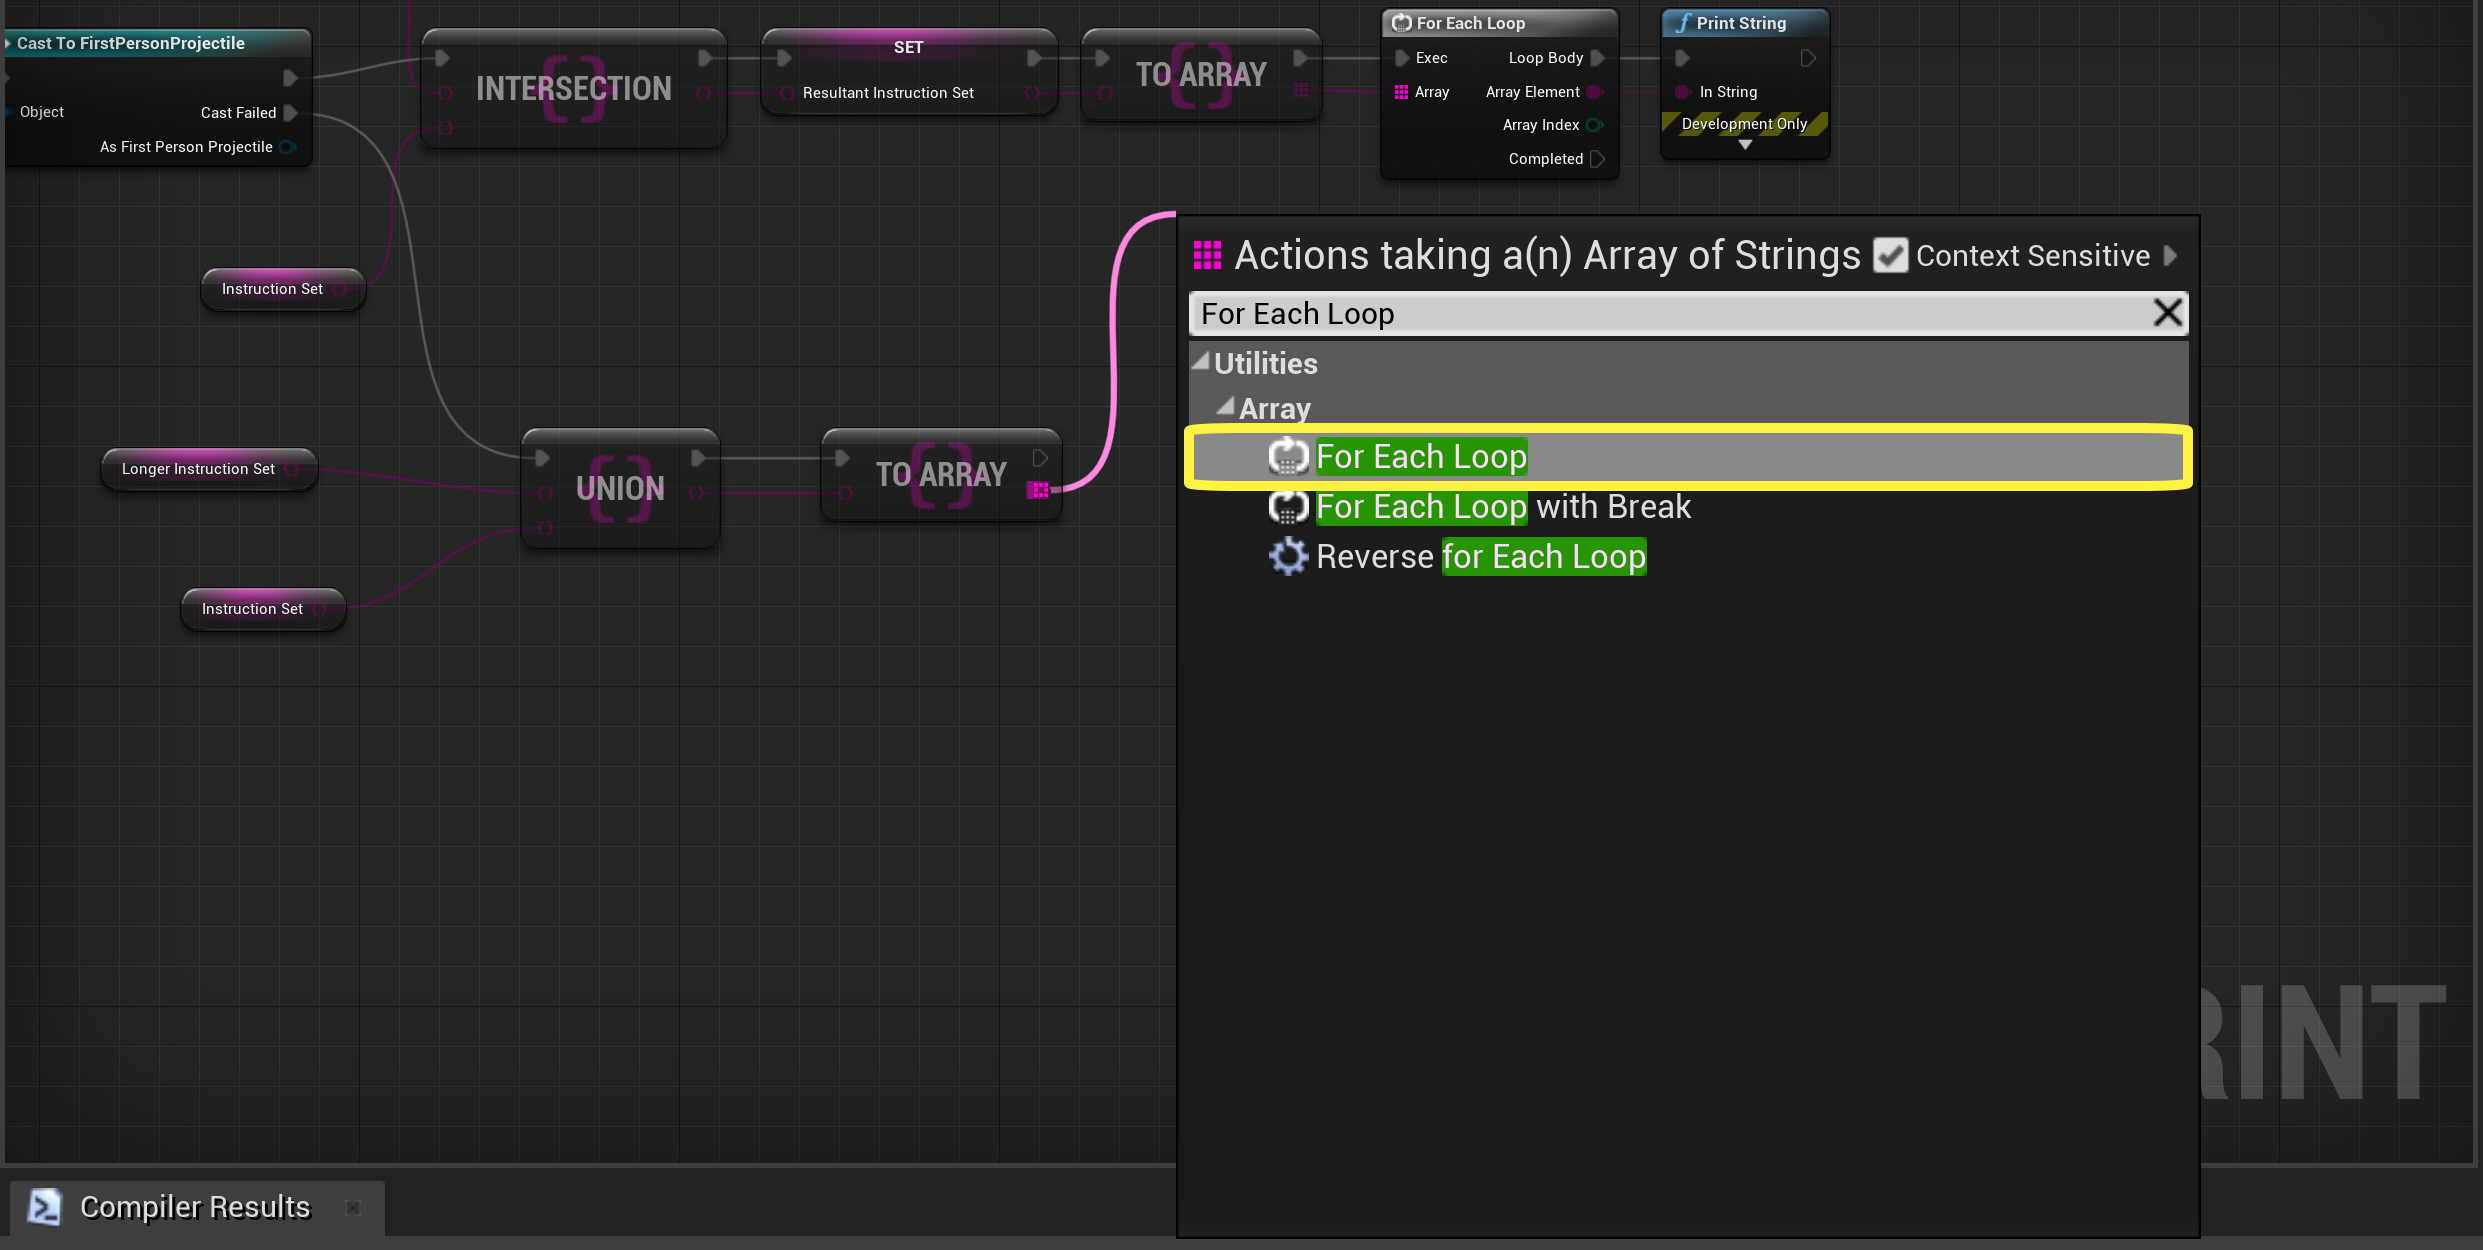
Drag off the To Array node, search for, and add the ForEachLoop node.
![Step4_11.png]()
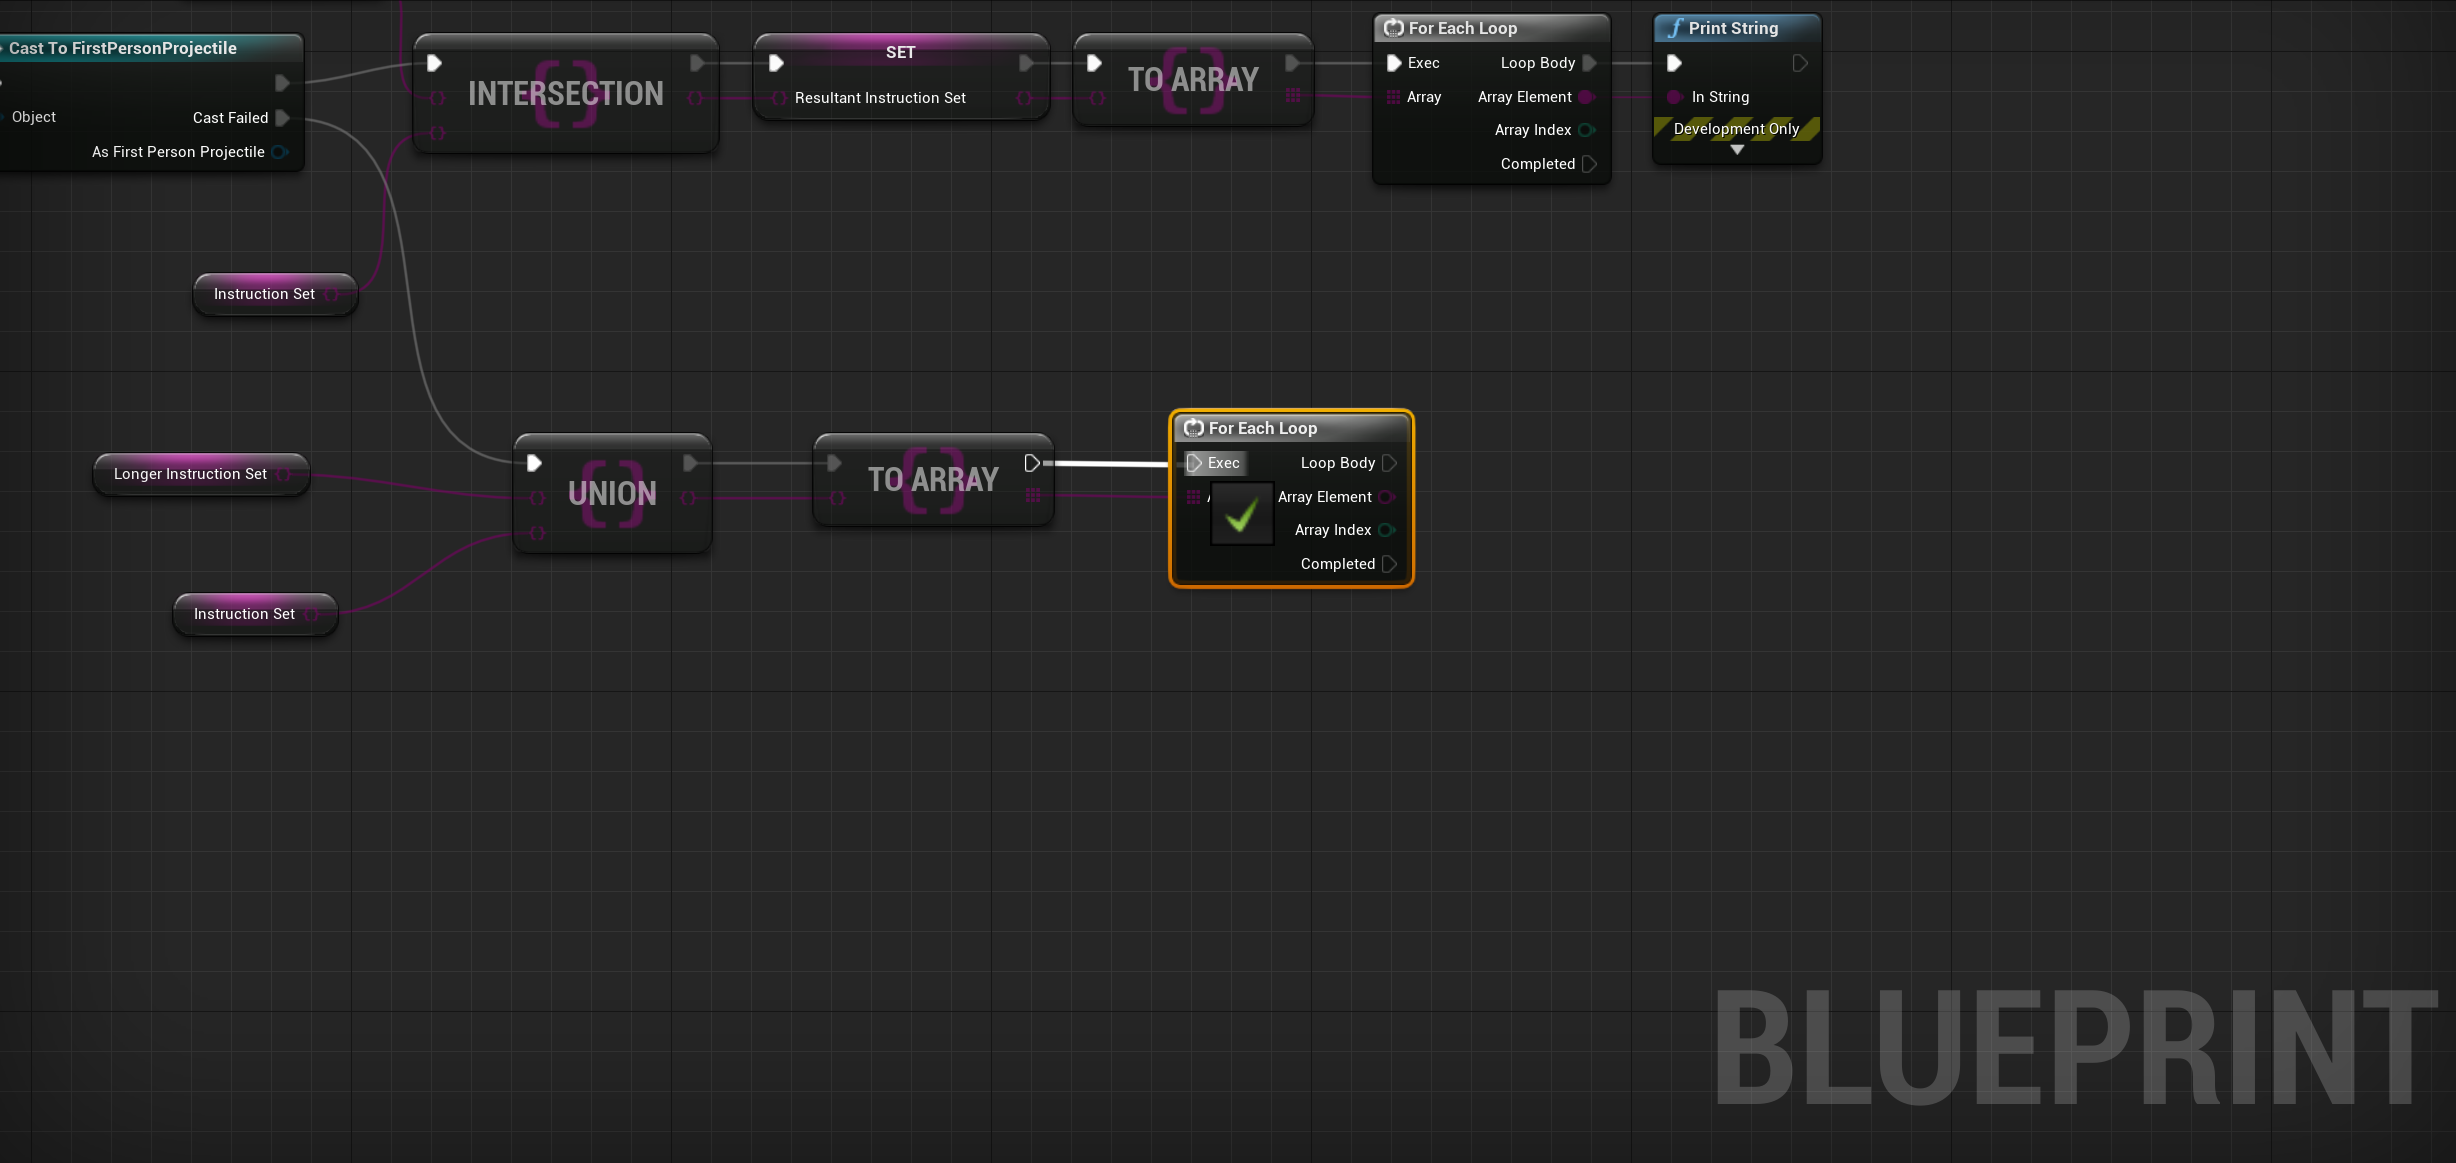
-
Connect the To Array node to the ForEachLoop node.
![Step4_12.png]()
-
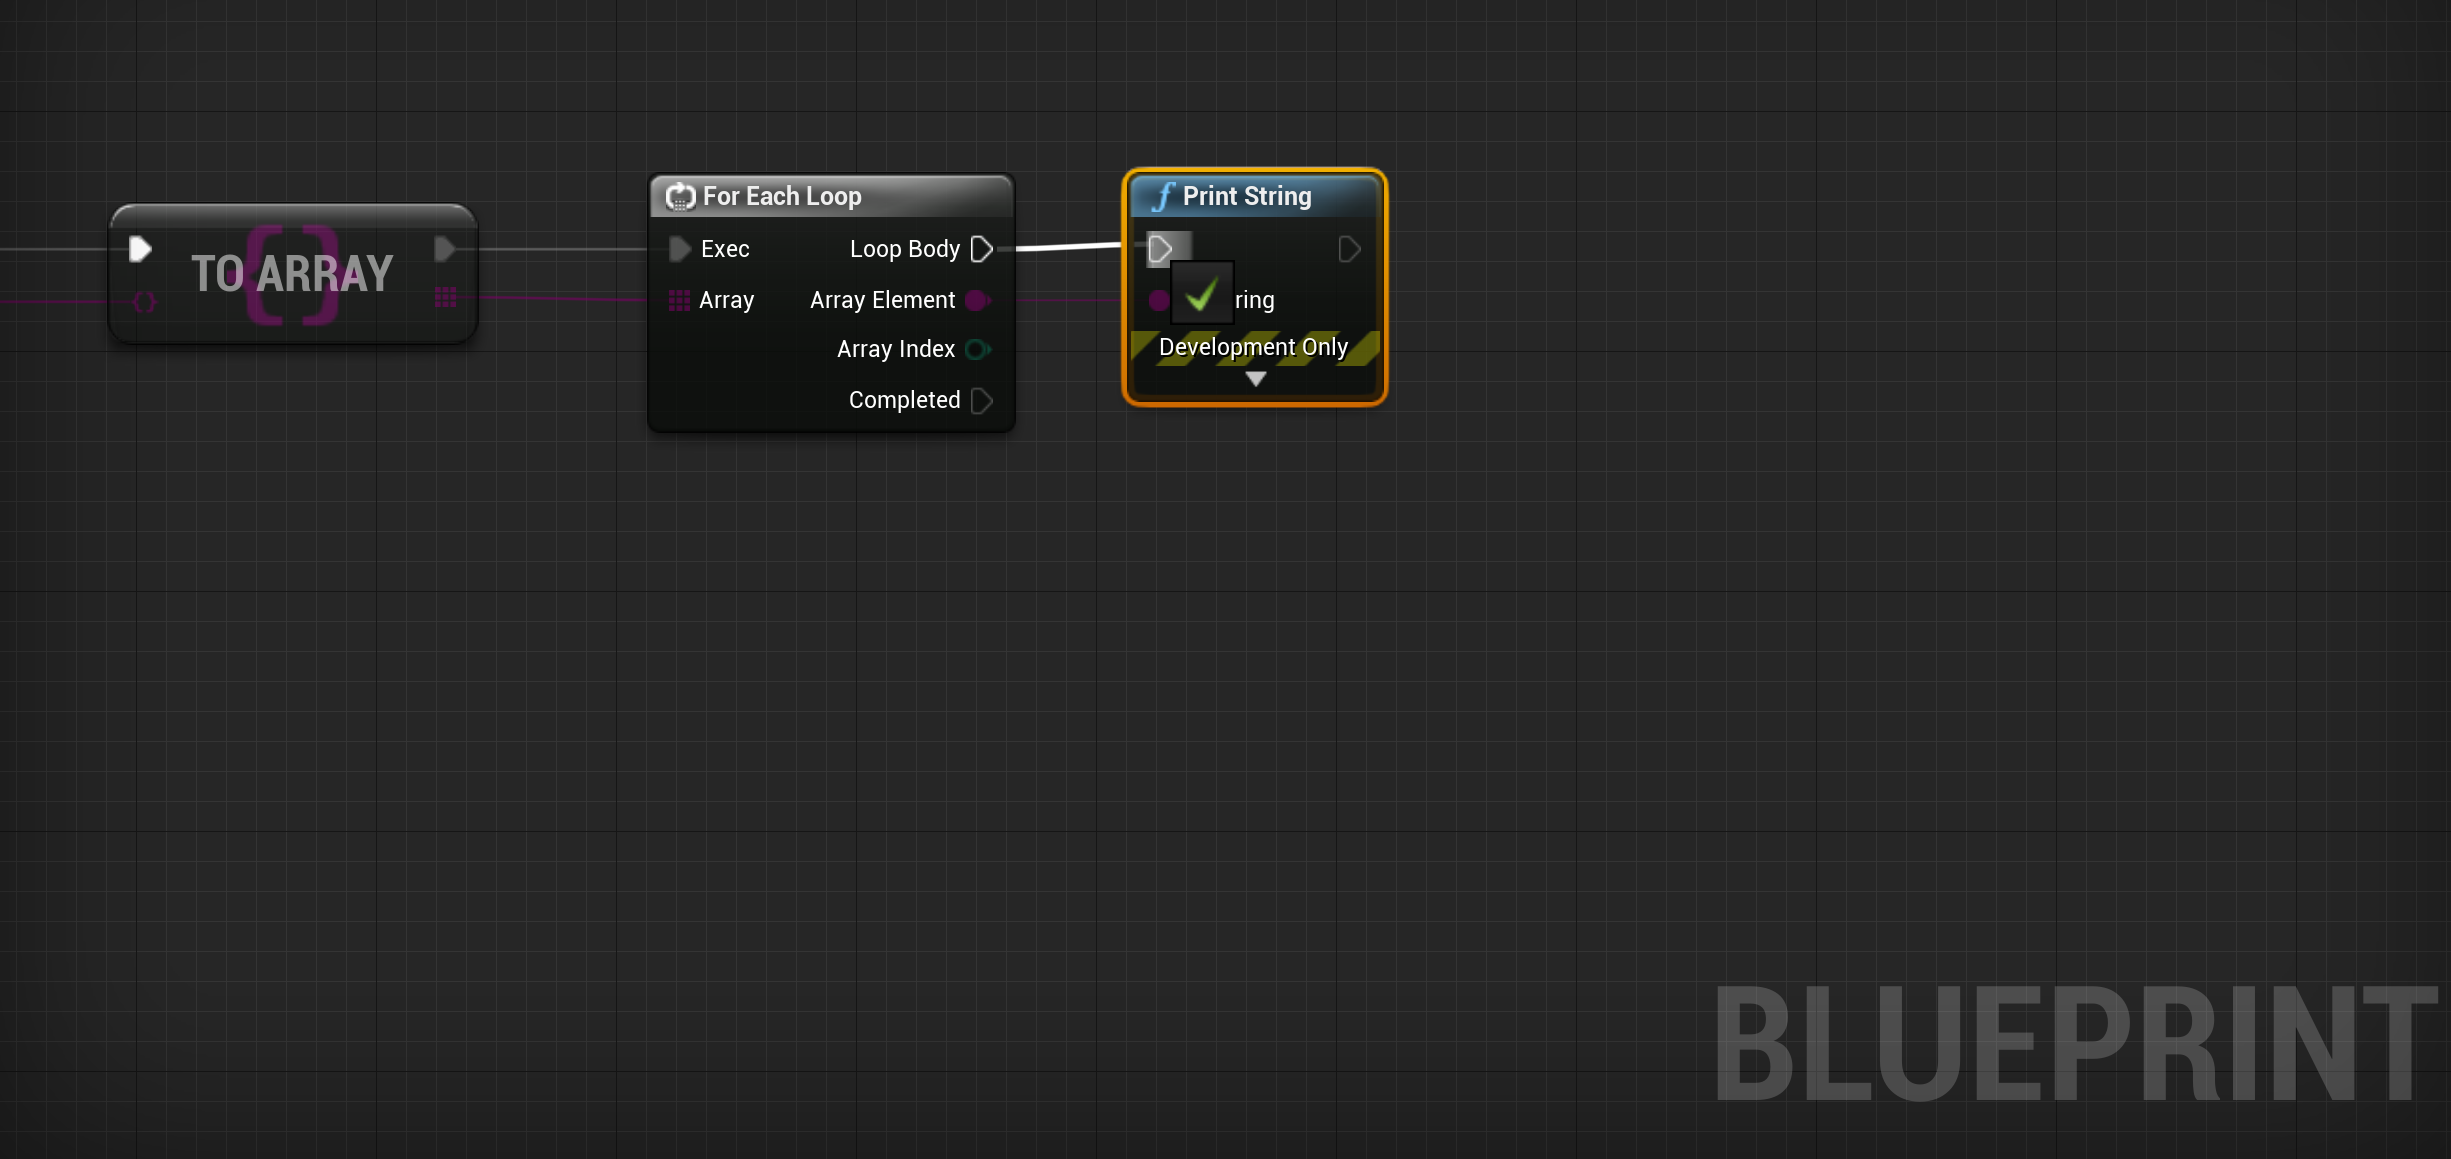
Now, you're ready to print the union's results to the Viewport . To do this, drag off the Array Element pin of the ForEachLoop node, search for, and add the Print String node.
![Step4_13.png]()
-
Connect the ForEachLoop node to the Print String node.
![Step4_14.png]()
-
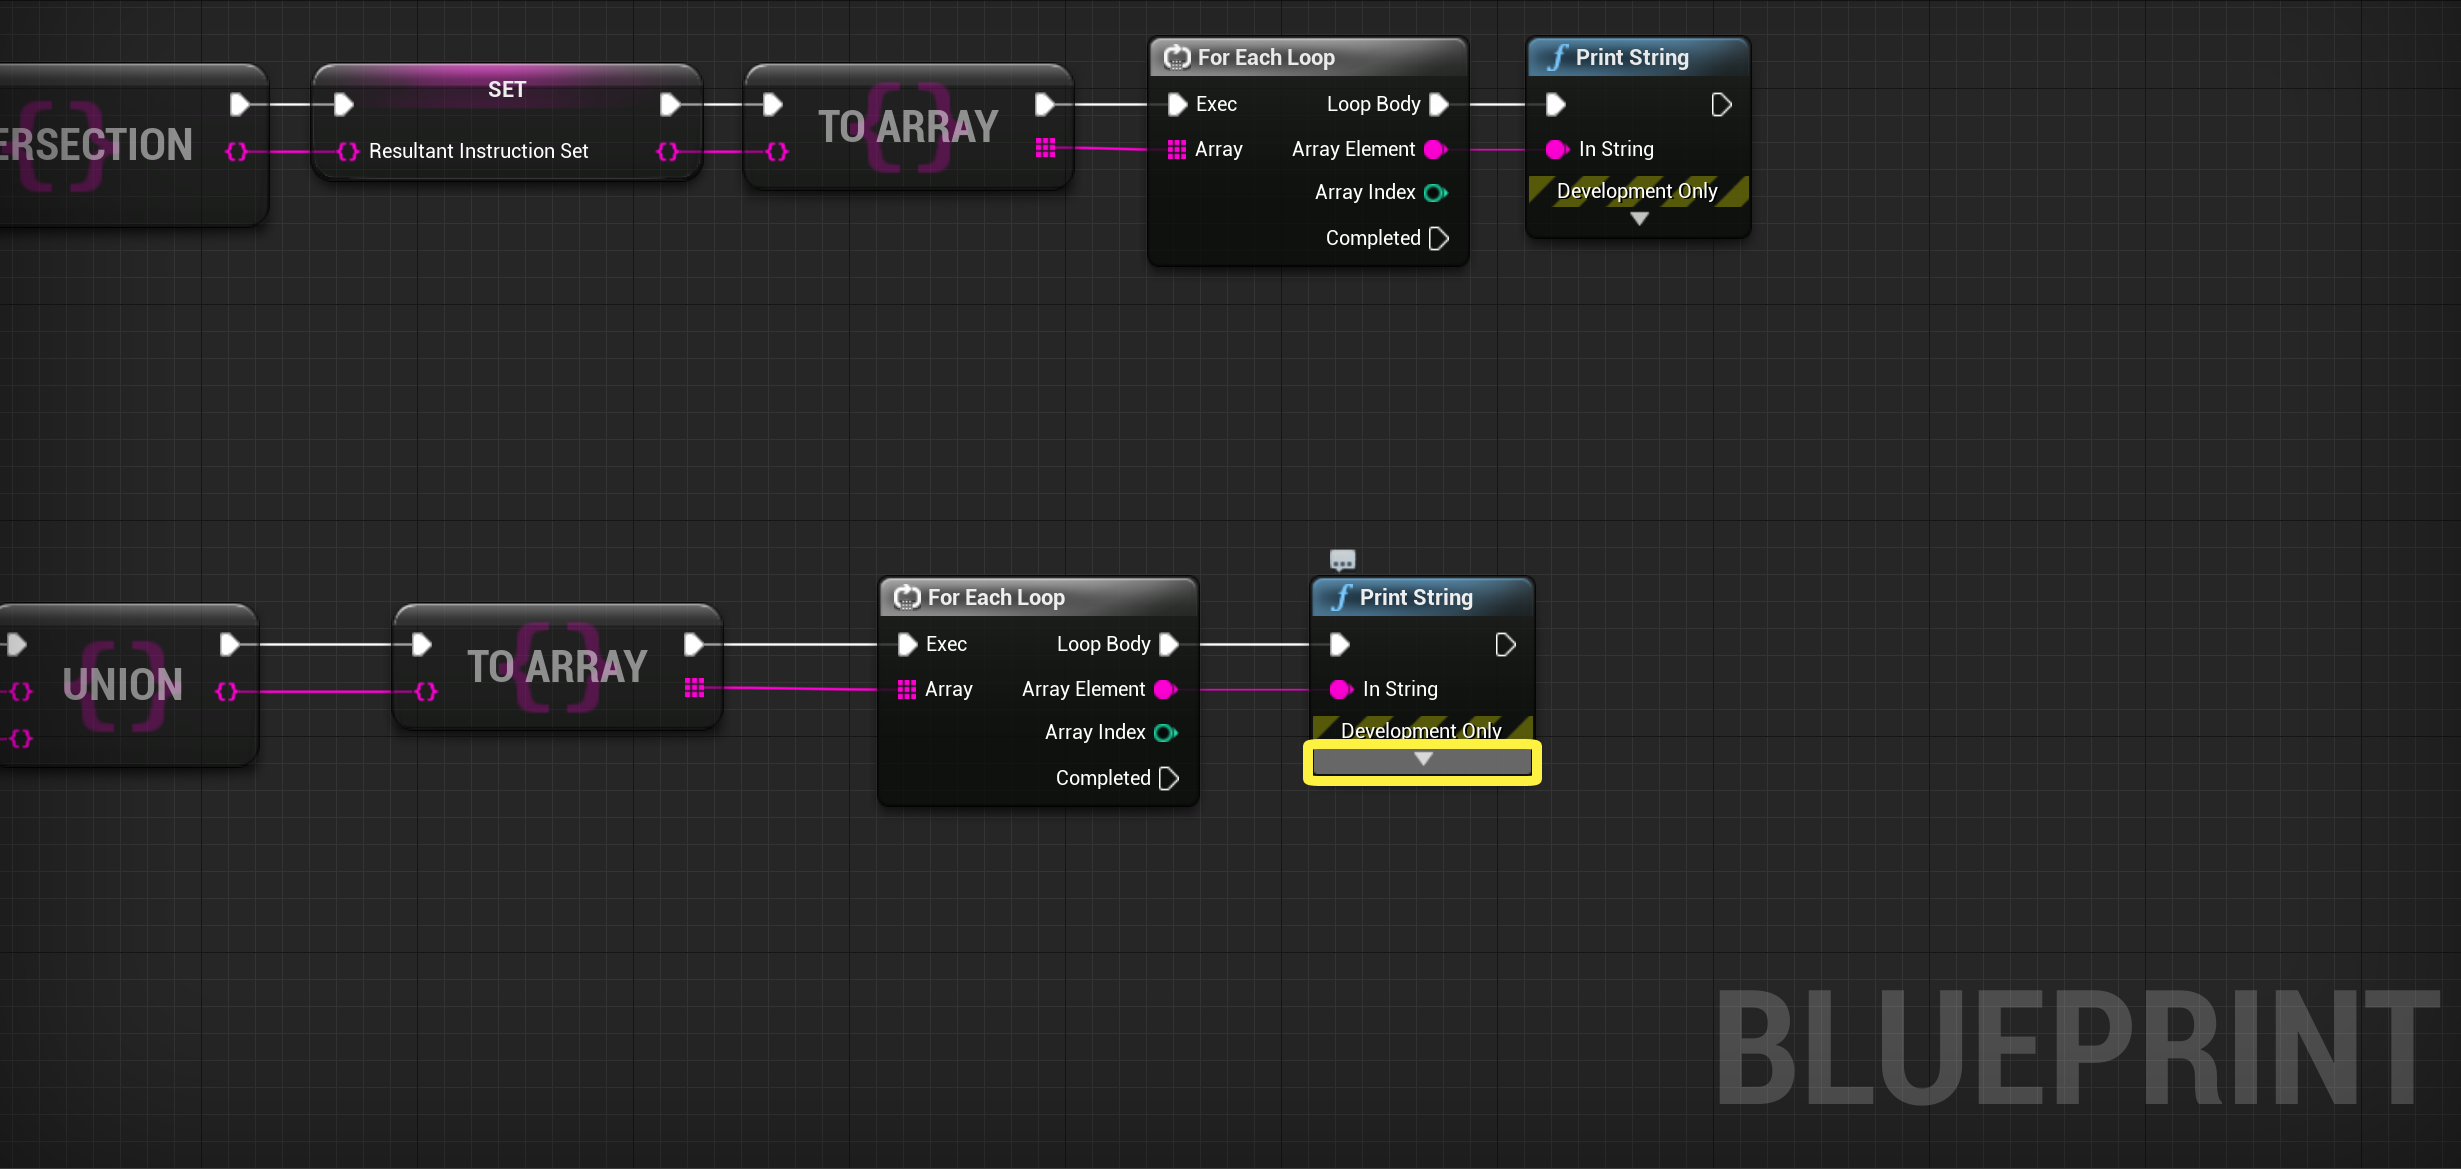
Because you already have a debug message being printed, you'll want to change the color of the text being printed to the Viewport . To do this, go ahead and click the menu expansion arrow, which is located at the bottom of the Print String node.
![Step4_15.png]()
-
Click on the Text Color box to open the Color Picker menu.
![Step4_16.png]()
-
Go ahead and set the color to the following values:
![Step4_17.png]()
-
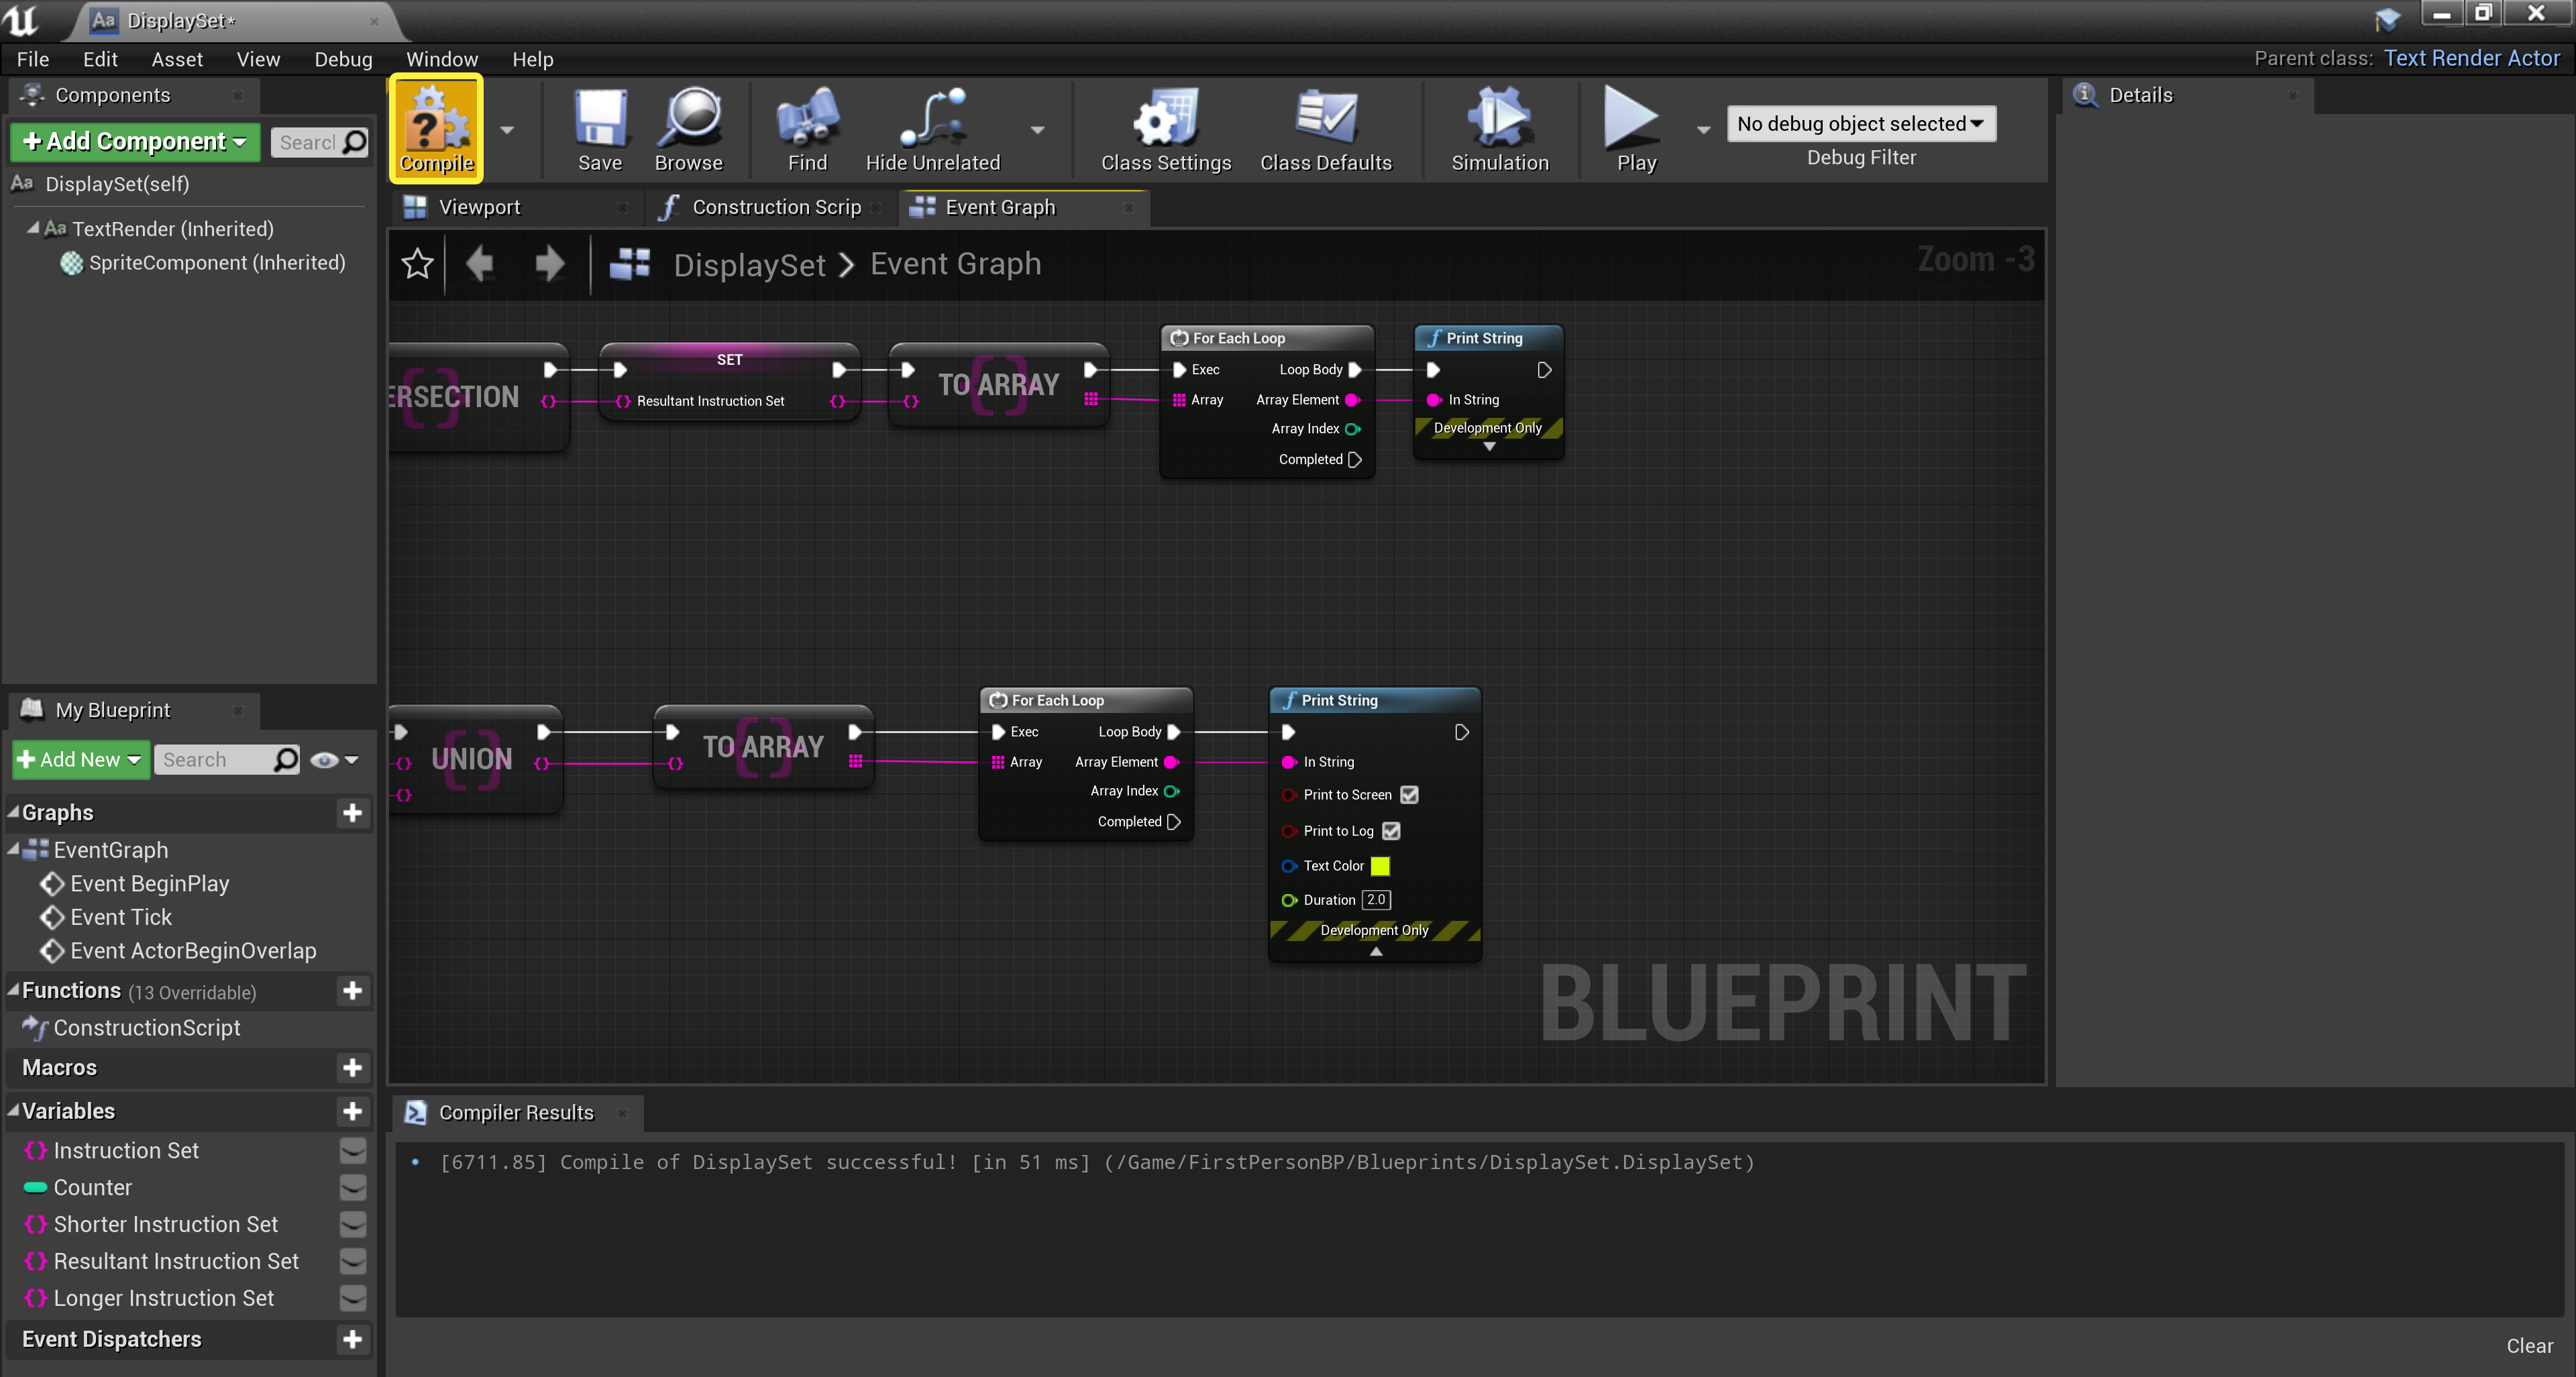
Now, go ahead and click the Compile button.
![Step4_18.png]()
Click for full image.
-
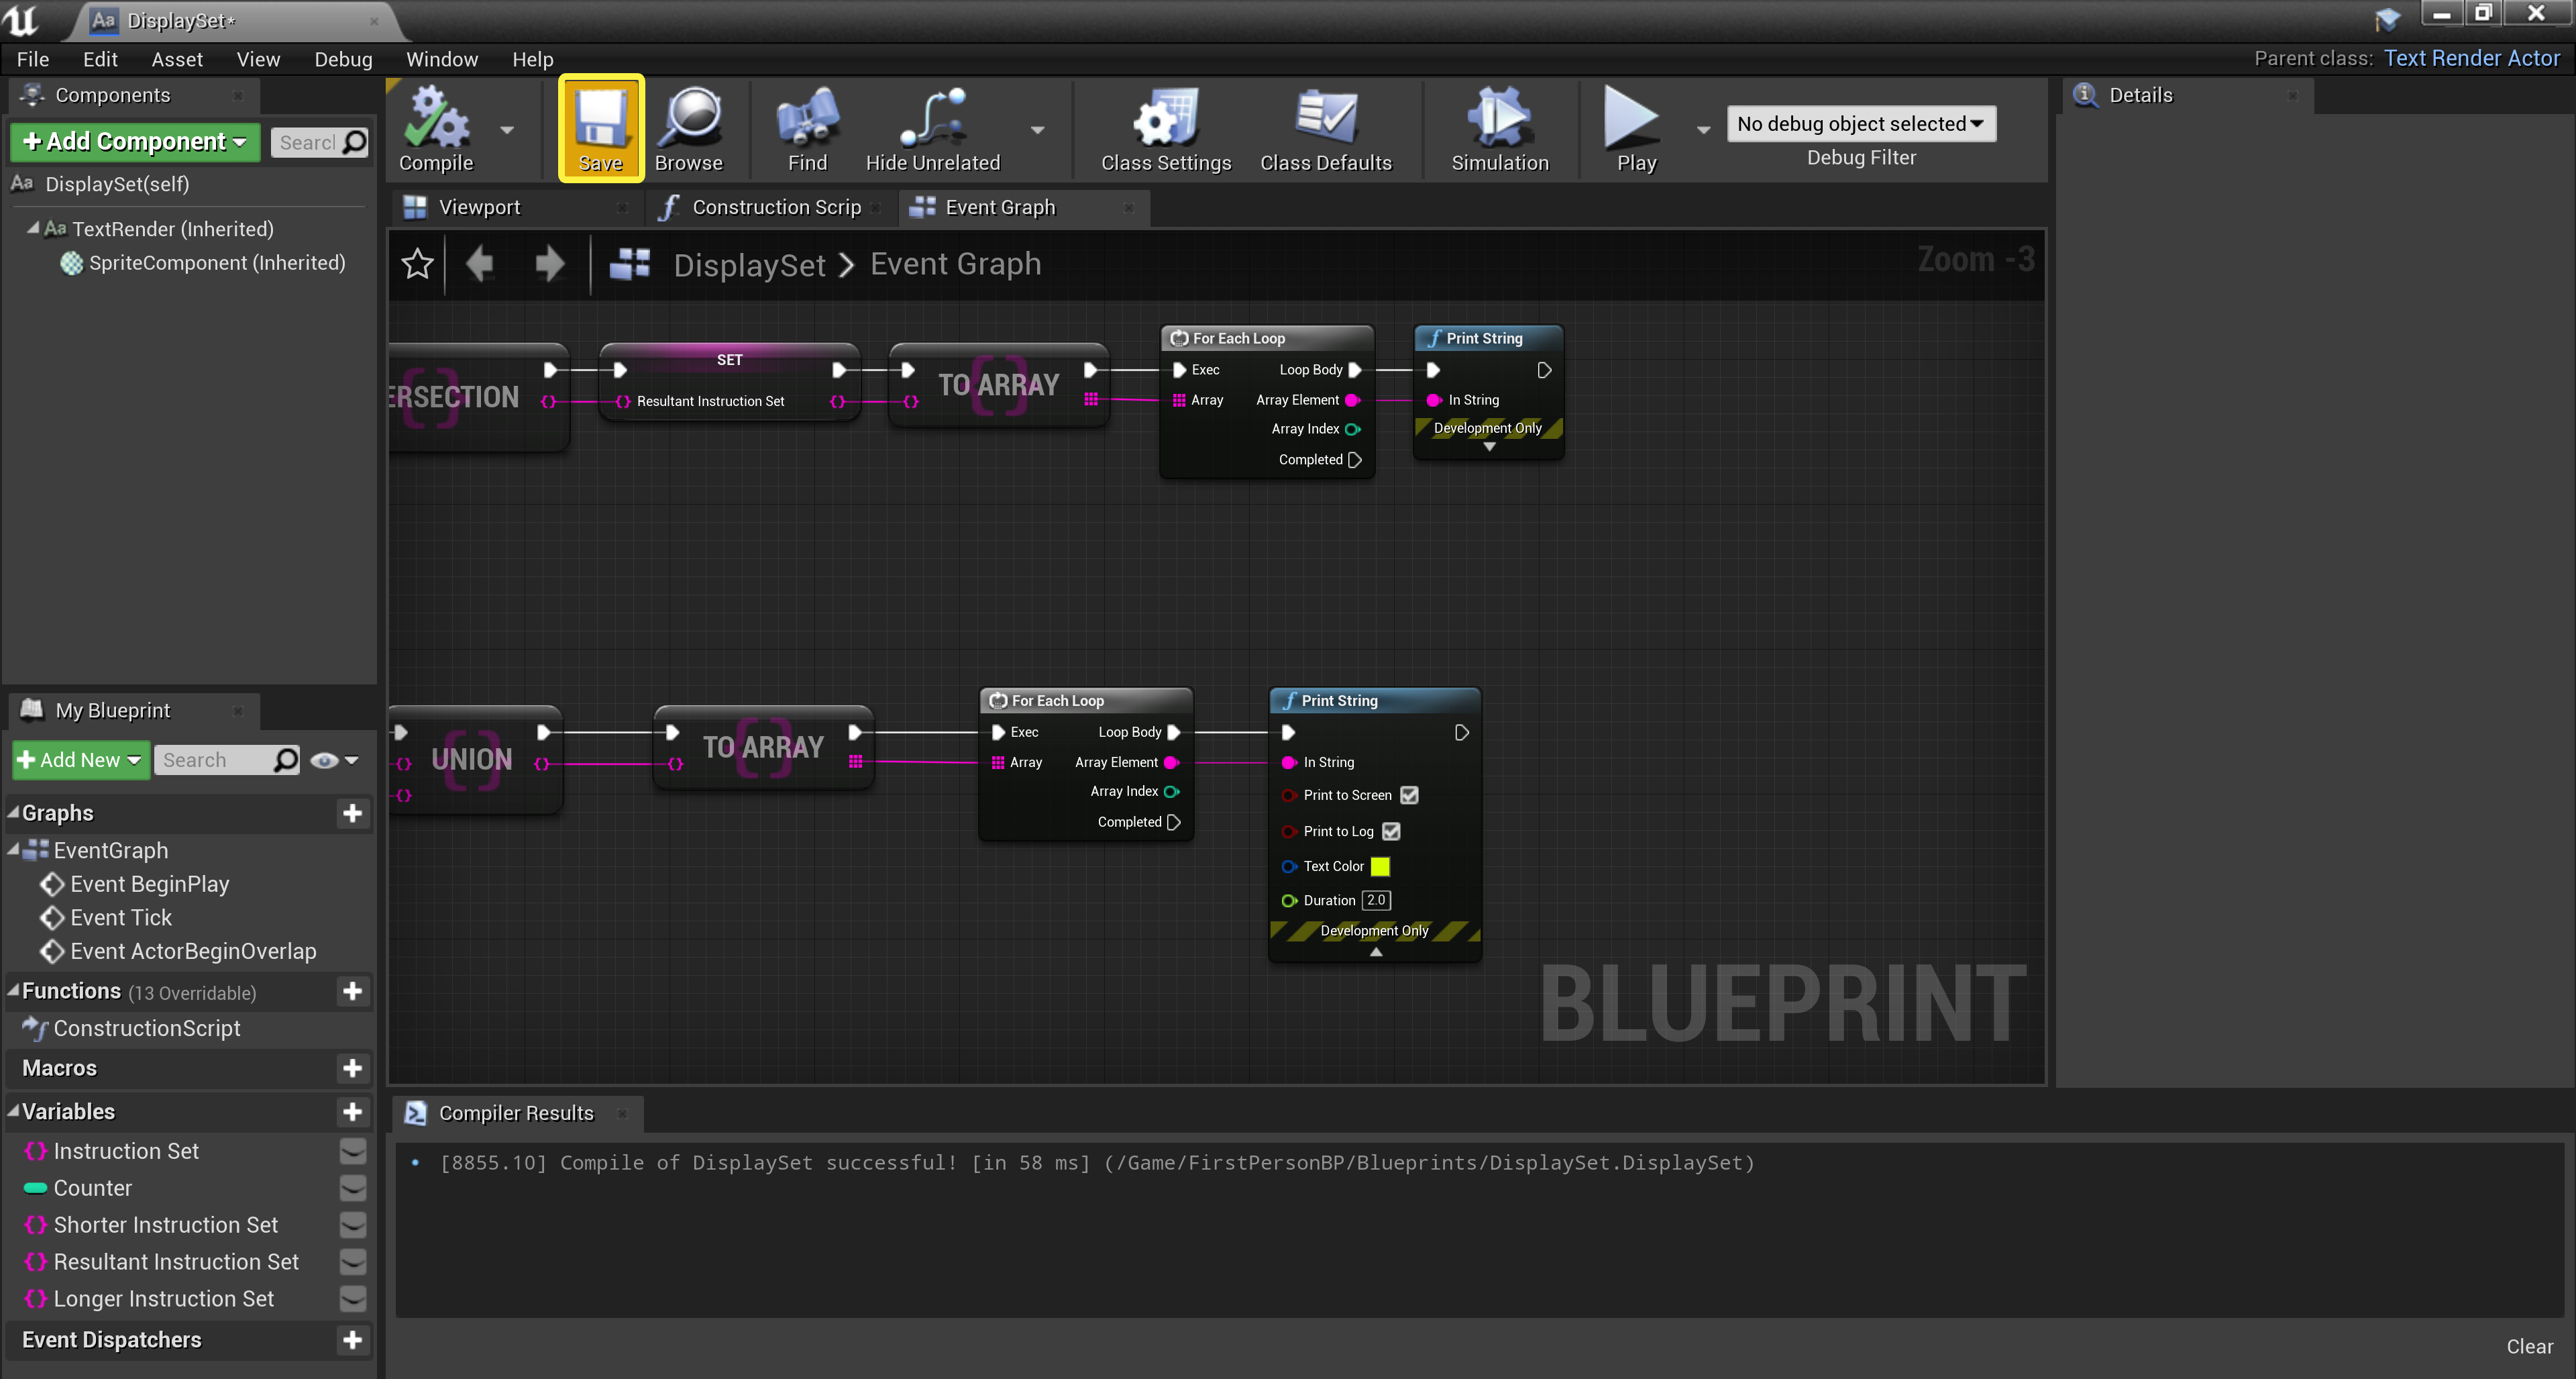
After expecting your completed script, go ahead and click the Save button before returning to the Editor's Viewport interface.
![Step4_19.png]()
Click for full image.
-
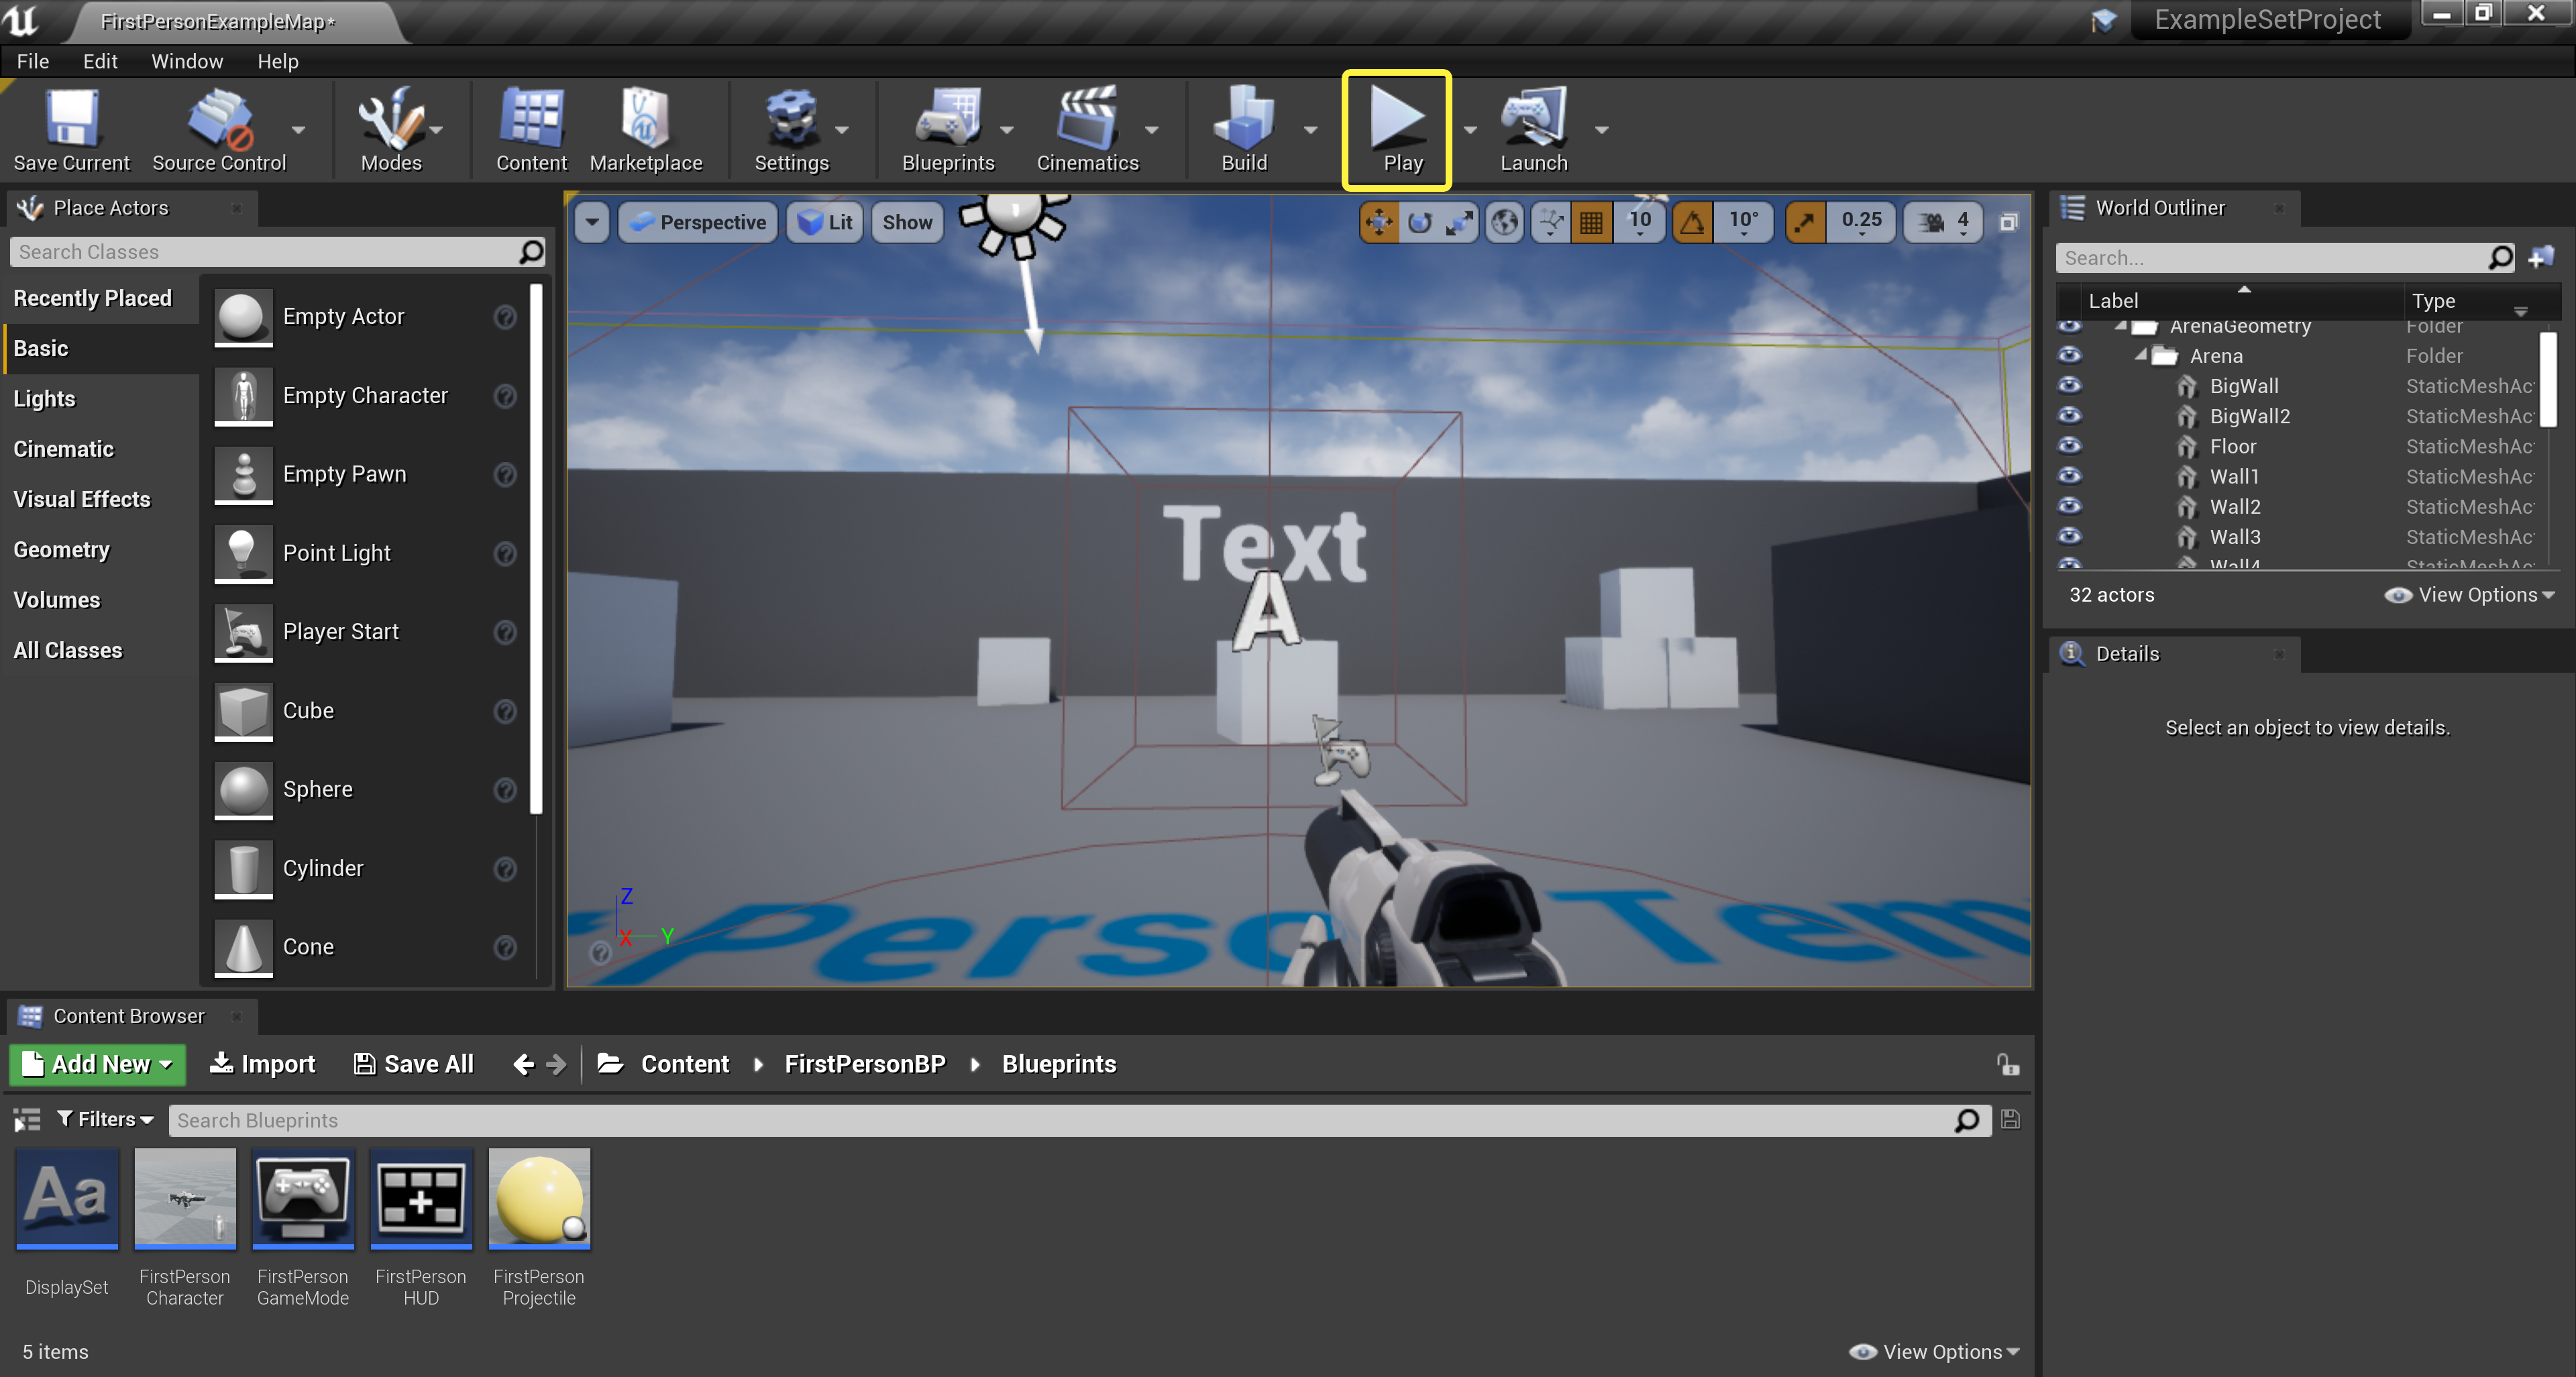
From the Editor's Viewport interface, click the Play button to see the updated script at work.
![Step4_20.png]()
Click for full image.


End Result
As you can see from the video, when the First Person Character collides with the Display Set collision box, the result of the Union is printed to the Viewport . Again, looking at the printed items, you'll notice that the items are not in any predictable order, which is a property of Blueprint Sets. As a final reminder, if you performed a Union operation of both Blueprint Sets on paper, you would have come up with the following result:
|
Instruction Set |
Longer Instruction Set |
Resultant Output (A ∪ B) |
|---|---|---|
|
Click |
your |
Click |
|
the |
Gun |
the |
|
Left |
Left |
|
|
Mouse |
Mouse |
|
|
Button |
Button |
|
|
and |
and |
|
|
Fire |
Fire |
|
|
your |
||
|
Gun |