Choose your operating system:
Windows
macOS
Linux


Functions are node graphs belonging to a particular Blueprint that can be executed, or called, from another graph within the Blueprint. Functions have a single entry point designated by a node with the name of the Function containing a single exec output pin. When the Function is called from another graph, the output exec pin is activated causing the connected network to execute.
See the Delegates page for reference and usage information.
Access Specifiers
When creating Functions, you have the ability to specify what other objects can and cannot access those Functions. This is done by setting the Access Specifier property, which is available within the Details panel for any selected Function.

The property contains the following settings:
|
Setting |
Description |
|---|---|
|
Public |
A setting of Public means that any other object can call this Function. This is the default setting. |
|
Protected |
A setting of Protected means that the Function can only be called by the current Blueprint, as well as any Blueprints that derive from the current Blueprint. |
|
Private |
A setting of Private means that the Function can only be called from within the current Blueprint. |
Pure vs. Impure
Functions can either be Pure or Impure . The main difference is that Pure Functions promise not to modify state or the members of the class in any way, while Impure Functions are free to modify state. Pure Functions are generally used for getter Functions or operators that just output a data value.
Impure Functions must be explicitly executed by connecting exec wires to Function Call nodes in an EventGraph . Impure Functions are designated using one of these methods:
-
Specifying the BlueprintCallable keyword in the UFUNCTION declaration for UFUNCTIONs defined in code.
-
Leaving the Pure checkbox unchecked for Functions added through the Blueprint Editor .
Pure Functions are wired to Data Pins and are automatically executed by the compiler when the data relying on them is required. This means that a Pure Function will be called one time for each node it is connected to. Pure Functions are designated using one of these methods:
-
Specifying the BlueprintPure keyword in the Function declaration for Functions defined in code.
-
Checking the Pure checkbox for Functions added through the Blueprint Editor .
Creating Functions
Within A Blueprint
To create a Function inside a Blueprint Class or Level Blueprint :
-
In the My Blueprint tab create a new function, by clicking on the Add Button
![plus_Button.png]()
![myblueprint_function.png]()
-
Enter a name for your Function.
![name_function_blueprint.png]()


Your Function will open in a new tab in the Graph Editor tab of the Blueprint Editor.
You can also create a Function by Right-clicking in the My Blueprint tab and selecting Function .

In a Blueprint Interface
Functions created in a Blueprint Interface are created with the same method as Functions in a Blueprint Class or Level Blueprint , but the implementation is very different.
To create a Function inside a Blueprint Interface :
-
In the My Blueprint tab create a new function, by clicking on the Add Button
![plus_Button.png]()
![myblueprint_function.png]()
-
Enter a name for your Function.
![name_function_interface.png]()

Your Function will open in a new tab in the Graph Editor tab of the Blueprint Editor.
You can also create a Function by Right-clicking in the My Blueprint tab and selecting Function .

See the Gameplay Timers page for reference and usage information.
Editing Functions
Once a Function has been created, you then need to define its functionality. This is a two-step process:
-
Create the necessary input and output parameters.
-
Create a node network in between your input and output to define Function behavior.
You can set a Description , Category , Access Specifier , and whether or not the Function is Pure in the Details tab.
To open the Details tab for your Function, you can:
-
Select your Function in the My Blueprint tab.
-
Select the Function node in the graph where it is being called.
-
Select the Function entry (or result) node in the Function's graph.

Input and Output Parameters
You can set the input and output parameters in the Details tab for your Function as well.
To add input or output parameters:
-
Click on the New button in either the Inputs or Outputs section of the Details pane.
-
Name the new parameter and set its type using the dropdown menu. In this example, there are two vector data inputs named VectorA and VectorB , and a float data output called Distance .
![function_details.png]()
Unlike Blueprint Macros , you can only add data inputs and outputs to Functions.
The entry and result nodes in the Function graph will automatically update with the correct pins, as will any Function call nodes.
![function_tunnel_with_pins.png]()
![function_call_with_pins.png]()
-
You can also set a default value by expanding the entry for the parameter, as well as select whether or not the value should be passed by reference.
![function_details_expanded.png]()


To change the location of the pin for this parameter on the edge of the node, use the up and down arrows in the expanded Details pane entry.
Your Function is now ready to have its functionality defined. We will do this by creating a node network between the entry and result nodes.
Defining Functionality
Your Function can be defined by creating a Blueprint graph that connects between the input and output nodes. In this example, we will have created the necessary network to apply the 3D version of the Pythagorean Theorem (illustrated below), returning the distance between 2 points in 3D space.
dx = (x2-x1)^2
dy = (y2-y1)^2
dz = (z2-z1)^2

D = sqrt(dx+dy+dz)
Converted to a node network in Blueprints...
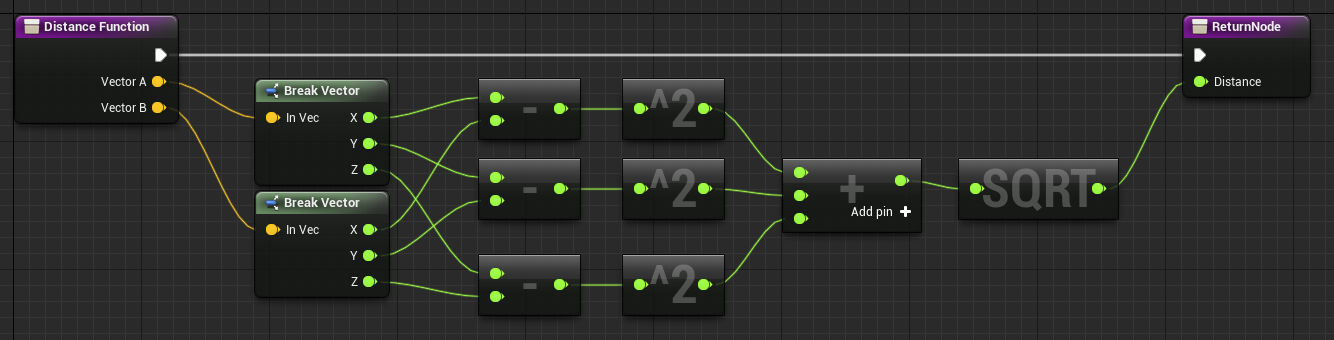
Click image for full view.
Calling Functions
Once you have created and defined your Function, it is time to call it in your EventGraph . To create a node that will call your Function:
-
Drag your Function from the My Blueprint tab to an empty spot in your EventGraph.
-
Right-click in the EventGraph or drag from an appropriate execution or data pin to open the context menu. Search within the context menu for your Function, and then select it to add the Function call node.
The network below takes two vector variables, and on every tick, calculates the distance between them and prints the distance to the screen.

In this example, we have created 2 public vector variables. In the settings for each one, we set Show 3D Widget to True. Now, after adding the Blueprint to the level, 3D widgets will appear at the positions defined by Point A and Point B. The 3D widgets allow us to easily change the values of Point A and Point B by moving them in the viewport.

Now when we test the map, the distance between the two points is logged on every tick, proving that our Function is working.

Calling Functions from External Blueprints
You can also call a Function in a Blueprint from inside another Blueprint, as long as you have reference to the Blueprint that contains the Function you want to call.
Take for example below, we have a Function in our Character Blueprint (which is called MyCharacter ) called Take Damage which reduces a variable called PlayerHealth by 10 whenever it is called.

Inside another Blueprint, which is a projectile that gets spawned when the player fires a weapon from the MyCharacter Blueprint, we have some script for what happens when the projectile hits something.

The script, which is the default MyProjectile Blueprint that is included with the Blueprint First Person Template Project, already does something when the projectile hits something that is simulating physics and adds impulse at the location it was hit. Say we wanted to check if we hit the player and if we did, to call the Take Damage Function.
We can do so by dragging off the Other pin of the Event Hit and Casting To our MyCharacter Blueprint.

Once we do that, we have a reference to our player character and can then drag off the As My Character pin and call the Function Take Damage that resides in that Blueprint.

We could then hook up the rest of the script to destroy the projectile after it hits the player as so:

And if we were to play in the editor, we would see something similar to below.
We have hooked the PlayerHealth variable up to a PrintString node so that we can show its current value. By default its set to 100 and when the player shoots into the wall and it bounces back and hits the player, you can see that the Take Damage function is being called and reduces the PlayerHealth variable by 10 each time they are hit.
Troubleshooting Functions
If you get a Warning! bar on your Function call node with an "Unable to find function with name [FunctionName]" message, Compile your Blueprint.

If you change the number of input or output parameters on your Function, you will also need to Compile your Blueprint.