Choose your operating system:
Windows
macOS
Linux
You can create Blueprint Assets through the Content Browser or the Level Editor using any of the methods described in this document.
Creating Blueprint Assets in the Content Browser
The Content Browser features a dedicated Add New button for creating new Blueprint Assets in the current directory. You can also right-click in the Asset View or the Asset Tree to create a Blueprint Asset in the selected location.
Using the Add New Button
-
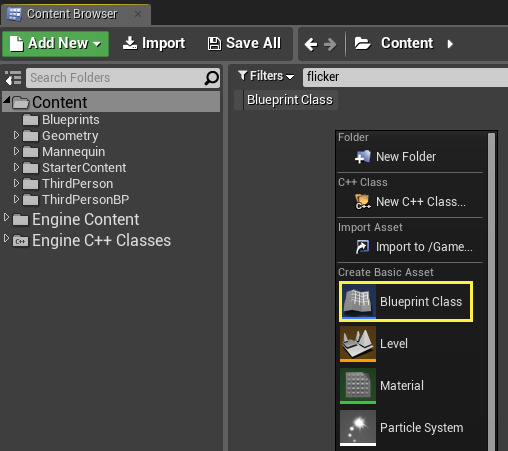
In the Content Browser , click the Add New button.
![ContentBrowserAddNew.png]()
-
Select Blueprint Class from the Create Basic Asset section of the dropdown menu.
![ContentBrowserDropDown.png]()
You can create several different types of Blueprint Assets from the Blueprints option under Create Advanced Asset .
-
Choose a Parent Class for your Blueprint Asset. See Parent Classes for more information.
![Choose a Parent Class]()
Using the Asset View
-
Right-click in the Asset View (right-hand panel) of the Content Browser to bring up the context menu.
-
Select Blueprint Class under the Create Basic Asset section.
![New Asset menu]()
-
Choose a Parent Class for your Blueprint.
![Choose a Parent Class]()
See Parent Classes for more information on selecting a Parent Class.
Using the Asset Tree
-
Right-click on a folder in the Asset Tree (left-hand panel) of the Content Browser .
-
In the context menu that appears, select New Asset , then select Blueprint Class .
![rtclick_content_browser_asset_tree.png]()
-
Choose a Parent Class for your Blueprint.
![Choose a Parent Class]()
See Parent Classes for more information on selecting a Parent Class.
Creating in the Level Editor
You can create a Blueprint Asset from one or more selected Actors in the Level Editor. The Blueprint you create will contain your Actor (or Actors), and will maintain any property changes you have made to them in the Level Editor, as well as their spatial relationships to each other. With this feature, you can save multi-Actor systems into a single, reusable Asset.
-
Select the Actor or Actors in the Level Editor viewport.
![MultiActorSelection.png]()
-
In the Level Editor toolbar, click the Blueprints dropdown menu and choose Convert Selection to Blueprint Class .
![BPDropdownButton.png]()
![ConvertSelectionToBP.png]()
If you have only one Actor selected, the Blueprint/Add Script button will appear in the Details panel. Since creating a Blueprint Asset from a single Actor requires less information from the user, you can use this button to save time by skipping directly to the New Subclass menu.
![BPAddScriptButton.png]()
-
At this point, the editor will present three methods for creating a new Blueprint Asset from the selected Actor or Actors: New Subclass , Child Actors , and Harvest Components .
![CreateBPFromSelection.png]()
-
After choosing a method, select the parent Actor class for your new Blueprint Asset from the list in the bottom portion of the window. If you are using the New Subclass method, the parent class will be further restricted to the class of the selected Actor or its subclasses.
![ParentClassSelection.png]()
-
Once you have selected a method and chosen a parent class, your new Blueprint Asset will appear in the Content Browser.
![ContentBrowserConvertedBP.png]()
New Subclass
New Subclass is only available if you have a single Actor selected. This method creates a Blueprint Asset as a subclass of your Actor or any of its subclasses, incorporating any changes you made to the Actor's properties. This is the most straightforward method. The Blueprint Asset will preserve any changes you have made to the selected Actor's properties.
Child Actors
The Child Actors method creates a Blueprint Asset based on any Actor class. The new Actor will have its default Components, and one additional Child Actor Component for each selected Actor in the Level Editor viewport. These Child Actor Components will preserve the changes you have made to the properties of the selected Actors.
Typically, users of this method choose the base Actor class, as this will not introduce any new behaviors or unneeded Components.
Harvest Components
The Harvest Components method creates a single Blueprint Asset based on any Actor class, then harvests the Components of all the selected Actors and attaches them to the new Actor. Use this method in cases where your Actors are primarily containers for their Components. For example, multiple Static Mesh Actors can combine efficiently into a single Actor with multiple Static Mesh Components, since they typically exhibit no behaviors other than rendering and possibly collision. However, AI-controlled characters generally need to remain as individual Actors, because they have Actor-level autonomy in their behaviors and may require individual control of Components and access to Component data.
Creating in the Class Viewer
The
-
In the Class Viewer toolbar, select Filters .
![class_viewer_filters.png]()
-
In the Filters menu, select Blueprint Bases Only .
![filter_blueprint_class_viewer.png]()
To create a new Blueprint Asset, select to the class you would like to use as a base. In this example, CameraActor is our base class.
-
Click the dropdown to the right of your chosen base class, or right-click on the class directly.
![class_viewer_arrow.png]()
-
The Create Blueprint option will appear in a context menu. Click this to open the dialog for creating a Blueprint.
![class_viewer_down_arrow.png]()
-
Enter a name for your Blueprint Asset, and select the folder where you want to save it.
-
Click "Create [Path]/[Name]" at the top of the Blueprint creation dialog. This will create your Blueprint Asset and open it in the Blueprint Editor .
![class_viewer_create_complete.png]()
-
Complete the process by saving your new Blueprint Asset. To do this, click Save in the Blueprint Editor toolbar.


