Choose your operating system:
Windows
macOS
Linux

This is what you will see at the end of this section.
Goals
The purpose of this section is to show you how to set up your First Person Shooter project.
Objectives
By the end of this section of the tutorial, you will be able to:
-
Set Up a New Project
-
Set the Editor Startup Map
-
Open Your Project in Visual Studio
-
Add Log Messaging to Your Project
-
Compile Your First C++ Class
-
Set the Default Game Mode
Steps
-
1.1 - Project Setup
-
1.2 - Opening the Project in Visual Studio
-
1.3 - Adding Log Messaging
-
1.4 - Compiling the Project
-
1.5 - Setting the Default Game Mode
-
1.6 - Section One Summary
1.1 - Project Setup
During this step, we are going to create a starting point for our First Person Shooter (FPS) game by using the Unreal Engine Project Browser.
-
Open Unreal Engine from the Epic Launcher and create a New Project .
-
Click on the Games new project category and click Next.
-
Select a Blank template and click Next.
-
Change the project type to C++ (instead of Blueprint ) and make sure No Starter Content is included.
-
Name your project "FPSProject".
![FPS_ProjectSettings.png]()
Some of the code samples in this tutorial will need to be updated if you name your project differently.
-
After you have named your project, go ahead and click the Create Project button.
-
After you create your project, it should automatically open in the Unreal Editor. This is a good time to click Play to enter Play in Editor (PIE) mode.
![ClickPlayButton.png]()
Use the WASD keys to move around the level while using your mouse to aim the camera.
-
Press the Escape key or click Stop in the Level Editor to exit PIE mode.
![ClickStopButton.png]()
-
Now that you are done exploring the level, head to the Content Browser (usually near the bottom of the screen) and create a Maps folder under the Content folder (Select the Content folder, right-click anywhere inside it, and select Folder > New Folder ).
![MapsFolder.png]()
-
In the File menu, select Save Current as... and click the Maps folder. Name your new map "FPSMap" and click Save.
![SaveLevelAs.png]()
-
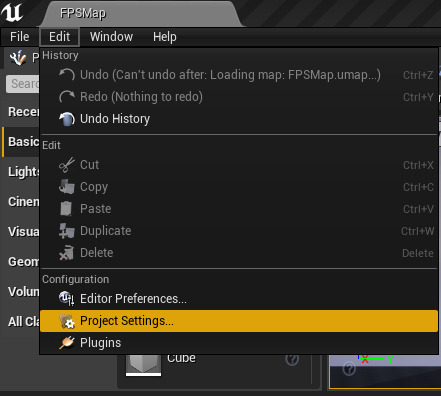
From the Edit menu, click on Project Settings .
![EditProjectSettings.png]()
-
Under the Project heading on the left side of the Project Settings tab, click on Maps & Modes .
![ProjectMaps_Modes.png]()
-
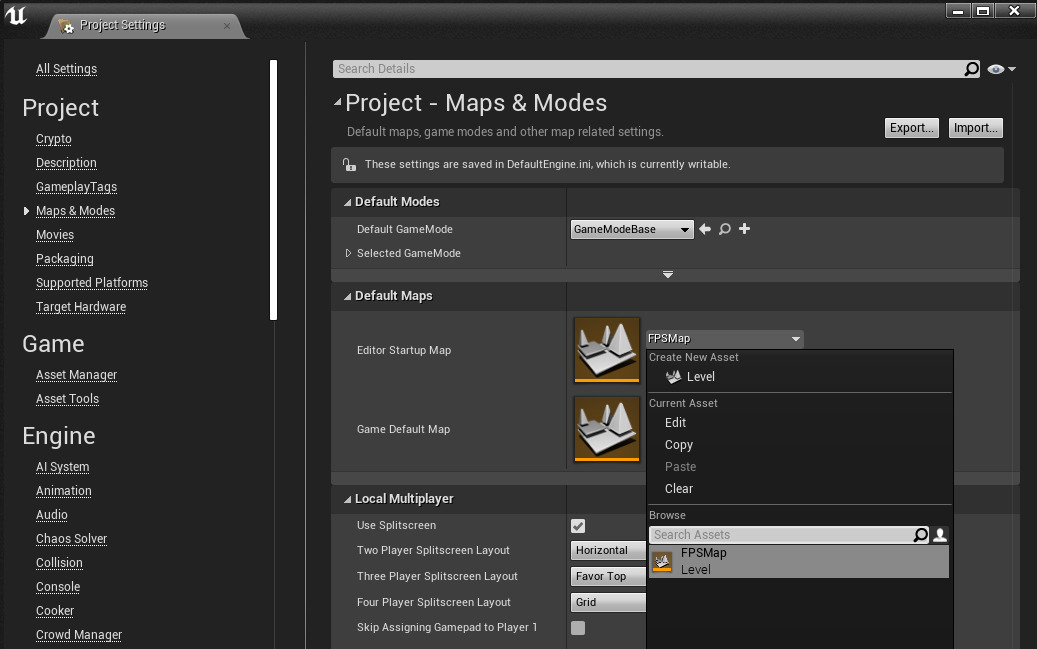
Expand the Editor Startup Map dropdown, and select FPSMap.
![EditorDefaultMap.png]()
From now on, the editor will automatically load FPSMap as the default map.
-
Finally, close the Project Settings menu and save your project before moving onto the next step.
1.2 - Opening the Project in Visual Studio
When you set up your Basic Code project in the previous step, Unreal Engine created a Game Mode for you. Game Modes define a game's rules and win conditions. The Game Mode also sets default classes that will be used for some basic gameplay framework types, including Pawn, PlayerController, and HUD. During this section, you are going to use the Editor to open your project as a solution in Visual Studio so that you can view your project's Game Mode class.
-
Expand the File menu and select Open Visual Studio to open your C++ code in Visual Studio.
![FileMenu_OpenVS.png]()
-
After Visual Studio launches your project, you should see the .cpp and .h files inside of Visual Studio's Solution Explorer.
![VS_SolutionExplorer.png]()
Do not be alarmed if Visual Studio in our example images looks a little different than yours, we are just using Dark Mode. You can enable this by going to: Tools > Options > Environment > General > Color Theme.
-
Expand Source and then FPSProject to view the main files for your new game.
-
Open FPSProjectGameModeBase.cpp. It should look like this:
// Copyright Epic Games, Inc. All Rights Reserved. #include "FPSProjectGameModeBase.h" -
Now open FPSProjectGameModeBase.h. It should look like this:
// Copyright Epic Games, Inc. All Rights Reserved. #pragma once #include "CoreMinimal.h" #include "GameFramework/GameModeBase.h" #include "FPSProjectGameModeBase.generated.h" /** * */ UCLASS() class FPSPROJECT_API AFPSProjectGameModeBase : public AGameModeBase { GENERATED_BODY() }; -
Now that you have opened your C++ project in Visual Studio, you are ready to start adding code to the project.
1.3 - Adding Log Messaging
A great way to start adding code to your project is by adding a log message to FPSGameMode. Log messages are really useful for verifying and debugging code during development. During this step, you will use a log message to verify that you are actually using FPSGameMode rather than the default Game Mode provided by Unreal Engine.
FPSProjectGameMode Header File
-
In the Solution Explorer , expand FPSProject > Source > FPSProject.
-
Double-click
FPSProjectGameModeBase.hto open the header file for your FPSGameMode class.![InterfaceFile.png]()
-
Your class declaration should look like the following:
UCLASS() class FPSPROJECT_API AFPSProjectGameModeBase : public AGameModeBase { GENERATED_BODY() }; -
Add the following function declaration under the
AFPSProjectGameModeconstructor declaration:virtual void StartPlay() override;This function declaration allows you to override StartPlay so that you can print a log message to the screen when gameplay begins.
-
FPSProjectGameMode.hshould now look like the following:// Copyright Epic Games, Inc. All Rights Reserved. #pragma once #include "CoreMinimal.h" #include "GameFramework/GameModeBase.h" #include "FPSProjectGameModeBase.generated.h" /** * */ UCLASS() class FPSPROJECT_API AFPSProjectGameModeBase : public AGameModeBase { GENERATED_BODY() virtual void StartPlay() override; }; -
Save your header file in Visual Studio.
FPSProjectGameMode CPP File
-
In the Solution Explorer , locate
FPSProjectGameModeBase.cpp( FPSProject > Source > FPSProject ).![ImplementationFile.png]()
-
Double-click
FPSProjectGameModeBase.cppto open the implementation file for your FPSGameModeBase class. -
Now add the following lines of code to the file:
void AFPSProjectGameModeBase::StartPlay() { Super::StartPlay(); check(GEngine != nullptr); // Display a debug message for five seconds. // The -1 "Key" value argument prevents the message from being updated or refreshed. GEngine->AddOnScreenDebugMessage(-1, 5.0f, FColor::Yellow, TEXT("Hello World, this is FPSGameMode!")); }StartPlay() will print a new debug message ("Hello World, this is FPSGameModeBase!") to the screen in yellow text for five seconds when gameplay begins.
-
FPSProjectGameModeBase.cppshould now look like the following:// Copyright Epic Games, Inc. All Rights Reserved. #include "FPSProjectGameMode.h" void AFPSProjectGameModeBase::StartPlay() { Super::StartPlay(); check(GEngine != nullptr); // Display a debug message for five seconds. // The -1 "Key" value argument prevents the message from being updated or refreshed. GEngine->AddOnScreenDebugMessage(-1, 5.0f, FColor::Yellow, TEXT("Hello World, this is FPSGameModeBase!")); -
Save your CPP file in Visual Studio.
1.4 - Compiling the Project
Now is a good time to compile your project so that you can see your code changes reflected in-game.
-
Going back to the editor, click the Compile button to compile your code.
![CompileProject.png]()
Since you started developing your project as a C++ project, you are able to compile your CPP code directly from Unreal Editor.
-
Go ahead and click the Play button to enter Play in Editor (PIE) mode.
![PIE_DefaultGameMode.png]()
You might be wondering why your log message is not being displayed on screen when you are in PIE mode. The reason you are not seeing your log message is because the Editor is still using the default Game Mode at this stage in development.
-
Press the Escape key or click the Stop button in the Level Editor to exit PIE mode.
Extending your C++ Game Mode Class to Blueprints
Now is a good time to extend the C++ Game Mode class to Blueprints. Please feel free to go to our C++ and Blueprints reference page to learn more about extending C++ classes to Blueprints.
-
First, create a Blueprints folder inside of the Content folder.
![BlueprintsFolder.png]()
-
Now, right-click the FPSProjectGameModeBase class (in C++ Classes > FPSProject ) to open the C++ Class Actions menu.
-
Click Create Blueprint class based on FPSProjectGameModeBase to open the Add Blueprint Class dialog menu.
![CreateDerivedBPClass.png]()
-
Name your new Blueprint Class "BP_FPSProjectGameModeBase" and choose the Blueprints folder before clicking the Create Blueprint Class button.
![AddBPClass.png]()
-
By now, you should have a newly created
BP_FPSProjectGameModeBaseBlueprint Class located inside of the Blueprints folder.![AddedBPClass.png]()
-
Make sure to save your
BP_FPSProjectGameModeBaseBlueprint before closing the Blueprint Editor.
1.5 - Setting the Default Game Mode
Now that you have successfully extended your newly modified Game Mode to Blueprints, you will need to set your project to use
BP_FPSProjectGameModeBase
as the default
Game Mode
in this step.
-
Expand the Edit menu, and click on Project Settings.
-
Under the Project heading on the left side of the Project Settings tab, click on Maps & Modes.
-
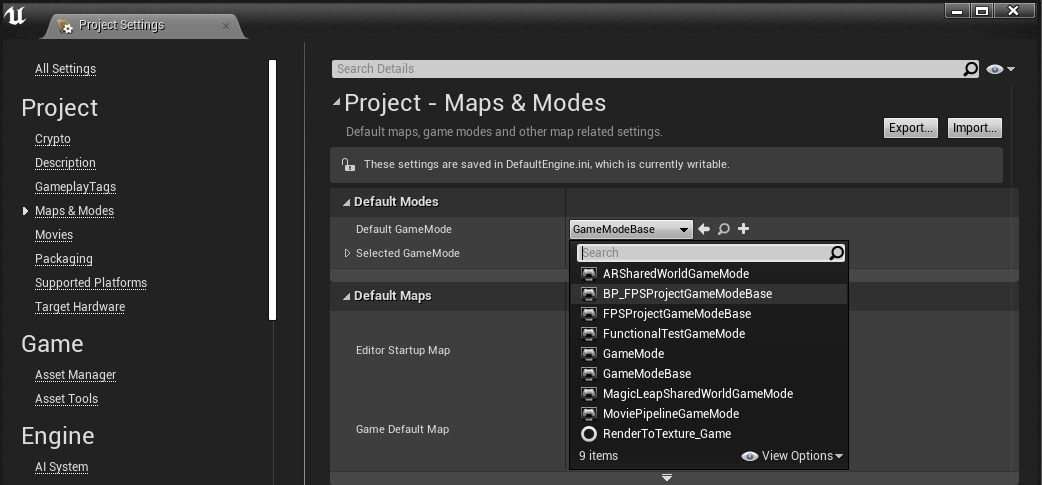
Expand the Default GameMode dropdown menu, and select BP_FPSGameModeBase.
![SettingFPSGameMode.png]()
-
Close the Project Settings menu.
-
Click the Play button in the Level Editor Toolbar. "Hello World, this is FPSGameMode!" should now be displayed in yellow text for five seconds in the upper left hand corner of your viewport.
![SectionResult.png]()
-
Press the Escape key or click the Stop button in the Level Editor to exit Play in Editor (PIE) mode.
1.6 Section One Summary
FPSProjectGameModeBase.h
// Copyright Epic Games, Inc. All Rights Reserved.

#pragma once

#include "CoreMinimal.h"
#include "GameFramework/GameModeBase.h"
#include "FPSProjectGameModeBase.generated.h"

/**
 *
 */
UCLASS()
class FPSPROJECT_API AFPSProjectGameModeBase : public AGameModeBase
{
GENERATED_BODY()

virtual void StartPlay() override;
};FPSProjectGameModeBase.cpp
    // Copyright Epic Games, Inc. All Rights Reserved.

    #include "FPSProjectGameMode.h"

    void AFPSProjectGameMode::StartPlay()
    {
        Super::StartPlay();

        checkGEngine != nullptr);

          // Display a debug message for five seconds.
          // The -1 "Key" value argument prevents the message from being updated or refreshed.
          GEngine->AddOnScreenDebugMessage(-1, 5.0f, FColor::Yellow, TEXT("Hello World, this is FPSGameModeBase!"));

    }
Congratulations! You've learned how to:
✓ Set up a New Project
✓ Open your Project in Visual Studio
✓ Add Log Messaging to your Project
✓ Compile your First C++ Class
✓ Set the Default Game Mode
You're now ready to learn how to implement your character in the next section.


