Choose your operating system:
Windows
macOS
Linux
In order to understand and use the content on this page, make sure you are familiar with the following topics:

This is what you'll see at the end of this section.
Goals
The purpose of this section is to show you how to add animations for your First Person Shooter character.
Objectives
By the end of this section of the tutorial you'll be able to:
-
Animate Your Character
-
Set Up Your Event Graph
-
Add an Animation State Machine
-
Add Transition States to Your Animation
-
Associate the Animation Blueprint with the Character Blueprint
Steps
-
4.1 - Animating Your Character
-
4.2 - Setting Up Your Event Graph
-
4.3 - Adding an Animation State Machine
-
4.4 - Adding Animation Transition States
-
4.4.1 - Add Idle to/from Run Transitions
-
4.4.2 - Add Idle to Jump Start Transition
-
4.4.3 - Add Run to Jump Start Transition
-
4.4.4 - Add Jump Start to Jump Loop Transition
-
4.4.5 - Add Jump Loop to Jump End Transition
-
4.4.6 - Add Jump End to Idle Transition
-
-
4.5 - Associating Animation and Character Blueprints
4.1 - Animating your Character
During this step, you are going to add some animations into your game.
Importing Animations
Before getting started, download and extract the sample animations from the following link:
-
Right-click in the Content Browser and select New Folder .
![RightClickImport.png]()
-
Name this new folder "Animations".
-
Double-click on the folder to open it.
-
Locate the five local animation files, namely:
-
FPP_Idle.FBX -
FPP_JumpEnd.FBX -
FPP_JumpLoop.FBX -
FPP_JumpStart.FBX -
FPP_Run.FBX
-
-
Right-click in the "Animations" folder and click Import to /Game/Animations/... to begin importing the animations.
![ImportAnimations.png]()
-
In the box that appears select HeroFPP_Skeleton under the Select Skeleton heading, then click Import All to import all of the animations.
![SelectHeroFPP_Skeleton.png]()
Make sure that you select the correct destination Mesh before importing your animations! Failing to do so can cause some issues when you go to map animations later.
-
You should now have all five animations inside of the Animations folder in the Content Browser .
![ImportedAnimations.png]()
-
Click the Save button to save your imported files.


Creating the Animation Blueprint
-
Right-click the Animations folder in the Content Browser. Under the Create Advanced Asset section expand Animation and select Animation Blueprint .
![AddNewAnimBP.png]()
-
Select AnimInstance as the Parent Class and choose HeroFPP_Skeleton as the Target Skeleton.
![CreateAnimBP.png]()
-
Name the new animation Blueprint "Arms_AnimBP".
-
Double-click Arms_AnimBP to open the Blueprint Editor .
![DoubleClickAnimBP.png]()


Adding State Machine Transition Variables
-
In the My Blueprint tab, click on the Add New button and select Variable .
![AddingNewVariable.png]()
-
Make the variable a Boolean (this might already be done, but check the Details panel to be sure) and name it "IsRunning".
-
In the My Blueprint tab, click on the Add New button and select Variable .
-
Make the variable a Boolean and name it "IsFalling".
-
You should now have two animation transition variables that will drive the animation's state machine.
-
Keep Arms_AnimBP open when moving on to the next section.

4.2 - Setting up your Event Graph
During this step, we are going to edit the animation's Event Graph to ensure that our animation transition variables are firing properly while the game is running.
Updating your State Variables
-
Open Arms_AnimBP if you have not already done so.
-
Open the event graph by double-clicking on EventGraph in the My Blueprint tab.
![OpenEventGraph.png]()
-
Right-click in the graph to bring up the Context Menu .
-
Type "Update" in the Context Menu search field, then click on the Event Blueprint Update Animation to add that node.
The Event Blueprint Update Animation node allows us to update our state variables every time the Animation updates so that they are always in sync with the game state.
![EventBlueprintUpdateAnimationNode.png]()
-
Right-click in the graph to bring up the Context Menu .
-
Type "Owner" in the Context Menu search field, then click on Try Get Pawn Owner to add that node.
![TryGetPawnOwnerBP_Node.png]()
-
Drag off the output pin and select Cast to Character from the Context Menu .
![CastToCharacterContextMenu.png]()
-
Wire the output execution pin on the Event Blueprint Update Animation to the input execution pin on Cast to Character .
![ConnectedCastToCharacterNode.png]()
-
Drag off the As Character output pin and select Get Character Movement (you may need to disable Context Sensitivity to locate this node).
![GetCharacterMovementNode.png]()
-
Drag off the Character Movement output pin and select Get Movement Mode .
![GetMovementMode.png]()


Querying Character Movement
-
Drag off the Movement Mode output pin and select Equal (Enum) .
![EqualEnumNode.png]()

Determining if the Character is Falling
-
Set the dropdown value on the Equal (Enum) node to Falling .
![SelectFalling.png]()
-
Alt-click on IsFalling in the My Blueprint tab and drag into the graph to create a Set Is Falling node.
-
Connect the unlabeled output execution pin of the Cast to Character node to the input execution pin of the Set Is Falling node and connect the output Boolean data pin of the Equal (Enum) node to the input Boolean data pin of the Set Is Falling node.
![ConnectedIsFalling.png]()


Determining if the Character is Running
-
Go back to the Cast To Character node and drag off the As Character pin again. This time, select the Get Velocity node.
![GetVelocityNode.png]()
-
If the character is not standing still, the length of its velocity vector will be greater than zero. So, drag off the Return Value vector output pin and select Vector Length to add that node to the graph.
![VectorLength.png]()
-
Drag off the Return Value float output pin and select the > (float) node.
![GreaterThan.png]()
-
Alt-click on IsRunning in the My Blueprint tab and drag into the graph to create a Set Is Running node.
![IsRunning.png]()
-
Connect the output execution pin of the Set Is Falling node to the input execution pin of the Set Is Running node and connect the output Boolean pin to the > (float) node to the input Boolean pin of the Set Is Running node.
![ConnectedIsRunning.png]()
-
Your Event Graph should now look like the following:
![CompleteEventGraph.png]()
Click on the image to zoom in.


4.3 - Adding an Animation State Machine
During this step, you are going to put together a state machine that will take advantage of your newly-made variables.
-
Double-click on AnimGraph in the My Blueprint tab to open it.
![AnimGraph.png]()
-
Right-click the graph and select State Machines > Add New State Machine... in the Context Menu .
![AddNewSM.png]()
-
Right-click on New State Machine in the My Blueprint tab and name it "Arms State Machine".
![NewArmsStateMachine.png]()
-
Connect the output execution pin on the "Arms State Machine" node to the Result input execution pin on the Final Animation Pose node.
![ConnectedArmsStateMachine.png]()
-
Double-click the "Arms State Machine" node to open its graph for editing.


4.4 - Adding Animation Transition States
During this step, you're going to add five states to the state graph, namely:
-
Idle
-
Run
-
JumpStart
-
JumpEnd
-
JumpLoop
-
Right-click in the graph and select Add State... from the context menu.
![AddState.png]()
-
Name the state "Idle".
-
Double-click the state to begin editing it.
-
Right-click in the graph area and search for "Idle" in the Context Menu .
-
Click on Play FPP_Idle to insert that node.
![PlayIdle.png]()
-
Connect the output execution pin of the Play FPP_Idle node to the Result input execution pin of the Output Animation Pose node.
![ConnectedIdleNode.png]()
Repeat steps 1-6 for each of the other 4 states, namely:
-
Run (Play FPP_Run > Output Animation Pose)
-
JumpStart (Play FPP_JumpStart > Output Animation Pose)
-
JumpEnd (Play FPP_JumpEnd > Output Animation Pose)
-
JumpLoop (Play FPP_JumpLoop > Output Animation Pose)
-
-
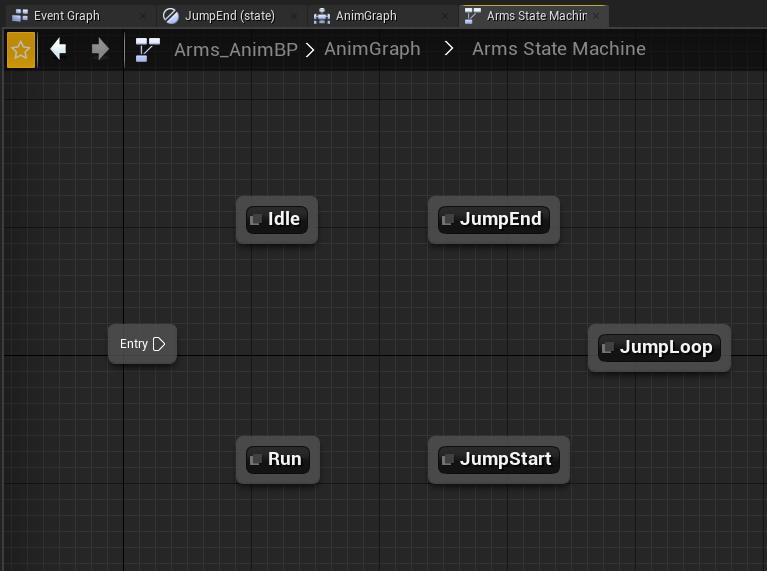
When you are done, the Arms State Machine graph should look like the following image:
![AnimationSMGraph.png]()
Click on the image to zoom in.
Each state should contain its Play node connected to a respective Final Animation Pose node.
-
Drag a wire from the Entry node to the Idle state node.
![ConnectEntrytoIdle.png]()


4.4.1 - Add Idle to/from Run Transitions
During this step, you are going to set the idle to and from run transitions so that when your character starts moving, the state machine will transition from Idle to Run.
-
Drag a wire from the Idle state to the Run state to create a transition.
![WireIdletoRun.png]()
-
Double-click the transition to edit it.
-
Control-click on IsRunning in the My Blueprint tab and drag into the graph to create a Get Is Running node.
-
Connect the output pin from the Get Is Running node to the input pin of the Can Enter Transition pin on the Result node.
![IsRunningtoResult.png]()
When your character stops moving, the state machine should transition from the Run state to the Idle state.
-
Return to the Arms State Machine graph and drag a wire from the Run state to the Idle state.
![WireRuntoIdle.png]()
-
Double-click the transition to edit it.
-
Control-click on IsRunning in the My Blueprint tab and drag into the graph to create a Get Is Running node.
-
Drag off the output Boolean pin on the Get Is Running node and create a Not Boolean node.
-
Connect the output pin from the Not Boolean node to the input pin of the Can Enter Transition pin on the Result node.
![IsNotRunningtoResult.png]()


4.4.2 - Add Idle to Jump Start Transition
During this step, you are going to set the idle to jump start transition.
-
Return to the Arms State Machine graph and drag a wire from the Idle state to the JumpStart state.
![IdletoJumpStart.png]()
-
Double-click the transition to edit it.
-
Control-click on IsFalling in the My Blueprint tab and drag into the graph to create a Get Is Falling node.
-
Connect the output Boolean pin from the Get Is Falling node to the input Boolean Can Enter Transition pin on the Result node.
![IsFallingtoResult.png]()


4.4.3 - Add Run to Jump Start Transition
During this step, you are going to set the run to jump start transition.
-
Return to the Arms State Machine graph and drag a wire from the Run state to the JumpStart state.
![RuntoJumpStart.png]()
-
Double-click the transition to edit it.
-
Control-click on IsFalling in the My Blueprint tab and drag into the graph to create a Get Is Falling node.
-
Connect the output Boolean pin from the Get Is Falling node to the input Boolean Can Enter Transition pin on the Result node.
![IsFallingtoResult.png]()

4.4.4 - Add Jump Start to Jump Loop Transition
During this step, you are going to set your jump start to jump loop transition.
-
Return to the Arms State Machine graph and drag a wire from the JumpStart state to the JumpLoop state.
![JumpStarttoJumpLoop.png]()
-
Double-click the transition to edit it.
-
Right-click in the graph, search for and select the TimeRemaining for 'FPP_JumpStart' node.
-
Drag off the Time Remaining output pin and add a
<= (float)node using the Context Menu . -
Enter 0.1 in the other output field on the
<= (float)node and then drag a wire from the Boolean output pin of that node to the Can Enter Transition input pin of the Result node.![TimeRemaining.png]()


4.4.5 - Add Jump Loop to Jump End Transition
During this step, you're going to set your jump loop to jump end transition.
-
Return to the Arms State Machine graph and drag a wire from the JumpLoop state to the JumpEnd state.
![JumpLooptoJumpEnd.png]()
-
Double-click the transition to edit it.
-
Control-click on IsFalling in the My Blueprint tab and drag into the graph to create a Get Is Falling node.
-
Drag off the output Boolean pin on the Get Is Falling node and create a Not Boolean node.
-
Connect the output pin from the Not Boolean node to the input pin of the Can Enter Transition pin on the Result node.
![IsNotFalling.png]()


4.4.6 - Add Jump End to Idle Transition
During this step, you're going to set your jump end to idle transition.
-
Return to the Arms State Machine graph and drag a wire from the JumpEnd state to the Idle state.
![JumpEndtoIdle.png]()
-
Double-click the transition to edit it.
-
Right-click in the graph, search for and select the TimeRemaining for 'FPP_JumpEnd' node.
-
Drag off the Time Remaining output pin and add a
<= (float)node using the Context Menu . -
Enter 0.1 in the other output field on the
<= (float)node and then drag a wire from the Boolean output pin of that node to the Can Enter Transition input pin of the Result node.![TimeRemaining.png]()

4.5 - Associating Animation & Character Blueprints
During this final section of the tutorial, you are going to associate the animation Blueprint that you created with your character Blueprint.
-
Compile and save the Arms_AnimBP Animation Blueprint before closing it.
-
Navigate to the Blueprints folder in the Content Browser and open the BP_FPSCharacter Blueprint.
-
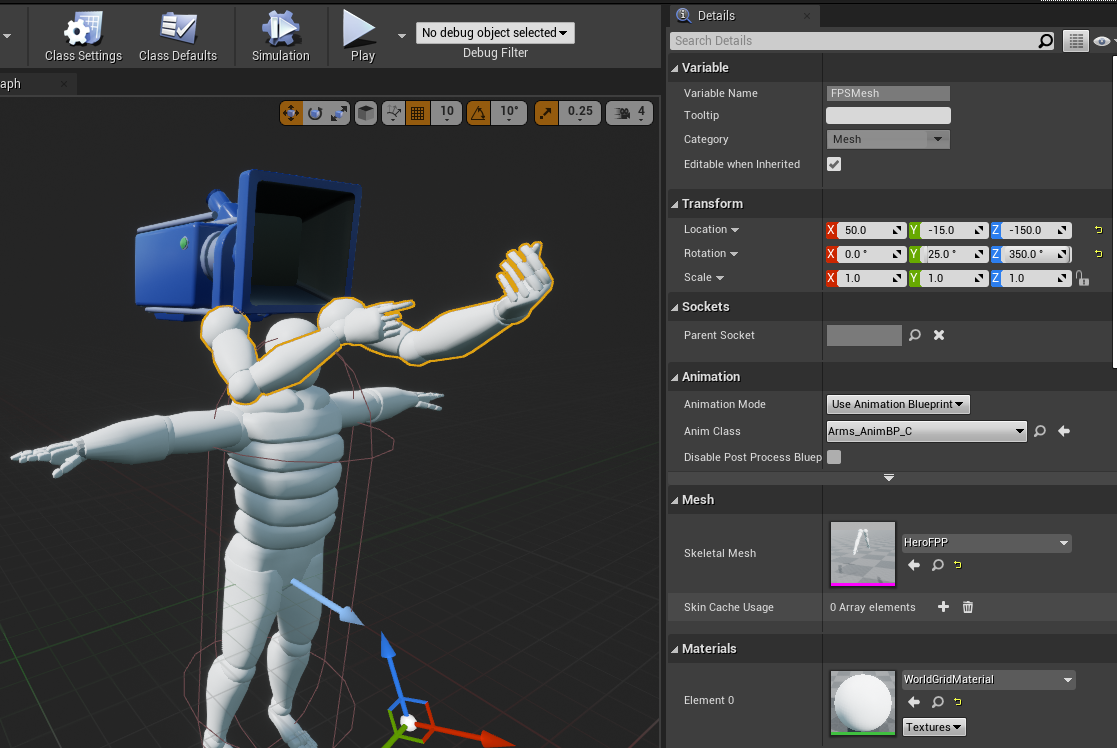
Select FPSMesh in the Components tab.
![LocateFPSMesh.png]()
-
Set the Anim Class for the FPSMesh to the Arms_AnimBP Animation Blueprint you just created.
-
While you are in the Defaults mode, change the FPSMesh transform to {50, -15, -150} for Location and {0, 25, 350} for Rotation.
![NewArmTransform.png]()
-
Compile and save the Blueprint before closing it.
-
Click the Play button in the Level Editor Toolbar .
![FinalGif.gif]()
Your arms will be animated as they transition through the animations that you hooked together in the Animation State Machine.


Congratulations! You've learned how to:
✓ Set-up a Project
✓ Implement a Character
✓ Implement a Projectile
✓ Animate a Character
You've just completed the C++ First Person Shooter tutorial!