Choose your operating system:
Windows
macOS
Linux
By establishing reference to an Actor , you can access its Properties , Variables , Events , or Functions (if applicable) during gameplay through Blueprints or C++ and alter them to suit your gameplay needs.
Say for example you want a light to turn on when a player enters a Trigger Box, having reference to the light and the Trigger Box will allow you to do so by tying the light Actor to the OnComponentBeginOverlap Event of the Trigger Box (in which case you could turn on the light).
Getting proper reference to an Actor is also important for communication between Actors, as incorrectly specifying a reference will result in failed communication and undesirable results.
Implementation Guide
In this guide, you will learn multiple ways you can Reference Actors in Blueprints. Referencing Actors properly is important if you want to change aspects of the Actor during gameplay through Blueprints or pass the reference from one Blueprint to another so that you may access and modify it.
Level Blueprint Reference
The most common method of creating a reference is by referencing an Actor that is placed in your level inside the Level Blueprint . To do this, simply follow the steps below.
-
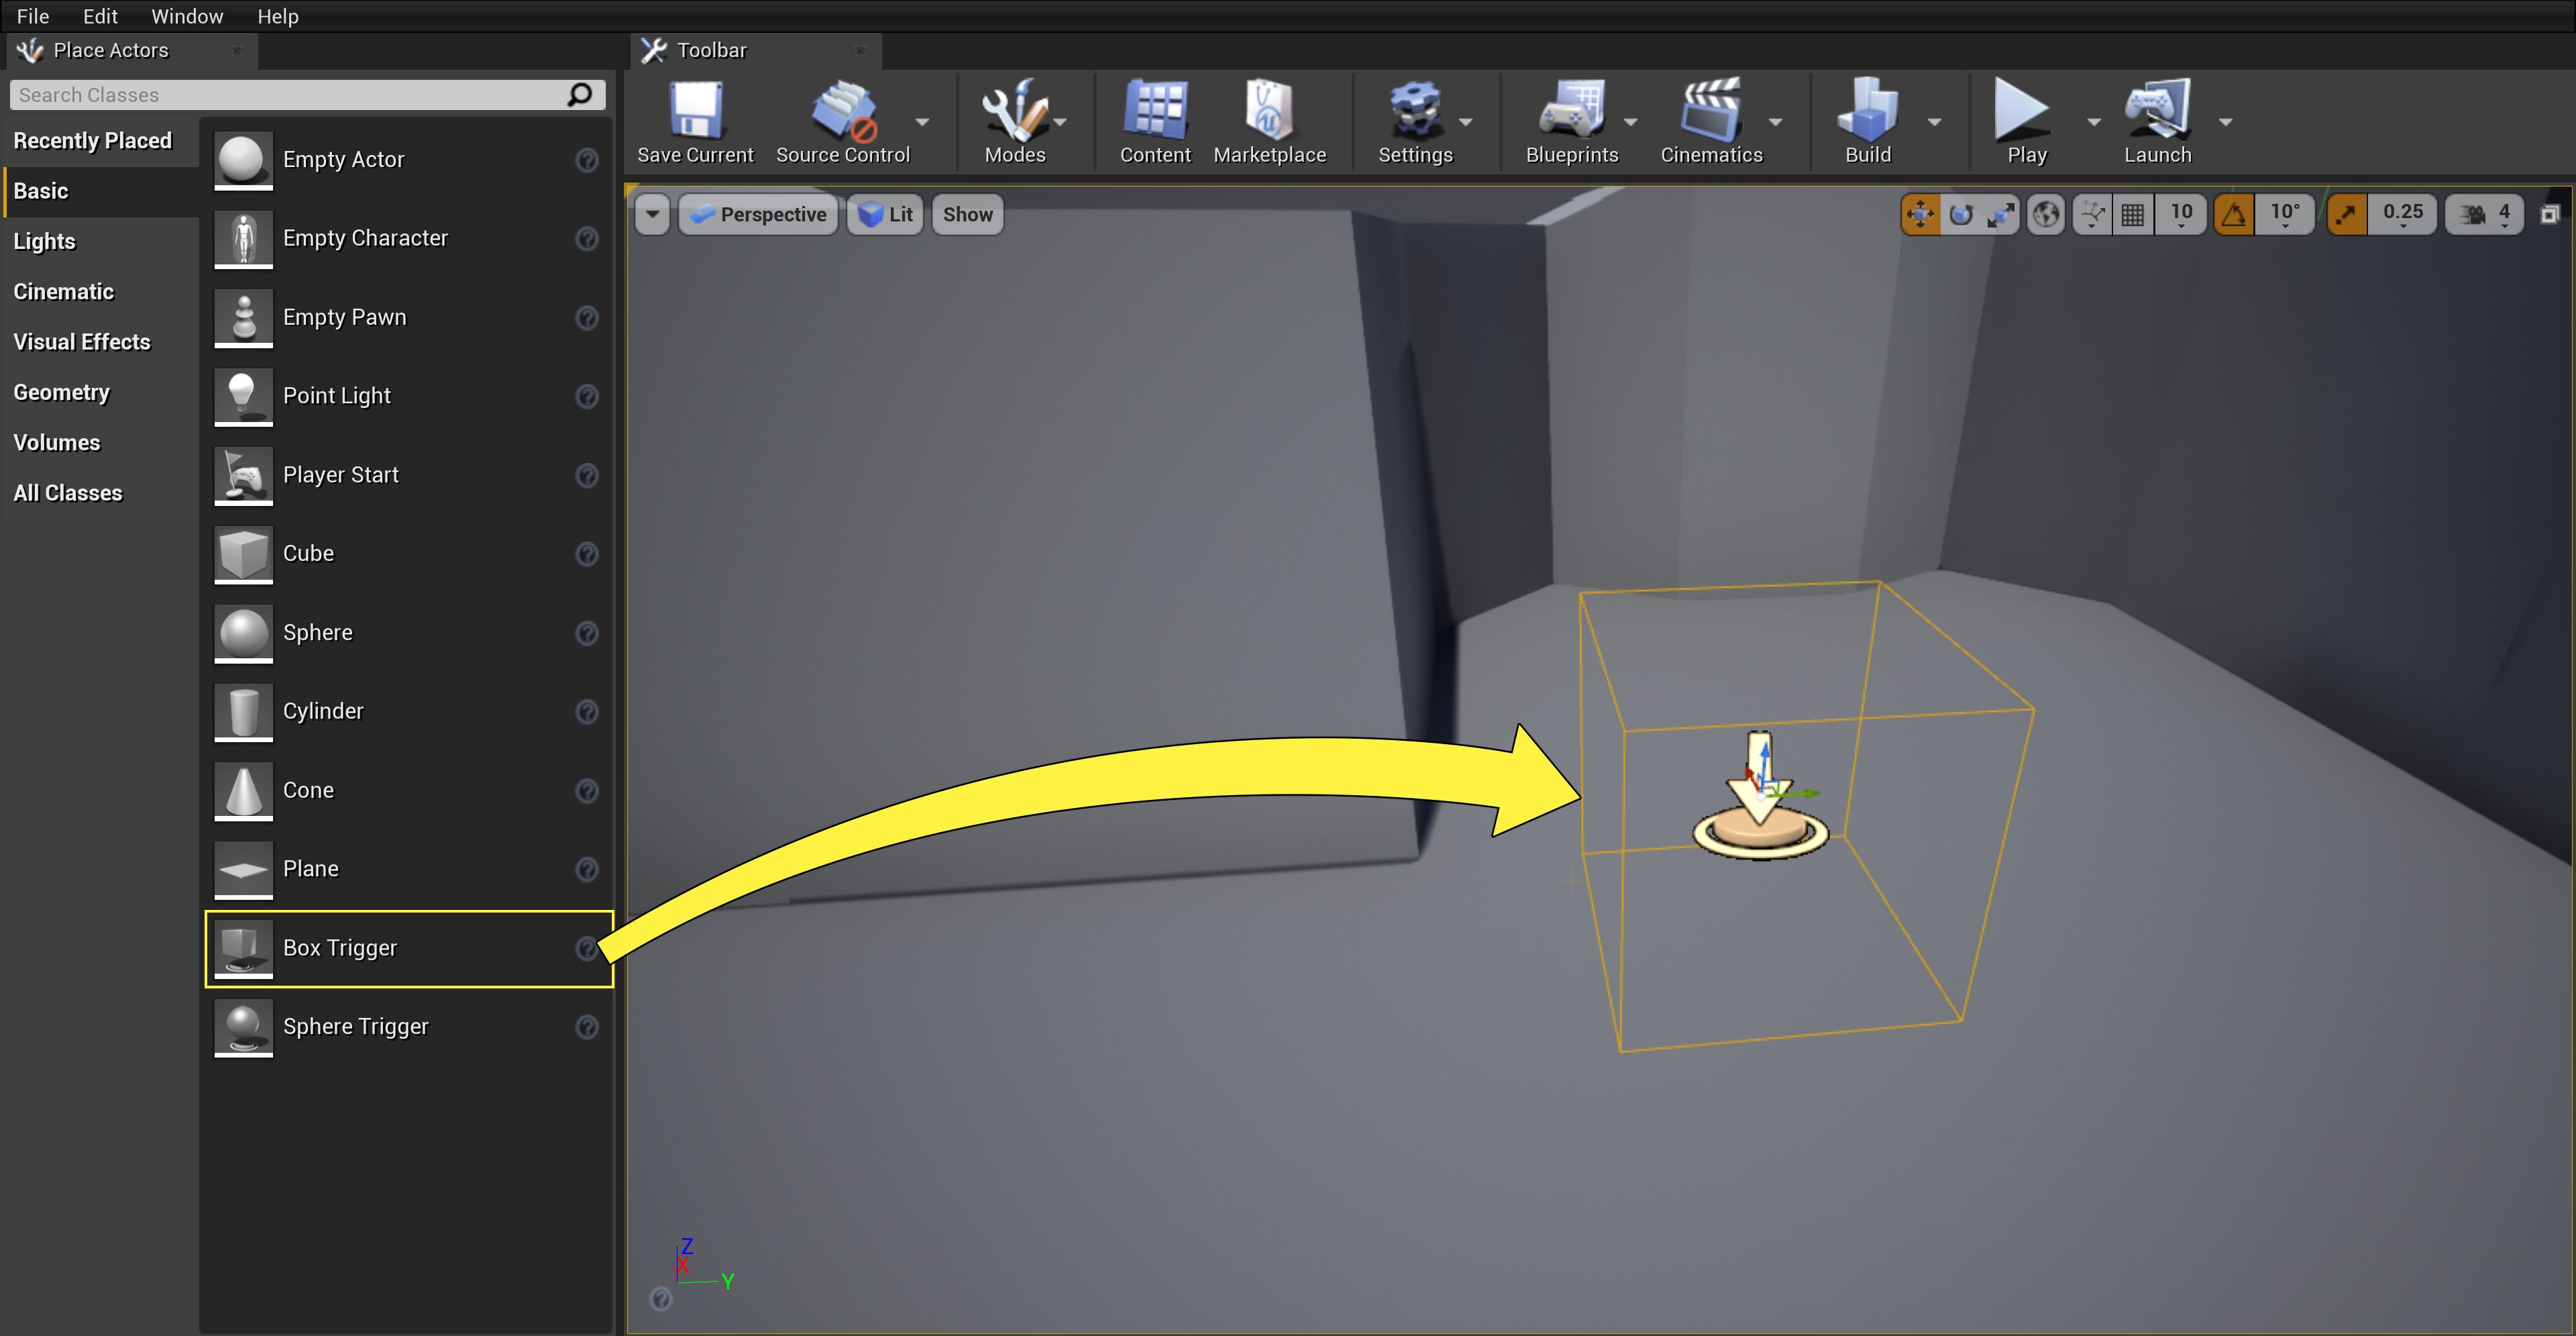
Inside your project, place an Actor or Blueprint Actor in your level.
![GHT5B_1.png]()
Here we dragged in a Box Trigger Actor.
Please see the Common Actor Types documentation for more on Actor Types.
-
With the Actor in the level selected, click the Blueprints button from the Main Toolbar, then click Open Level Blueprint .
![GHT5B_2.png]()
-
With the Blueprint Editor window open, Right-click in the graph window and select Create a Reference to TriggerBox .
![GHT5B_3.png]()
In our example, we are adding reference to the TriggerBox , however your Actor will appear here.
-
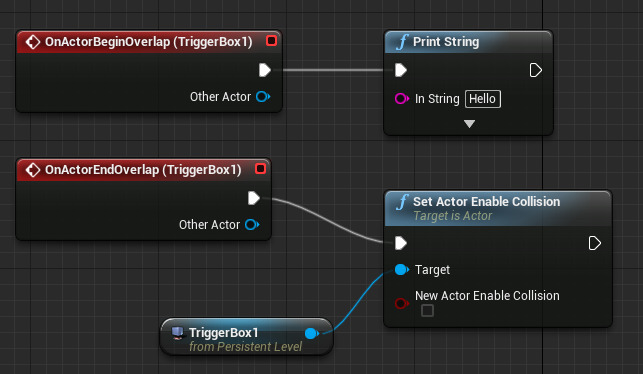
A new node will be added to the Blueprint which you can drag off to access/set its properties, or Call Events or Functions from it.
![GHT5B_4.png]()
Here we are printing to the screen when the player overlaps the trigger. When they exit the trigger, we are disabling its collision so it cannot be triggered again (unless we re-enable collision on it). While we used a TriggerBox, you could have a Blueprint Actor in your level which has its own Variables, Events, or Functions within it that you could access or call by using this method of getting reference.
Spawn Actor Reference
Another method of getting reference to an Actor can be done when spawning an Actor in your levels. Take a look at the example below.
-
Inside your project, open your player character's Blueprint (we are using ThirdPersonCharacter ).
-
Inside the graph, Right-click and add an Event Begin Play node and connect it to a Spawn Actor from Class node.
-
For the Class drop-down menu on the Spawn Actor node, select the Actor Class you want to spawn when the game starts.
![GHT5B_5.png]()
Here we are spawning the Blueprint_Effect_Fire Actor at the player's Transform (denoted by the Get Actor Transform node).
-
Drag off the Return Value pin of the Spawn Actor node and select Promote to variable .
![GHT5B_6.png]()
This will create a variable out of the spawned Actor (which we named SpawnedActor ). You could also drag off the Return Value to directly access the Variables, Events, or Functions inside your selected Actor that you are spawning, but we are making it a variable so that we may access it later.
-
You can now hold Control and drag the variable into the graph, then drag off it to access the properties inside it.
![GHT5B_7.png]()
Here we are accessing the Particle Effect Component ( P_Fire denoted in the yellow box above) from the Spawned Actor and Deactivating it from our ThirdPersonCharacter Blueprint when the player presses the F key.
Direct Blueprint Communication Referencing
There may be times when you have several Blueprint Actors in your level and you want to modify one of them from inside another Blueprint. Referred to as Direct Blueprint Communication , the typical steps used to do so are outlined below.
-
Place two Blueprint Actors in your level.
![GHT5B_8.png]()
Here we are using the Blueprint_Effect_Fire and Blueprint_Effect_Sparks Actors included with Starter Content.
Say we want the fire effect to deactivate the spark effect after a few seconds when the game starts.
-
Inside the Blueprint_Effect_Fire Blueprint, we create an Event Begin Play connected to a Delay node (set to 2 seconds).
-
We are at the point where we want to reference the sparks effect so we create a new variable using Blueprint_Effect_Sparks_C .
![GHT5B_9.png]()
Reference Blueprint Actors are denoted with a _C following their name as seen above.
-
Hold Control and drag the new variable into the graph, then drag off it to access the Blueprint's properties.
![GHT5B_10.png]()
We named our variable Target Blueprint and you can see here that we can access the Blueprint's properties as we attempt to get the spark effect to deactivate it.
-
We then hook up our graph to deactivate the spark effect 2 seconds after the game starts.
![GHT5B_11.png]()
-
We Compile and Play in the editor and see that it does not work and are presented with an error message.
![GHT5B_12.png]()
Expanded...
![GHT5B_13.png]()
The error states that we have Accessed None and is a common error that occurs when trying to communicate between Blueprints and get reference to Actors for the first time.
In the Blueprint_Effect_Fire Blueprint, we identified our target Blueprint and created a variable for it and deactivated the sparks, however we need to specify the actual Instance of that Blueprint that we want to apply the change to.
We can do that by making the variable Public which will allow us to access it inside the Main Editor window where we can select which Instance should be affected.
-
In the Blueprint_Effect_Fire Blueprint, click the eye icon next to the TargetBlueprint variable.
![GHT5B_14.png]()
This will set the variable to Public which will allow us to set it inside the Editor.
-
Click the Compile button then return to the Main Editor window and select the Blueprint_Effect_Fire Actor in the level.
-
In the Details panel, you will now see that there is a Target Blueprint option where we can select the targeted Blueprint Actor.
![GHT5B_16.png]()
You can use the drop-down menu to select the target Actor, or you can use the Eye Dropper and select the target Actor in the scene.
![GHT5B_17.png]()
-
With the target Actor set, if you Play in the editor now, the spark effect will deactivate after two seconds.
You can refer to Direct Blueprint Communications and Blueprint Communication Usage for more information on using Direct Blueprint Communication.
Cast To Referencing
While the Direct Blueprint Communication method works for getting reference between Actors that exist in your level, there may be instances when you want to get a reference to an Actor in your level and pass it to a Blueprint Actor that is not in the level yet, for example the player character (or other Actor) that does not exist in the level until the game starts. In this case, you can use a Cast To node to send the reference to your Target Blueprint.
-
Place an Actor in your level that you want to reference.
![GHT5B_18.png]()
-
With the Actor in the level selected, click the Blueprints button from the Main Toolbar, then click Open Level Blueprint .
![GHT5B_2.png]()
-
Right-click and select the Create a Reference to... option.
![GHT5B_19.png]()
-
Right-click and add an Event Begin Play and Get Player Character node.
-
In your Character Blueprint, create a new variable of the type you want to reference.
![GHT5B_21.png]()
Here we created a variable of the Blueprint_Effect_Fire_C type called TargetBlueprint (as the fire effect is what we want to reference) inside the ThirdPersonCharacter Blueprint. When the game is started the Level Blueprint will get the reference to the Actor in the level then pass it to the ThirdPersonCharacter Blueprint so that we may access its properties.
-
Control drag the variable into the graph, then drag off it to access its properties.
![GHT5B_22.png]()
Here we are deactivating the P_Fire effect when the player presses the F key.
Now that we have created a variable to hold the reference, we still need to pass the reference from the Level Blueprint .
-
Compile the Character Blueprint when your script is complete, then open the Level Blueprint again.
-
Drag off the As My Character C pin of the Cast To node and add the Set Target Blueprint node.
![GHT5B_23.png]()
Plug in the reference node to the in pin of your Set Target Blueprint (or whatever you called your variable).
-
Compile then Play in the editor.
If you followed this example, you should be able to deactivate the fire effect by pressing the F key.
You can refer to Casting to Blueprint Types and Blueprint Communication Usage for more information on Actor Casting.


