Choose your operating system:
Windows
macOS
Linux


Creating, setting up, and tweaking standard Materials can be a very time-consuming process in Unreal Engine 4. To help speed up and streamline this process, UE4 offers a special type of Material called a Material Instance . In the following How-To, you will learn to set up and use Material Instances in your projects.
Material Instancing
Material Instancing is a way to create a parent Material, that can then be used as a base to make a wide variety of different-looking child Materials. To achieve this flexibility Material Instancing uses a concept called inheritance : the properties of the parent are given to its children. Here is an example of Material inheritance in action.
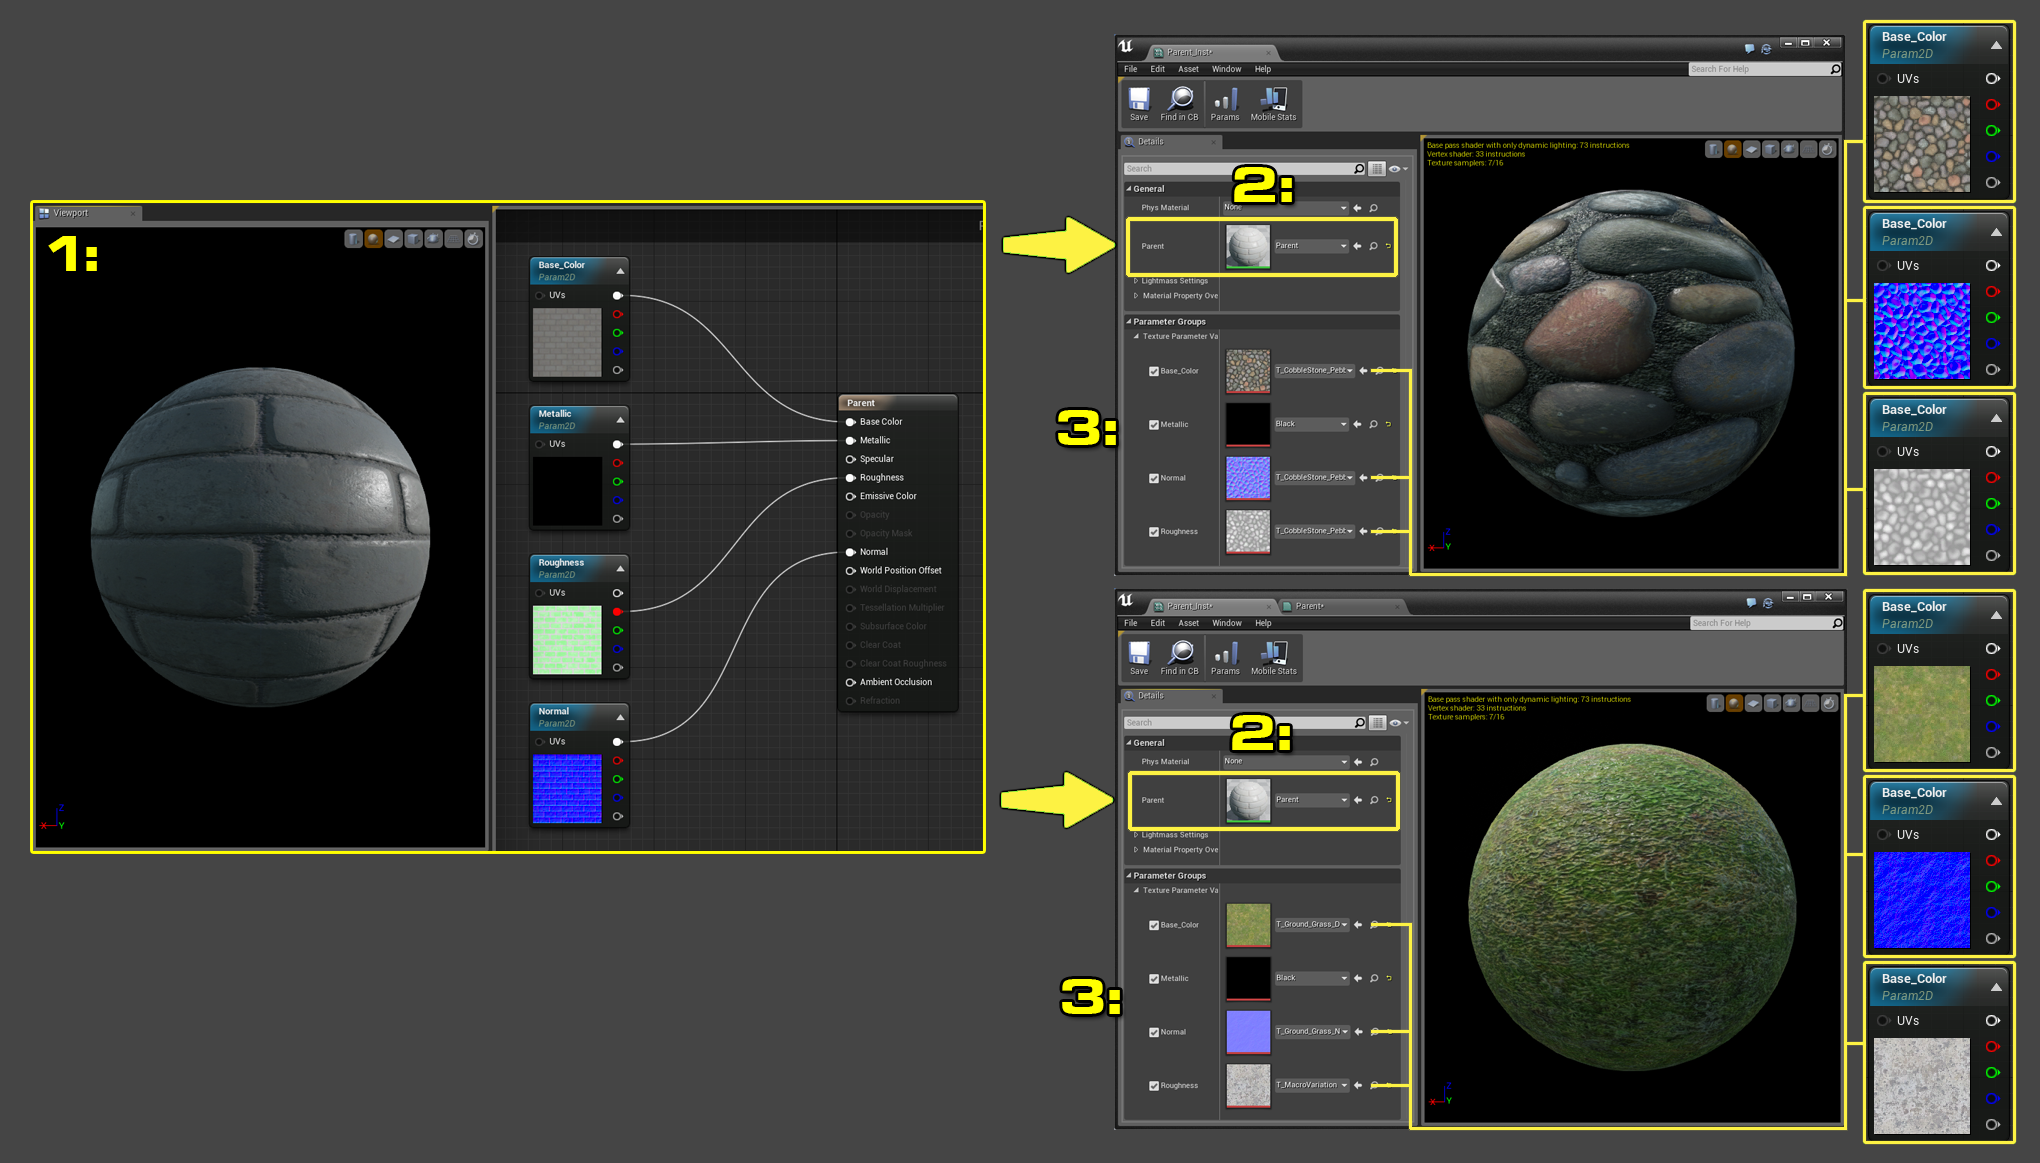
Click for full image.
|
Step |
Description |
|---|---|
|
1 |
This is the parent Material of the two Material Instances you see to the right. Note there are four Textures used in the parent Material. |
|
2 |
This is where the parent Material is set in the Material Instance. Changing this Material can change how the Material Instance works. |
|
3 |
By changing these Textures, you can affect the entire look of the Material Instance. Note the four Texture inputs, which are there because the Material Instance inherited that functionality from the parent Material on the left. |
Material Parameters
To change the parameters of Material Instances, you have to use a different kind of node in the Material Graph called a Parameter Node . A Parameter Node looks and works like a regular Material Expression node but its key difference is Parameter Nodes are used for telling Material Instances how to function. Use Material parameters to get a Material to interact with a Material Instance.
There are two ways to add Parameter Nodes to the Material Graph .
Adding Parameter Nodes from the Material Palette
If you do a search using the word "parameter" in the Material Palette you can find all of the Parameter Nodes that are available. You can then drag and drop these nodes from the Palette to the Material Graph.

Converting a Node
When inside of the Material Graph, you can right-click on a node and the choose the Convert To Parameter option:
You cannot do this for every Material node. If you see the Convert To Parameter option when you right-click on a node, then that node can be converted into a Parameter Node.
Creating a Material Instance
We will now create a Material Instance using the methods mentioned above.
-
We need to create a new Material to work with. Right-click in the Content Browser , then select Create Basic Assets > Material .
![Materails_Instances_Creat_New_Material.png]()
-
Name the new material Material_Master .
![Materails_Instances_Named_Material.png]()
-
Locate it in the Content Browser , then double-click it to open it in the Material Graph. Once opened, search for the following Material Expression nodes in the Palette and add them to the Material Graph.
-
Constant 3 Vector
-
Constant Node
-
Scalar Parameter
-
-
Now that the Material Expression nodes have been placed, wire them up to the their respective pins in the main Material Node. For this example, we will be using the following pins.
-
Base Color
-
Metallic
-
Roughness
-
-
Once everything has been hooked up, it is now time to convert some of the Material nodes into Parameter nodes so that they can be used in Material Instances. To do this, right-click on the Material node that you want to convert to display the context menu, then select Convert to Parameter .
-
Now that we have our nodes converted to Parameter nodes, we can label them so that when we use them in a Material Instance, we will know what each node does. To give a Parameter node a name, select the Parameter node in the Material Graph, and under the Parameter Name section, type in the name that you want to use. For this example, we will be using the following names:
-
Base Color
-
Metallic
-
Roughness
Make sure that the name that you pick for your node matches very closely to what the node actually does. This way you do not have to keep going back and forth between the Material and Material Instance to see what the node actually does.
-
-
Compile your Material by pressing the Apply button. If compiled correctly, the button should be grayed out.
![Materails_Instances_Complied.png]()
-
Now that the Material has been compiled, make a Material Instance. In the Content Browser , right-click on the Material, then select Create Material Instance .
Your Material Instance will derive its name from the Material that you are using to create it. You can rename the Material Instance during creation or by selecting the Material and pressing F2 on the keyboard, then entering the new name.
-
In the Content Browser , double-click the newly created Material Instance to open it. You should see something that looks like this.
![Materails_Instances_Instance_Editor.png]()
-
Once you have the Material Instance Editor open, you can start to adjust parameters. To adjust a parameter, you need to enable it by clicking on the box that is to the left of the parameter name to enable it. Once a parameter has been enabled, its name will no longer be grayed out and a check mark will be placed in the box to the left of the name.
-
Now that the parameters have been enabled, you can adjust any of them and see the results in real time, without having to recompile the Material.


The names that you set for parameters inside of the Material reflect the names that you see in your Material Instance. This is why it is important to pick names that correspond to what the parameter actually does.

Material Instances in Action
The full power of the Material Instance system becomes clear when you need to have many Materials that look different but still have similar controls, or if you need to control a Material in a specific way during gameplay. In the following example, we will make three different instanced Materials that are based on the parent Material that was created in the previous steps. We will show how changes to the parent Material will affect the child Materials.
-
We need to make some more Material Instances using the Material_Master Material that was created above as the parent Material. In the Content Browser , right-click the Material_Master Material, then select Create New Material Instance . Do this two more times until you have a total of three Material Instances.
![Materails_Instances_Create_3_New_MI.png]()
-
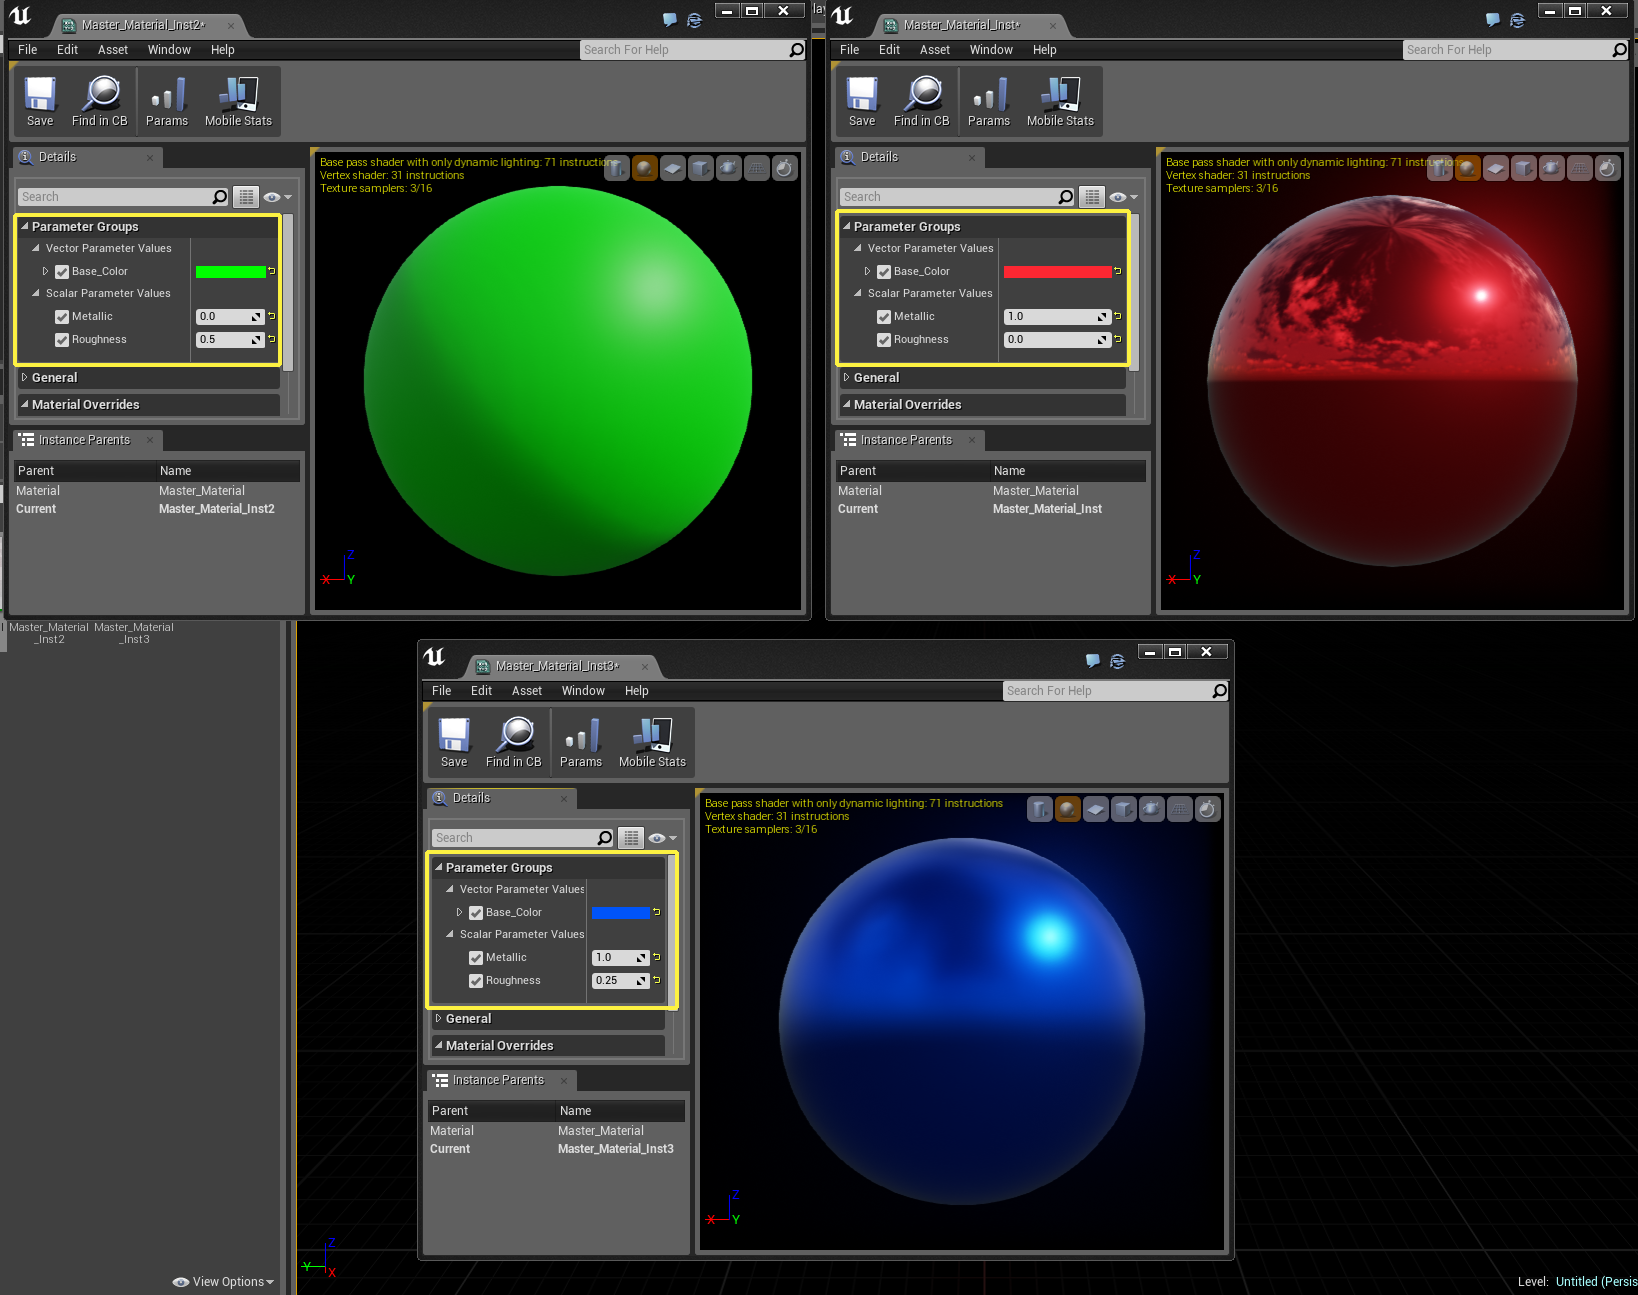
Open the three additional Material Instances and begin adjusting their parameters. To open a Material Instance, double-click it in the Content Browser . You can now set the Color , Roughness , and Metallic values. For this example, we are using Red , Green , and Blue as the colors. You can see all of the values used for this example in the following image.
![Materails_Instances_Fill_In_Instances.png]()
Click for full image.
-
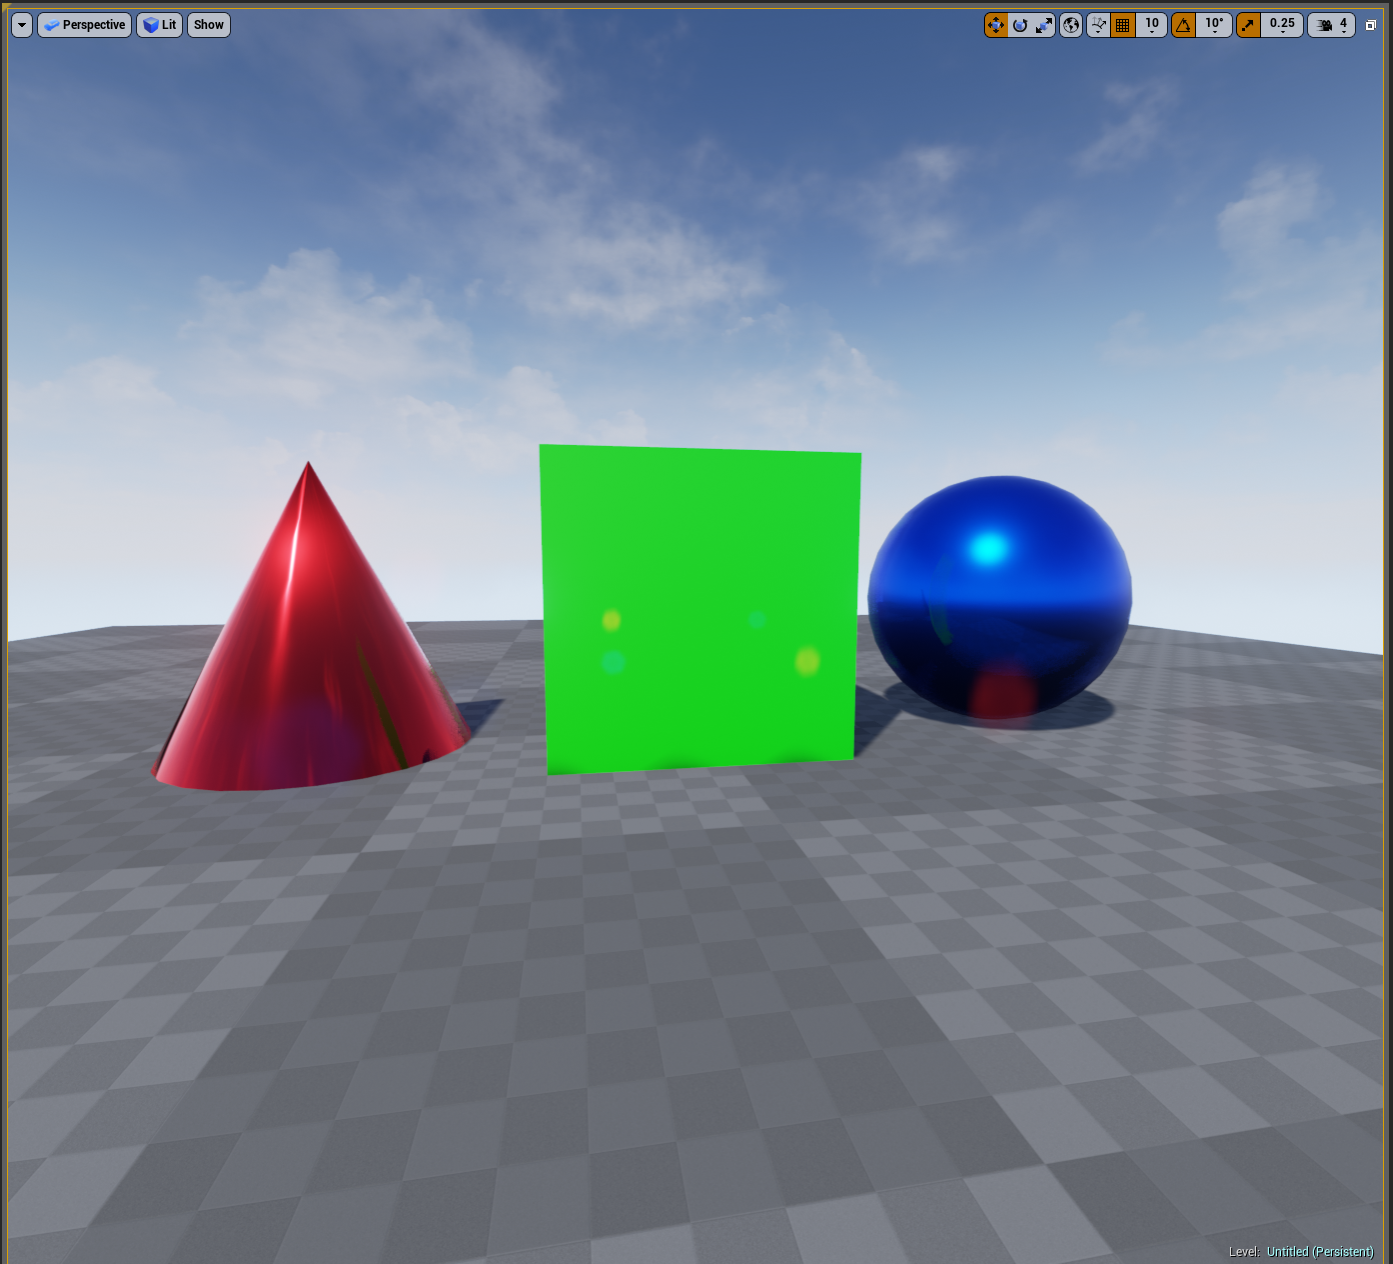
We can now apply our Material Instances to objects. Let us apply the Material Instances to some basic meshes that can be found in the Shapes folder of the Starter Content .
![Materails_Instances_Applied_Instanaces.png]()
Click for full image.
-
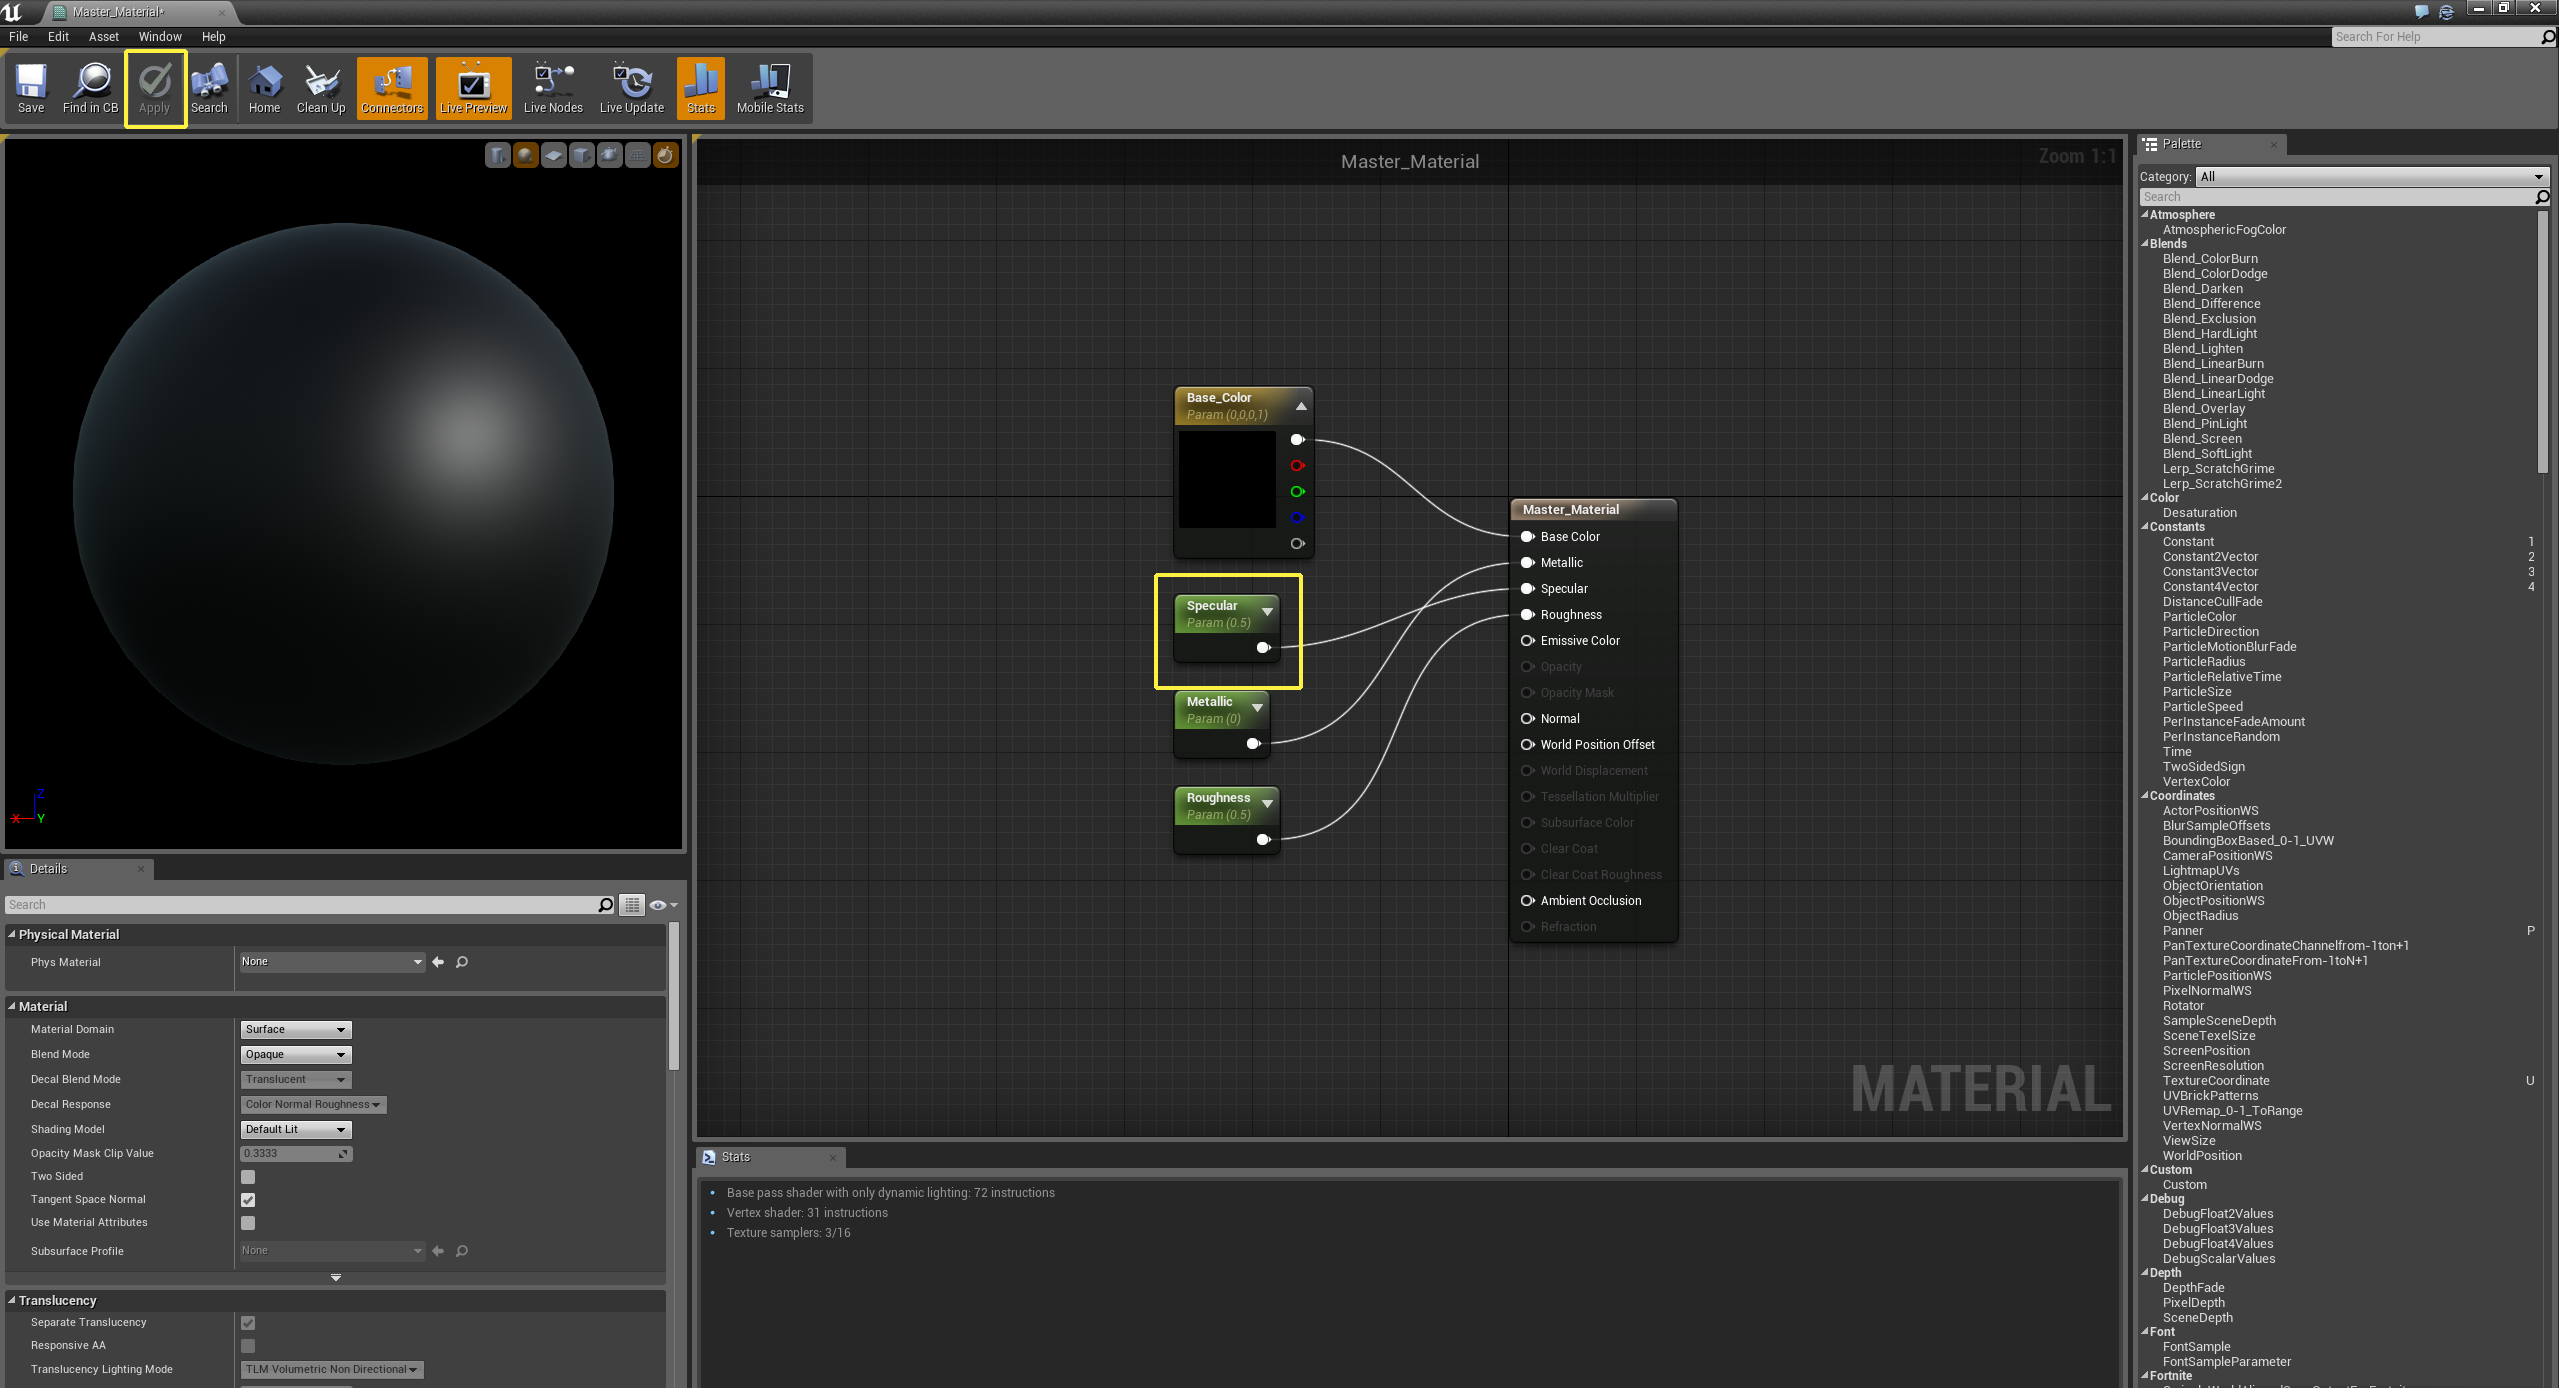
Open Master_Material in the Material Graph. Select one of the Scalar Parameter Nodes and duplicate it by pressing CRTL + W . Now that the node has been duplicated, rename it to Specular and set the default value to 0.5 . Connect the output of the Scalar Parameter node to the Specular input pin and then compile the Material.
![Materails_Instances_Add_New_Param.png]()
Click for full image.
-
Once the Material has been compiled, you can exit Master_Material and then open the Red Material Instance . Once opened, notice how there is now a new input for Specular . Check the Blue and Green Material Instances. Note how they both have new inputs for Specular . This is where the real power of the Material Instance lies: Changes that you make to the parent Material will always be propagated to their children.
![Materails_Instances_New_Options.png]()
Click for full image.


Changing the Parent Material of a Material Instance
You can quickly change the Material that is used as a parent Material of a Material Instance by setting a new parent in the Material Instance Editor. Open the Material Instance In the Details panel, under the General section, change the Material in the Parent property. Depending on the options of the new Material, the Material Instance Editor will change to reflect the options of that new Parent Material. The following image shows is a Material Instance that was created using the parent Material shown in the Parent property.

Here is that same Material Instance, but this time with a different parent Material. Notice how there are fewer Texture inputs and some new numeric inputs have been added.

Conclusion
Material Instancing is a powerful tool that can be used across all aspects of your project. From helping to add some variation to weapons and props, to helping artists make better use of available Materials, Material Instances can help to streamline and unify how Materials are created and used in your project.