Choose your operating system:
Windows
macOS
Linux
In order to understand and use the content on this page, make sure you are familiar with the following topics:
Spawning a Static Mesh instead of a camera-facing sprite can increase the realism of the effects you are creating. In the following how-to, we will show how to set up a Niagara Emitter to spawn Static Meshes instead of sprites.
Prerequisite Step: This how-to uses the Shape_Sphere Static Mesh, which is found with the Starter Content . If you have not done so already, make sure that this Static Mesh or the Starter Content has been added to your project.
Create a Material
The effect in this guide is meant to look like a cloud of balloons being released. To enhance this effect, you will make a simple material that makes the mesh look like a rubber balloon.
-
Right-click in the Content Browser and under Create Basic Asset select Material .

Click image for full size.
-
Name the new Material M_Balloon . Double-click it to open in the Material Editor.

Click image for full size.
-
In the Palette panel, type
Particlein the search bar. Select Particle Color and drag it into the Graph to add a Particle Color node.
Click image for full size.
-
Drag off the RGB output and connect the wire to the Base Color input on the Material node.
-
While holding down the 1 key, click in the Graph. This creates a Constant node. Copy and paste it twice, for a total of three Constant nodes .

Click image for full size.
-
Connect the output on one Constant node to the Metallic input on the Material node.
-
You can set the Value of a selected constant in the Details panel, under Material Expression Constant . This material is not metallic, so leave the Metallic constant's value at 0 .

Click image for full size.
-
Connect the output on the second Constant node to the Specular input on the Material node.

Click image for full size.
-
With the Specular constant node selected, set the Specular Value in the Details panel to 0.7 . This will give the material a slightly reflective surface.

Click image for full size.
-
Connect the output on the third Constant node to the Roughness input on the Material node.

Click image for full size.
-
With the Roughness constant node selected, set the Roughness Value in the Details panel to 0.2 . This will create a mostly smooth surface.

Click image for full size.


Your final result for the Material should look like the image below.

Create the System and Emitter
Niagara emitters and systems are independent. The current recommended workflow is to create a system from existing emitters or emitter templates.
-
First, create a Niagara System by right-clicking in the Content Browser and selecting FX > Niagara System . The Niagara Emitter wizard displays.

Click image for full size.
-
Select New system from selected emitters . Then click Next .

Click image for full size.
-
Under Templates , select Fountain .

Click image for full size.
-
Click the Plus sign ( + ) icon to add the emitter to the list of emitters to add to the system. Then click Finish .

Click image for full size.
-
Name the new system MeshSystem . Double-click to open it in the Niagara Editor.
![Name System]()
Click image for full size.
-
The emitter instance in your new system has the default name of Fountain , but you can rename it. Click the name of the emitter instance in the System Overview , and the field will become editable. Name the emitter FX_Mesh .

Click image for full size.
-
Drag your MeshSystem into your Level.


When you make a particle effect, it is always a good idea to drag your system into a Level. This gives you a chance to see every change and edit in context. Any changes you make to the system automatically propagate to the instance of the system in your level.
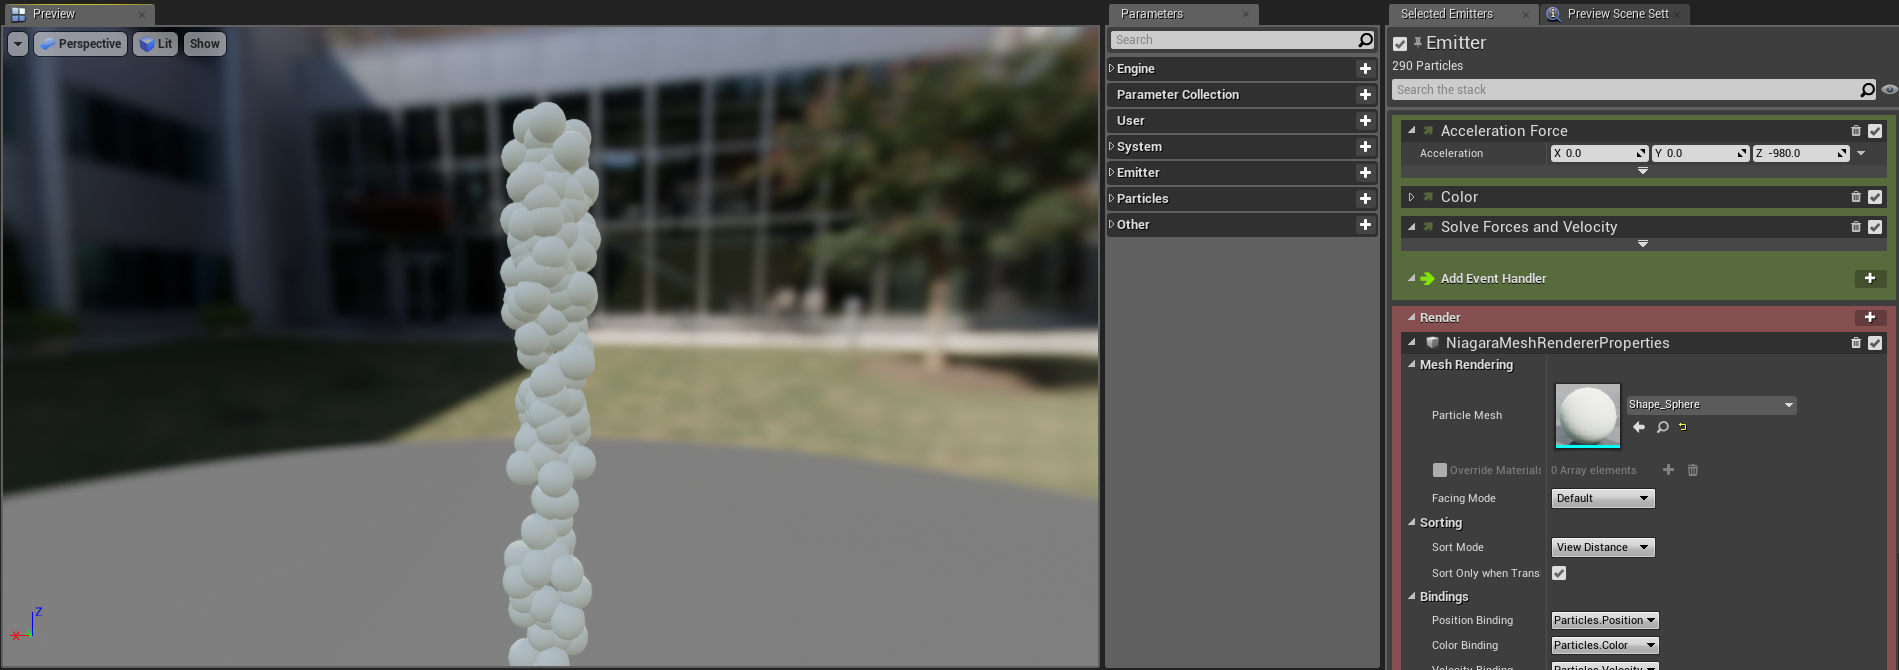
Change the Renderer
The Render group is last in the stack, but you need to change some things so that the effect displays the way it is supposed to. In this case, the template contains a Sprite Renderer, and this effect needs a Mesh Renderer.
-
In the System Overview , click Render to open it in the Selection panel.

Click image for full size.
-
To make a mesh particle effect you need a Mesh Renderer module, but the template has a Sprite Renderer module. Click the Trashcan icon to delete the Sprite Renderer.

Click image for full size.
-
Click the Plus sign ( + ) icon for Render and select Mesh Renderer .

Click image for full size.
-
Click the dropdown for Particle Mesh and select Shape_Sphere .

Click image for full size.
-
The sphere shape used in this effect has a default material applied to it. By enabling Override Materials, you can use the custom material you created instead. Click to enable Override Materials , then click the Plus sign ( + ) icon to add an element to the array.

Click image for full size.
-
Click the dropdown for Explicit Mat , and select M_Balloon .

Click image for full size.


Edit Emitter Update Group Settings
First, you will edit the modules in the Emitter Update group. These are behaviors that apply to the emitter, and that update each frame.
-
In the System Overview , click the Emitter Update group to open it in the Selection panel.

Click image for full size.
-
Expand the Emitter State module. Because you used the Fountain template, the Life Cycle Mode is set to Self . Click the dropdown and set the Life Cycle Mode to System . This enables your system to calculate the lifecycle settings, which usually optimizes performance.

Click image for full size.
-
The Spawn Rate module creates a continuous stream of particles while the emitter is active. This module is already present in the Fountain template. Set the Spawn Rate to 100 .

Click image for full size.


Edit Particle Spawn Group Settings
Next, you will edit the modules in the Particle Spawn group. These are behaviors that apply to particles when they first spawn.
-
In the System Overview , click the Particle Spawn group to open it in the Selection panel.

Click image for full size.
-
Expand the Initialize Particle module. This module collects several related parameters together in one module, minimizing clutter in your stack. Under Point Attributes , locate the Lifetime parameter. This parameter determines how long particles will display before they disappear. For this effect, you will use a dynamic input called Random Range Float to randomize how long the particles display. Random Range Float is already applied to the Lifetime parameter in the Fountain template. Set the Minimum and Maximum values to the following.

Click image for full size.
Setting
Value
Minimum
2.0
Maximum
4.0
-
Locate the Color parameter. Change the RGB values to the following. The material you made in the Create a Material section has no color designated inside it. To make the mesh particle look like a balloon, you have to set a color. There are modules that can change the color in various ways in the Particle Update group, but for this effect a solid color is simpler and works fine.
Setting
Value
Red
1.0
Green
0.0
Blue
0.0
-
Under Sprite Attributes , set Sprite Size Mode , Sprite Rotation Mode , and Sprite UV Mode to Unset . Since you are using a mesh, these attributes are not needed for this effect.

Click image for full size.
-
The original sphere mesh is pretty large, so it looks better for our effect if we make it significantly smaller. Under Mesh Attributes , set Mesh Scale to Non-Uniform . Set the X , Y and Z values to 0.2 .

Click image for full size.
-
The Add Velocity module will give the particles movement as soon as they spawn. Add the Add Velocity module to the Particle Spawn section by clicking the Plus sign ( + ) icon and selecting Velocity > Add Velocity .

Click image for full size.
-
Because this effect is meant to look like balloons being released, some randomness to the speed of the particles is needed. Click the downward arrow next to the Velocity value fields, and select Dynamic Inputs > Random Range Vector . This spreads out the particles and gives them a small amount of movement on the X ,Y, and Z axes.

Click image for full size.
-
Set the Velocity Minimum and Maximum values to the following. This gives the effect a small amount of movement on the X and Y axes, and a larger amount of movement on the Z axis.

Click image for full size.
Setting
Value
Minimum
X : 15, Y : 25, Z : 50
Maximum
X : 30, Y : 30, Z : 100
-
The Sphere Location module module controls the shape of the location where sprites spawn. You can have the sprites spawn in a sphere shape, and you can set the size of the sphere shape by indicating a radius. Set the Sphere Radius to 200 . This spreads the particles out more, as balloons would do when released.

Click image for full size.


Edit Particle Update Group Settings
Now you will edit the modules in the Particle Update group. These behaviors apply to an emitter's particles and update each frame.
-
In the System Overview , click the Particle Update group to open it in the Selection panel.

Click image for full size.
-
Typically, you would use the Gravity Force module to simulate how gravity affects objects. You can also use it more generally to add acceleration to your particles. Set the Gravity Force X, Y and Z values to the following.

Click image for full size.
Setting
Value
X
10
Y
10
Z
40
-
The Drag module applies drag to the particles, which slows them down. Set the Drag to 1.0 .

Click image for full size.
-
The Scale Color module is part of the Fountain template, but this effect does not require it. Click the Trashcan icon to remove the Scale Color module.

Click image for full size.


End Result
Congratulations! You've made a mesh particle effect in Niagara. This effect is meant to simulate a big cloud of balloons being released, but it uses a very simple mesh and material. You can get a more realistic look by replacing the simple mesh and material with more detailed meshes and materials.