Choose your operating system:
Windows
macOS
Linux
Creating a Material for Post Process Effects
Follow these instructions on how to set up a simple Post Process Material:
-
Create a new Level by choosing File > New Level from the Main Menu Bar.
-
Create a new Material by clicking the Add New button in the Content Browser and selecting Material . Name the Material.
![CreateNewMaterial.png]()
-
Double-click this new Material to open it up in the Material Editor.
-
In the Material Properties panel, look under the Material category and set Material Domain to Post Process . This will require you to also set Shading Model to Unlit .
![PostMaterialProperties.png]()
-
In the Post Process Material category, be sure to set the Blendable Location property to Before Tonemapping . This makes for more of a performance hit, but prevents ghosting of the scan lines while the view is in motion. For more information about the Blendable Location property, see the Critical Settings for Post Process Materials section below.
![PostProcessMaterialsCategory.png]()
-
At this point, you would create some Material expression network that defined the look of your post process. As a test for this example, we will create a video scan line overlay effect. You can really make just about anything you like, however. If you would like an example of a cool video scan line post process material, see the Material Setup section.


Material Setup
This is an overview and breakdown of a simple video scan line Post Process Material.

First, here are the textures used in the effect. You can right-click and save each one if you like or create variations of your own. They are all pretty simple.
|
|
|
|
|---|---|---|
|
ScanDistortion.png (2x128) |
Noise.png (512x512) |
Scanlines.png (4x4) |


It should be noted that the images seen here are slightly misleading in that they have been scaled in this document for visual clarity. When you download them (right-click and select Save As) , they will come appear at their original sizes, which are noted in the table.
Assembly Overview
To facilitate putting this Material together, we have broken the key elements into separate numbered Comment boxes. You can go through each one and simply recreate each node network and connect them together and shown in the network image.
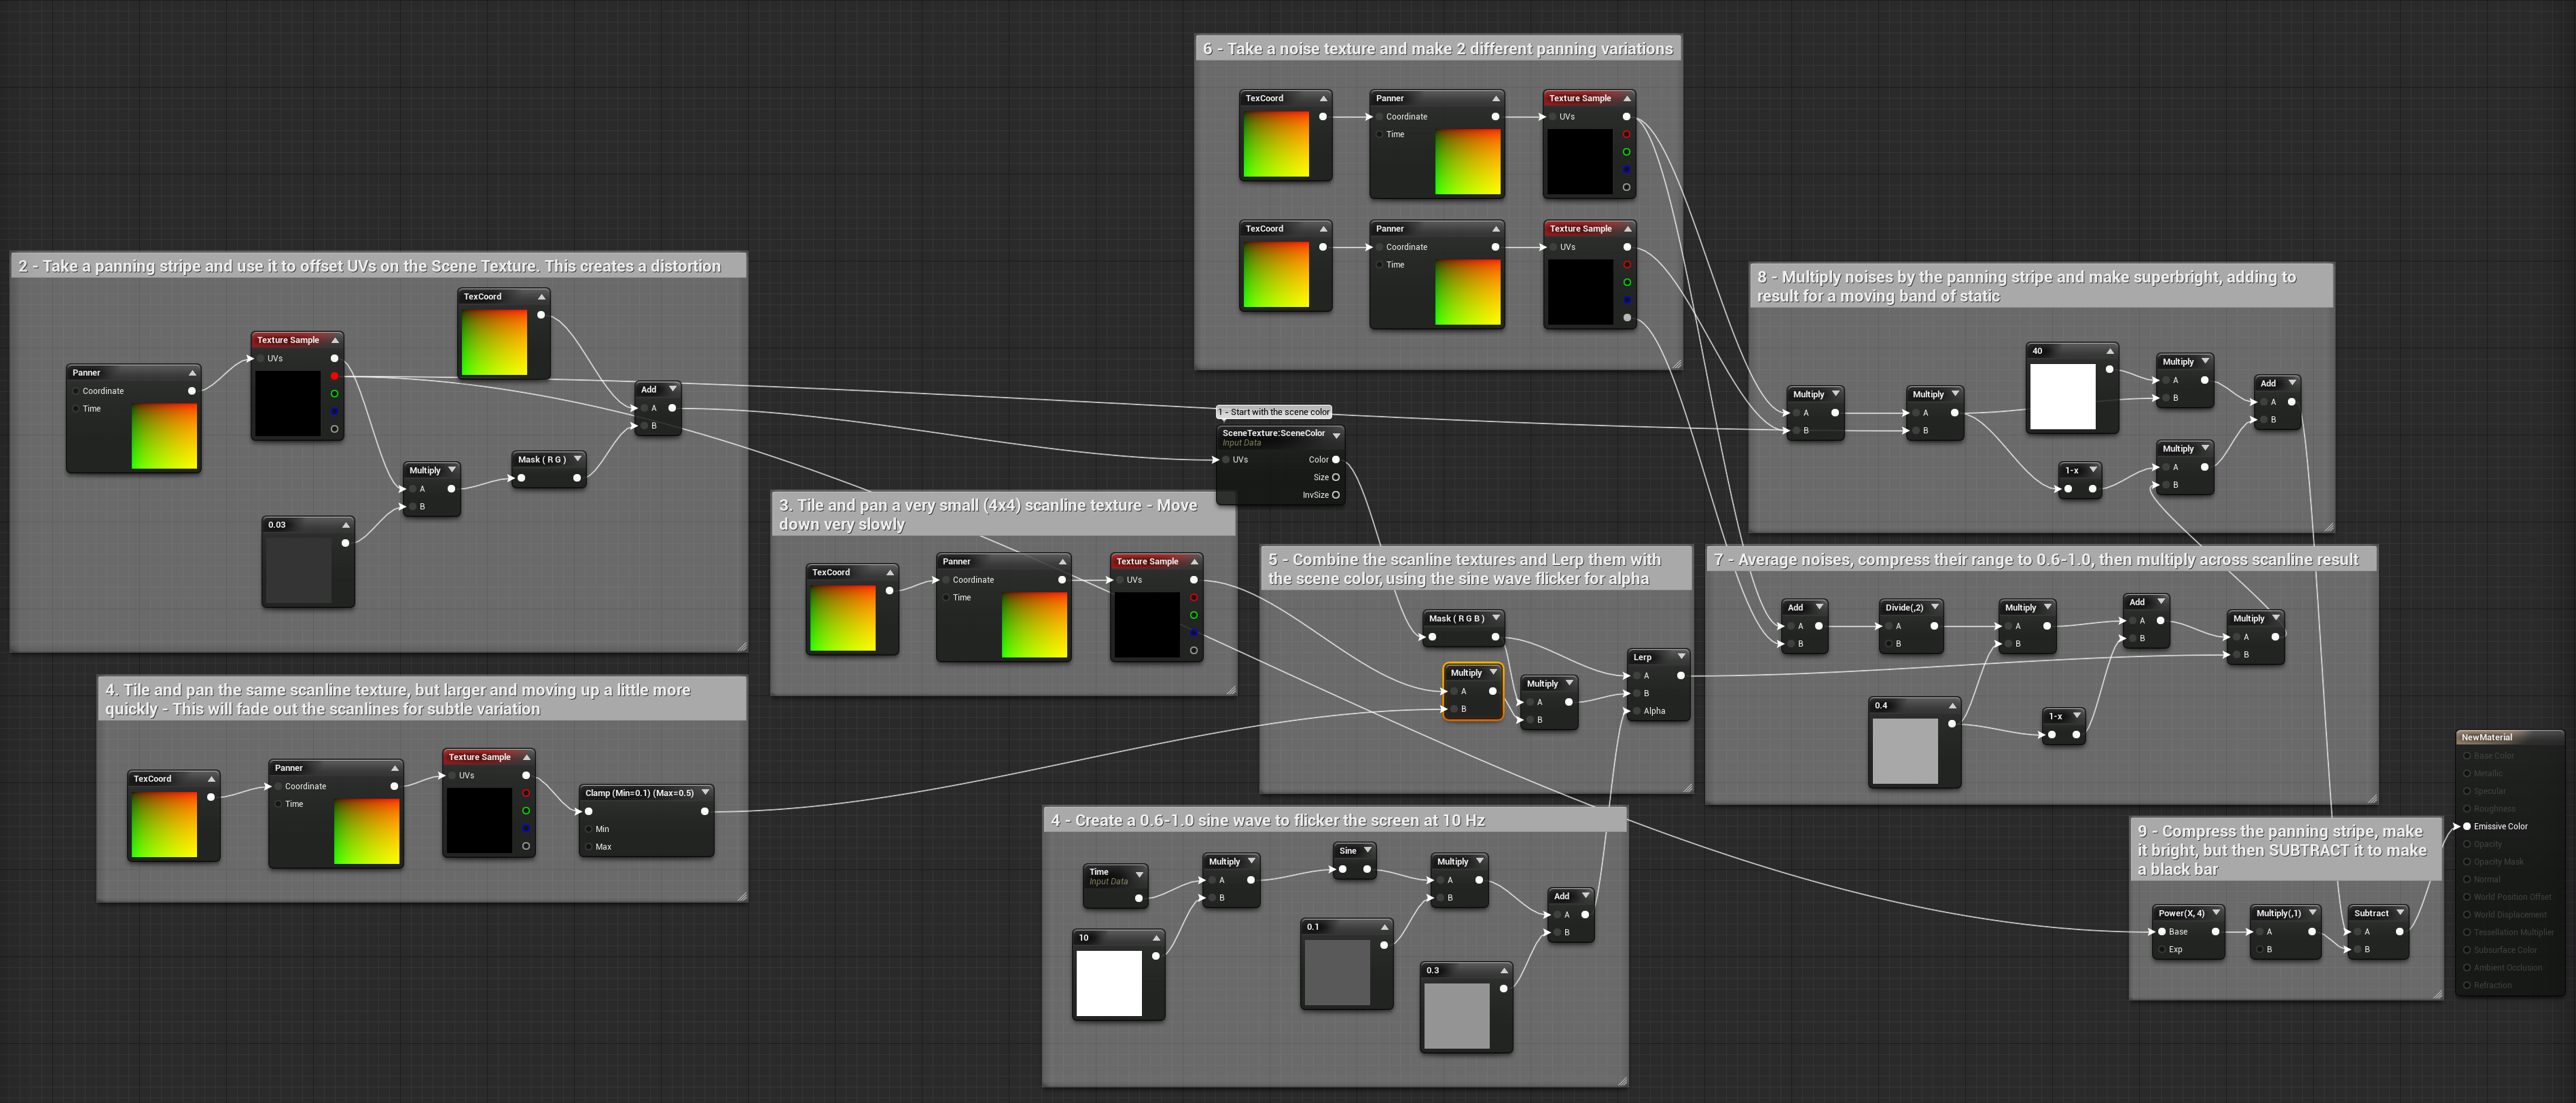
Click to enlarge image.
The numbered steps that follow correspond to the numbers found in the Comment Boxes in the image above. By using the them in tandem, you should be able to recreate this effect.
-
We start with the Scene Texture expression, which is set to bring in the Scene Color . This is how we will manipulate the scene via post process.
-
We perturb the UVs of the Scene Color using a simple panning texture (
ScanDistort.png). This is done by multiplying the result of the texture by 0.03 and then combining it only with the red channel of the texture coordinates, effectively sliding the pixels across the screen. This creates a distortion effect. -
We bring in our 4x4 pixel scan line texture and tile it very heavily in the vertical direction (v:128). We also pan it downward very slowly.
-
We reuse the same scanline texture, this time tiling it only by 1.28 and panning it upward, but a little more quickly. We also clamp it between 0.1 and 0.5 . This will be used to create some variation in the scanlines.
-
Create a time-driven sine wave that runs between 0.6 and 1.0 , at a frequency of 10 Hz. This will be used to flicker the scanlines.
-
Take the noise texture and tile and pan it at 2 different amounts and speeds for variation.
-
Make an average of the two noises, then multiply it by the ScanDistort texture. Multiply that result by 40 and add it into the result to create white static.
-
We take the panning ScanDistort texture, raise it to a power of 4 (this boosts contrast), multiply it by 40 to make it very bright, but then subtract that from the final result to push it to full black. This creates the black bar effect often seen when tracking an old-school VCR .
Assigning to a Post Process Volume
-
We now need to associate the Material with a post process volume. In our case, we will use the Global Post Process. In the World Outliner , click Global PostProcess .
![SceneOutlinerGlobalPost.png]()
-
In the Details panel, locate the Blendables property, found under the Misc category. Click the
![button_Plus.png]()
![BlendablesProperty.png]()
-
Select your new Material in the Content Browser and click the
![button_CBApply.png]()


Now you can add in some of the property-based post process settings that are a part of the Post Process Volume. In this case, we did the following:
-
Pull Saturation to very near 0 .
-
Use Tint to put a pale green cast over the result.
-
Boost Contrast to about 0.65 .
-
Tweak Crush Shadows and Crush Highlights to increase contrast even further.
-
Set Vignette Intensity to about 0.9 for a really strong vignette.
-
Kick Bloom intensity up to about 3.0 .