Choose your operating system:
Windows
macOS
Linux
Ray tracing techniques have long been used in film, television, and visualization for rendering photo-realistic images for a long time but required powerful computers and time to render each image or frame. For film and television, it can take many hours or even days to render out high-quality image sequences, but the final result can create real-life 3D content that can blend seamlessly with real-life ones. For architectural visualization companies, ray tracing has meant creating beautiful renders for the automotive industry or showing what a densely-filled house or office complex could look like when complete all while achieving realistic-looking results.
The power of Unreal Engine 4 (UE4) combined with Real-Time Ray Tracing (RTRT) makes it possible to create interactive experiences with subtle lighting effects comparable with many offline renderers in real time. Ray tracing effects look more natural, producing soft shadowing for lights, accurate ambient occlusion (AO), interactive global illumination, reflections and more.
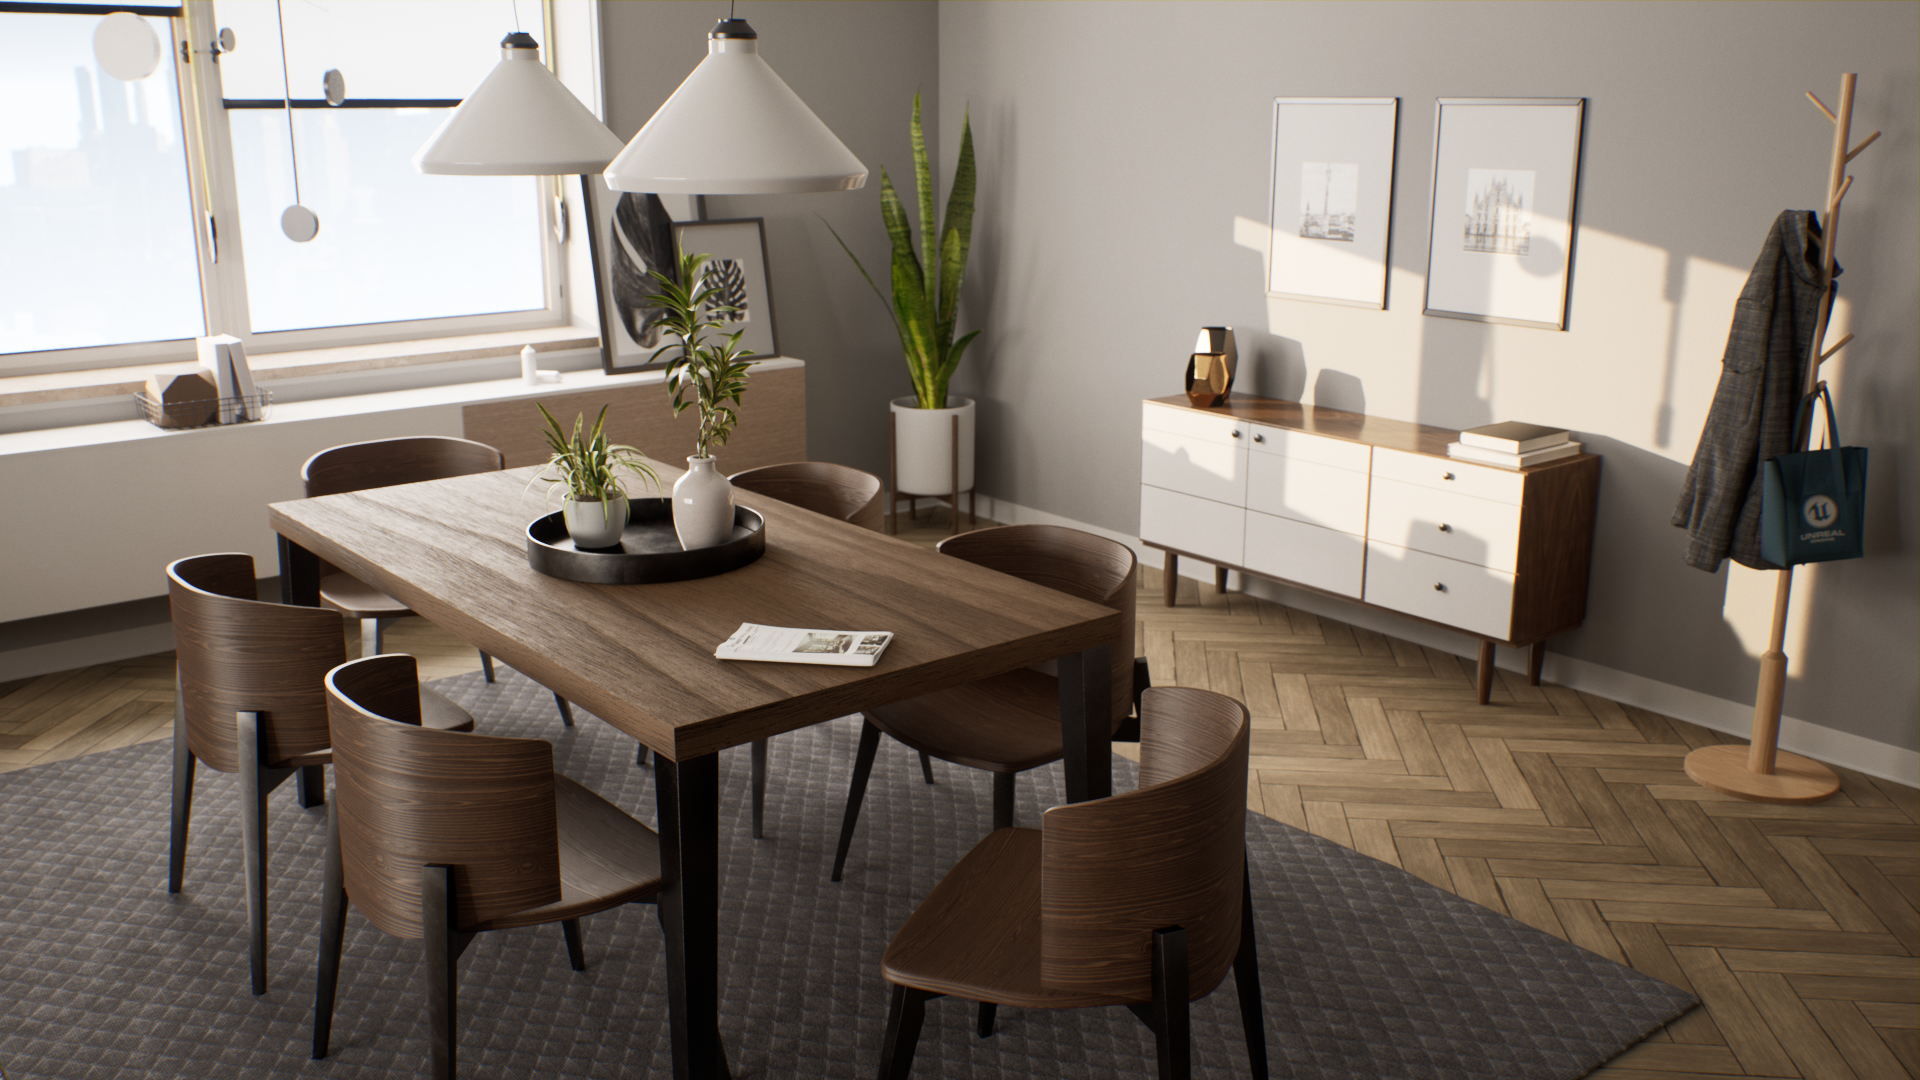
Real-time rendering of Ray Tracing features in the Archviz Interior sample project available on the Epic Games Launcher.
Ray Tracing in Unreal Engine
Ray tracing in UE4 is composed of two techniques:
-
A hybrid Ray Tracer that couples ray tracing capabilities with our existing raster effects.
-
A Path Tracer for generating reference renders.
Ray Tracer
The Ray Tracer enables ray traced results for shadows, AO, reflections, translucency and global illumination all happening in real-time within your project. It uses a low number of samples coupled with a denoising algorithm that is perceptually close to the ground truth results of the Path Tracer.
Path Tracer
The Path Tracer is an unbiased, physically based path tracer that is good for rendering reference images of your scene. It works similarly to offline renderers by gathering samples over time and, in its current state, is useful for generating ground truth renders of your scene rather than final pixels.
For additional information, see the Path Tracer .
Enabling Ray Tracing in your Project
Follow these steps to enable ray tracing support in your project.
|
System Requirements |
|
|---|---|
|
Operating System |
Windows 10 RS5 (Build 1809) or later
Verify your Windows build by typing winver in the Windows search bar. |
|
GPU |
|
|
Unreal Engine Version |
4.22 or Later |
|
Unreal Engine Rendering Path |
Deferred path (See Supported Features below) |
Enabling DX12 and Ray Tracing
-
Go to the main menu and use the Edit menu to open the Project Settings .
-
Under Platforms > Windows , use the Default RHI dropdown to select DX12 .
![EnableDX12Mode.png]()
-
Under Engine > Rendering , enable Ray Tracing .
![ProjectSetting_EnableRT]()
To enable Ray Tracing, Support Compute Skincache must be enabled for the project. If it is not already enabled, you'll receive a message dialogue asking if you would like to enable it now. If so, click Yes .
![SupportSkinCache.png]()
-
Restart the engine to launch the Editor with DX12 and to enable Ray Tracing for your project.


Real-Time Ray Tracing Features
Ray Traced Shadows
Ray Traced Shadows simulate soft area lighting effects for objects in the environment. This means that based on the light's source size or source angle, an object's shadow will have sharper shadows near the contact surface than farther away where it softens and widens.


Ray Traced Reflections
Ray Traced Reflections (RTR) simulates accurate environment representation supporting multiple reflection bounces.
This example shows a single bounce of ray traced reflections compared to multiple bounces of ray traced reflection. Using multiple bounces creates real-time inter-reflection between reflective surfaces in the scene.


In contrast, Screen Space Reflections (SSR), Planar Reflections , or even Reflection Capture Actors cannot capture the entire scene dynamically nor does it have some of the limitations present in these other reflection methods.
In this comparison, SSR is only capable of a single reflection bounce and is limited to what is visible on the screen for representation. On the other hand, RTR is capable of multiple bounces and is not limited to what is visible, meaning that we can visibly see the sides of the book, reflected floor behind the camera, and additional lightings being reflected on surfaces coming through the window.

Ray Traced Translucency
Ray Traced Translucency (RTT) accurately represents glass and liquid materials with physically correct reflections, absorption, and refraction on transparent surfaces.


Ray Traced Ambient Occlusion
Ray Traced Ambient Occlusion (RTAO) accurately shadows areas blocking ambient lighting better grounding objects in the environment, such as shadowing the corners and edges where walls meet or adding depth to the crevices and wrinkles in skin.


When compared with Screen Space Ambient Occlusion (SSAO), RTAO grounds objects and adds depth to the scene to produce natural looking shadowing in indirectly lit areas.


By varying the Intensity and Radius properties of the Ambient Occlusion effect, you can control its size and strength.
Ray Traced Global Illumination
Ray Traced Global Illumination (RTGI) adds real-time interactive bounce lighting to areas of your scene not directly lit by a given light source.


Final Gather Method
This is currently an experimental RTGI method.
An alternative ray tracing based global illumination global illumination method using a final gather-based technique has been developed that seeks to give back some runtime performance. This technique is a two-pass algorithm. The first phase distributes shading points—similarly to the original RTGI method—but at a fixed rate of one sample per-pixel. A history of up to 16 shading point samples are stored in screen space during this phase. During the second phase, the algorithm attempts to reconnect to the shading point history, amortizing the cost of the method.
The original RTGI algorithm intends to emulate the Path Tracer's ground truth reference and is similar in execution of the path tracing result. The new method trades that emulation for performance, which introduces some limitations; it's currently limited to a single bounce of indirect diffuse GI, and reprojection of the previous frame GI sample data is susceptible to ghosting.
Enable the Final Gather method from the Ray Tracing Global Illumination section of a Post Process Volume using the Types dropdown selection.
To aid in suppressing temporal ghosting artifacts, you can use the following command to modify the world space rejection criteria.
r.RayTracing.GlobalIllumination.FinalGatherDistance [number of units] It is currently based on a world distance measured from the original shading point. This rejection crieteria defaults to 10 units.
The Final Gather method also requires the following settings to be used in the Post Process Volume for it to work effectively:
-
Max Bounces: 1
-
Samples Per Pixel: 16
Any additional Max Bounces beyond 1 are silently discarded and when adjusting the Samples Per Pixel, it's best to increase it by powers of two (for example, 8, 16, 32, 64).
Using Ray Tracing Features
Post Process Volume
Use Post Process Volumes in your scene to control Ray Tracing and Path Tracing features and properties. Volumes can be added to different areas for interiors and exteriors to apply the features and settings you want.
The following Ray Tracing features are controlled using Post Process Volumes:
-
Ambient Occlusion
-
Global Illumination
-
Reflections
-
Translucency
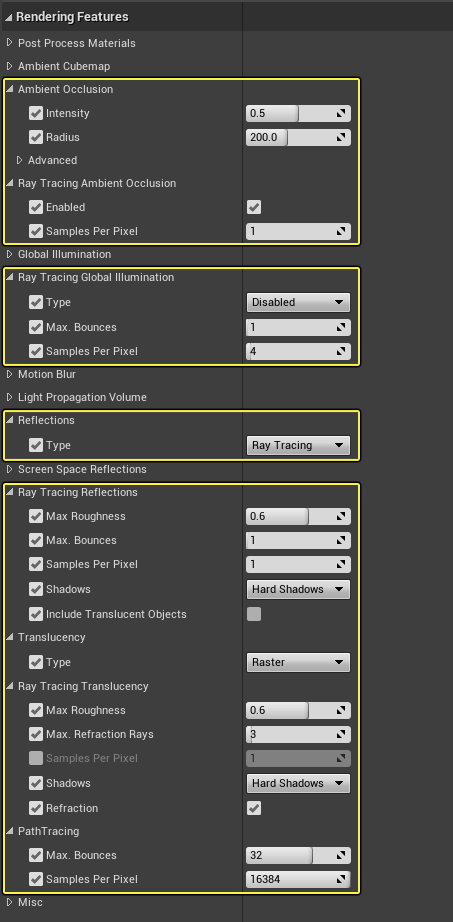
Click image for full size.
For additional information about the available post process settings, see Ray Tracing Settings .
Lights
The Ray Tracer supports soft area shadows for all types of lights available in UE4.


Control the softness of the shadow by adjusting the following:
-
On a Directional Light, set the Source Angle .
-
On Point and Spot Lights, set the Source Radius .
-
On a Rect Light, set the Barn Door Angle and Barn Door Length to shape the light and soften the shadow softness.
Sky Lights
On the Sky Light , use SLS Captured Scene or SLS Specified Cubemap with raytraced shadowing to capture the distance parts of the level and apply that to the scene as a light. Check the Cast Raytraced Shadow flag to enable sky lighting in your scene.

For RTGI to work with the Sky Light, enable the experimental console variable
r.RayTracing.GlobalIllumination.EvalSkylight
.
Ray Tracing Ambient Occlusion
Performance and Debugging
Stat GPU
Check relevant Ray Tracing GPU performance by using the console command
GPU Stats
. You'll find relevant information about enabled Ray Tracing features and how much frame time is being spent to render them in the current view.

Stat D3D12RayTracing
Check relevant Ray Tracing resource usage using the console command
Stat D3D12RayTracing
.

Ray Tracing Debug View Modes
Under the Level Viewport, select the View Mode dropdown and select Ray Tracing Debug to select from the available debug view modes.
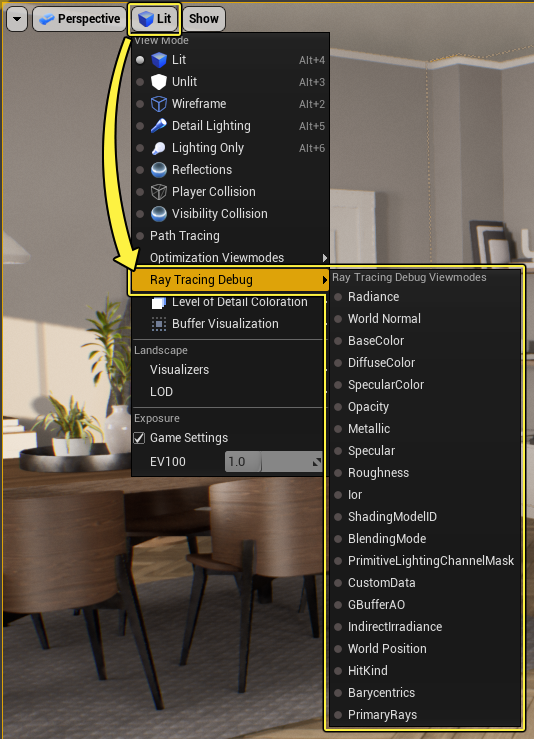
Click image for full size.
Evaluating Denoiser Quality
Evaluate the quality of the Denoiser for different raytracing effects by doing the following:
-
Disable Temporal Anti-Aliasing and Depth of Field
-
Both of these are running in linear color space in Unreal Engine's renderer. They do some HDR color weighting tricks to avoid aliasing between shadows and highlights.
-
-
Compare the Denoised single sample per pixel with an Undenoised single sample per pixel.
-
The result will look incorrect due to the energy difference and that the denoiser is darkening the shadows too much. However, a single sample per pixel will look brighter due to the tonemapper's non-linear operation.
-
For a better comparison, the Denoised single sample per pixel should be tested against an Undenoised multiple samples per pixel.
-


The denoised single sample per pixel will not be perfect due to information loss. However, when compared to undenoised multiple samples per pixel, the results are consistent.
Also, keep in mind that the Denoiser supports up to four samples per pixel, which improves the quality and more closely matches the undenoised multiple samples per pixel result.
Other Debugging Notes
-
Use the command
r.raytracing.ForceAllRayTracingEffectsto quickly enable and disable Ray Tracing in your scene. A value of 0 will disable all effect, 1 will enable all effects, and -1 will use the previous settings enabled for your project.
Additional Notes
Materials
-
Testing Material Costs
-
Complex Materials can affect performance of Ray Tracing features. Use the console command r.RayTracing.EnableMaterials to test performance impact.
-
-
Ray Tracing Quality Switch Replace Node
-
Use this node to replace entire parts of your Material logic to lower the cost of features like RTGI, RT Reflections, and RT Translucency with less complex logic. This is a global change that affects all ray tracing effects.
-
In this example, the Normal logic path renders as seen in the scene. The Ray Tracing path uses less complex logic for effects in Ray Tracing, such as RTGI and Reflections where textures, normals, and roughness can be come an expensive added cost.
![RT_MaterialSwitch]()
Click image for full size.
-
-
Cast Ray Traced Shadows Per-Material
-
Use the Cast Ray Traced Shadows checkbox to set whether this Material casts ray traced shadows. This is useful for controlling specific elements of your Materials assigned to geometry that should or should not cast a raytraced shadow.
-

Reflections
-
Ray Tracing Reflections can be expensive when rendering multiple bounces with reflections inside of reflections. Without multiple bounces, the intra-reflected material will appear black. Enable
r.RayTracing.Reflections.ReflectionCapturesto use Reflection Capture Actors as the last bounce in Ray Traced Reflections.


Dragging the slider shows a single bounce RTR, two bounces RTR with no reflection capture fallback, and a single bounce with reflection capture fallback.
Including Translucent Objects in Reflections
Enable objects with translucent materials to appear in Ray Traced Reflections by enabling Include Translucent Objects in the Post Process Volume's settings under Rendering Features > Ray Tracing Reflections.
Translucency Index of Refraction (IOR)
When setting up and using refraction for ray tracing, the Specular material input is used to control the index of refraction, or IOR, in your translucent materials. The ray tracing features of Unreal Engine follows the Disney BRDF model whereby specular and IOR values are coupled and cannot be defined independently.
When defining the specular value in your Material and setting the refraction properties in your Post Process Volume, you're able to adequately control the IOR for your translucent materials.


Material Setup:
-
Enable Two Sided in your Material.
-
While this is not a requirement, single sided/non-manifold geometry doesn't have a good way of handling volume tracking or ray medium stacking. A two-sided material provides accurate results and is the recommended method for handling all translucent materials when using ray tracing translucency.
-
-
Set the Lighting Mode to Surface Translucency Volume or Surface Forward Shading .
-
Use the Specular input to control the index of refraction.
-
Note that the Refraction input does not affect ray tracing translucent materials.
-
Post Process Volume Rendering Features Setup:
-
Under the Translucency category, set the Type to Ray Tracing .
-
Under the Ray Tracing Translucency category, set the following:
-
Refraction: Enabled
-
Max Refraction Rays: Set the maximum number of rays to use. This should be a high enough value that it allows light to pass through to the other side.
-
Use a Material Instance to drive the specular value to easily control the IOR.
Controlling the amount of Refraction
The amount of refraction and light transport that takes place is controlled by using the Specular input in your material and using Max Refraction Rays and Refraction properties of the Post Process Volume.
The following translucent material is using a specular value of 0.04 and is using a max of six refraction rays to pass light through the material. The comparison below shows the difference that refraction makes when it's enabled and disabled for a translucent material.

Different values applied to the Specular input affect the index of refraction for the translucent material.
Dragging the slider shows the amount of refraction being applied from 0.01, 0.05, and 0.1.


Different values for the Max Refraction Rays property of the Post Process Volume also affect light transport through the material. With a single ray, there are not enough to escape the material, leaving it appear dark. With an increase in the ray count, it's possible to see objects through refracted glass. However, depending on the number of rays used, some areas may still appear darkened. Additional rays can ensure that they escape the volume.
Dragging the slider shows the result of using 1, 3, and 5 refraction rays.


Single Sided Material Refraction
While it is possible to have ray traced refraction using a single-sided material, the results are similar but not equal to that of a two-sided material that exhibits physically accurate results.

The Post Process Volume property Max Refraction Rays is available for use with both single-sided and two-sided materials to allow light transport through the volume. However, note that only a two-sided material provides proper results and is the recommended way of handling all translucent materials using ray tracing features.
Light Transmission for Subsurface Profile Materials
Light transmission on Subsurface Profile materials is possible when the light source has its Transmission property enabled.


During the ray tracing shadow computation, a small scattering simulation is run to compute the expected volumetric scattering distance, through the medium, to the shadow-casting light. The scatter distance is used during lighting to compute the in-scattering contribution.
Sky Lights
Capturing distant objects, like a Sky Dome should be disabled for Sky Light contribution unless needed. This can save some performance and optmize your scene. For the BP_SkySphere provided with the UE4, this option is disabled by default and will make reflections from the sky look different than expected. You can control an ojects contribution by enabling/disabling the checkbox for Visible in Ray Tracing in its Details panel properties.
Ray Tracing Features Optimization
-
Setting Reflections and Translucency Maximum Roughness
-
Use Max Roughness to set a threshold for raytraced reflections on Materials. This can be done within the Post Process Volume or using the console command r.RayTracing.Reflections.MaxRoughness.
-
-
Setting a Maximum Ray Distance for Global Illumination, Reflections, and Translucency
-
This sets a maximum ray distance for each of these features to lower their cost and contribution in the scene.
-
Use the console to set the MaxRayDistance console variable for each of these raytraced features. You can find them under r.RayTracing.*.
-
-
RTGI Optimizations
-
Screen Percentage and Sample Per-Pixel now defaults to 50 and 4 , respectively. If you need to set these to different values, by default, use their console commands to do so:
r.RayTracing.GlobalIllumination.ScreenPercentage, andr.RayTracing.GlobalIllumination.SamplesPerPixel. -
Light contribution to GI can be enabled/disabled with the Affect Global Illumination property on the light.
-
Geometry Considerations with Ray Tracing
-
Geometry with small holes or lots of little details can impact performance, such as foliage and fences.
-
Indoor environments are slower to render than outdoors ones.
-
For example, when light enters from outside, areas that are directly lit is faster than points that are indirectly lit.
-
Also, you have to consider that more ray tracing features are being used, such as reflections and translucency
-
Supported Ray Tracing Features
This list is intended to give you an idea of what is currently supported and is not meant to be a comprehensive list of Ray Tracing feature support in Unreal Engine 4.23 .
|
Feature |
Supported (Y/N/Partially) |
Additional Notes |
||
|---|---|---|---|---|
|
Rendering Path |
||||
|
Deferred |
Y |
|||
|
Forward |
N |
|||
|
Types of Lights |
||||
|
Directional Light |
Y |
|||
|
Sky Light |
Y |
|||
|
Point Light |
Y |
|||
|
Spot Light |
Y |
|||
|
Rect Light |
Y |
|||
|
Lighting Features |
||||
|
Emissive Surfaces |
Partially |
Supported for reflections on surfaces, but does not emit light or cast shadows. |
||
|
Light Transmission |
N |
The translucent shadow is treated as opaque, meaning no colored shadows or light transmission through the material. |
||
|
Area Shadowing |
Y |
|||
|
IES Profiles |
Y |
|||
|
Light Functions |
N |
|||
|
Volumetric Fog |
N |
|||
|
Image Based Lighting (IBL) |
Y |
Support for HDRI with Sky Light. |
||
|
Materials: Blend Mode |
||||
|
Opaque |
Y |
|||
|
Masked |
Y |
|||
|
Translucent |
Y |
|||
|
Anisotropic |
Y |
|||
|
Materials: Shading Model |
||||
|
Default Lit |
Y |
|||
|
Unlit |
Partially |
|||
|
Masked |
Partially |
Supports casting of masked shadows. |
||
|
SubSurface and SubSurface Profile |
Y |
|||
|
Preintegrated Skin |
Partially |
Works but the result isn't correctly raytraced. It uses the raster pipeline. |
||
|
Clear Coat |
Y |
UE 4.25 includes significant improvements to the Clear Coat Shading Model. |
||
|
TwoSided Foliage |
Y |
|||
|
Hair |
Partially |
Works but the result isn't correctly raytraced. It uses the raster pipeline. |
||
|
Cloth |
Partially |
Works but the result isn't correctly raytraced. It uses the raster pipeline. |
||
|
Material Functions |
Y |
|||
|
Two-Sided |
Y |
|||
|
World Position Offset |
Y |
Static Mesh is enabled per-Actor. |
||
|
Geometry Types |
||||
|
Skeletal Mesh |
Y |
|||
|
Static Mesh |
Y |
|||
|
Geometry Cache (Alembic) |
Y |
|||
|
Landscape |
Y |
|||
|
Hierarchical Instanced Static Mesh (HISM) |
Y |
|||
|
Instanced Static Mesh (ISM) |
Y |
|||
|
Splines |
N |
|||
|
Procedural Mesh |
Y |
This type of geometry can be expensive to render in Ray Tracing. |
||
|
BSP Brushes |
N |
|||
|
Levels of Detail (LOD) |
Y |
Dithered LOD transitions are not yet supported. |
||
|
Visual Effects (VFX) |
||||
|
Niagara |
Partially |
Currently supports Sprites, Ribbons, and Mesh emitters. |
||
|
Cascade |
N |
|||
|
Platform Support |
||||
|
Multi-View (VR and Split-Screen) |
Y |
|||