Choose your operating system:
Windows
macOS
Linux

Imposters are sprites that use flipbook style textures to store a view of a Static Mesh from every possible view - or at least the number of views you can comfortably fit onto your texture sheet. The result is a sprite that matches the original mesh very well in terms of the material and lighting; however, there will be some popping between frames. That means they are not perfect for all applications. When you need to render LOTS of objects that will not move slowly and closely past the camera, it can be very useful.
Initial Setup
Before you can create an imposter sprite, you need to bake out a series of imposter textures. To do this, set the Render Type on your RenderToTexture_LevelBP to Render 3D Imposter Sprites , choose your Capture Settings , and adjust the render 3D Imposter Sprite settings.

|
Property |
Description |
|---|---|
|
Imposter Static Mesh |
This is the Static Mesh you want to make an imposter for. |
|
Imposter Material Array |
This is an array so that you can specify materials for each index for meshes that have more than one material ID. You need to use a Transform node set to "Tangent to Local" on the normalmap input for the materials in the imposter material array . The reason for that is we want to represent the world normal as viewed from the direction the camera would be, instead of all using the same camera which this top-down method forces. You can simple use 0,0,1 transformed Tangent->World if there is no normalmap texture. |
|
Frames around Z |
This setting determines how many frames around Z your imposter will store. Higher numbers result in less 'popping' in the final result during motion but will either cause less texture resolution or require you to use very larger texture sizes. |
|
Mesh Scale |
This allows you to scale down the mesh slightly if you have any issues with edge bleeding in the final imposter sprite material. This is only necessary in rare cases where the mesh very closely matches its sphere bounds causing the meshes to get close to the edge of each grid cell. Only adjust when necessary as the smaller the scale, the more resolution that is lost. |
|
Aspect Ratio 1 by |
This setting allows you to create nonuniform textures. At the default 1, the imposter grid will be square. If the setting is 2, the aspect ratio will be 2:1; if the setting is 4 it will be 4:1 etc. It is suggested to keep the aspect ratio square for "Full 3D Imposters" and to only modify it when "Single Rotation Axis" mode is used. Note: I only realized upon typing this doc how incorrect this setting name is. Expect a more friendly name for this setting soon. |
|
Imposter Enum |
This is a drop down that allows you to choose between two different types of Imposter baking: "Full 3D Imposters" and "Single Rotation" axis. Full 3D imposters get represented from all angles, including above and below. "Single Rotation Axis" only rotates the mesh around Z which is ideal for distant LOD for things that are grounded on the horizon such as Trees, large buildings or general skybox elements. Single Rotation axis allows for better use of texture memory as there are not as many necessary to store. |
|
Single Rotation Axis rotation |
This setting is a start rotation setting that is only used when the single rotation axis option is selected. It allows you to orient the mesh how you want relative to the camera. |
Mesh Normals
The material on the mesh you are creating an imposter from will require a few tweaks.
-
Open the Material of the Static Mesh you are going to be creating an imposter from.
-
Select the material node.
-
Disable Tangent Space Normal .
-
Add a Transform Node to the Material Graph in between your normal map/calculation and the Normal input pin on the Material Node.
If you do not have a normal map or normal calculation, add a Vector 3 set to 0,0,1 (Blue) and use that instead.
-
On the Transform Node, set the Source property to Tangent.
-
On the Transform Node, set the Destination property to Local.

Render the Imposters
After you have configured your imposter with the desired number of frames, rendering the imposter textures is just like the original "tiling material" step.
Select the desired buffer targets under Capture Settings ; Make sure the High resolution screenshot window is open and the Include buffer visualization option is enabled; Play the game in a New Window , bring up the console using the ~ key and type "ke * rendertextures" at the console and hit enter.

You should get a popup message indicating that images were saved, the message is actually a clickable link to the folder location. If you are not able to click the link in time, you can find the saved textures here:
\YourProject\Saved\Screenshots\Windows\


If your normal map looks mostly composed of blues and some light reds/greens, then you probably skipped a one of the steps for setting up the Static Mesh's material to shift from Tangent to Local space normals.
Import the Imposters
As the High Resolution Screen Shot functionality in Unreal Engine 4 exports .bmp files, you will need to load them in an image editing tool and save them as .tga files, then you can import them like any other texture.
Adjust the Normal Map Texture
You will need to change a few properties on the Normal Map Texture:
-
Open the Normal Map by double-clicking it in the Content Browser .
-
Disable the sRGB property.
-
Set the Compression Settings to
TC_Default. -
Save the texture.

Make The Imposter Material
Now you should have a series of rendered imposter images. To make use of these textures, you will need to create a material that uses the ImposterUVs material function by clicking and dragging the function from the Content Browser into your Imposter Material Graph:


This function sets up the UVs, Normals, and WorldPositionOffset for your material. There are a few parameters you need to define to match your Imposter setup:
|
Input Pin |
Description |
|---|---|
|
Frames X (S) |
This should be the number of frames on the X axis for your imposter. For example if you specified 16 rotations around Z there will be 16 frames on the X axis. |
|
Fixed Z (B) |
This is a Boolean option that should only be set to True when using an imposter with "Single Rotation Axis". This makes the calculations much cheaper. |
|
Frames Y (S) |
This should be the number of frames on the Y axis. For square aspect ratios this should always match the frame Y. If you entered an aspect ratio of 2:1, then the Y frames would be half of the X frames. |
|
SpriteWidth (S) |
This is how wide your resulting sprite will be. |
|
SpriteHeight (S) |
This is how Tall your resulting sprite will be. |
|
Position (V3) |
Defaults to AbsoluteWorldPosition and should be left untouched in most cases. Can be used if you want to trick the function into displaying the imposter at a weird angle or if you want to use custom data to represent locations. |
|
VertexShaderZrotation (S) |
This is a debug only setting. What this feature does is break up the sprite's Z rotation into a set of discreet steps rather than smoothly interpolating across the entire range. This prevents popping from looking worse due to how imposters are baked. With smooth sprite interpolation, the imposter appears to overshoot its rotation at each frame transition. This fixes that when the value equals 1. You can set to 0 to see what it looks like disabled. Mostly noticeable from above an imposter mesh. |
|
Rotation (S) |
The imposter sprites can be rotated around the specified axis. This allows you to randomly rotate various copies of the same imposter sprite in the world so that they do not look the same. |
|
Rotation Axis (V3) |
This setting is currently disabled. The rotation axis always defaults to 0,0,1 or around Z. There were some issues when trying to support any rotation axis but this support may be added in the future. |
|
Normals (V3) |
This should be your normalmap texture. What this does is rotate the normal to match your specified Rotation value. |
|
Output Pins |
Description |
|---|---|
|
TransformedNormals |
Contains transformed normalmap, connect to material Normal input. |
|
WorldPositionOffset |
Contains WPO for camera facing sprite, connect to World Position Offset input. |
|
UVs |
This is the UVs for the Imposter textures. Any Imposter textures you place in the material should have this output as the UVs. That includes the normalmap which will then appear to loop back into the function in the "Normals" input. |
|
Phase2UVs |
This is an experimental feature that was not fully implemented. It is the start of the ability to have two or more texture lookups that are one phase ahead and/or behind and fade/dissolve between them to reduce popping. |
This is what your material should look like:
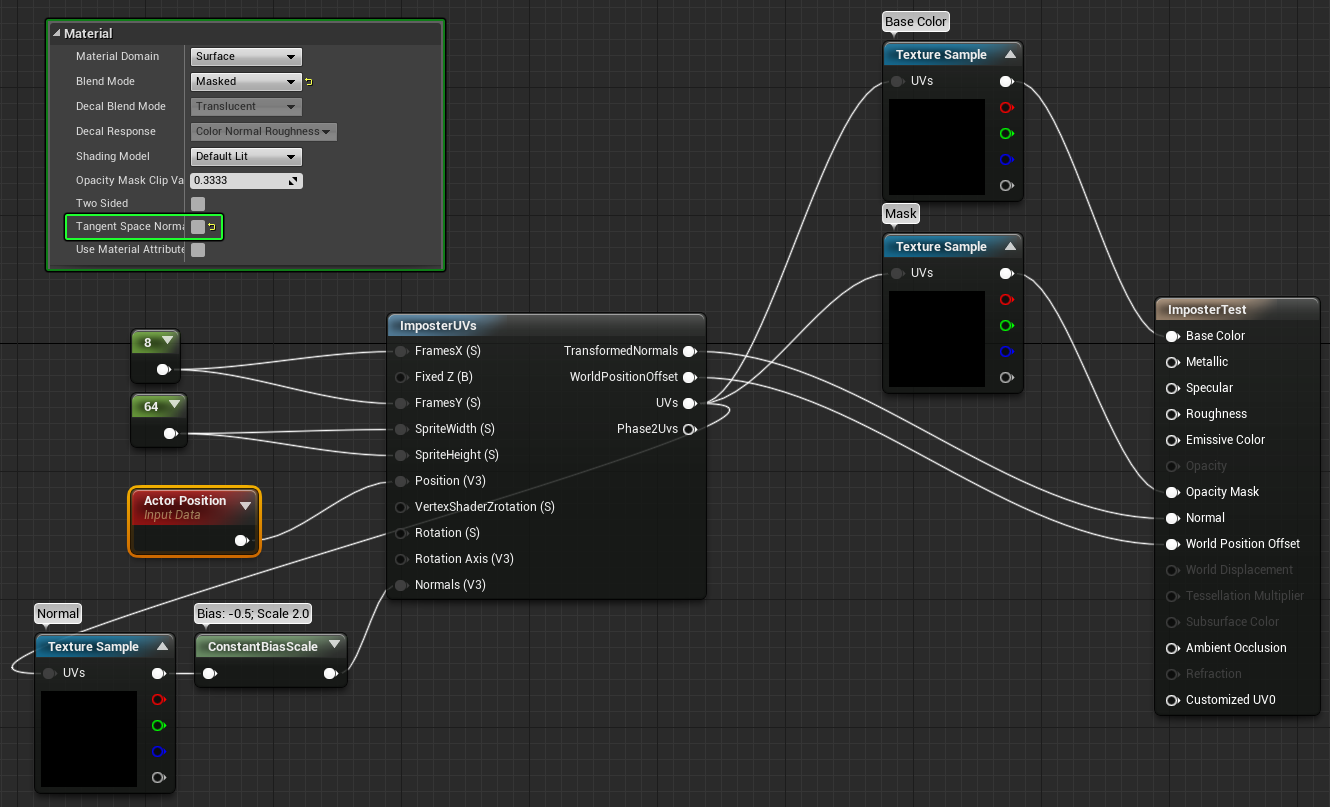
You probably noticed the Constant Bias Scale node that takes input from the normal map texture. This is needed to re-balance the colors for world space normals.
Example Full Imposters:

Example Single Rotation Axis imposters: