Choose your operating system:
Windows
macOS
Linux

At the end of this tutorial, you'll create, deploy, and package a game onto your Android device from Linux on Unreal Engine 4 (UE4).
If you're a developer looking to create and distribute games on Android devices from Linux; you've landed on the right page. This guide teaches you how to configure an Android device with UE4 on Linux, ultimately showing you how to deploy and package mobile games on Android from Linux.
Thanks to our community of talented contributors, we've successfully added Android support for Linux on UE4.
1 - Required Setup
Unreal Engine 4 uses a special version of the Android Software Development Kit (SDK), called CodeWorks for Android. CodeWorks for Android is the easiest way to set up the SDK and Native Development Kit (NDK) needed to develop Android projects with Unreal Engine 4. If you have older versions (prior to version 1R5) of the Android SDK installed (or, older versions of CodeWorks for Android), we recommend that you uninstall them and install CodeWorks for Android , using the CodeWorks for Android installer that is distributed with Unreal Engine 4.
We've bundled the CodeWorks for Android installer with Unreal Engine 4 to make sure that your Android SDK will be compatible with the Engine. It's important to note that, as of Unreal Engine version 4.16, the Engine includes CodeWorks for Android 1R6u1.
For the purpose of showing you how to get started with Android on Linux, we will use CodeWorks for Android 1R6u1 while working with Unreal Engine version 4.14. The Engine should be closed before installing CodeWorks for Android 1R6u1. Also, please make sure that you have Java Development Kit 8 (JDK 8) installed, with your
JAVA_HOME
environment variable set to the correct version of the Java Development Kit (JDK). To verify that
JAVA_HOME
is set properly, enter
echo $JAVA_HOME
into the terminal. If you don't see the correct JDK version,
download JDK 8
, and install it on your Linux computer, making sure to set the
JAVA_HOME
environment variable to the newly installed JDK.
Before continuing, please note that Android Vulkan on Linux is not supported at this time.
-
Getting started, open the Terminal and navigate to the
[UE4Root]folder that contains the compiled engine (using thecdcommand, changing the shell working directory).![LinuxAndroid_Step0.png]()
-
From inside of the
[UE4Root]folder, navigate to the CodeWorks for Android 1R6u1 binary file ( CodeWorksforAndroid-1R6u1-linux-x64.run ) by entering the following string into the terminal:cd Engine/Extras/AndroidWorks/Linux.![LinuxAndroid_Step1.png]()
-
Now, enter
ls -linto the terminal, displaying a long listing of the directory's contents.![LinuxAndroid_Step2.png]()
The file's permission settings tell you that CodeWorksforAndroid-1R6u1-linux-x64.run is not ready for execution. Before you can run the CodeWorks for Android 1R6u1 binary, you need to change the file's access rights to allow for "execute" permissions.
-
To change the file permission settings of
CodeWorksforAndroid-1R6u1-linux-x64.run, enabling it to run like a normal executable, enterchmod +x CodeWorksforAndroid-1R6u1-linux-x64.runinto the terimal.![LinuxAndroid_Step3.png]()
If you want to learn more about the
chmodcommand, enterman chmodinto the terminal to read the manual page covering howchmodworks. -
Now, enter
ls -linto the terminal.![LinuxAndroid_Step4.png]()
The file's permission settings highlighted in the image indicate that the CodeWorks for Android 1R6u1 binary file is ready for execution.
-
To run the CodeWorks for Android binary, enter
./CodeWorksforAndroid-1R6u1-linux-x64.runinto the terminal.![LinuxAndroid_Step5.png]()
Please make sure that your computer has a valid Internet connection prior to moving onto the next step.
-
After the CodeWorks for Android 1R6u1 binary unpacks the NVIDIA CodeWorks for Android installer, you'll see the Installer Welcome window, prompting you to click either Next or Cancel .
![LinuxAndroid_Step6.png]()
-
From the Installer Welcome window, click Next button to begin the installation process.
![LinuxAndroid_Step7.png]()
-
Now, from the Android Developer's Welcome Window , click Next button to continue the installation process.
![LinuxAndroid_Step8.png]()
-
Specify the directory where CodeWorks for Android 1R6u1 should be installed and downloaded.
![LinuxAndroid_Step9.png]()
-
Click Next > button to download CodeWorks for Android 1R6u1 from NVIDIA, ultimately installing CodeWorks on your computer.
![LinuxAndroid_Step10.png]()
-
Now, verify that you're installing CodeWorks for Android 1R6u1 before clicking Next button from the Android Component Manager window.
![LinuxAndroid_Step11.png]()
-
After the Terms and Conditions window appears, take some time to read through all of the Terms and Conditions before selecting the Accept All check box.
![LinuxAndroid_Step12.png]()
-
Now, click the Accept button to begin the installation process.
![LinuxAndroid_Step13.png]()
-
Once the installer completes the installation process, go ahead and click Next > button to proceed.
![LinuxAndroid_Step14.png]()
-
After the Installation Complete window opens, click the Finish button to complete the installation.
![LinuxAndroid_Step15.png]()
-
Make sure to reboot your computer before moving onto the next step.
![LinuxAndroid_Note16.png]()
If you don't want to use Ubuntu's GUI, you can restart your computer by entering
sudo rebootinto the terminal.


Click image for full view.
2 - Setting up your Android Device
Now that you've installed the Android SDK on your Linux computer, you're almost ready to start developing mobile games for your Android device. However, before you can run Unreal Engine games on your Android device, you need to enable your Android's development environment.
Make sure you have access to a USB cable prior to commencing the following steps.
Enabling Android's Developer Options
-
Connect the Android device to your Linux computer with a USB cable.
-
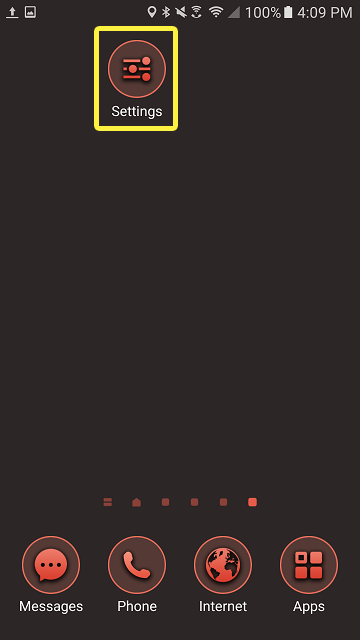
Open the Settings application on your Android device.
![LinuxAndroid_Step17.png]()
Click for full image.
-
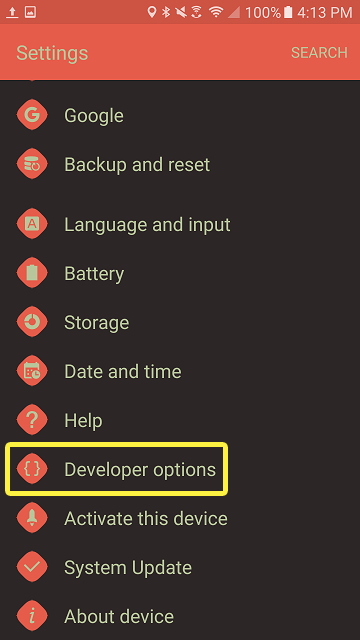
Tap Developer Options to open the Developer Options menu.
![LinuxAndroid_Step18.png]()
Click for full image.
If you don't see this item, you'll need to enable Developer Options on your device. To enable Developer Options , open the Settings application, scroll to the bottom and select About phone . After selecting About phone scroll to the bottom and tap Build number seven (7) times. For additional instructions on how to enable Developer Options on Android devices, visit Android's User Guide .
Enabling USB Debugging
-
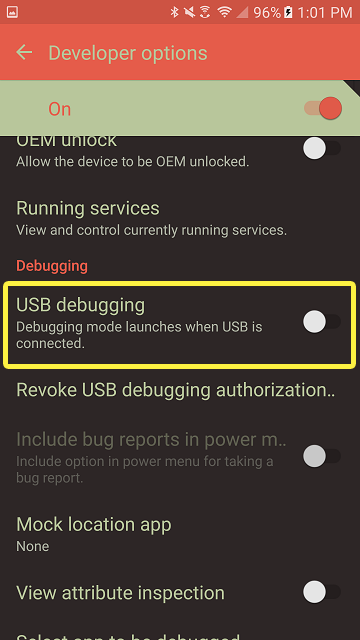
From the Developer Options menu, enable USB debugging .
![LinuxAndroid_Step19.png]()
Click for full image.
-
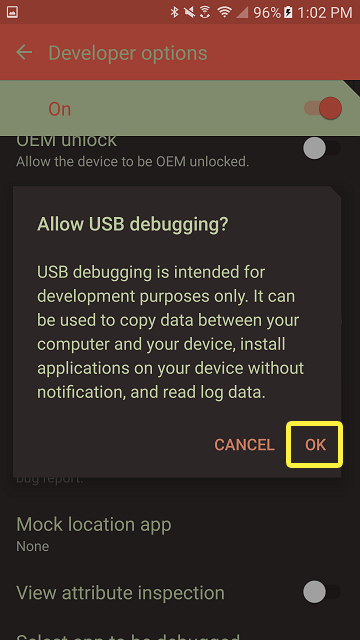
A window should appear, confirming your selection to enable USB debugging. After reading the prompt, go ahead and tap OK button.
![LinuxAndroid_Step20.png]()
Click for full image.
USB debugging is now enabled.
![LinuxAndroid_Step20Note.png]()
-
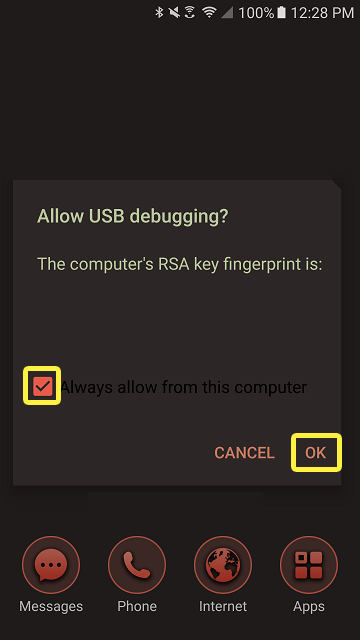
Now, disconnect the Android device from its USB cable, plugging it back in after a few seconds. If you're connecting a device running Android 4.2.2 or higher, the following dialog will appear, asking whether you should accept an RSA key that allows debugging through your Linux computer. Go ahead and select the checkbox next to Always allow from this computer before tapping OK button.
![LinuxAndroid_Step21.png]()
Click for full image.

Section Result
At this point, you're ready to verify that your device can be debugged on your Linux computer. To verify that your device was setup properly, open the terminal and enter
adb devices
.

You should see a list of devices that are attached to your Linux computer, which means that you have an Android device that's ready to run an Unreal Engine game.
If you didn't see your device after you entered
adb devices
into the terminal, you may need to set up adb on your Linux computer. Refer to the
Android Debug Bridge User Guide
to learn more about adb and how to set up the program on your computer. If you're certain that adb was already installed and configured on your computer, try the following troubleshooting techniques:
-
You may need to disconnect and reconnect the Android device from your computer.
-
If you didn't select the checkbox next to Always allow from this computer , you may need to do so.
-
If the device is listed as being unauthorized, you may be to get the Android device to authorize your Linux computer for USB debugging.
-
In some cases, a correctly configured device might not be recognized if it's connected as a Media Device using the Media Transfer Protocol (MTP).
-
Also, a correctly configured device might not be recognized if it's connected as a Camera Device using the Picture Transfer Protocol (PTP).
3 - Creating your Project
By now, you've installed and configured the Android SDK, you've set up your Android's development environment, and Android Debug Bridge is able to list all devices that are connected to your Linux computer. You're ready to create a new mobile project in UE4.
Creating your Mobile Project
-
Open the Unreal Project Browser and create a new Project from the Games > Third Person template, with the following settings:
-
Mobile / Tablet enabled
-
Scalable 3D or 2D enabled
-
No Starter Content enabled
-
-
Give the Project a Name and set the Project's Folder location. For this tutorial, we're naming the Project
LinuxAndroidProject. -
After you've set up your Project's settings, click the Create Project button.
Section Result

Click for full image.
Congratulations! You've just created a new UE4 project that's ready for use with a mobile device.
4 - Deploying your Level
Deploying a level means that you're going to Cook and Launch a level from UE4 onto your Android device. Because you're deploying a mobile application onto an Android device, there are a lot of details to consider, including (although, not limited to); your Linux computer's compilation environment, your Android device's instruction set, and your device's rendering capabilities. As such, you'll review some of the most common pre-deployment considerations before deploying the ThirdPersonExampleMap level onto your Android device.
Pre-deployment Considerations on Linux
Prior to deploying your application, refer to this list, which was written to help you avoid some common problems that might arise while you're deploying the game to your device.
-
Although it may seem like an obvious consideration, please make sure that the Android device is properly connected to your computer.
-
If you already haven't done so, verify that Android Debug Bridge (adb) lists your connected device(s). To learn more about adb, enter
adb --helpinto the terminal. You can also refer to the Android Debug Bridge User Guide to learn more about adb and how to set up the program on your computer. -
In order to properly build, cook, package, and deploy your game to Android, you'll need to have JDK 8 installed, with your
JAVA_HOMEenvironment variable set to the correct version of the JDK. To verify thatJAVA_HOMEis set properly, enterecho $JAVA_HOMEinto the terminal. If you don't see the correct JDK version, download JDK 8 , and install it on your Linux computer, making sure to set theJAVA_HOMEenvironment variable to the newly installed JDK. You can set theJAVA_HOMEenvironment variable in the Android SDK Project Settings . -
Make sure that you're building for the appropriate ARM architecture, because if you don't, your project won't deploy properly. After verifying the instruction set that'll work on your device, you can select the appropriate ARM architecture support from inside the Editor by navigating to Edit > Project Settings... > Android > Build , and selecting either Support arm7 or Support arm64 .
-
Currently, we don't provide Vulkan rendering support from UE4 on Linux.
-
Different Android devices uniquely support a variety of texture formats. If you don't know which texture formats are supported by your Android device, try setting your target texture to the Ericsson Texture Compression 1 (ETC 1) compression scheme, which should be supported by most Android devices. To learn more about supporting multiple textures, check out Android's documentation on Creating Multiple APKs for Different GL Textures .
Reviewing Available Texture Formats
If you're interested in reading more about currently supported textures, the following chart provides a quick summary of the most commonly supported textures on Android devices:
|
Format |
Description |
|
|---|---|---|
|
ETC1 |
Supported by all Android based devices but cannot compress alpha textures (they are stored uncompressed). Recommend using an RGB and a separate alpha texture if need alpha to get better compression. |
|
|
ETC2 |
Supported by all OpenGL 3.x class devices and supports alpha compression. |
|
|
ATC |
Supported by Qualcomm Adreno GPUs and supports alpha compression. |
|
|
DXT |
Supported by Nvidia Tegra GPUs and supports alpha compression. |
|
|
PVRTC |
supported by PowerVR GPUs and supports alpha compression. |
|
|
ASTC |
Latest Texture compression format allowing more quality control by specifying block size and supports alpha compression. Available on some devices at this point and will be required for Vulkan Level 1. |
|
Deploying your Level
Now that you've read through some of the most important considerations for deploying games to Android devices, you're ready to begin the deployment process.
-
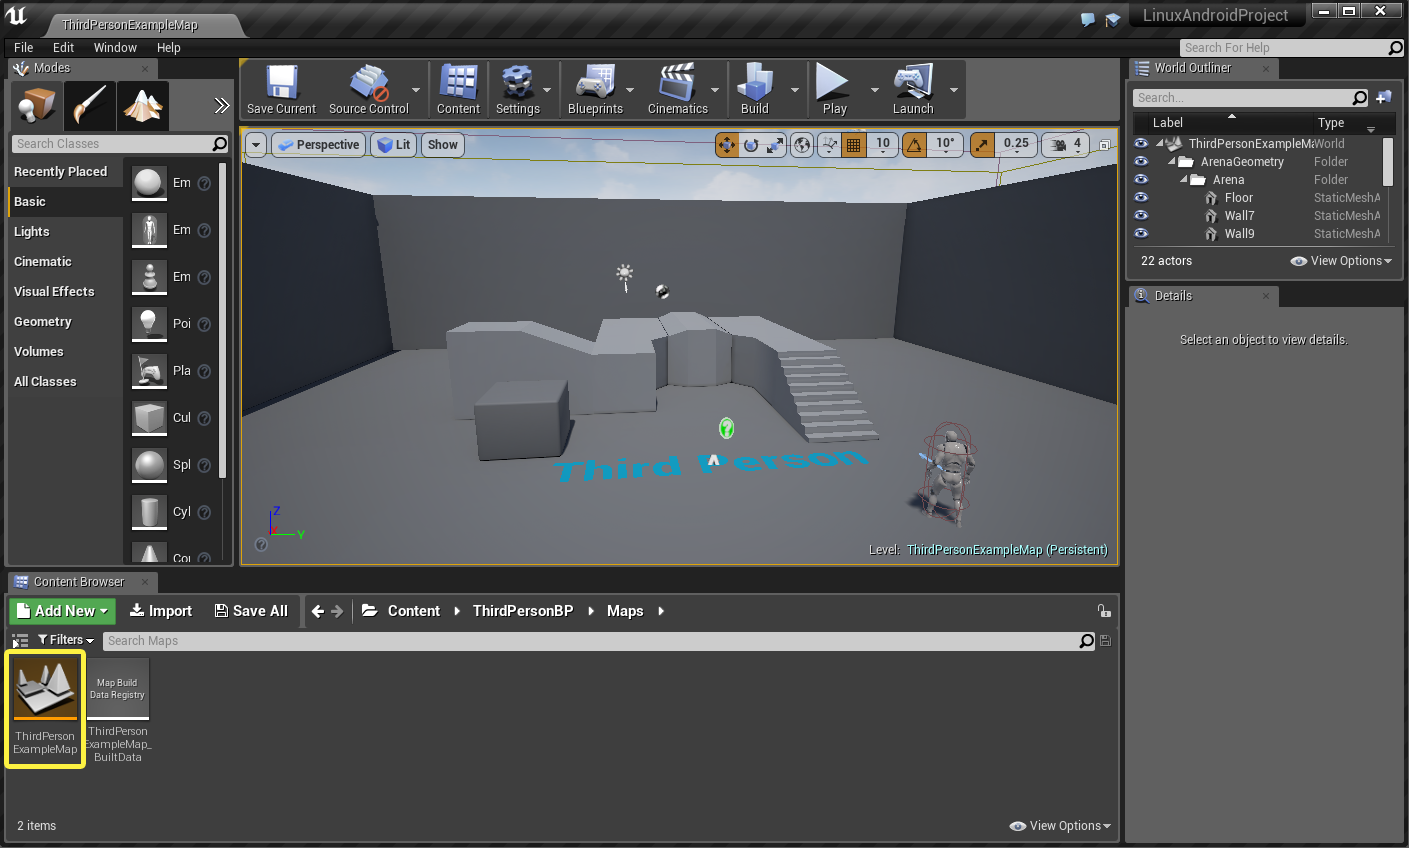
First, make sure that the ThirdPersonExampleMap is open.
![LinuxAndroid_Step26.png]()
Click for full image.
-
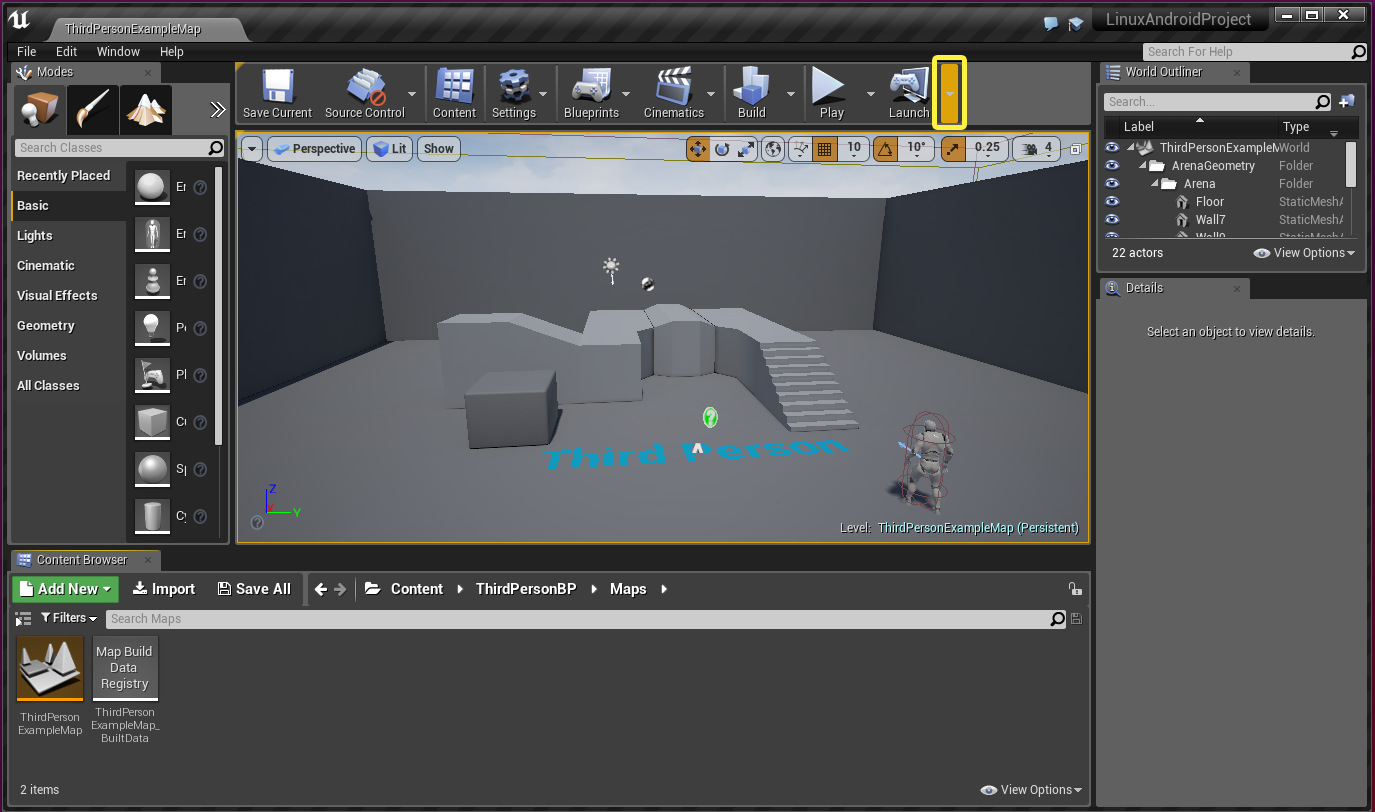
To open the Devices menu, click the arrow next to the Launch icon located in the Main Toolbar .
![LinuxAndroid_Step27.png]()
Click for full image.
-
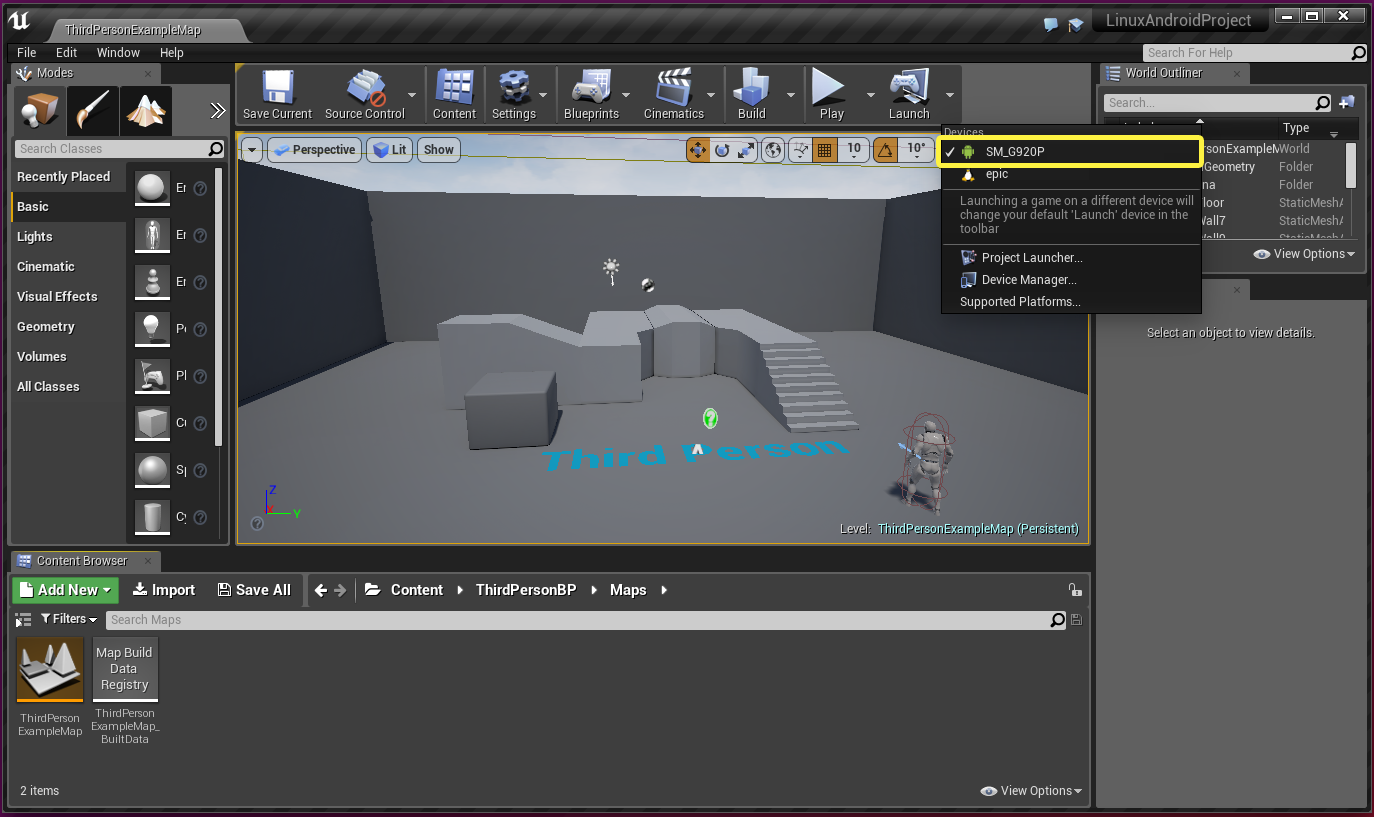
With the Devices menu open, select your Android Device.
![LinuxAndroid_Step28.png]()
Click for full image.
-
At this point, your Unreal Engine will deploy the level to your Android device.
As you can see in the video, UE4 updates the progress of your application's deployment process in the Editor's lower right corner.
-
When UE4 finishes cooking and launching your project, the level should be running on your device. You'll also be able to see an Unreal Engine icon, which should be accessible from your Android Applications Drawer.
![LinuxAndroid_Step29.png]()

Determining Supported Texture Formats
If you're still wondering which texture formats are supported by your Android device, try out the following step:
-
While the game is running on your device, tap the screen with four (4) fingers.
![LinuxAndroid_Step30.png]()
A dialog should appear, displaying the texture formats that are supported by your Android device.

Section Result
Congratulations! You should now have the Third Person Example Map running on your Android device.
5 - Packaging your Game
Up to this point in the tutorial, you've created and deployed your mobile game project to an Android device; however, if you want to make your game distributable, you'll need to package the project. The following steps show you how to package your project for distribution on the Android platform. Before we begin, it's important to note that you're going to package the project in Development mode. It's always a good practice to initially package your game in Development mode for testing purposes. Once you're satisfied with your game, you can package the project in Shipping mode, which tells the engine to strip out console commands, statistics, and profiling tools.
To learn more about the differences between the different build configurations made available in UE4, read through our Build Configurations Reference page.
Packaging a Project
-
Opening the File menu, scroll down to Package Project , and hover your mouse curser over Android before selecting Android (ETC1) .
![LinuxAndroid_Step31.png]()
Click for full image.
-
After the Open Directory menu appears, create a new folder entitled
Android_Buildsusing the New Folder button.![LinuxAndroid_Step32.png]()
Click for full image.
-
Now, click the Open button to begin the packaging process.
![LinuxAndroid_Step33.png]()
Click for full image.
-
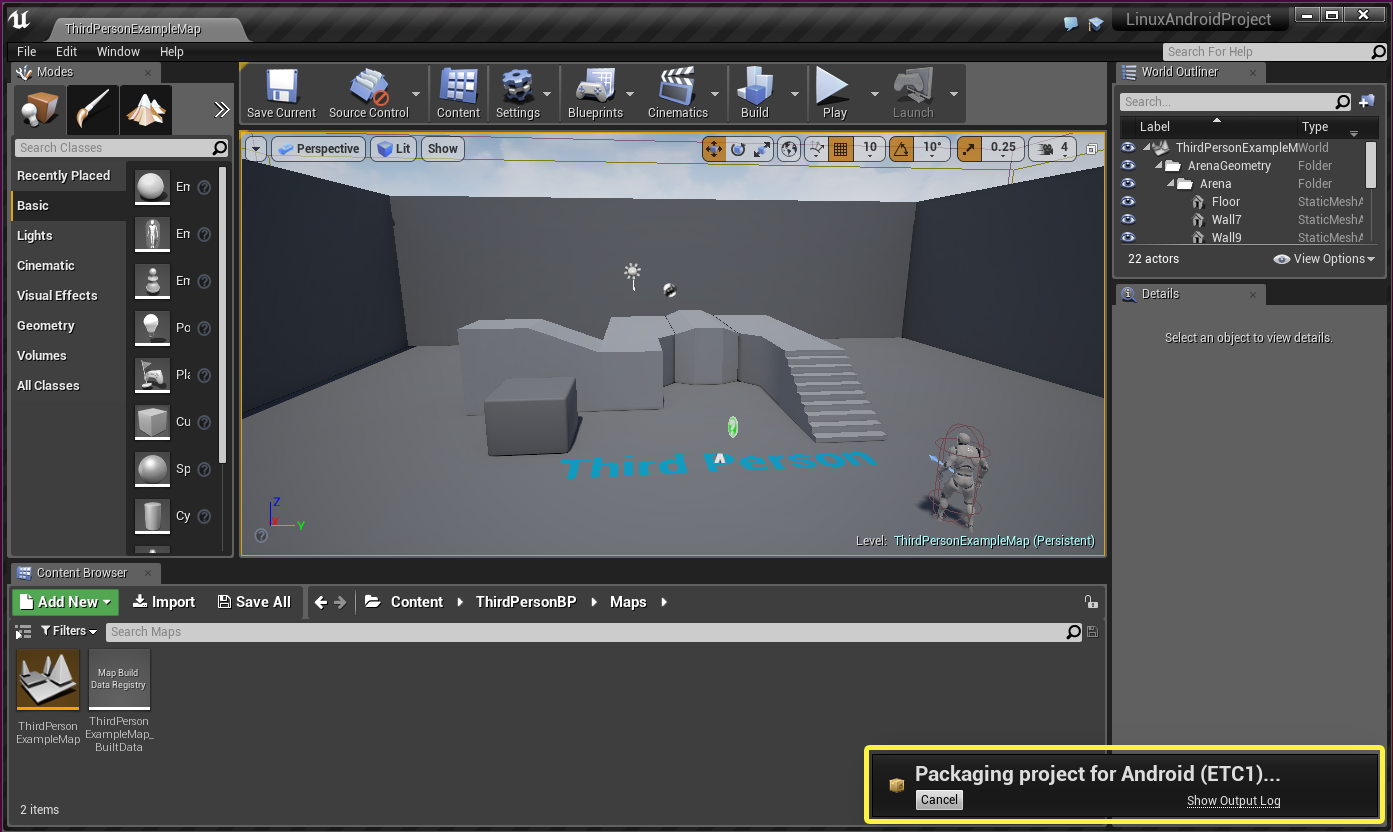
You should see a progress indicator in the bottom right corner while UE4 packages your project.
![LinuxAndroid_Step34.png]()
Click for full image.
-
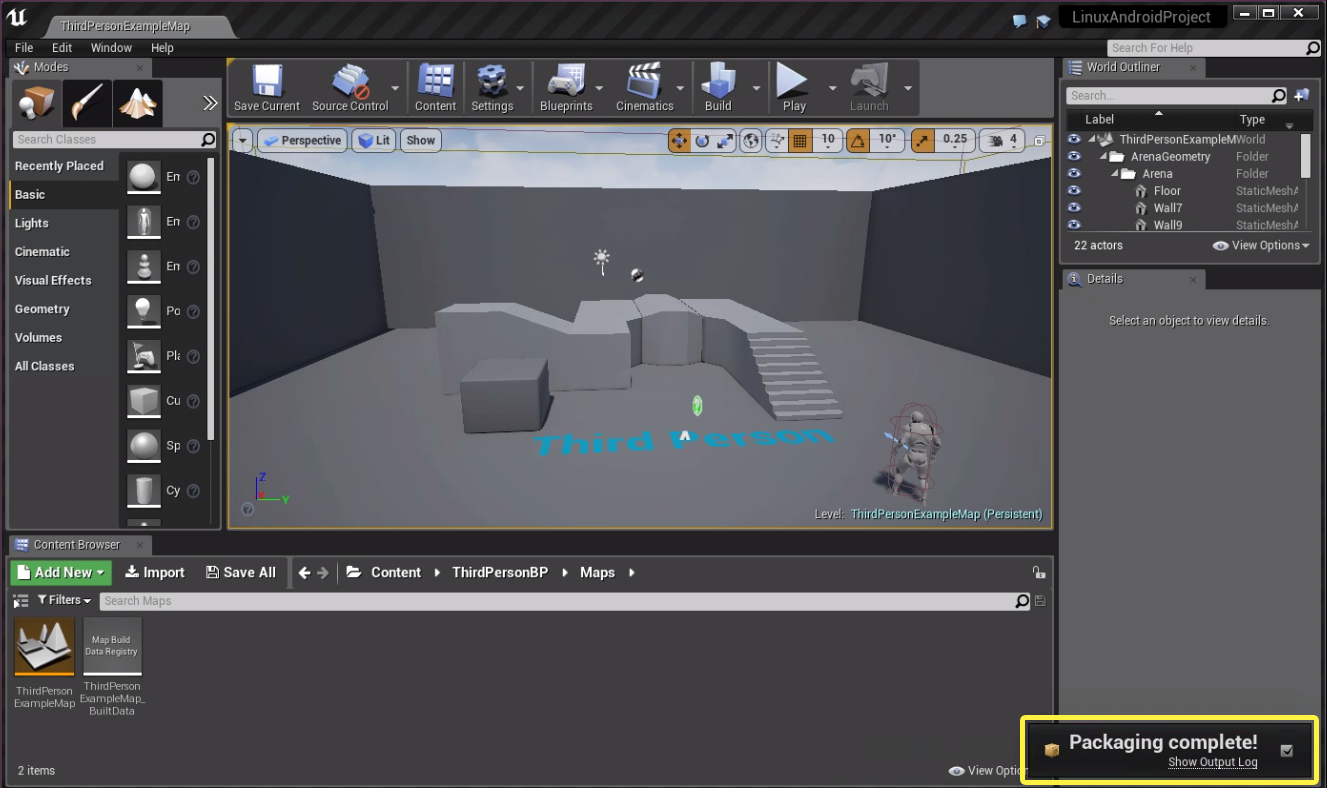
At the end of the packaging process, you should see a message telling you that the packaging process has completed.
![LinuxAndroid_Step35.png]()
Click for full image.
-
Navigate to the Android_Builds folder, where you should see a folder entitled Android_ETC1 .
![LinuxAndroid_Step36.png]()
-
Open the Android_ETC1 folder, where you'll find the files that were created during the packaging process.
![LinuxAndroid_Step37.png]()
You should see the Installation and Uninstallation shell scripts (/ .sh) along with the Android Application Package (/ .apk) that contains all of the files you need to install the project onto any Android device that supports the ETC1 compression scheme.
-
Now, open up the terminal from this folder's location by right-clicking inside of the folder and selecting Open in Terminal .
![LinuxAndroid_Step38.png]()
-
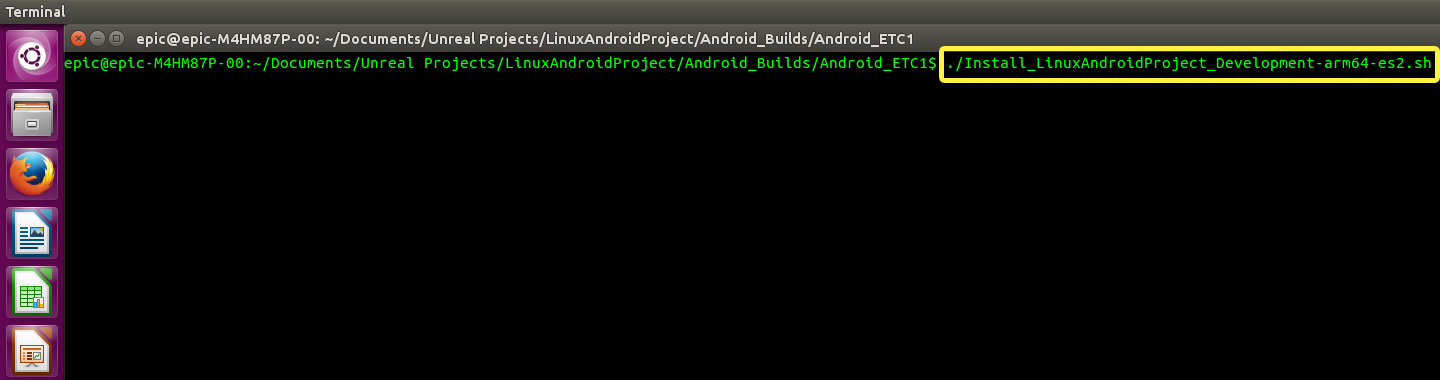
Enter
./Install_LinuxAndroidProject_Development-arm64.es2.shinto the terminal to install the project onto your Android device.![LinuxAndroid_Step39.png]()
Click for full image.
If you're having trouble running the shell script, try entering
adb devicesinto the terminal to verify that your device is indeed, connected to your computer. -
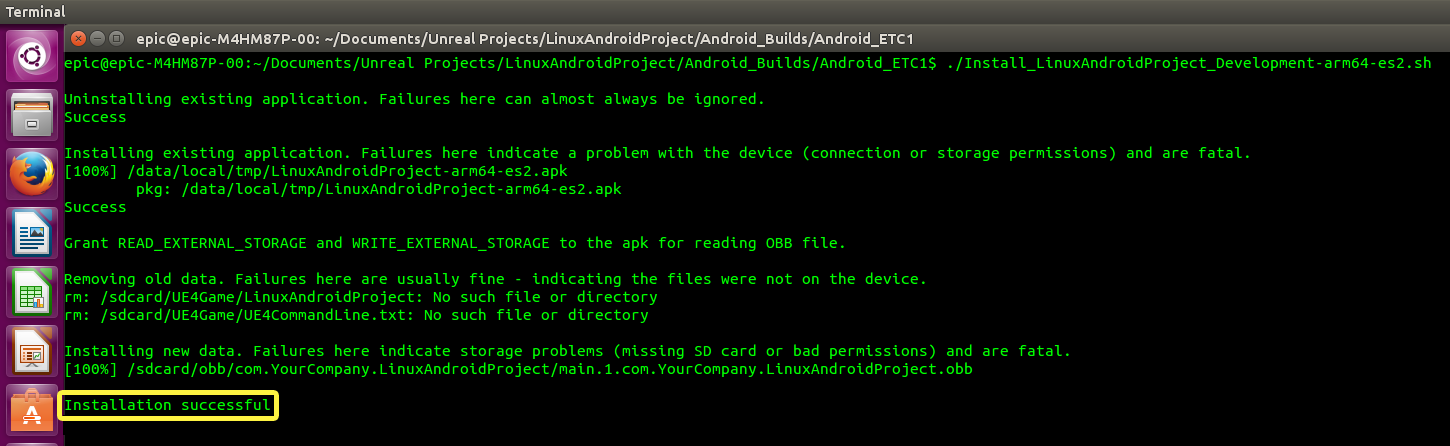
During the installation process, the shell script should flush the following output to your terminal.
![LinuxAndroid_Step40.png]()
Click for full image.
When the shell script has completed the installation process, you should see an Installation successful message.


Section Result
Now that the Installation script has finished installing the game onto your Android device, the project should now be visible inside of your device's application drawer.
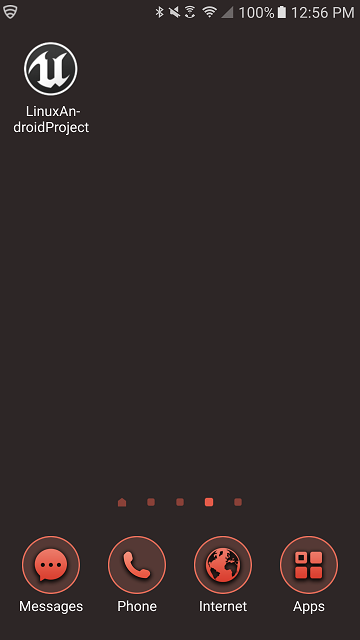
Click for full image.
Congratulations! You've learned:
✓ How to install and set up the Android SDK for mobile game development with UE4 on Linux.
✓ How to enable an Android's development environment.
✓ How to create an Android mobile game project in UE4.
✓ How to deploy a level onto your Android device from UE4.
✓ How to package your mobile game for distribution (release).
The next section has some suggestions on how you can apply your newly acquired skills.
6 - On your own!
Developing mobile games requires a high degree of attention, especially when it comes to device compatibility, mobile performance, and space limitations. Applying best practices while you're designing mobile games will help you effectively refine your mobile game development skills. After designing mobile content using the best practices you've just learned, learn how to preview and deploy your mobile game using an alternative deployment method. Finally, at the end of this page, we've added a couple of exercises to help you practice your newly acquired mobile development skills.
Learning Some Best Practices
Now that you know how to create, package, and deploy a template mobile UE4 project for your Android device; it's a good time to consider device compatibility, mobile performance, and APK best practices that could impact your ability to create mobile games from UE4 on Linux.
Android Device Compatibility
Mobile Performance
Reducing APK Package Sizes
There are times when you'll need to limit the size of your mobile game due to limitations imposed by targeted hardware or software platforms. If you encounter a situation where you need to reduce the size of your mobile game, you may need to reduce the size of your Android Application Package (APK), which is a custom file format that the Android operating system uses to package mobile applications for distribution. Check out the Reducing APK Package Size Reference Page , where you'll learn ways to reduce the size of your packaged game.
Designing Mobile Content
If you want to harness what you've learned about mobile game development with UE4 on Linux, you'll want to design game content that'll take advantage of your device's available rendering capabilities. Go ahead and read the following reference information:
Previewing your Mobile Game
Prior to deploying your mobile game to an Android device, you might want to preview your game inside of the Editor. Read through our Mobile Previewer Overview Page to learn how to preview your mobile game inside of the Editor.
Deploying Over a Wireless Network
At this point, you've learned some best practices for designing mobile game content, you've previewed your mobile game with the Editor, and you're ready to deploy your game onto an Android device over a wireless network. Please read through our Gear VR Debugging Reference Page to learn more about deploying a UE4 project to an Android device over a wireless network.
Doing Some Exercises On Your Own
If you want to continue testing your mobile game development skills, try out a couple of exercises on your own:
-
Create a new mobile project using something other than the Third Person template, subsequently trying to get your newly created project running on your Android device.
-
Try packaging your project using different Android Texture formats, documenting which ones will work for your specific device.