Choose your operating system:
Windows
macOS
Linux
Local notifications are messages that can be displayed outside of your Unreal Engine 4 (UE4) application, alerting users to changes or updates that have been made. In the following How-To we will take a look at how to set up local notifications that will work on both Android and iOS devices.
The current implementation of Local Notifications for both Android and iOS is very simplistic in its setup and execution. This system also will only work with local notifications and not notifications that are sent via a remote server.
Choose Your mobile platform
iOS
Steps
-
First, create a new Project from the Games > Blank template with the following options:
-
Blueprint enabled
-
Mobile / Tablet enabled
-
Scalable 3D or 2D enabled
-
No Starter Content enabled
-
-
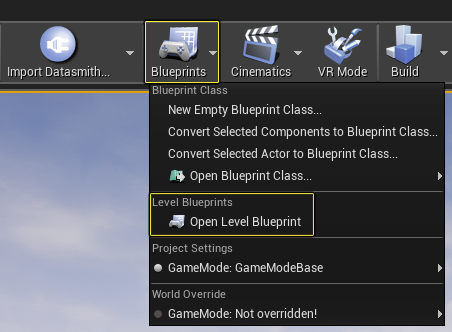
Once the project has opened, open the Level Blueprint by clicking on the Blueprints button that is on Main Toolbar and then from the displayed list, select the Open Level Blueprint option.
![Android&20OSLocalNotification_OpenLevelBlueprint.png]()
Click for full image.
To make this How-To easy to follow along with, we are using the Level Blueprint to set up and call the required Local Notifications Blueprint nodes. While setting up Local Notifications in the Level Blueprint will work, you should consider adding this logic where it makes the most sense for your project.
-
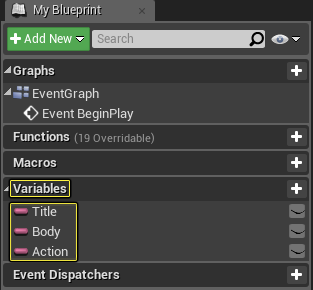
In the Variables section, create the following three text variables so that we can display messages to the user when the local notification is shown:
![LocalNotifications_StingVariables.png]()
Click for full image.
Variable Name
Value
Title
Title: This is the Title!
Body
Body: This is the body!
Action
Action: I am taking this Action!
-
To make sure that the user can see the local notifications when they are called to be displayed, add Event Begin Play and Register for Remote Notifications nodes to the Event Graph .
![LocalNotifications_BeginPlayRegisterRemoteNot-1.png]()
Click for full image.
When adding this to your UE4 project, make sure that the Register for Remote Notifications node is called right when your project first loads. This way you will not have to worry about calling it again when trying to display notifications.
-
To make sure that users can see the notifications when they are fired off, you will need to connect the output of the Event Begin Play to the input on the Register for Remote Notifications . This will make sure that the user gives the operating system (OS) the permission to display the notifications.
![LocalNotifications_ConnectBeginPlayRegisterRemoteNot.png]()
Click for full image.
-
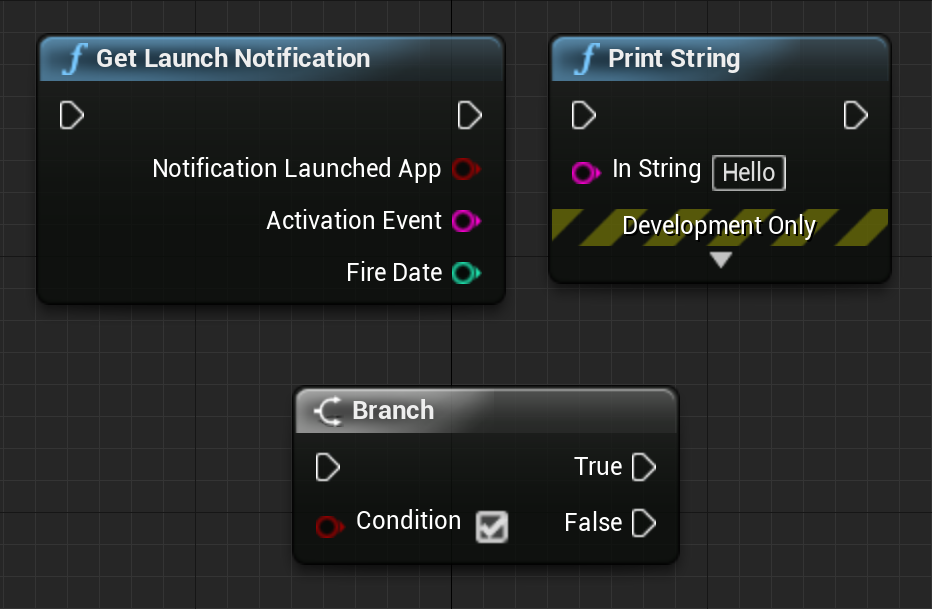
Now that we have given the OS permission to display the notification, next we need to set up what will happen when the user clicks on the notification. To handle this type of interaction, add Get Launch Notification , Print String and Branch nodes to the Event Graph .
![LocalNotifications_LaucnBrankPrintNodes.png]()
Click for full image.
-
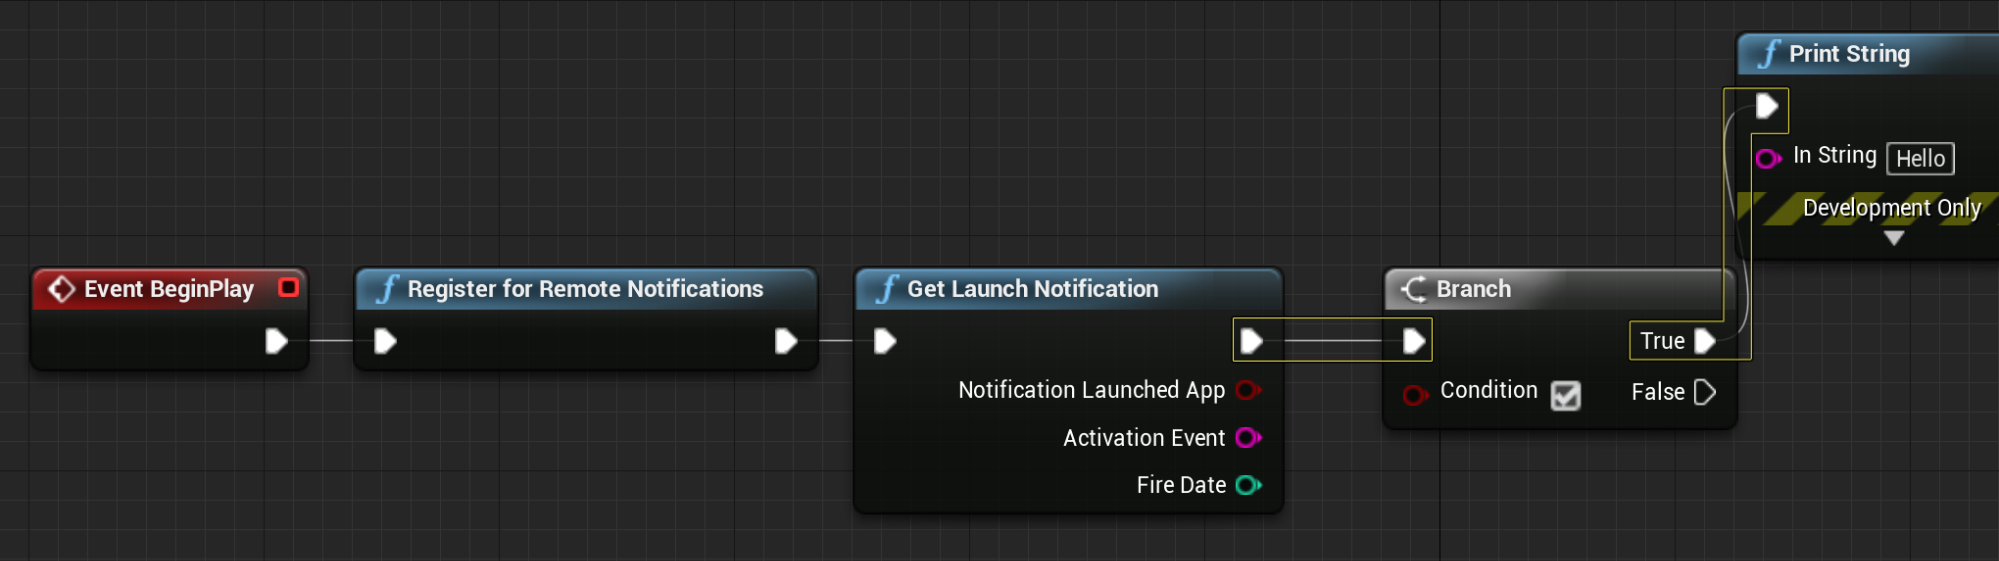
Connect the Output of the Get Launch Notification node to the input on the Branch node and then connect the True output of the Branch node to the input on the Print String node.
![LocalNotifications_ConnectGetLaunchToPrintAndBranch-2.png]()
Click for full image.
-
Now, connect the Notification Launched App to the Condition input on the Branch node and the Activation Event to the In String on the Print String node.
![LocalNotifications_ConnectLaunchToBranch.png]()
Click for full image.
When adding this to your project you can omit the Print String node. This was added to make sure that the correct Activation Event was being used.
-
Now, we need to set up what the notification will say and how much time should pass before the notification is displayed. To accomplish this, you will first need to add the following Blueprint nodes to the Event Graph.
-
Schedule Local Notifications from Now
-
Delay
-
Title, Body, and Action Text Variables
![20OSLocalNotification_DelayVarsSchedule.png]()
Click for full image.
-
-
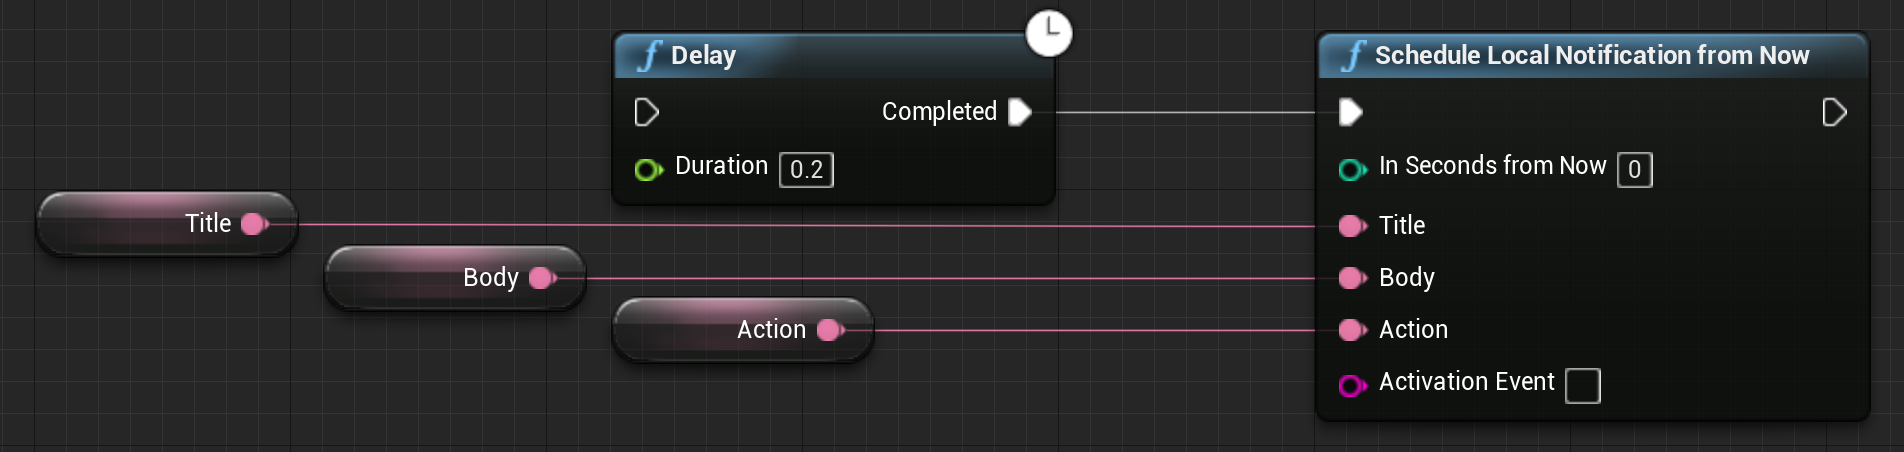
With the required nodes added to the Event Graph, connect the Completed output of the Delay node to the input on the Schedule Local Notifications from Now , and then connect each of the Text variables to their respective inputs on the Schedule Local Notifications from Now node. When completed, your Event Graph should match the image below.
![LocalNotifications_DelayVarSetup.png]()
Click for full image.
-
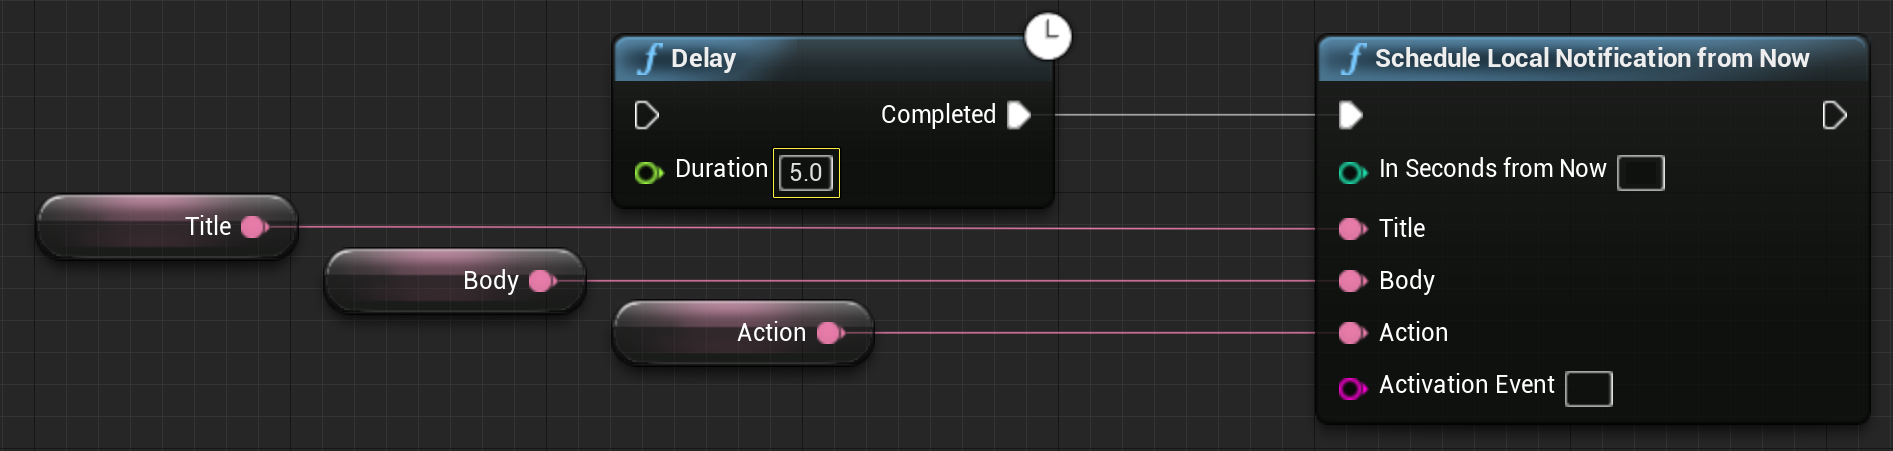
Set the Duration on the Delay node to five (5) seconds. This will help make sure that there is enough time to either close the app or put the app in the background before the local notification is called and displayed.
![LocalNotifications_DelayNodeSetup.png]()
Click for full image.
The Delay node was only added to ensure that there would be enough time to close the app or send it to the background before the notification went off. When adding this to your project you do not have to use the Delay node.
-
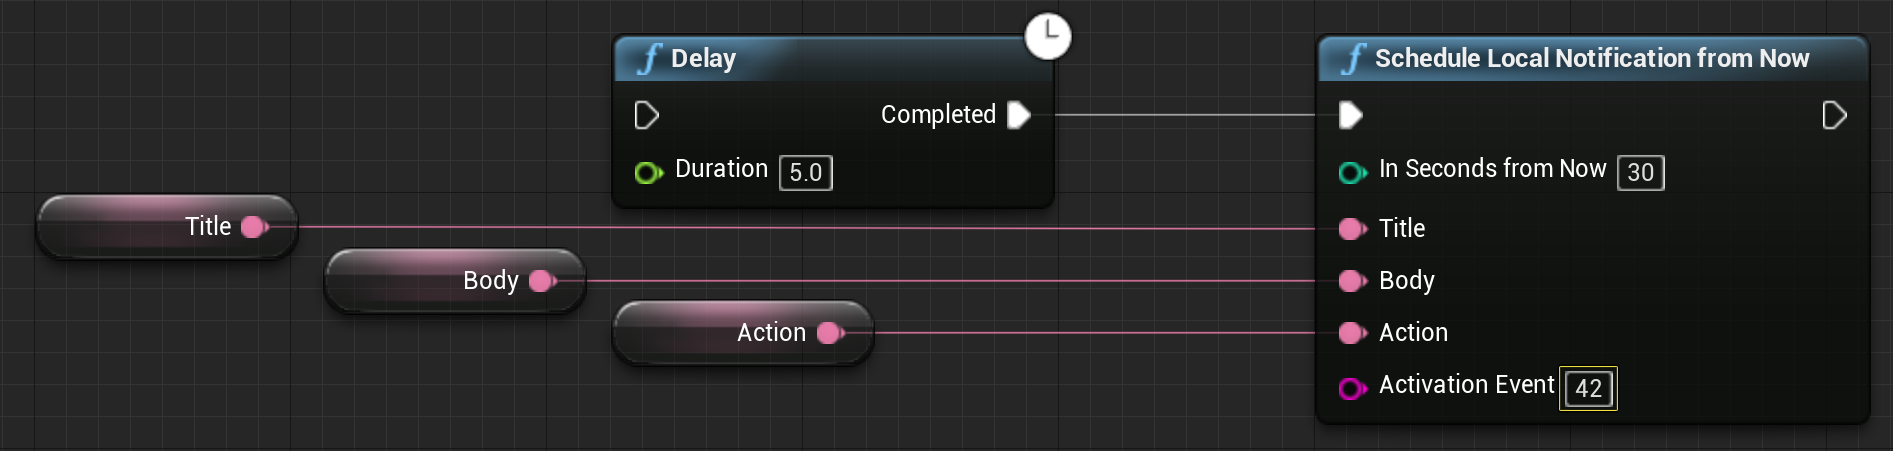
Next, set the Seconds from Now input on the Schedule Local Notifications from Now node to 30 seconds. This will display the notification 30 seconds after this piece of code has been run.
![LocalNotifications_SetSchedualeTime.png]()
Click for full image.
-
Set the Activation Event on the Schedule Local Notifications from Now to a value of 42 .
![LocalNotifications_SetActivationEvent.png]()
Click for full image.
The Activation Event input enables you to associate a string value that can be used to call a specific notification. This allows you to set up and use different notifications that can be displayed when certain conditions are met.
-
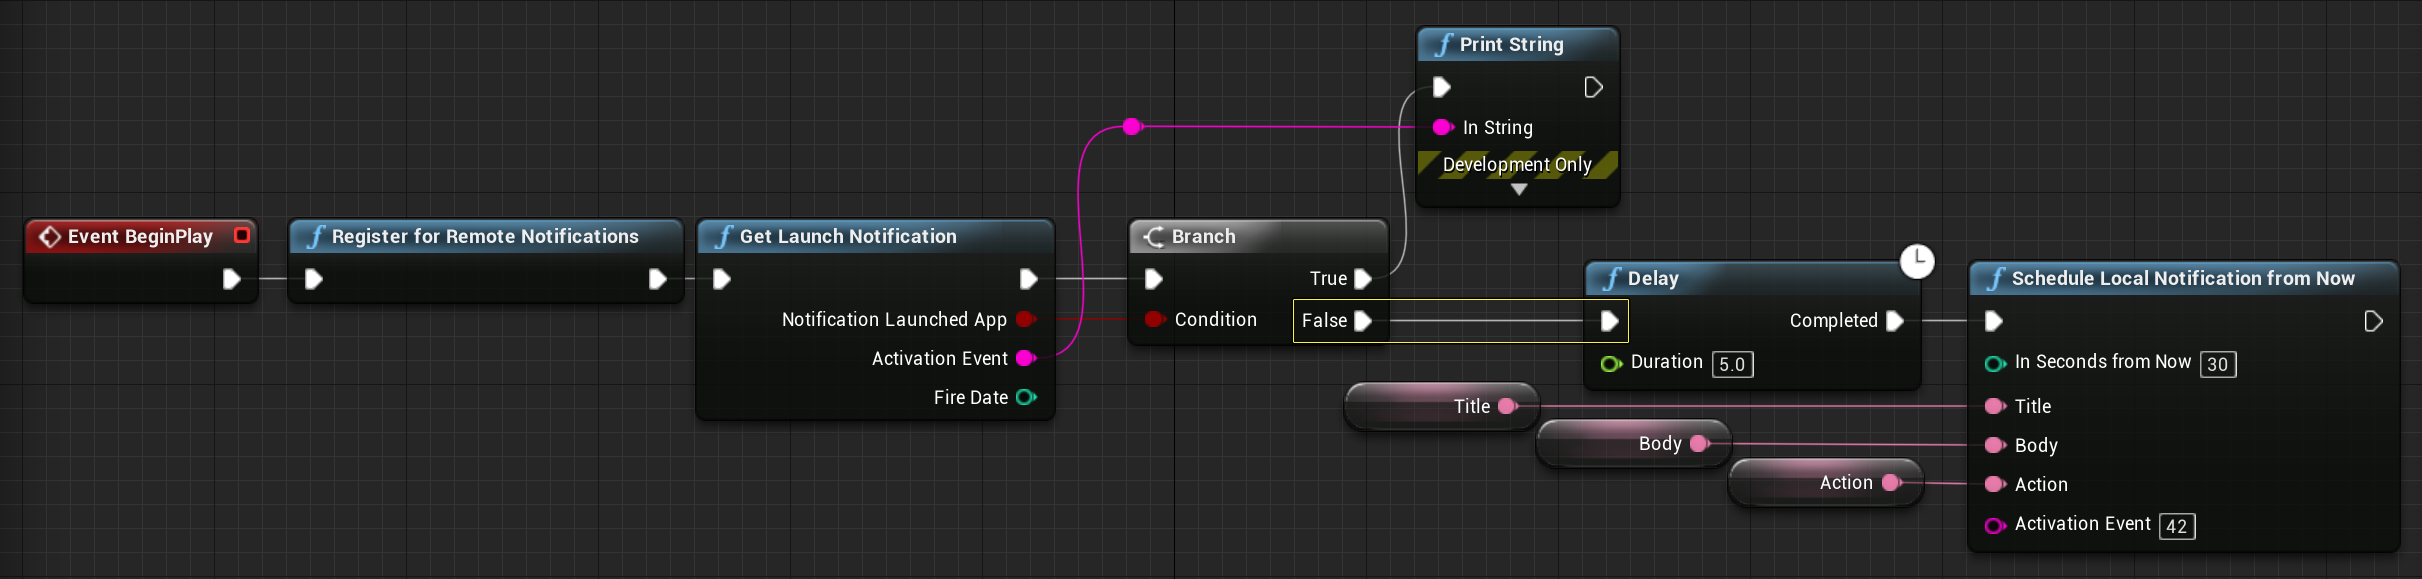
With all of the needed nodes for Local Notifications to work now added to the Event graph, the last thing left to do is connect the False output of the Branch node to the input on the Delay node. When completed your Event Graph should look like the following image.
![LocalNotifications_ConnectFalseToDelay.png]()
Click for full image.
-
Press the Compile button to compile the level Blueprint and the Save button to your level.
-
Finally, on the Main Toolbar click on the Advanced Options drop down next to the Launch icon and then select the device you want to test this on.
![LocalNotifications_LaunchOneDevice.png]()


Local Notifications for iOS projects are only available using source builds at present time.
-
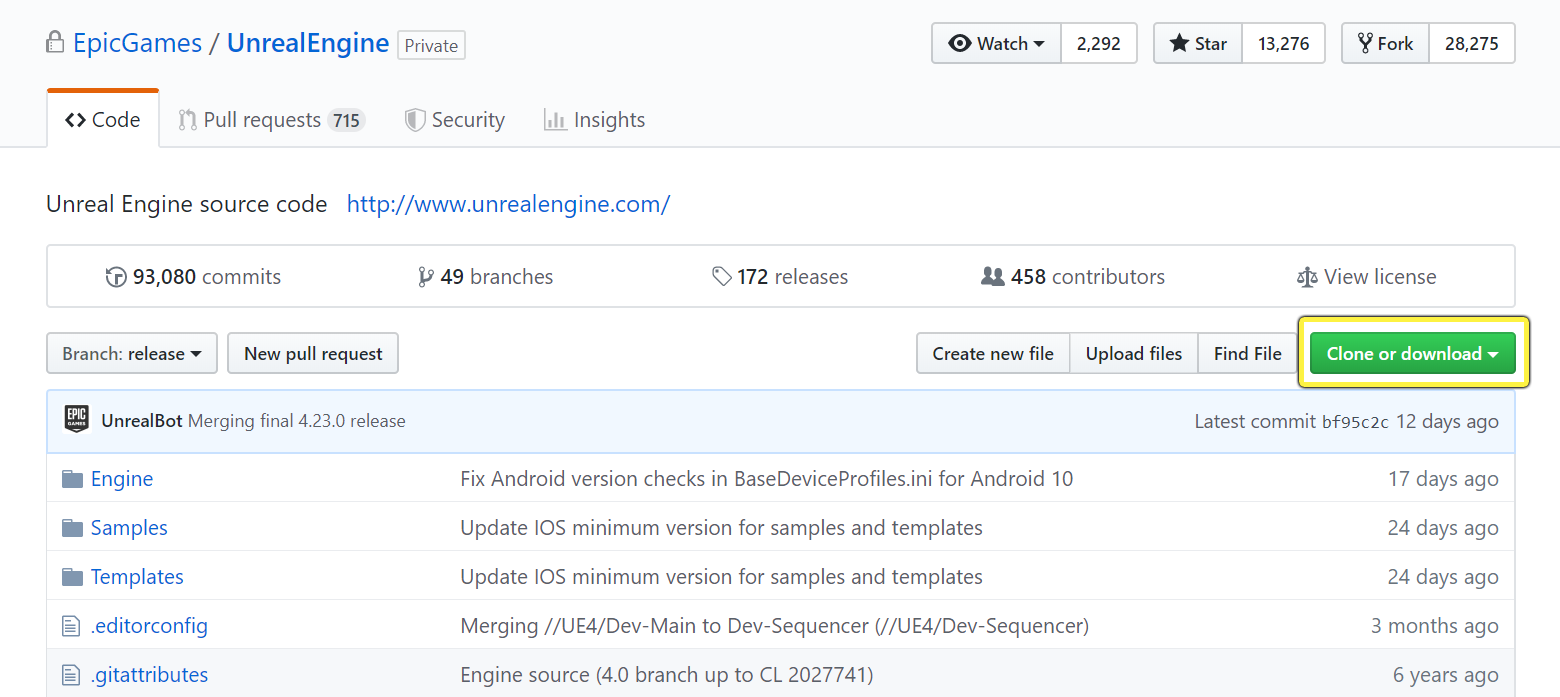
First, download and compile a source code build of Unreal Engine. You can find instructions on how to download the source code from GitHub on the UE4 On GitHub page as well as the Downloading Unreal Engine Source Code guide.
![GitHub Source]()
Click for full image.
-
Once you have compiled the Editor, open it and create a new Project from the Games > Blank template with the following options:
-
C++ enabled
-
Mobile / Tablet enabled
-
Scalable 3D or 2D enabled
-
No Starter Content enabled
-
-
When the project has opened, go to the Edit and then select Project Settings .
-
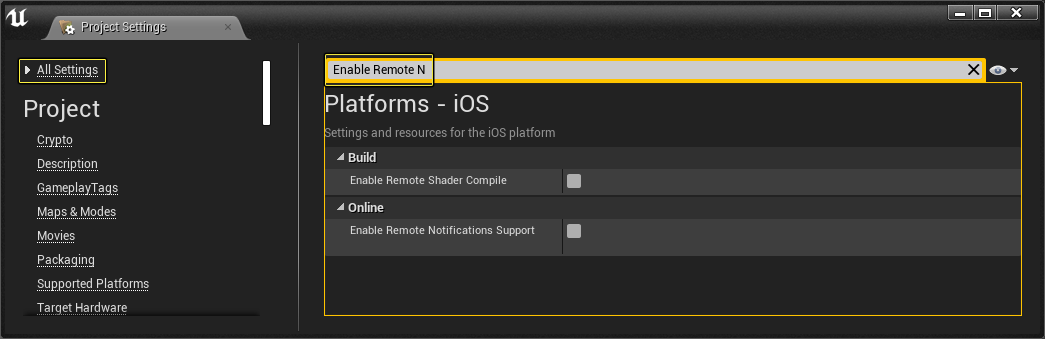
From the Project Settings menu, click on All Settings and then in the search box input Enable Remote Notifications Support .
![LocalNotification_EnableRemoteNotiOS-1.png]()
Click for full image.
Enable Remote Notifications Support is only available when using a C++ based project. If you are using a Blueprint based project, this option will be grayed out.
-
Once the project has opened, open the Level Blueprint by clicking on the Blueprints button that is on Main Toolbar and then from the displayed list, select the Open Level Blueprint option.
![Android&20OSLocalNotification_OpenLevelBlueprint.png]()
Click for full image.
To make this How-To easy to follow along with, we are using the Level Blueprint to set up and call the required Local Notifications Blueprint nodes. While setting up Local Notifications in the Level Blueprint will work, you should consider adding this logic where it makes the most sense for your project.
-
In the Variables section, create the following three text variables so that we can display messages to the user when the local notification is shown:
![LocalNotifications_StingVariables.png]()
Click for full image.
Variable Name
Value
Title
Title: This is the Title!
Body
Body: This is the body!
Action
Action: I am taking this Action!
-
To make sure that the user can see the local notifications when they are called to be displayed, add Event Begin Play and Register for Remote Notifications nodes to the Event Graph .
![LocalNotifications_BeginPlayRegisterRemoteNot-1.png]()
Click for full image.
When adding this to your UE4 project, make sure that the Register for Remote Notifications node is called right when your project first loads. This way you will not have to worry about calling it again when trying to display notifications.
-
To make sure that users can see the notifications when they are fired off, you will need to connect the output of the Event Begin Play to the input on the Register for Remote Notifications . This will make sure that the user gives the operating system (OS) the permission to display the notifications.
![LocalNotifications_ConnectBeginPlayRegisterRemoteNot.png]()
Click for full image.
-
Now that we have given the OS permission to display the notification, next we need to set up what will happen when the user clicks on the notification. To handle this type of interaction, add Get Launch Notification , Print String , and Branch nodes to the Event Graph .
![LocalNotifications_LaucnBrankPrintNodes.png]()
Click for full image.
-
Connect the Output of the Get Launch Notification node to the input on the Branch node and then connect the True output of the Branch node to the input on the Print String node.
![LocalNotifications_ConnectGetLaunchToPrintAndBranch-2.png]()
Click for full image.
-
Now, connect the Notification Launched App to the Condition input on the Branch node and the Activation Event to the In String on the Print String node.
![LocalNotifications_ConnectLaunchToBranch.png]()
Click for full image.
When adding this to your project you can omit the Print String node. This was added to make sure that the correct Activation Event was being used.
-
Now, we need to set up what the notification will say and how much time should pass before the notification is displayed. To accomplish this, you will first need to add the following Blueprint nodes to the Event Graph.
-
Schedule Local Notifications from Now
-
Delay
-
Title, Body, and Action Text Variables
![20OSLocalNotification_DelayVarsSchedule.png]()
Click for full image.
-
-
With the required nodes added to the Event Graph, connect the Completed output of the Delay node to the input on the Schedule Local Notifications from Now , and then connect each of the Text variables to their respective inputs on the Schedule Local Notifications from Now node. When completed, your Event Graph should match the image below.
![LocalNotifications_DelayVarSetup.png]()
Click for full image.
-
Set the Duration on the Delay node to five (5) seconds. This will help make sure that there is enough time to either close the app or put the app in the background before the local notification is called and displayed.
![LocalNotifications_DelayNodeSetup.png]()
Click for full image.
The Delay node was only added to ensure that there would be enough time to close the app or send it to the background before the notification went off. When adding this to your project you do not have to use the Delay node.
-
Next, set the Seconds from Now input on the Schedule Local Notifications from Now node to 30 seconds. This will display the notification 30 seconds after this piece of code has been run.
![LocalNotifications_SetSchedualeTime.png]()
Click for full image.
-
Set the Activation Event on the Schedule Local Notifications from Now to a value of 42 .
![LocalNotifications_SetActivationEvent.png]()
Click for full image.
The Activation Event input enables you to associate a string value that can be used to call a specific notification. This allows you to set up and use different notifications that can be displayed when certain conditions are met.
-
With all of the needed nodes for Local Notifications to work now added to the Event graph, the last thing left to do is connect the False output of the Branch node to the input on the Delay node. When completed your Event Graph should look like the following image.
![LocalNotifications_ConnectFalseToDelay.png]()
Click for full image.
-
Press the Compile button to compile the level Blueprint and the Save button to your level.
-
Finally, on the Main Toolbar click on the Advanced Options drop down next to the Launch icon and then select the device you want to test this on.
![LocalNotifications_LaunchOnIOS.png]()

End Result
Once the project has been deployed to your mobile device, you should hear and see a notification pop up five seconds after your app has been opened like in the video below.