Choose your operating system:
Windows
macOS
Linux
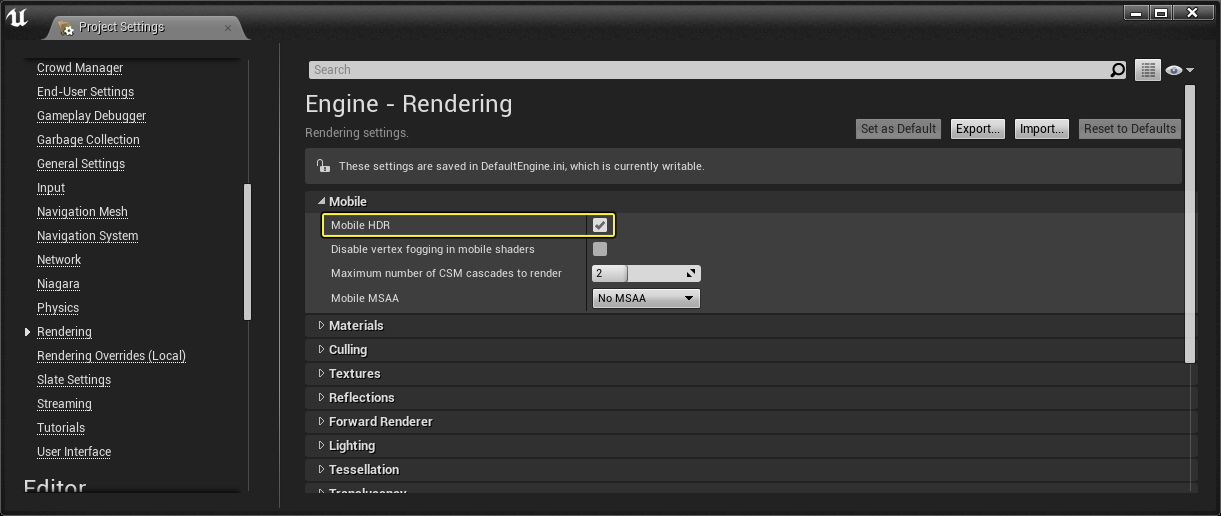
Mobile Post Processing is implemented as a separate code path from PC/Console Post Processing. This is to reflect the slower dependent texture reads, missing hardware features, extra render target resolve costs, and slower performance in general. To enable Post Processing for your mobile applications, please make sure that Mobile HDR is enabled in your Project Settings as most of the settings below require Mobile HDR to be enabled for the effect(s) to work.
Click for full image.
Enabling Tonemapper for Mobile Devices
To use the Tonemapper Post Processing options on Mobile Devices, you will need to set the value of r.mobile.tonemapperfilm from its default of 0 to 1 . You can change, enable, or disable the Tonemapper inside of the Unreal Engine 4 (UE4) Editor in the following ways:


Enabling Tonemapper Film via the Console
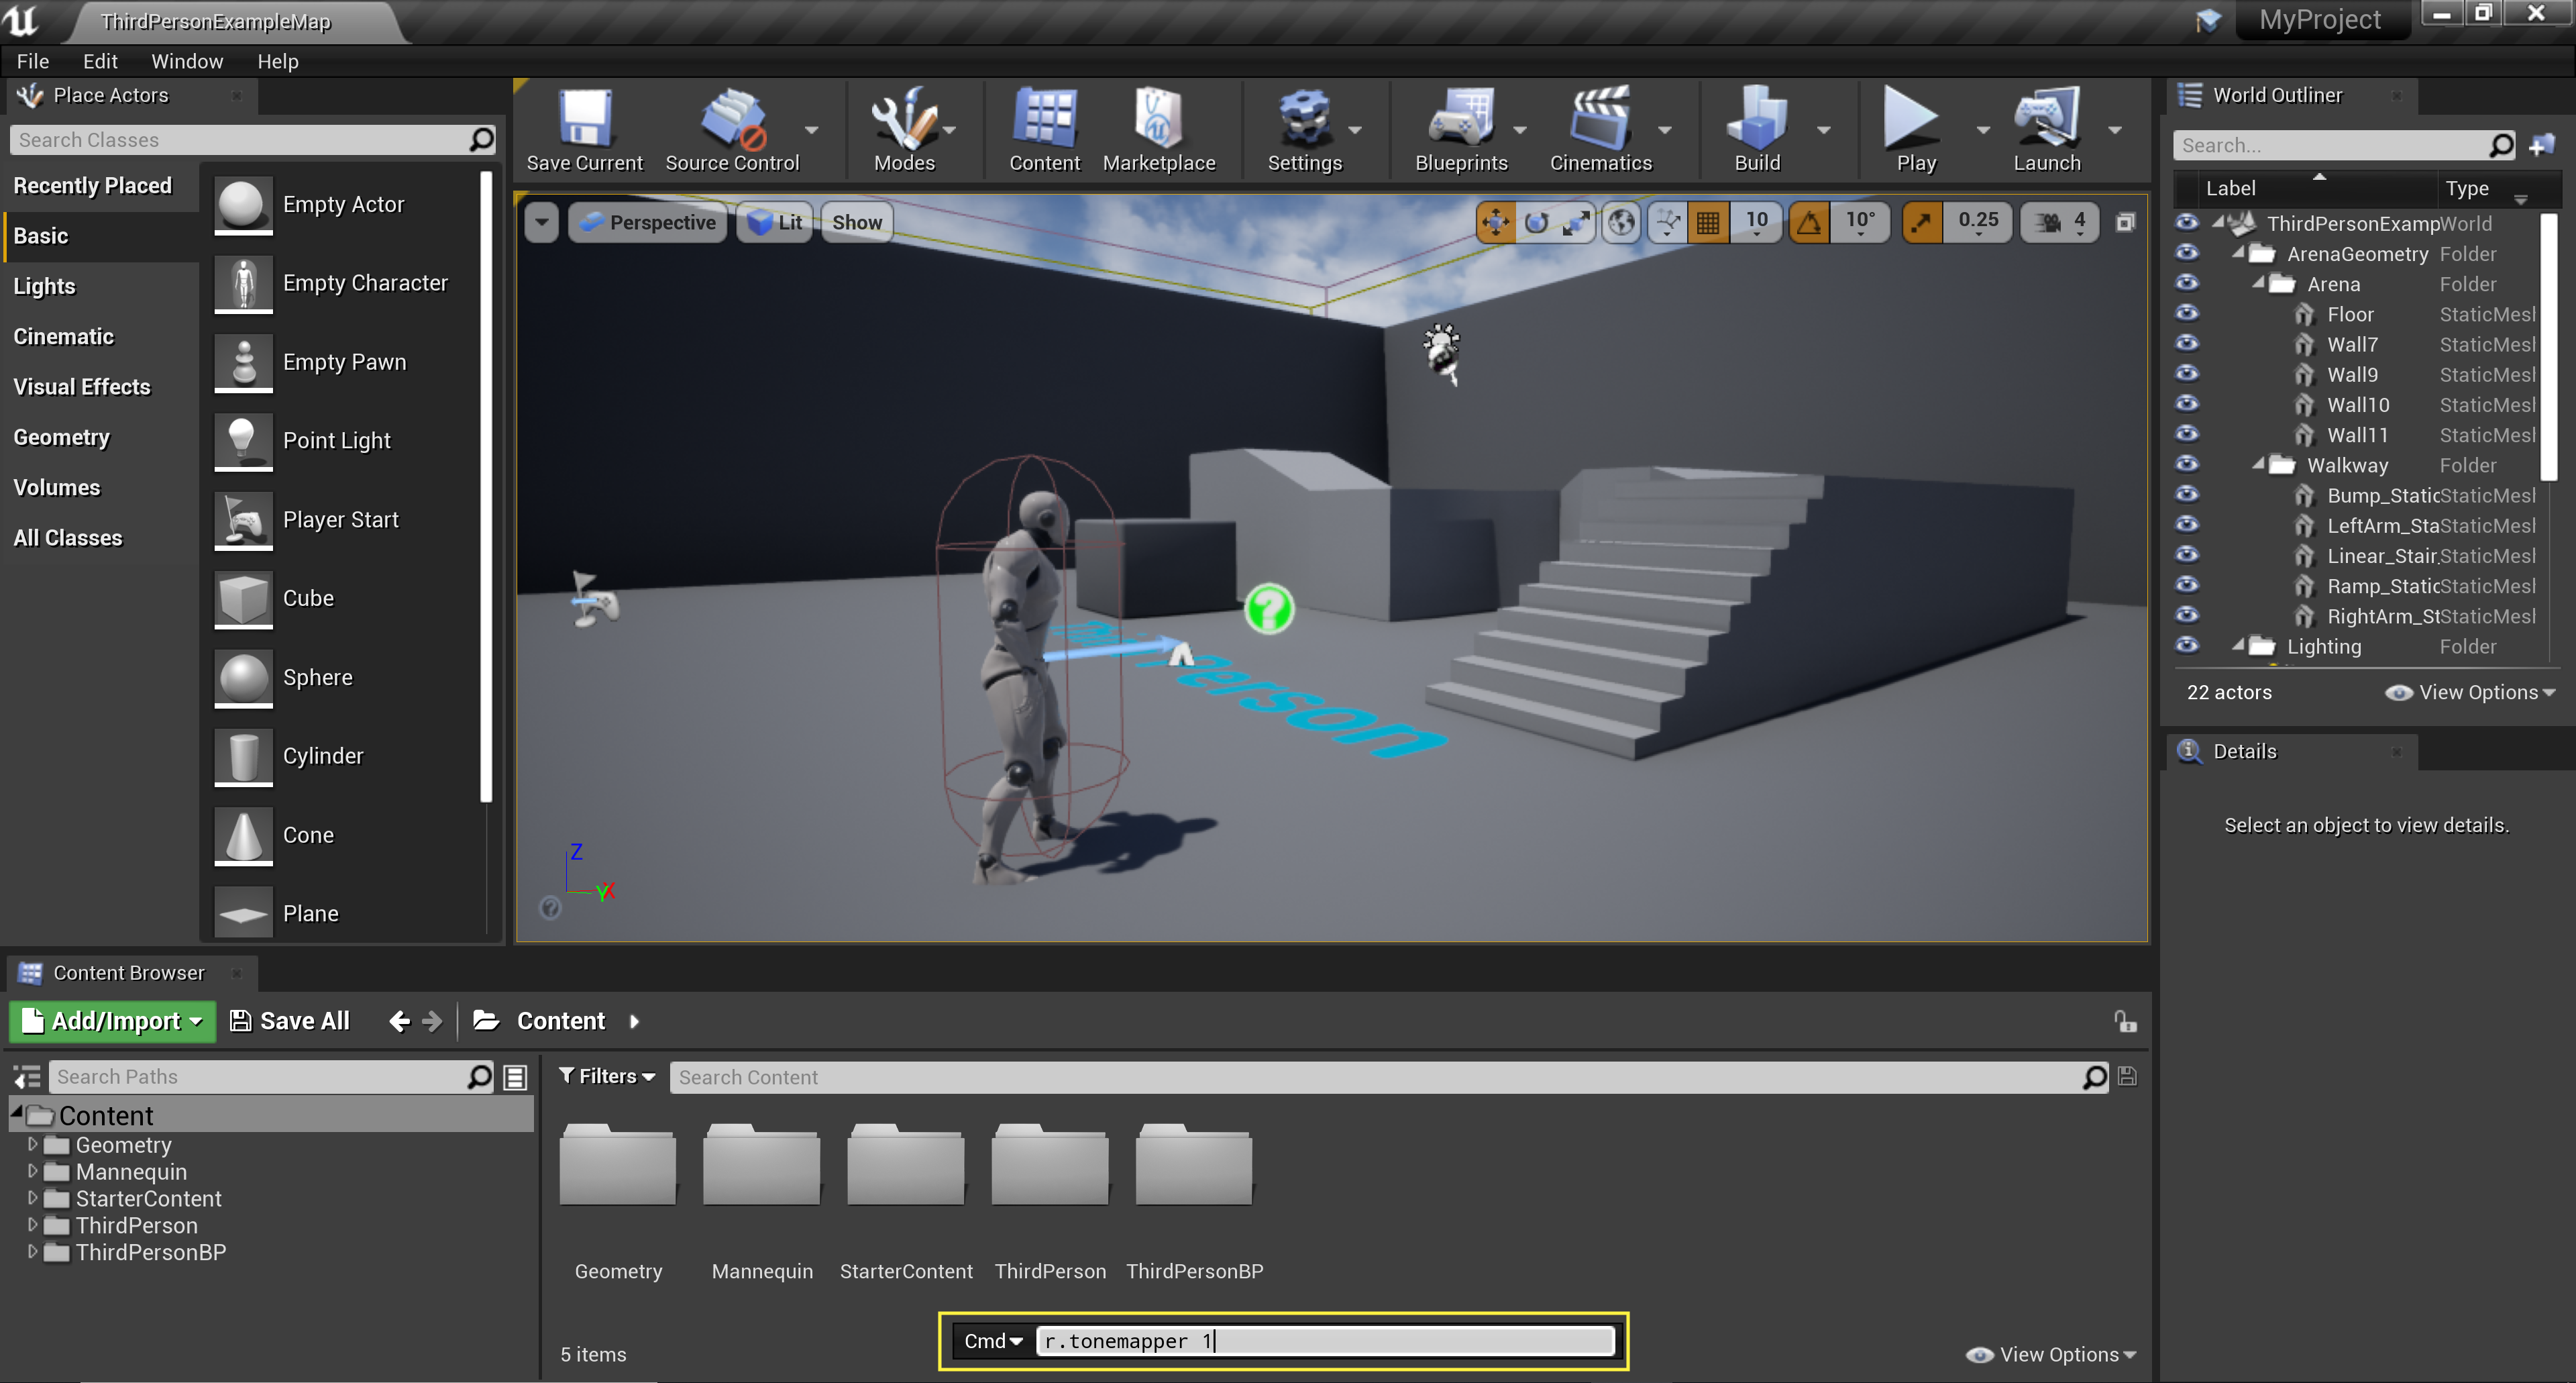
You can enable the Tonemapper in the UE4 Editor by first opening up the console by pressing the Backtick key(`) and then entering the following command:
-
r.Mobile.TonemapperFilm 1
To disable the Tonemapper, open up the console and enter the following command:
-
r.Mobile.TonemapperFilm 0
This method will enable the Tonemapper only for this session. If you want the Tonemapper to always be on you will need to add the Tonemapper settings you want to use to the DefaultEngine.INI.
Click for full image.
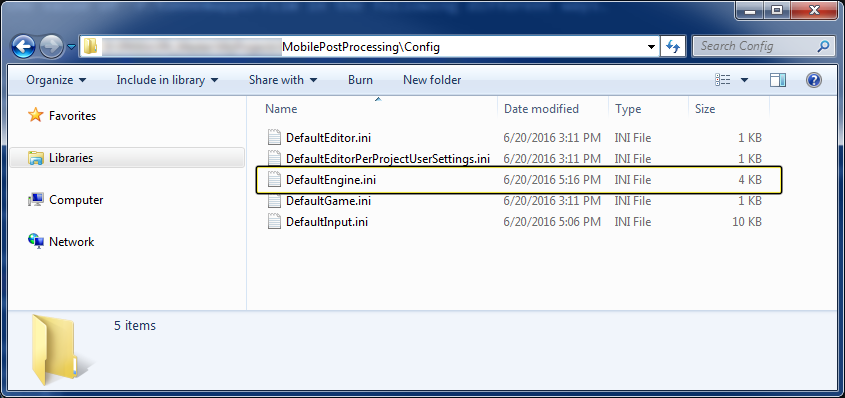
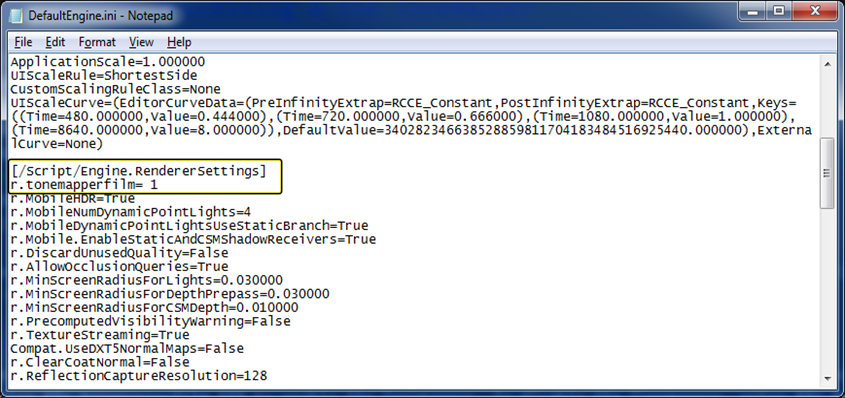
Enabling Tonemapper Film via .INI Files
To enable or disable the Tonemapper project wide you will need to add r.mobile.tonemapperfilm=1 to the Rendering Settings section of your project's DefaultEngine.ini file.
Click for full image.
Click for full image.
Enabling Tonemapper Film on a Mobile Device
To enable or disable the Tonemapper on a Mobile Device you will need to tap the screen with four fingers at the same time to bring up the Console Window and then input r.mobile.tonemapperfilm 1 to enable the Tonemapper or r.mobile.tonemapperfilm 0 to disable the Tonemapper.
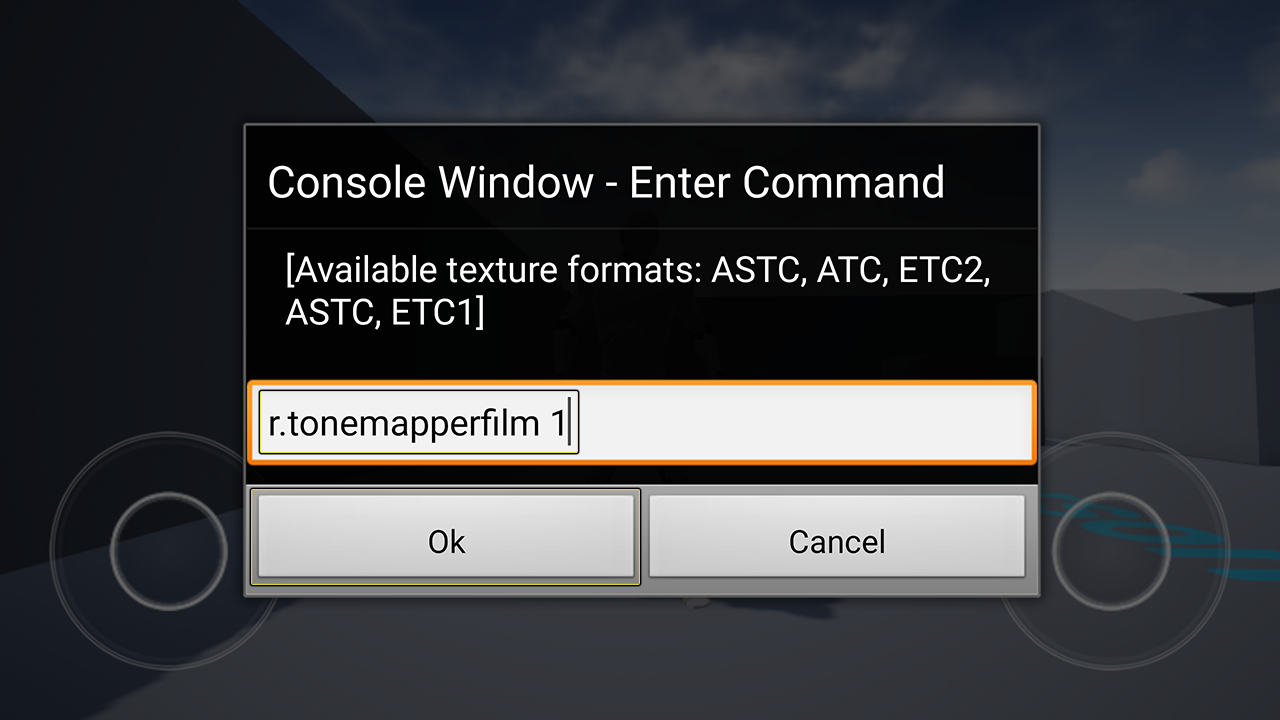
Click for full image.
Supported Post Process Effects and Settings on Mobile
In the following section we will go over what Post Process Effects and settings are supported on Mobile devices, as well as whether they require the tonemapper to be enabled.
Click for full image.
Color Grading
In the Color Grading section, you'll find the supported properties that enable you to make color corrections to the image.
|
Post Process Property |
Supported |
r.mobile.tonemapperfilm Value |
||
|---|---|---|---|---|
|
White Balance |
||||
|
Temp |
Yes |
1 |
||
|
Tint |
Yes |
1 |
||
|
Global |
||||
|
Saturation |
Yes |
1 |
||
|
Contrast |
Yes |
1 |
||
|
Gamma |
Yes |
1 |
||
|
Gain |
Yes |
1 |
||
|
Offset |
Yes |
1 |
||
|
Scene Color Tint |
Yes |
1 |
||
|
Color Grading LUT Intensity |
Yes |
1 |
||
|
Color Grading LUT |
Yes |
1 |
||
|
Shadows |
||||
|
Saturation |
Yes |
1 |
||
|
Contrast |
Yes |
1 |
||
|
Gamma |
Yes |
1 |
||
|
Gain |
Yes |
1 |
||
|
Offset |
Yes |
1 |
||
|
Shadows Max |
Yes |
1 |
||
|
Midtones |
||||
|
Saturation |
Yes |
1 |
||
|
Contrast |
Yes |
1 |
||
|
Gamma |
Yes |
1 |
||
|
Gain |
Yes |
1 |
||
|
Offset |
Yes |
1 |
||
|
Highlights |
||||
|
Saturation |
Yes |
1 |
||
|
Contrast |
Yes |
1 |
||
|
Gamma |
Yes |
1 |
||
|
Gain |
Yes |
1 |
||
|
Offset |
Yes |
1 |
||
|
Highlights Min |
Yes |
1 |
||
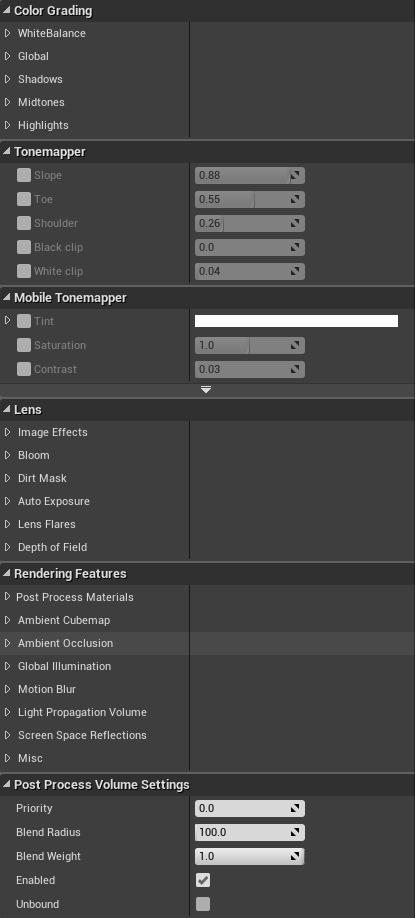
Tonemapper
In the Tonemapper section, you'll find the supported properties that enable you to make adjustments to the image color range.
|
Post Process Property |
Supported |
r.mobile.tonemapperfilm Value |
|---|---|---|
|
Slope |
Yes |
1 |
|
Toe |
Yes |
1 |
|
Shoulder |
Yes |
1 |
|
Black Clip |
Yes |
1 |
|
White Clip |
Yes |
1 |
Mobile Tonemapper
In the Mobile Tonemapper section, you'll find the supported properties specific to mobile that enable you to make adjustments to the image color range.
|
Post Process Property |
Supported |
r.mobile.tonemapperfilm Value |
|---|---|---|
|
Tint |
Yes |
0 |
|
Saturation |
Yes |
0 |
|
Contrast |
Yes |
0 |
|
Tint Shadow |
Yes |
0 |
|
Tint Shadow Blend |
Yes |
0 |
|
Tint Shadow Amount |
Yes |
0 |
|
Channel Mixer Red |
Yes |
0 |
|
Channel Mixer Green |
Yes |
0 |
|
Channel Mixer Blue |
Yes |
0 |
|
Crush Shadows |
Yes |
0 |
|
Crush Highlights |
Yes |
0 |
|
Dynamic Range |
Yes |
0 |
Lens
In the Lens section, you'll find the supported properties that enable you to make different visual adjustments to the image for features like Bloom and Depth of Field.
|
Post Process Property |
Supported |
r.mobile.tonemapperfilm Value |
||
|---|---|---|---|---|
|
Image Effects |
||||
|
Chromatic Aberation |
Yes |
0 & 1 |
||
|
Vignette Intensity |
Yes |
0 & 1 |
||
|
Grain Jitter |
Yes |
0 & 1 |
||
|
Color Grading Intensity |
Yes |
1 |
||
|
Bloom |
||||
|
Method: Standard |
Yes |
0 & 1 |
||
|
Method: Convolution |
No |
n/a |
||
|
Intensity |
Yes |
0 & 1 |
||
|
Threshold |
Yes |
0 & 1 |
||
|
Size Scale |
Yes |
0 & 1 |
||
|
#123456 Size |
No |
n/a |
||
|
#123456 Tint |
No |
n/a |
||
|
Convolution Scale |
No |
n/a |
||
|
Convolution Center |
No |
n/a |
||
|
Convolution Boost |
No |
n/a |
||
|
Convolution Buffer |
No |
n/a |
||
|
Dirt Mask |
||||
|
Dirt Mask Texture |
Yes |
1 |
||
|
Dirt Mask Intensity |
Yes |
1 |
||
|
Dirt Mask Tint |
Yes |
1 |
||
|
Auto Exposure |
||||
|
Auto Exposure Histogram |
No |
n/a |
||
|
Auto Exposure Basic |
No |
n/a |
||
|
Low Percent |
No |
n/a |
||
|
High Percent |
No |
n/a |
||
|
Min Brightness |
No |
n/a |
||
|
Max Brightness |
No |
n/a |
||
|
Speed Up |
No |
n/a |
||
|
Speed Down |
No |
n/a |
||
|
Exposure Bias |
Yes |
0 & 1 |
||
|
Histogram Log Min |
No |
n/a |
||
|
Histogram Log Max |
No |
n/a |
||
|
Low Percent |
No |
n/a |
||
|
High Percent |
No |
n/a |
||
|
Histogram Log Min |
No |
n/a |
||
|
Histogram Log Max |
No |
n/a |
||
|
Lens Flares |
||||
|
Intensity |
No |
n/a |
||
|
Tint |
No |
n/a |
||
|
Bokeh Size |
No |
n/a |
||
|
Threshold |
No |
n/a |
||
|
Bokeh Shape |
No |
n/a |
||
|
Tints #012345678 |
No |
n/a |
||
|
Depth of Field |
||||
|
BokehDOF |
No |
n/a |
||
|
GaussianDOF |
Yes |
0 |
||
|
CircleDOF |
No |
n/a |
||
|
High Quality Gaussian DoF on Mobile |
Yes |
1 |
||
|
Aperture F - Stop |
No |
n/a |
||
|
Focal Distance |
Yes |
0 |
||
|
Depth Blur km for 50% |
No |
n/a |
||
|
Depth Blur Radius |
No |
n/a |
||
|
Focal Region |
No |
n/a |
||
|
Near Transition Region |
Yes |
0 |
||
|
Far Transition Region |
Yes |
0 |
||
|
Scale |
Yes |
0 |
||
|
Max Bokeh Size |
No |
n/a |
||
|
Near Blur Size |
No |
n/a |
||
|
Far Blur Size |
No |
n/a |
||
|
Shape |
No |
n/a |
||
|
Occlusion |
No |
n/a |
||
|
Color Threshold |
No |
n/a |
||
|
Size Threshold |
No |
n/a |
||
|
Sky Distance |
No |
n/a |
||
|
Vignette Size |
No |
n/a |
||
Rendering Features
In the Rendering Features section, you'll find the supported properties that enable you to make visual adjustments to the image for specific Post Process Materials, like Custom Depth and Custom Stencil.
|
Post Process Property |
Supported |
r.mobile.tonemapperfilm Value |
||
|---|---|---|---|---|
|
Post Process Materials |
||||
|
Array |
Yes |
1 |
||
|
Ambient Cubemap |
||||
|
Tint |
No |
n/a |
||
|
Intensity |
No |
n/a |
||
|
Cubemap Texture |
No |
n/a |
||
|
Ambient Occlusion |
||||
|
Intensity |
No |
n/a |
||
|
Radius |
No |
n/a |
||
|
Static Fraction |
No |
n/a |
||
|
Radius in Worldspace |
No |
n/a |
||
|
Fade Out Distance |
No |
n/a |
||
|
Fade Out Radius |
No |
n/a |
||
|
Power |
No |
n/a |
||
|
Bias |
No |
n/a |
||
|
Quality |
No |
n/a |
||
|
Mip Blend |
No |
n/a |
||
|
Mip Scale |
No |
n/a |
||
|
Mip Threshold |
No |
n/a |
||
|
Global Illumination |
||||
|
Indirect Lighting Color |
Yes |
0 & 1 |
||
|
Indirect Lighting Intensity |
Yes |
0 & 1 |
||
|
Motion Blur |
||||
|
Amount |
No |
n/a |
||
|
Max |
No |
n/a |
||
|
Per Object Size |
No |
n/a |
||
|
Light Propagation Volume |
||||
|
Intensity |
No |
n/a |
||
|
Size |
No |
n/a |
||
|
Secondary Occlusion Intensity |
No |
n/a |
||
|
Occlusion Intensity |
No |
n/a |
||
|
Diffuse Occlusion Exponent |
No |
n/a |
||
|
Specular Occlusion Exponent |
No |
n/a |
||
|
Light Injection Bias |
No |
n/a |
||
|
Secondary Bounce Intensity |
No |
n/a |
||
|
Geometry Volume Bias |
No |
n/a |
||
|
Emissive Injection Intensity |
No |
n/a |
||
|
Occlusion Radius |
No |
n/a |
||
|
Diffuse Occlusion Intensity |
No |
n/a |
||
|
Specular Occlusion Intensity |
No |
n/a |
||
|
Fade Range |
No |
n/a |
||
|
Directional Occlusion Fade Range |
No |
n/a |
||
|
Screen Space Reflections |
||||
|
Intensity |
No |
n/a |
||
|
Quality |
No |
n/a |
||
|
Max Roughness |
No |
n/a |
||
|
Misc |
||||
|
Screen Percentage |
No |
n/a |
||
Custom Post Process Materials
The Unreal Engine ships with a variety of Post Process effects, enabling you to customize the look and feel of your mobile applications. There are times, though, when you'll want to create custom Post Process Materials to implement your own effects (such as "VCR Static").

Adding effects to your mobile application requires the development of custom Post Process materials. When creating custom Post Process Materials for mobile applications, you should note that there are some key things to consider. Specifically, it's important to note that custom Post Process Materials for mobile applications can only fetch from PostProcessInput0 (Scene Color) , Scene Depth , Custom Depth , and Custom Stencil with the following Blendable Locations .
-
Before Tonemapping
-
After Tonemapping
To learn more about Blendable Locations, read through our Post Process Materials reference page. Currently, you cannot create custom Post Process materials for older Android devices that require 'mosaic' mode for HDR rendering. Finally, pixel depth information is not yet supported.
As this features requires Post-Processing to work correctly, Mobile HDR must be enabled. To enable Mobile HDR go to Project Settings > Engine > Rendering > Mobile and make sure that Mobile HDR is checked.
Click for full image.
You now use Custom Depth Post Process option with the Mobile Rendering path. Custom Post Process Materails can now sample from Scene Depth , Custom Depth , Scene Color , and Custom Stencil .
|
|
|
|---|---|
|
Custom Depth |
Custom Stencil |


General Post Process Performance Tips
-
For best performance and quality, it is best to stick to using just Bloom and TemporalAA.
For better performance, we have implemented a special workaround which is controlled by the console variable "r.RenderTargetSwitchWorkaround". In BaseDeviceProfiles.ini , you can see that it is enabled for several devices. Note that there will be a small change in appearance to the bloom effect on devices with certain performance characteristics.