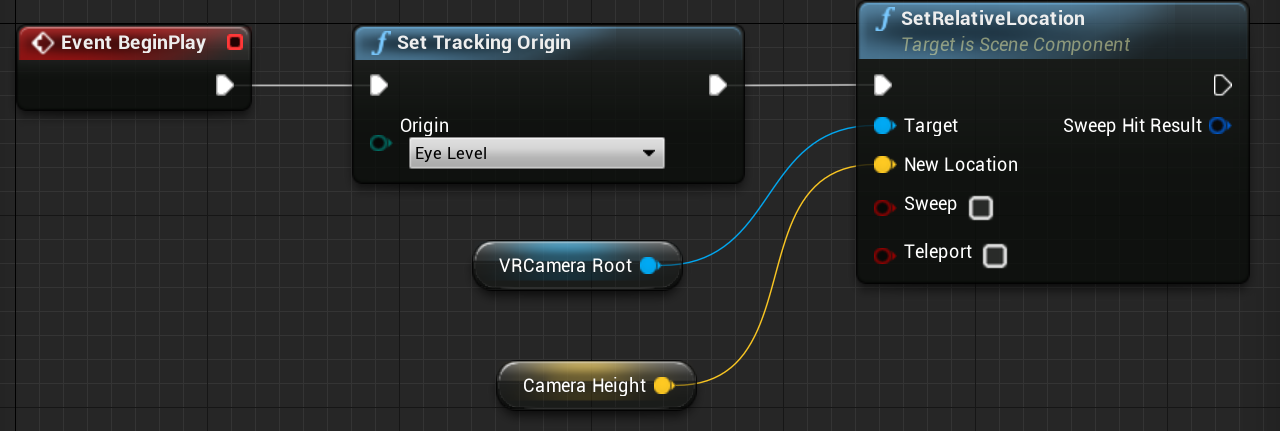
Begin Object Class=/Script/BlueprintGraph.K2Node_Event Name="K2Node_Event_3"
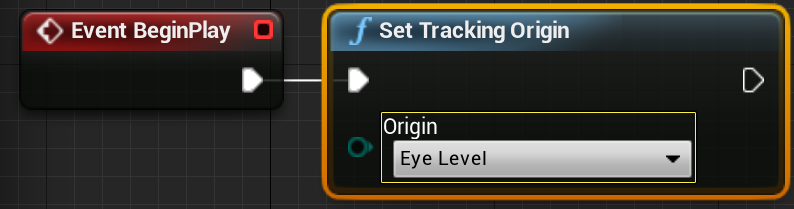
EventReference=(MemberParent=Class'/Script/Engine.Actor',MemberName="ReceiveBeginPlay")
bOverrideFunction=True
NodePosX=-64
NodePosY=208
NodeGuid=93C09D814ED1E9D44D261A9686B86DCA
CustomProperties Pin (PinId=7F2EC56943D8143A39FA97A62B1F4E79,PinName="OutputDelegate",Direction="EGPD_Output",PinType.PinCategory="delegate",PinType.PinSubCategory="",PinType.PinSubCategoryObject=None,PinType.PinSubCategoryMemberReference=(MemberParent=Class'/Script/Engine.Actor',MemberName="ReceiveBeginPlay"),PinType.PinValueType=(),PinType.ContainerType=None,PinType.bIsMap=False,PinType.bIsSet=False,PinType.bIsArray=False,PinType.bIsReference=False,PinType.bIsConst=False,PinType.bIsWeakPointer=False,PersistentGuid=00000000000000000000000000000000,bHidden=False,bNotConnectable=False,bDefaultValueIsReadOnly=False,bDefaultValueIsIgnored=False,bAdvancedView=False,bOrphanedPin=False,)
CustomProperties Pin (PinId=FBAC704C41732BA0574711B1FCA29206,PinName="then",Direction="EGPD_Output",PinType.PinCategory="exec",PinType.PinSubCategory="",PinType.PinSubCategoryObject=None,PinType.PinSubCategoryMemberReference=(),PinType.PinValueType=(),PinType.ContainerType=None,PinType.bIsMap=False,PinType.bIsSet=False,PinType.bIsArray=False,PinType.bIsReference=False,PinType.bIsConst=False,PinType.bIsWeakPointer=False,LinkedTo=(K2Node_CallFunction_1 65C430D34EC91388FB4328874913A070,),PersistentGuid=00000000000000000000000000000000,bHidden=False,bNotConnectable=False,bDefaultValueIsReadOnly=False,bDefaultValueIsIgnored=False,bAdvancedView=False,bOrphanedPin=False,)
End Object
Begin Object Class=/Script/BlueprintGraph.K2Node_CallFunction Name="K2Node_CallFunction_1"
FunctionReference=(MemberParent=Class'/Script/HeadMountedDisplay.HeadMountedDisplayFunctionLibrary',MemberName="SetTrackingOrigin")
NodePosX=176
NodePosY=208
NodeGuid=9A4CBAD3436F40EAADD15FB1E078F81F
CustomProperties Pin (PinId=65C430D34EC91388FB4328874913A070,PinName="execute",PinType.PinCategory="exec",PinType.PinSubCategory="",PinType.PinSubCategoryObject=None,PinType.PinSubCategoryMemberReference=(),PinType.PinValueType=(),PinType.ContainerType=None,PinType.bIsMap=False,PinType.bIsSet=False,PinType.bIsArray=False,PinType.bIsReference=False,PinType.bIsConst=False,PinType.bIsWeakPointer=False,LinkedTo=(K2Node_Event_3 FBAC704C41732BA0574711B1FCA29206,),PersistentGuid=00000000000000000000000000000000,bHidden=False,bNotConnectable=False,bDefaultValueIsReadOnly=False,bDefaultValueIsIgnored=False,bAdvancedView=False,bOrphanedPin=False,)
CustomProperties Pin (PinId=93BC380F44B0A11FE8A023977452EE2B,PinName="then",Direction="EGPD_Output",PinType.PinCategory="exec",PinType.PinSubCategory="",PinType.PinSubCategoryObject=None,PinType.PinSubCategoryMemberReference=(),PinType.PinValueType=(),PinType.ContainerType=None,PinType.bIsMap=False,PinType.bIsSet=False,PinType.bIsArray=False,PinType.bIsReference=False,PinType.bIsConst=False,PinType.bIsWeakPointer=False,LinkedTo=(K2Node_CallFunction_52 FE5D38794B000B7752514CAFCC5316E4,),PersistentGuid=00000000000000000000000000000000,bHidden=False,bNotConnectable=False,bDefaultValueIsReadOnly=False,bDefaultValueIsIgnored=False,bAdvancedView=False,bOrphanedPin=False,)
CustomProperties Pin (PinId=3CDA4D324563AA248BE6FD898AE21B08,PinName="self",PinFriendlyName=NSLOCTEXT("K2Node", "Target", "Target"),PinType.PinCategory="object",PinType.PinSubCategory="",PinType.PinSubCategoryObject=Class'/Script/HeadMountedDisplay.HeadMountedDisplayFunctionLibrary',PinType.PinSubCategoryMemberReference=(),PinType.PinValueType=(),PinType.ContainerType=None,PinType.bIsMap=False,PinType.bIsSet=False,PinType.bIsArray=False,PinType.bIsReference=False,PinType.bIsConst=False,PinType.bIsWeakPointer=False,DefaultObject="/Script/HeadMountedDisplay.Default__HeadMountedDisplayFunctionLibrary",PersistentGuid=00000000000000000000000000000000,bHidden=True,bNotConnectable=False,bDefaultValueIsReadOnly=False,bDefaultValueIsIgnored=False,bAdvancedView=False,bOrphanedPin=False,)
CustomProperties Pin (PinId=61713C8E4CF694BE266DD2BD7B1A2A53,PinName="Origin",PinType.PinCategory="byte",PinType.PinSubCategory="",PinType.PinSubCategoryObject=Enum'/Script/HeadMountedDisplay.EHMDTrackingOrigin',PinType.PinSubCategoryMemberReference=(),PinType.PinValueType=(),PinType.ContainerType=None,PinType.bIsMap=False,PinType.bIsSet=False,PinType.bIsArray=False,PinType.bIsReference=False,PinType.bIsConst=False,PinType.bIsWeakPointer=False,DefaultValue="Eye",PersistentGuid=00000000000000000000000000000000,bHidden=False,bNotConnectable=False,bDefaultValueIsReadOnly=False,bDefaultValueIsIgnored=False,bAdvancedView=False,bOrphanedPin=False,)
End Object
Begin Object Class=/Script/BlueprintGraph.K2Node_CallFunction Name="K2Node_CallFunction_52"
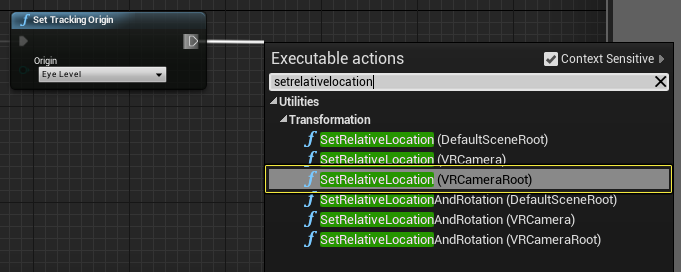
FunctionReference=(MemberParent=Class'/Script/Engine.SceneComponent',MemberName="K2_SetRelativeLocation")
NodePosX=528
NodePosY=192
NodeGuid=CBF27D16498498DCC1B698BBB05BBB64
CustomProperties Pin (PinId=FE5D38794B000B7752514CAFCC5316E4,PinName="execute",PinType.PinCategory="exec",PinType.PinSubCategory="",PinType.PinSubCategoryObject=None,PinType.PinSubCategoryMemberReference=(),PinType.PinValueType=(),PinType.ContainerType=None,PinType.bIsMap=False,PinType.bIsSet=False,PinType.bIsArray=False,PinType.bIsReference=False,PinType.bIsConst=False,PinType.bIsWeakPointer=False,LinkedTo=(K2Node_CallFunction_1 93BC380F44B0A11FE8A023977452EE2B,),PersistentGuid=00000000000000000000000000000000,bHidden=False,bNotConnectable=False,bDefaultValueIsReadOnly=False,bDefaultValueIsIgnored=False,bAdvancedView=False,bOrphanedPin=False,)
CustomProperties Pin (PinId=1C7A9A54494AE23B7164B7B8725F5D52,PinName="then",Direction="EGPD_Output",PinType.PinCategory="exec",PinType.PinSubCategory="",PinType.PinSubCategoryObject=None,PinType.PinSubCategoryMemberReference=(),PinType.PinValueType=(),PinType.ContainerType=None,PinType.bIsMap=False,PinType.bIsSet=False,PinType.bIsArray=False,PinType.bIsReference=False,PinType.bIsConst=False,PinType.bIsWeakPointer=False,PersistentGuid=00000000000000000000000000000000,bHidden=False,bNotConnectable=False,bDefaultValueIsReadOnly=False,bDefaultValueIsIgnored=False,bAdvancedView=False,bOrphanedPin=False,)
CustomProperties Pin (PinId=0811E84B4E91F1030D8FE3BAC770A247,PinName="self",PinFriendlyName=NSLOCTEXT("K2Node", "Target", "Target"),PinType.PinCategory="object",PinType.PinSubCategory="",PinType.PinSubCategoryObject=Class'/Script/Engine.SceneComponent',PinType.PinSubCategoryMemberReference=(),PinType.PinValueType=(),PinType.ContainerType=None,PinType.bIsMap=False,PinType.bIsSet=False,PinType.bIsArray=False,PinType.bIsReference=False,PinType.bIsConst=False,PinType.bIsWeakPointer=False,LinkedTo=(K2Node_VariableGet_23 14EFDA2C47FF2DF1F58E7A9BA401135E,),PersistentGuid=00000000000000000000000000000000,bHidden=False,bNotConnectable=False,bDefaultValueIsReadOnly=False,bDefaultValueIsIgnored=False,bAdvancedView=False,bOrphanedPin=False,)
CustomProperties Pin (PinId=C2D0A283497566CAFA793CB992D07158,PinName="NewLocation",PinType.PinCategory="struct",PinType.PinSubCategory="",PinType.PinSubCategoryObject=ScriptStruct'/Script/CoreUObject.Vector',PinType.PinSubCategoryMemberReference=(),PinType.PinValueType=(),PinType.ContainerType=None,PinType.bIsMap=False,PinType.bIsSet=False,PinType.bIsArray=False,PinType.bIsReference=False,PinType.bIsConst=False,PinType.bIsWeakPointer=False,DefaultValue="0, 0, 0",AutogeneratedDefaultValue="0, 0, 0",LinkedTo=(K2Node_VariableGet_24 7FE7B76D4888DB151FF54EAB9D25F826,),PersistentGuid=00000000000000000000000000000000,bHidden=False,bNotConnectable=False,bDefaultValueIsReadOnly=False,bDefaultValueIsIgnored=False,bAdvancedView=False,bOrphanedPin=False,)
CustomProperties Pin (PinId=3D1069744CC4C94F298F3980C2A0F289,PinName="bSweep",PinType.PinCategory="bool",PinType.PinSubCategory="",PinType.PinSubCategoryObject=None,PinType.PinSubCategoryMemberReference=(),PinType.PinValueType=(),PinType.ContainerType=None,PinType.bIsMap=False,PinType.bIsSet=False,PinType.bIsArray=False,PinType.bIsReference=False,PinType.bIsConst=False,PinType.bIsWeakPointer=False,DefaultValue="false",AutogeneratedDefaultValue="false",PersistentGuid=00000000000000000000000000000000,bHidden=False,bNotConnectable=False,bDefaultValueIsReadOnly=False,bDefaultValueIsIgnored=False,bAdvancedView=False,bOrphanedPin=False,)
CustomProperties Pin (PinId=63A901EA42073DA211529DBD9BDB4FF8,PinName="SweepHitResult",Direction="EGPD_Output",PinType.PinCategory="struct",PinType.PinSubCategory="",PinType.PinSubCategoryObject=ScriptStruct'/Script/Engine.HitResult',PinType.PinSubCategoryMemberReference=(),PinType.PinValueType=(),PinType.ContainerType=None,PinType.bIsMap=False,PinType.bIsSet=False,PinType.bIsArray=False,PinType.bIsReference=False,PinType.bIsConst=False,PinType.bIsWeakPointer=False,PersistentGuid=00000000000000000000000000000000,bHidden=False,bNotConnectable=False,bDefaultValueIsReadOnly=False,bDefaultValueIsIgnored=False,bAdvancedView=False,bOrphanedPin=False,)
CustomProperties Pin (PinId=03544D8C4FC9FC037BE82CB2780E14A1,PinName="bTeleport",PinType.PinCategory="bool",PinType.PinSubCategory="",PinType.PinSubCategoryObject=None,PinType.PinSubCategoryMemberReference=(),PinType.PinValueType=(),PinType.ContainerType=None,PinType.bIsMap=False,PinType.bIsSet=False,PinType.bIsArray=False,PinType.bIsReference=False,PinType.bIsConst=False,PinType.bIsWeakPointer=False,DefaultValue="false",AutogeneratedDefaultValue="false",PersistentGuid=00000000000000000000000000000000,bHidden=False,bNotConnectable=False,bDefaultValueIsReadOnly=False,bDefaultValueIsIgnored=False,bAdvancedView=False,bOrphanedPin=False,)
End Object
Begin Object Class=/Script/BlueprintGraph.K2Node_VariableGet Name="K2Node_VariableGet_23"
VariableReference=(MemberName="VRCameraRoot",bSelfContext=True)
NodePosX=272
NodePosY=352
NodeGuid=8372D50849CD3678B5FC15A6DEF7B8FF
CustomProperties Pin (PinId=14EFDA2C47FF2DF1F58E7A9BA401135E,PinName="VRCameraRoot",Direction="EGPD_Output",PinType.PinCategory="object",PinType.PinSubCategory="",PinType.PinSubCategoryObject=Class'/Script/Engine.SceneComponent',PinType.PinSubCategoryMemberReference=(),PinType.PinValueType=(),PinType.ContainerType=None,PinType.bIsMap=False,PinType.bIsSet=False,PinType.bIsArray=False,PinType.bIsReference=False,PinType.bIsConst=False,PinType.bIsWeakPointer=False,LinkedTo=(K2Node_CallFunction_52 0811E84B4E91F1030D8FE3BAC770A247,),PersistentGuid=00000000000000000000000000000000,bHidden=False,bNotConnectable=False,bDefaultValueIsReadOnly=False,bDefaultValueIsIgnored=False,bAdvancedView=False,bOrphanedPin=False,)
CustomProperties Pin (PinId=E2C335C44D268CDCA73404AA7E7D9ABD,PinName="self",PinFriendlyName=NSLOCTEXT("K2Node", "Target", "Target"),PinType.PinCategory="object",PinType.PinSubCategory="",PinType.PinSubCategoryObject=BlueprintGeneratedClass'/Game/Blueprints/GoogleVR_Pawn.GoogleVR_Pawn_C',PinType.PinSubCategoryMemberReference=(),PinType.PinValueType=(),PinType.ContainerType=None,PinType.bIsMap=False,PinType.bIsSet=False,PinType.bIsArray=False,PinType.bIsReference=False,PinType.bIsConst=False,PinType.bIsWeakPointer=False,PersistentGuid=00000000000000000000000000000000,bHidden=True,bNotConnectable=False,bDefaultValueIsReadOnly=False,bDefaultValueIsIgnored=False,bAdvancedView=False,bOrphanedPin=False,)
End Object
Begin Object Class=/Script/BlueprintGraph.K2Node_VariableGet Name="K2Node_VariableGet_24"
VariableReference=(MemberName="CameraHeight",MemberGuid=ACC6F49F42C088E811CC9BB892E6F87B,bSelfContext=True)
NodePosX=288
NodePosY=432
NodeGuid=BBF93606403186ED65F98F907C091CC5
CustomProperties Pin (PinId=7FE7B76D4888DB151FF54EAB9D25F826,PinName="CameraHeight",Direction="EGPD_Output",PinType.PinCategory="struct",PinType.PinSubCategory="",PinType.PinSubCategoryObject=ScriptStruct'/Script/CoreUObject.Vector',PinType.PinSubCategoryMemberReference=(),PinType.PinValueType=(),PinType.ContainerType=None,PinType.bIsMap=False,PinType.bIsSet=False,PinType.bIsArray=False,PinType.bIsReference=False,PinType.bIsConst=False,PinType.bIsWeakPointer=False,DefaultValue="0, 0, 0",AutogeneratedDefaultValue="0, 0, 0",LinkedTo=(K2Node_CallFunction_52 C2D0A283497566CAFA793CB992D07158,),PersistentGuid=00000000000000000000000000000000,bHidden=False,bNotConnectable=False,bDefaultValueIsReadOnly=False,bDefaultValueIsIgnored=False,bAdvancedView=False,bOrphanedPin=False,)
CustomProperties Pin (PinId=DA87D3494F0E12714F4126B699524EAA,PinName="self",PinFriendlyName=NSLOCTEXT("K2Node", "Target", "Target"),PinType.PinCategory="object",PinType.PinSubCategory="",PinType.PinSubCategoryObject=BlueprintGeneratedClass'/Game/Blueprints/GoogleVR_Pawn.GoogleVR_Pawn_C',PinType.PinSubCategoryMemberReference=(),PinType.PinValueType=(),PinType.ContainerType=None,PinType.bIsMap=False,PinType.bIsSet=False,PinType.bIsArray=False,PinType.bIsReference=False,PinType.bIsConst=False,PinType.bIsWeakPointer=False,PersistentGuid=00000000000000000000000000000000,bHidden=True,bNotConnectable=False,bDefaultValueIsReadOnly=False,bDefaultValueIsIgnored=False,bAdvancedView=False,bOrphanedPin=False,)
End Object
END OBJECT