BEGIN OBJECT
Begin Object Class=/Script/BlueprintGraph.K2Node_Event Name="K2Node_Event_3"
EventReference=(MemberParent=Class'/Script/Engine.Actor',MemberName="ReceiveBeginPlay")
bOverrideFunction=True
bCommentBubblePinned=True
NodeGuid=71F8712B42D30302CBA9CE84C38862B7
CustomProperties Pin (PinId=63E599D74E38B8776D6E88A4AAB2C2B3,PinName="OutputDelegate",Direction="EGPD_Output",PinType.PinCategory="delegate",PinType.PinSubCategory="",PinType.PinSubCategoryObject=None,PinType.PinSubCategoryMemberReference=(MemberParent=Class'/Script/Engine.Actor',MemberName="ReceiveBeginPlay"),PinType.PinValueType=(),PinType.ContainerType=None,PinType.bIsMap=False,PinType.bIsSet=False,PinType.bIsArray=False,PinType.bIsReference=False,PinType.bIsConst=False,PinType.bIsWeakPointer=False,PersistentGuid=00000000000000000000000000000000,bHidden=False,bNotConnectable=False,bDefaultValueIsReadOnly=False,bDefaultValueIsIgnored=False,bAdvancedView=False,bOrphanedPin=False,)
CustomProperties Pin (PinId=96D13FDB4718AC06F0F132AEEBA98395,PinName="then",Direction="EGPD_Output",PinType.PinCategory="exec",PinType.PinSubCategory="",PinType.PinSubCategoryObject=None,PinType.PinSubCategoryMemberReference=(),PinType.PinValueType=(),PinType.ContainerType=None,PinType.bIsMap=False,PinType.bIsSet=False,PinType.bIsArray=False,PinType.bIsReference=False,PinType.bIsConst=False,PinType.bIsWeakPointer=False,LinkedTo=(K2Node_CallFunction_1 0AF4F2C243DAA259B82A0AB55A91B640,),PersistentGuid=00000000000000000000000000000000,bHidden=False,bNotConnectable=False,bDefaultValueIsReadOnly=False,bDefaultValueIsIgnored=False,bAdvancedView=False,bOrphanedPin=False,)
End Object
Begin Object Class=/Script/BlueprintGraph.K2Node_CallFunction Name="K2Node_CallFunction_1"
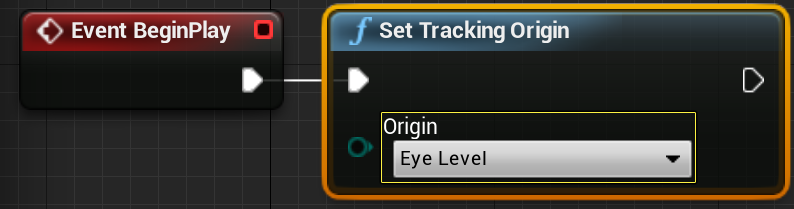
FunctionReference=(MemberParent=Class'/Script/HeadMountedDisplay.HeadMountedDisplayFunctionLibrary',MemberName="SetTrackingOrigin")
NodePosX=224
NodeGuid=401DF7CA48C88D2786ECB8B5C2AC8F46
CustomProperties Pin (PinId=0AF4F2C243DAA259B82A0AB55A91B640,PinName="execute",PinToolTip="\nExec",PinType.PinCategory="exec",PinType.PinSubCategory="",PinType.PinSubCategoryObject=None,PinType.PinSubCategoryMemberReference=(),PinType.PinValueType=(),PinType.ContainerType=None,PinType.bIsMap=False,PinType.bIsSet=False,PinType.bIsArray=False,PinType.bIsReference=False,PinType.bIsConst=False,PinType.bIsWeakPointer=False,LinkedTo=(K2Node_Event_3 96D13FDB4718AC06F0F132AEEBA98395,),PersistentGuid=00000000000000000000000000000000,bHidden=False,bNotConnectable=False,bDefaultValueIsReadOnly=False,bDefaultValueIsIgnored=False,bAdvancedView=False,bOrphanedPin=False,)
CustomProperties Pin (PinId=E9F9736F435EF94B7A4B16A0C9347FFB,PinName="then",PinToolTip="\nExec",Direction="EGPD_Output",PinType.PinCategory="exec",PinType.PinSubCategory="",PinType.PinSubCategoryObject=None,PinType.PinSubCategoryMemberReference=(),PinType.PinValueType=(),PinType.ContainerType=None,PinType.bIsMap=False,PinType.bIsSet=False,PinType.bIsArray=False,PinType.bIsReference=False,PinType.bIsConst=False,PinType.bIsWeakPointer=False,LinkedTo=(K2Node_CallFunction_5 DE9FB716426D0575C24DBD90B0B7F9B0,),PersistentGuid=00000000000000000000000000000000,bHidden=False,bNotConnectable=False,bDefaultValueIsReadOnly=False,bDefaultValueIsIgnored=False,bAdvancedView=False,bOrphanedPin=False,)
CustomProperties Pin (PinId=E21CFDB440B456D7A54A2B991677B221,PinName="self",PinFriendlyName=NSLOCTEXT("K2Node", "Target", "Target"),PinToolTip="Target\nHead Mounted Display Function Library Object Reference",PinType.PinCategory="object",PinType.PinSubCategory="",PinType.PinSubCategoryObject=Class'/Script/HeadMountedDisplay.HeadMountedDisplayFunctionLibrary',PinType.PinSubCategoryMemberReference=(),PinType.PinValueType=(),PinType.ContainerType=None,PinType.bIsMap=False,PinType.bIsSet=False,PinType.bIsArray=False,PinType.bIsReference=False,PinType.bIsConst=False,PinType.bIsWeakPointer=False,DefaultObject="/Script/HeadMountedDisplay.Default__HeadMountedDisplayFunctionLibrary",PersistentGuid=00000000000000000000000000000000,bHidden=True,bNotConnectable=False,bDefaultValueIsReadOnly=False,bDefaultValueIsIgnored=False,bAdvancedView=False,bOrphanedPin=False,)
CustomProperties Pin (PinId=D3A2C5724D17455C5C1DCBAA7E724282,PinName="Origin",PinToolTip="Origin\nEHMDTrackingOrigin Enum",PinType.PinCategory="byte",PinType.PinSubCategory="",PinType.PinSubCategoryObject=Enum'/Script/HeadMountedDisplay.EHMDTrackingOrigin',PinType.PinSubCategoryMemberReference=(),PinType.PinValueType=(),PinType.ContainerType=None,PinType.bIsMap=False,PinType.bIsSet=False,PinType.bIsArray=False,PinType.bIsReference=False,PinType.bIsConst=False,PinType.bIsWeakPointer=False,DefaultValue="Eye",PersistentGuid=00000000000000000000000000000000,bHidden=False,bNotConnectable=False,bDefaultValueIsReadOnly=False,bDefaultValueIsIgnored=False,bAdvancedView=False,bOrphanedPin=False,)
End Object
Begin Object Class=/Script/BlueprintGraph.K2Node_VariableGet Name="K2Node_VariableGet_0"
VariableReference=(MemberName="VRCameraRoot",bSelfContext=True)
NodePosX=720
NodePosY=48
NodeGuid=DE98398C46FA741DD0ECCFA88342B5DC
CustomProperties Pin (PinId=D3E17C4549E0A126BF8A2D97653C64D5,PinName="VRCameraRoot",Direction="EGPD_Output",PinType.PinCategory="object",PinType.PinSubCategory="",PinType.PinSubCategoryObject=Class'/Script/Engine.SceneComponent',PinType.PinSubCategoryMemberReference=(),PinType.PinValueType=(),PinType.ContainerType=None,PinType.bIsMap=False,PinType.bIsSet=False,PinType.bIsArray=False,PinType.bIsReference=False,PinType.bIsConst=False,PinType.bIsWeakPointer=False,LinkedTo=(K2Node_CallFunction_5 560BA9474CC7FF8D01863CB899932E82,),PersistentGuid=00000000000000000000000000000000,bHidden=False,bNotConnectable=False,bDefaultValueIsReadOnly=False,bDefaultValueIsIgnored=False,bAdvancedView=False,bOrphanedPin=False,)
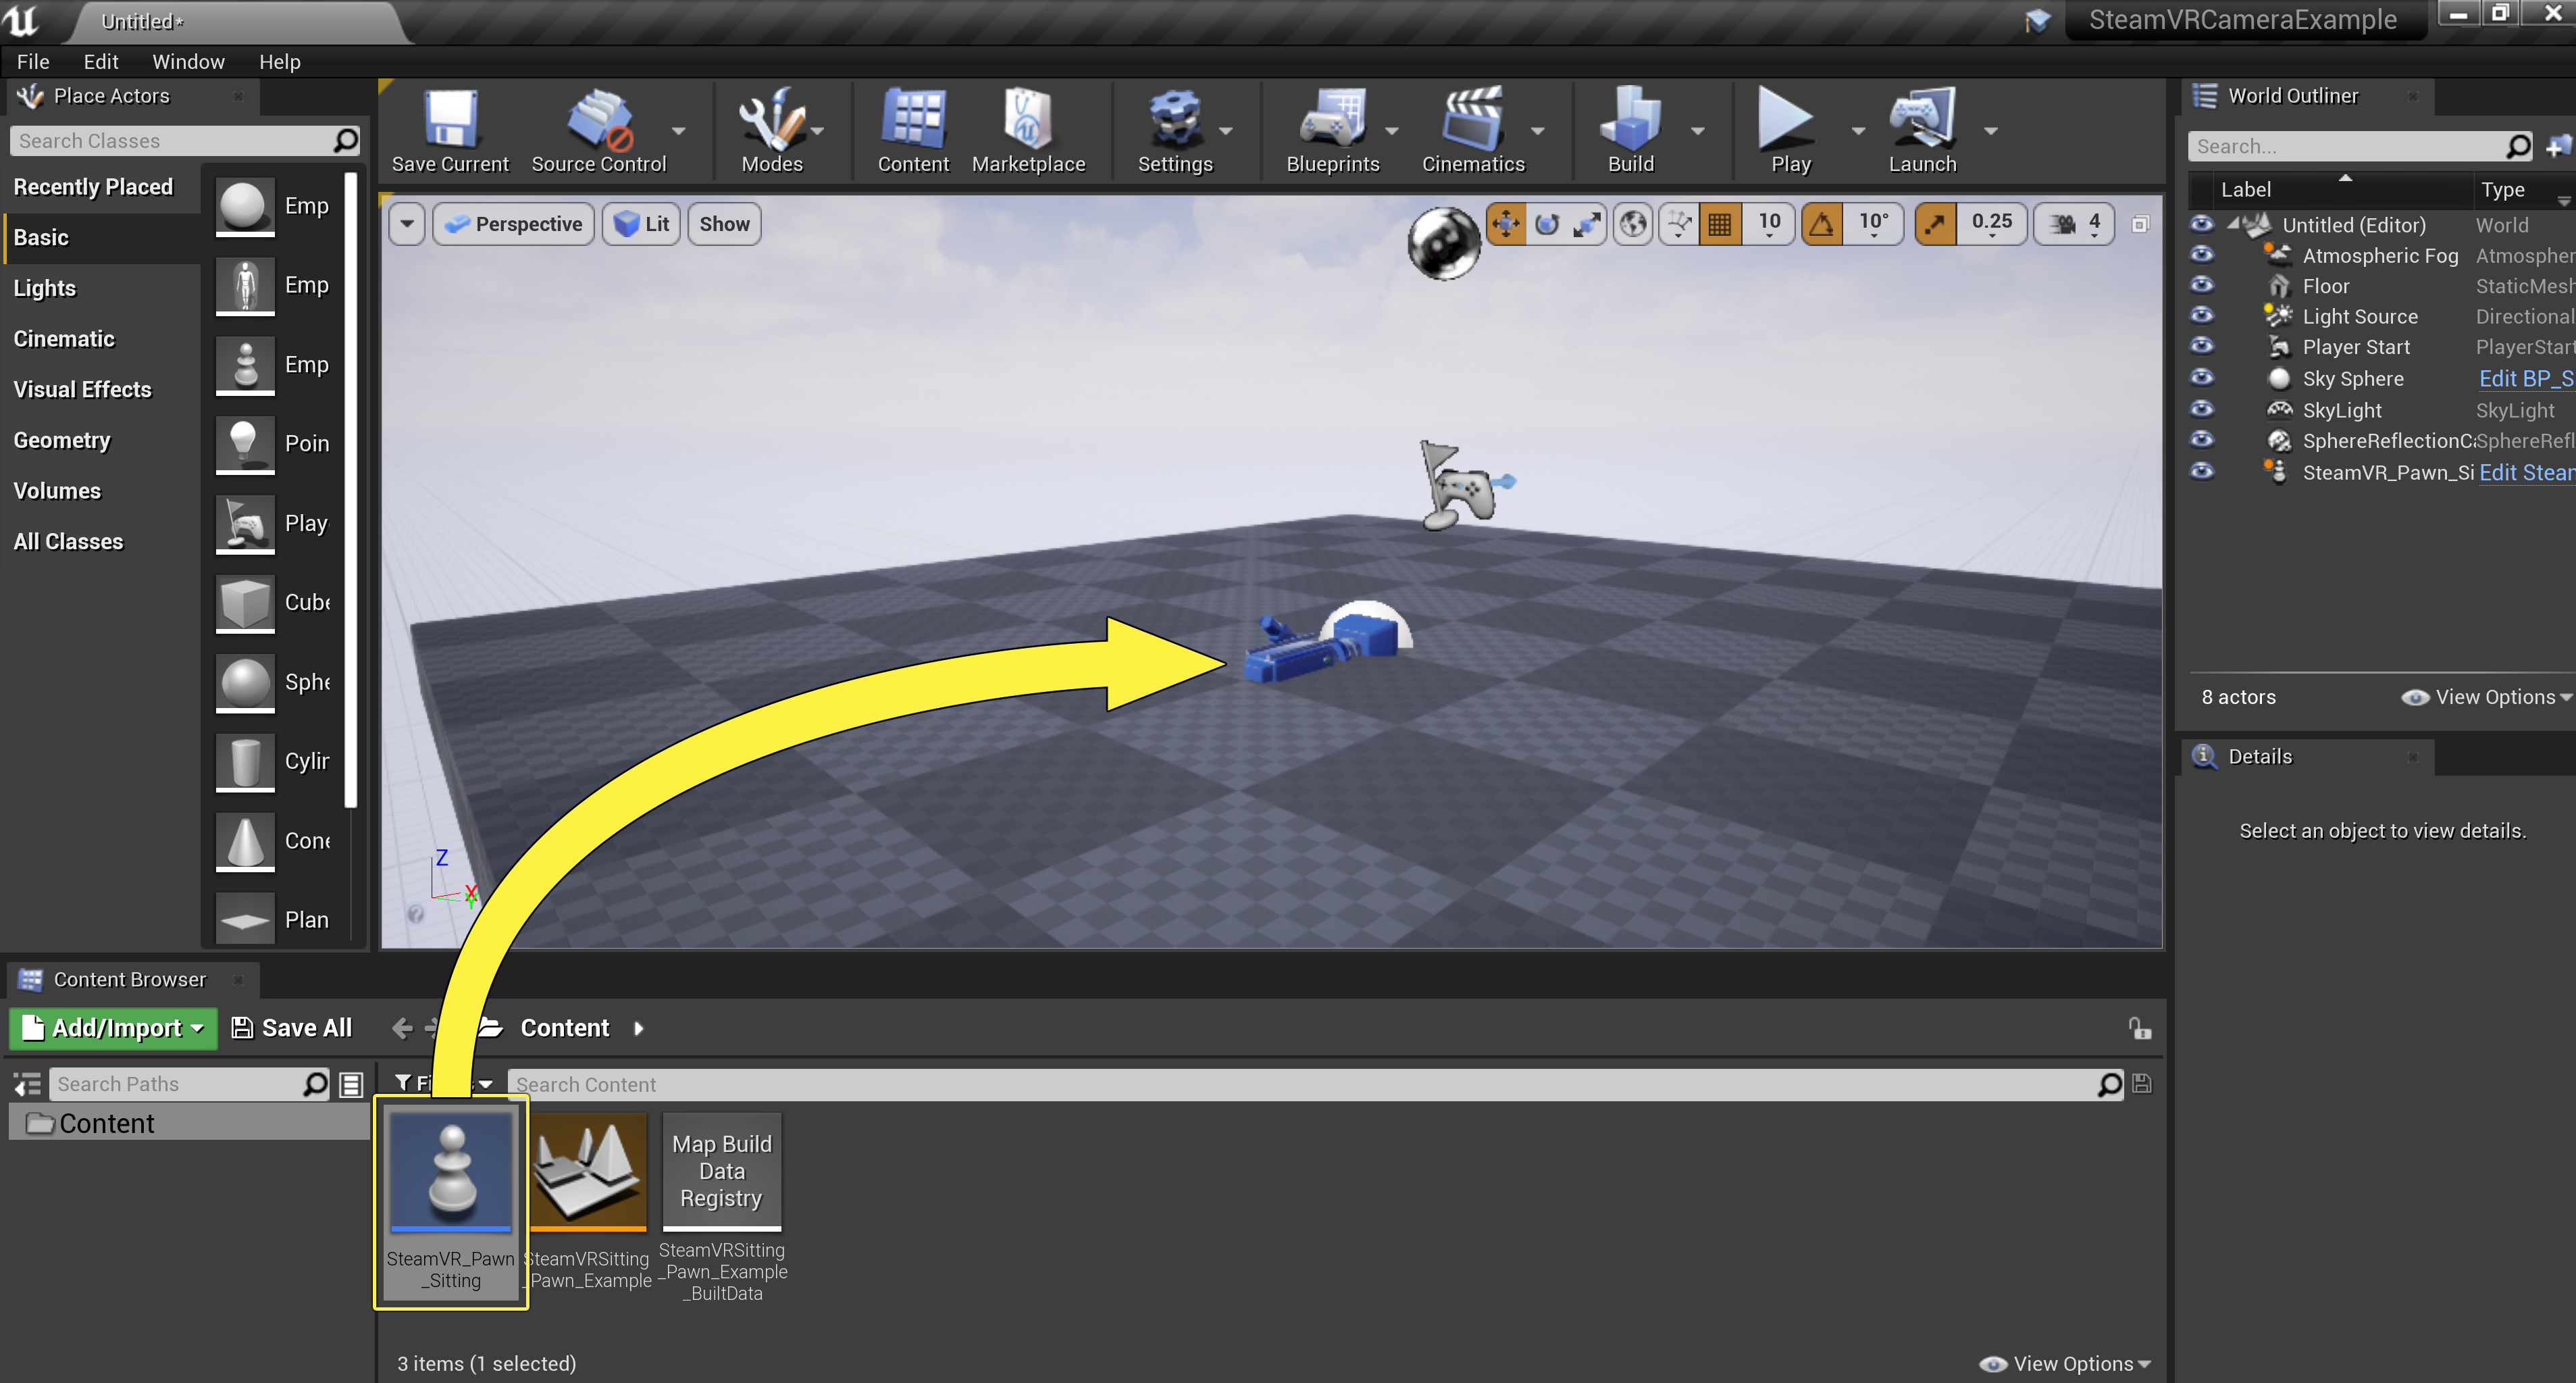
CustomProperties Pin (PinId=8B50EC6646D9AB54EDFBCAAA7B690B9B,PinName="self",PinFriendlyName=NSLOCTEXT("K2Node", "Target", "Target"),PinType.PinCategory="object",PinType.PinSubCategory="",PinType.PinSubCategoryObject=BlueprintGeneratedClass'/Game/SteamVR_Pawn_Sitting.SteamVR_Pawn_Sitting_C',PinType.PinSubCategoryMemberReference=(),PinType.PinValueType=(),PinType.ContainerType=None,PinType.bIsMap=False,PinType.bIsSet=False,PinType.bIsArray=False,PinType.bIsReference=False,PinType.bIsConst=False,PinType.bIsWeakPointer=False,PersistentGuid=00000000000000000000000000000000,bHidden=True,bNotConnectable=False,bDefaultValueIsReadOnly=False,bDefaultValueIsIgnored=False,bAdvancedView=False,bOrphanedPin=False,)
End Object
Begin Object Class=/Script/BlueprintGraph.K2Node_CallFunction Name="K2Node_CallFunction_5"
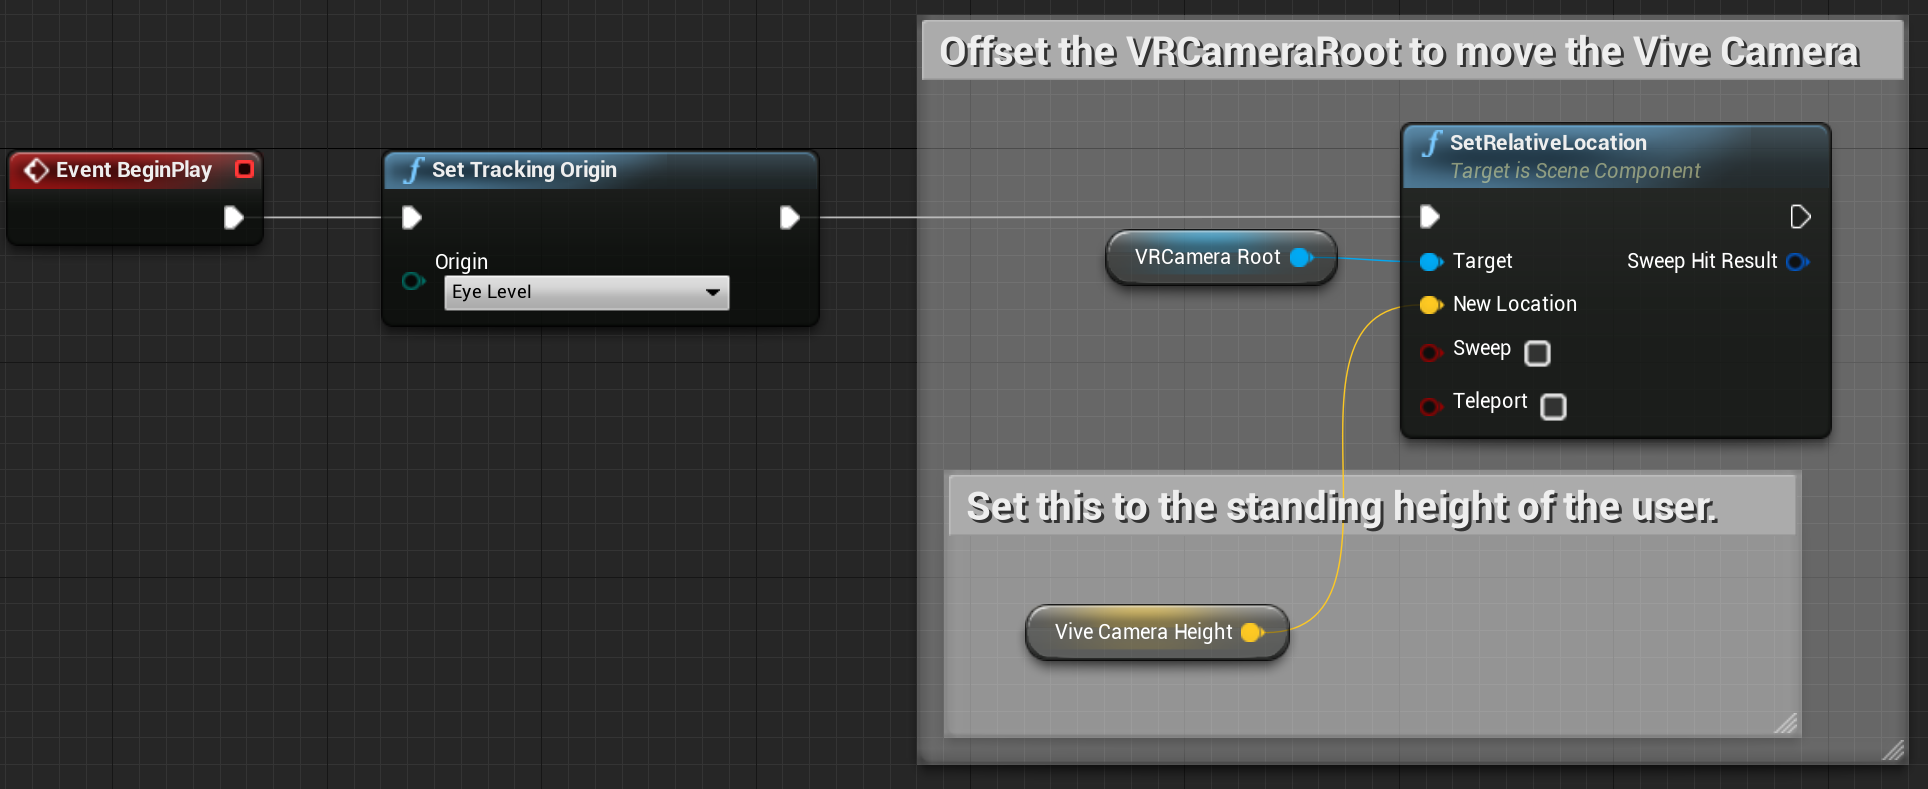
FunctionReference=(MemberParent=Class'/Script/Engine.SceneComponent',MemberName="K2_SetRelativeLocation")
NodePosX=896
NodePosY=-16
NodeGuid=9C212BB84E9A16ED4D937A898C2B6367
CustomProperties Pin (PinId=DE9FB716426D0575C24DBD90B0B7F9B0,PinName="execute",PinToolTip="\nExec",PinType.PinCategory="exec",PinType.PinSubCategory="",PinType.PinSubCategoryObject=None,PinType.PinSubCategoryMemberReference=(),PinType.PinValueType=(),PinType.ContainerType=None,PinType.bIsMap=False,PinType.bIsSet=False,PinType.bIsArray=False,PinType.bIsReference=False,PinType.bIsConst=False,PinType.bIsWeakPointer=False,LinkedTo=(K2Node_CallFunction_1 E9F9736F435EF94B7A4B16A0C9347FFB,),PersistentGuid=00000000000000000000000000000000,bHidden=False,bNotConnectable=False,bDefaultValueIsReadOnly=False,bDefaultValueIsIgnored=False,bAdvancedView=False,bOrphanedPin=False,)
CustomProperties Pin (PinId=E5FB25D74A81ACC9C7E06593A4BC6E98,PinName="then",PinToolTip="\nExec",Direction="EGPD_Output",PinType.PinCategory="exec",PinType.PinSubCategory="",PinType.PinSubCategoryObject=None,PinType.PinSubCategoryMemberReference=(),PinType.PinValueType=(),PinType.ContainerType=None,PinType.bIsMap=False,PinType.bIsSet=False,PinType.bIsArray=False,PinType.bIsReference=False,PinType.bIsConst=False,PinType.bIsWeakPointer=False,PersistentGuid=00000000000000000000000000000000,bHidden=False,bNotConnectable=False,bDefaultValueIsReadOnly=False,bDefaultValueIsIgnored=False,bAdvancedView=False,bOrphanedPin=False,)
CustomProperties Pin (PinId=560BA9474CC7FF8D01863CB899932E82,PinName="self",PinFriendlyName=NSLOCTEXT("K2Node", "Target", "Target"),PinToolTip="Target\nScene Component Object Reference",PinType.PinCategory="object",PinType.PinSubCategory="",PinType.PinSubCategoryObject=Class'/Script/Engine.SceneComponent',PinType.PinSubCategoryMemberReference=(),PinType.PinValueType=(),PinType.ContainerType=None,PinType.bIsMap=False,PinType.bIsSet=False,PinType.bIsArray=False,PinType.bIsReference=False,PinType.bIsConst=False,PinType.bIsWeakPointer=False,LinkedTo=(K2Node_VariableGet_0 D3E17C4549E0A126BF8A2D97653C64D5,),PersistentGuid=00000000000000000000000000000000,bHidden=False,bNotConnectable=False,bDefaultValueIsReadOnly=False,bDefaultValueIsIgnored=False,bAdvancedView=False,bOrphanedPin=False,)
CustomProperties Pin (PinId=4751BC714842E8CEC1B7A294186125C2,PinName="NewLocation",PinToolTip="New Location\nVector \n\nNew location of the component relative to its parent.",PinType.PinCategory="struct",PinType.PinSubCategory="",PinType.PinSubCategoryObject=ScriptStruct'/Script/CoreUObject.Vector',PinType.PinSubCategoryMemberReference=(),PinType.PinValueType=(),PinType.ContainerType=None,PinType.bIsMap=False,PinType.bIsSet=False,PinType.bIsArray=False,PinType.bIsReference=False,PinType.bIsConst=False,PinType.bIsWeakPointer=False,DefaultValue="0, 0, 0",AutogeneratedDefaultValue="0, 0, 0",LinkedTo=(K2Node_VariableGet_47 78E971AE41B9BC4AA335A6BCC9E5AE69,),PersistentGuid=00000000000000000000000000000000,bHidden=False,bNotConnectable=False,bDefaultValueIsReadOnly=False,bDefaultValueIsIgnored=False,bAdvancedView=False,bOrphanedPin=False,)
CustomProperties Pin (PinId=42E17DA8407F1D6AE61E5AB8CE56D509,PinName="bSweep",PinToolTip="Sweep\nBoolean\n\nWhether we sweep to the destination location, triggering overlaps along the way and stopping short of the target if blocked by something. Only the root component is swept and checked for blocking collision, child components move without sweeping. If collision is off, this has no effect.",PinType.PinCategory="bool",PinType.PinSubCategory="",PinType.PinSubCategoryObject=None,PinType.PinSubCategoryMemberReference=(),PinType.PinValueType=(),PinType.ContainerType=None,PinType.bIsMap=False,PinType.bIsSet=False,PinType.bIsArray=False,PinType.bIsReference=False,PinType.bIsConst=False,PinType.bIsWeakPointer=False,DefaultValue="false",AutogeneratedDefaultValue="false",PersistentGuid=00000000000000000000000000000000,bHidden=False,bNotConnectable=False,bDefaultValueIsReadOnly=False,bDefaultValueIsIgnored=False,bAdvancedView=False,bOrphanedPin=False,)
CustomProperties Pin (PinId=C758BE724ED2C35AF55937B09A2B53F4,PinName="SweepHitResult",PinToolTip="Sweep Hit Result\nHit Result Structure\n\nHit result from any impact if sweep is true.",Direction="EGPD_Output",PinType.PinCategory="struct",PinType.PinSubCategory="",PinType.PinSubCategoryObject=ScriptStruct'/Script/Engine.HitResult',PinType.PinSubCategoryMemberReference=(),PinType.PinValueType=(),PinType.ContainerType=None,PinType.bIsMap=False,PinType.bIsSet=False,PinType.bIsArray=False,PinType.bIsReference=False,PinType.bIsConst=False,PinType.bIsWeakPointer=False,PersistentGuid=00000000000000000000000000000000,bHidden=False,bNotConnectable=False,bDefaultValueIsReadOnly=False,bDefaultValueIsIgnored=False,bAdvancedView=False,bOrphanedPin=False,)
CustomProperties Pin (PinId=C8D4DFF74546FCDE47077A8F575C2D36,PinName="bTeleport",PinToolTip="Teleport\nBoolean\n\nWhether we teleport the physics state (if physics collision is enabled for this object). If true, physics velocity for this object is unchanged (so ragdoll parts are not affected by change in location). If false, physics velocity is updated based on the change in position (affecting ragdoll parts). If CCD is on and not teleporting, this will affect objects along the entire sweep volume.",PinType.PinCategory="bool",PinType.PinSubCategory="",PinType.PinSubCategoryObject=None,PinType.PinSubCategoryMemberReference=(),PinType.PinValueType=(),PinType.ContainerType=None,PinType.bIsMap=False,PinType.bIsSet=False,PinType.bIsArray=False,PinType.bIsReference=False,PinType.bIsConst=False,PinType.bIsWeakPointer=False,DefaultValue="false",AutogeneratedDefaultValue="false",PersistentGuid=00000000000000000000000000000000,bHidden=False,bNotConnectable=False,bDefaultValueIsReadOnly=False,bDefaultValueIsIgnored=False,bAdvancedView=False,bOrphanedPin=False,)
End Object
Begin Object Class=/Script/BlueprintGraph.K2Node_VariableGet Name="K2Node_VariableGet_47"
VariableReference=(MemberName="ViveCameraHeight",MemberGuid=534B2E2F41DF6BFC3DD3ABA221017A9B,bSelfContext=True)
NodePosX=672
NodePosY=272
NodeGuid=EECF89E94031777604797C9F4E162A93
CustomProperties Pin (PinId=78E971AE41B9BC4AA335A6BCC9E5AE69,PinName="ViveCameraHeight",Direction="EGPD_Output",PinType.PinCategory="struct",PinType.PinSubCategory="",PinType.PinSubCategoryObject=ScriptStruct'/Script/CoreUObject.Vector',PinType.PinSubCategoryMemberReference=(),PinType.PinValueType=(),PinType.ContainerType=None,PinType.bIsMap=False,PinType.bIsSet=False,PinType.bIsArray=False,PinType.bIsReference=False,PinType.bIsConst=False,PinType.bIsWeakPointer=False,DefaultValue="0, 0, 0",AutogeneratedDefaultValue="0, 0, 0",LinkedTo=(K2Node_CallFunction_5 4751BC714842E8CEC1B7A294186125C2,),PersistentGuid=00000000000000000000000000000000,bHidden=False,bNotConnectable=False,bDefaultValueIsReadOnly=False,bDefaultValueIsIgnored=False,bAdvancedView=False,bOrphanedPin=False,)
CustomProperties Pin (PinId=9489DF2447B3B0AFE5ED5086A7A47CB8,PinName="self",PinFriendlyName=NSLOCTEXT("K2Node", "Target", "Target"),PinType.PinCategory="object",PinType.PinSubCategory="",PinType.PinSubCategoryObject=BlueprintGeneratedClass'/Game/SteamVR_Pawn_Sitting.SteamVR_Pawn_Sitting_C',PinType.PinSubCategoryMemberReference=(),PinType.PinValueType=(),PinType.ContainerType=None,PinType.bIsMap=False,PinType.bIsSet=False,PinType.bIsArray=False,PinType.bIsReference=False,PinType.bIsConst=False,PinType.bIsWeakPointer=False,PersistentGuid=00000000000000000000000000000000,bHidden=True,bNotConnectable=False,bDefaultValueIsReadOnly=False,bDefaultValueIsIgnored=False,bAdvancedView=False,bOrphanedPin=False,)
End Object
Begin Object Class=/Script/UnrealEd.EdGraphNode_Comment Name="EdGraphNode_Comment_2"
CommentDepth=-2
NodePosX=608
NodePosY=-80
NodeWidth=592
NodeHeight=448
NodeComment="Offset the VRCameraRoot to move the Vive Camera"
NodeGuid=3C39203E41D17487AD060C9123DA366B
End Object
Begin Object Class=/Script/UnrealEd.EdGraphNode_Comment Name="EdGraphNode_Comment_3"
NodePosX=624
NodePosY=192
NodeWidth=512
NodeHeight=160
NodeComment="Set this to the standing height of the user."
NodeGuid=C4F04D894FB9E577FF5AF7A8DB3E8FC3
End Object
END OBJECT