Choose your operating system:
Windows
macOS
Linux
In order to understand and use the content on this page, make sure you are familiar with the following topics:

This quick start guide shows you how to add assets to your Unreal Engine (UE4) games. By the end of this guide, you'll know how to use the Project Browser to create new projects and navigate the Content Browser to find and add content. You'll also know where to find information on the FBX Content Pipeline while learning how to use the Material Editor to modify Materials before applying them to a Static Mesh Actor .
Save often, save early!
1. Required Project Setup
-
Open Unreal Engine from the Launcher. The Project Browser appears.
-
Create a new Project using the Games > Blank template using the following settings:
-
C++ enabled
-
With Starter Content enabled
-
-
We'll need to enter a project name, so we'll use Artist_QuickStart .
-
We can now click Create Project and get started.
The Unreal Editor will now open our new project. Visual Studio will also open and load the solution file that our project has created.
2. Creating Folders
It's always good practice to keep your project's content organized. The first thing you're going to learn is how to create a folder that will store your imported content.
Before you get started: Download Quick Start Assets from the following link.
-
Extract the downloaded assets to a location on your computer.
![ExtractedContent.png]()
![ExtractedContent_Mac.png]()
-
From the Content Browser inside the Editor, click the Add New button.
![AddNewButton.png]()
-
Select New Folder to create a new folder in '/Game' .
![NewFolderSelection.png]()
-
Name the folder 'QuickStartContent' .
![NameQuickStartContentFolder.png]()
-
Double-click the 'QuickStartContent' folder.


Naming conventions matter! Be consistent when naming folders and files.
3. Importing Meshes
There are a few ways to add content to your UE4 project; however, we'll focus on the Content Browser's Import functionality.
-
Now that you're inside the 'QuickStartContent' folder, click the Content Browser's Import button to open a file dialog box.
![ContentBrowserImportButton.png]()
-
Locate and select the Basic_Asset1 and Basic_Asset2 FBX mesh files.
![ImportMeshDialogBox.png]()
![ImportMeshDialogBox_Mac.png]()
-
Click Open to begin importing the FBX mesh files to your project.
-
Inside the editor, the FBX Import Options dialog box appears. Clicking Import or Import All adds your meshes to the Project.
![FBXImportOptionsDialogBox.png]()
-
Click the Save All button to save your imported meshes.
![SaveAllMeshesButton.png]()
-
A Save Content dialog box appears. Click Save Selected to save your imported assets.
![SaveSelectedDialogBox.png]()
-
Navigating to the 'QuickStartContent' folder, verify that UE4 created the corresponding .uasset files .
![QuickStartContentFolder.png]()
![QuickStartContentFolder_Mac.png]()


Organize your assets so that you can easily find them.
4. Importing Textures
-
Navigating to the 'QuickStartContent' folder in the Editor, click the Content Browser's Import button to open a file dialog box.
![ContentBrowserImportButton.png]()
-
Locate and select the T_Rock_04_D and T_Rock_04_n Targa (TGA) image files.
![ImportTextureDialogBox.png]()
![ImportTextureDialogBox_Mac.png]()
-
Click Open to begin importing the TGA image files to your project.
-
A confirmation box appears in the lower right corner of the Unreal Editor.
![TextureNormalConfirmation.png]()
-
Click OK to accept the T_Rock_04_n.TGA normal map's settings.
-
Click the Save All button to save your imported images.
![SaveAllTextures.png]()
-
A Save Content dialog box appears.
-
Click Save Selected to save your imported assets.
-
Navigating to the 'QuickStartContent' folder, verify that UE4 created the corresponding .uasset files .
![QuickStartContentFolder2.png]()
![QuickStartContentFolder2_Mac.png]()


The Marketplace (accessible from the Epic Launcher ) is a great place to find and share content.
5. Preparing Meshes for Import
If you have your own meshes to import, this section is for you.
The UE4 FBX import pipeline uses FBX 2018 . Using a different version during export may result in incompatibilities.
Choose Your 3D Art Tool
Autodesk 3ds Max
-
Select the mesh(es) to be exported in the viewport.
![maya_export_1.png]()
-
In the File menu, choose Export Selection (or Export All if you want to export everything in the scene regardless of selection).
![maya_export_2.png]()
-
In the Export dialog box:
-
Choose the Content folder inside your UE4 Project (1)
-
Enter a name for the file and set it to FBX Export (2)
-
Set your Export Options (3)
-
Click Export All (4)
![maya_export_3.png]()
The settings in the Geometry category above are the most basic requirements for exporting Static Meshes to Unreal Engine 4.
You can use the default options for importing. Refer to FBX Import Options Reference for more information on each option.
-
-
Your asset has now been imported and you can drag-and-drop it from the Content Browser into your level.
![max_export_7.png]()
In the example above (as part of our Import Options), we imported Materials and Textures .


-
Select the mesh(es) to be exported in the viewport.
![max_export_1.png]()
-
In the File menu, choose Export Selected (or Export if you want to export everything in the scene regardless of selection).
![max_export_2.png]()
-
Choose the Content folder inside your UE4 Project (1) and a name for the FBX file (2) then click the
![max_save_button.jpg]()
![max_export_3.png]()
-
Set your options in the FBX Export dialog, then click the
![max_ok_button.jpg]()
![max_export_4.png]()
The settings in the Geometry category above are the most basic requirements for exporting Static Meshes to Unreal Engine 4.
-
You can leave the default options for importing. Refer to FBX Import Options Reference for more information on each option.
-
Your asset has now been imported and you can drag-and-drop it from the Content Browser into your level.
![max_export_7.png]()
In the example above (as part of our Import Options), we imported Materials and Textures .


Well done! You've learned how to prepare meshes for import into UE4.
✓ Click here if you want to learn more about the FBX content pipeline. .
Clean modeling improves a game's performance.
6. Creating Materials
Materials
are assets applied to meshes, contributing to a scene's visual aesthetic.
There are a few ways to create and edit materials for your UE4 project; however, we'll focus on using the
Material Editor
.
-
Navigating to your Content Browser , click Add New and select Material .
![newCreateMaterial.png]()
-
Name your material 'Rock' .
![materialNaming.png]()
-
Your 'Rock' Material is now ready to be used.
![NewRockMaterial.png]()
-
Double-clicking the 'Rock' Material will open the Material Editor .
![MaterialEditor.png]()
Read our Material - How-to documentation if you want to learn more about working with material nodes.


Size your textures using powers of two.
7. Editing Materials
At this point, you should have created a new material and opened the Material Editor .
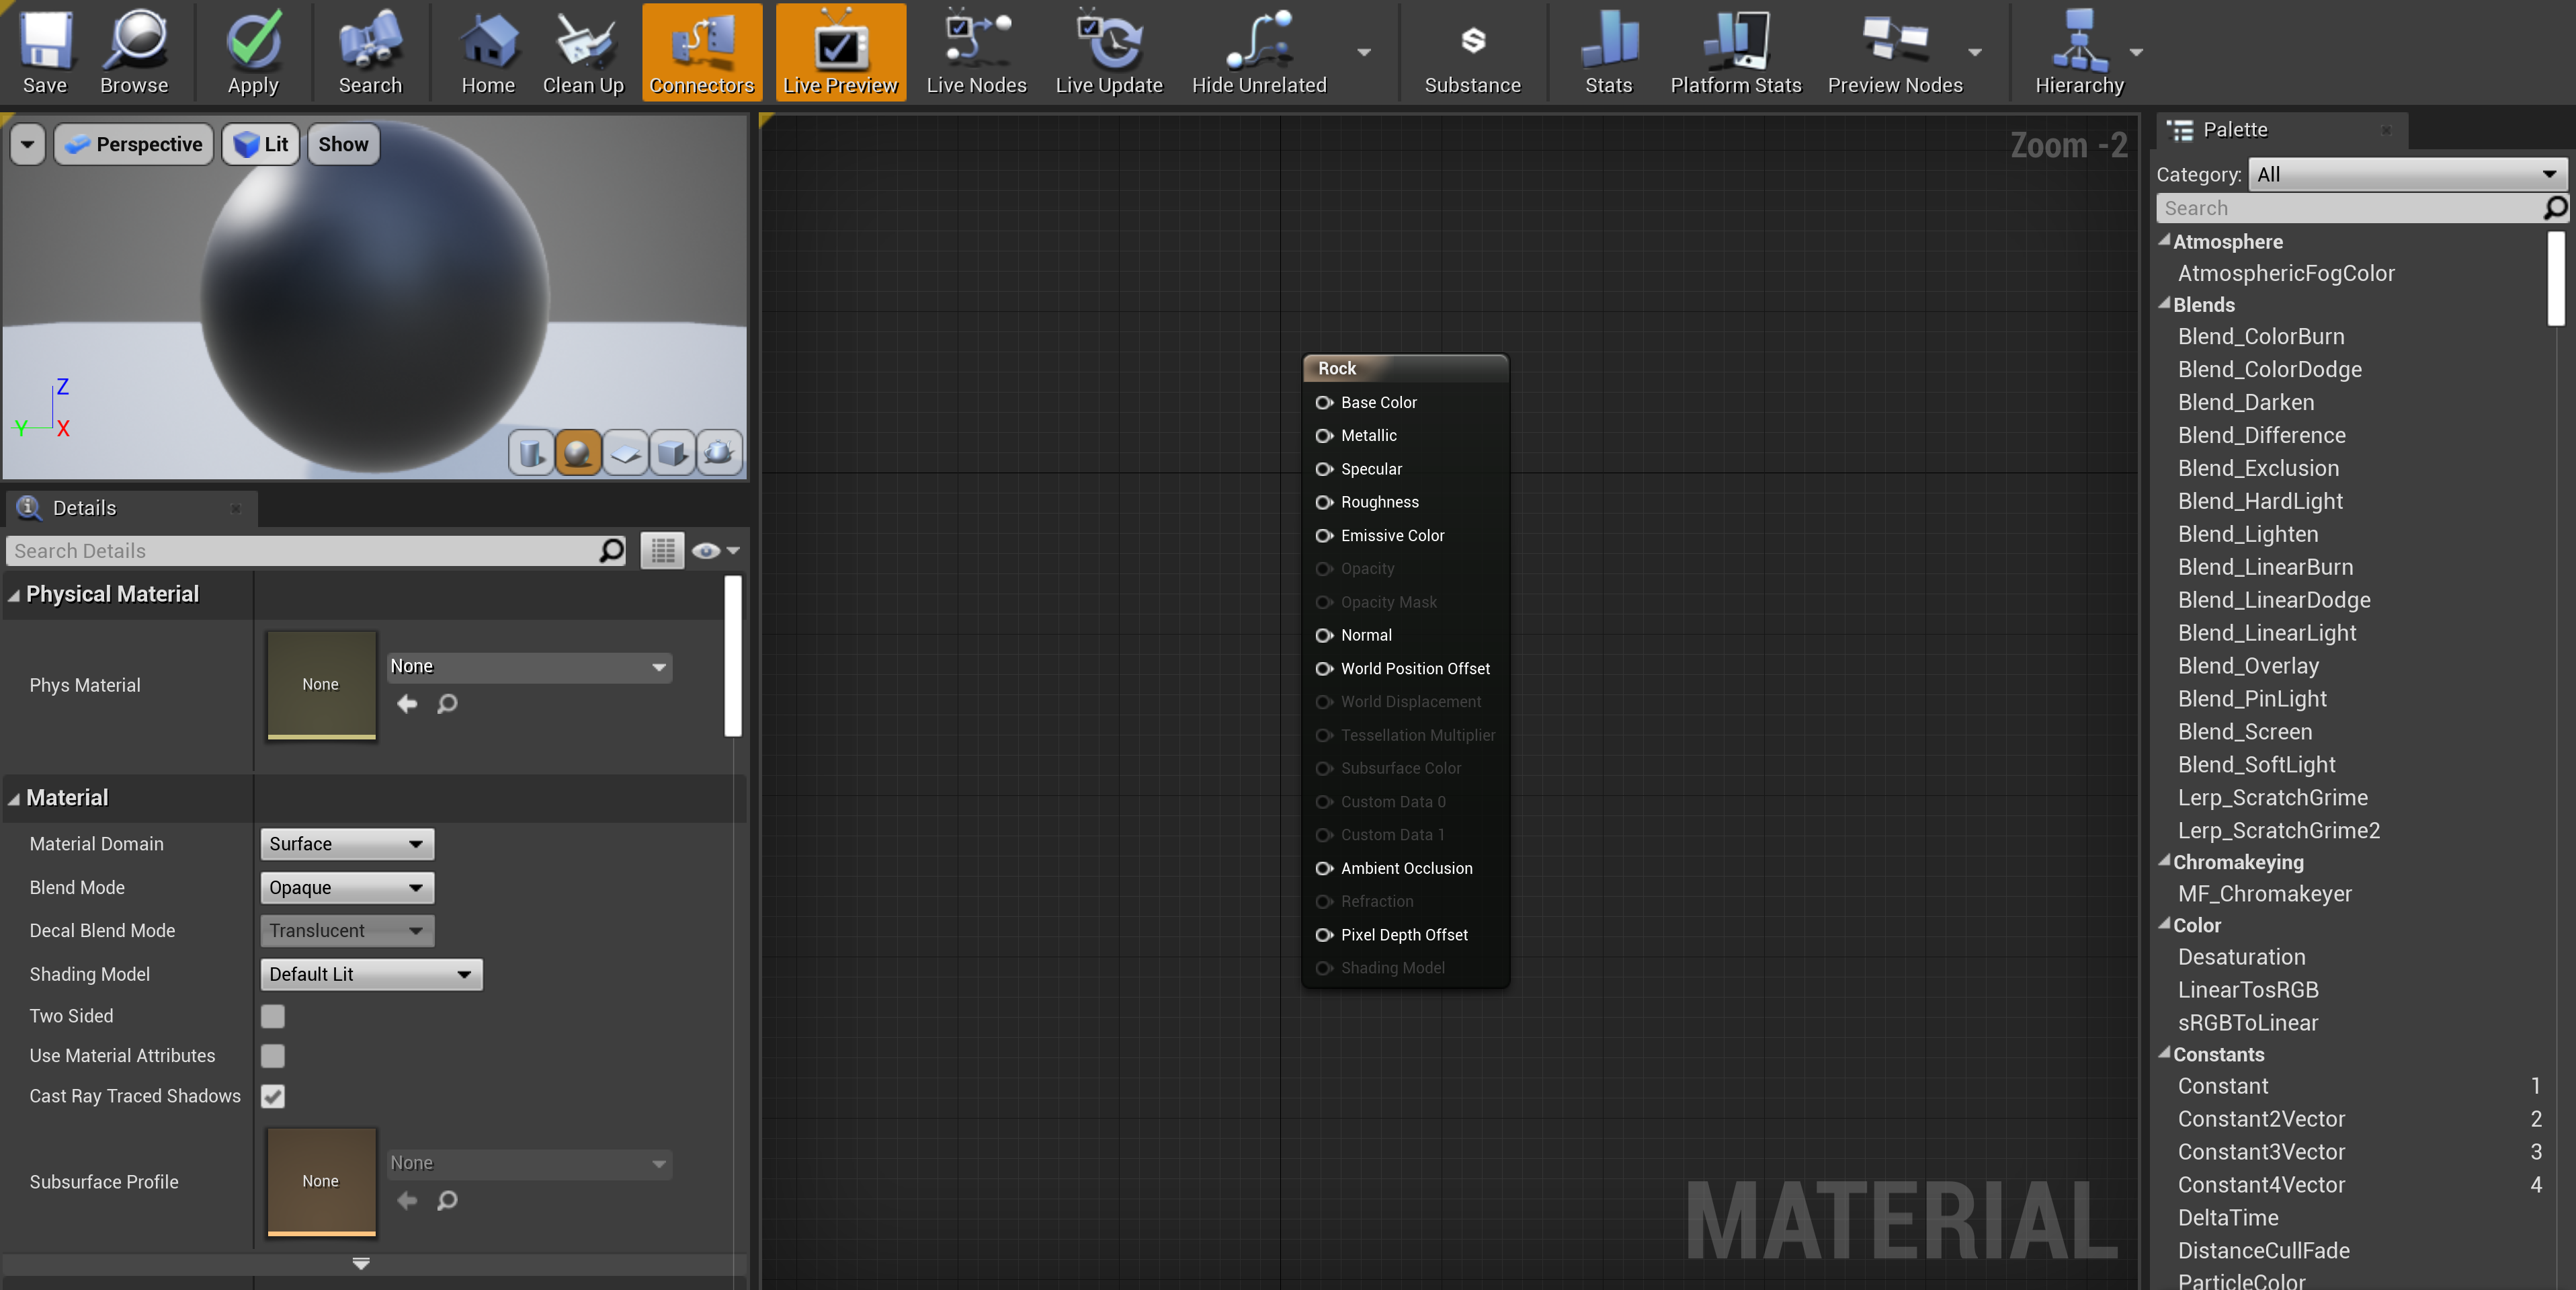
You can define a material's color, shininess, transparency, and much more in the Material Editor . You're now ready to edit the 'Rock' Material you created.
-
Select the Main Material Node in the center of the Material Graph . The Material Editor will highlight the node for you when you select it.
![newMainNode.png]()
It is the only node in the graph (named after your material).
-
Inside the Details panel, change the Shading Model from Default Lit to Subsurface .
![selectSubsurface.png]()
-
The Subsurface Shading Model enables two more pins in the Main Material Node : Opacity and Subsurface Color .
![newMorePins.png]()
-
Get your textures into the Graph. Hold the ' T ' key and left-click inside the Editor's Graph area. A Texture Sample Node should appear inside the graph.
![TextureSample.png]()
-
You'll want at least 2 textures. Repeat Step 4 until your graph looks like the image below.
![newTextureSampleNodes.png]()
-
Select one of the Texture Sample Nodes and locate the Details Panel under the Material Expression Texture Base category.
![matExpressionTextureBase.png]()
Under the texture property, left-click the pull down menu labeled 'None' and select the color texture named T_Rock_04_D .
You can also use the search field to locate the texture asset by entering 'T_Rock_04_D' in the search field.
-
Repeat Step 6 for the other Texture Sample Node , making sure to select the normal map texture named T_Rock_04_n .
![newBothTexturesSelected.png]()
The Material Graph should resemble the image pictured above.
-
Connect the T_Rock_04_D Texture Sample's Color pin (white) to the Rock Material's Base Color pin .
![newConnectColorPin.png]()
The newly connected white pin contains the texture's color channels.
-
Connect the T_Rock_04_n Texture Sample's Normal pin (white) to the Rock Material's Normal pin .
![newConnectNormalPin.png]()
The newly connected white pin contains information for the texture's normal map .
-
The Preview should look similar to the image pictured below.
![newPreview_DN.png]()
-
Hold the ' 1 ' key and left-click in the Graph Panel to create three ( 3 ) Constant nodes.
![Constants.jpg]()
The Constant Node is a modifiable scalar float variable.
-
Hold the ' 3 ' key and left-click in the Graph Panel to create one ( 1 ) Constant3Vector .
![Constant3.jpg]()
The Constant3Vector node is a modifiable vector corresponding to color without an alpha channel.
Read our Constant Expression documentation if you want to learn more about working with constant expressions.
-
Your nodes should be arranged so that connections can be easily made without wires crossing or sliding beneath each other.
![newMatConstantsAdded.png]()
-
Connect all of the Constant and Constant3Vector nodes to corresponding pins in the 'Rock' Material Main Node .
![newAllNodesConnectedNoVal.png]()
-
Change the values of each Constant and Constant3Vector by updating their Value parameter in the Details panel.
-
Specular Value = 0.0
-
Roughness Value = 0.8
-
Opacity Value = 0.95
-
Subsurface Color = Red(1,0,0)
![newAllConnectedAllAdjusted.png]()
-
-
The Preview should look similar to the image pictured below.
![newPreviewAll.png]()
Make sure to save your material before exiting the Material Editor .


You're almost done! You've just used the Material Editor to edit your 'Rock' Material .
A list of all Material Editor Keyboard Shortcuts can be found by going to Edit Menu > Editor Preferences > Keyboard Shortcuts > "Material Editor" and "Material Editor-Spawn Nodes" categories.
8. Applying Materials to Static Mesh Actors
You're now ready to bring things together!
The objective of this step is to apply our Material to the Static Mesh we imported. Specifically, you'll learn how to:
Setting an Actor's Default Material
This section will show you how to set a Static Mesh Actor's default material. The default material will be used whenever an Actor is placed in the level.
-
Inside the Content Browser , double-click the asset you imported earlier in this guide.
![newBrowserContenAsset.png]()
The Static Mesh Editor will load your asset for editing.
![StaticMeshEditor.jpg]()
-
Inside the Details panel under LOD0 , left-click the material's drop-down menu.
![LOD0.png]()
-
Select the 'Rock' Material you created earlier. The material should be available in the selection window.
![selectRockMaterial.png]()
Your Preview Pane will update to reflect the newly applied material.
![NewDefaultMaterial.jpg]()
-
Clicking the Save button first, close the Material Editor .
-
Inside the Content Browser , drag-and-drop the newly textured Static Mesh Actor into your level.
![newMaterialInLevel.png]()
The specified Material will be used anytime you place this asset in the level.


Changing Material Used by an Actor
When we placed a Static Mesh object in our level, we created an instance of our object (an Actor ). For every instance of that Actor , we're able to specify its Material .
Here's how you change a Static Mesh Actor's Material.
-
Select your Static Mesh Actor .
![newStatisMeshSelected.png]()
-
Inside the Details panel, locate the Materials section and click the Materials dropdown menu.
![materialDropDown.png]()
-
Inside the pop-up menu, select a different Material.
![selectTutorialAssetMat.png]()
-
Alternatively, drag-and-drop a new Material onto the Static Mesh Actor .
![newMaterialDrop.png]()


You've just applied materials to your Static Mesh Actors by:
-
Setting your Actor's Default Material
-
Changing Material used by your Actor
We've now reached the end of the Artist Quick Start Guide. By now, you should have the skills needed to:
✓ Set-up a Project
✓ Create Materials
✓ Edit Materials
✓ Apply Materials to a Static Mesh Actor
Are you ready to do some exercises on your own?
9. On your own!
Using what you know, create a new Material similar to this graph:

The Main Material node settings simulate a plastic material.
Add Basic_Asset1 to the level, apply the Material to it, and update the Material to apply a "Brick" Normal Map Texture.

For information on importing different types of content, refer to:
-
Information on the FBX pipeline (in general): FBX Content Pipeline .
-
Information on the FBX Skeletal Mesh pipeline: FBX Skeletal Mesh Pipeline .
-
Information on the FBX Animation pipeline: FBX Animation Pipeline .
-
Information on the FBX Morph Target pipeline: FBX Morph Target Pipeline .
-
Information on the FBX Material pipeline: FBX Material Pipeline .
-
Information on Importing Audio:
[Audio Files](WorkingWithAudio/WAV).
For specifics covered in this Quick Start Guide, refer to:
-
Information on Supported Image Types: Texture Import Guide .
-
Information on Materials: Materials .
-
Information on the Content Browser: Content Browser .
-
Information on the Static Mesh Editor: Static Mesh Editor UI .