Working with UV Channels

The role of UV Channels for rendering Static Meshes, and how you can work with them in the Unreal Editor.

Choose your operating system:

Windows

macOS

Linux

A UV Channel is a set of data within a Static Mesh that maps each of the mesh's vertices to coordinates in 2D space. These mappings define how 2D texture maps get wrapped around the 3D geometry when the mesh is rendered.

You typically create and manage your UV mappings in a dedicated modeling tool—the same tool you use to create the geometry of your Static Mesh. However, the Editor does offer a few possibilities for working with the UV Channels of your models, outlined below on this page.

UV Channels have two main purposes in the Engine:

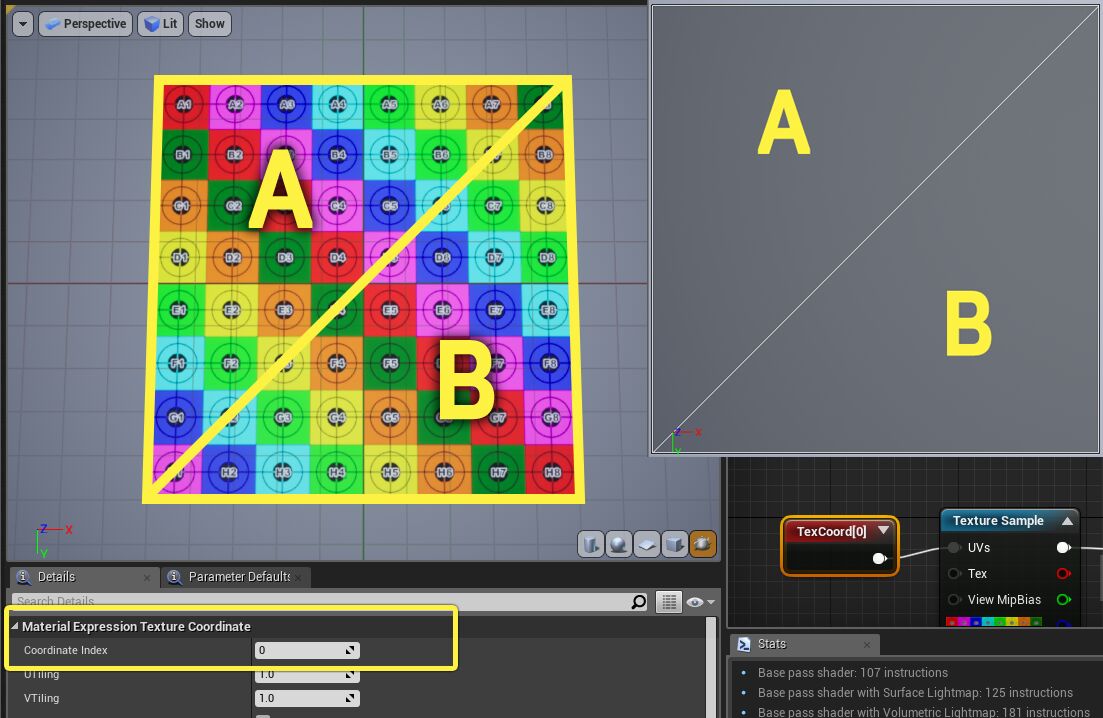
  • Texture coordinates in Materials: When you create a Material that samples a texture map and applies it to the surface of a Static Mesh, you can use a Texture Coordinate (or Texcoord ) node to specify a UV Channel. The Material uses the mapping between 2D coordinates and 3D vertex positions contained in the selected UV Channel to determine which areas of the texture should be used to shade what triangles in the 3D model.

    For example, UV Channel 0 in this simple plane Static Mesh (shown at the top right of the following image) shows the simplest way to map the two triangles of the mesh (A and B) into texture space. When you use this UV Channel (set by the Coordinate Index property of the TexCoord node), the Material applies the full width and height of a texture to the plane.
    texture-mapping-1-1.png
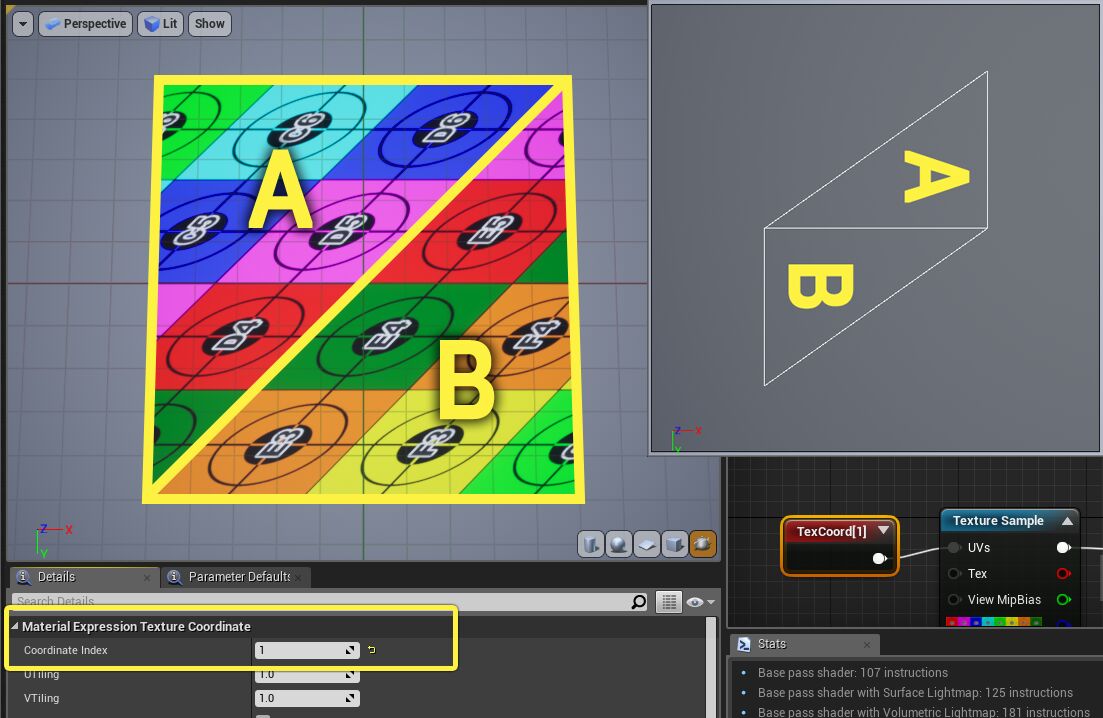
    On the other hand, the image below shows UV Channel 1, which rotates and skews the mapping between the triangles and the UV texture space. When the same image texture is applied to the Static Mesh, it changes what parts of the texture get applied to what parts of the Static Mesh.
    texture-mapping-2.png
    Triangles in the UV mapping can overlap. An overlap just means that the same part of the texture gets applied to multiple parts of the 3D Static Mesh geometry.

    The U in "UV channel" refers to the horizontal axis of the texture; the V refers to the vertical axis. Texture coordinates are usually kept between 0 and 1, where (0,0) represents the bottom left of the texture, and (1,1) represents the top right. However, this is not always true. By default, when a U or V value exceeds 1 or is below 0, the Material will "wrap" around to the other side of the texture. For example, a V value of 1.25 is usually treated as 0.25. However, you can choose to clamp these values instead in your Material, limiting them to a minimum value of 0 and a maximum value of 1.

  • Lightmaps: UV channels are also used to store and apply lightmaps. A lightmap is a special kind of texture that stores precomputed lighting information for Static Meshes. When you have lights in your Level that have their Mobility setting set to Stationary or Static, and you build the lighting for your Level, the Lightmass tool saves the indirect lighting (and direct lighting for Static lights) to lightmap textures, using a UV channel to determine the mapping between the 3D geometry of the Static Mesh and the 2D texture space.

    UV channels used for lightmaps have to follow some special rules. Because every part of an object usually receives different amounts of lighting, no two triangles in the mesh can overlap in the 2D texture space. Each triangle must cover its own area in the texture. In addition, all UV coordinate values must fall between 0 and 1. Lightmap textures can not "wrap around" the same way as regular texture mappings.
    For these reasons, lightmap UVs are typically generated—or packed —from simpler UV mappings.

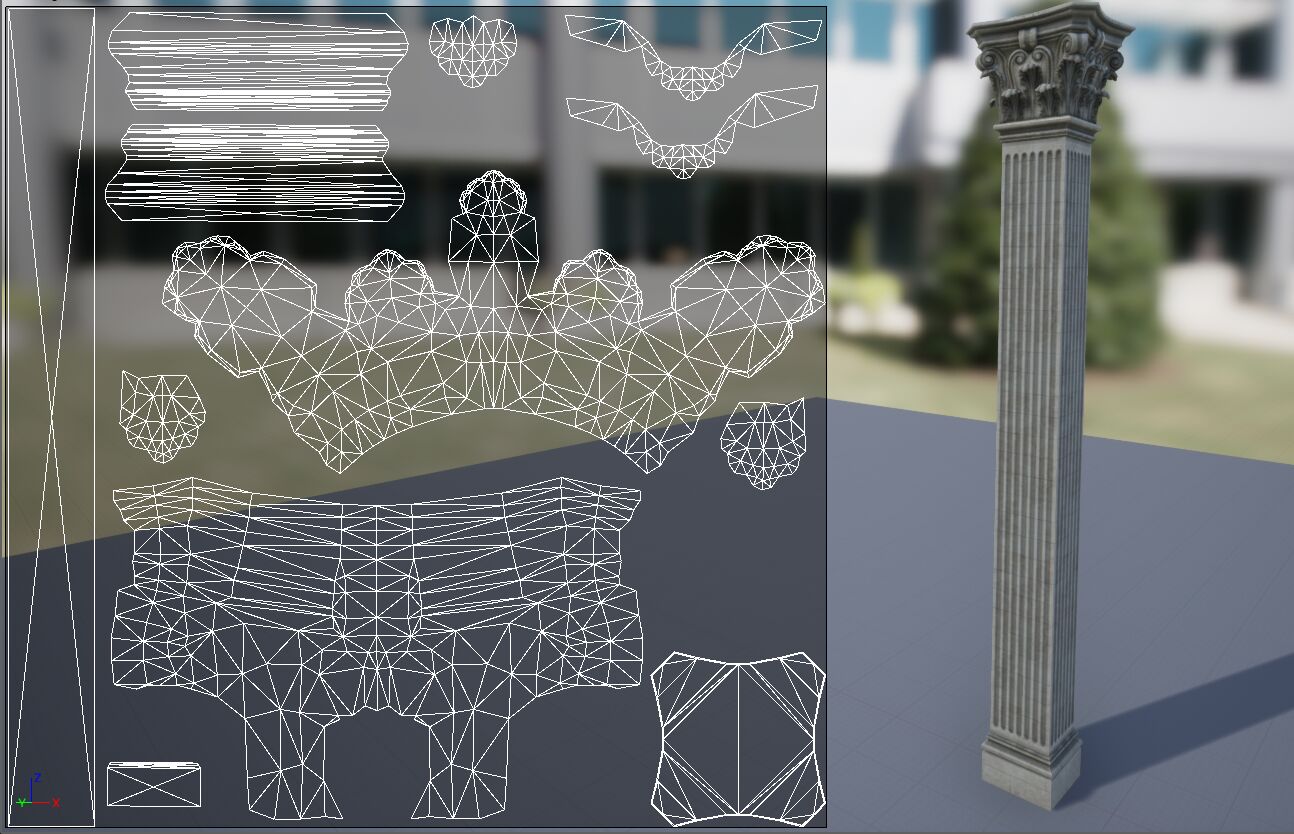
    For example, this pillar's texture mapping UV channel maps the geometry of each of the four sides to the same overlapping areas of the texture. When you use this UV channel to apply a texture to the geometry, each of the sides uses the same parts of the texture.
    texture-mapping-pillar.png
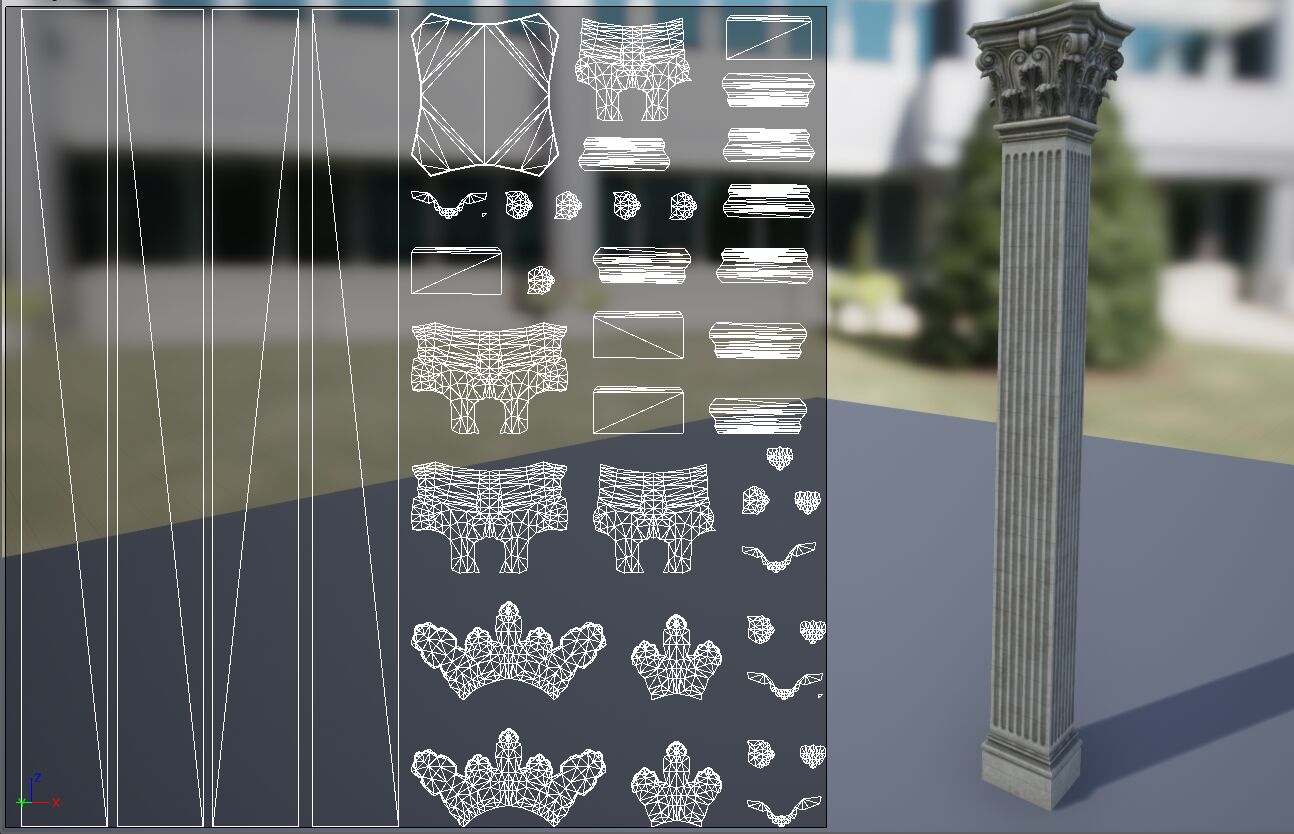
    However, in the object's lightmap UV, each side needs to cover its own unique area of 2D space:
    texture-mapping-pillar-packed.png
    For more information on lightmap UVs and how to generate them, see Unwrapping UVs for Lightmaps and Generating Lightmap UVs .

Each Static Mesh in the Engine can have up to seven different UV Channels, so you can set up multiple different ways of wrapping textures for different Materials (or for different texture sampling nodes within a single Material).

UV Channels in the Static Mesh Editor

In the Static Mesh Editor UI, you can list, visualize, and remove UV Channels.

Listing UV Channels

When you have any Static Mesh Asset open in the Static Mesh Editor, you can use the UV button in the Toolbar to list all the UV Channels in use by the current Static Mesh.
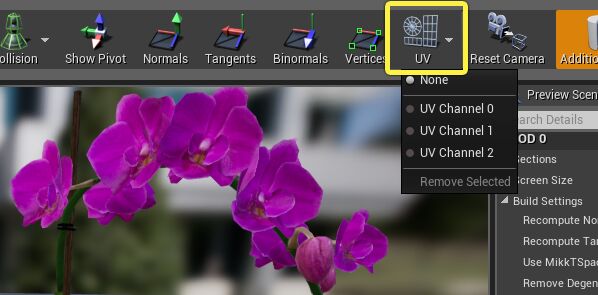
List UV Channels

Visualizing a UV Channel

Select any UV Channel in the list to visualize the mapping of the mesh's triangles into 2D texture space as an overlay in the Viewport:
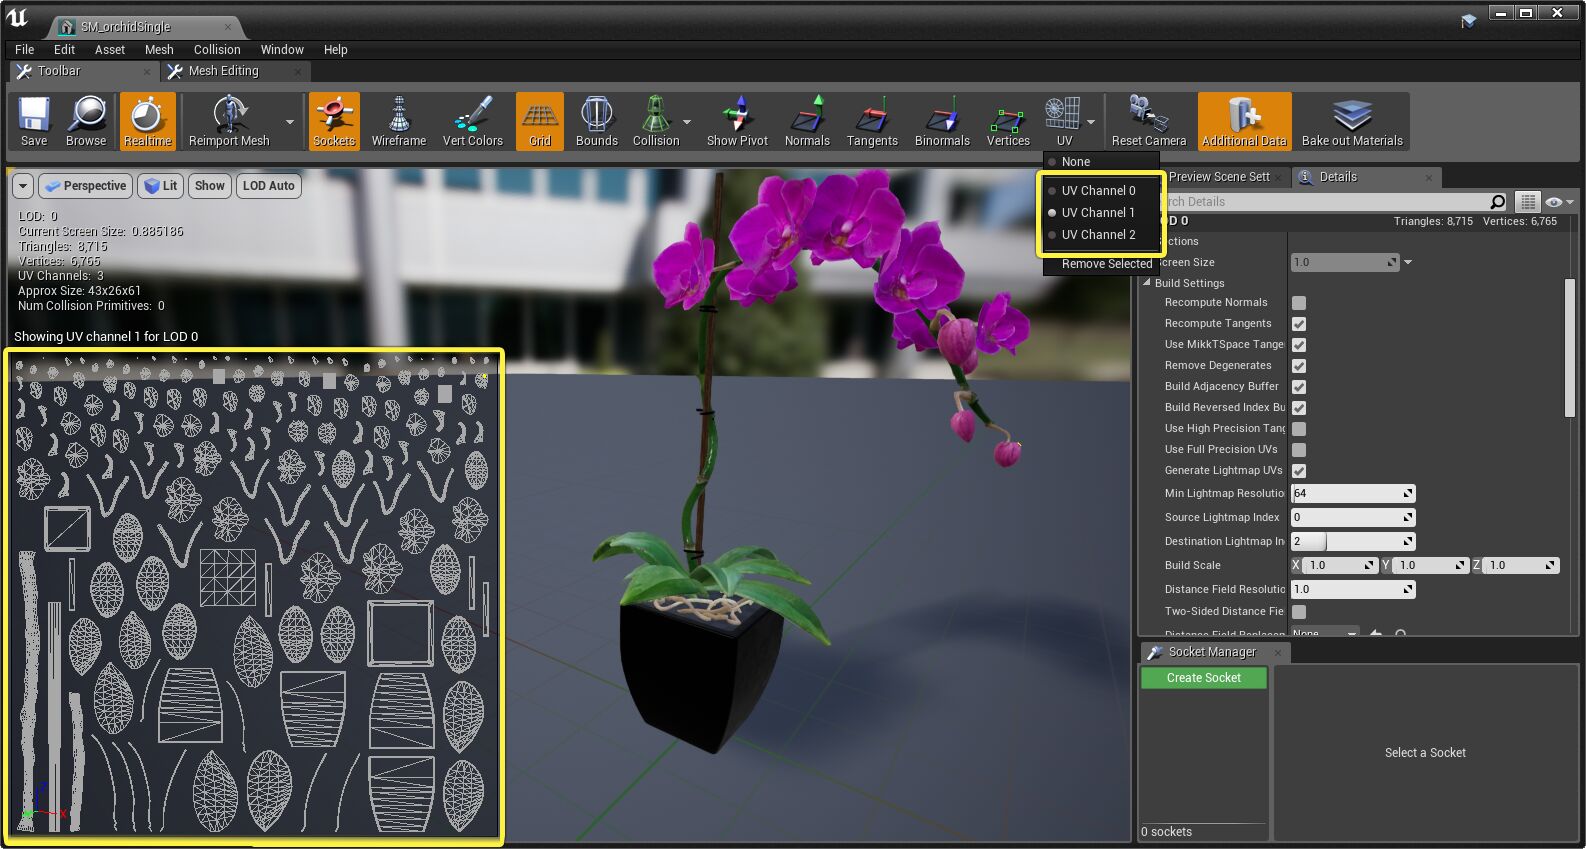
Visualize UV Channels

Select None at the top of the list to hide the UV overlay.

Removing a UV Channel

When you have a channel selected in the list, you can remove it. Each UV Channel stores texture coordinates for each vertex as part of the Static Mesh, so you may be able to save some runtime memory by removing any mappings you don't use.
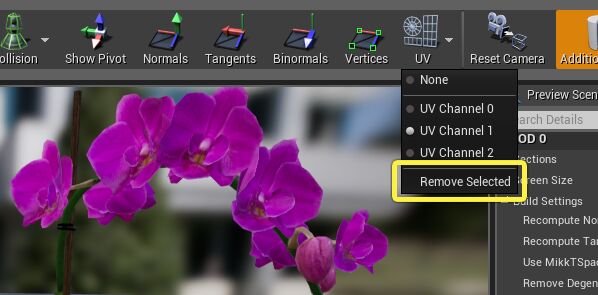
Remove selected UV channel

All other UV Channels that were present in the list after the deleted channel are moved up one spot to fill the empty space left by the removed channel.

You can't delete a UV Channel if your Static Mesh Asset is set up to generate lightmap UVs, and the UV Channel you have selected is already in use as the source or destination channel for lightmap UVs. Either deactivate the Build Settings > Generate Lightmap UVs option, or change the Build Settings > Source Lightmap Index and Build Settings > Destination Lightmap Index settings to point to different UV Channels.

Creating UV Mappings

When a Material uses textures as source data for its channels (like its Base Color, Normal Map, Roughness, and so on), it typically uses the model's UV mapping to determine what parts of those textures get wrapped around what parts of the geometry. Therefore, when a model does not have any UV mappings, or it has UV mappings that are poorly laid out, you'll often see visible problems when you try to use a textured Material. For example, if the UV mapping has many seams —places where triangles that are adjacent on the mesh geometry are not adjacent in the UV mapping—the texture will show a visible joint at that seams. Or, if your UV mapping assigns areas of UV space unevenly to the triangles of the mesh—so that big triangles on the mesh are mapped to small areas of the texture or vice-versa—the texture will look stretched or distorted on different parts of the mash.

For best artistic results, you should always try to create the UV mappings for your 3D objects in a dedicated modeling tool. However, this is not always possible. For example, when you import data from some types of CAD modeling applications into Unreal Engine, there may be no way for you to create a high-quality UV mapping in your source application. For these cases, you can create UV mappings in the Unreal Editor.

The Unreal Editor offers two ways to create UV mappings for a Static Mesh:

Project Setup: In order to use either of the UV channel generation methods outlined below, you must install the Polygon Editing Plugin for your Unreal Engine project.

Option 1: Unwrapping the Mesh Geometry

In this approach, the triangles that make up your Static Mesh geometry are automatically unfolded and flattened. The surface area of the triangles is automatically adjusted to preserve the adjacency of neighboring triangles, and seams are introduced anywhere the angle between adjacent surfaces crosses a threshold you set.

To unwrap a Static Mesh into a new UV mapping:

  1. Choose the Static Mesh you want to unwrap, and do either of the following:

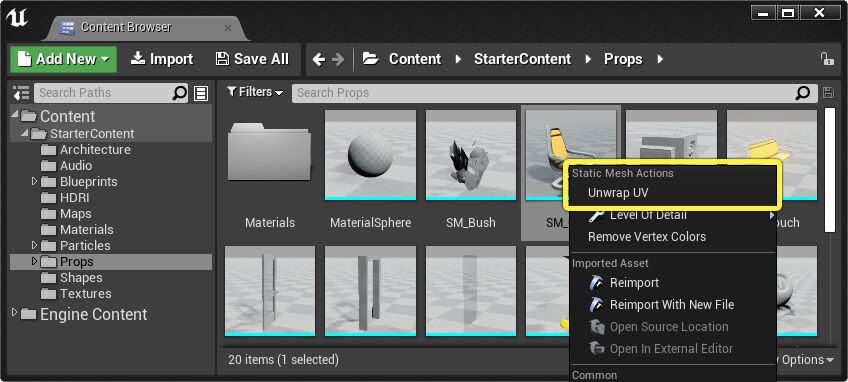
    • Right-click your Static Mesh in the Content Browser and select Unwrap UV from the context menu.

      Unwrap UV in the Content Browser

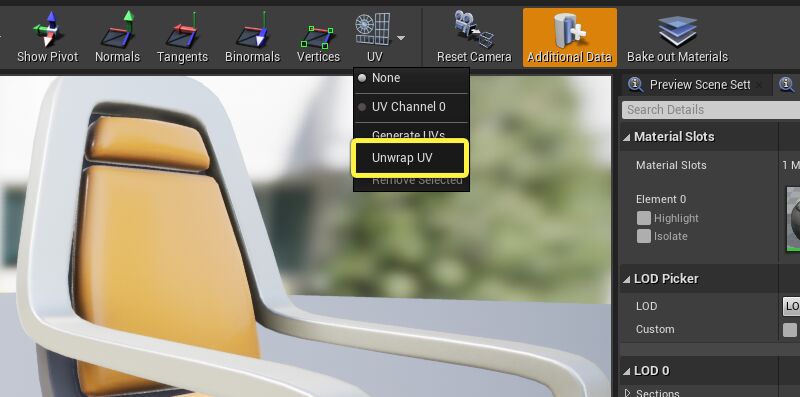
    • Open the Static Mesh that you want to generate in the Static Mesh Editor. Then, from the Toolbar of the Static Mesh Editor, select UV > Unwrap UVs .

      Unwrap UV in the Static Mesh Editor

    If you don't see either menu option, make sure that you have enabled the Polygon Editing Plugin for your project.

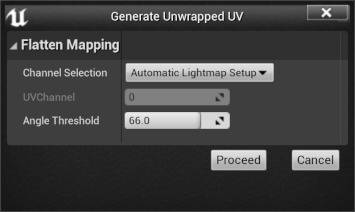
  2. Set up parameters to control the results of the unwrapping:

    Unwrap UV settings

    Setting

    Description

    Channel Selection

    Determines how the unwrapping process chooses what channel to save the new UV mapping to.

    • Automatic Lightmap Setup : Saves the unwrapped UV mapping to the channel that is set for this Static Mesh as the source for Lightmap UVs, then generates new lightmap UVs from the new UV mapping.

    • First Empty Channel : Saves the unwrapped UV mapping to the first empty UV channel in the Static Mesh.

    • Specify Channel : Choose this option to specify a channel index in the UVChannel setting.

    UVChannel

    When Channel Selection is set to Specify Channel , use this setting to determine the index of the UV channel that the unwrapped UV is saved to.

    Angle Threshold

    Determines the maximum angle between two adjacent faces for those faces to remain connected after unwrapping. Raising this value minimizes the number of separate UV "islands", keeping more triangles connected to their neighbors and reducing the number of seams that may cause breaks in texture mapping. However, this may also introduce more distortion in the wrapped textures, as triangles may need to be more aggressively resized in 2D space in order to remain connected to their neighbors.

  3. Click Proceed .

Option 2: Projecting Mesh Geometry into a UV Channel

You can project the 3D geometry of your Static Mesh into 2D texture space using a projection volume: a plane, box, or sphere. In this approach, each face of your Static Mesh is projected outward on to the faces of the projection volume, then the projection volume is unwrapped into 2D texture space.

This feature currently only handles projecting the 3D mesh to 2D, not the full projection editing capabilities found in a full-featured modeling and texturing tool.

  1. Open the Static Mesh that you want to generate in the Static Mesh Editor.

    For example, double-click the Static Mesh Asset in the Content Browser .

  2. In the Toolbar of the Static Mesh Editor, select UV > Generate UVs .

    If you don't see this menu option, make sure that you enable the Polygon Editing Plugin for your project.

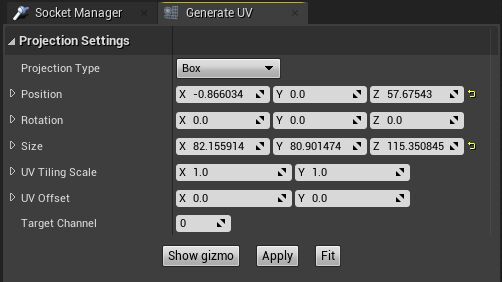
  3. You'll see the Generate UV panel appear, offering a set of controls that help you control the results of the UV projection.

    Projection Settings in the Generate UV panel

    You'll also see a green volume appear around your Static Mesh in the Viewport, with a standard Unreal Editor manipulator gizmo.

    If the volume and manipulator don't appear at first, toggle the Show Gizmo button at the bottom of the Generate UV panel.

  4. In the Projection Type setting, choose the volume that best fits the dimensions of your Static Mesh.

  5. Adjust the size, position, and rotation of the volume to match the extents of your Static Mesh.

    To do this, you can use the manipulator in the Viewport or the text fields in the Generate UV panel. You can also use the Fit button to make the volume fit extents of the Static Mesh geometry automatically as a good starting point.

  6. In the Target Channel setting, set the index of the channel where you want to save the projected UV mapping.

    Most Materials get texture coordinates from channel 0. If you're generating a UV mapping to improve the way textures map around your Static Mesh geometry, you'll typically want to set 0 in this field.

  7. Click Apply to generate the UV mapping and save it to the target channel in the Static Mesh.

The following table describes all the settings in the Generate UV panel:

Setting

Description

Projection Type

The volume that the Static Mesh geometry is projected to.

Size

The dimensions of the projection volume.

Position

The position of the projection volume relative to the pivot point of the Static Mesh.

Rotation

The rotation of the projection volume relative to the pivot point of the Static Mesh.

UV Tiling Scale

The scale of the projection in UV space. Larger values make the projection larger in texture space, which results in texture details appearing smaller when wrapped around the surface of the mesh.

UV Offset

Controls the placement of the projection in 2D texture space. Smaller values on the X axis move the projection to the left in the UV mapping; larger values move the projection to the right. Smaller values on the Y axis move the projection upward in the UV mapping; larger values move the projection downward.

Target Channel

The index of the UV channel where the projection will be saved. This can't be the same channel as the one being used by the Static Mesh Editor to store generated lightmap UVs. If the target channel already contains data, the Editor will ask for confirmation before proceeding.

Show Gizmo

Toggles rendering the projection volume and manipulator gizmo in the Viewport.

Apply

Generates the UV projection according to the settings above and saves the result to the Target Channel .

Fit

Makes the size of the projection volume enclose the full geometry of the Static Mesh.

UV Channels in Editor Scripting

You can also work with UV Channels in Blueprint and Python scripts that you run in the Unreal Editor. You can do everything that you can do in the Static Mesh Editor, plus you can add new channels and generate new UV mappings.

Prerequisite: If you haven't already done so, you'll need to install the Editor Scripting Utilities Plugin. For details, see Scripting and Automating the Editor .

Choose your implementation method:

Blueprints

Python

You'll find the nodes you'll need to manage UV Channels under the Editor Scripting > Static Mesh category.

To use these nodes, your Blueprint class must be derived from an Editor-only class, such as the PlacedEditorUtilityBase class. For details, see Scripting the Editor using Blueprints .

All of these functions work with a Static Mesh Asset, which you'll typically need to load by calling the Editor Scripting > Asset Library > Load Asset node.

Modifying UV Channels modifies the Asset. Assuming you want to keep the changes you make, you'll also need to use a node like Editor Scripting > Asset Library > Save Asset or Save Loaded Asset afterward. See the examples below.

Listing UV channels

You can use the Get Num UV Channels node to find out how many UV Channels currently exist in a given Static Mesh Asset.

For example:

Removing a UV Channel

Each UV Channel stores texture coordinates for each vertex as part of the Static Mesh, so you may be able to save some runtime memory by removing any mappings you don't use.

To remove a UV Channel, call the Remove UV Channel node. Pass it the Static Mesh Asset and the index of the UV Channel that you want to remove.

For example:

All other UV Channels that were already present in the list after the specified index are moved up one spot, to fill the empty space left by the removed entry.

You can't delete a UV Channel if your Static Mesh Asset is set up to generate lightmap UVs, and the UV Channel you have selected is already in use as the source or destination channel for lightmap UVs. Either deactivate the Build Settings > Generate Lightmap UVs option, or change the Build Settings > Source Lightmap Index and Build Settings > Destination Lightmap Index settings to point to different UV Channels.

Adding a New UV Channel

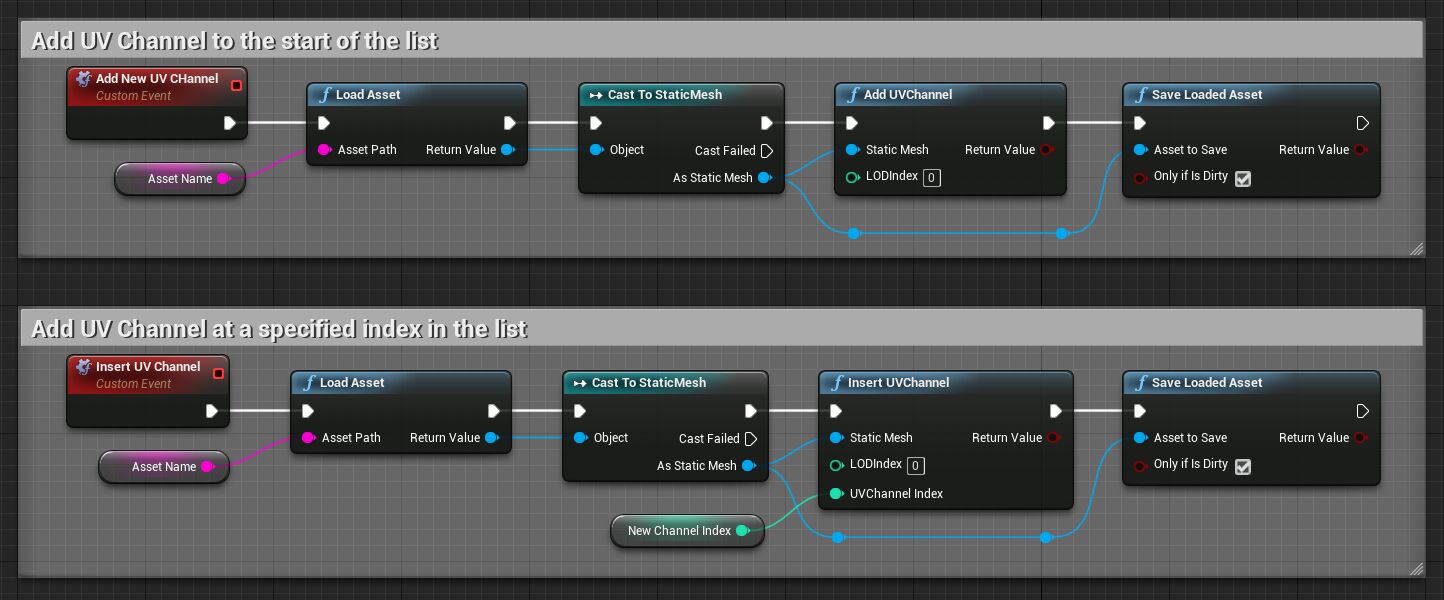
You can add a new UV Channel to your Static Mesh Asset by calling either of the following nodes:

  • Add UV Channel - Adds the new channel at the end of the existing list of channels.

  • Insert UV Channel - Adds the new channel at the index you specify, moving each other UV Channel down one number in the list. Note that the array of UV Channels can't be sparse: you can only insert a new channel at a position in the list that is next to another existing channel. For example, if there are three UV Channels in the list (indices 0, 1, and 2), you can add a new one with index 3, but not with index 4.

The new mapping is empty. You'll want to fill it somehow before you use it—either by projecting the mesh geometry (see below) or by using it as the destination for lightmap generation.

Unwrapping Mesh Geometry into a UV Channel

You can create new UV mappings by having the Static Mesh Editor automatically unfold and flatten the triangles that make up your Static Mesh geometry. The surface area of the triangles is automatically adjusted to preserve the adjacency of neighboring triangles, and seams are introduced anywhere the angle between adjacent surfaces crosses a threshold you set.

Project Setup: In order to use the UV channel generation method outlined below, you must install the Polygon Editing Plugin for your Unreal Engine project.

Use the Generate Unwrapped UVs node. You'll need to give this node:

  • A reference to the Static Mesh Asset you want to modify,

  • The index of the UV channel where you want the unwrapped UV to be saved. If this channel does not exist yet, the unwrapping process will create it.

  • The maximum angle between two adjacent faces for those faces to remain connected after unwrapping. Raising this value minimizes the number of separate UV "islands", keeping more triangles connected to their neighbors and reducing the number of seams that may cause breaks in texture mapping. However, this may also introduce more distortion in the wrapped textures, as triangles may need to be more aggressively resized in 2D space in order to remain connected to their neighbors.

For example:

Projecting Mesh Geometry into a UV Channel

You can create new UV mappings by projecting the triangles in the Static Mesh onto a 2D plane or a simple 3D volume.

Each of the nodes described below saves the UV mapping it creates into a UV Channel that you specify. This UV Channel must already exist; if it doesn't exist, the function will not create it.

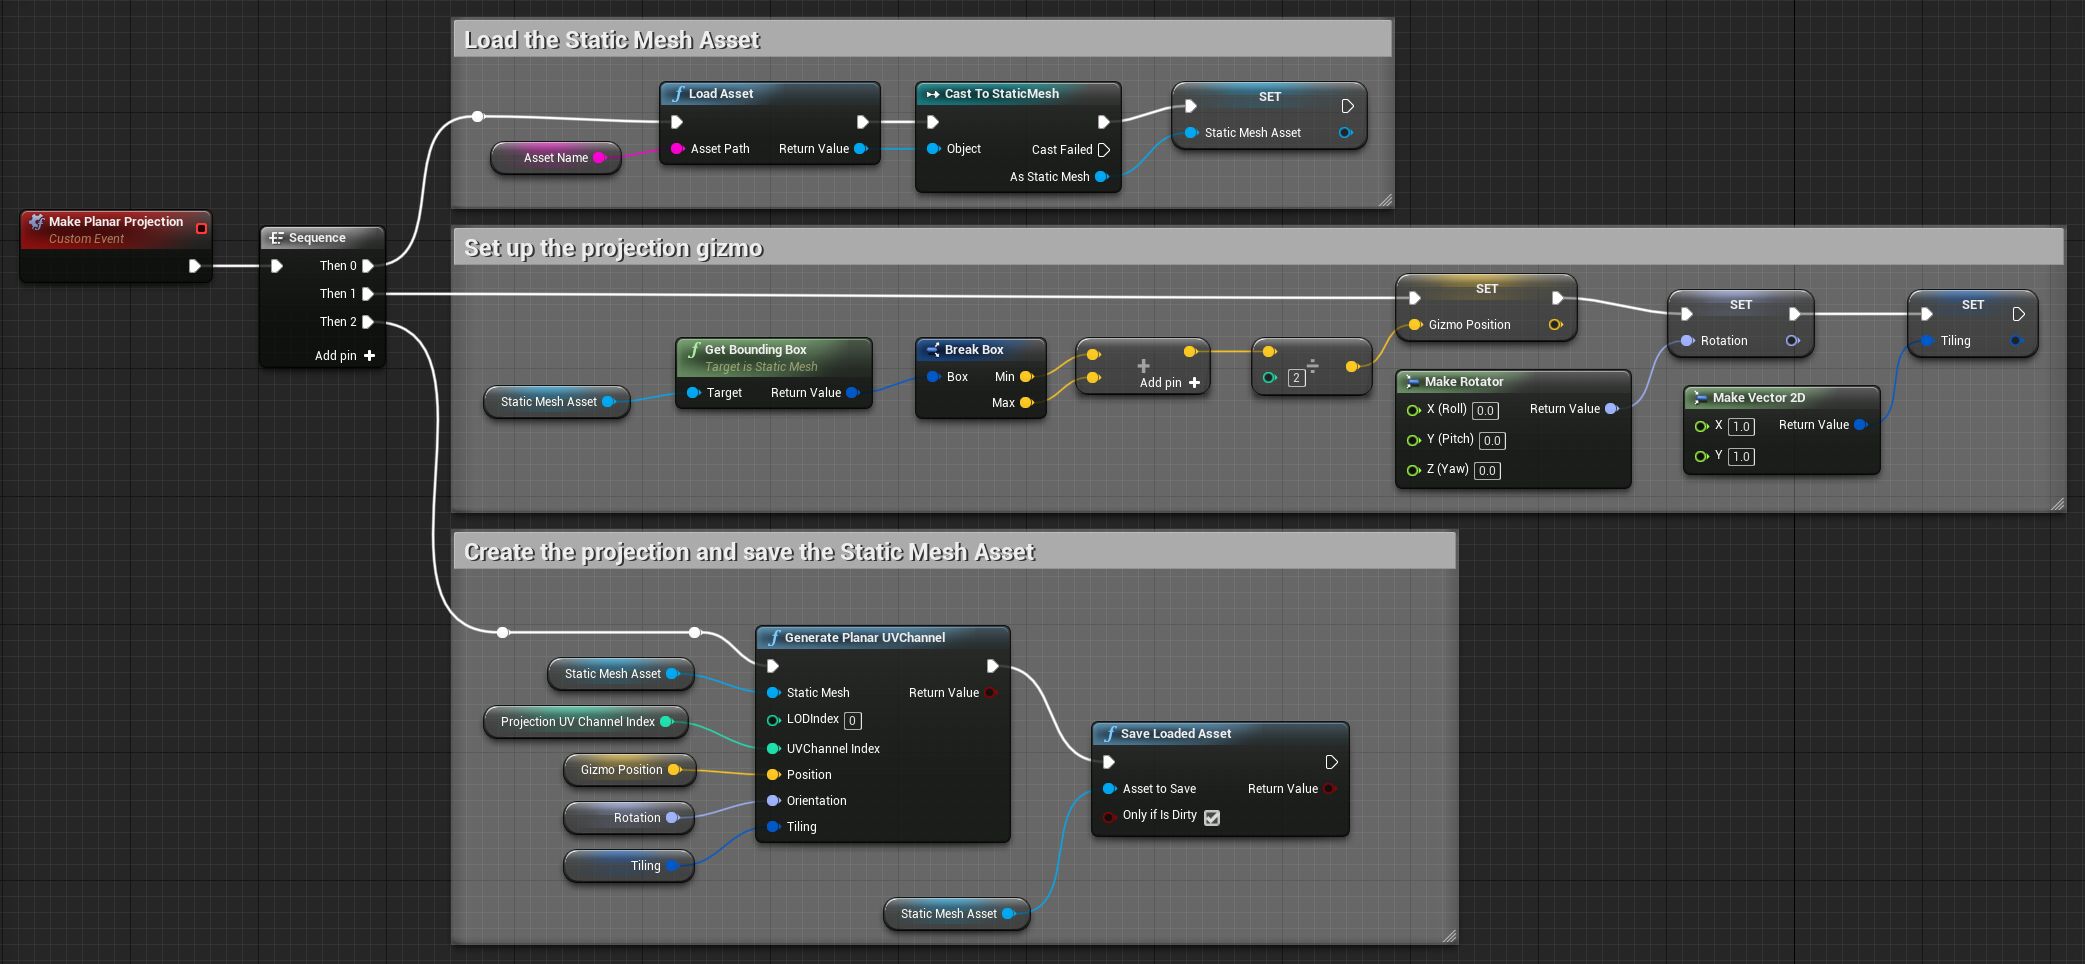
Planar Projection

Use the Generate Planar UV Channel node to project your Static Mesh geometry onto a plane. Use this kind of projection if only one side of your Static Mesh needs to have textures wrapped around it.

For example:

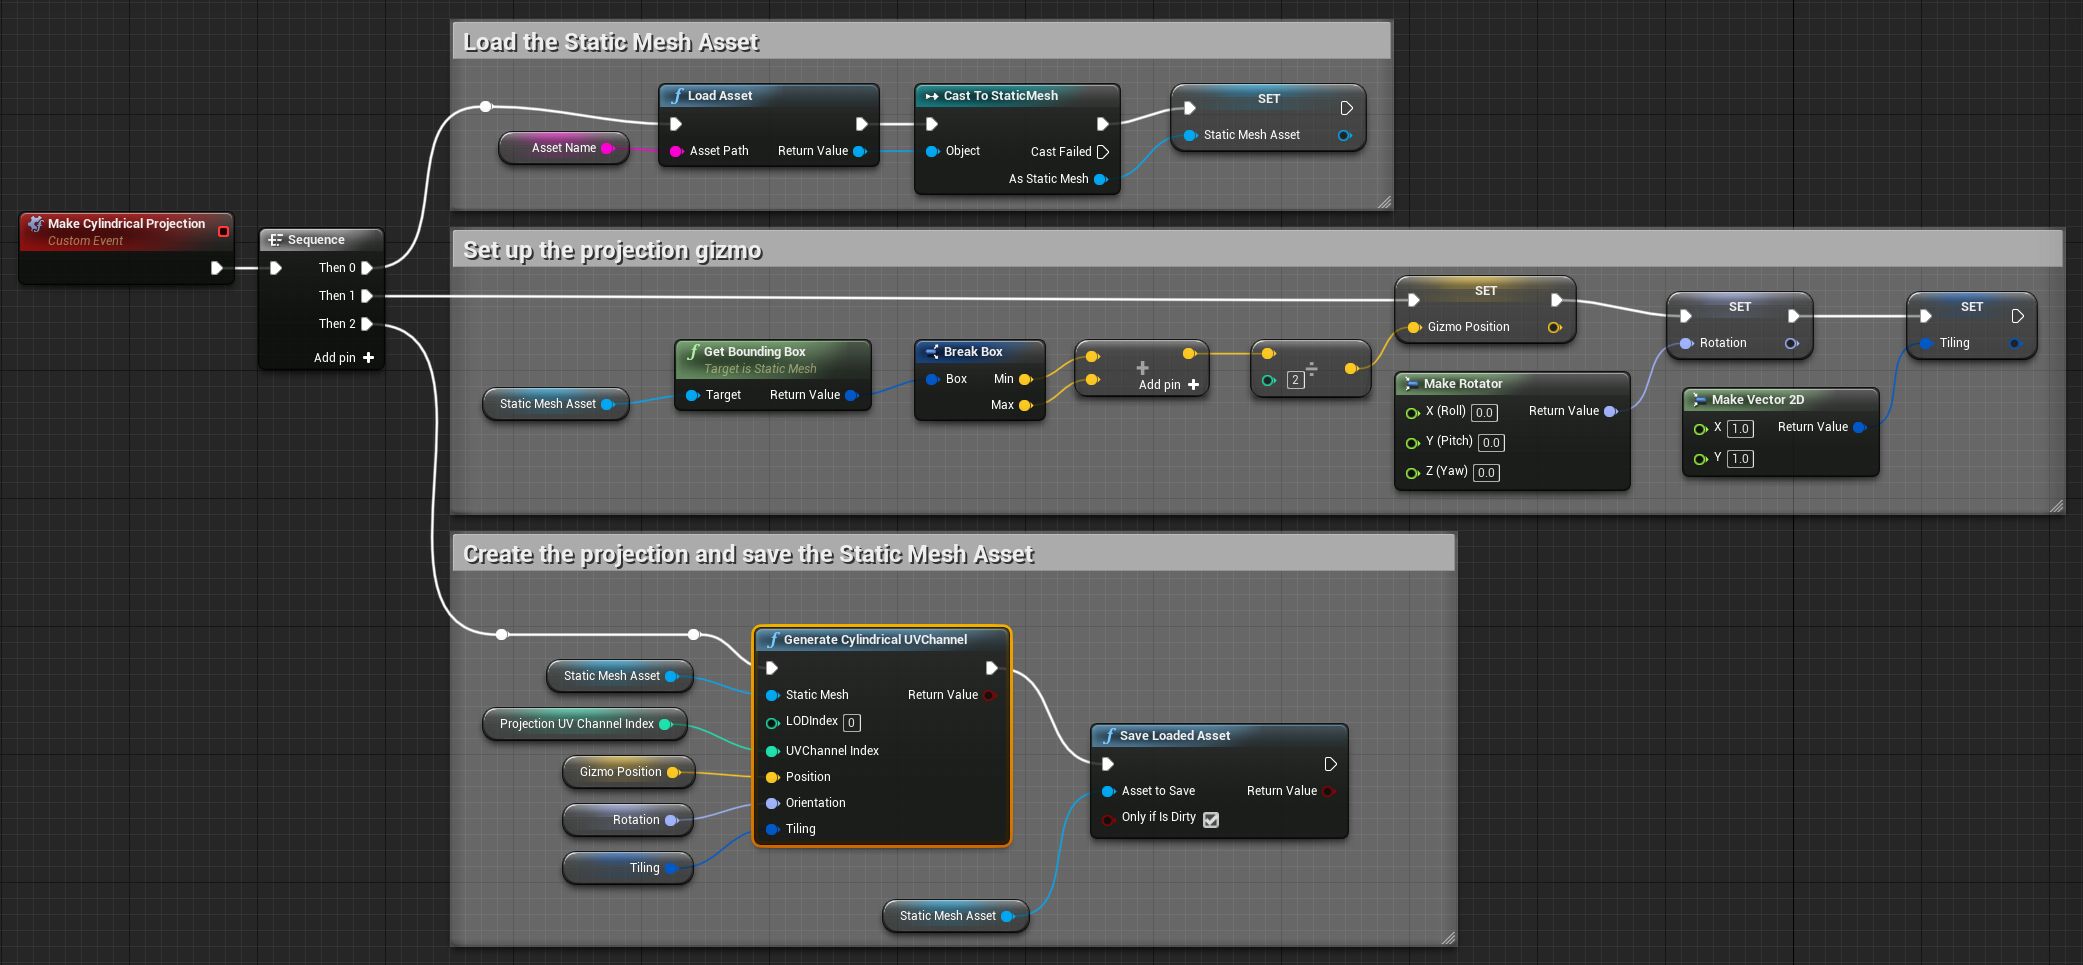
Cylindrical Projection

Use the Generate Cylindrical UV Channel node to project your Static Mesh geometry onto the sides, top and bottom of a cylinder.

For example:

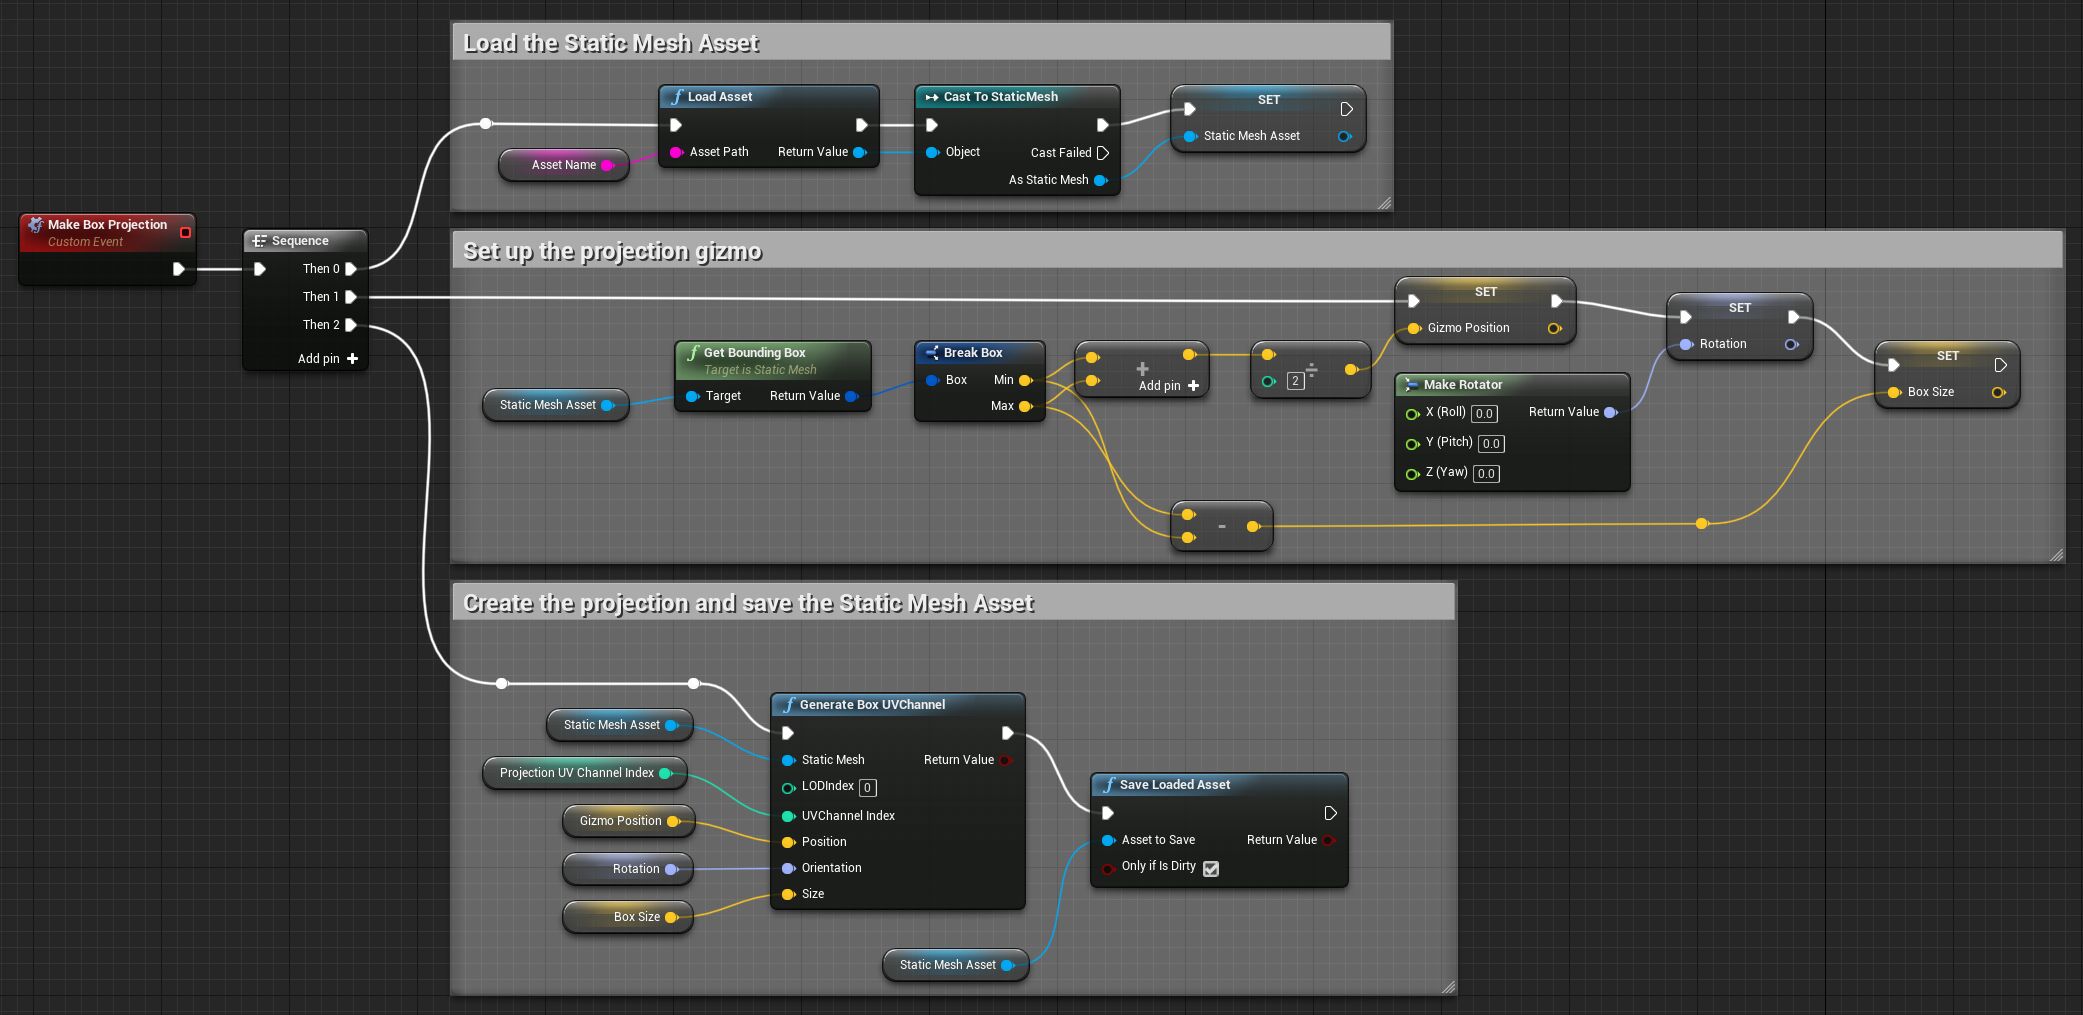
Box Projection

Use the Generate Box UV Channel node to project your Static Mesh geometry onto the faces of a cube.

For example, the following script creates a box the same approximate size as the Static Mesh, then creates a new UV mapping by projecting the geometry of the Static Mesh onto the sides of that box:

You'll find the LOD management functions in the unreal.EditorStaticMeshLibrary class.

All of these functions work with a Static Mesh Asset, which you'll typically need to load by calling a function like unreal.EditorAssetLibrary.load_asset .

Modifying UV Channels modifies the Asset. Assuming you want to keep the changes you make, you'll also need to use a function like unreal.EditorAssetLibrary.save_asset or unreal.EditorAssetLibrary.save_loaded_asset afterward.

Listing UV channels

You can use the unreal.EditorStaticMeshLibrary.get_num_uv_channels function to find out how many UV Channels currently exist in a given Static Mesh Asset.

For example:

import unreal
asset_name = '/Game/Path/MyStaticMeshAsset'
# Load the Static Mesh Asset.
loaded_asset = unreal.EditorAssetLibrary.load_asset(asset_name)
# Get the number of UV channels saved in the Asset.
num_uv_channels = unreal.EditorStaticMeshLibrary.get_num_uv_channels(asset_name)
print("Number of UV channels: " + str(num_uv_channels))

Removing a UV Channel

Each UV Channel stores texture coordinates for each vertex as part of the Static Mesh, so you may be able to save some runtime memory by removing any mappings you don't use.

To remove a UV Channel, call the unreal.EditorStaticMeshLibrary.remove_uv_channel function. Pass it the Static Mesh Asset and the index of the UV Channel that you want to remove.

For example:

import unreal
asset_name = '/Game/Path/MyStaticMeshAsset'
# Load the Static Mesh Asset.
loaded_asset = unreal.EditorAssetLibrary.load_asset(asset_name)
# Get the number of UV channels saved in the Asset.
num_uv_channels = unreal.EditorStaticMeshLibrary.get_num_uv_channels(asset_name)
# Remove the last one in the list.
channel_to_remove = num_uv_channels - 1
unreal.EditorStaticMeshLibrary.remove_uv_channel(asset_name, channel_to_remove)
# Save the modified Asset.
unreal.EditorAssetLibrary.save_asset(asset_name)

All other UV Channels that were already present in the list after the specified index are moved up one spot, to fill the empty space left by the removed entry.

You can't delete a UV Channel if your Static Mesh Asset is set up to generate lightmap UVs, and the UV Channel you have selected is already in use as the source or destination channel for lightmap UVs. Either deactivate the Build Settings > Generate Lightmap UVs option, or change the Build Settings > Source Lightmap Index and Build Settings > Destination Lightmap Index settings to point to different UV Channels.

Adding a New UV Channel

You can add a new UV Channel to your Static Mesh Asset by calling either of the following functions:

  • unreal.EditorStaticMeshLibrary.add_uv_channel - Adds the new channel at the end of the existing list of channels.

  • unreal.EditorStaticMeshLibrary.insert_uv_channel - Adds the new channel at the index you specify, moving each other UV Channel down one number in the list. Note that the array of UV Channels can't be sparse: you can only insert a new channel at a position in the list that is next to another existing channel. For example, if there are three UV Channels in the list (indices 0, 1, and 2), you can add a new one with index 3, but not with index 4.

For example:

import unreal
asset_name = '/Game/Path/MyStaticMeshAsset'
# Load the Static Mesh Asset.
loaded_asset = unreal.EditorAssetLibrary.load_asset(asset_name)
# Get the number of UV channels saved in the Asset.
num_uv_channels = unreal.EditorStaticMeshLibrary.get_num_uv_channels(asset_name)
print("Number of UV channels before: " + str(num_uv_channels))
# Add one to the end of the list.
unreal.EditorStaticMeshLibrary.add_uv_channel(asset_name)
# Add one at the beginning of the list.
unreal.EditorStaticMeshLibrary.insert_uv_channel(asset_name, 0)
# Get the new number of UV channels saved in the Asset.
num_uv_channels = unreal.EditorStaticMeshLibrary.get_num_uv_channels(asset_name)
print("Number of UV channels after: " + str(num_uv_channels))
# Save the modified Asset.
unreal.EditorAssetLibrary.save_asset(asset_name)

The new mapping is empty. You'll want to fill it somehow before you use it—either by projecting the mesh geometry (see below) or by using it as the destination for lightmap generation.

Unwrapping Mesh Geometry into a UV Channel

You can create new UV mappings by having the Static Mesh Editor automatically unfold and flatten the triangles that make up your Static Mesh geometry. The surface area of the triangles is automatically adjusted to preserve the adjacency of neighboring triangles, and seams are introduced anywhere the angle between adjacent surfaces crosses a threshold you set.

Project Setup: In order to use the UV channel generation method outlined below, you must install the Polygon Editing Plugin for your Unreal Engine project.

Use the unreal.UVGenerationFlattenMapping.generate_flatten_mapping_u_vs() function. Pass it:

  • A reference to the Static Mesh Asset you want to modify,

  • The index of the UV channel where you want the unwrapped UV to be saved. If this channel does not exist yet, the unwrapping process will create it.

  • The maximum angle, in degrees, between two adjacent faces for those faces to remain connected after unwrapping. Raising this value minimizes the number of separate UV "islands", keeping more triangles connected to their neighbors and reducing the number of seams that may cause breaks in texture mapping. However, this may also introduce more distortion in the wrapped textures, as triangles may need to be more aggressively resized in 2D space in order to remain connected to their neighbors.

For example:

import unreal
asset_name = '/Game/Meshes/StaticMesh'
# Load the Static Mesh Asset.
loaded_asset = unreal.EditorAssetLibrary.load_asset(asset_name)
# Specify the UV channel to save into.
channel_index = 2
# Set the angle threshold
angle_threshold = 55
# Unwrap the mesh into the UV channel
unreal.UVGenerationFlattenMapping.generate_flatten_mapping_u_vs(loaded_asset, channel_index, angle_threshold)
# Save the modified Asset.
unreal.EditorAssetLibrary.save_asset(asset_name)

Projecting Mesh Geometry into a UV Channel

You can create new UV mappings by projecting the triangles in the Static Mesh onto a 2D plane or a simple 3D volume.

This is currently only exposed in the Unreal Editor scripting APIs, not in the UI of the Static Mesh Editor. However, the process and the settings required by the API are easier to understand if you are already familiar with visual tools for mesh projection, such as those in 3ds Max. See the UVW Map Modifier in the 3ds Max Help for background.

Each of the functions described below saves the UV mapping it creates into a UV Channel that you specify. This UV Channel must already exist; if it doesn't exist, the function will not create it.

Planar Projection

Use the unreal.EditorStaticMeshLibrary.generate_planar_uv_channel function to project your Static Mesh geometry onto a plane. Use this kind of projection if only one side of your Static Mesh needs to have textures wrapped around it.

For example:

import unreal
asset_name = '/Game/Path/MyStaticMeshAsset'
# Load the Static Mesh Asset.
loaded_asset = unreal.EditorAssetLibrary.load_asset(asset_name)
# Specify the LOD to project.
lod_index = 0
# Add a new UV channel for our projection.
num_uv_channels = unreal.EditorStaticMeshLibrary.get_num_uv_channels(asset_name)
unreal.EditorStaticMeshLibrary.add_uv_channel(asset_name)
channel_index = num_uv_channels
# Set up the projection plane, or "gizmo".
bbox = loaded_asset.get_bounding_box()
gizmo_pos = ((bbox.min + bbox.max) * 0.5)   # Find the center of the object's bounding box.
# Set the rotation angles in degrees.
pitch = 0   # Around the X axis
yaw = 0     # Around the Y axis
roll = 0    # Around the Z axis
gizmo_orientation = unreal.Rotator(pitch, yaw, roll)
# Increase or decrease values to make the projection larger or smaller.
tiling = unreal.Vector2D(1, 1)
# Project the Static Mesh geometry into the UV Channel.
unreal.EditorStaticMeshLibrary.generate_planar_uv_channel(loaded_asset, lod_index, channel_index, gizmo_pos, gizmo_orientation, tiling)
# Save the modified Asset.
unreal.EditorAssetLibrary.save_asset(asset_name)

Cylindrical Projection

Use the unreal.EditorStaticMeshLibrary.generate_cylindrical_uv_channel function to project your Static Mesh geometry onto the sides, top and bottom of a cylinder.

For example:

import unreal
asset_name = '/Game/Path/MyStaticMeshAsset'
# Load the Static Mesh Asset.
loaded_asset = unreal.EditorAssetLibrary.load_asset(asset_name)
# Specify the LOD to project.
lod_index = 0
# Add a new UV channel for our projection.
num_uv_channels = unreal.EditorStaticMeshLibrary.get_num_uv_channels(asset_name)
unreal.EditorStaticMeshLibrary.add_uv_channel(asset_name)
channel_index = num_uv_channels
# Set up the projection cylinder, or "gizmo".
bbox = loaded_asset.get_bounding_box()
gizmo_pos = ((bbox.min + bbox.max) * 0.5)   # Find the center of the object's bounding box.
# Set the rotation angles in degrees.
pitch = 0   # Around the X axis
yaw = 0     # Around the Y axis
roll = 0    # Around the Z axis
gizmo_orientation = unreal.Rotator(pitch, yaw, roll)
# Increase or decrease values to make the projection larger or smaller.
tiling = unreal.Vector2D(1, 1)
# Project the Static Mesh geometry into the UV Channel.
unreal.EditorStaticMeshLibrary.generate_cylindrical_uv_channel(teapot, lod_index, channel_index, gizmo_pos, gizmo_orientation, tiling)
# Save the modified Asset.
unreal.EditorAssetLibrary.save_asset(asset_name)

Box Projection

Use the unreal.EditorStaticMeshLibrary.generate_box_uv_channel function to project your Static Mesh geometry onto the faces of a cube.

For example, the following script creates a box the same approximate size as the Static Mesh, then creates a new UV mapping by projecting the geometry of the Static Mesh onto the sides of that box:

import unreal
asset_name = '/Game/Path/MyStaticMeshAsset'
# Load the Static Mesh Asset.
loaded_asset = unreal.EditorAssetLibrary.load_asset(asset_name)
# Specify the LOD to project.
lod_index = 0
# Add a new UV channel for our projection.
num_uv_channels = unreal.EditorStaticMeshLibrary.get_num_uv_channels(asset_name)
unreal.EditorStaticMeshLibrary.add_uv_channel(asset_name)
channel_index = num_uv_channels
# Set up the projection volume, or "gizmo".
bbox = loaded_asset.get_bounding_box()
gizmo_pos = ((bbox.min + bbox.max) * 0.5)   # Find the center of the object's bounding box.
# Set the rotation angles in degrees.
pitch = 0   # Around the X axis
yaw = 0     # Around the Y axis
roll = 0    # Around the Z axis
gizmo_orientation = unreal.Rotator(pitch, yaw, roll)
# Get the size of the box.
gizmo_size = bbox.max - bbox.min
# Project the Static Mesh geometry into the UV Channel.
unreal.EditorStaticMeshLibrary.generate_box_uv_channel(box, channel_index, lod_index, gizmo_pos, gizmo_orientation, gizmo_size)
# Save the modified Asset.
unreal.EditorAssetLibrary.save_asset(asset_name)
Help shape the future of Unreal Engine documentation! Tell us how we're doing so we can serve you better.
Take our survey
Dismiss