Choose your operating system:
Windows
macOS
Linux
Reference for the Sound Attenuation settings asset, which controls various aspects of how sound behaves over distance relative to the listener. Usually, the player is the listener, but not always, and so for the purposes of this document, we will use the term ‘listener'.
Attenuation Distance

This section defines how the sound's volume will reduce (attenuate) as the listener moves away from it. The volume of the sound will be at its maximum within the inner area of the attenuation shape. As the listener moves away from this inner area the sound will decrease in volume, reaching its minimum volume at the boundary of the outer area. The rate of attenuation relative to distance is determined by the attenuation function.
Attenuation Function
This property defines the function that determines the rate of attenuation over distance. There are a number of different functions to choose from:
Linear

This is the default function. When using this function the volume will attenuate linearly and so the changes in volume are constant as the listener moves towards and away from the source. This function is good for crossfading between large background-type sounds that don't need tightly focussed 3D spatial falloff settings.
Logarithmic

When using this function the volume attenuates such that the changes in volume are greater at close distances, and lesser at far distances. This function is good for spot sounds that need good 3D positioning, while still being audible at reasonable distances.
Inverse

When using this function, the changes in volume are similar to that of the logarithmic curve, but are more exaggerated. This function is good for sounds that only need to be just audible at far distances, but that gets significantly louder as the listener gets quite close to the source.
Log Reverse

When using this function, the changes in volume are lesser at close distances, with more dramatic differences at far distances. This function is good for sounds that need to be loud across larger distances.
Natural Sound

This function attempts to model a more ‘naturalistic' falloff behavior to produce behaviors that closer match reality. This function is a kind of ‘middle ground' between the Logarithmic and Inverse functions.
Custom

Click for full image.
This allows you to define your own custom function when none of the provided ones give you the required behavior. You can either draw one directly into the curve editor window, or assign a pre-existing Float Curve asset.
Attenuation Shape
This property defines the shape that is used to define the minimum and maximum attenuation points of the sound.
Sphere

This is the default and produces a spherical attenuation shape, which is useful for most spot sounds as it models how sound propagates in the real world.

Capsule

This produces a capsule attenuation shape (a cylinder with rounded ends), this is useful for things like water pipes, where the sound doesn't want to appear to come from a single, specific point in space—the sound of gurgling water would follow the length of the pipe

Box

This produces a box attenuation shape, this is useful for things like room tones/ambiance as you can define the shape of the box to match that of the room.

Cone

This produces a cone attenuation shape, this is useful in situations when you want a directional attenuation pattern—for example, public address speakers.

Inner Shape Areas
These properties define the inner area of the attenuation shape—the area where the sound will be at maximum volume (in other words, completely unattenuated). They are measurements of distance from the origin of the source sound in Unreal Units.
The exact property you see depends on which attenuation shape you have chosen.
Inner Radius
This property defines the inner area of the sphere attenuation shape.

Capsule Half Height
This property defines the height of the inner area of the capsule attenuation shape (termed ‘half height' as it's measured from the sound's origin which is at the midpoint of the capsule).

Capsule Radius
This property defines the radius of the inner area of the capsule attenuation shape.

Extents
This property defines the dimensions of the box attenuation shape (as measured from the sound's origin). There are 3 values to this property: x, y, z.

Cone Radius
This property defines the length of the inner area of the cone attenuation shape (as measured from the sound's origin.

Cone Angle
This property defines the width (in degrees) of the inner area of the cone attenuation shape (as measured from the center of the cone).
Cone Falloff Angle
This property defines the width (in degrees) of the outer area of the cone attenuation shape (as measured from outside of the cone angle).

Cone Offset
This property defines the distance directly behind the sound's origin from where you want the cone to start (this is independent from the other properties, so will extend the cone backward rather than shift it backward).

Falloff Distance
This property defines the size of the outer area of the attenuation shape. This is the same property regardless of shape and is measured from the edge of the inner area.


Enable Volume Attenuation
This property is used to enable or disable the distance-based volume attenuation.
When True, the sound will attenuate over distance according to the settings defined above.
When False, the sound will play at full volume irrespective of the distance between the sound and the listener.
Attenuation Spatialization

This section defines how the sound will spatialize in the game world. You can choose the method of spatialization that best suits your project, as well as experiment with different settings for how your sounds will behave as the listener moves around them.
Enable Spatialization
This property is used to enable or disable spatialization of the sound.
When True, the sound will be spatialized from a specific location within the game world and will pan accordingly as the listener moves around. Use this if you want the sound to appear to come from a particular location in the game world (eg. a spot source sound).
When False, the sound will be non-spatialized, and will effectively become a 2D ‘flat' sound and so no panning will be applied, regardless of the sound's source position relative to the listener. The exact nature of this process will depend on the configuration of your speakers and the format of your sounds. For example, if you're using stereo playback, then a mono sound would be upmixed to stereo, while quad, 5.1, and 7.1 sounds would be downmixed to stereo. You can set the method used when upmixing mono sounds within Project Settings > Engine > Audio > Quality > Mono Channel Upmix Method (you may need to expand the Quality section using the arrow). Use this if you don't want the sound to come from a particular location in the game world (such as an area loop or room tone).
Spatialization Method
This property allows you to define which panning method you want to use when spatializing the sound. Currently, there are 2 options:
Panning
This is the default and uses UE4's standard panning method to calculate spatial positioning. When using this method you can define as a global project setting whether to use linear or equal power panning. This can be found within Project Settings > Engine > Audio > Quality > Panning Method (you may need to expand the Quality section using the little arrow). This method is the best one to use if playing back over loudspeakers.
Binaural
This uses whatever binaural plugin you have enabled to handle the spatial positioning of your sound. The plugin can be set within Project Settings > Platforms > [YourPlatform] > Audio > Spatialization Plugin. You can use the built-in spatialization plugin, or enable a third-party one via the Plugins window. This method requires playback over headphones as binaural panning does not translate well over loudspeakers.
Non-Spatialized Radius
The property defines the distance threshold below which the sound will start to transition from being spatialized to non-spatialized (becoming a 2D sound). This is useful for preventing sudden, and jarring jumps in the spatial position of a sound when close to the source. It is also useful for helping ‘large' sounds to fill the spatial field when up close (such as large machines, waterfalls, etc).
In the image below, the sound of a large machine has been set to have a non-spatialized radius of 450 (depicted by the green sphere). When the listener is beyond this, the sound will be spatialized as normal, but as the listener crosses the threshold all channels of the sound will start to bleed to all channels of the speaker configuration. This process is interpolated, starting at the defined threshold and ending with a 100% bleed at the sound's origin. As an example, a stereo sound being played back on a 5.1 system would have it's left channel bleed to all 5 channels, and it's right channel bleed to all 5 channels. The result of this is a sound that starts to fill the spatial field (in whatever speaker configuration you're using, the sound will start to come from all the speakers) giving a much more convincing sense of scale.

3D Stereo Spread
This property defines the distance between the left and right channels of a stereo sound when spatialized in the game world. This is useful for creating a greater sense of width and size when using stereo sounds. It can also help mitigate sudden jumps in the spatial position of the source. In the image below, the green and red spheres depict the left and right channels of the stereo sound which have been positioned either side of the machine through the use of this parameter.

Normalize 3D Stereo Sounds
This property is used to enable or disable a 6dB gain reduction applied to stereo sounds which are being spatialized in the world. This is useful if you find the sound clipping due to channel summing when the stereo spread reduces to 0.0, either as a result of the 3D Stereo Spread property above, or through distance-related panning.
Attenuation Air Absorption

This section defines how the algorithm that attempts to model the effect air absorption has on the sound behaves, namely that higher frequencies decay quicker than lower frequencies relative to distance.
You can define a distance range within which the filter will be applied and then use the lowpass cutoff frequency settings to determine how much filtering you want—the filter will interpolate between the min and max cutoff frequency as you move between the min and max distances. As well as a lowpass filter for modeling air absorption, you also have a high pass filter that could be used to reduce the perceived size of the sound relative to distance.
In the image below, the green circle represents the min distance, and the red circle the max distance—any filter settings will be applied and interpolated between these two distances.

Enable Air Absorption
This property is used to enable or disable the air absorption model.
If True, then the sound will be processed using a low pass filter whose cutoff point varies relative to the listener's distance from the sound's source (as configured by the settings below).
If False, then the sound will go unprocessed.
Min Distance Range
This property defines the minimum distance from the sound's source at which the filter should be applied. You should experiment with different settings to find the point that best suits the sound you are using (but a good starting point would be based on the inner range of your attenuation distance settings).
Max Distance Range
This property defines the maximum distance from the sound's source at which the filter should be applied. You should experiment with different settings to find the point that best suits the sound you are using (but a good starting point would be based on the falloff range of your attenuation distance settings).
Low Pass Cutoff Frequency Min
This property defines the cutoff frequency of the lowpass filter when at the Min Distance Range (as defined above). You should experiment with different settings to find the value that best suits the sound you are using, but given that in reality there is little air absorption effect when in close proximity to a sound, higher values here work well.
Low Pass Cutoff Frequency Max
This property defines the cutoff frequency of the lowpass filter when at the Max Distance Range (as defined above). You should experiment with different settings to find the value that best suits the sound you are using, but given that, in reality, there is more air absorption effect when further away from a sound, lower values here work well.
High Pass Cutoff Frequency Min
This property defines the cutoff frequency of the highpass filter when at the Min Distance Range (as defined above). You should experiment with different settings to find the value that best suits the sound you are using, but subtle values work best here (for the most part). Given that you will likely want the sound to feel large when up close, lower values here work well.
High Pass Cutoff Frequency Max
This property defines the cutoff frequency of the highpass filter when at the Max Distance Range (as defined above). You should experiment with different settings to find the value that best suits the sound you are using, but subtle values work best here (for the most part). To make your sound feel smaller in size, and less dominant, when at a distance higher values here work well.
Enable Log Frequency Scaling
This property is used to enable or disable the application of a logarithmic scale to the filter cutoff frequency values as they are interpolated relative to the listener position. Depending on your settings, you may find the default linear scale produces some extreme and unnatural sounding results. If so, you can enable the log scale which should smooth out the changes as it will produce a perceptually linear frequency sweep.
Absorption Method
This property is used to determine whether you want to use either the inbuilt scaling function (log or linear from above) or whether you want to create your own custom curve for how the interpolation is scaled over the filtering distance.
You have two choices:
Linear
This uses the inbuilt scaling function (either linear or logarithmic depending on the property above).
Custom
This enables you to create your own custom scaling curves for the lowpass and highpass filters independently.

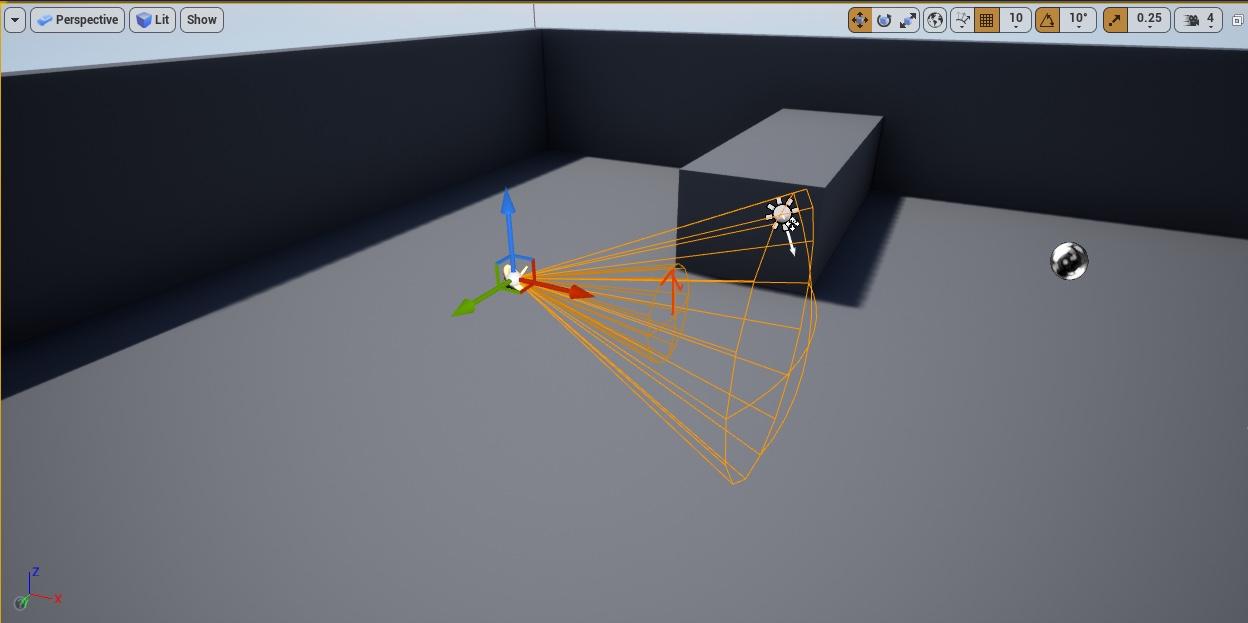
Attenuation Listener Focus

This section controls some additional processing that you can use to the ‘focus behavior' of sounds. There may be times when you want a sound to be more prominent depending on its position relative to the listener's rotation. For example, you may have certain sounds that belong to a special pickup item that is usually (intentionally) masked slightly by the rest of the mix, but if the player is looking directly at (or nearly directly at) the pickup item, you may want to bring the sound up in the mix slightly to accentuate it. Alternatively, you may want to set this listener focus behavior up across all your sounds in order to try and emulate the perceptual differences that arise from the fact that we tend to focus our attention on sounds that are directly in front of us.
With these settings you can control the angles that determine whether a sound is classed as being in or out of focus, the amount of scaling to apply to a sound's distance calculations and priority settings based on whether it is in or out of focus, the amount of attenuation to apply to in and out of focus sounds, and the interpolation speed for these settings as sounds move in and out of focus.
In the image below, the green cone depicts the angular area in which objects are classed as being in focus, the red cone depicts the transition area—anything beyond this is classed as being out of focus.

Enable Listener Focus
This property is used to enable or disable the listener focus system.
If True, then the sound will check to see whether it is in or out of focus and apply the various scaling factors accordingly.
If False, then the sound will simply behave according to its usual attenuation, distance, and priority settings.
Focus Azimuth
This property determines the azimuth (horizontal rotation) angle that a sound needs to be within in order to be classed as in focus, and is expressed in degrees. An angle of 0 degrees would be directly in front of the listener's forward vector.
Non-Focus Azimuth
This property determines the azimuth (horizontal rotation) angle that a sound needs to be beyond in order to be classed as out of focus, and is expressed in degrees. An angle of 0 degrees would be directly in front of the listener's forward vector.
Focus Distance Scale
This property defines the scaling value that will be applied to the sound's calculated distance from the listener, and therefore the attenuated volume of the sound. A value of less than 1.0 here will result in the sound appearing to be closer to the listener than it actually is when it is in focus.
Non-Focus Distance Scale
This property defines the scaling value that will be applied to the sound's calculated distance from the listener, and therefore the attenuated volume of the sound. A value greater than 1.0 here will result in the sound appearing to be further away from the listener than it actually is when it is out of focus.
Focus Priority Scale
This property defines the scaling value that will be applied to the sound's priority setting (which is defined within the sound itself). A value greater than 1.0 here will result in the sound's priority setting increasing when it is in focus.
Non-Focus Priority Scale
This property defines the scaling value that will be applied to the sound's priority setting (which is defined within the sound itself). A value of less than 1.0 here will result in the sound's priority setting decreasing when it is out of focus.
Focus Volume Attenuation
This property defines the scaling value that will be applied to the sound's volume when it is classed as being in focus. This occurs after the sound's initial volume has been scaled relative to its distance from the listener according to the Attenuation Distance settings above. A value greater than 1.0 here will result in sounds being boosted in volume when in focus.
Non-Focus Volume Attenuation
This property defines the scaling value that will be applied to the sound's volume when it is classed as being out of focus. This occurs after the sound's initial volume has been scaled relative to its distance from the listener according to the Attenuation Distance settings above. A value less of than 1.0 here will result in sounds being reduced in volume when out of focus.
Enable Focus Interpolation
This property allows you to enable or disable the focus interpolation system—this can be used to smoothly transition between settings when sounds move between being in or out of focus.
If True, interpolation will be applied to the various settings above when moving between being in or out of focus.
If False, the system will simply switch between the settings defined above when the sound between being in and out of focus.
Focus Attack Interp Speed
This property defines the interpolation speed used when moving from being out of focus to in focus. Smaller values here result in quicker transition times.
Focus Release Interp Speed
This property defines the interpolation speed used when moving from being in focus to out of focus. Smaller values here result in quicker transition times.
Attenuation Reverb Send

This section defines the relationship between the sound's distance from the listener and the amount of reverb that is applied to the sound. This assumes you have either defined a default reverb setting within the World Settings or the sound is within an audio volume with a reverb effect applied, and the sound's sound class settings allow for reverb to be applied.
You can control the method used to determine the reverb send level, the amount of the sound to send to the reverb effect (Reverb Min/Max Send Level) and how this might vary with the sound's distance from the listener (Reverb Min/Max Send Distance).
Enable Reverb Send
This property is used to enable or disable the reverb send system.
If True, the sound will be processed by the assigned reverb effect according to the settings defined below.
If False, the sound will not be processed by reverb and will be completely dry.
Reverb Send Method
This property defines the method used to determine how much of the sound is sent to the reverb effect.
Linear
The amount of the sound sent to the reverb effect will be determined by interpolating between the values defined in the Min/Max Send Levels, over the distances defined in the Min/Max Distance values.
Custom Curve

Click for full image.
The amount of the sound sent to the reverb will be determined by the curve you have defined, over the distances defined in the Min/Max Distance values.
Manual
The amount of the sound sent to the reverb will be defined by a single constant value—this doesn't change relative to distance, and so is probably most useful for non-spatialized ‘ambiance-style' sounds rather than point-source 3D sounds.
Reverb Min Send Level
This property is only available when using the Linear Send Method, and determines the amount of reverb to apply to the sound when at the distance defined in the Min Distance property. Typically you would use lower values here so that there appears to be more direct than reverberant sound when close to the sound's source.
Reverb Max Send Level
This property is only available when using the Linear Send Method, and determines the amount of reverb to apply to the sound when at the distance defined in the Max Distance property. Typically you would use higher values here so that there appears to be more reverberant than direct sound when far away from the sound's source.
Reverb Min Distance
This property defines the distance from the sound's source that will correspond with the Min Send Level (when using the Linear Send Method), or the lowest value of your Custom curve.
Reverb Max Distance
This property defines the distance from the sound's source that will correspond with the Max Send Level (when using the Linear Send Method), or the highest value of your Custom curve.
Attenuation Occlusion

This section defines how the in-built occlusion system will behave in order to simulate the effect of sound being reduced in high-frequency content and/or amplitude as a result of an object being between the source and the listener.
You can control how the engine will check for obstructions, as well the severity of low pass filtering and volume reduction should an obstruction be found. You can also change the speed that, as a result, any changes to the sound will occur.
Enable Occlusion
This property allows you to enable and disable the in-built occlusion system.
If True, the in-built system will check for obstructions and apply the settings defined below.
If False, the in-built system will be turned off, and unless you're using a 3rd party plugin (defined in the Plugin Settings below), your sounds will not emulate occlusion.
Occlusion Trace Channel
This property determines which trace channel will be used to determine whether there is an obstruction between the source and the listener. The default here is Visibility, which would probably work fine for most purposes—essentially, if the object has collision set up in its properties then it will work with this setting. If you want to exclude any specific objects from the occlusion system, so that they didn't form obstructions to your sounds, you can do this by setting their Collision Response property for the channel you're using (for example Visibility) to ‘Ignore' (you may have to change the Collision Preset property to ‘Custom' to access this—this may have implications on the correct functioning of other systems, so do this with care. It may be better to set up a custom Audio Trace channel).
Occlusion Low Pass Filter Frequency
This property defines the cutoff frequency of the low pass filter that will be applied if the system detects an obstruction between the sound source and the listener. The lower the values used here, the more extreme and noticeable the filtering effect will be.
Occlusion Volume Attenuation
This property defines how the scaling value to apply to the sound's volume if the system detects an obstruction between the sound source and the listener. The lower the values used here, the more extreme and noticeable the volume reduction will be.
Occlusion Interpolation Time
This property defines the transition time for the occlusion effect as a sound alternates between being obstructed and not obstructed. The lower the values here, the more responsive the system is able to be, but if depending on your settings this can produce some fairly extreme behavior. It's a good idea to experiment with different time values to find what works best for different situations.
Use Complex Collision for Occlusion
This property allows you to enable and disable the use of complex collision for the obstruction system. By default, the system will use an object's simple collision to check for obstructions as this is significantly cheaper in terms of resources. However, if the objects in your level have complex shapes, then you may find that this produces unconvincing results—for example, sounds may be flagged as obstructed even though they are not. In the screenshots below, you can see the difference between an object's simple and complex collision models, and how if the listener was towards the bottom of the object then it could produce the problem highlighted above.


Attenuation Plugin Settings
This section allows you to define any settings made available to you by the developers of any third-party plugins you choose to use for either Spatialization, Occlusion, or Reverb. If you are using the native built-in systems, then this section will be empty.
Spatialization Plugin Settings
This is where any spatialization plugin settings will appear.
Occlusion Plugin Settings
This is where any occlusion plugin settings will appear.
Reverb Plugin Settings
This is where any reverb plugin settings will appear.