Choose your operating system:
Windows
macOS
Linux

At the end of this guide, you will have a TV playing content in your level that you can turn on or off when standing next to them and pressing a key.
Goals
In the Media Framework Quick Start guide, we walk through setting up a television (TV) that can play videos inside your level. We also set the TV up with Blueprints so the content on the TV can be turned on with the press of a button. We also expose the Media Framework variables so that we can quicly change the content that is played on the TV through the Details panel. If you are new to the Media Framework tools, or want to know how to play videos on Static Meshes inside your levels, this guide is for you.
This guide includes some setup using Materials and Blueprints to achieve the effect of a video playing on a TV. Some prior knowledge of these topics is recommended but not required.
Objectives
After going through this tutorial, developers will know the following:
-
How to import Media and use different Media Sources.
-
How to create a Material incorporating a Media Texture used to play media files.
-
How to start and stop playback of media using Blueprint.
-
How to create a TV Blueprint where you can specify what Media Source to use.
1 - Project and Material Setup
-
Create a New Project using from the Games category using the ThirdPerson Blueprint template and give it any name.
-
Extract this Sample Content to your machine, then import all content into the Engine.
![MediaFrameworkQS_02.png]()
Optionally, you can create a new folder to hold all the sample content. A Material will automatically be created based on the Texture asset.
-
In the M_TV_Inst Material, delete the Vector Parameter node, and add a Texture Sample with the Sample Type set to External .
![MediaFrameworkQS_03.png]()
-
Add a Texture Object Parameter and name it TV_Texture , then connect to the Texture Sample through the Tex pin.
-
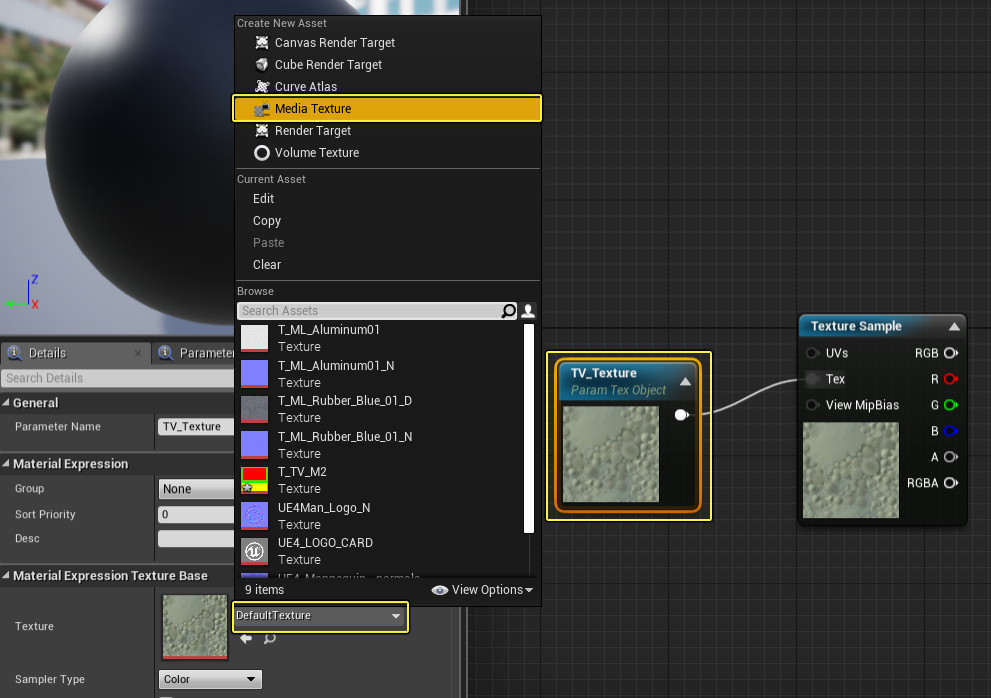
For the TV_Texture Param Tex Object, change the Texture to a new Media Texture and call it MediaPlayer_01_Video .
![MediaFrameworkQS_04.png]()
Click image for full view.
-
Click the magnifying glass icon to browse to and open the MediaPlayer_01_Video asset.
![MediaFrameworkQS_04b.png]()
If you are using a Texture Sample or Texture Object with the Electra Media Player , set the Sampler Type to Color .
![MediaFrameworkQS_04_electra.png]()
-
Click the Media Player drop-down menu and create a Media Player asset called MyMediaPlayer .
![MediaFrameworkQS_04c.png]()
When the Create Media Player pop-up menu appears, just click Ok as we do not need to create another Media Texture as we did this in Step 5 above.
![MediaFrameworkQS_04d.png]()
-
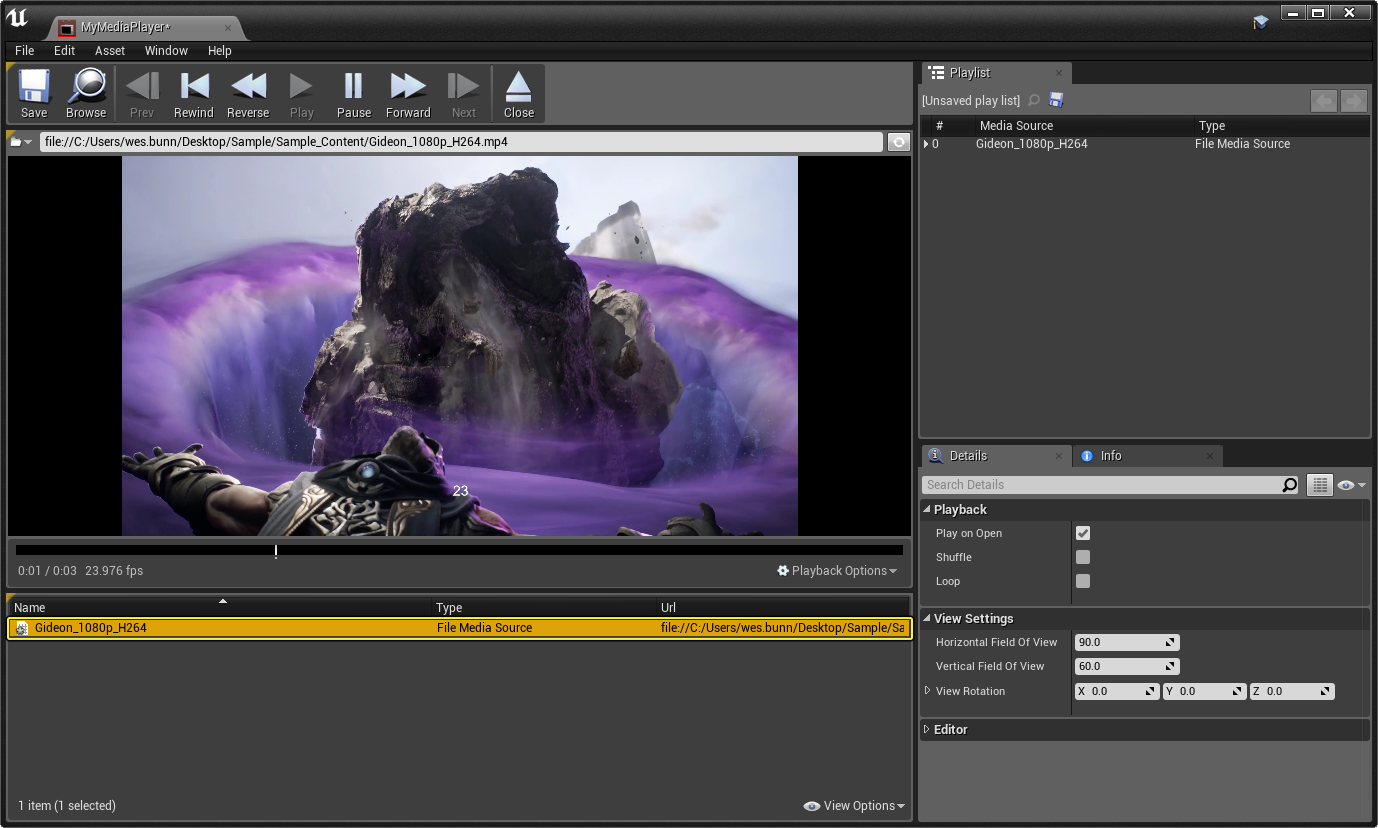
Open your MyMediaPlayer asset, then double-click the Gideon_1080p_H264 file and the video will start playing.
![MediaFrameworkQS_04e.png]()
Click image for full view.
-
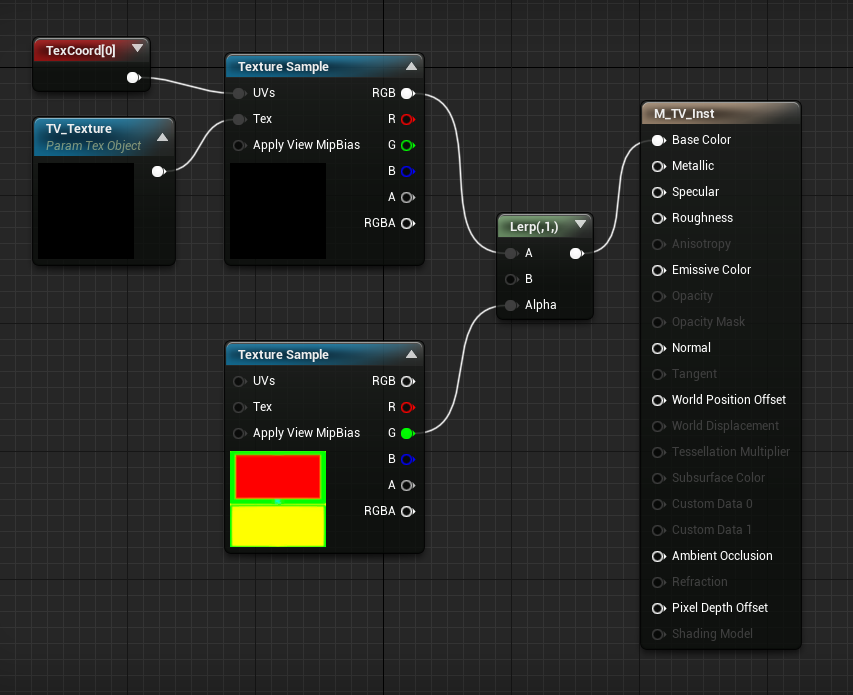
In the M_TV_Inst Material, add a TexCoord with VTiling set to 2.0 and connected to the UVs pin of the Texture Sample .
![MediaFrameworkQS_05.png]()
-
Add another TextureSample with the Texture set to the T_TV_M2 asset.
![MediaFrameworkQS_06.png]()
-
Add a LinearInterpolate node with the Texture from the previous step connect to the Alpha through the Green channel.
![MediaFrameworkQS_07.png]()
-
Connect the remaining pins as shown below.
![MediaFrameworkQS_08.png]()
Click image for full view.


Section Result
We've set up the Material that will play back our Media using a Media Player and associated Media Texture asset. If we open the TV mesh in the Content Browser , you may notice that the screen appears black (or white in some instances).

To preivew, you can open the Media Player asset and double-click the Media Source, at which point, the media will play on the Static Mesh TV in the Viewport.
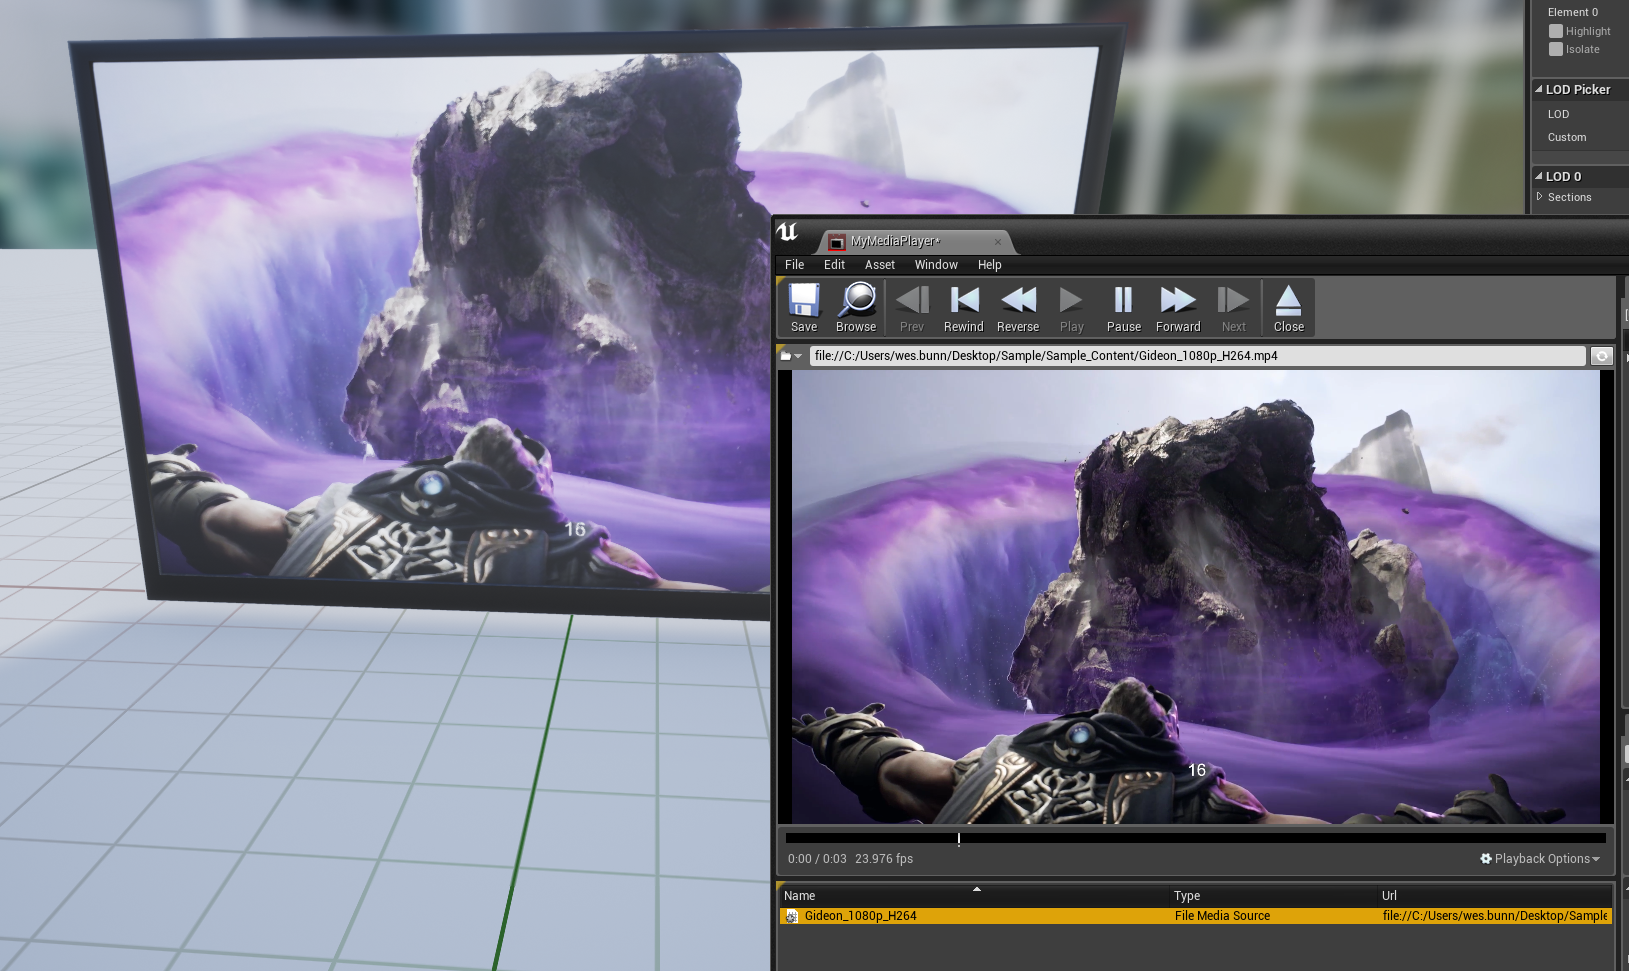
Click image for full view.
2 - TV Blueprint - Component Setup
In this step, we create a Blueprint that uses the TV Static Mesh and the remaining components needed make our TV work in the Level.
-
In the Content Browser click the Add New button and select Blueprint Class .
![MediaFrameworkQS_010.png]()
-
In the Pick Parent Class menu, select Actor and name the Blueprint TV_BP .
![MediaFrameworkQS_011.png]()
-
In the TV_BP asset, click the Add Component button and select Static Mesh .
![MediaFrameworkQS_012.png]()
-
In the Details panel for the Static Mesh , assign the SM_TV as the Static Mesh to use.
![MediaFrameworkQS_013.png]()
-
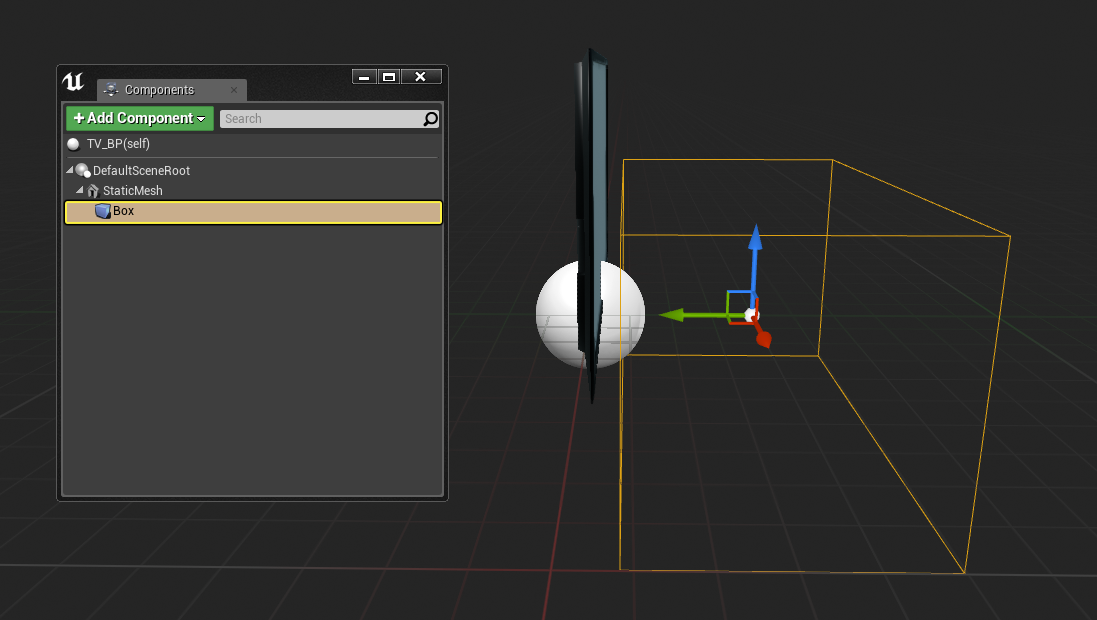
Add a Box Collision component, then resize and move the box infront of the TV as shown below.
![MediaFrameworkQS_014.png]()
Click image for full view.
We are going to use the Box Collision to indicate when the player is infront of the TV and can turn it on (we don't want to be able to turn on the TV while standing behind it).
-
Add a MediaSound component and assign the MyMediaPlayer asset in the Details panel for the Media Player property.
![MediaFrameworkQS_015.png]()
This will be used to play back the audio associated with the defined Media Source inside the Media Player .
-
In the Details panel for the Box Collision , add both the On Component Begin Overlap and On Component End Overlap events.
![MediaFrameworkQS_016.png]()


Section Result
Our TV Blueprint is set up, next we will add the scripted functionality to be able to turn the TV on when standing next to it by pressing a key.
3 - TV Blueprint - Scripted Setup
In this final step, we add the scripted functionality that enables the player to press a button to turn the TV on or off.
-
On the Event Graph of the TV Blueprint, use a Get Player Controller , Enable Input and Disable input connected as shown below.
![MediaFrameworkQS_017.png]()
Click image for full view.
-
Right-click in the graph and add a P Keyboard Event (or your desired key press) and connect Pressed to a FlipFlop node.
![MediaFrameworkQS_018.png]()
-
Right-click in the graph and disable Context Sensitive , then add an Open Source node.
![MediaFrameworkQS_019.png]()
-
On the Open Source node, right-click the Target pin and select Promote to Variable and call it MediaPlayerforVideo .
![MediaFrameworkQS_020.png]()
By default, Media Players are set to Play on Open which will play the media whenever it is opened.
For Media Players that have Play on Open disabled, you can use a Play node followed by an Open Source call.
-
Promote Media Source to a variable and call it SourceToOpen .
-
In the Variables list, click the eye icon on both variables to make them Instance Editable and connect as shown below.
![MediaFrameworkQS_021.png]()
-
Add a Close node connected to the B pin of the FlipFlop and Target set to MediaPlayerforVideo .
![MediaFrameworkQS_022.png]()
-
Drag the TV_BP into the Level, then in the Details panel, assign the MyMediaPlayer and Gideon_1080p_H264 assets.
![MediaFrameworkQS_023.png]()
We are going to use the Box Collision to indicate when the player is infront of the TV and can turn it on (we don't want to be able to turn on the TV while standing behind it).
-
Inside the MyMediaPlayer asset, enable the Loop option.
![MediaFrameworkQS_024.png]()
This will automatically loop the video once it starts playing unless instructed to close.
-
Click the Play button to play in the Level.


End Result
When playing in the Level and approaching the TV, pressing the P button will start playing the assigned media. Pressing P again will stop playback.
4 - On Your Own!
Here are some additional things to try with your project using the Media Framework tools:
-
Enable the player to control playback of the TV.
-
Use a Media Playlist as a Media Source and allow the player to "change the channels" for the TV.
-
Add a second TV Blueprint to the level with its own Media Player, Media Sound, and Media Source Assets.