Choose your operating system:
Windows
macOS
Linux
By the end of this guide, you will be familiar with:
-
Building the Texture Share SDK from source.
-
Integrating the C++ SDK with DirectX11 and DirectX12 applications.
-
Using the Unreal Engine plugin and Blueprints.
-
Sending the project's rendered viewport in Unreal to an external application.
-
Sending and receiving textures from an external application during your Unreal session.
Step 1 - Getting Started with the SDK
In order to use the Texture Share SDK, you must download and build the engine from source. See Downloading Unreal Engine Source Code for details on where to find the engine source code.
Building the engine in Visual Studio won't build the TextureShareSDK project by default.
Follow these steps to build the Texture Share SDK:
-
Open the
UE4.slnfile in Visual Studio. -
In the Solution Explorer panel, navigate to Programs > TextureShare . Right-click the TextureShareSDK project and build it.
![image alt text]()
-
When the project finishes building, it generates
.liband.dllfiles in the folder Engine\Binaries\Win64\TextureShareSDK .

C++ SDK Integration
The Texture Share API provides granular control over the texture sharing process.
To use Texture Share, you must establish a session between exchanging parties before you can perform any read or write operations. Each step of the process provides control over a variety of synchronization states that you can customize for your project.
C++ applications using the Texture Share API adhere to the following structure:
-
Client application creates texture share object by specifying its name.
-
Textures are registered with the texture share object, which can hold multiple textures, and the texture session is started.
-
On each frame, data can be written and sent to the other application or read. The data buffers must be locked before read or write operations and unlocked afterwards.
-
Step 3 is repeated for every frame until the session ends.
The following section shows how the Texture Share API is used in the DirectX12 sample project
TextureShareD3D12Client.vcxproj
located in
Engine/Source/Programs/TextureShare/Samples/ThirdParty/TextureShare_ClientD3D12
.
This example uses DirectX12 but the process is the same for DirectX11. You can follow along with the DirectX11 sample project in the ThirdParty folder with some modifications.
Include Files
-
Include the header files
TextureShareD3D12Client.handTextureShareDLL.h. -
Link the static library file using a pragma comment . Use
TextureShareSDK.libif you're building with the Release configuration in Visual Studio andTextureShareSDK-Win64-Debug.libif you're building with the Debug configuration.#include "TextureShareD3D12Client.h" #include "TextureShareDLL.h" #ifdef _DEBUG #pragma comment( lib, "TextureShareSDK-Win64-Debug.lib" ) #else #pragma comment( lib, "TextureShareSDK.lib" ) #endif
Initialize
The following steps describe what to intialize and how to start a Texture Share session in C++.
-
Load the render pipeline and assets with the DirectX APIs:
-
Create a DirectX device .
-
Create a GraphicsCommandList .
See
D3D12HelloTexture::LoadPipeline()andD3D12HelloTexture::LoadAssets()for examples. -
-
Create the Texture Share item:
-
Set the share name. Maximum length is 128 characters.
-
Set the application as the client with
ETextureShareProcess::Client. -
Define the sync policies for the Texture Share session. See Sync Policies for more details. In this example, all the sync policies are set to None so the synchronization events will be non-blocking.
-
Specify which graphics API is being used. Currently only DirectX11 and DirectX12 are supported.
FTextureShareSyncPolicy DefaultSyncPolicy;
DefaultSyncPolicy.ConnectionSync = ETextureShareSyncConnect::None;
DefaultSyncPolicy.FrameSync = ETextureShareSyncFrame::None;
DefaultSyncPolicy.TextureSync = ETextureShareSyncSurface::None;
FTextureShareInterface::CreateTextureShare(ShareName.c_str(), ETextureShareProcess::Client, DefaultSyncPolicy, ETextureShareDevice::D3D12);
-
-
Register the texture with the Texture Share item:
-
Set the share name of the session.
-
Set the texture name.
-
Set the texture resolution.
-
Define the texture format and value.
-
Set whether the texture is readable or writable.
ETextureShareFormat ShareFormat = ETextureShareFormat::Undefined;
uint32 ShareFormatValue = 0;
// Use client texture format:
if (InFormat != DXGI_FORMAT_UNKNOWN)
{
    ShareFormat = ETextureShareFormat::Format_DXGI;
    ShareFormatValue = InFormat;
}
FTextureShareInterface::RegisterTexture(ShareName.c_str(), TextureName.c_str(), Width, Height, ShareFormat, ShareFormatValue, TextureOp);
-
-
Define the start of the scope of the Texture Share session:
FTextureShareInterface::BeginSession(ShareName.c_str());
Render Thread
The following steps describe how to access the shared memory in the render thread. The steps show how to use both the read and write operations.
-
Define the start of the scope for the frame in the Texture Share session:
FTextureShareInterface::BeginFrame_RenderThread(ShareName.c_str()); -
Read the texture in the render thread:
-
Put a lock on the texture.
-
Access the texture memory.
-
Release the lock on the texture.
if (FTextureShareInterface::IsValid(ShareName.c_str()))
{
    ID3D12Resource* SharedResource;
    if (FTextureShareInterface::LockTextureD3D12_RenderThread(pD3D12Device, ShareName.c_str(), TextureName.c_str(), SharedResource))
    {
        if (!FTextureShareD3D12Helper::IsTexturesEqual(SharedResource, *InOutSRVTexture))
        {
            // Shared texture size changed on server side. Remove temp texture, and re-create new tempTexture
            ReleaseTextureAndSRV(InOutSRVTexture);
        }
        if (!*InOutSRVTexture)
        {
            // Create Temp texture&srv
            FTextureShareD3D12Helper::CreateSRVTexture(pD3D12Device, pD3D12HeapSRV, SharedResource, InOutSRVTexture, SRVIndex);
        }
        // Copy from shared to temp:
        if (*InOutSRVTexture)
        {
            FTextureShareD3D12Helper::CopyResource(pCmdList, SharedResource, *InOutSRVTexture);
        }
        // Unlock shared resource
        FTextureShareInterface::UnlockTexture_RenderThread(ShareName.c_str(), TextureName.c_str());
    }
    else
    {
        // Release unused texture (disconnect purpose)
        ReleaseTextureAndSRV(InOutSRVTexture);
      }
}
-
-
Write to the texture in the render thread:
-
Check if the session is valid.
-
Put a lock on the texture.
-
Access the memory.
-
Release the lock on the texture.
  if (FTextureShareInterface::IsValid(ShareName.c_str()))
{
    ID3D12Resource* SharedResource;
    if (FTextureShareInterface::LockTextureD3D12_RenderThread(pD3D12Device, ShareName.c_str(), TextureName.c_str(), SharedResource))
    {
            FTextureShareD3D12Helper::CopyResource(pCmdList, InTexture, SharedResource);
            FTextureShareInterface::UnlockTexture_RenderThread(ShareName.c_str(), TextureName.c_str());
    }
}
-
-
Get frame data to access the information in the auxiliary buffers, such as the projection and camera matrices:
FTextureShareSDKAdditionalData* OutFrameData; FTextureShareInterface::GetRemoteAdditionalData(ShareName.c_str(), *OutFrameData); -
Define the end of the scope for the frame in the Texture Share session:
FTextureShareInterface::EndFrame_RenderThread(ShareName.c_str()); -
Present the frame to display.
Clean Up
The following steps describe how to end the Texture Share session when the application exits.
-
Define the end of the scope for the Texture Share session:
FTextureShareInterface::EndSession(ShareName.c_str()); -
Delete the Texture Share item and release the memory:
FTextureShareInterface::ReleaseTextureShare(ShareName.c_str());
Step 2 - Getting Started in Unreal
Follow these steps to use the Texture Share plugin and to access the Texture Share Blueprints in Unreal Engine.
-
In the Editor's main menu, choose Edit > Plugins to open the Plugins Editor .
-
In the Plugins Editor, find the Texture Share plugin in the Misc section.
![image alt text]()
-
Check the Enabled checkbox and restart the Editor.
-
In the Content Browser , expand the View Options dropdown at the bottom right of the panel. Check Show Engine Content and Show Plugin Content .
![image alt text]()
-
Click the folder icon at the top of the Content Browser to choose a content path. Find TextureShare Content in the list and select it.
![image alt text]()
-
In the Blueprints folder, there are two Blueprint objects you can add directly to your scene:
-
BP_TextureShare_Scene : This Blueprint shares the rendered frame of the whole Unreal scene.
-
BP_TextureShare_Postprocess : This Blueprint sends and receives specific Texture objects.
![image alt text]()
-
-
In the Materials folder are textures and materials you can use with the BP_TextureShare_Postprocess Blueprint:
-
RTT_TextureShare_Backbuffer : A Texture Render Target 2D asset.
-
M_TextureShare_RTTBackbuffer : A material that samples the RTT_TextureShare_Backbuffer texture and uses it as an Emissive Color .
![image alt text]()
-


The remaining steps in this quick start describe how to use each Blueprint and connect them to other DirectX applications.
Step 3 - Send Unreal Scene as a Texture to a DirectX Application
Follow these steps to stream an Unreal scene to an external DirectX application.
-
Navigate to the folder Engine/Source/Programs/TextureShare/Samples/ThirdParty/TextureShare_ClientD3D11 and open the sample project `TextureShareD3D11Client.vcxproj`in Visual Studio.
-
Set the Solution Configuration to Release in Visual Studio .
-
Build the project in Visual Studio.
-
Navigate to the folder Engine\Source\Programs\TextureShare\Samples\ThirdParty\TextureShare_ClientD3D11\Binaries\TextureShareD3D11Client-Win64-Release and launch the
TextureShareD3D11Client.exeapplication. -
Open your Unreal project in Unreal Engine and add the Blueprint BP_TextureShare_Scene object to your scene.
-
Select the BP_TextureShare_Scene object to open its Details panel.
-
Ensure the Share Name parameter is set to the same name as the ShareName variable in the sample project: vp_1 .
-
Press Play in Unreal. The rendered frames from your Unreal scene are streamed as a texture to the client application and applied to the rotating cube.

Step 4 - Send Textures to External DirectX Application
The previous step described how to share the Unreal scene as a texture in a separate process. Any texture object in the project can also be sent to an external application.
Follow these steps to share any texture object in your Unreal project to the sample DirectX application.
-
Navigate to the folder Engine\Source\Programs\TextureShare\Samples\ThirdParty\TextureShare_ClientD3D12 and open the sample project
TextureShareD3D12Client.vcxprojin Visual Studio. -
Set the Solution Configuration to Release .
-
Build the project.
-
Navigate to the folder Engine\Source\Programs\TextureShare\Samples\ThirdParty\TextureShare_ClientD3D12\Binaries\TextureShareD3D12Client-Win64-Release and launch the executable built by the project:
TextureShareD3D12Client.exe. -
Open your Unreal project in Unreal Engine and add the Blueprint BP_TextureShare_Postprocess object to your scene.
-
Select the BP_TextureShare_Postprocess object you added to the scene to open its Details panel.
![image alt text]()
-
Expand the Postprocess section.
-
Expand the Send section under Postprocess . There are two Send array elements. The Ids must correspond to the texture names defined in the file
D3D12HelloTexture.cppin the sample project:// Define share and texture names std::wstring ShareName1 = L"vp_1"; std::wstring ReceiveTextureNames[] = { L"SceneDepth" , L"BackBuffer" };-
Set the first Send element's Id to SceneDepth .
-
Set the second Send element's Id to BackBuffer .
![image alt text]()
-
-
Press Play in the Unreal Editor .
-
Update the Texture parameters for both Send elements with texture objects. The engine streams the textures to the client application and applies them to the rendered triangles.


Step 5 - Receive Textures from a DirectX Application and Display Them in Unreal
The previous step described how to send textures to an external DirectX application. This section describes how to receive textures from another application.
Follow these steps to receive textures from the sample DirectX application.
-
Navigate to the folder Engine\Source\Programs\TextureShare\Samples\ThirdParty\TextureShare_ClientD3D12 and open the sample project
TextureShareD3D12Client.vcxprojin Visual Studio. -
Set the Solution Configuration to Release .
-
Build the project.
-
Navigate to the folder Engine\Source\Programs\TextureShare\Samples\ThirdParty\TextureShare_ClientD3D12\Binaries\TextureShareD3D12Client-Win64-Release and launch the executable the project built:
TextureShareD3D12Client.exe. -
Open your Unreal project in Unreal Engine and add the Blueprint BP_TextureShare_Postprocess object to your scene.
-
Select the BP_TextureShare_Postprocess object you added to the scene to open its Details panel.
-
In the Details panel under Default , expand the Postprocess section.
-
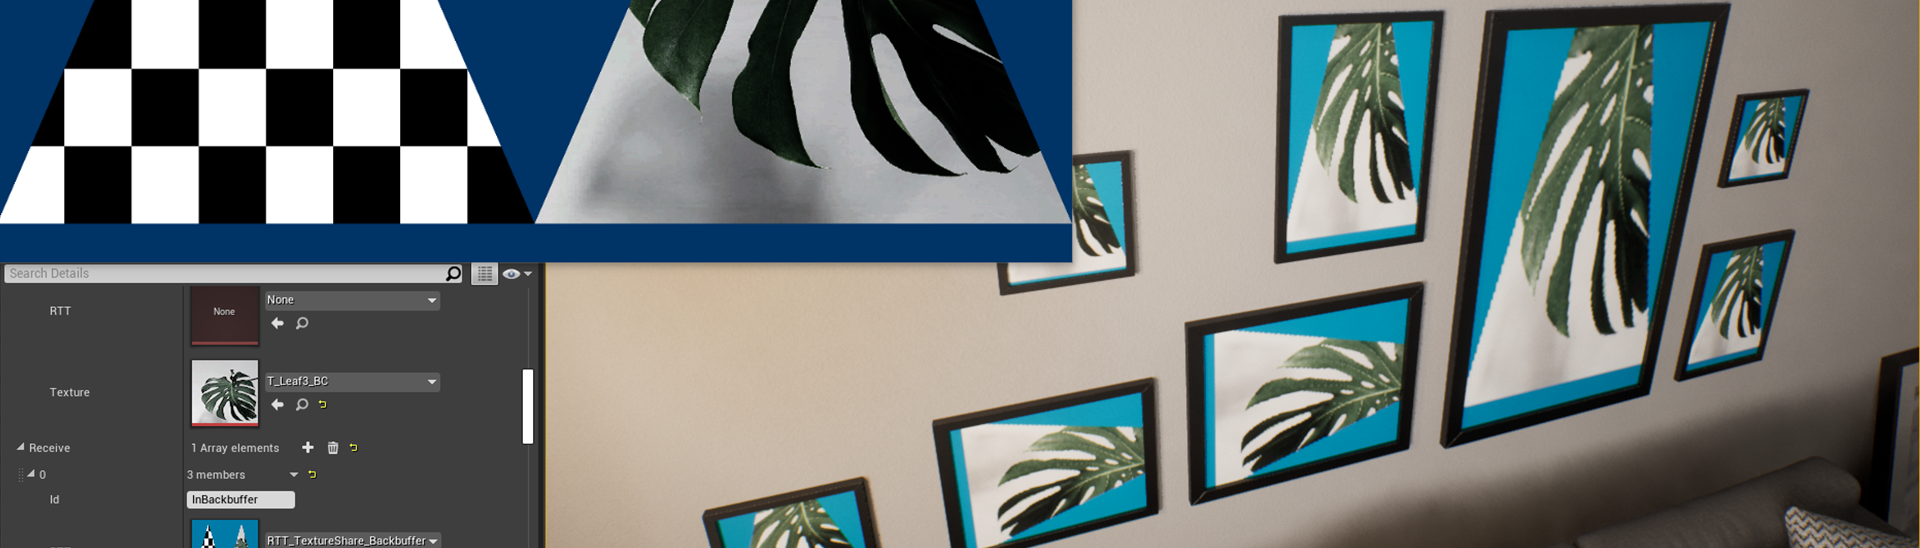
Expand the Receive section under Postprocess . There is one Receive array element. The Id for this element must correspond to the texture name defined in the file
D3D12HelloTexture.cppin the sample project:// Define share and texture names std::wstring ShareName1 = L"vp_1"; std::wstring SendBackbufferTextureName = L"InBackbuffer";![image alt text]()
-
Set the Receive element's RTT parameter to the texture RTT_TextureShare_Backbuffer provided in the TextureShare plugin.
![image alt text]()


Now your Unreal project is set up to receive textures from another application using TextureShare.
In the example below, the Unreal Engine session is started. Unreal is sending a texture to the TextureShareD3D12Client application and receiving the backbuffer from that application. The pictures on the wall in the scene are using a material that's sampling the RTT_TextureShare_Backbuffer texture to display what's received in real-time.
