Choose your operating system:
Windows
macOS
Linux
The Virtual Camera Plugin enables a user to drive a Cine Camera in Unreal Engine 4 (UE4) using an iPad Pro in a virtual production environment. With ARKit or an optical motion capture system such as Vicon or Optitrack, the position and rotation of the iPad is broadcast wirelessly to the PC, with the PC sending video back to the iPad.
Camera settings such as Focal Length , Aperture , Focus Distance , and Stabilization can be adjusted using touch input. Additionally, the Virtual Camera can be used for taking high-res screenshots , setting waypoints, recording camera motion and other tasks related to virtual production.
Below is a video that outlines the features of the Virtual Camera Plugin that mirrors most of the documentation on this page:
This document focuses on setup for an ARKit enabled iPad Pro. See also the section on connecting to Maya with Live Link .
Dependencies
The Virtual Camera relies on a separate UE4 Plugin called Remote Session and the associated Unreal Remote 2 app (which you can find for free on the App Store ).
Remote Session Plugin
This Plugin transmits video from a Play in Editor (PIE) or Standalone Game window on a PC to a mobile device over IP, receiving touch input and ARKit tracking data back. This can be used for mobile preview without the need to deploy to the device and is also used by the Virtual Camera Plugin.
Unreal Remote 2 App
This App is used in conjunction with the Remote Session Plugin to transmit and receive data over IP between the device and PC. The only user input required in the app is the IP address of the PC.
You will also need to have an iOS device that meets the ARKit prerequisites in order to track the device's movement and enable the Apple ARKit Plugin inside of UE4.
Communication Port
The Unreal Remote 2 app needs to establish a connection with the instance of Unreal Engine running on your computer. You provide the IP address of the computer that you want it to connect to when you start the app (see iOS Device Setup below). However, the app always uses port 2049 to communicate with Unreal Engine. You must ensure that the computer running Unreal Engine has this port open for communications from your local network. This may involve configuring your computer's firewall and security settings.
Enabling the Required Plugins
To get started, enable the following Plugins:
-
From the Main Editor under Edit , select Plugins .

-
From the Virtual Production tab, enable the VirtualCamera Plugin.

-
Restart the Editor for the Plugins to be applied.


After restarting the Editor, the Virtual Camera Plugin will be enabled. When enabling the Plugin, two additional Plugins will be automatically enabled: Remote Session and Apple ARKit which are needed to fully maximize the potential and features of the Virtual Camera.


iOS Device Setup
Download the
Unreal Remote 2
app from the App Store to your ARKit enabled iOS device and launch the app, you will see a similar screen to below.

You will need to enter the IP address of the remote server and press the
Connect
button to try and establish a connection. The IP address may vary, however, you can open a
CMD
prompt and type
IPCONFIG
on Windows machines to retrieve your IPv4 address.
A connection will only occur while a Play Session has been initiated by UE4. The Unreal Remote 2 app will appear in the "connecting" state until either the cancel button is pressed or a Play Session has been launched by UE4.
UE4 Project Setup
The first thing you will need to do is assign the
VirtualCameraGameMode
inside your UE4 project:
-
Inside your project, go to the World Settings menu:

-
From the World Settings menu under Game Mode , assign the VirtualCameraGameMode .


This will assign the correct Game Mode and Pawn to use for the Virtual Camera and virtual production.
To set up your ARKit enabled iPad, for the Unreal Remote 2 app to use ARKit, it needs to have the AR and XR channels exposed in your project. This can be done by adding the following to your project's DefaultEngine.ini file (make sure you clear the Read-Only flag on the project by right-clicking on the project file and selecting Properties ):
[RemoteSession]
+Channels=(Name=FRemoteSessionFrameBufferChannel,Mode=Write)
+Channels=(Name=FRemoteSessionInputChannel,Mode=Read)
+Channels=(Name=FRemoteSessionXRTrackingChannel,Mode=Read)
In addition to movement tracking through ARKit, another option for movement is using Virtual Joysticks. However, since we are not deploying the project to the device, we need to expose the Virtual Joysticks in the project which can be done from the
Edit > Project Settings > Input
section and enabling
Always Show Touch Interface
under the
Mobile
section.
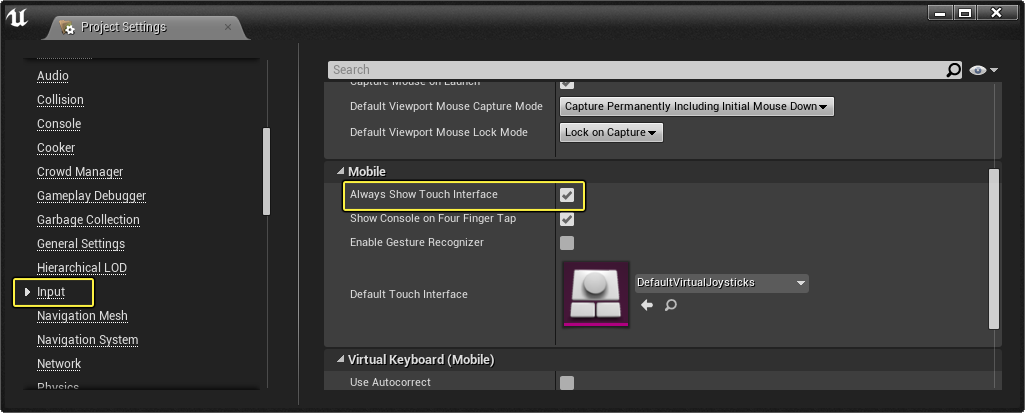
Click image for full view.
To prevent stretching or skewing of the Virtual Camera UI, you may want to also change the
Game Viewport Settings
to match your device's resolution. This can be done from the
Edit > Editor Preferences > Play
menu under
Game Viewport Settings
with the
Common Window Sizes
option (the button directly next to this option also enables you to set the view to Landscape or Portrait orientation).
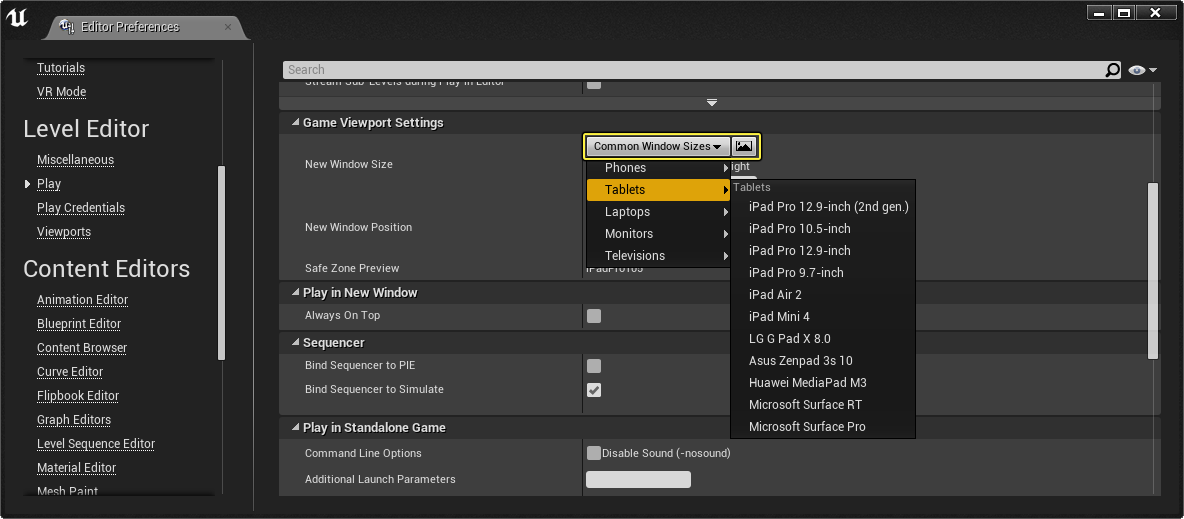
Click image for full view.
If the playback seems too slow with a native window size, you can adjust the resolution of the window here, keeping the aspect ratio the same. For example, 1280x960 works well for the iPad Pro, which has a 4:3 aspect ratio.
Click the
Play Options
drop-down menu next to the
Play
button and select
New Editor Window (PIE)
.

The project will launch and the Virtual Camera UI will be seen overlaid on top of your project:

Make sure that you do not expand the Play in Editor (PIE) window. Depending on the resolution of your monitor, this may cause undesired stretching.
The iOS device running the
Unreal Remote 2
app will also automatically connect to the Play Session.

You can now control the session through the iOS device with the
Unreal Remote 2
app.
Virtual Camera UI
This section outlines the Virtual Camera UI and its settings.

1 - Visibility
Tapping the Eye icon in the upper-left corner will hide/show the Virtual Camera UI. You can define which elements to hide from the Settings menu.
2 - Slate and FPS
In the top center portion of the UI is an informational section showing the Slate Name and FPS of the recording. This can be customized using Sequence Recorder , otherwise, it will default to basic camera and scene/take naming conventions. The naming convention will be used when recording Takes as well as during playback.
3 - Focus Mode
The three buttons in the top-right corner of the UI ( M, T, A ) are used to set the Focus Mode for the Virtual Camera.
-
Manual (M) - The default setting which will set the focus distance to a constant value each time you tap the screen to focus.
-
Tracking (T) - This setting will continually update the focus distance to keep the selected 3D point in focus.
-
Auto (A) - This setting will display a reticle that can be moved around the screen by tapping. The focus distance will continually update to keep whatever is under the reticle in focus.
4 - Settings
Tapping on the Gear icon in the upper-right corner will bring up the Settings menu.
4.1 General Settings

The General Settings tab contains the ability to set input camera tracking source (ARKit, Custom, LiveLink), display playback in seconds or frames and change global boom to local boom (not recommended) across the feature set.
4.2 Film Format / Aspect Ratio

The Film Format / Aspect Ratio tab enables a user to choose from a list of predetermined Film Formats and Mattes (customizable in arrays on the CineCamera Component of the Virtual Camera Pawn ) and set the Matte Opacity .
4.3 Focus

The Focus tab gives the user access to the Focus Method (these options are identical to the M/T/A buttons in the main UI), the display format of the Focus Distance , whether or not to show the Focus Plane when using touch input to focus, and what the Color of the plane will be.
4.4 Stabilization

The
Stabilization
tab is used to dampen the motion of the tracking input, giving the user a smoother camera move. In addition to different stabilization values for position and rotation, the user also has the ability to adjust stabilization per channel.
Dampening the motion of the tracking input will introduce some lag.
4.5 Axis Locking

Axis Locking will stop the input source from affecting that specific axis. It is based on the direction the camera is facing when the axis is locked. For example, locking the Truck and the Boom will force the camera to only move side-to-side. This is a great way to quickly create a linear dolly track.
By default, locking Dutch will zero out the roll on the camera, keeping the horizon level. When an axis is unlocked, the camera will again inherit the position/rotation from the input source for that axis. This will cause the camera to move/rotate which is the expected behavior.
4.6 Motion Scale

Motion Scale is used to amplify the motion of the input source. This enables a user to exaggerate (or minimize) their movement as they walk around a scene. The scale on all three movement axes can be adjusted independently.
Additionally, the Truck and Dolly can be linked so that movement in the x-y plane is uniform. Hitting the double arrows next to the scroll wheels adds 10x to the scale value. The button at the bottom of the window can be used for resetting scale back to 1.
4.7 View Freeze

Pressing the Freeze the View button will temporarily disable the input source so the view on the tablet freezes, enabling the user to move the tablet somewhere else in the real world. Pressing Unfreeze the View then re-enables the input source but keeps the view offset.
This is particularly helpful if a user wants to re-orient the scene in relation to the real-world or simply to more comfortably hold the tablet while scouting or shooting. You can also define which axes to freeze in the lower portion of the View Freeze window.
4.8 Visibility

The Visibility tab enables a user to choose which UI elements remain visible when the visibility (eye icon) button is tapped on the main UI.
4.9 Presets

Presets enable a user to save specific settings and load those back during another session. By default, the Plugin will save the current camera settings when the user closes the PIE/game window.
5 - Focal Length
The
Focal Length
is displayed in the top-left region of the UI. Tapping on that region expands a wheel with a customizable lens kit.

Scrolling through the wheel will cycle through the lenses one at a time. Additionally, clicking on any Focal Length will immediately change to that lens. The lens kit can be customized by altering the Focal Length Options array on the CineCamera component in the VirtualCameraPawn .
6 - Focus Distance and Aperture
The
Focus Distance
and
Aperture
are displayed in the top-right region of the UI. Together, these are used to set focus. Tapping in that region expands two wheels, one for Focus Distance and the other for Aperture.

There are multiple ways to change Focus Distance (left wheel): scrolling with the wheel, tapping the double arrows to increment by 3 meters (~10ft), or tapping anywhere in the Viewport to focus on that point in 3D space. Double-clicking on the wheel will collapse/expand it.
It is important to note that touch focus is only active with the Focus menu open (when the wheels are visible). When the Focus menu is closed, touch input will not affect focus.
Scrolling through the Aperture (right wheel) will increment the value across a customizable Aperture list (by default, the list is based on full stops). Additionally, tapping on any value directly will change the Aperture to that value.
The Aperture value affects Depth-of-Field (DoF), a lower value creates a shallower DoF. Double-clicking on the wheel will collapse/expand it. The Aperture kit can be customized by altering the Aperture Options array on the CineCamera component in the VirtualCameraPawn .
7 - Record and Record Sub-Menu
Clicking the
Record
button initiates a new recording while clicking again stops the recording. Next to the
Record
button is an arrow used to access the
Record sub-menu
.

Currently, this contains a button for taking high-res screenshots (single camera icon) as well as a button for loading a previous screenshot (multiple cameras icon). The act of loading a screenshot moves the camera to the location of where the screenshot was taken (position only, not rotation) and adjusts
Focal Length
and
Aperture
to match.

If you tap and hold on the sub-menu Screenshot button, it swaps out the Record button for a Screenshot button. This is helpful when you're scouting locations and have no need to record camera motion. Tap and hold on the sub-menu Screenshot button again to swap back to a Record button.
8 - Analog Sticks
The
Analog Sticks
are docked on the bottom of the frame and can be accessed by tapping on either docked grip to reveal them.

The Left Analog Stick moves the camera forward/back/left/right based on the direction the camera is facing while the Right Analog Stick booms the camera up/down globally.
9 - Performances
To load a previously recorded camera move or any Level Sequence with animation, tap on the
Performances
button to open a window containing any recorded performances.

If Sequences have been recorded they will be displayed here. Clicking on a Sequence will initiate playback and present you with the
Playback Controls
.
If the Level Sequence contains a Camera Cut Track, Sequencer will take over the camera view so the Virtual Camera will no longer be tracking. In this case, you cannot record either.

Once a performance is loaded, timeline and playback controls appear. The Timeline enables you to scrub through the Sequence. The Playback Controls allow you to play forward, play backward, jump to the first frame and jump to the last frame. In addition, touch swiping in the main view will finely scrub the animation timeline.
10 - Waypoint and Waypoint Sub-Menu
Tapping the blue button in the bottom-right corner will create a Waypoint , which is a saved location in space. These are useful for teleporting around a map. Next to the Waypoint button is an arrow used to access the Waypoint sub-menu .

From the
Waypoints
roll out menu, there is a
Home
button that removes all offsets and teleports the camera to a designated home
Waypoint
. If no
Waypoint
has been designated as home, the Camera will teleport back to the Player Start (in the case of ARKit) or will reset the camera to 1:1 with the mocap volume (in the case of LiveLink tracking).
The second button in the Waypoint sub-menu is for loading Waypoints . This is also where a user can specify a unique Home Waypoint .
Live Link Setup
The Live Link setup enables the user to control the Virtual Camera from a running instance of Maya. To test with the Maya with Live Link, you will need to make sure the following Plugins are enabled in your project (along with the Virtual Camera Plugin and Remote Session Plugin ).
Under Edit > Plugins , enable the following Plugins:
-
Under Animation , enable the Live Link Plugin then restart the Editor.


You will also need to follow the steps on the Connecting Unreal Engine 4 to Maya with Live Link documentation page to get Live Link setup and establish a connection between Maya and the Unreal Editor.
You only need to complete the Enabling the Live Link Plugin and Enabling Maya Live Link steps in the documentation as the remaining steps are not needed for Virtual Production and using the Virtual Camera.
Once Live Link is set up and Maya is connected to UE4:
-
For testing purposes, import the following Virtual Camera Anim FBX asset into Maya.
-
Expose the Outliner (1), select the Root (2), then inside the Maya Live Link UI window, click the Add Subject button.

-
Inside UE4 go to Window > Live Link to open the Live Link Connection window.

-
Click the Add button, then under Message Bus Source , select the Source associated with your PC's name and click Ok .


You will also need to set the Input Source to Live Link inside VirtualCameraPlayerController Blueprint, as well as assign the Live Link Target Name , which points to the Subject streaming from Maya
To do this:
-
Inside your Project in the Content Browser under View Options , enable Show Engine Content and Show Plugin Content .

-
Inside the VirtualCameraContent folder, open the VirtualCameraPlayerController Blueprint.

-
In the Class Defaults under Camera Settings , set the Input Source to Live Link and the Live Link Target Name to Maya (which is the name of our Subject in Maya).


When initiating a Play session, the Virtual Camera will take data being streamed in from the Live Link and any movement of the Root bone will be applied to the Virtual Camera.
Virtual Camera Sample Project
On the Learn tab of the Epic Games Launcher under the Engine Feature Samples section, there is a Virtual Camera project which includes a sample scene and project set up for use with the Virtual Camera Plugin.

The required Plugins are enabled by default and the Virtual Camera Game Mode is already assigned and ready to use. With your ARKit enabled iPad or optical motion capture system, you can track your movement as you move through the virtual environment while shooting the scene.
Below is a quick example of recording a shot from an iPad with the Virtual Camera Plugin.
The Processing Recording message appears when we stop recording our shot.
The Virtual Camera Project is only intended to be used in the Unreal Editor. You won't be able to package it for use at runtime in the Unreal Engine.