Choose your operating system:
Windows
macOS
Linux
In the
Behavior Tree Quick Start Guide
, you will learn how to create an enemy AI that responds to seeing the Player and proceeds to chase them. When losing sight of the Player, after a few seconds (which can be adjusted based on your preference), the AI will give up chasing and randomly move around the environment until seeing the Player again as seen in the example video below.
By the end of this guide, you will have an understanding of the following systems:
-
Blueprint Visual Scripting
-
AI Controllers
-
Blackboards
-
Behavior Trees
-
Behavior Tree Services
-
Behavior Tree Decorators
-
Behavior Tree Tasks
1 - Required Project Setup
In this first step, we set up our project with the assets we'll need for our AI character to get around the environment.
For this guide we are using a new Blueprint Third Person Template project.
-
Expand the Sources panel, then right-click on the ThirdPersonBP folder and create a New Folder called AI .
![1_CreateFolder.png]()
-
In the ThirdPersonBP > Blueprints folder, drag the ThirdPersonCharacter onto the AI folder and select Copy Here .
![2_CopyCharacter.png]()
-
In the AI folder, create a new Blueprint Class based on the AIController class.
![3_CreateAIController.png]()
-
Name the AIController Blueprint Enemy_Controller and the ThirdPersonCharacter Blueprint Enemy_Character .
![4_RenameAndSave.png]()
-
Open Enemy_Character , then delete all the script from the graph.
-
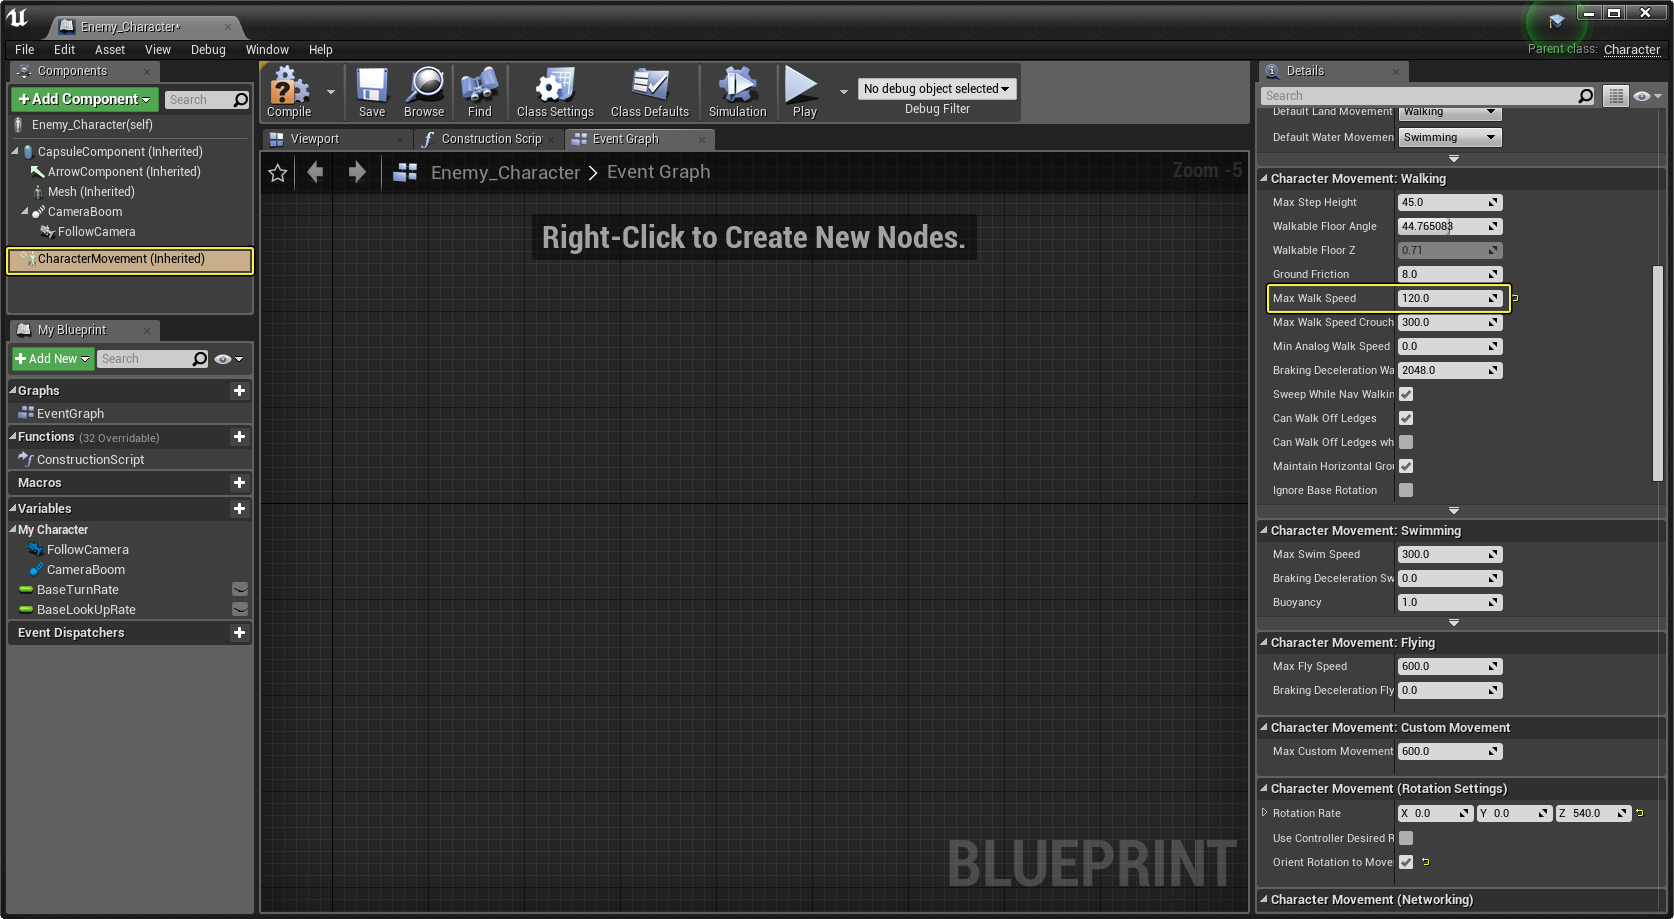
Select the Character Movement component then set Max Walk Speed in the Details panel to 120.0 .
![5_WalkSpeed.png]()
Click image for full view.
This reduces the speed of our AI Character movement around the environment when patrolling and not chasing the Player.
-
Select Class Defaults from the Toolbar, then in the Details panel, assign the Enemy_Controller as the AI Controller Class .
![6_AIController.png]()
Click image for full view.
We are going to place our AI in the world. If you spawn the AI after the world is loaded, change the Auto Possess AI setting to Spawned .
-
From the Content Browser , drag the Enemy_Character into the Level.
-
From the Modes panel, drag a Nav Mesh Bounds Volume into the Level.
![7_NavMesh.png]()
-
With the Nav Mesh Bounds Volume selected, press R and scale the volume to encapsulate the entire Level.
![8_ScaleNavMesh.png]()
This will generate a Navigation Mesh that enables our AI character to move around the environment. You can press the P key to toggle the display of the Nav Mesh in the Viewport (areas that are green indicate possible navigation locations).
During gameplay, you can use the Show Navigation console command to toggle the display of the Nav Mesh on/off.


Our project setup is complete, in the next step we will set up our Blackboard asset.
2 - Blackboard Setup
In this step, we create our
Blackboard
asset, which is essentially the brain of our AI. Anything we want our AI to know about will have a
Blackboard Key
that we can reference. We'll create keys for keeping track of the Player, whether or not the AI has line of sight to the Player, and a location where the AI can move to when it is not chasing the Player.
-
In the Content Browser , click Add New and under Artificial Intelligence , select Blackboard and call it BB_Enemy .
![1_CreateBB.png]()
-
Inside the BB_Enemy Blackboard, click the New Key button and select Object .
![Step_2_2.png]()
The Blackboard asset consists of two panels: the Blackboard , which enables you to add and keep track of your Blackboard Keys (variables to monitor), and Blackboard Details , which enables you to name and specify the type of Keys.
-
For the Object key, enter EnemyActor as the Entry Name and Actor as the Base Class .
![Step_2_3.png]()
-
Add another Key with the Key Type set to Bool called HasLineOfSight .
![Step_2_4.png]()
This will be used to keep track of whether or not the AI has line of sight to the Player.
-
Add another Key , with the Key Type set to Vector called PatrolLocation .
![Step_2_5.png]()
This will be used to keep track of a location in the Level where the AI can move when it is not chasing the Player.


Our Blackboard is set up with the things we need to track. In the next step, we will lay out our Behavior Tree .
3 - Behavior Tree Layout
In this step, we will lay out the flow of our
Behavior Tree
and the states that we want our AI to enter. Laying out your
Behavior Tree
with the states you anticipate your AI could be in as a visual flow will give you an idea of what type of logic and rules you will need to create to enter those states.
-
In the Content Browser , click Add New and under Artificial Intelligence , select Behavior Tree and call it BT_Enemy .

Naming conventions may vary, but it's generally good practice to add an acronym of the asset type to the name.
-
Open the BT_Enemy and assign the BB_Enemy as the Blackboard Asset .
![BTQS_Step3_2-1.png]()
If you do not see the Blackboard Keys we created, clear the Blackboard Asset by clicking the yellow arrow, then re-assign the Enemy_BB to refresh the keys.
The Behavior Tree consists of three panels: the Behavior Tree graph, where you visually layout the branches and nodes that define your behaviors, the Details panel, where properties of your nodes can be defined, and the Blackboard , which shows your Blackboard Keys and their current values when the game is running and is useful for debugging.
-
In the graph, left-click and drag off the Root and add a Selector node.
![BTQS_Step3_3.png]()
Composites are a form of flow control and determine how the child branches that are connected to them execute.
Composites
Description
Selector
Executes branches from left-to-right and are typically used to select between subtrees. Selectors stop moving between subtrees when they find a subtree they successfully execute. For example, if the AI is successfully chasing the Player, it will stay in that branch until its execution is finished, then go up to selector's parent composite to continue the decision flow.
Sequence
Executes branches from left-to-right and are more commonly used to execute a series of children in order. Unlike Selectors, the Sequence continues to execute its children until it reaches a node that fails. For example, if we had a Sequence to move to the Player, check if they are in range, then rotate and attack. If the check if they are in range portion failed, the rotate and attack actions would not be performed
Simple Parallel
Simple Parallel has two "connections". The first one is the Main Task, and it can only be assigned a Task node (meaning no Composites). The second connection (the Background Branch) is the activity that's supposed to be executed while the main Task is still running. Depending on the properties, the Simple Parallel may finish as soon as the Main Task finishes, or wait for the Background Branch to finish as well.
-
For the Selector node, in the Details panel, change the Node Name to AI Root .
![BTQS_Step3_4.png]()
Renaming nodes in the graph is a good way to easily identify, from a high-level, what the node accomplishes. In this example, we name it AI Root as this is the real "Root" of our Behavior Tree which will switch between our child branches. The default Root node that is automatically added when creating a Behavior Tree is used to configure properties of the Behavior Tree as well as assign the Blackboard asset it's using.
-
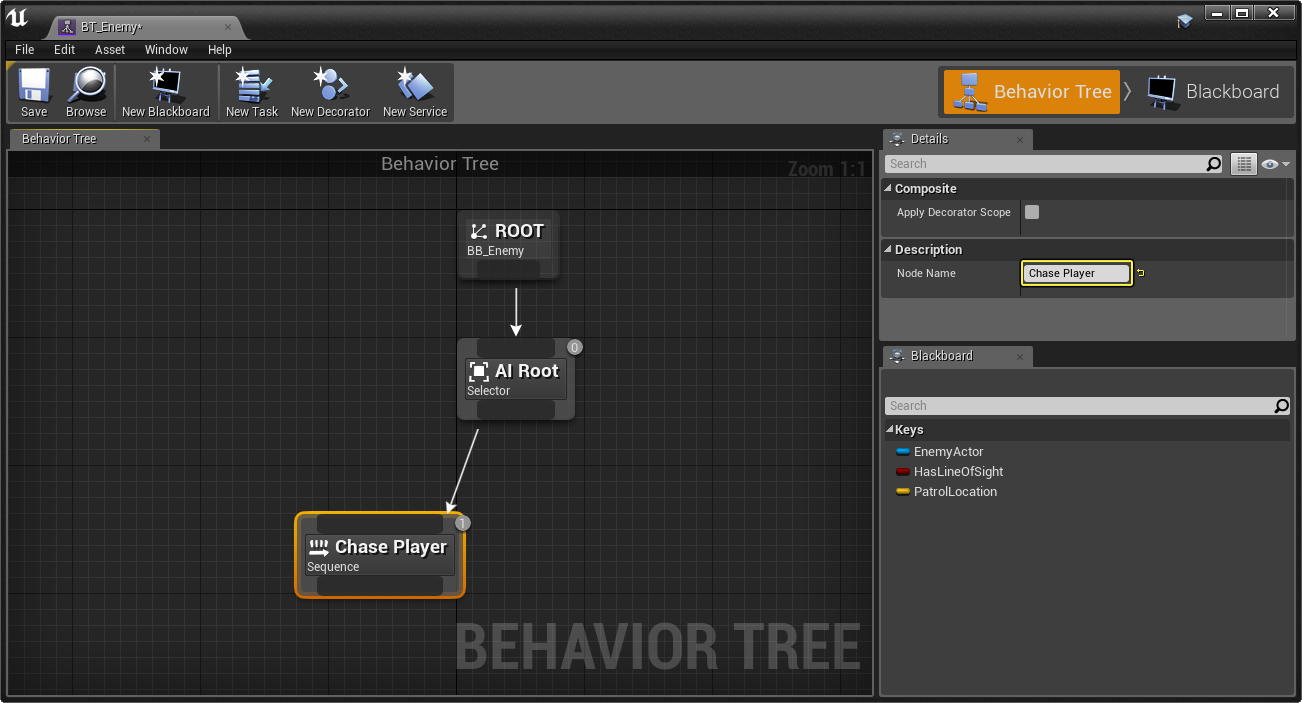
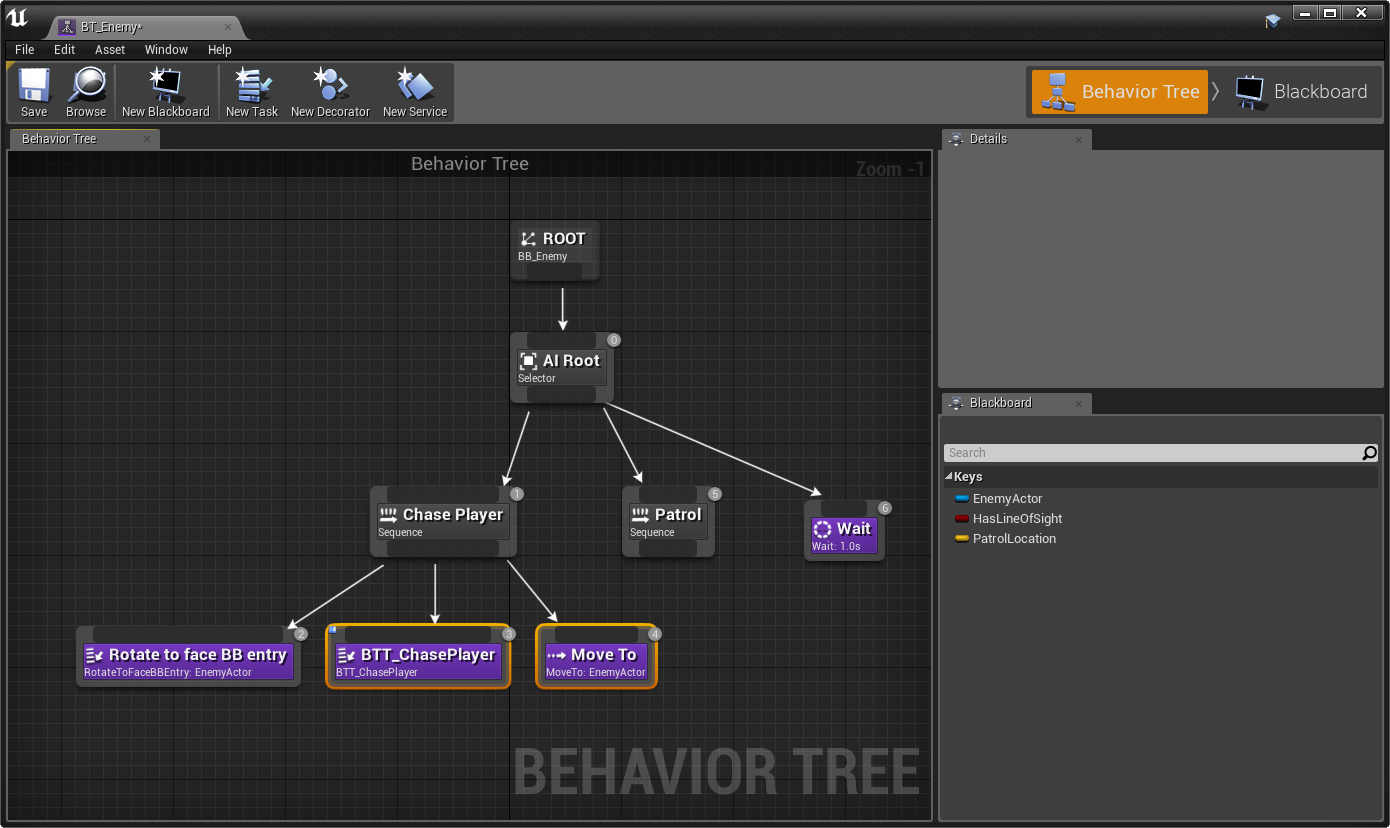
Left-click and drag off AI Root and add a Sequence node named Chase Player .
![BTQS_Step3_5.png]()
Click image for full view.
We use a Sequence node here as we plan to tell the AI to do a sequence of actions: rotate towards the player, change their movement speed, then move to and chase the Player.
-
Left-click and drag off the AI Root node and add a Sequence node called Patrol .
![BTQS_Step3_6.png]()
Click image for full view.
For our AI, we will use the Sequence node to find a random location in the map, move to that location, then wait there for a period of time before repeating the process of finding a new location to move to.
You may also notice the numbers in the upper-right corner of the nodes:
![BTQS_Step3_6b.png]()
This indicates the order of operation. Behavior Trees execute from left-to-right and top-down, so the arrangement of your nodes is important. The most important actions for the AI should usually be placed to the left, while the less important actions (or fall back behaviors) are placed to the right. Child branches execute in the same fashion and should any child branch fail, the entire branch will stop executing and will fail back up the tree. For example, if Chase Player failed, it would return back up to AI Root before moving on to Patrol .
-
Drag off AI Root then add a Wait Task to the right of Patrol with Wait Time set to 1.0 .
![BTQS_Step3_7.png]()
Click image for full view.
You will notice that this node is purple, indicating that it is a Task node. Task nodes are the actions that you want the Behavior Tree to perform. The Wait Task acts as a catch-all in the event that the Behavior Tree fails both Chase Player or Patrol.
-
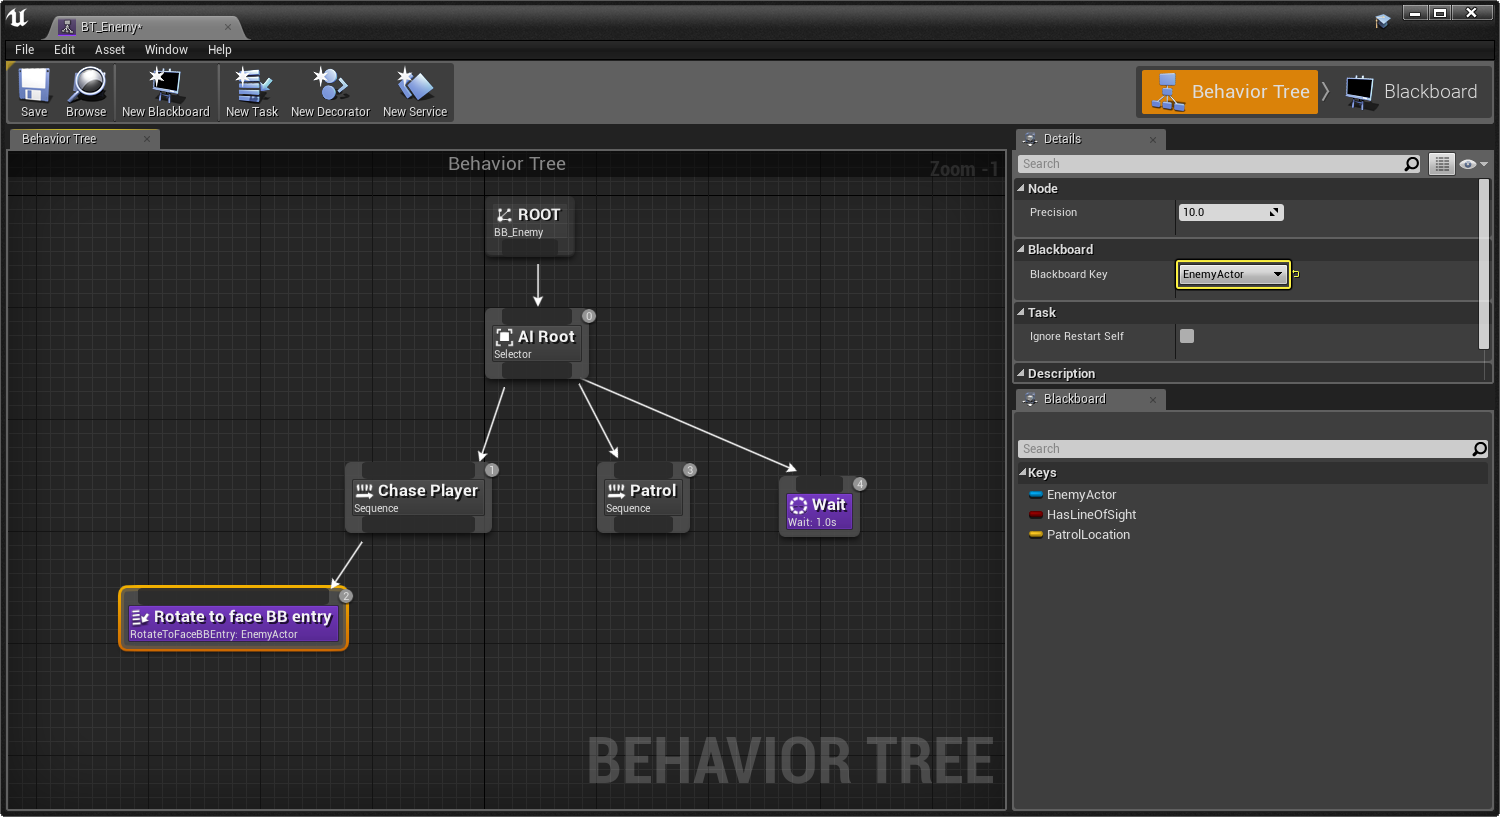
Drag off the Chase Player and add a Rotate to Face BBEntry node.
![BTQS_Step3_8.png]()
Click image for full view.
This particular Task enables you to designate a Blackboard Entry that you want to rotate and face, in our case the Enemy Actor (Player). Once you add the node, if you look in the Details panel, the Blackboard Key will automatically be set to EnemyActor because it filters for the Actor blackboard variable and it is the first one in the list. You can adjust the Precision option if you want to tune the success condition range as well as change the Node Name .
-
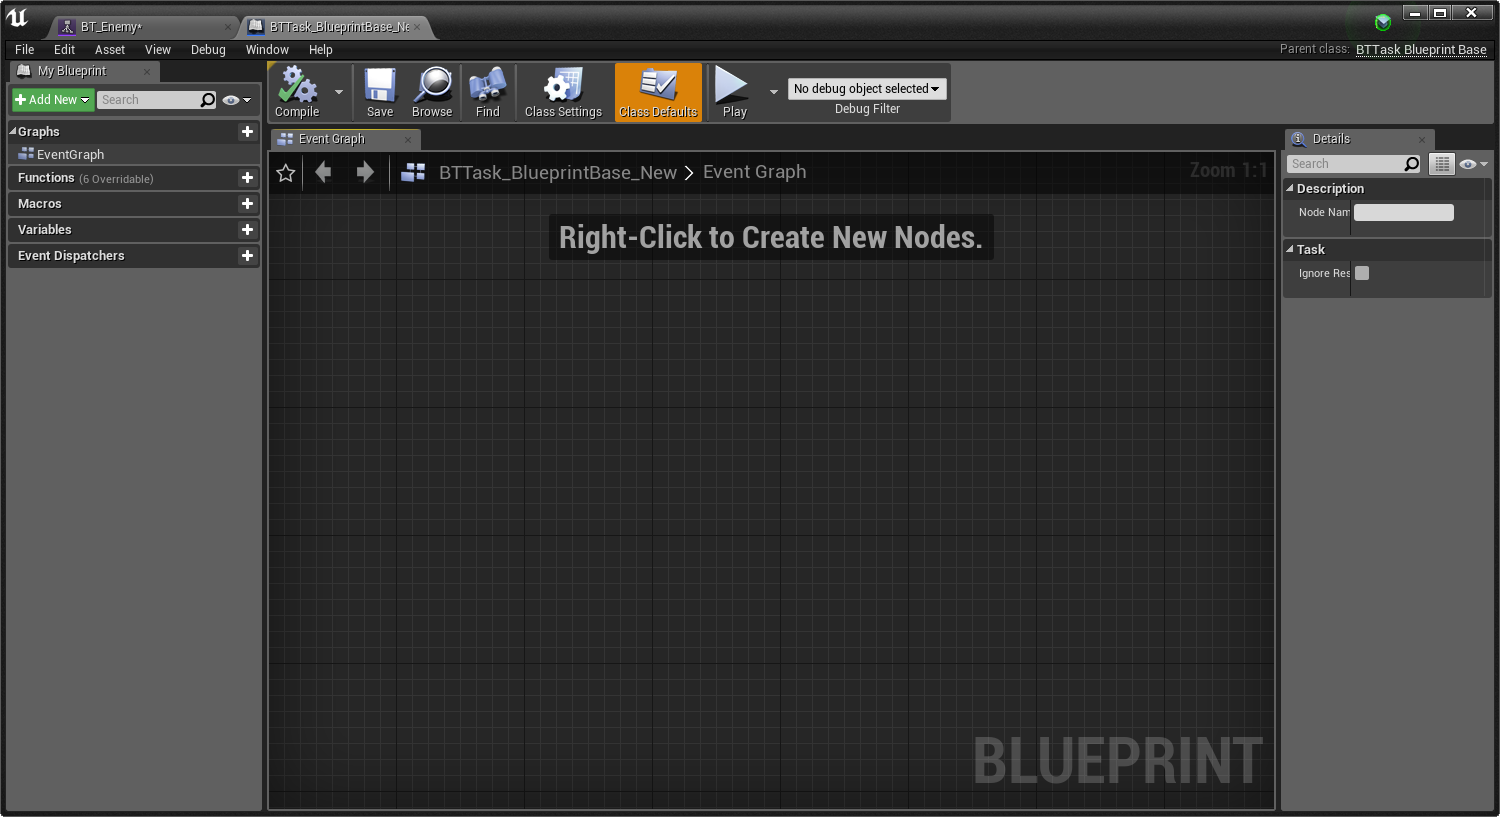
From the Toolbar , click the New Task button.
![BTQS_Step3_9.png]()
In addition to using the built in Tasks, you can create and assign your own custom Tasks that have additional logic that you can customize and define. This Task will be used to change the movement speed of the AI so that it runs after the Player. When you create a new Task, a new Blueprint will automatically be created and opened.
![BTQS_Step3_9b.png]()
Click image for full view.
-
In the Content Browser , rename the new asset as BTT _ChasePlayer .
![BTQS_Step3_10.png]()
It's a good practice to immediately rename any newly created Tasks , Decorators or Services when you create them. Proper naming conventions would be to prefix the name of the asset with the type of asset you create such as: BTT for Behavior Tree Tasks, BTD for Behavior Tree Decorators, or BTS for Behavior Tree Services.
-
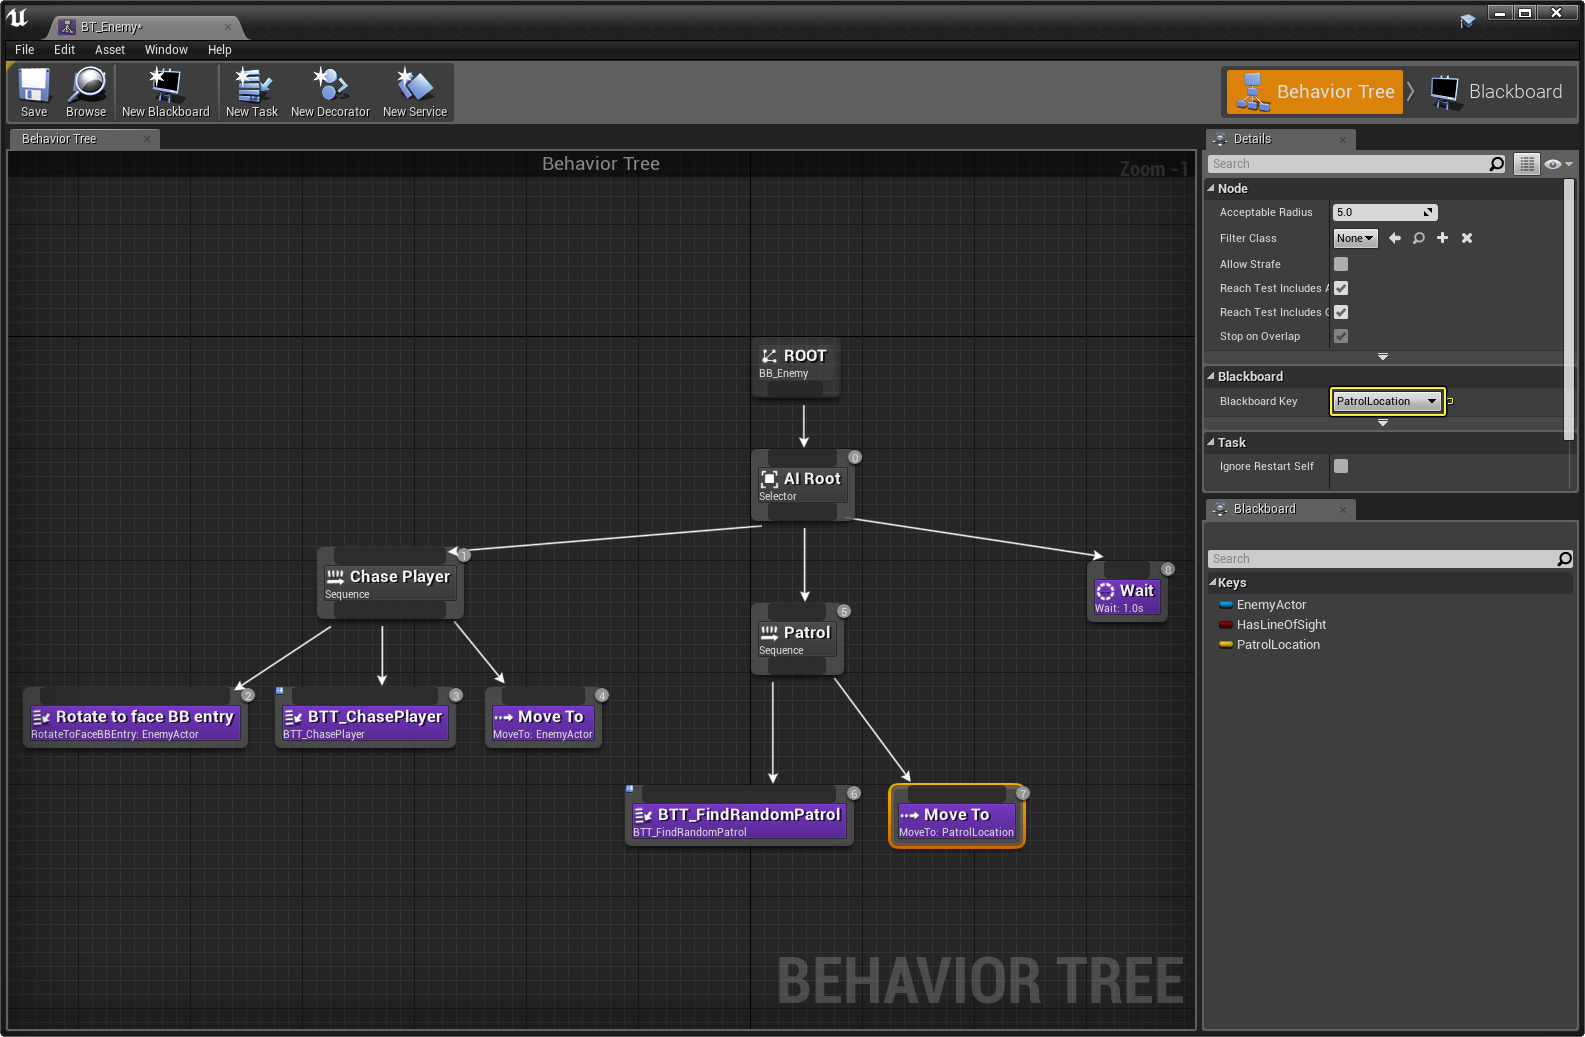
Inside the BT_Enemy , add the BTT_ChasePlayer Task followed by a Move To .
![BTQS_Step3_11.png]()
Click image for full view.
Our new Task has no logic in it yet, but we will come back and add the logic for changing the movement speed of our AI character after which, the AI will Move To the EnemyActor (Player).
-
Create a new Task and rename it BTT_FindRandomPatrol , then connect it to Patrol .
![BTQS_Step3_12.png]()
Click image for full view.
-
Add a Move To Task and set the Blackboard Key to PatrolLocation .
![BTQS_Step3_13.png]()
Click image for full view.
This will instruct the AI to Move To the PatrolLocation which will be set inside the BTT_FindRandomPatrol Task.
-
Add a Wait Task following Move To with Wait Time to 4.0 and Random Deviation to 1.0 .
![BTQS_Step3_14.png]()
Click image for full view.
This instructs the AI to wait at PatrolLocation for 3-5 seconds (Random Deviation adds + or - a second to Wait Time).


The framework for our Behavior Tree is complete. In the next step, we will add the logic for changing the movement speed of the AI, finding a random location to navigate to when the AI is patrolling, and the logic for determining when the AI should be chasing the player or patrolling.
4 - Task Setup - Chase Player
In this step, we set up our
Chase Player Task
to change the movement speed when chasing the Player.
-
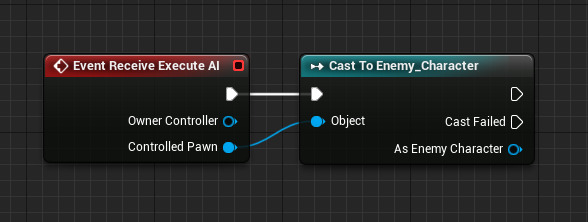
Inside BTT_ChasePlayer , right-click and add an Event Receive Execute AI node.
![BTQS_Step4_1.png]()
The Event Receive Execute AI node is fired when this Task is activated inside the Behavior Tree .
You should always select the AI version of Event Receive Execute , Event Receive Abort , and Event Receive Tick if the Agent is an AI Controller. If both generic and AI event versions are implemented, only the more suitable one will be called, meaning the AI version if called for AI, and the generic one otherwise.
-
Off the Controlled Pawn pin, use a Cast to Enemy_Character node.
![2_EventReceiveAi.png]()
Here, we are accessing the Character Blueprint for our AI called Enemy_Character by using a Cast node.
-
Inside the Content Browser , open the Enemy_Character Blueprint and add a Function called Update Walk Speed .
![BT_AddNewFunction.png]()
This function will be called from our Behavior Tree and will be used to change the AI's movement speed.
Technically we could access the Character Movement Component off the Cast node in our Chase Player Task and adjust the movement speed from within the Task, however having the Behavior Tree directly change properties of sub-objects is not a recommended best practice. Instead, we will have the Behavior Tree call a function inside the Character which will then make the modifications we need.
-
In the Details panel for the Update Walk Speed function, add a Float input called NewWalkSpeed .
![BT_NewWalkSpeed.png]()
-
Drag the CharacterMovement Component off the Components tab, then use Set Max Walk Speed and connect as shown below.
![BT_FunctionComplete.png]()
When we call this function from the Behavior Tree, we can pass through a value to be used as the new speed.
-
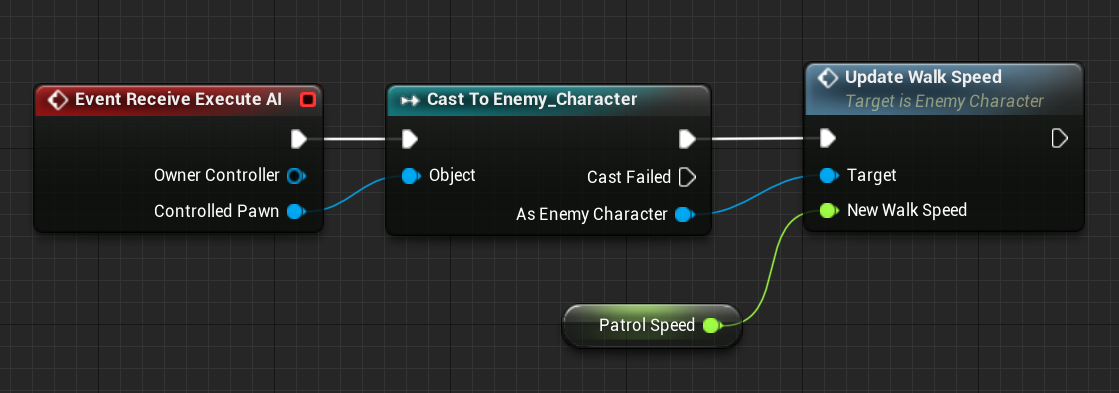
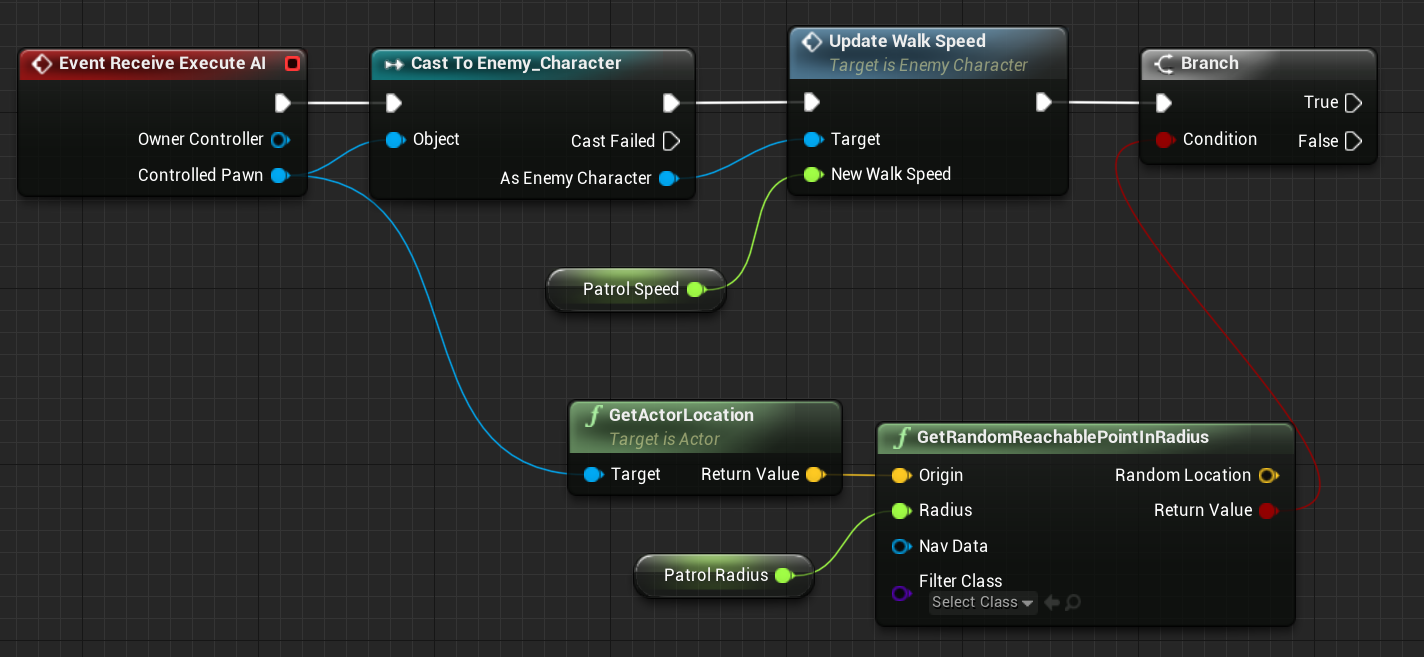
Back inside the BTT_ChasePlayer Task, from the As Enemy Character node, call Update Walk Speed set to 500.0 and connect as shown.
![BT_ChasePlayerFunctionCall.png]()
Don't see the Update Walk Speed function you created? You may need to Compile the Enemy_Character Blueprint before trying to add it in the Chase Player Task .
-
Following Update Walk Speed , add two Finish Execute nodes and connect as shown below.
![BT_FinishExecute.png]()
Here we mark the Task as successfully finishing when we successfully cast to the Enemy_Character. In the event that the controlled Pawn is not Enemy_Character, we need to handle this case so we mark the Task as unsuccessful which will abort the Task.
-
Right-click the New Walk Speed pin, then promote it to a variable and call it ChaseSpeed .
![BT_ChaseSpeedVariable_Promoted.png]()
-
For ChaseSpeed , make sure to enable Instance Editable .
![BT_ChaseSpeedVariable.png]()
By promoting this to an Instance Editable variable, the value of Max Walk Speed can be set from outside of this Blueprint and will be available as a property inside our Behavior Tree .
![BTQS_Step4_7b.png]()
We can now easily change the value of Chase Speed that is being sent to the Enemy_Character Blueprint enabling us to tune and tweak how fast our AI chases the Player.


Our Chase Player Task is complete, in the next step, we will set up the Find Random Patrol Task logic to get a random location for the AI to move to.
5 - Task Setup - Find Random Patrol
In this step, we set up our Find Random Patrol Task so our AI moves to a random location when it is not chasing the Player.
Implementing a Blueprint Behavior Tree Task is a clever way to quickly iterate, but, if performance is a concern, you may decide to move to a native Behavior Tree Task.
-
Inside BTT_FindRandomPatrol , use Event Receive Execute AI and Cast to Enemy_Character .
-
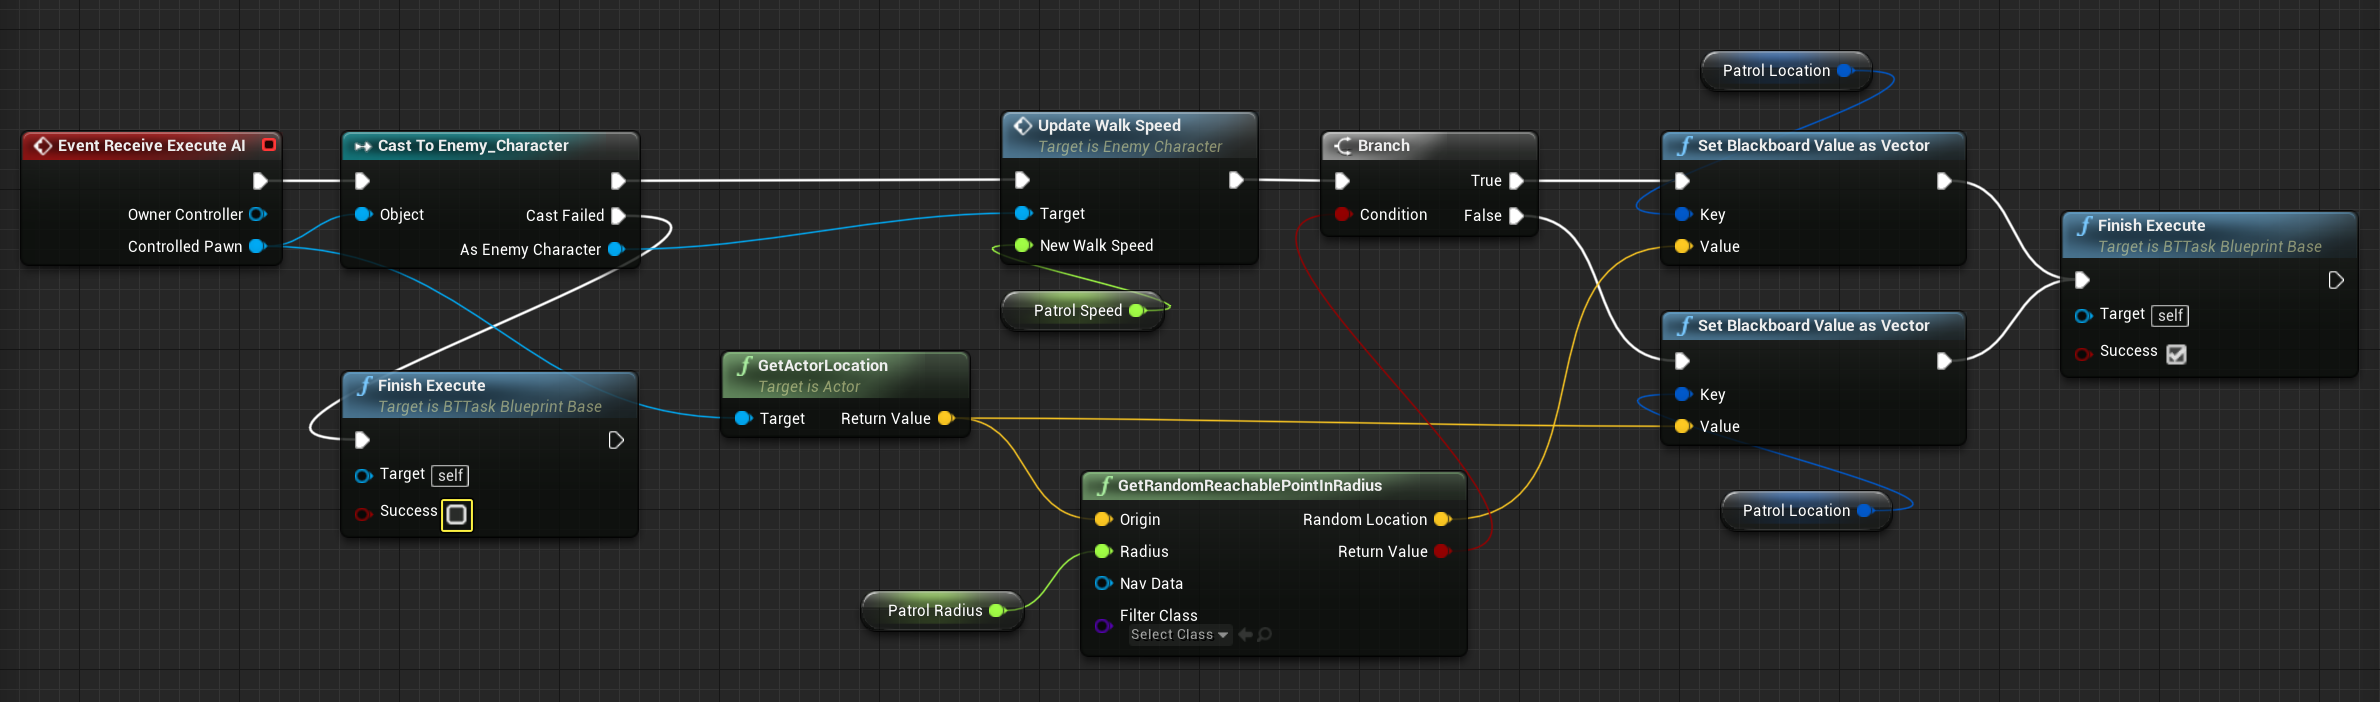
Off As Enemy Character , call Update Walk Speed and promote New Walk Speed to a variable called Patrol Speed with the following settings:
![BT_PatrolWalkSpeedVariable.png]()
Click image for full view.
- Variable Name to PatrolSpeed
- Instance Editable to Enabled
- Patrol Speed (Default Value) to 125.0
Here we are lowering the enemy movement speed while patrolling.
-
Off Controlled Pawn , Get Actor Location then GetRandomReachablePointInRadius with the Return Value connected to a Branch .
-
Promote the Radius on GetRandomReachablePointInRadius to a variable with the following settings:
![BT_UpdatedFindPatrol_02.png]()
Click image for full view.
- Variable Name to PatrolRadius
- Instance Editable to Enabled
- Patrol Radius (Default Value) to 1000.0
Here we are finding a random location within 1000 units of the enemy character's current location. We are also using a Branch node to handle the edge case that a random point to move to is not found.
-
Off the Random Location pin, use Set Blackboard Value as Vector with the Key promoted to a variable called PatrolLocation .
-
Use another Set Blackboard Value as Vector node with the Value coming from Get Actor Location .
-
Continuing from the previous step, connect as shown below with both nodes resulting in Finish Execute marked Success .
![BT_UpdatedFindPatrol_03.png]()
Click image for full view.
If the enemy finds a random position to move to, it will be stored in the Blackboard as the location to move to. If a location is not found, it will use it's current location and stay put before trying a new location. We still need to handle the edge case that the Controlled Pawn is not Enemy_Character.
-
Off the Cast Failed pin of the Cast node, use Finish Execute with Success disabled.
![BT_UpdatedFindPatrol_04.png]()
Click image for full view.
If the Controlled Pawn is not Enemey_Character, this Task will be marked as unsuccessful and will be aborted.

Our Find Random Patrol Task is complete. In the next step, we will learn more about Decorators and how they can be used as conditionals as well as set up our AI Controller.
6 - AI Controller Setup
In this step, we do a little bit of work inside the AI Controller in preparation for the final step, setting up a
Decorator
to determine which branch of our
Behavior Tree
to enter.
-
In the Content Browser , open the Enemy_Controller Blueprint and add an Event On Possess node.
-
Off Event On Possess , add a Run Behavior Tree node with BTAsset set to BT_Enemy .
![BTQS_Step6_3.png]()
Run Behavior Tree is a contextual functional call that targets AI Controller Class Blueprints and enables you to execute the assigned Behavior Tree** asset.
-
In the Components window, click + Add Component and search for and add an AIPerception Component .
![2_AIPerception.png]()
The AI Perception Component is used to create a stimuli listener within the AI Perception System and gathers registered stimuli (in our case, we can use Sight) that you can respond to. This will give us the ability to determine when the AI actually sees the Player and can react accordingly.
-
In the Details panel for the AIPerception Component , add an AI Sight config and enable Detect Neutrals .
![3_PerceptionSetup.png]()
The Detection by Affiliation properties enable you to set up team based AI that fight alongside teammates of the same affiliation and attack members of the opposing affiliation. Actors by default are not assigned an affiliation and are considered as neutral.
Currently, you cannot assign affiliation through Blueprint, therefore we are enabling the Detect Neutral flag in order to detect the Player. As an alternative, we are going to use Actor Tagging to determine which Character is the Player and force AI Character(s) to only chase Actors tagged as Player.
-
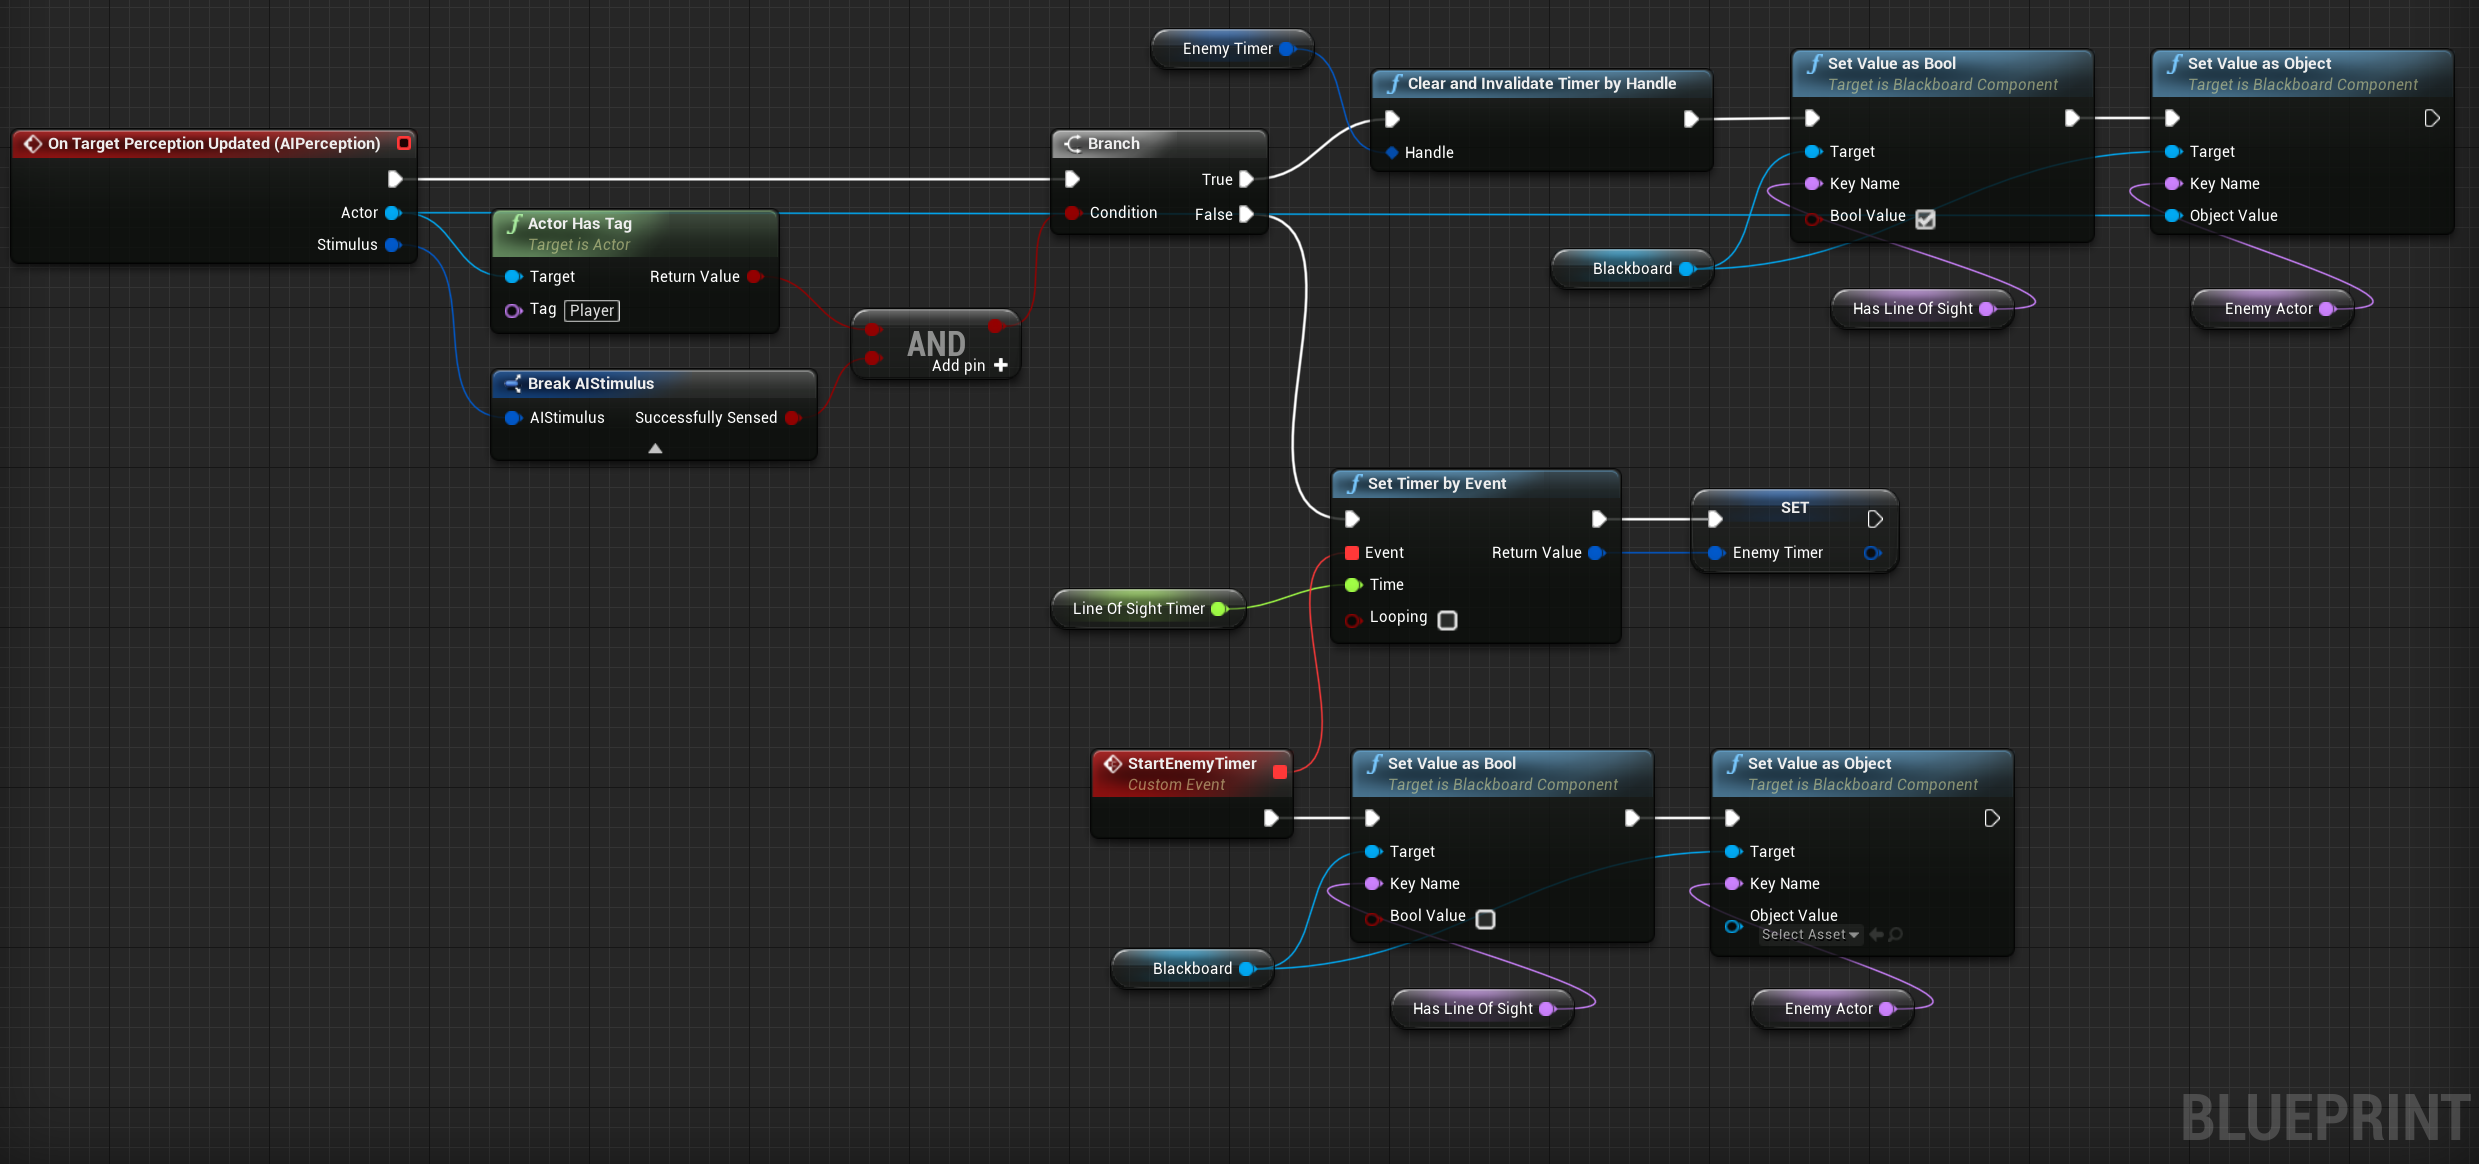
In the Events section for AIPerception , click the + sign next to On Target Perception Updated .
![3b_ClickAddEvent.png]()
-
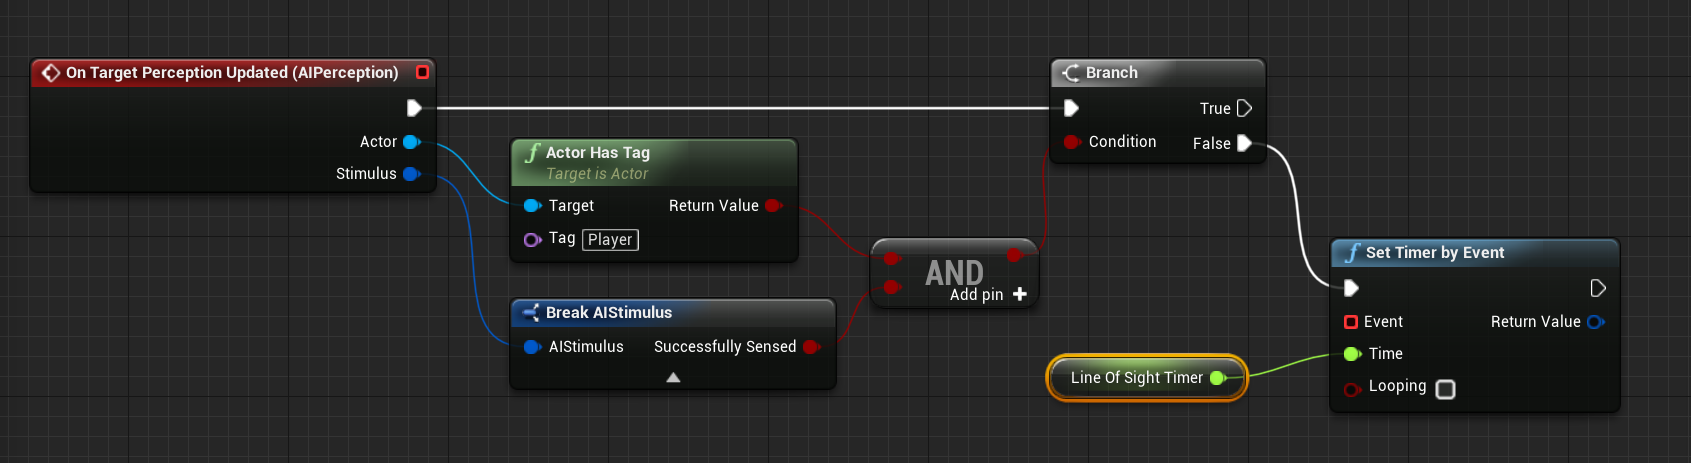
Off On Target Perception Updated in the graph, add an Actor Has Tag node with Tag set to Player .
![BTQS_Step6_7.png]()
-
Off the Stimulus pin, add a Break AIStimulus node.
-
Add a Branch node with the Condition shown below.
![BTQS_Step6_8.png]()
Here we are checking if the Actor was successfully Sensed and if that Actor has the Tag of Player.
You can select the Break AIStimulus node and in the Details panel use Hide Unconnected Pins to hide all pins that are not connected so your graph looks similar to the one above.
-
Off the False of the Branch , use Set Timer by Event with Time set to 4.0 .
-
Right-click and promote Time to a variable and call it Line Of Sight Timer .
![BTQS_Step6_9.png]()
Click image for full view.
This Variable and the value assigned will determine how long before the AI gives up chasing the Player at which point, the attached Event will execute.
-
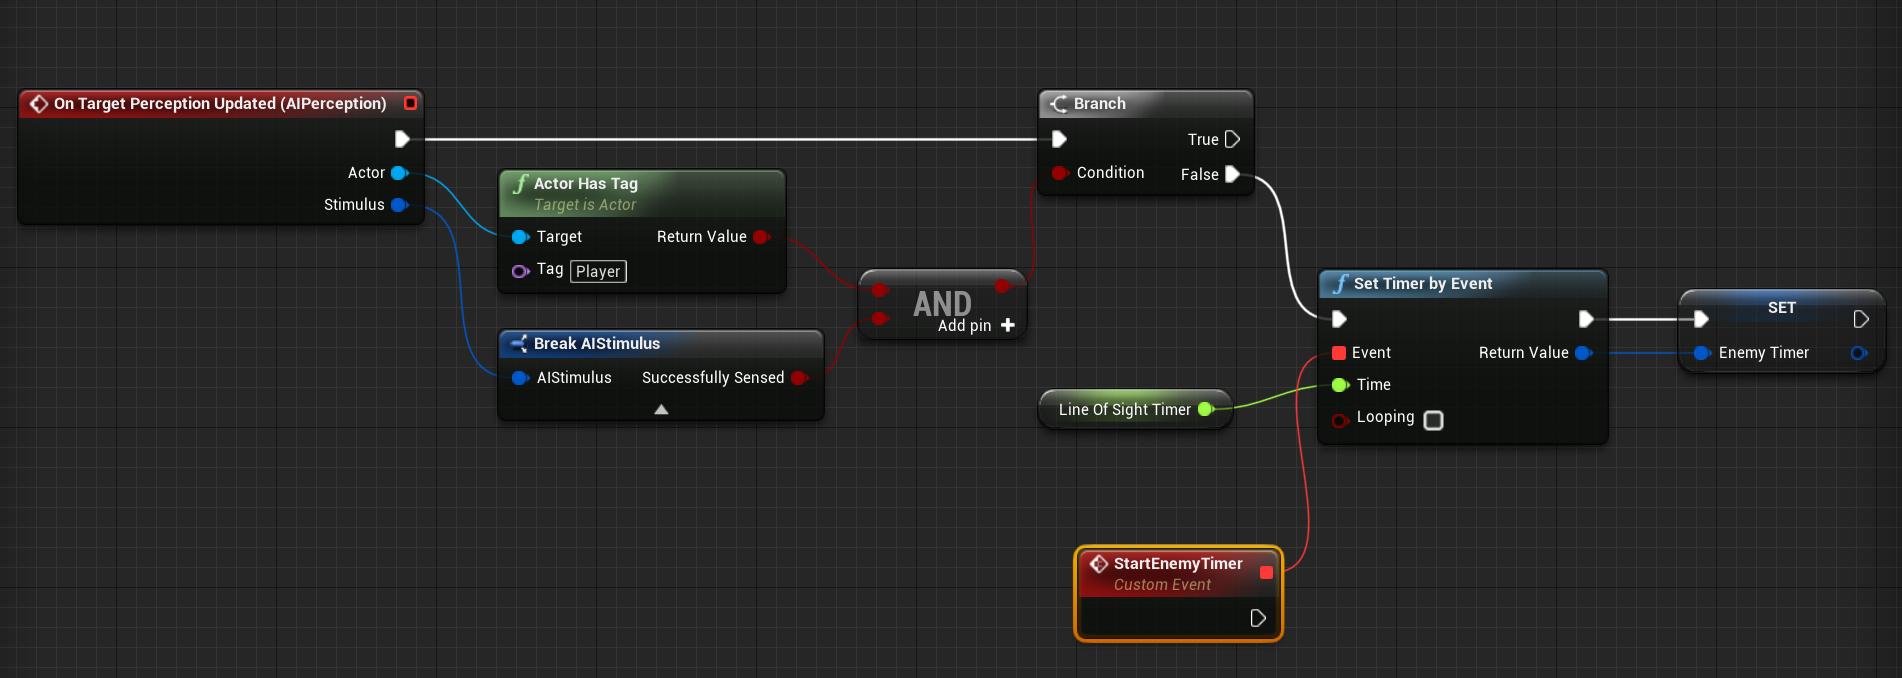
Right-click on the Return Value of Set Timer by Event and promote it to a Variable called EnemyTimer .
![BTQS_Step6_10.png]()
Click image for full view.
This stores a reference to the Timer by way of a Handle . This Handle can be called upon through script to invalidate itself and clear any associated Events (preventing the associated Event from being executed). We can use this later in the event the AI sees the player again before the Line of Sight Timer runs out, which stop the AI from losing sight of the player and giving up chase.
-
Create a Custom Event and call it StartEnemyTimer and connect it to the Event pin of Set Timer by Event .
![BTQS_Step6_11.png]()
Click image for full view.
-
Right-click, then under Variables > AI , add a Get Blackboard node
![BTQS_Step6_12.png]()
-
Off Blackboard , use Set Value as Bool and Set Value as Object and connect as shown below.
![BTQS_Step6_13.png]()
This enables us to update the Blackboard Keys defined with new Values.
-
Right-click and promote both Key Names to Variables called HasLineOfSight and EnemyActor respectively.
-
Compile the Blueprint and set the Default Values for both Key Names to HasLineOfSight and EnemyActor respectively.
![BTQS_Step6_14.png]()
Click image for full view.
-
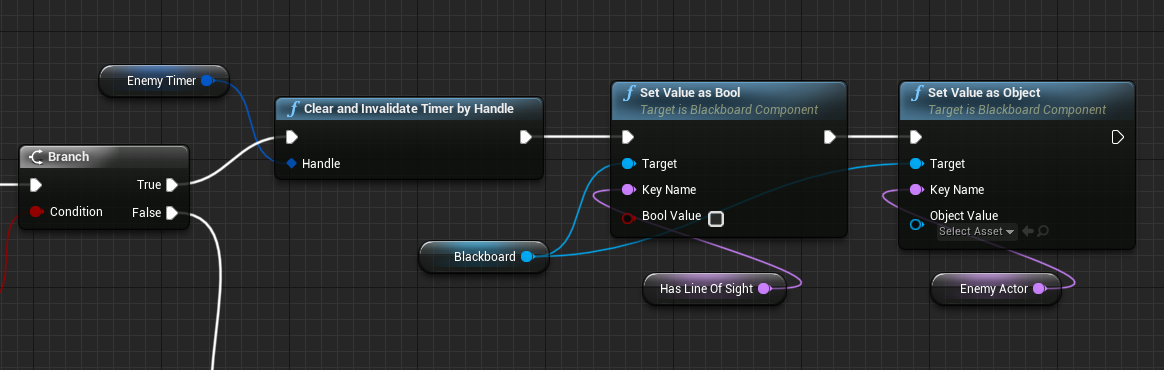
Off the True of the Branch , use Get EnemyTimer then Clear and Invalidate Timer by Handle .
![BTQS_Step6_15.png]()
Click image for full view.
When the AI sees the Player, it will clear the Line Of Sight Timer until it loses sight of the Player again (where a new Line Of Sight Timer will start).
-
Copy and Paste the Blackboard node, Set Value as and Key Name nodes as shown.
![BTQS_Step6_16.png]()
Click image for full view.
-
On the Set Value as Bool node, enable the Bool Value and drag the Actor pin to the Object Value as shown.
![BTQS_Step6_17.png]()
Click image for full view.
This sets the Blackboard Key Values for Has Line Of Sight to True and EnemyActor to the Actor we perceived (which we have set up to only trigger if it is the Player).
-
Click Compile to compile then close the Blueprint.
![BTQS_Step5_7.png]()
Click image for full view.
The final graph should look similar to above.


7 - Decorator and Final Setup
In this final section, we adjust a few settings on the Player Character and Enemy Character Blueprints. We also set up our
Decorator
in our
Behavior Tree
which will determine what branch we can enter based on a specified condition.
-
Inside the Content Browser under Content > ThirdPersonBP > Blueprints , open the ThirdPersonCharacter Blueprint.
-
In the Details panel, search for and add a Tag set to Player .
![BTQS_Step6_18.png]()
By setting adding this Tag of Player, the AI can now perceive and react to the Player.
-
Open up the Enemy_Character Blueprint inside your AI folder.
-
In the Details panel, search for Rotation and enable Use Controller Rotation Yaw .
![BTQS_Step6_19.png]()
This will cause the AI to rotate properly when the Rotate to Face BB Entry is called from our Behavior Tree .
Don't see the Pawn options? You may need to click the Class Defaults button from the Toolbar first.
-
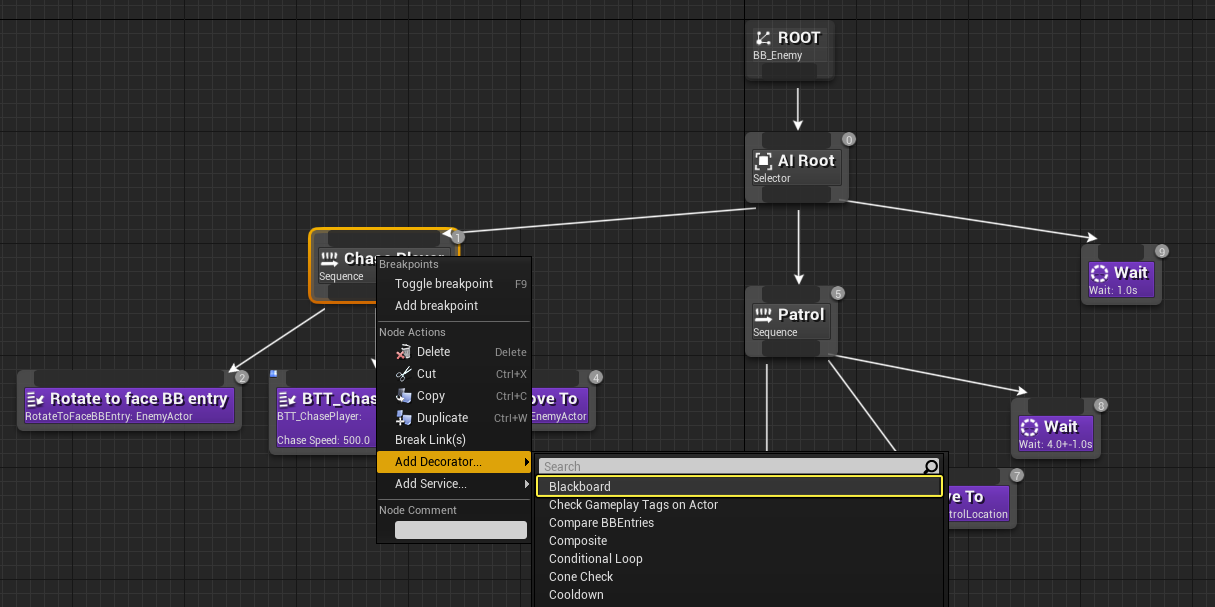
Open up the BT_Enemy and right-click on Chase Player , then under Add Decorator.. , select Blackboard .
![BTQS_Step6_1-1.png]()
Click image for full view.
When you right-click on a node in a Behavior Tree , you can add subnodes that provide additional functionality:
Subnode
Description
Decorator
Also known as conditionals. These attach to another node and make decisions on whether or not a branch in the tree, or even a single node, can be executed.
Service
These attach to both Task and Composite nodes, and will execute at their defined frequency as long as their branch is being executed. These are often used to make checks and to update the Blackboard . These take the place of traditional Parallel nodes in other Behavior Tree systems.
We are going to use a the Blackboard Decorator to determine the value of a Blackboard Key , which when valid, is going to allow this branch to execute.
-
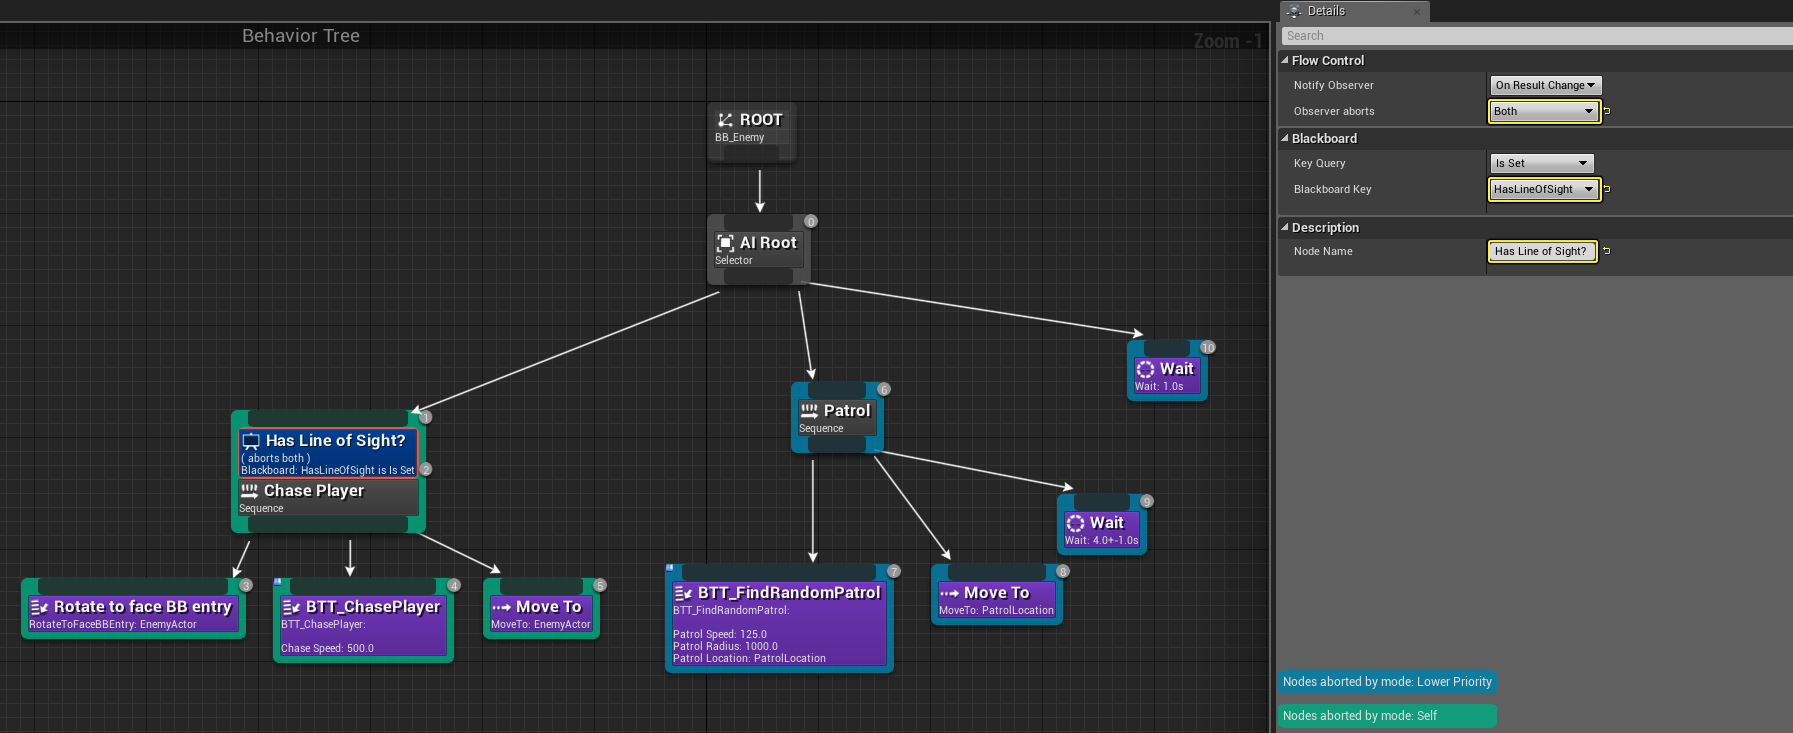
Select the Blackboard Based Condition that was added and set the following settings in the Details panel.
![BTQS_Step6_2-1.png]()
Click image for full view.
-
Observer aborts to Both
-
Blackboard Key to HasLineOfSIght
-
Node Name to Has Line of Sight?
Here we are stating that when the HasLineOfSight value Is Set (or is true), execute this Chase Player branch. The Observer aborts setting of Both states that when the Blackboard Key we assigned changes, abort our self ( Chase Player ) and any lower priority Tasks. This means, when the value of HasLineOfSight changes and is not set, abort self ( Chase Player ), at which point the next branch ( Patrol ) will execute. When the HasLineOfSight value becomes Is Set again, the observer will abort lower priority Tasks as well enabling the Chase Player branch to be executed again.
-
-
Compile and close the Behavior Tree then Play in the Editor.


End Result
You should now be able to test your AI and it will follow you when it sees you.
When the AI loses sight of you, it will still attempt to track you down and regain line of sight. After the time you have entered as the
Line Of Sight Timer
value, it will give up chasing you and return to patrolling.
You can watch the
Behavior Tree
in action as you are playing to see how it switches between the different branches. The variables can also be watched inside the
Behavior Tree
as you are playing to get idea of what values the AI current has.
8 - Own Your Own!
Now that your AI Character will chase the Player and return to patrolling after losing sight of the Player for a specified duration of time, try to add some of the following elements to your
Behavior Tree
on your own!
-
In the Behavior Tree , for both Move To Tasks, add a new Service that incorporates the the functionality from the Task that precedes it.
-
Our original Behavior Tree uses a separate Task for adjusting the movement speed (in the case of chasing the Player) and finding a random location to patrol to and decreasing movement speed (in the case of patrolling). Convert these to Services that are attached to the Move To Task .
-
Hint: The script in the Services will be similar to the script in each Task , however instead of Event Receive Execute AI , you want to use Event Receive Activation AI . Because they are a Service , you will also not need a Finish Execute node.
-
-
Instead of using a random patrol point to move to, create a Patrol Path Blueprint that contains an array variable of vector values that than AI can move between.
-
Hint: Cycle through and get the next entry in the array to move the AI between the locations, then update the Blackboard Key value PatrolLocation based on the current entry in your array.
-
-
When losing line of sight to the Player, move the AI to the last known location of the Player rather than getting the current location of the Player.
-
Hint: On the Move To command for Turning and Chasing the Player , you will need to specify a location instead of EnemyActor as it is currently set to get the location of EnemyActor (which retrieves the Player's current location).
-
-
Add attacking functionality to the AI once they reach the Player.
-
Hint: Add a new Composite node as the Background Task for Turning and Chasing the Player . Once the AI reaches the Player, add a Task node for an Attack animation.
-